
9. Connecting to the Address Book
In addition to standard user interface controls and media components that you see on any computer, the iOS SDK provides a number of tightly focused developer solutions specific to iOS delivery. Among the most useful of these is the AddressBook framework, enabling you to programmatically access and manage the contacts database. This chapter introduces the Address Book and demonstrates how to use its frameworks in your applications. You read about accessing information on a contact-by-contact basis, how to modify and update contact information, and how to use predicates to find just the contact you’re interested in. This chapter also covers the GUI classes that provide interactive solutions for picking, viewing, and modifying contacts. By reading this chapter, you can discover the Address Book from the bottom up.
The AddressBook Frameworks
The iOS SDK provides not one, but two AddressBook frameworks: AddressBook.framework and AddressBookUI.framework. As their names suggest, they occupy distinct niches in the iOS SDK. AddressBook provides low-level Core Foundation (C-based) objects and routines for accessing contact information from the iPhone’s onboard databases. AddressBookUI offers high-level Objective-C–based UIViewController browser objects to present to users. Both frameworks are small. They provide just a few classes and data types.
AddressBook UI
The AddressBookUI framework provides several precooked view controllers that interact with the onboard contacts database. These interfaces include a general people picker, a contact viewer, and a contact editor. You set a delegate and then push these controllers onto your navigation stack or display them modally, as shown in the recipes in this chapter.
Like other special-purpose controllers discussed throughout this book, the AddressBookUI controllers are not general or flexible. Apple intends you to use them as provided, with little or no customization from the developer. What’s more, they require a certain degree of low-level programming prowess. As you see in this chapter, these classes interact with the underlying Address Book in circuitous ways.
AddressBook and Its Databases
The AddressBook framework offers centralized access to iOS’s Contacts database. This database stores information about individual contacts, including names, addresses, phone numbers, IM details, and more. Built using a Core Foundation-style API, the AddressBook framework enables you to query, modify, and add contacts from your applications.
The iOS contact data resides in the user’s home Library folder. On the Macintosh-based iPhone simulator, you can freely access these files in ~/Library/Application Support/iPhone Simulator/iOS Version//Library/AddressBook. The files you find there—specifically, AddressBook.sqlitedb and AddressBookImages.sqlitedb—use standard SQLite to store contact information and, in the latter file, optional contact images.
On iOS, the same files live in /var/mobile/Library/AddressBook—that is, out of the application sandbox and therefore out of the reach of your direct inspection. Use the two AddressBook frameworks to query or modify the user’s contact information rather than attempting to access these files through code.
Note
By default, starting in OS X 10.7, a user’s Library folder is hidden in Finder. Access it via the Terminal or by holding the Option key while using Finder’s Go menu. Alternatively, enter chflags nohidden ~/Library/ in Terminal to make the folder visible in Finder.
Records
In the Core Foundation C-based AddressBook framework, the ABRecordRef type provides the core contact structure. This record stores all information for each contact, including name, e-mail, phone numbers, an optional image, and so forth. Every record corresponds to a complete Address Book contact. Create a new record by calling ABPersonCreate():
ABRecordRef person = ABPersonCreate();
Each record is stored in a single central Address Book. You can access this data by creating a new Address Book instance. How you do this has changed in iOS 6. Prior to iOS 6, you’d call ABAddressBookCreate(). Now you call ABAddressbookCreateWithOptions(), which takes two arguments. The first is reserved, so pass NULL; the second is a CFErrorRef pointer, for example, ABAddressBookCreateWithOptions(NULL, &errorRef).
Should the create request fail, you can easily cast the CFErrorRef to an NSError to determine the failure reason.
Despite the name, the ABAddressbookCreateWithOptions() function does not create a new Address Book; it builds a local object that loads its data from the system Address Book. This function offers the primary entry point for you to access Address Book data directly. What’s more, until you create an Address Book or a record instance, many of the constants you need to use in your applications will be undefined.
Apple has many warnings along these lines in its documentation: “The value of these constants is undefined until one of the following functions has been called: ABAddressBookCreate(), ABPersonCreate(), ABGroupCreate().”
The Custom ABStandin Class
Rather than create an Address Book instance each time data is accessed, the samples in this chapter use a custom ABStandin class. This class provides several basic Address Book access utilities and stores a static shared ABAddressBookRef instance. It is implemented as follows:
// Shared reference
static ABAddressBookRef shared = NULL;
@implementation ABStandin
// C-function callback updates address book when changed
void addressBookUpdated(ABAddressBookRef reference,
CFDictionaryRef dictionary, void *context)
{
ABAddressBookRevert(reference);
}
// Return the current address book
+ (ABAddressBookRef) addressBook
{
if (shared) return shared;
// Create the new address book
CFErrorRef errorRef;
shared = ABAddressBookCreateWithOptions(NULL, &errorRef);
if (!shared)
{
NSError *error = (__bridge_transfer NSError *)errorRef;
NSLog(@"Error creating new address book object: %@",
error.localizedFailureReason);
return nil;
}
// Register for automatic updates when information changes
ABAddressBookRegisterExternalChangeCallback(
shared, addressBookUpdated, NULL);
return shared;
}
// Load the current address book with updates
+ (ABAddressBookRef) currentAddressBook
{
if (!shared)
return [self addressBook];
ABAddressBookRevert(shared);
return shared;
}
// Thanks Frederic Bronner. Save the address book out
+ (BOOL) save: (NSError **) error
{
CFErrorRef errorRef;
if (shared)
{
BOOL success = ABAddressBookSave(shared, &errorRef);
if (!success)
{
if (error)
*error = (__bridge_transfer NSError *)errorRef;
return NO;
}
return YES;
}
return NO;
}
// Test authorization status
+ (BOOL) authorized
{
ABAuthorizationStatus status =
ABAddressBookGetAuthorizationStatus();
return (status == kABAuthorizationStatusAuthorized);
}
// Place access request
+ (void) requestAccess
{
// Post a notification that the app is authorized
if ([self authorized])
{
NSNotification *note = [NSNotification notificationWithName:
kAuthorizationUpdateNotification object:@YES];
[[NSNotificationCenter defaultCenter] postNotification:note];
return;
}
// Build a completion handler for the next step
ABAddressBookRequestAccessCompletionHandler handler =
^(bool granted, CFErrorRef errorRef){
// Respond to basic error condition
if (errorRef)
{
NSError *error = (__bridge NSError *) errorRef;
NSLog(@"Error requesting Address Book access: %@",
error.localizedFailureReason);
return;
}
// Post notification on main thread for success/fail
dispatch_async(dispatch_get_main_queue(), ^{
NSNotification *note =
[NSNotification notificationWithName:
kAuthorizationUpdateNotification
object:@(granted)];
[[NSNotificationCenter defaultCenter]
postNotification:note];
});
};
ABAddressBookRequestAccessWithCompletion(shared, handler);
}
+ (void) showDeniedAccessAlert
{
UIAlertView *alertView = [[UIAlertView alloc]
initWithTitle:@"Cannot Access Contacts"
message:@"Please enable in Settings > Privacy > Contacts."
delegate:nil cancelButtonTitle:nil
otherButtonTitles:@"Okay", nil];
dispatch_async(dispatch_get_main_queue(), ^{
[alertView show];
});
}
@end
In earlier editions of this book, Address Book objects were created on-the-fly and autoreleased. The code in this edition assumes that a single static instance is available at all times, which is automatically updated whenever the Address Book data changes. A method called save: updates the persistent Address Book data store with any updates you have made to the shared in-memory Address Book instance.
The big change to this edition is represented by the new iOS 6 restrictions that limit access to users’ contacts. Users must explicitly allow access to their Address Book, and when they do (or do not) are not generally asked again. If a user has denied access, (you can test with ABAddressBookGetAuthorizationStatus()), you must offer directions to them on how to grant that access. In this case, the showDeniedAccessAlert method sends them to the Settings app.
Always provide some sort of instructions that enable users to work around previously denied permissions and never assume they know how to do this on their own. Users deny access for all sorts of reasons: mistapped buttons, a general distrust, or because they weren’t paying attention to what they were being asked. Apple does not provide an “ask again” API. Instead, have your application react to the current status on launch.
That is the only time you need to check. Updating permissions in Settings automatically kills your application if it is running in the background. It will relaunch rather than resume the next time the user accesses it. This detail ensures that there will never be a situation, at least in iOS 6, in which you must update your GUI while the app is running to respond to a change in permissions. Apple may change this behavior in the future.
This class uses a notification system that updates the application regarding current authorization status. This enables you to use the current status to enable or disable affected GUI elements. You won’t want to offer an Add Contact button, for example, when your app isn’t authorized to respond to those requests:
[[NSNotificationCenter defaultCenter]
addObserverForName:kAuthorizationUpdateNotification
object:nil queue:[NSOperationQueue mainQueue]
usingBlock:^(NSNotification *note)
{
NSNumber *granted = note.object;
[self enableGUI:granted.boolValue];
}];
Querying the Address Book
You can ask the Address Book for the number of objects currently stored in its database using a single function call. Although the name refers to Persons, this method counts all entries, including businesses, and returns a simple count.
+ (int) contactsCount
{
ABAddressBookRef addressBook = [ABStandin addressBook];
return ABAddressBookGetPersonCount(addressBook);
}
Wrapping the AddressBook Framework
Because it’s C-based, the AddressBook framework can be fussy and difficult to work with if you’re more comfortable using Objective-C. To deal with this, this chapter introduces a simple wrapper called ABContact. This wrapper class hides the CF nature of the class and replaces it with an Objective-C interface. Objective-C wrappers simplify integration between the C-based Address Book calls and normal Cocoa Touch development and memory management. You can find the full source for this, and other associated wrapper classes, in the sample code repository for this chapter.
The ABContact class hides an auto-synthesized internal ABRecordRef, the CF type that corresponds to each contact record. The remaining portion of the wrapper involves nothing more than generating properties and methods that enable you to reach into the ABRecordRef to set and access its subrecords:
@interface ABContact : NSObject
@property (nonatomic, readonly) ABRecordRef record;
@end
A second helper class ABContactsHelper wraps the AddressBook framework at the global level. It enables you to modify and query the database as a whole. Take its contacts method, for example. As with the record count, the Address Book can also return an array of contacts. You recover individual records by calling the ABAddressBookCopyArrayOfAllPeople() function, which returns a CF array of ABRecordRef objects.
The following ABContactsHelper method wraps this function to retrieve a record array. It then adds each contact record to a new ABContact wrapper and returns a standard NSArray populated with Objective-C contact instances:
+ (NSArray *) contacts
{
ABAddressBookRef addressBook = [ABStandin addressBook];
NSArray *thePeople =
(__bridge_transfer NSArray *)
ABAddressBookCopyArrayOfAllPeople(addressBook);
NSMutableArray *array = [NSMutableArray array];
for (id person in thePeople)
[array addObject:[ABContact
contactWithRecord:(__bridge ABRecordRef)person]];
return array;
}
Working with Record Functions
The majority of ABRecordRef functions use the ABPerson prefix. This prefix corresponds to the ABPerson class available on the Macintosh but not on iOS. So, although the function calls are ABPerson-centric, all the data affected by these calls are actually ABRecordRef instances.
The reason for this becomes clearer when you notice that the same ABRecordRef structure is used in the AddressBook framework to represent both people (individual contacts, whether people or businesses) and groups (collections of contacts, such as work colleagues and personal friends). The SDK provides ABGroup functions and ABPerson ones, enabling you to add members and access membership lists. You read more about groups later in this section.
You already encountered the ABPersonCreate() function earlier in this section. As its prefix indicates, it’s used to create a contact record. The SDK offers almost two dozen other ABPerson-named functions and a handful each of ABGroup and ABRecord functions. Together, these functions enable you to set and retrieve values within a contact, compare records, test for conforming data, and more.
Retrieving and Setting Strings
Each ABRecord stores about a dozen simple string values that represent, among other items, a person’s name, title, job, and organization. You retrieve single-valued strings by copying field values from the record. Single-valued means that a person can own just one of each of these items. A person has only one first name, one birthday, and one nickname—at least as far as the AddressBook framework is concerned. Contrast this with phone numbers, e-mail addresses, and social-network identities. These latter are called multivalued and refer to items that naturally occur in multiples.
Recovering Strings
As you’d expect, working with single-valued elements is simpler than multivalued ones. You have just one item to set and to retrieve. All single-valued elements can be accessed using the same ABRecordCopyValue() function. The ABContact wrapper specializes this access based on the data type returned, such as for strings or dates. The following method copies a record value, casts it to a string, and returns that content:
- (NSString *) getRecordString:(ABPropertyID) anID
{
NSString *result =
(__bridge_transfer NSString *)
ABRecordCopyValue(_record, anID);
return result;
}
To determine which value to copy, it requires a property constant (ABPropertyID) that identifies the requested field in the record. The sample calls that follow use identifiers for the first and last name fields:
// Sample uses
- (NSString *) firstname
{return [self getRecordString:kABPersonFirstNameProperty];}
- (NSString *) lastname
{return [self getRecordString:kABPersonLastNameProperty];}
String Fields
The string-based fields you can recover in this fashion follow; their names are self-explanatory. These identifiers are declared as constant integers in the ABPerson.h header file and have remained stable now for generations of iOS. Each item identifies a single string-based field in an ABRecordRef record:
• kABPersonFirstNameProperty
• kABPersonLastNameProperty
• kABPersonMiddleNameProperty
• kABPersonPrefixProperty
• kABPersonSuffixProperty
• kABPersonNicknameProperty
• kABPersonFirstNamePhoneticProperty
• kABPersonLastNamePhoneticProperty
• kABPersonMiddleNamePhoneticProperty
• kABPersonOrganizationProperty
• kABPersonJobTitleProperty
• kABPersonDepartmentProperty
• kABPersonNoteProperty
Setting String Properties
Setting string-based properties proves to be just as simple as retrieving them. Cast the string you want to set to a CFStringRef. You need to use Core Foundation objects with Address Book calls. Then, use ABRecordSetValue() to store the data into the record.
These calls do not update the Address Book. They change only the data within the record. If you want to store a user’s contact information, you must write that information back to the Address Book. Use the save: method, shown earlier in this section:
- (BOOL) setString: (NSString *) aString
forProperty:(ABPropertyID) anID
{
CFErrorRef errorRef = NULL;
BOOL success = ABRecordSetValue(_record, anID,
(__bridge CFStringRef) aString, &errorRef);
if (!success)
{
NSError *error = (__bridge_transfer NSError *) errorRef;
NSLog(@"Error: %@", error.localizedFailureReason);
}
return success;
}
// Examples of use
- (void) setFirstname: (NSString *) aString
{[self setString: aString forProperty:
kABPersonFirstNameProperty];}
- (void) setLastname: (NSString *) aString
{[self setString: aString
forProperty: kABPersonLastNameProperty];}
Working with Date Properties
In addition to the string properties you just saw, the Address Book stores three key dates: an optional birthday, the date the record was created, and the date the record was last modified. These items use the following property constants:
• kABPersonBirthdayProperty
• kABPersonCreationDateProperty
• kABPersonModificationDateProperty
Access these items exactly as you would with strings, but cast to and from NSDate instances instead of NSString instances. Don’t try to modify the latter two properties; allow the Address Book to handle them for you:
// Return a date-time field from a record
- (NSDate *) getRecordDate:(ABPropertyID) anID
{
return (__bridge_transfer NSDate *)
ABRecordCopyValue(_record, anID);
}
// Get the contact's birthday
- (NSDate *) birthday
{return [self getRecordDate:kABPersonBirthdayProperty];}
// Set a date-time field in a record
- (BOOL) setDate: (NSDate *) aDate forProperty:(ABPropertyID) anID
{
CFErrorRef errorRef = NULL;
BOOL success = ABRecordSetValue(_record, anID,
(__bridge CFDateRef) aDate, &errorRef);
if (!success)
{
NSError *error = (__bridge_transfer NSError *) errorRef;
NSLog(@"Error: %@", error.localizedFailureReason);
}
return success;
}
// Set the contact's birthday
- (void) setBirthday: (NSDate *) aDate
{[self setDate: aDate forProperty: kABPersonBirthdayProperty];}
Multivalue Record Properties
Each person may have multiple e-mail addresses, phone numbers, and important dates (beyond the birthday singleton) associated with his or her contact. ABPerson uses a multivalue structure to store lists of these items.
Each multivalue item is actually an array of pairs, which can be a bit confusing when you first start using this feature:
@[pair1, pair2, pair3,...]
Further, ABContact represents these pairs as a two-item dictionary. The value refers to the actual item that’s added to the Address Book. The label specifies the role of that item:
@[{label:label1, value:value1}, {label:label2, value:value2}, ...]
For example, a person may have a work phone, a home phone, and a mobile phone. Each of these roles (work, home, and mobile) are labels. The actual phone numbers are the values associated with the roles:
@[{label: WorkPhone, value: 303-555-1212},
{label: HomePhone, value: 720-555-1212}, ...]
Although you’d think it would be far easier for Apple to use a single dictionary using this information as key/value pairs, this is not how AddressBook is implemented.
Here’s how you can create the ABContact dictionaries that populate each of these arrays. You pass a value and label, building up a dictionary from those elements. These elements are used when calling ABMultiValueAddValueAndLabel().
+ (NSDictionary *) dictionaryWithValue: (id) value
andLabel: (CFStringRef) label
{
NSMutableDictionary *dict = [NSMutableDictionary dictionary];
if (value) dict[@"value"] = value;
if (label) dict[@"label"] = (__bridge NSString *)label;
return dict;
}
Multivalue Labels
The AddressBook framework uses three generic labels, which can be used for any data class. These are kABWorkLabel, kABHomeLabel, and kABOtherLabel. In addition, you can find type-specific labels for URLs, Social Media, Instant Messaging, Phone Numbers, Dates, and Relationships. Each of these items is documented in the AddressBook documentation and may change over time. The Social Media elements (Twitter, Facebook, LinkedIn, Sina Weibo, and so on) represent recent additions to the iOS SDK.
Most multivalue items now enable you to add custom labels in addition to the system supplied ones. For example, you can add a contact’s “Receptionist” (custom) in addition to Friend (system). The method calls in the following snippet are implemented in the ABContact wrapper:
// System-supplied
[person addRelationItem:contact1.compositeName
withLabel:kABPersonFriendLabel];
// Custom
[person addRelationItem:contact2.compositeName
withLabel:(__bridge CFStringRef)@"Receptionist"];
Note
“Related names” is now fully supported in iOS 6. The kABPersonRelatedNamesProperty constant helps store names and their relationships (for example, Mary BallWashington might be stored in George Washington’s contact using the kABPersonMotherLabel). See ABPerson.h for a full list of predefined relation constants.
Retrieving Multivalue Arrays
Recover each array from the record via its property identifier, returning a CFArrayRef, which you can use directly or bridge to an NSArray. The multivalue property identifiers you work with are as follows:
• kABPersonEmailProperty
• kABPersonPhoneProperty
• kABPersonDateProperty
• kABPersonAddressProperty
• kABPersonSocialProfileProperty
• kABPersonInstantMessageProperty
Each multivalue type plays an important role in storing data back to the record. The type is used to allocate memory and determine the size for each field within the record.
The first three of these items (e-mail, phone, and URL) store multistrings—that is, arrays of strings. Their associated type is the kABMultiStringPropertyType.
The next item, the date property, stores an array of dates using kABMultiDateTimePropertyType.
The last three items, namely the address, social profile, and instant-message properties, consist of arrays of dictionaries and use kABMultiDictionaryPropertyType. Each of these dictionaries has its own complexities and custom keys. (They are discussed later in this section.)
Retrieving Multivalue Property Values
To retrieve an array of values for any of these properties, copy the property out of the record (using ABRecordCopyValue()) and then break it down into its component array. The Address Book provides a function that copies the array from the property into a standard CFArrayRef:
- (NSArray *) arrayForProperty: (ABPropertyID) anID
{
CFTypeRef theProperty =
ABRecordCopyValue(_record, anID);
if (!theProperty) return nil;
NSArray *items = (__bridge_transfer NSArray *)
ABMultiValueCopyArrayOfAllValues(theProperty);
CFRelease(theProperty);
return items;
}
Although you might think you’ve retrieved all the information with those two calls, you have not. Value retrieval alone is not sufficient for working with multivalued items. As mentioned earlier, each dictionary stored in a multivalue array uses a label and a value. Figure 9-1 shows part of an Address Book contact page. Grouped items use labels to differentiate the role for each e-mail, phone number, and so forth. This contact has three phone numbers and three e-mail address, each of which displays a label indicating the value’s role.
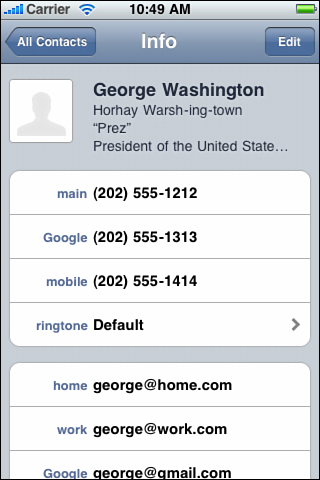
Figure 9-1. Multivalue items consist of both a label (for example, main, Google, and mobile for these phone numbers, or home, work, and Google for these e-mail addresses) and a value.
Retrieving Multivalue Labels
You must transfer the labels from the property and the values to retrieve all the information stored for each multivalue property. The following method copies each label by index and then adds it to a labels array. Together, the labels and the values compose a complete multivalue collection:
- (NSArray *) labelsForProperty: (ABPropertyID) anID
{
CFTypeRef theProperty = ABRecordCopyValue(_record, anID);
if (!theProperty) return nil;
NSMutableArray *labels = [NSMutableArray array];
for (int i = 0;
i < ABMultiValueGetCount(theProperty); i++)
{
NSString *label = (__bridge_transfer NSString *)
ABMultiValueCopyLabelAtIndex(theProperty, i);
[labels addObject:label];
}
CFRelease(theProperty);
return labels;
}
Combine the retrieved labels and values together as follows to create the final multivalued array of dictionaries:
- (NSArray *) dictionaryArrayForProperty: (ABPropertyID) aProperty
{
NSArray *valueArray = [self arrayForProperty:aProperty];
NSArray *labelArray = [self labelsForProperty:aProperty];
int num = MIN(valueArray.count, labelArray.count);
NSMutableArray *items = [NSMutableArray array];
for (int i = 0; i < num; i++)
{
NSMutableDictionary *md = [NSMutableDictionary dictionary];
md[@"value"] = valueArray[i];
md[@"label"] = labelArray[i];
[items addObject:md];
}
return items;
}
Storing Multivalue Data
Saving into multivalue objects works the same way as the retrieval functions you just read about, but in reverse. To store multivalued items into a record, you transform your Cocoa Touch objects into a form the record can work with, namely the two-item value-label pair.
Custom Dictionaries
Although the value and label items are passed to the AddressBook functions as separate parameters, it’s convenient to store them together in a single dictionary. This makes it easier to retrieve them in tandem when they are later needed. The following method tests a dictionary for conformance:
+ (BOOL) isMultivalueDictionary: (NSDictionary *) dictionary
{
if (dictionary.allKeys.count != 2)
return NO;
if (!dictionary[@"value"])
return NO;
if (!dictionary[@"label"])
return NO;
return YES;
}
The following method expects an array of these custom dictionaries, whose objects correspond to the value and label retrieved from the original multivalued property. This code iterates through that array of dictionaries and adds each value and label to the mutable multivalue object, an instance of ABMutableMultiValueRef, which is created by calling ABMultiValueCreateMutable() with a property type:
- (ABMutableMultiValueRef) copyMultiValueFromArray:
(NSArray *) anArray withType: (ABPropertyType) aType
{
ABMutableMultiValueRef multi = ABMultiValueCreateMutable(aType);
for (NSDictionary *dict in anArray)
{
if (![ABContact isMultivalueDictionary:dict])
continue;
ABMultiValueAddValueAndLabel(
multi, (__bridge CFTypeRef) dict[@"value"],
(__bridge CFTypeRef) dict[@"label"], NULL);
}
return multi;
}
The ABPropertyType supplied as the method parameter specifies what kind of values is stored. For example, you can populate an e-mail property with strings and labels using kABMultiStringPropertyType or an Address Book using kABMultiDictionaryPropertyType.
Working with Multivalue Items
After you create a multivalue item using a method like the one just shown, you can then add it to a contact by setting a record value. The following method assigns a multivalue item to a property ID using the standard ABRecordSetValue() call. There is essentially no difference between this call and the calls that set a single date or string property. All the work is done in creating the multivalue item in the first place, not in the actual assignment:
- (BOOL) setMultiValue: (ABMutableMultiValueRef) multi
forProperty: (ABPropertyID) anID
{
CFErrorRef errorRef = NULL;
BOOL success = ABRecordSetValue(_record, anID, multi, &errorRef);
if (!success)
{
NSError *error = (__bridge_transfer NSError *) errorRef;
NSLog(@"Error: %@", error.localizedFailureReason);
}
return success;
}
You might call this general assignment method from a specialized setter, such as the one shown here. This method assigns an array of e-mail dictionaries by first building up a multivalued item and then setting the value:
- (void) setEmailDictionaries: (NSArray *) dictionaries
{
// kABWorkLabel, kABHomeLabel, kABOtherLabel
ABMutableMultiValueRef multi =
[self copyMultiValueFromArray:dictionaries
withType:kABMultiStringPropertyType];
[self setMultiValue:multi
forProperty:kABPersonEmailProperty];
CFRelease(multi);
}
Addresses, Social Profile, and Instant-Message Properties
Three properties (addresses, social profiles, and instant-message IDs) use multivalued dictionaries rather than strings or dates. This adds an extra step to the creation of a multivalue array. You must populate a set of dictionaries and then add them to an array along with their labels before building the multivalued item and adding it to a contact record. Figure 9-2 illustrates this additional layer. As the figure shows, e-mail multivalue items consist of an array of label-value pairs, where each value is a single string. In contrast, addresses use a separate dictionary, which is bundled into the value item.
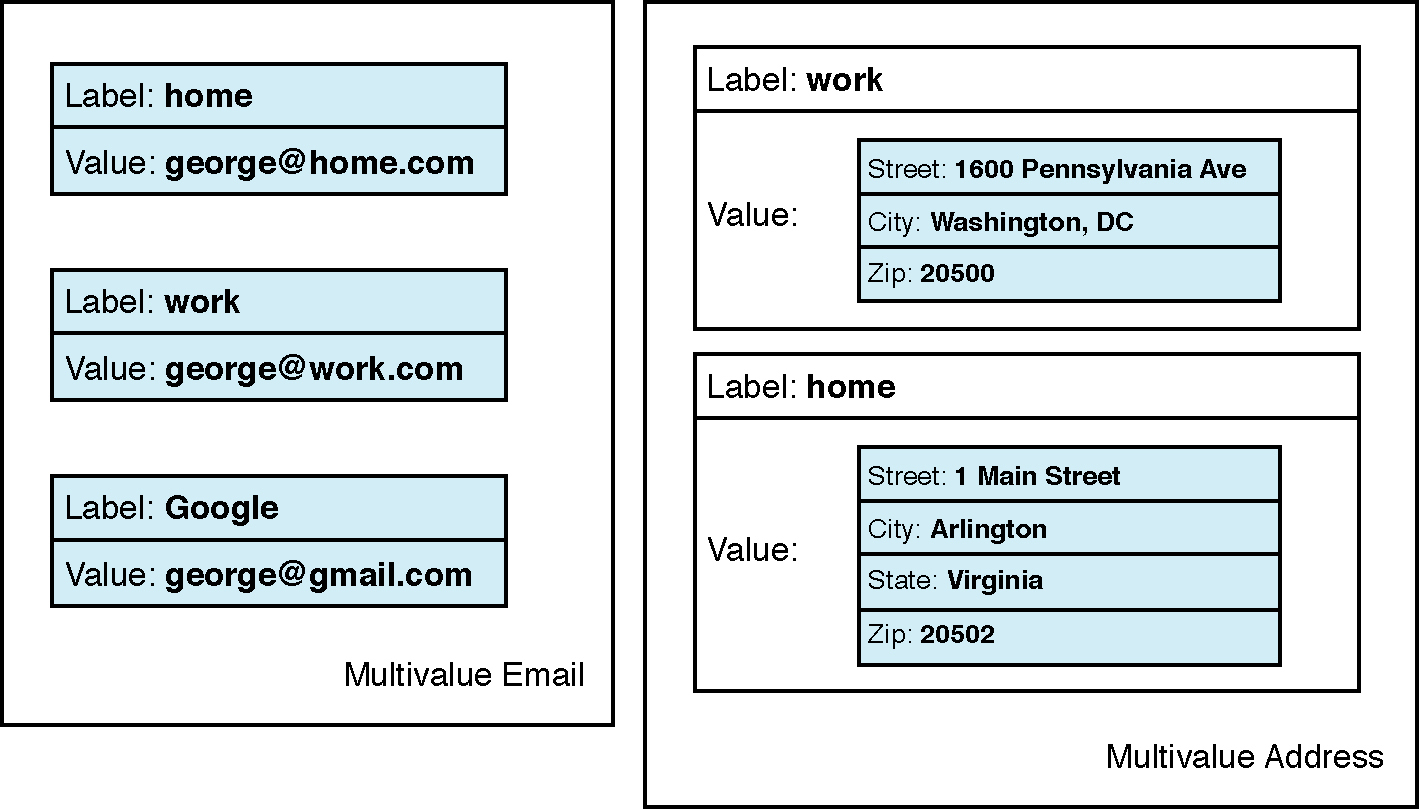
Figure 9-2. Unlike multivalue e-mail, which stores a single string for each value, multivalue addresses contain an entire address dictionary.
Here’s an example that demonstrates the steps involved in creating a two-address multivalue item. This code builds the dictionaries and then adds them, along with their labels, to a base array. The array created by this code corresponds to the multivalue address object shown on the right side of Figure 9-2:
// Create the array that will store all the address
// value-label dictionaries
NSMutableArray *addresses = [NSMutableArray array];
// Create White House Address and add it to the array
NSDictionary *wh_addy = [ABContact
addressWithStreet:@"1600 Pennsylvania Avenue"
withCity:@"Washington, DC" withState:nil
withZip:@"20500" withCountry:nil withCode:nil];
[addresses addObject:[ABContact dictionaryWithValue:wh_addy
andLabel:kABWorkLabel]];
// Create a home address and add it to the array
NSDictionary *home_addy = [ABContact
addressWithStreet:@"1 Main Street" withCity:@"Arlington"
withState:@"Virginia" withZip:@"20502"
withCountry:nil withCode:nil];
[addresses addObject:[ABContact dictionaryWithValue:home_addy
andLabel:kABHomeLabel]];
This code relies on convenience methods to create both the address dictionaries and the value/label dictionaries used for the multivalue array. The following methods produce the label/value dictionaries for these three types. Notice how the keys for each dictionary are predefined, using Address Book key constants:
+ (NSDictionary *) addressWithStreet: (NSString *) street
withCity: (NSString *) city
withState:(NSString *) state
withZip: (NSString *) zip
withCountry: (NSString *) country
withCode: (NSString *) code
{
NSMutableDictionary *md = [NSMutableDictionary dictionary];
if (street) md[
(__bridge NSString *) kABPersonAddressStreetKey] = street;
if (city) md[
(__bridge NSString *) kABPersonAddressCityKey] = city;
if (state) md[
(__bridge NSString *) kABPersonAddressStateKey] = state;
if (zip) md[
(__bridge NSString *) kABPersonAddressZIPKey] = zip;
if (country) md[
(__bridge NSString *) kABPersonAddressCountryKey] = country;
if (code) md[
(__bridge NSString *) kABPersonAddressCountryCodeKey] = code;
return md;
}
+ (NSDictionary *) socialWithURL: (NSString *) url
withService: (NSString *) serviceName
withUsername: (NSString *) username
withIdentifier: (NSString *) key
{
NSMutableDictionary *md = [NSMutableDictionary dictionary];
if (url) md[
(__bridge NSString *) kABPersonSocialProfileURLKey] = url;
if (serviceName) md[
(__bridge NSString *) kABPersonSocialProfileServiceKey] = serviceName;
if (username) md[
(__bridge NSString *) kABPersonSocialProfileUsernameKey] = username;
if (key) md[
(__bridge NSString *) kABPersonSocialProfileUserIdentifierKey] = key;
return md;
}
+ (NSDictionary *) imWithService: (CFStringRef) service
andUser: (NSString *) userName
{
NSMutableDictionary *im = [NSMutableDictionary dictionary];
if (service) im[(__bridge NSString *)
kABPersonInstantMessageServiceKey] = (__bridge NSString *) service;
if (userName) im[(__bridge NSString *)
kABPersonInstantMessageUsernameKey] = userName;
return im;
}
Address Book Images
Each record in the Address Book may be associated with an optional image. You can copy image data to and from each record. The ABPersonHasImageData() function indicates whether data is available for a given record. Use this to test whether you can retrieve image data.
Image data is stored as Core Foundation data, which can be bridged to NSData. As the UIImage class fully supports converting images into data and creating images from data, you just need to cast that data as needed. You might use the UIImagePNGRepresentation() function, for example, to transform a UIImage instance into an NSData representation. Address Book supports JPEG, JPG, BMP, PNG, and GIF data. To reverse, use imageWithData: to create a new image from NSData.
Apple details target size limitations for Contacts in various support documents. The iCloud-specific document http://support.apple.com/kb/HT4489 limits contacts to 25,000 entries, each of which may contain a 224 KB contact photo. (The entire contact is limited to 256 KB total.) The entire contacts book should not exceed 100 MB of photo data and 24 MB of card information:
// Retrieve image
- (UIImage *) image
{
if (!ABPersonHasImageData(_record)) return nil;
CFDataRef imageData = ABPersonCopyImageData(_record);
if (!imageData) return nil;
NSData *data = (__bridge_transfer NSData *)imageData;
UIImage *image = [UIImage imageWithData:data];
return image;
}
// Set image
- (void) setImage: (UIImage *) image
{
CFErrorRef errorRef = NULL;
BOOL success;
if (image == nil) // remove
{
if (!ABPersonHasImageData(_record)) return;
success = ABPersonRemoveImageData(_record, &errorRef);
if (!success)
{
NSError *error = (__bridge_transfer NSError *) errorRef;
NSLog(@"Error: %@", error.localizedFailureReason);
}
return;
}
NSData *data = UIImagePNGRepresentation(image);
success = ABPersonSetImageData(
record, (__bridge CFDataRef) data, &errorRef);
if (!success)
{
NSError *error = (__bridge_transfer NSError *) errorRef;
NSLog(@"Error: %@", error.localizedFailureReason);
}
return;
}
Creating, Adding, and Deleting Records
The ABPersonCreate() function returns a new ABRecordRef instance. This record exists outside the Address Book and represents a freestanding data structure. To date, all the examples in this chapter have modified individual records, but none so far has actually saved a record to the Address Book. Keep that in mind as you look at this convenience method that returns a newly initialized contact:
+ (id) contact
{
ABRecordRef person = ABPersonCreate();
id contact = [ABContact contactWithRecord:person];
CFRelease(person);
return contact;
}
Writing to the Address Book
To write new information to the Address Book takes two steps. First, add the record and then save the Address Book. New iOS developers often forget the second step, leading to an Address Book that appears to resist changes. This method adds a new contact to the Address Book but does not save the changes. Remember to call the custom AddressBook class’s save: method, shown earlier, after adding the contact to make the new contact stick:
+ (BOOL) addContact: (ABContact *) aContact
withError: (NSError **) error
{
ABAddressBookRef addressBook = [ABStandin addressBook];
BOOL success;
CFErrorRef errorRef = NULL;
success = ABAddressBookAddRecord(
addressBook, aContact.record, &errorRef);
if (!success)
{
if (error)
*error = (__bridge_transfer NSError *)errorRef;
return NO;
}
return YES;
}
Removing Records
Removing a record from the Address Book requires a save step, just like adding a record. When removed, the record still exists as an object, but it no longer is stored in the Address Book database. Here’s how you can remove a record from the Address Book. Again, call [ABStandin save:&error] after:
- (BOOL) removeSelfFromAddressBook: (NSError **) error
{
CFErrorRef errorRef = NULL;
BOOL success;
ABAddressBookRef addressBook = [ABStandin addressBook];
success = ABAddressBookRemoveRecord(
addressBook, self.record, &errorRef);
if (!success)
{
if (error)
*error = (__bridge_transfer NSError *)errorRef;
return NO;
}
return success;
}
Searching for Contacts
The default AddressBook framework enables you to perform a prefix search across records. This function returns an array of records whose composite names (typically first name appended by last name, but localizable to countries where that pattern is reversed) match the supplied string:
NSArray *array = (__bridge_transfer NSArray *)
ABAddressBookCopyPeopleWithName(addressBook, CFSTR("Eri"));
It’s easier to use predicates and properties to perform searches. Use the custom ABContact class properties with NSPredicate instances to quickly filter for wanted matches. The following code matches a string against a contact’s first name, middle name, last name, and nickname. The predicate uses property names to define how it matches or rejects contacts. It does this using a case and diacritical insensitive match ([cd]) that compares against all points within each string (contains), not just the start (begins with):
+ (NSArray *) contactsMatchingName: (NSString *) fname
{
NSPredicate *pred;
NSArray *contacts = [ABContactsHelper contacts];
pred = [NSPredicate predicateWithFormat:
@"firstname contains[cd] %@ OR lastname contains[cd] %@ OR
nickname contains[cd] %@ OR middlename contains[cd] %@",
fname, fname, fname, fname];
return [contacts filteredArrayUsingPredicate:pred];
}
Apple’s Predicate Programming Guide offers a comprehensive introduction to predicate basics. It demonstrates how to create predicates and use them in your application.
Sorting Contacts
At times, you may want to sort your contacts in some way. The following methods mimic string sorting, but do so using the ABContact class’s composite name property that combines the first, middle, and last names. You can easily adapt this approach to sort using other keys:
- (BOOL) isEqualToString: (ABContact *) aContact
{
return [self.compositeName isEqualToString:aContact.compositeName];
}
- (NSComparisonResult) caseInsensitiveCompare: (ABContact *) aContact
{
return [self.compositeName
caseInsensitiveCompare:aContact.compositeName];
}
Working with Groups
Groups collect contacts into related sets, such as friends, colleagues, drinking buddies, and other natural groupings. Each group is nothing more than another ABRecord, but with a few special properties. Groups don’t store names, addresses, and phone numbers. Instead, they store a reference to other contact records.
Counting Groups
You can count the number of groups in the current Address Book by retrieving the group records, as shown in this method. There’s no direct way to query the number of groups as there is with the number of person contacts. The following methods are part of an ABGroup wrapper class that provides an Objective-C wrapper for Address Book groups like ABContact wraps Address Book contacts:
+ (int) numberOfGroups
{
ABAddressBookRef addressBook = [ABStandin addressBook];
NSArray *groups = (__bridge_transfer NSArray *)
ABAddressBookCopyArrayOfAllGroups(addressBook);
int ncount = groups.count;
return ncount;
}
Creating Groups
Create groups using the ABGroupCreate() function. This function returns an AB-RecordRef in the same way that ABPersonCreate() does. The difference lies in the record type. For groups, this property is set to kABGroupType instead of kABPersonType:
+ (id) group
{
ABRecordRef grouprec = ABGroupCreate();
id group = [ABGroup groupWithRecord:grouprec];
CFRelease(grouprec);
return group;
}
Adding and Removing Members
Add and remove members of a group by calling ABGroupAddMember() and ABGroupRemoveMember(). These calls affect records only and, as always, are not applied globally until you save the Address Book:
- (BOOL) addMember: (ABContact *) contact
withError: (NSError **) error
{
CFErrorRef errorRef = NULL;
BOOL success;
success = ABGroupAddMember(self.record,
contact.record, &errorRef);
if (!success)
{
if (error)
*error = (__bridge_transfer NSError *)errorRef;
return NO;
}
return YES;
}
- (BOOL) removeMember: (ABContact *) contact
withError: (NSError **) error
{
CFErrorRef errorRef = NULL;
BOOL success;
success = ABGroupRemoveMember(self.record,
contact.record, &errorRef);
if (!success)
{
if (error)
*error = (__bridge_transfer NSError *)errorRef;
return NO;
}
return YES;
}
Listing Members
Each member of a group is a person, or using this chapter’s ABContact terminology, a contact. This method scans through a group’s members and returns an array of ABContact instances, each initialized with the ABRecordRef for a group member:
- (NSArray *) members
{
NSArray *contacts = (__bridge_transfer NSArray *)
ABGroupCopyArrayOfAllMembers(self.record);
NSMutableArray *array =
[NSMutableArray arrayWithCapacity:contacts.count];
for (id contact in contacts)
[array addObject:[ABContact contactWithRecord:
(__bridge ABRecordRef)contact]];
return array;
}
Group Names
Every group has a name. It is the primary group property that you can set and retrieve. It uses the kABGroupNameProperty identifier, and it otherwise works just like the contacts properties:
- (NSString *) getRecordString:(ABPropertyID) anID
{
return (__bridge_transfer NSString *)
ABRecordCopyValue(_record, anID);
}
- (NSString *) name
{
return [self getRecordString:kABGroupNameProperty];
}
- (void) setName: (NSString *) aString
{
CFErrorRef errorRef = NULL;
BOOL success;
success = ABRecordSetValue(_record, kABGroupNameProperty,
(__bridge CFStringRef) aString, &errorRef);
if (!success)
{
NSError *error = (__bridge_transfer NSError *) errorRef;
NSLog(@"Error: %@", error.localizedFailureReason);
}
}
ABContact, ABGroup, and ABContactsHelper
The sample code that accompanies this section includes the source for three wrapper classes that have been demonstrated through these sections. The snippets shown throughout this discussion highlight the techniques used in these classes. Because of the length and overall redundancy of the classes, a single recipe listing has been omitted from this section. You can find the complete classes in the sample code folder for this chapter on the github repository.
The custom ABContact class is somewhat based on the Mac-only ABPerson class. It provides a more Cocoa Touch interface with built-in Objective-C 2.0 properties than the C-style property queries that Apple’s ABPerson uses. All the contact-specific methods you’ve seen to date in this section derive from this class.
A second class called ABGroup wraps all the group functionality for ABRecordRef instances. It offers Objective-C access to group creation and management. Use this class to build new classes and add and remove members.
The final class, ABContactsHelper, provides Address Book-specific methods. Use this class to search through the Address Book, retrieve arrays of records, and so forth. Although a few basic searches are included across names and phone numbers, you can easily expand this class, which is hosted at http://github.com/erica, for more complex queries.
Recipe: Searching the Address Book
Predicate-based searches are both fast and effective. Recipe 9-1 is built on ABContact’s predicate queries. It presents a search table that displays a scrolling table of contacts. This table responds to user search bar queries with live listing updates.
When a user taps a row, this recipe displays an ABPersonViewController instance. This class offers a contact overview, displaying the details for a given record, similar to the view shown in Figure 9-1. To use this view controller, you allocate and initialize it and set its displayedPerson property. As you’d expect, this property stores an ABRecordRef, which can easily be retrieved from an ABContact instance.
Person view controllers offer a limited delegate. By setting the personViewDelegate property, you can subscribe to the personViewController:shouldPerformDefault-ActionForPerson: method. This method triggers when users select certain items in the view, including phone numbers, e-mail addresses, URLs, and addresses. Return YES to perform the default action (dialing, e-mailing, and so on) or NO to skip.
Recipe 9-1 uses this callback to display the value for the selected item in the debug console. It’s a convenient way to determine what the user touched and where his or her point of interest lies.
Although you can interact with other display elements, like the contact note and ringtone, these items do not produce callbacks.
To extend this recipe to allow editing, set the person view controller’s allowsEditing property to YES. This provides the Edit button that appears at the top right of the display. When tapped, the Edit button triggers the same editing features in the person view that you normally see in the Contacts application.
Recipe 9-1. Selecting and Displaying Contacts with Search
// Return the number of table sections
- (NSInteger)numberOfSectionsInTableView:(UITableView *)aTableView
{
// One section for this example
return 1;
}
// Return the number of rows per section
- (NSInteger)tableView:(UITableView *)aTableView
numberOfRowsInSection:(NSInteger)section
{
if (aTableView == self.tableView)
return matches.count;
// On cancel, matches are restored in the search bar delegate
matches = [ABContactsHelper
contactsMatchingName:searchBar.text];
matches = [matches sortedArrayUsingSelector:
@selector(caseInsensitiveCompare:)];
return matches.count;
matches = [matches sortedArrayUsingSelector:
@selector(caseInsensitiveCompare:)];
return matches.count;
}
// Produce a cell for the given index path
- (UITableViewCell *)tableView:(UITableView *)aTableView
cellForRowAtIndexPath:(NSIndexPath *)indexPath
{
// Dequeue or create a cell
UITableViewCellStyle style = UITableViewCellStyleDefault;
UITableViewCell *cell =
[aTableView dequeueReusableCellWithIdentifier:@"BaseCell"];
if (!cell)
cell = [[UITableViewCell alloc]
initWithStyle:style reuseIdentifier:@"BaseCell"];
ABContact *contact = [matches objectAtIndex:indexPath.row];
cell.textLabel.text = contact.compositeName;
return cell;
}
- (BOOL)personViewController:
(ABPersonViewController *) personViewController
shouldPerformDefaultActionForPerson:(ABRecordRef)person
property:(ABPropertyID)property
identifier:(ABMultiValueIdentifier)identifierForValue
{
// Reveal the item that was selected
if ([ABContact propertyIsMultiValue:property])
{
NSArray *array =
[ABContact arrayForProperty:property inRecord:person];
NSLog(@"%@", [array objectAtIndex:identifierForValue]);
}
else
{
id object =
[ABContact objectForProperty:property inRecord:person];
NSLog(@"%@", [object description]);
}
return NO;
}
// Respond to user taps by displaying the person viewcontroller
- (void) tableView:(UITableView *)tableView
didSelectRowAtIndexPath:(NSIndexPath *)indexPath
{
ABContact *contact = [matches objectAtIndex:indexPath.row];
ABPersonViewController *pvc =
[[ABPersonViewController alloc] init];
pvc.displayedPerson = contact.record;
pvc.personViewDelegate = self;
// pvc.allowsEditing = YES; // optional editing
[self.navigationController
pushViewController:pvc animated:YES];
}
Get This Recipe’s Code
To find this recipe’s full sample project, point your browser to https://github.com/erica/iOS-6-Advanced-Cookbook and go to the folder for Chapter 9.
Recipe: Accessing Contact Image Data
Recipe 9-2 expands on Recipe 9-1 by adding contact image thumbnails to each table cell, where available. It does this by creating a new thumbnail from the contact’s data. When image data is available, that image is rendered onto the thumbnail. When it is not, the thumbnail is left blank. Upon being drawn, the image is assigned to the cell’s imageView.
Figure 9-3 shows the interface for this recipe. In this screen shot, a search is in progress (matching against the letter “e”). The records that match the search each display their image thumbnail.
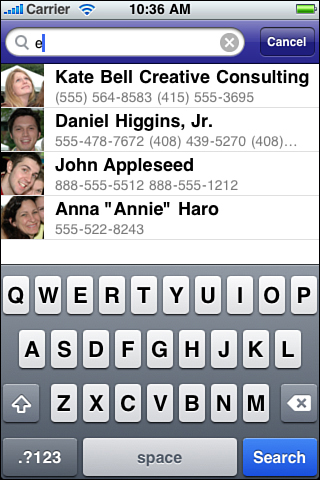
Figure 9-3. You can easily retrieve and display the image data associated with Address Book contacts.
Notice how simple it is to create and use thumbnails in this recipe. It takes just a few lines of code to build a new image context, draw into it (for contacts with images), and save it out to a UIImage instance.
Recipe 9-2. Displaying Address Book Images in Table Cells
- (UITableViewCell *)tableView:(UITableView *)aTableView
cellForRowAtIndexPath:(NSIndexPath *)indexPath
{
// Dequeue or create a cell
UITableViewCellStyle style = UITableViewCellStyleSubtitle;
UITableViewCell *cell =
[aTableView dequeueReusableCellWithIdentifier:@"BaseCell"];
if (!cell)
cell = [[UITableViewCell alloc]
initWithStyle:style reuseIdentifier:@"BaseCell"];
ABContact *contact = [matches objectAtIndex:indexPath.row];
cell.textLabel.text = contact.compositeName;
cell.detailTextLabel.text = contact.phonenumbers;
CGSize small = CGSizeMake(48.0f, 48.0f);
UIGraphicsBeginImageContext(small);
UIImage *image = contact.image;
if (image)
[image drawInRect:(CGRect){.size = small}];
cell.imageView.image = UIGraphicsGetImageFromCurrentImageContext();
UIGraphicsEndImageContext();
return cell;
}
Get This Recipe’s Code
To find this recipe’s full sample project, point your browser to https://github.com/erica/iOS-6-Advanced-Cookbook and go to the folder for Chapter 9.
Recipe: Picking People
The AddressBookUI framework offers a people picker controller, which enables you to browse your entire contacts list. It works similarly to the individual contact screen but does not require an a priori contact selection. The ABPeoplePickerNavigationController class presents the interactive browser, as shown in Figure 9-4.
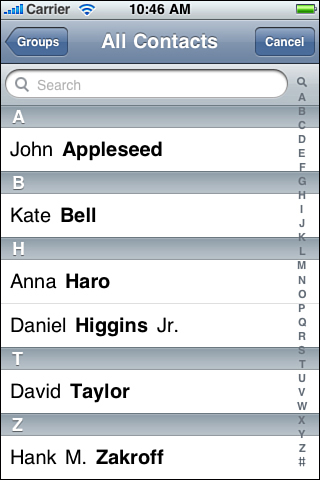
Figure 9-4. The iPhone people picker navigation control enables users to search through the contacts database and select a person or organization.
Allocate and display the controller before presenting it modally. Make sure to set the peoplePickerDelegate property, which enables you to catch user interactions with the view:
- (void) action: (UIBarButtonItem *) bbi
{
ABPeoplePickerNavigationController *ppnc =
[[ABPeoplePickerNavigationController alloc] init];
ppnc.peoplePickerDelegate = self;
[self presentViewController:ppnc animated:YES completion:nil];
}
When you declare the ABPeoplePickerNavigationControllerDelegate protocol, your class must implement the following three methods. These methods respond to users when they tap a contact, or any of a contact’s properties, or when the user taps Cancel:
• peoplePickerNavigationController:shouldContinueAfterSelectingPerson:—When users tap a contact, you have two choices. You can accept the person as the final selection and dismiss the modal view, or you can navigate to the individual display. To pick just the person, this method returns NO. To continue to the individual screen, return YES. The second argument contains the selected person, in case you want to stop after selecting any ABPerson record.
• peoplePickerNavigationController:shouldContinueAfterSelectingPerson:property:identifier:—This method does not get called until the user has progressed to an individual contact display screen. Then, it’s up to you whether to return control to your program (return NO) or to continue (return YES). You can determine which property has been tapped and to recover its value using the code from Recipe 9-1. Although this method should be optional, it is not at the time of writing this book.
• peoplePickerNavigationControllerDidCancel:—When a user taps Cancel, you still want a chance to dismiss the modal view. This method catches the cancel event, enabling you to use it to perform the dismissal.
Recipe 9-3 presents the simplest possible people picking example. It presents the picker and waits for a user to select a contact. When the user does so, it dismisses the picker and changes the view controller title (in the navigation bar) to show the composite name of the selected person. Returning NO from the primary callback means the property callback will never be called. You must still include it in your code because all three methods are required.
- (BOOL)peoplePickerNavigationController:
(ABPeoplePickerNavigationController *)peoplePicker
shouldContinueAfterSelectingPerson:(ABRecordRef)person
{
self.title = [[ABContact contactWithRecord:person] compositeName];
[self dismissViewControllerAnimated:YES completion:nil];
return NO;
}
- (BOOL)peoplePickerNavigationController:
(ABPeoplePickerNavigationController *)peoplePicker
shouldContinueAfterSelectingPerson:(ABRecordRef)person
property:(ABPropertyID)property
identifier:(ABMultiValueIdentifier)identifier
{
// required method that is never called in the people-only-picking
[self dismissViewControllerAnimated:YES completion:nil];
return NO;
}
- (void)peoplePickerNavigationControllerDidCancel:
(ABPeoplePickerNavigationController *)peoplePicker
{
[self dismissViewControllerAnimated:YES completion:nil];
}
- (void) action: (UIBarButtonItem *) bbi
{
ABPeoplePickerNavigationController *ppnc =
[[ABPeoplePickerNavigationController alloc] init];
ppnc.peoplePickerDelegate = self;
[self presentViewController:ppnc animated:YES completion:nil];
}
Get This Recipe’s Code
To find this recipe’s full sample project, point your browser to https://github.com/erica/iOS-6-Advanced-Cookbook and go to the folder for Chapter 9.
Recipe: Limiting Contact Picker Properties
When you need users to pick a certain kind of property, such as an e-mail address, you won’t want to present users with a person’s street address or fax number. Limit the picker’s displayed properties to show just those items you want the users to select from. Figure 9-5’s picker has been limited to e-mail selection.
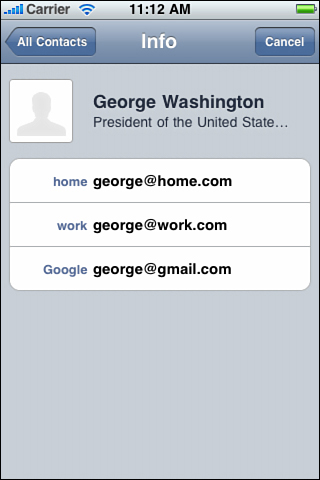
Figure 9-5. The people picker’s displayed properties enable you to choose which properties to present to users (in this case, e-mail only).
To make this happen, choose the displayed properties by submitting an array of property types to the controller. Set the picker’s displayedProperties property. Recipe 9-4 offers two picking options: one for e-mail, the other for phone numbers. Although these examples use a single property for the properties array, you can choose to display any number of properties.
Recipe 9-4. Choosing Display Properties
- (BOOL)peoplePickerNavigationController:
(ABPeoplePickerNavigationController *)peoplePicker
shouldContinueAfterSelectingPerson:(ABRecordRef)person
{
// Continue onto the detail screen
return YES;
}
- (BOOL)peoplePickerNavigationController:
(ABPeoplePickerNavigationController *)peoplePicker
shouldContinueAfterSelectingPerson:(ABRecordRef)person
property:(ABPropertyID)property
identifier:(ABMultiValueIdentifier)identifier
{
// Guaranteed to only be working with e-mail or phone here
[self dismissViewControllerAnimated:YES completion:nil];
NSArray *array =
[ABContact arrayForProperty:property inRecord:person];
self.title = (NSString *)[array objectAtIndex:identifier];
return NO;
}
- (void)peoplePickerNavigationControllerDidCancel:
(ABPeoplePickerNavigationController *)peoplePicker
{
// Respond to cancel
[self dismissViewControllerAnimated:YES completion:nil];
}
- (void) email: (UIBarButtonItem *) bbi
{
ABPeoplePickerNavigationController *ppnc =
[[ABPeoplePickerNavigationController alloc] init];
ppnc.peoplePickerDelegate = self;
[ppnc setDisplayedProperties:
[NSArray arrayWithObject:@(kABPersonEmailProperty)]];
[self presentViewController:ppnc animated:YES completion:nil];
}
- (void) phone: (UIBarButtonItem *) bbi
{
ABPeoplePickerNavigationController *ppnc =
[[ABPeoplePickerNavigationController alloc] init];
ppnc.peoplePickerDelegate = self;
[ppnc setDisplayedProperties:
[NSArray arrayWithObject:@(kABPersonPhoneProperty)]];
[self presentViewController:ppnc animated:YES completion:nil];
}
Get This Recipe’s Code
To find this recipe’s full sample project, point your browser to https://github.com/erica/iOS-6-Advanced-Cookbook and go to the folder for Chapter 9.
Recipe: Adding and Removing Contacts
Allow your users to create new contacts with the ABNewPersonViewController class. This view controller offers an editing screen that simplifies the interactive creation of a new Address Book entry. After allocating and initializing the view controller, start by creating a new contact and assigning it to the displayedPerson property. If you want, you can prefill the contact’s record with properties first.
Next, assign the newPersonViewDelegate, making sure to declare the ABNewPersonViewControllerDelegate protocol in the delegate class. Delegates receive one new callback: newPersonViewController:didCompleteWithNewPerson:. This callback is sent for both selection and cancel events. Check the person parameter to determine which case applies, as shown in Recipe 9-5. If the person is nil, the user tapped Cancel, and the new contact should not be added to the Address Book. If the user taps Done after editing the new contact, add the contact data to the Address Book and save it.
To remove a contact from the Address Book, the user is first presented with standard people picker navigation controller and solicited for a selection. When the user selects a name, the callback method asks them to confirm deletion before continuing. When confirmed, the Address Book must be saved. Removing a record from the Address Book requires a save step, just like adding a record.
Recipe 9-5. Using the New Person View Controller
#pragma mark NEW PERSON DELEGATE METHODS
- (void)newPersonViewController:
(ABNewPersonViewController *)newPersonViewController
didCompleteWithNewPerson:(ABRecordRef)person
{
if (person)
{
ABContact *contact = [ABContact contactWithRecord:person];
self.title = [NSString stringWithFormat:
@"Added %@", contact.compositeName];
NSError *error;
BOOL success =
[ABContactsHelper addContact:contact withError:&error];
if (!success)
{
NSLog(@"Could not add contact. %@",
error.localizedFailureReason);
self.title = @"Error.";
}
[ABStandin save:nil];
}
else
self.title = @"Cancelled";
[self.navigationController popViewControllerAnimated:YES];
}
#pragma mark PEOPLE PICKER DELEGATE METHODS
- (BOOL)peoplePickerNavigationController:
(ABPeoplePickerNavigationController *)peoplePicker
shouldContinueAfterSelectingPerson:(ABRecordRef)person
{
[self dismissViewControllerAnimated:YES completion:nil];
ABContact *contact = [ABContact contactWithRecord:person];
NSString *query = [NSString stringWithFormat:
@"Really delete %@?", contact.compositeName];
if ([self ask:query])
{
self.title = [NSString stringWithFormat:@"Deleted %@",
contact.compositeName];
[contact removeSelfFromAddressBook:nil];
[ABStandin save:nil];
}
return NO;
}
- (BOOL)peoplePickerNavigationController:
(ABPeoplePickerNavigationController *)peoplePicker
shouldContinueAfterSelectingPerson:(ABRecordRef)person
property:(ABPropertyID)property
identifier:(ABMultiValueIdentifier)identifier
{
[self dismissViewControllerAnimated:YES completion:nil];
return NO;
}
- (void)peoplePickerNavigationControllerDidCancel:
(ABPeoplePickerNavigationController *)peoplePicker
{
[self dismissViewControllerAnimated:YES completion:nil];
}
#pragma mark Respond to User Requests
- (void) add
{
// create a new view controller
ABNewPersonViewController *npvc =
[[ABNewPersonViewController alloc] init];
// Create a new contact
ABContact *contact = [ABContact contact];
npvc.displayedPerson = contact.record;
// Set delegate
npvc.newPersonViewDelegate = self;
[self.navigationController
pushViewController:npvc animated:YES];
}
- (void) remove
{
ABPeoplePickerNavigationController *ppnc =
[[ABPeoplePickerNavigationController alloc] init];
ppnc.peoplePickerDelegate = self;
[self presentlViewController:ppnc animated:YES completion:nil];
}
Get This Recipe’s Code
To find this recipe’s full sample project, point your browser to https://github.com/erica/iOS-6-Advanced-Cookbook and go to the folder for Chapter 9.
Modifying and Viewing Individual Contacts
The ABPersonViewController’s allowsEditing property enables your user to edit contacts. You create a controller, assign an Address Book record as its displayedPerson, set its editable property, and display it. Here’s a typical example of this feature in a callback method. Upon resolving to a particular contact, the application creates a new person presentation and pushes it onto the navigation stack:
- (void)unknownPersonViewController:
(ABUnknownPersonViewController *)unknownPersonView
didResolveToPerson:(ABRecordRef)person
{
// Handle cancel events
if (!person) return;
ABPersonViewController *abpvc = [[ABPersonViewController alloc] init];
abpvc.displayedPerson = person;
abpvc.allowsEditing = YES;
abpvc.personViewDelegate = self;
[self.navigationController pushViewController:abpvc animated:YES];
}
User Edits
When the allowsEditing property has been set to YES, an Edit button appears at the top right of the displayed person presentation. Users may tap this button and modify contact details. Edits are automatically propagated to the Address Book. You do not need to explicitly add calls to save the data; this is handled for you by the Cocoa Touch AddressBookUI implementation. Unlike the Contacts application, the Delete Contact option will not appear in red at the bottom of the controller.
If you want to allow the user to view the contact information without enabling edits, switch the allowsEditing property value to NO. Otherwise, leave the presentation code as is. No other modifications are necessary.
Delegate Methods
The person view controller has only one delegate callback method. You specify if tapping items, such as e-mail addresses or URLs, should perform actions based on those taps (that is, opening Mail or linking to Safari). Return YES or NO as wanted. When set to YES, be aware that control may pass out of the application in response to these actions:
#pragma mark PERSON DELEGATE
- (BOOL)personViewController:
(ABPersonViewController *)personViewController
shouldPerformDefaultActionForPerson:(ABRecordRef)person
property:(ABPropertyID)property
identifier:(ABMultiValueIdentifier)identifierForValue
{
return NO;
}
Recipe: The “Unknown” Person Controller
What happens when you have some information such as an e-mail address or a phone number, but you don’t have a contact to associate with it yet? The ABUnknownPersonViewController enables you to add that information to a new or existing contact. This class exists to associate known properties with unknown contacts. It works like this.
You allocate and initialize the view controller and then create and prefill a record with whatever properties you like. For example, Recipe 9-6 builds a random “monster” image. You can add more items if you want, but typically, this controller is used to add a single bit of information. The unknown person controller specializes in that kind of add-one-item utility. Figure 9-6 shows this recipe’s controller in action.

Figure 9-6. You can add images to contacts with the unknown person controller as well as e-mail addresses, phone numbers, and other text-based data.
Users can add the image to an existing contact or create a new contact. Tapping Back returns without adding the image.
The Create New Contact and Add to Existing Contact buttons are controlled by the controller’s allowsAddingToAddressBook property. When a user taps on the new contact button, a form appears that is prefilled with the properties from the passed record. If you disable this adding property, these buttons do not appear.
The allowsAction property enables users to tap on form elements in this interface. This enables them to connect to an e-mail address, to phone numbers, to web pages, and so forth. By tapping any element, you permit users to branch out of your app to make a call or move to Mobile Safari, and so on. This provides a handy way to add interactive contact information and URLs into an already-defined view controller.
The alternateName and message properties on the controller provide text that fills the name and organization fields. Although you can populate these fields with data via the record, the options do not transfer to contacts. Therefore, they provide a nice way to prompt the user without side effects.
Set the unknownPersonViewDelegate property and declare the ABUnknownPersonViewControllerDelegate protocol to receive the unknownPersonViewController:didResolveToPerson: method. Called when the user taps Done, this method enables you to recover the record that the data was saved to. It also provides a place in which you can programmatically pop the view controller, knowing that the user has finished interaction with the dialog.
Note
The Monster ID project art used with this recipe consists of a collection of body part art that can be compiled together to form random pictures. It was developed by Andreas Gohr and was inspired by a web post by Don Park and the combinatoric critters. Built up by adding predrawn arms, legs, a body, and so forth, the resulting composite image produces a full creature.
Recipe 9-6. Working with the Unknown Controller
#pragma mark UNKNOWN PERSON DELEGATE
- (void)unknownPersonViewController:
(ABUnknownPersonViewController *)unknownPersonView
didResolveToPerson:(ABRecordRef)person
{
// Handle cancel events
if (!person) return;
ABPersonViewController *abpvc =
[[ABPersonViewController alloc] init];
abpvc.displayedPerson = person;
abpvc.allowsEditing = YES;
abpvc.personViewDelegate = self;
[self.navigationController
pushViewController:abpvc animated:YES];
}
#pragma mark PERSON DELEGATE
- (BOOL)personViewController:
(ABPersonViewController *)personViewController
shouldPerformDefaultActionForPerson:(ABRecordRef)person
property:(ABPropertyID)property
identifier:(ABMultiValueIdentifier)identifierForValue
{
return NO;
}
- (BOOL)unknownPersonViewController:
(ABUnknownPersonViewController *)personViewController
shouldPerformDefaultActionForPerson:(ABRecordRef)person
property:(ABPropertyID)property
identifier:(ABMultiValueIdentifier)identifier
{
return YES;
}
#pragma mark Action
- (void) assignAvatar
{
ABUnknownPersonViewController *upvc =
[[ABUnknownPersonViewController alloc] init];
upvc.unknownPersonViewDelegate = self;
ABContact *contact = [ABContact contact];
contact.image = imageView.image;
upvc.allowsActions = NO;
upvc.allowsAddingToAddressBook = YES;
upvc.message = @"Who looks like this?";
upvc.displayedPerson = contact.record;
[self.navigationController pushViewController:upvc animated:YES];
}
Get This Recipe’s Code
To find this recipe’s full sample project, point your browser to https://github.com/erica/iOS-6-Advanced-Cookbook and go to the folder for Chapter 9.
Summary
This chapter introduced Address Book core functionality for both the AddressBook and AddressBookUI frameworks. You’ve read about how these work in this heavily technical chapter. After all that work, here are a few final thoughts about the frameworks you just encountered:
• Although useful, the low-level Address Book functions can prove frustrating to work with directly. The various helper classes that accompany this chapter may help make your life easier. All the wrappers have been updated for iOS 6 and its user-permission challenges.
• Accessing and modifying an Address Book image works like any other field. Supply image data instead of strings, dates, or multivalue arrays. Don’t hesitate to use image data in your contacts applications.
• The view controllers provided by the AddressBookUI framework work seamlessly with the underlying AddressBook routines. There’s no need to roll your own GUIs for most common Address Book interaction tasks.
• Do you work with Vcards? The AddressBook framework provides two Vcard-specific functions that enable you to create Vcard data from an array of records (ABPersonCreateVCardRepresentationWithPeople()) and transform Vcard data into ABRecordRefs (ABPersonCreatePeopleInSourceWithVCardRepresentation ()).
• The unknown person controller provides a great way to store specific information (such as a company’s e-mail address, an important Web site, and so on) into a contact while allowing user discretion for where (or whether) to place that information.