14. Using Google Chrome Safely and Securely
In this chapter, you find out why Chromebooks are more safe and secure than traditional computers—and how to make them even safer.
Many users are embracing Chromebooks because of security issues. That is, using a Chromebook with web-based storage is safer and more secure than using a traditional PC with local storage. You don’t have to worry about computer viruses, spyware, and such; you don’t even have to worry about someone hacking into your computer and stealing your data.
This security inherent in the Chrome model is great, but there are things you can do to make your Chromebook even more safe and secure. It’s a matter of practicing safe computing—and knowing all your options.
Cloud Computing and Data Security
With Chrome OS, all your data is stored in the cloud; nothing is stored on your Chromebook. That makes for a uniquely secure computer system.
Unlike traditional desktop computing, where a hard disk crash can destroy all your valuable data, if your Chromebook crashes, it doesn’t affect the storage of your data; all your data is still out there in the cloud, still accessible. In a world where few personal computer users back up their data on a regular basis, cloud computing is the ultimate in data-safe computing.
With cloud computing, all the important stuff is in the cloud, not on your computer. For example, it really doesn’t matter if someone steals your Chromebook. (Other than the inconvenience, that is.) All a thief would get is a piece of hardware, but no personal data; that data remains in the cloud, accessible only by you, but from any computer.
Corporate information technology (IT) departments love this degree of data security. Cloud data is less likely to be stolen than data on a computer’s hard drive. Because most Chromebooks don’t even have a hard drive, what’s to steal?
Chrome OS and Malware
Here’s something else that makes the lack of local storage a good thing. Because your Chromebook can’t download, store, or run traditional applications, that also means it can’t download malware. At all.
With a Chromebook, unlike any other form of personal computer, there’s absolutely zero chance you’ll run into computer viruses, spyware, and the like. Apple may talk about having less malware than Windows, but you can still hack into the Mac OS. You simply can’t hack into Chrome OS; there’s nothing on your Chromebook to infect.
So with a Chromebook, you don’t have to do any of the following:
• Install an antivirus program
• Install an anti-spyware program
• Install a firewall program
None of these items is necessary with a Chromebook because most Chromebook can’t download and run malware programs. In fact, most Chromebooks can’t download executable programs of any type, so you’re extremely safe from this sort of attack. There are no viruses, spyware, or other infiltrations possible with the Chrome OS.
Bottom line: There’s no safer computer out there than a Chromebook.
Protecting Against Phishing
Although Chrome OS and your Chromebook are, by design, virtually invulnerable to malware-based attacks, there’s still the issue of those intrusions that depend on the human element to succeed. That is, when it comes to online scams, your Chromebook can’t protect you from yourself.
One of the most common forms of online scams involves something called phishing, where a fraudster tries to extract valuable information from you via a series of fake email messages and websites.
Most phishing scams start with an email message. A phishing email is designed to look like an official email, but is in reality a clever forgery, down to the use of the original firm’s logo. The goal of the email is to get you to click an enclosed link that purports to take you to an “official” website. That website, however, is also fake. Any information you provide to that website is then used for various types of fraud, from simple user name/password theft to credit card and identity theft.
For example, one common phishing scam starts with an email message that looks like it came from your bank. It’s a very official-looking email, complete with the bank’s logo, and it alerts you to a potential problem with your account. You’re urged to click the link in the email to log into your account on the bank’s website to correct the problem.
The thing is, the email itself is fraudulent, as is the site you link to. Oh, the site looks like your bank’s site, but it isn’t. So when you enter your username and password, or maybe even your account number, that information goes directly to the criminals behind the scam. Said criminals now have everything they need to log into your bank account and withdraw your funds into their hands. You’ve been scammed.
As I said, there’s little Google can do to protect you from yourself; the best defense against phishing scams is simple common sense. That is, you should never click through a link in an email message that asks for any type of personal information—whether that be your bank account number or eBay password or whatever. Even if the email looks official, it probably isn’t; legitimate institutions and websites never include this kind of link in their official messages. If you don’t click to the phishing site, you’re safe.
That said, a lot of people do click the links found in phishing emails, and proceed to fraudulent websites. Because these phishing sites are designed to look like official sites, it’s often difficult to tell a fraudulent site from the real thing.
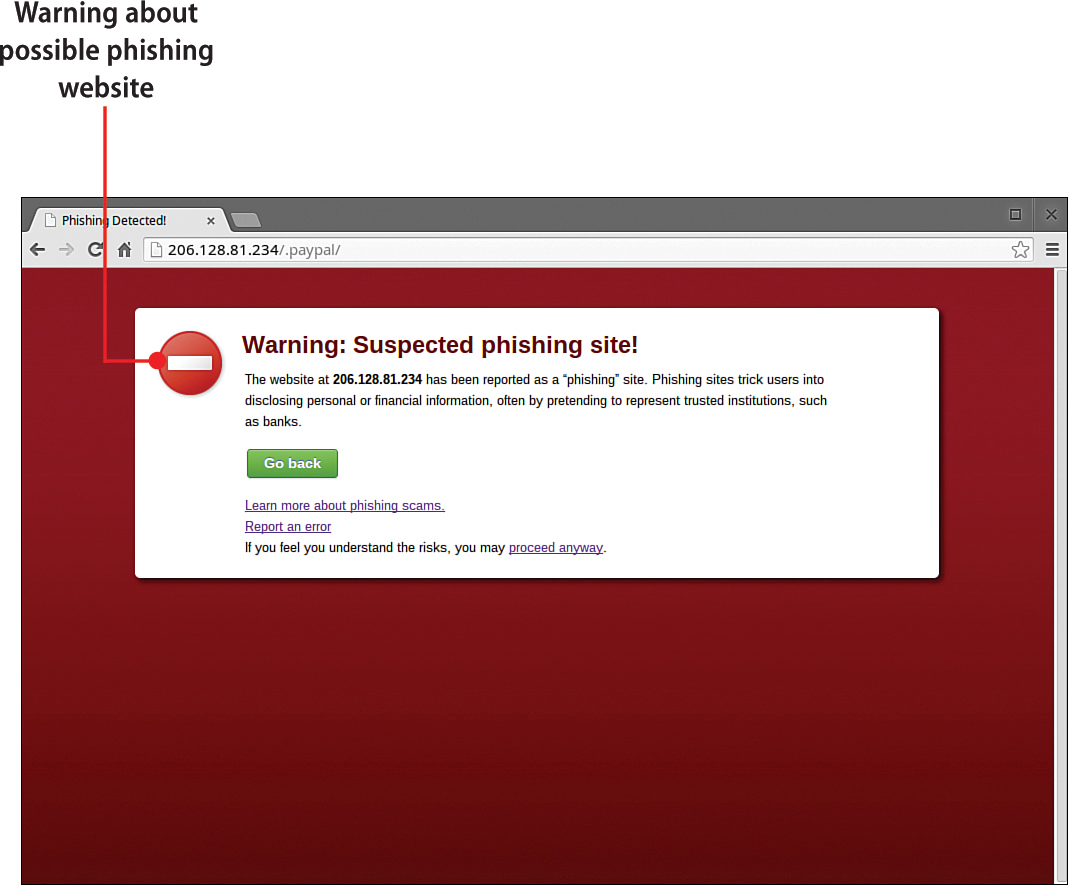
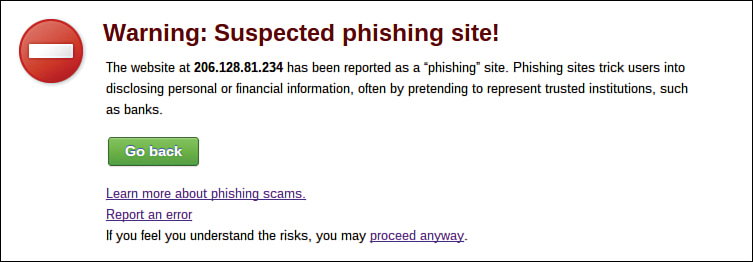
Fortunately, Google Chrome includes anti-phishing technology that can detect most phishing websites. If you navigate to a known phishing website, Chrome displays a warning message instead of the suspect web page. When you see this warning message in the Chrome browser, navigate away from the troublesome web page as quickly as possible.
Practicing Safe Computing
As noted, Chrome includes some built-in safeguards, as well as the general benefit that comes from having limited local storage, that protects you from malware and other automated forms of computer attack. But malware isn’t the only danger lurking online; you also need to defend against identity theft, cyberstalkers, and threats to your children online.
Protecting Your Personal Data
Identity thieves look to steal your personal data and then use it for their own nefarious benefit—typically by siphoning funds from your bank or credit card accounts. Fortunately, there are several steps you can take to keep your personal data safe online, including the following:
• Always use passwords. Make sure your Google Account has a strong password, and that every user of your Chromebook has his or her own Google Account. Don’t let other users log on using your account; if you do so, they can access your files and programs, and maybe even your passwords to various sites. Restricting each user to his or her own password-protected user account puts a strong layer of protection between your data and potential thieves.
• Create strong passwords. Speaking of passwords, it’s important that you use passwords whenever possible; do not leave any important account not password-protected. It’s also important to create strong and hard-to-guess passwords; don’t use common identifiers, such as your birth date or the last four digits of your Social Security number. Create as long a password as you can, using a mix of letters and numbers. Make the password as nonsensical as you can while still being able to remember it; it should not be a simple password to guess. And, to make an even stronger password, increase the length of the password; eight characters is better than six, and way better than four. You should also use a combination of letters, numbers, and special characters (!@#$%). Avoid using real words you might find in a typical dictionary; any standard dictionary cracker will crack that password faster than it takes you to type it. Also, don’t use easily guessed words, like your middle name or your wife’s maiden name or the name of your dog or cat. Better to use nonsense words, or random combinations or letters and numbers—anything that won’t be found in a dictionary.
• Never share passwords. It’s important to remember that your passwords should never be shared—with anyone. As blatantly obvious as that sounds, many people feel no compunction about providing others with their passwords, for whatever reason. This is a huge security risk; your password is yours and yours alone, and should never be shared or compromised.
• Don’t click unsolicited links. As noted previously, you should never click links sent to you via email or instant messaging, if they’re sent from someone you know; some Windows and Mac-based viruses hijack other users’ email programs and replicate themselves via bulk email mailings.
• Avoid entering personal information. To better protect yourself against identity theft, you need to browse smartly and securely. It’s all too easy to send personal information over the Web; if you do so cavalierly, your data could eventually end up in the hands of ID thieves. For this reason, you want to avoid entering personal information into web forms on sites with which you’re not familiar. And, when shopping or providing personal information online, look for the “lock” icon on Chrome’s status bar; this ensures that information is sent and received in a secure fashion.
Avoiding Cyberstalkers
You also need to protect yourself against individuals who may stalk you or your family online. These so-called cyberstalkers and cyberbullies may follow you on social networks and message forums, taunting you and leaving threatening or obscene messages. The best way to protect against cyberstalkers is to, as much as possible, hide your identity online. If the cyberstalker doesn’t know who you are, he can’t stalk you.
To help create a safe and relatively anonymous identity online, here are some preventative measures you should take:
• Don’t share personal information online—especially with strangers in chat rooms, message forums, and social networks.
• Don’t fill out public profiles on websites, blogs, and social networks—or if you do, make sure the profile doesn’t contain any personal information about you (your real name, location, phone number, and so on).
• Use a gender-neutral screen name and email address.
• Avoid making a provocative statement with your screen name and email address; don’t deliberately invite controversy.
• Don’t flirt with other users online; avoid sexually suggestive comments.
• Don’t start arguments online; don’t flame other users.
Protecting Your Children Online
It’s one thing to protect yourself from cyberstalkers; you also need to protect your children from online predators. Unfortunately, you can’t control what your children do 24/7; you have to give them some autonomy, and with that autonomy comes the freedom to make bad decisions.
That said, there are some steps you can take to protect your children online. Here are some of the most effective things you can do:
• Take an interest in your children’s online pals, just as you (should) do with friends that your kids bring home to visit.
• Talk to your children about the dangers of getting together with someone they meet online.
• Provide your children with online pseudonyms, so they don’t have to use their real names online. Their online screen names should be neutral in terms of revealing gender or age.
• Forbid your children to physically meet anyone they talk to online. (This includes talking to them on the phone.)
• If you do allow your children to set up a real-world meeting, accompany them to the meeting and introduce yourself to the new friend.
• Make sure your children know that people aren’t always who they pretend to be online; explain that some people view online chatting as a kind of game, where they can assume different identities.
• Set reasonable rules and guidelines for your kids’ computer use; consider limiting the number of minutes/hours they can spend online each day.
• Monitor your children’s Internet activities; ask them to keep a log of all websites they visit; oversee any chat and instant messaging sessions they participate in; check out any files they download; even consider sharing an email account (especially with younger children) so that you can oversee their messages.
• Instruct your children not to respond to messages that are suggestive, obscene, belligerent, or threatening, or that make them feel uncomfortable in any way; encourage your children to tell you if they receive any such messages, and then report the senders to your ISP.
• Don’t let your children send pictures of themselves over the Internet; don’t let them receive pictures from others. The same goes for posting personal photos on Facebook and other social networks; younger children, especially, should be discouraged from doing this.
• Caution your children about providing personal information (including passwords!) to strangers.
• Discourage your children from posting their phone numbers and other personal information on their Facebook and Twitter accounts.
• Instruct your children to only add people as Facebook friends and Twitter followers whom they know in real life; they should reject friend requests from total strangers.
• On any social networking site, set your children’s privacy settings so that people can only be added as a friend if your child approves it, and so that people can only view your child’s profile if they have been approved as a friend.
• As much as your children won’t like it, you should occasionally check out their Facebook and Twitter feeds; look not only for any personal information they may have posted online, but also for signs of inappropriate or suspicious behavior.
• Teach your children not to respond if they receive offensive or suggestive email or instant messages.
• Use the Internet with your children; make going online a family activity.
• Consider moving the Chromebook your children use into a public room (such as a living room or den), rather than a private bedroom.
• If you think that one of your children, or one of your children’s friends, is in any danger, immediately contact the authorities.
Above all, teach your children that Internet access is not a right; it should be a privilege earned by your children, and kept only when their use of it matches your expectations.
Configuring Chrome’s Privacy and Security Settings
Your Chromebook includes several settings you can use to increase your online privacy and offline security.
Don’t Save Passwords
By default, Chrome offers to save the passwords you use to log onto various websites. However, if another user logs onto your Chromebook using your Google Account, that person can access these password-protected sites without your knowledge or permission. It’s safer, then, to not have Chrome save passwords.
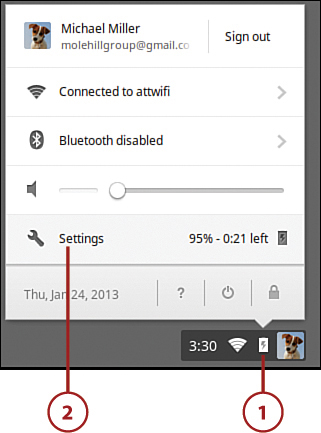
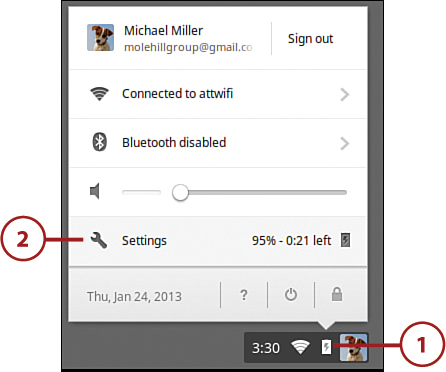
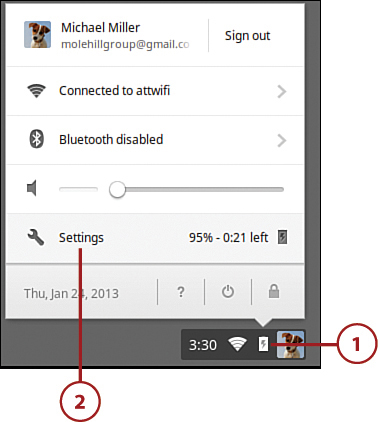
1. Click anywhere in the status area to display the Settings panel.
2. Click Settings to display the Settings page.
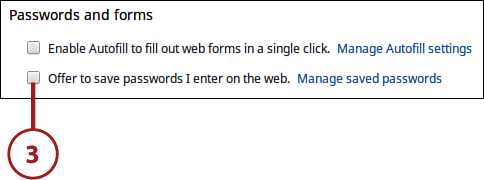
3. Click Show Advanced Settings and then go to the Passwords and Forms section and uncheck the Offer to Save Passwords I Enter on the Web option.
Don’t Use Autofill
Similarly, Chrome’s Autofill feature automatically saves the personal data you enter into web forms for later automatic entry. If you want to be sure that other unauthorized users don’t have access to this web form data, you need to turn off the Autofill feature.
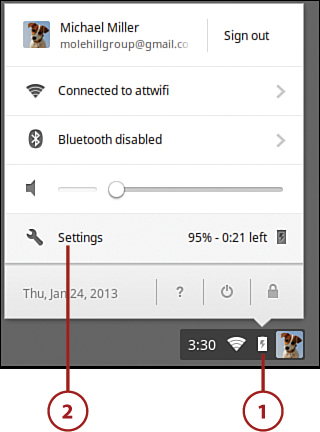
1. Click anywhere in the status area to display the Settings panel.
2. Click Settings to display the Settings page.
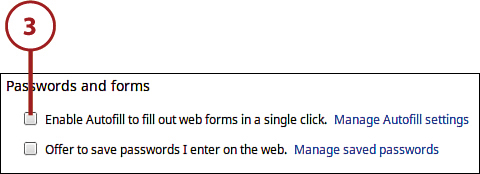
3. Click Show Advanced Settings and then go to the Passwords and Forms section and uncheck the Enable Autofill to Fill Out Web Forms in a Single Click option.
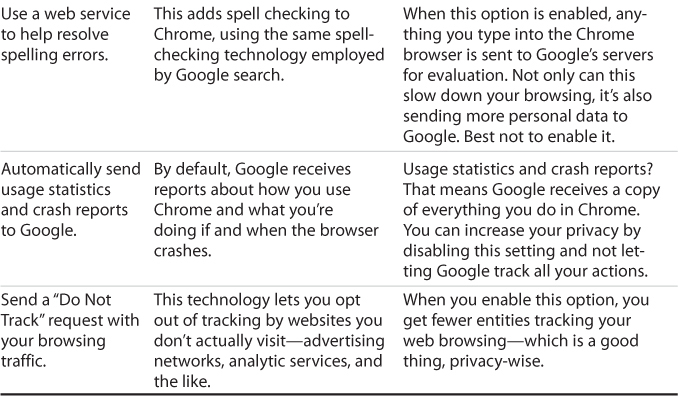
Configure Privacy Settings
Chrome OS includes a bevy of small but important privacy settings you can configure to increase your online privacy, which are detailed in the following table.
Google Chrome Privacy Settings

1. Click anywhere in the status area to display the Settings panel.
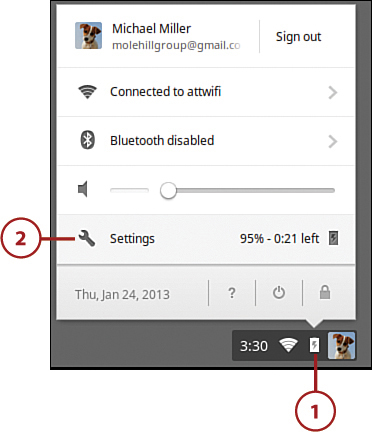
2. Click Settings to display the Settings page.
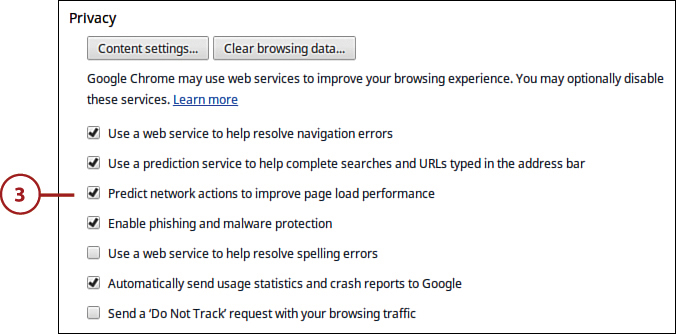
3. Click Show Advanced Settings and then go to the Privacy section and uncheck any settings you don’t want to use.
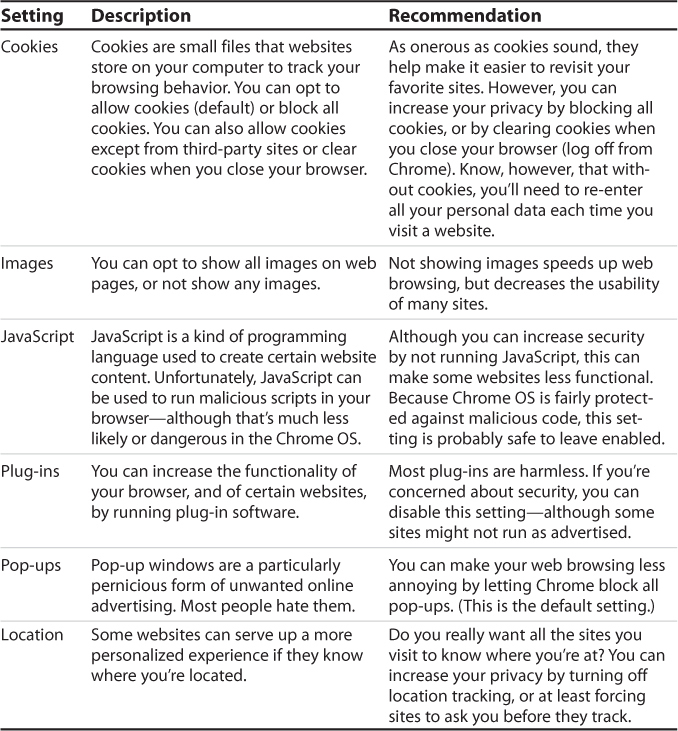
Configure Content Settings
Chrome also includes a half-dozen settings that determine what content is displayed in the browser. The following table details these settings.
1. Click anywhere in the status area to display the Settings panel.
2. Click Settings to display the Settings page.
3. Click Show Advanced Settings and then go to the Privacy section and click the Content Settings button.

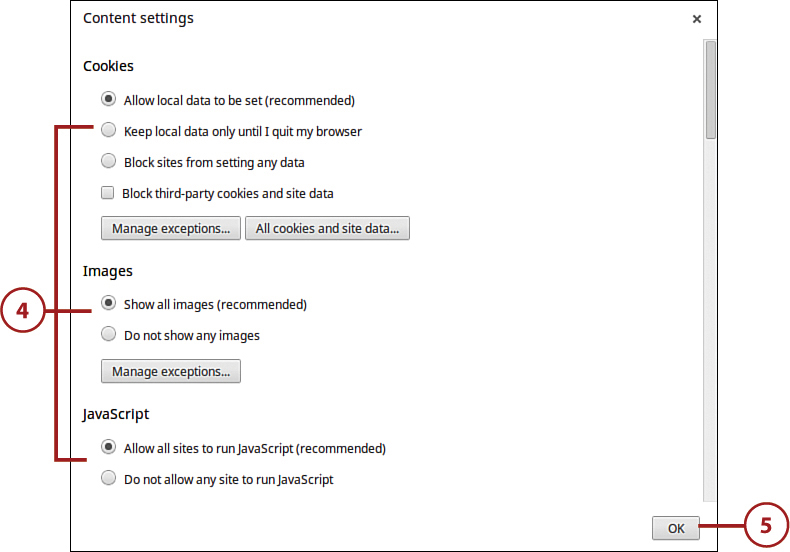
4. When the Content Settings page appears, select or deselect the desired settings.
5. Click OK.
Clear Browsing Data
If you want to cover your tracks, as it were, you can clear the data that Chrome keeps about your browsing history. In particular, you can do the following:
• Clear browsing history
• Clear download history
• Empty the cache
• Delete cookies and other site data
• Clear saved passwords
• Clear saved Autofill form data
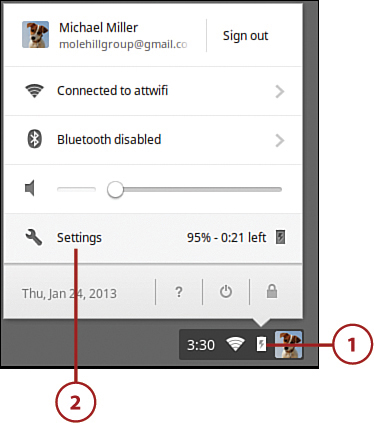
1. Click anywhere in the status area to display the Settings panel.
2. Click Settings to display the Settings page.
3. Click Show Advanced Settings and then go to the Privacy section and click the Clear Browsing Data button.

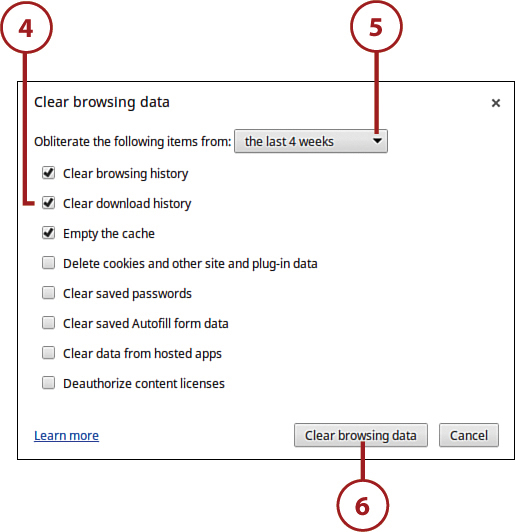
4. When the Clear Browsing Data dialog box appears, check those items you want to clear or delete.
5. Pull down the list and select how much data (for how long) you want to clear.
6. Click the Clear Browsing Data button.
Restrict Sign-In
There’s one last setting you should consider. By default, anyone with a Google Account can log into your Chromebook and then into their own personal data and settings. You might not want just anyone to use your Chromebook, however; to that end, you (as your Chromebook’s owner) can limit use to only those people you pre select.
1. Click anywhere in the status area to display the Settings panel.
2. Click Settings to display the Settings page.
3. Go to the Users section and click the Manage Other Users button.
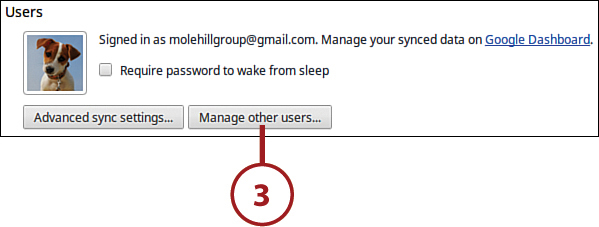
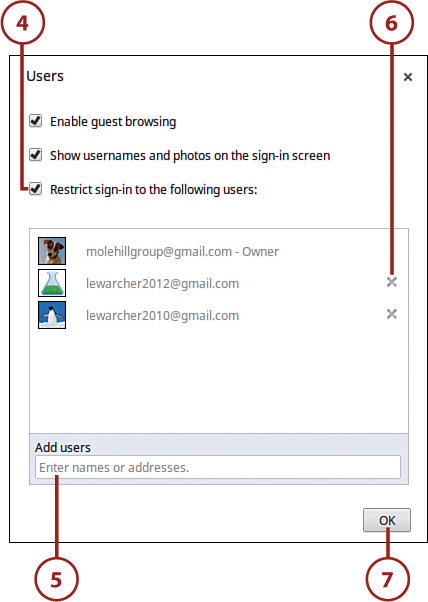
4. Check the Restrict Sign-In to the Following Users option.
5. Enter the email addresses of those people you want to be able to use your Chromebook into the Add Users box and then press Enter.
6. To remove someone from the approved user list, click the X next to his or her name.
7. Click the OK button.