Hour 19. Working with Rich Media
,What You’ll Learn in This Hour:
![]() How to play full-motion video from local or remote (streaming) files
How to play full-motion video from local or remote (streaming) files
![]() Ways of recording and playing back audio files on your iDevice
Ways of recording and playing back audio files on your iDevice
![]() How to access the built-in music library from within your applications
How to access the built-in music library from within your applications
![]() How to display and access images from the built-in photo library or camera
How to display and access images from the built-in photo library or camera
![]() The use of Core Image filters to easily manipulate images
The use of Core Image filters to easily manipulate images
![]() Methods of retrieving and displaying information about currently playing media items
Methods of retrieving and displaying information about currently playing media items
Each year, new iPads and iPhones come out, and each year I find myself standing in line to snatch them up. Is it the new amazing features? Not so much. In fact, my primary motivation is to keep expanding my storage space to keep up with an ever-growing media library. Sounds, podcasts, movies, TV shows—I keep them all on my iDevices. When the original 8GB iPhone came out, I assumed that I’d never run out of space. Today, I’m anxiously awaiting my 128GB iPad Air.
There’s no denying that iOS is a compelling platform for rich media playback. To make things even better, Apple provides a dizzying array of Cocoa classes that will help you add media to your own applications—everything from video, to photos, to audio recording. This hour’s lesson walks you through a few different features that you may want to consider, including in your development efforts.
Exploring Rich Media
Hour 10, “Getting the User’s Attention,” introduced you to System Sound Services for playing back short (30-second) sound files. This is great for alert sounds and similar applications, but it hardly taps the potential of iOS. This hour takes things a bit further, giving you full playback capabilities, and even audio recording, within your own applications.
In this hour, we use three new frameworks: Media Player, AV Foundation, and Core Image. These frameworks encompass more than a dozen new classes. Although we cannot cover everything in this hour, you will get a good idea of what’s possible and how to get started.
In addition to these frameworks, we introduce the UIImagePickerController class. You can add this simple object to your applications to allow access to the photo library or camera from within your application.
Caution: Do as Appropriate, Not as I Do!
As I discuss these frameworks and classes, I provide code snippets that demonstrate their use. To keep the code as straightforward as possible, I treat everything as a variable within a method rather than a property or instance variable. In a production implementation, however, chances are, many of the objects I create would best be defined as instance variables or properties. You’ll see this in the tutorial, but not in the tiny snippets of code used to describe a feature.
Media Player Framework
The Media Player framework is used for playing back video and audio from either local or remote resources. It can be used to call up a modal iPod interface from your application, select songs, and manage playback. This is the framework that provides integration with all the built-in media features that your device has to offer. We use five different classes in our tutorial later in this hour:
![]() MPMoviePlayerController: Allows playback of a piece of media, either located on the file system or through a remote URL. The player controller can provide a GUI for scrubbing through video, pausing, fast forwarding, rewinding, or sending to AirPlay.
MPMoviePlayerController: Allows playback of a piece of media, either located on the file system or through a remote URL. The player controller can provide a GUI for scrubbing through video, pausing, fast forwarding, rewinding, or sending to AirPlay.
![]() MPMediaPickerController: Presents the user with an interface for choosing media to play. You can filter the files displayed by the media picker or allow selection of any file from the media library.
MPMediaPickerController: Presents the user with an interface for choosing media to play. You can filter the files displayed by the media picker or allow selection of any file from the media library.
![]() MPMediaItem: A single piece of media, such as a song.
MPMediaItem: A single piece of media, such as a song.
![]() MPMediaItemCollection: Represents a collection of media items that will be used for playback. An instance of
MPMediaItemCollection: Represents a collection of media items that will be used for playback. An instance of MPMediaPickerController returns an instance of MPMediaItemCollection that can be used directly with the next class—the music player controller.
![]() MPMusicPlayerController: Handles the playback of media items and media item collections. Unlike the movie player controller, the music player works “behind the scenes”—allowing playback from anywhere in your application, regardless of what is displayed on the screen.
MPMusicPlayerController: Handles the playback of media items and media item collections. Unlike the movie player controller, the music player works “behind the scenes”—allowing playback from anywhere in your application, regardless of what is displayed on the screen.
To use any of the media player functionality, your project must include the Media Player framework. Because it is a system framework and can be imported as a module, this is simply the following:
@import MediaPlayer;
This prepares your application for a wide variety of media playback functions. Let’s take a look at a few simple use cases for these media player classes.
Using the Movie Player
The MPMoviePlayerController class is used to present a movie file for playback. It can display video in both fullscreen and embedded views—and toggle between them with a simple method. It can also be used to enable AirPlay playback of any video that it is displaying.
To make use of the movie player, you declare and initialize an instance of the MPMoviePlayerController, typically using the initWithContentURL method to provide it with a file or URL where it can find a video.
For example, to create a movie player that will play a file named movie.m4v located inside my application, I could use the following:
NSString *movieFile = [[NSBundle mainBundle]
pathForResource:@"movie" ofType:@"m4v"];
MPMoviePlayerController *moviePlayer = [[MPMoviePlayerController alloc]
initWithContentURL:
[NSURL fileURLWithPath: movieFile]];
Adding AirPlay support is as simple as setting the movie player object’s allowsAirPlay property to true:
moviePlayer.allowsAirPlay=YES;
To choose where the movie player is added to your screen, you must use the CGRectMake function to define a rectangle that it will occupy and then add the movie player to your view. Recall that the CGRectMake takes four values: x, y coordinates followed by a width and height in points. For example, to set the display of the movie player to a location of 50 points over and 50 points down (x,y) with a width of 100 points and a height of 75 points, I could use the following:
[moviePlayer.view setFrame:CGRectMake(50.0, 50.0, 100.0, 75.0)];
[self.view addSubview:moviePlayer.view];
To transition to a fullscreen view, use the setFullscreen:animated method:
[moviePlayer setFullscreen:YES animated:YES];
Finally, to initiate playback, just send the play message to the movie player instance:
[moviePlayer play];
To pause playback, you can use the pause message, or to stop it altogether, the stop message.
Which Formats Are Supported?
![]() AAC (16Kbps to 320Kbps)
AAC (16Kbps to 320Kbps)
![]() AIFF
AIFF
![]() AAC Protected (MP4 from iTunes Store)
AAC Protected (MP4 from iTunes Store)
![]() MP3 (16Kbps to 320Kbps)
MP3 (16Kbps to 320Kbps)
![]() MP3 VBR
MP3 VBR
![]() Audible (formats 2–4)
Audible (formats 2–4)
![]() Apple Lossless
Apple Lossless
Handling Movie Player Completion
When the movie player finishes playing a file, it’s possible that we will need to do a bit of cleanup—including removing the media player from our view. To do this, we use the NSNotificationCenter class to register an “observer” that will watch for a specific notification message from the moviePlayer object and then call a method of our choosing when it receives the notification. For example:
[[NSNotificationCenter defaultCenter]
addObserver:self
selector:@selector(playMovieFinished:)
name:MPMoviePlayerPlaybackDidFinishNotification
object:moviePlayer];
This statement adds an observer to our class that will watch for an event with the name MPMoviePlayerPlaybackDidFinishNotification. When it sees that event, it calls the method playMovieFinished.
In the implementation of playMovieFinished, we must remove the notification observer (because we’re done waiting for a notification) and then perform any additional cleanup, such as removing the movie player from a view. Listing 19.1 shows an implementation example.
LISTING 19.1 Handling the Notification of Playback Completion
-(void)playMovieFinished:(NSNotification*)theNotification
{
MPMoviePlayerController *moviePlayer=[theNotification object];
[[NSNotificationCenter defaultCenter]
removeObserver:self
name:MPMoviePlayerPlaybackDidFinishNotification
object:moviePlayer];
[moviePlayer.view removeFromSuperview];
}
Note that we can retrieve a reference to the movie player using [theNotification object]. This gives us a simple way to reference the object that registered for a notification (in this case, the movie player).
Using the Media Picker
When Apple opened iOS for development, it didn’t initially provide a method for accessing the iOS music library. This led to applications implementing their own libraries for background music and a less-than-ideal experience for the end user. Thankfully, this restriction is now a thing of the past.
To program a full music-playback function into your application, you need to implement a media picker controller (MPMediaPickerController) for choosing your media, along with a music player controller (MPMusicPlayerController) for playing it back.
The MPMediaPickerController class displays an interface for choosing media files from a user’s device. The initWithMediaTypes method initializes the media picker and filters the files that are available to the user in the picker.
Before the media picker is displayed, we can tweak its behavior by setting the prompt property to a string that is displayed to the user when choosing media and enable or disable multiple pieces of media from being returned with the allowsPickingMultipleItems property.
The object’s delegate property will also need to be set so that the application can react appropriately when a choice is made—more on that in a minute. Once configured, the media picker is displayed with the presentViewController:animated:completion method. Listing 19.2 displays the setup and display of a typical media picker.
LISTING 19.2 Typical Setup and Display of a Media Picker
MPMediaPickerController *mediaPicker;
mediaPicker = [[MPMediaPickerController alloc]
initWithMediaTypes: MPMediaTypeMusic];
mediaPicker.prompt = @"Choose Songs";
mediaPicker.allowsPickingMultipleItems = YES;
mediaPicker.delegate = self;
[self presentViewController:mediaPicker animated:YES completion:nil];
Notice in this sample code that the value we provide for initWithMediaTypes is MPMediaTypeMusic. This is one of several types of filters that you can apply to the media picker, including the following:
![]() MPMediaTypeMusic: The music library
MPMediaTypeMusic: The music library
![]() MPMediaTypePodcast: Podcasts
MPMediaTypePodcast: Podcasts
![]() MPMediaTypeAudioBook: Audio books
MPMediaTypeAudioBook: Audio books
![]() MPMediaTypeAnyAudio: Any type of audio file
MPMediaTypeAnyAudio: Any type of audio file
When the media picker is displayed and songs are chosen (or not), that’s where the delegate comes in. By conforming to the MPMediaPickerControllerDelegate protocol and implementing two new methods, we can handle the cases where a user has chosen media or canceled his selection entirely.
The Media Picker Controller Delegate
When a user displays the media picker and makes a selection, we need to do something—what that is, exactly, depends on conforming to the delegate protocol and implementation of two delegate methods. The first, mediaPickerDidCancel, is called if the user taps the Cancel button in the middle of choosing his media. The second, mediaPicker:didPickMediaItems, is invoked if the user made a valid selection from his media library.
In the case of a cancellation, a proper response is just to dismiss the view. Nothing was chosen, so there’s nothing else to do, as shown in Listing 19.3.
LISTING 19.3 Handling the Cancellation of a Media Selection
- (void)mediaPickerDidCancel:(MPMediaPickerController *)mediaPicker {
[self dismissViewControllerAnimated:YES completion:nil];
}
When media is selected, however, it is returned to the mediaPicker:didPickMediaItems delegate method by way of an instance of the class MPMediaItemCollection. This object contains a reference to all the chosen media items and can be used to queue up the songs in a music player. We haven’t yet seen the music player object, so we’ll come back to the handling of the MPMediaItemCollection shortly. In addition to providing the media item collection, this method should dismiss the view controller, because the user has finished making his selection. Listing 19.4 shows the beginnings of the method for handling media selection.
LISTING 19.4 Handling the Selection of Media Items
- (void)mediaPicker: (MPMediaPickerController *)mediaPicker
didPickMediaItems:(MPMediaItemCollection *)mediaItemCollection {
// Do something with the media item collection here
[self dismissViewControllerAnimated:YES completion:nil];
}
That’s it for the delegate methods. We can now configure and display a media picker, handle a user canceling the media selection, and receive a MPMediaItemCollection if the user decides to choose something. Now let’s explore how to actually do something with that media collection.
Using the Music Player
Using the music player controller class (MPMusicPlayerController) is similar to using the movie player—but there are no onscreen controls, nor do you need to allocate or initialize the controller. Instead, you simply declare it, and then you choose whether it should be a controller that integrates with the iPod functionality or if it is localized to the application:
MPMusicPlayerController *musicPlayer;
musicPlayer=[MPMusicPlayerController iPodMusicPlayer];
Here, I’ve created an iPodMusicPlayer, which means that the songs I queue and the playback controls affect the system-level iPod controls. Had I chosen to create an applicationMusicPlayer, nothing I might do in my application would have any effect on the iPod playback outside of the program.
Next, to get audio into the player, I can use its method setQueueWithItemCollection. This is where the media item collection that was returned by the media picker comes in handy. We can use that collection to queue up the songs in the music player:
[musicPlayer setQueueWithItemCollection: mediaItemCollection];
After the media is queued in the player, we can control playback by sending the player messages such as play, stop, skipToNextItem, and skipToPreviousItem:
[musicPlayer play];
To verify that the music player is playing audio, we can check its playbackState property. The playbackState indicates what operation the player is currently performing. For example:
![]() MPMusicPlaybackStateStopped: Audio playback has been stopped.
MPMusicPlaybackStateStopped: Audio playback has been stopped.
![]() MPMusicPlaybackStatePlaying: Audio playback is underway.
MPMusicPlaybackStatePlaying: Audio playback is underway.
![]() MMPMusicPlaybackStatePaused: Audio playback is paused.
MMPMusicPlaybackStatePaused: Audio playback is paused.
In addition, we may want to access the audio file that is currently playing to provide some feedback to the user; we do this through the MPMediaItem class.
Accessing Media Items
A single piece of media in an MPMediaItemCollection is an MPMediaItem. To get the current MPMediaItem being accessed by the player, just reference its nowPlayingItem property:
MPMediaItem *currentSong;
currentSong=musicPlayer.nowPlayingItem;
The MPMediaItem can be used to access all the metadata stored for a media file by using the valueForProperty method, along with one of several predefined property names. For example, to get the title of the current song, you could use the following:
NSString *songTitle;
songTitle=[currentSong valueForProperty:MPMediaItemPropertyTitle];
Other properties include the following:
![]() MPMediaItemPropertyArtist: The artist of the media item
MPMediaItemPropertyArtist: The artist of the media item
![]() MPMediaItemPropertyGenre: A string representing the genre of the item
MPMediaItemPropertyGenre: A string representing the genre of the item
![]() MPMediaItemPropertyLyrics: The lyrics, if available, for the item
MPMediaItemPropertyLyrics: The lyrics, if available, for the item
![]() MPMediaItemAlbumTitle: The name of the album the media item comes from
MPMediaItemAlbumTitle: The name of the album the media item comes from
These are just a few of the pieces of metadata available. You can even access the artwork, beats per minute (BPM), and other data using similar properties that you’ll find documented in the MPMediaItem class reference.
The Media Player framework provides much more than we can cover in a single hour, let alone part of an hour; so I encourage you to use this as a starting point. You can add an amazing amount of additional functionality to your applications through this framework with only a limited amount of coding involved.
AV Foundation Framework
Although the Media Player framework is great for all your general media playback needs, Apple recommends the AV Foundation framework for most audio playback functions that exceed the 30 seconds allowed by System Sound Services. In addition, the AV Foundation framework offers audio recording features, making it possible to record new sound files directly in your application. This might sound like a complex programming task, but it takes only about four statements to prepare and begin recording to your iDevice.
You need just two new classes to add audio playback and recording to your apps:
![]() AVAudioRecorder: Records audio (in a variety of different formats) to memory or a local file on the device. The recording process can even continue while other functions are running in your application.
AVAudioRecorder: Records audio (in a variety of different formats) to memory or a local file on the device. The recording process can even continue while other functions are running in your application.
![]() AVAudioPlayer: Plays back audio files of any length. Using this class, you can implement game soundtracks or other complex audio applications. You have complete control over the playback, including the ability to layer multiple sounds on top of one another.
AVAudioPlayer: Plays back audio files of any length. Using this class, you can implement game soundtracks or other complex audio applications. You have complete control over the playback, including the ability to layer multiple sounds on top of one another.
To use the AV Foundation framework, you must import the corresponding module:
@import AVFoundation;
Using AV Audio Player
To play back an audio file in AV Audio Player, you follow the same steps as using the movie player described earlier. First, you create an NSURL instance that references a local or remote file, and then you allocate and initialize the player using the AVAudioPlayer method initWith ContentsOfURL:error.
For example, to prepare the audio player to play back a sound file named sound.wav stored inside the current application, we write this:
NSString *soundFile = [[NSBundle mainBundle]
pathForResource:@"mysound" ofType:@"wav"];
AVAudioPlayer *audioPlayer = [[AVAudioPlayer alloc]
initWithContentsOfURL:[NSURL fileURLWithPath: soundFile]
error:nil];
To play the sound, we then send the player the play message:
[audioPlayer play];
Pausing or stopping the playback is just a matter of sending pause or stop. You’ll find additional methods in the class reference for adjusting audio and jumping to specific points within the audio file.
Handling AV Audio Player Completion
If you have a need to react to the condition of your AV Audio Player finishing playing a sound, you can do this by conforming to the AVAudioPlayerDelegate protocol and setting the delegate property for the player to the class that will handle the completion state:
audioPlayer.delegate=self;
Then implement the method audioPlayerDidFinishPlaying:successfully, as shown in the method stub in Listing 19.5.
LISTING 19.5 Handling Playback Completion
- (void)audioPlayerDidFinishPlaying:(AVAudioPlayer *)player
successfully:(BOOL)flag {
// Do something here, if needed.
}
No need to add a notification to the notification center (like the movie player). Just indicate that you’re conforming to the protocol, set the delegate, and implement the method. In many cases, you won’t even need to do this; you’ll just play the file and walk away, so to speak.
Using AV Audio Recorder
For the most part, recording audio in your application is only marginally more difficult than playing it back. In iOS 7, you must signal the intent of your application to record before setting up the recording. This amounts to including a single line prior to setting up the recording:
[[AVAudioSession sharedInstance ] setCategory: AVAudioSessionCategoryPlayAndRecord
error: nil];
To prepare the audio recorder, you must identify a file (NSURL) where you can store the audio, configure the parameters of the sound file to be created (an NSDictionary), and then allocate and initialize an instance of the AVAudioRecorder class with the file and settings.
If you’re recording without the intention of keeping the sound file, you can record to the temp directory. Otherwise, you should target the documents directory. See Hour 15, “Reading and Writing Application Data,” for more details on accessing the file system. Here, I prepare an NSURL that references a file sound.caf in the temp directory:
NSURL *soundFileURL=[NSURL fileURLWithPath:
[NSTemporaryDirectory()
stringByAppendingString:@"sound.caf"]];
Next, I need to create an NSDictionary that contains the settings for my recorded audio:
NSDictionary *soundSetting = @{AVSampleRateKey:@44100.0F,
AVFormatIDKey:@(kAudioFormatMPEG4AAC),
AVNumberOfChannelsKey:@2,
AVEncoderAudioQualityKey:@(AVAudioQualityHigh)
};
This code creates an NSDictionary called soundSetting with keys and values that should be completely obvious, so I’ll just move on. Just kidding. Unless you’re familiar with audio recording, many of these might be pretty foreign sounding. Here’s the 30-second summary:
![]() AVSampleRateKey: The number of audio samples the recorder will take per second.
AVSampleRateKey: The number of audio samples the recorder will take per second.
![]() AVFormatIDKey: The recording format for the audio.
AVFormatIDKey: The recording format for the audio.
![]() AVNumberofChannelsKey: The number of audio channels in the recording. Stereo audio, for example, has two channels.
AVNumberofChannelsKey: The number of audio channels in the recording. Stereo audio, for example, has two channels.
![]() AVEncoderAudioQualityKey: A quality setting for the encoder.
AVEncoderAudioQualityKey: A quality setting for the encoder.
Tip
To learn more about the different settings, what they mean, and what the possible options are, read the AVAudioRecorder Class Reference (scroll to the “Constants” section) in the Xcode Developer Documentation utility.
After getting the sound file and settings ready, we can finally prepare an instance of the AV Recorder by allocating it and initializing it with the initWithURL:settings:error method:
AVAudioRecorder *soundRecorder = [[AVAudioRecorder alloc]
initWithURL: soundFileURL
settings: soundSetting
error: nil];
We’re now ready to record. To record, we send the recorder the record message; to stop, we send stop:
[soundRecorder record];
When recording is complete, we can play back the new sound file using the AV Audio Player.
The Image Picker
The image picker (UIImagePickerController) works like the MPMediaPickerController, but instead of presenting a view where songs can be selected, the user’s photo library is displayed instead. When the user chooses a photo, the image picker hands us a UIImage object based on the user’s selection.
Like the MPMediaPickerController, the image picker is presented within your application modally. The good news is that both of these objects implement their own view and view controller, so there’s very little work that we need to do to get them to display—other than a quick call to presentViewController:animated:completion. On the iPad, the image picker is required to be displayed within a popover, so your code will need to change a bit for this; we cover that in the tutorial project a bit later this hour.
Using the Image Picker
To display the image picker, allocate and initialize an instance of UIImagePickerController, and then set the sourceType to what the user should be allowed to pick from:
![]() UIImagePickerControllerSourceTypeCamera: A picture that will be taken from the device’s camera
UIImagePickerControllerSourceTypeCamera: A picture that will be taken from the device’s camera
![]() UIImagePickerControllerSourceTypePhotoLibrary: A picture chosen from the device’s photo library
UIImagePickerControllerSourceTypePhotoLibrary: A picture chosen from the device’s photo library
![]() UIImagePickerControllerSourceTypeSavedPhotosAlbum: The device’s camera roll
UIImagePickerControllerSourceTypeSavedPhotosAlbum: The device’s camera roll
Next, you want to set the image picker’s delegate; this is the class that will handle doing something when the user picks a photo (or takes a picture) or taps the Cancel button. Finally, the image picker is displayed using the presentViewController:animated:completion method. Listing 19.6 shows a sample setup and display of an image picker that uses the camera as the source.
LISTING 19.6 Setting Up and Displaying the Image Picker
UIImagePickerController *imagePicker;
imagePicker = [UIImagePickerController new];
imagePicker.sourceType=UIImagePickerControllerSourceTypeCamera;
imagePicker.delegate=self;
[self presentViewController:imagePicker animated:YES completion:nil];
Note
You might have encountered instances where you can choose an image and apply filters or scale and crop it before using it. This functionality is “baked into” the image picker. To enable it, set the property allowsEditing to YES on the UIImagePickerController instance.
If you want to determine exactly what sort of camera devices are available on your system, you can test using the UIImagePickerController method isCameraDeviceAvailable, which returns a Boolean value: [UIImagePickerController isCameraDeviceAvailable:<camera type>], where the camera type is UIImagePickerControllerCameraDeviceRear or UIImagePickerControllerCameraDeviceFront.
The UI Image Picker Controller Delegate
To handle the actions of when a user either cancels picking an image or picks one, you must conform your class to the UIImagePickerControllerDelegate protocol and implement the methods imagePickerController:didFinishPickingMediaWithInfo and imagePickerControllerDidCancel.
The first, imagePickerController:didFinishPickingMediaWithInfo, is called automatically when the user makes a selection in the image picker. The method is passed an NSDictionary object that can contain several things: the image itself, an edited version of the image (if cropping/scaling is allowed), or information about the image. We must provide the key value to retrieve the value we want. For example, to get back the chosen image, we use the UIImagePickerControllerOriginalImage key, a UIImage. Listing 19.7 shows a sample implementation that retrieves the selected image and dismisses the image picker.
LISTING 19.7 Handling the Selection of an Image
- (void)imagePickerController:(UIImagePickerController *)picker
didFinishPickingMediaWithInfo:(NSDictionary *)info {
[self dismissViewControllerAnimated:YES completion:nil];
UIImage *chosenImage=
info[UIImagePickerControllerOriginalImage];
// Do something with the image here
}
Tip
To learn more about the data that can be returned by the image picker, read the UIImagePicker ControllerDelegate Protocol Reference within the Apple developer documentation.
In the second delegate method, we react to the user canceling the image selection and get rid of the image picker view. Listing 19.8 shows an implementation example.
LISTING 19.8 Handling the Cancellation of an Image Selection
- (void)imagePickerControllerDidCancel:(UIImagePickerController *)picker {
[self dismissViewControllerAnimated:YES completion:nil];
}
As you can see, there’s more than a little similarity to the media picker controller; once you get the hang of one, using the other will be a piece of cake.
Caution: Using an Image Picker? Conform to the Navigation Controller Delegate
The navigation controller delegate (UINavigationControllerDelegate) is required whenever you use an image picker. The good news is that you won’t need to implement any additional methods for it—just a reference in your interface file.
Caution: Popover Enforced on iPad
If you are building your application for the iPad, you’ll need to display the media picker via a popover, as described in Hour 11, “Implementing Multiple Scenes and Popovers” (and in this hour’s tutorial). If you don’t, your application will encounter an error when it attempts to show the picker onscreen.
The Core Image Framework
Core Image provides nondestructive methods for applying filters to images and performing other types of image analysis (including face detection). If you’ve ever wondered how to add fancy image effects to an application without needing to understand the complex math behind image manipulation, Core Image can be your best friend.
To use Core Image in your application, import the corresponding module:
@import CoreImage;
Using Core Image Filters
To get a feel of how Core Image works, let’s examine its use to apply a “sepia tone” image filter (CIFilter) to an image in your application. Core Image defines a new “nondestructive” image type of CIImage, but we’ve been dealing exclusively with UIImages (often within UIImageViews) to this point. No worries—converting between these two types is not difficult. For example, assume we have an image view called myImageView. To access its underlying UIImage and create a new CIImage called imageToFilter that we can manipulate, we could write the following:
CIImage *imageToFilter=[[CIImage alloc] initWithImage:myImageView.image];
To apply a filter, we must know the name of a filter and the names of the parameters that it requires. For example, the Core Image sepia tone filter is named CISepiaTone, and it takes a parameter called inputIntensity that is a number between 1.0 and 0.0. (1.0 is no sepia tone applied.) Armed with that information, we can create a new CIFilter, set its default values, perform any additional configuration, and then pass it the input image (imageToFilter) and get back the result in a new CIImage, as demonstrated in Listing 19.9. This is the process for applying any CIFilter.
LISTING 19.9 Processing a CIImage with a CIFilter
1: CIFilter *activeFilter = [CIFilter filterWithName:@"CISepiaTone"];
2: [activeFilter setDefaults];
3: [activeFilter setValue: @0.5F
4: forKey: @"inputIntensity"];
5: [activeFilter setValue:imageToFilter forKey: @"inputImage"];
6: CIImage *filteredImage=[activeFilter valueForKey: @"outputImage"];
Line 1 declares and returns a new instance of the sepia CIFilter, and line 2 sets its defaults. In line 3, the inputIntensity parameter is configured to an NSNumber floating-point value of 0.5.
Line 5 uses this same method to pass the input image (imageToFilter) to the filter. Line 6 returns the filtered image in filteredImage by accessing the outputImage key from the filter.
The filteredImage object is a CIImage, so chances are, to use it, we need to convert it back to a UIImage. The UIImage class method imageWithCIImage makes this a breeze:
UIImage *myNewImage = [UIImage imageWithCIImage:filteredImage];
The new UIImage, myNewImage, contains the final filtered image with sepia tone applied. To display it in a UIImageView, you can just set the UIImageView’s image property to the new image.
Tip
More than a dozen built-in Core Image filters are available for use in your applications. To learn the names of the filters and the parameters they require, be sure to read the developer document Core Image Filter Reference.
You’ve just learned the basics of working with quite a few of the iOS media frameworks; now it’s time to put them to use in a media sandbox application.
The Media Playground Application
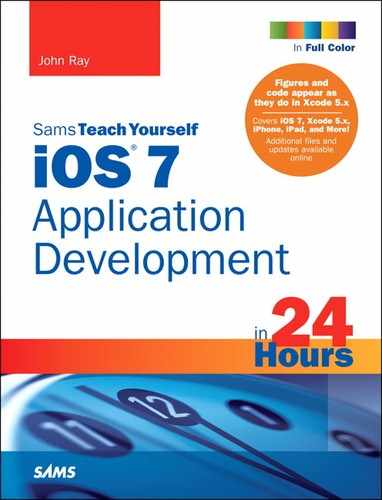
This hour’s exercise is less about creating a real-world application and more about building a sandbox for testing out the rich media classes that we’ve introduced. The finished application shows embedded or fullscreen video, records and plays audio, browses and displays images from the photo library or camera, applies a filter to the images, and browses and selects music from the device’s music library.
Implementation Overview
Because so much is going on in this application, be careful that you don’t miss any of the connections or properties that we will be defining. We start by creating an application skeleton for all the different functionality, and then we fill them in to implement the features we’ve been discussing.
The application has five main components, as follows:
![]() A video player plays an MPEG-4 video file when a button is pressed; fullscreen presentation is controlled by a toggle switch
A video player plays an MPEG-4 video file when a button is pressed; fullscreen presentation is controlled by a toggle switch
![]() We create an audio recorder with playback features.
We create an audio recorder with playback features.
![]() We add a button that shows the photo library or camera and a
We add a button that shows the photo library or camera and a UIImageView that displays the chosen photo. A toggle switch controls the image source.
![]() After an image is chosen, the user will be able to apply a
After an image is chosen, the user will be able to apply a CIFilter to it.
![]() We enable the user to choose songs from the music library and start or pause playback. The title of the currently playing song is displayed onscreen in a label.
We enable the user to choose songs from the music library and start or pause playback. The title of the currently playing song is displayed onscreen in a label.
Setting Up the Project
Begin by creating a new single-view iOS application project in Xcode. Name the new project MediaPlayground. We need to define more than a few frameworks and properties, so follow along closely. If you experience any errors while building the application, it’s likely that an @import statement is missing.
Adding the Media Files
For this tutorial, we need to add two media files to our project: movie.m4v and norecording.wav. The first is used to demo the movie player, and the second is used as a default sound to play in our audio recorder if we haven’t made a recording yet.
Locate the Media folder included in this hour’s project folder, and drag it into your Xcode project code group so that you can access it directly in the application. Be sure to choose to copy the files and choose to create a new group when prompted.
Adding the Frameworks
This application requires that a total of three additional frameworks be added to accommodate media playback (MediaPlayer.framework), sound playback/recording (AVFoundation.framework), and image filtering (CoreImage.framework). Let’s get these out of the way up front by importing the corresponding modules after the existing #import line in ViewController.h:
@import CoreImage;
@import AVFoundation;
@import MediaPlayer;
Planning the Properties and Connections
There’s no way to sugarcoat this: We need a lot of stuff to make this application work. Let’s start with the outlets/variables and then move on to the actions. For the media player, we need an outlet for the toggle switch that enables fullscreen mode: toggleFullScreen. We’ll add a UIView as a placeholder for the media player itself; this is the same trick we used in Hour 17, “Using Advanced Touches and Gestures,” for an image view. This view will be named movieRegion.
We also need a private property for the MPMoviePlayerController instance itself: moviePlayer. This won’t be an outlet because we are creating it in code, not through the Interface Builder (IB) editor.
For the AV Foundation audio recording and playback, we want an outlet for the Record button so that we can toggle its title between record and stop; we’ll name this recordButton. We also want an private property declared for both the audio recorder (AVAudioRecorder) and the audio player (AVAudioPlayer): audioRecorder and audioPlayer, respectively. Again, these do not need to be exposed as outlets, because there is nothing in the user interface (UI) to connect to them.
To implement music playback, we need a reference to a Play Music button that changes between Play and Pause (musicPlayButton) and a label that presents the name of the current track (displayNowPlaying). As with the other players/recorder, we also need a private property for the music player itself: musicPlayer.
For the camera, the toggle switch to enable the camera is connected via toggle Camera. The image view that displays the chosen image will be accessed via a property named displayImageView.
Moving to the actions, we define a total of seven: playMovie, recordAudio, playAudio, chooseImage, applyFilter, chooseMusic, and playMusic. Each is triggered from a similarly named button.
None of this is difficult, but there’s a lot to do. Open the Main.storyboard file and get started.
Designing the Interface
This application has a total of seven buttons (UIButton), two switches (UISwitch), three labels (UILabel), a UIView, and a UIImageView. The UIView acts as a placeholder for an embedded video player that is added programmatically. iPad developers will find this exercise much easier than those on the iPhone; we’re really pushing the limits of what can fit in a view.
Figure 19.1 represents a potential design for the application. Feel free to use this approach with your layout, or modify it to suit your fancy, with a few minor exceptions. Be sure to title the button for recording audio Record Audio and the button for initiating music library playback as Play Music. We’ll be changing those titles programmatically, so it’s important to have a consistent starting point. Finally, make sure that you add a label with the default text No Song Playing at the bottom of the view. This updates with the name of the song the user has chosen to play.
Tip
You might want to consider using the Attributes Inspector (Option-Command-4) to set the UIImageView mode to Aspect Fill or Aspect Scale to make sure that your photos look right within the view.
Creating and Connecting the Outlets and Actions
When finished creating your view, switch to the assistant editor to get ready to start making connections. For your reference, the following list presents the required outlets, and then the actions, from top to bottom in my version of the interface:
![]() The fullscreen toggle for movie playback (UISwitch):
The fullscreen toggle for movie playback (UISwitch): toggleFullscreen
![]() The view acting as a placeholder for the video player (UIView):
The view acting as a placeholder for the video player (UIView): movieRegion
![]() The Record Audio button (UIButton):
The Record Audio button (UIButton): recordButton
![]() The camera toggle switch (UISwitch):
The camera toggle switch (UISwitch): toggleCamera
![]() The image view (UIImageView):
The image view (UIImageView): displayImageView
![]() The Play Music button (UIButton):
The Play Music button (UIButton): musicPlayButton
![]() The default No Song Playing feedback label (UILabel):
The default No Song Playing feedback label (UILabel): displayNowPlaying
The actions:
![]() The Play Movie button (UIButton):
The Play Movie button (UIButton): playMovie
![]() The Record Audio button (UIButton):
The Record Audio button (UIButton): recordAudio
![]() The Play Audio button (UIButton):
The Play Audio button (UIButton): playAudio
![]() The Choose Image button (UIButton):
The Choose Image button (UIButton): chooseImage
![]() The Apply Filter button (UIButton):
The Apply Filter button (UIButton): applyFilter
![]() The Choose Music button (UIButton):
The Choose Music button (UIButton): chooseMusic
![]() The Play Music button (UIButton):
The Play Music button (UIButton): playMusic
Adding the Outlets
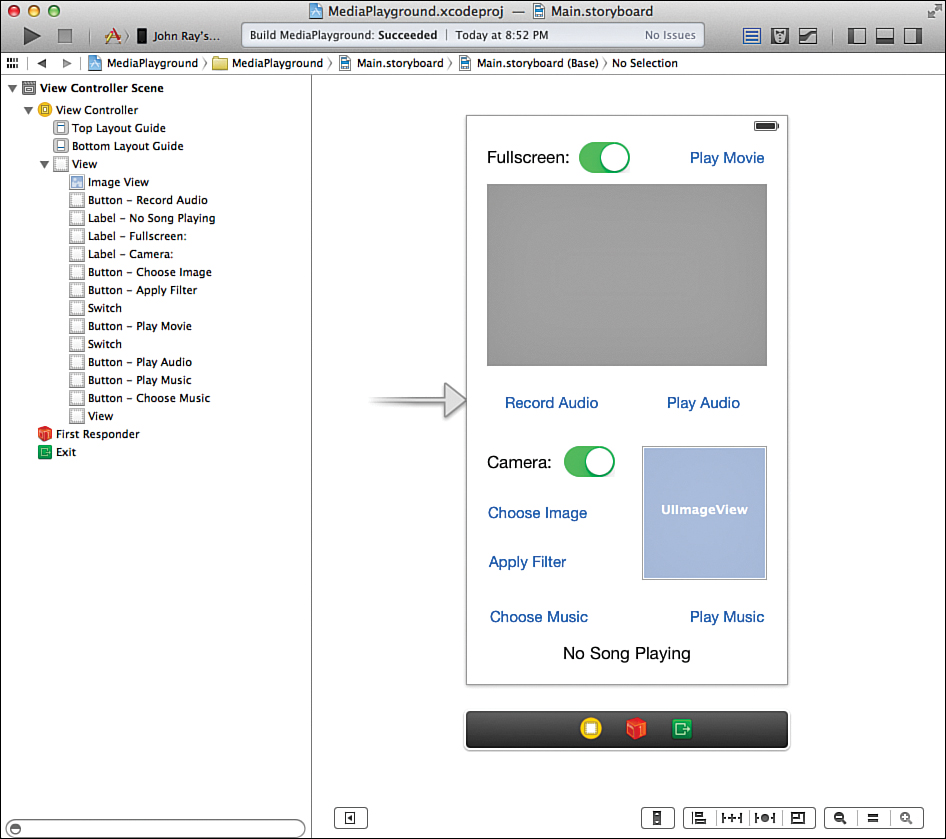
The bad news is that you need to add a bunch of outlets. The good news is that there isn’t anything tricky about any of them. With the assistant editor open and the Main.storyboard and ViewController.m files visible, Control-drag from the fullscreen toggle switch to just below the @interface line in ViewController.m. When prompted, make a connection to toggleFullscreen, as shown in Figure 19.2.
Move through the rest of the outlets listed, repeating this process until each outlet has been added to the file. Time for the actions.
Adding the Actions
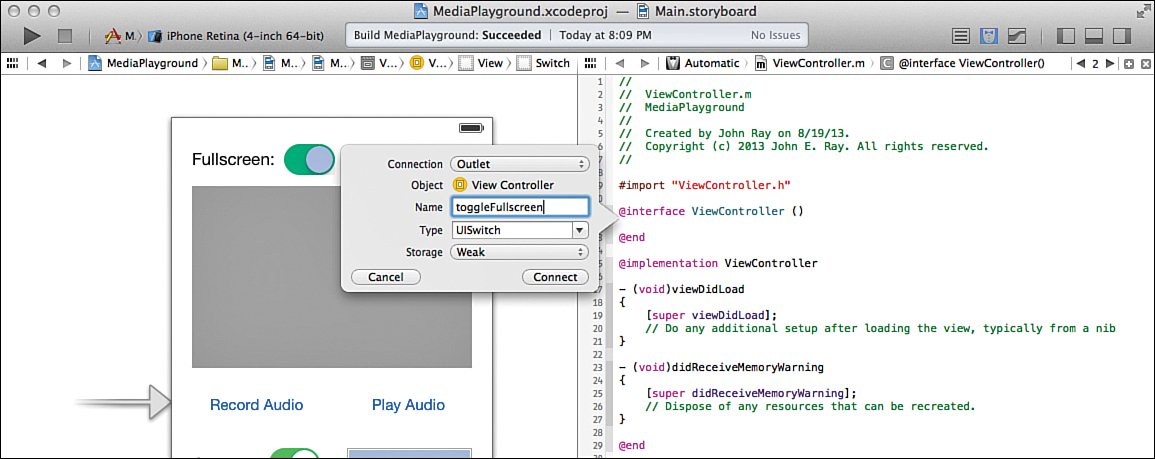
Once all seven outlets are accounted for, move on to the actions. Begin by Control-dragging from the Play Movie button to below the last @property declaration you added. When prompted, create a new action named playMovie, as shown in Figure 19.3.
Repeat this for each of the other buttons, until you’ve created a total of seven new actions in the ViewController.m file. Now pat yourself on the back; you’ve just finished the most tedious part of the project.
Implementing the Movie Player
In this exercise, we use the MPMoviePlayerController class that you learned about earlier this hour. Only three methods stand between us and movie-playback bliss:
![]() initWithContentURL: Provided with an
initWithContentURL: Provided with an NSURL object, this method initializes the movie player and prepares it for playback.
![]() play: Begins playing the selected movie file.
play: Begins playing the selected movie file.
![]() setFullscreen:animated: Sets the movie playback to fullscreen.
setFullscreen:animated: Sets the movie playback to fullscreen.
Because the movie controller itself implements a graphical user interface (GUI) for controlling playback, we don’t need to implement additional features ourselves. If we wanted to, however, there are many other methods, including stop, that we could call on to control playback.
Dozens of methods and properties are available for the movie player. You can get pointers to additional resources in the “Further Exploration” section at the end of this hour.
Initializing a Movie Player Instance
The first step in playing back a movie file is to declare and initialize an instance of the movie player (MPMoviePlayerController) object. We will be setting up the movie player as an instance variable/property for our class and initializing the content in the viewDidAppear method.
Begin by editing ViewController.m to add a new private instance variable moviePlayer that will reference an instance of the MPMoviePlayerController class. Edit the @interface block at the top of the file to include this line:
@property (strong, nonatomic) MPMoviePlayerController *moviePlayer;
We now have a variable, moviePlayer, that we can use throughout our class. Our next step is to initialize it with content. Add the viewDidAppear method to ViewController.m as shown in Listing 19.10.
LISTING 19.10 Initializing the Movie Player
1: - (void)viewDidAppear:(BOOL)animated {
2: [super viewDidAppear:animated];
3: //Set up the movie player
4: NSString *movieFile = [[NSBundle mainBundle]
5: pathForResource:@"movie" ofType:@"m4v"];
6: self.moviePlayer = [[MPMoviePlayerController alloc]
7: initWithContentURL: [NSURL
8: fileURLWithPath:
9: movieFile]];
10: self.moviePlayer.allowsAirPlay=YES;
11: [self.moviePlayer.view setFrame: self.movieRegion.frame];
12: }
Line 4 declares a string movieFile that will hold the path to the movie file (movie.m4v) we added to our project.
Next, lines 6–9 allocate and initialize moviePlayer itself using an NSURL instance that contains the path from movieFile. Believe it or not, this is most of the “heavy lifting” of the movie playback method. After we’ve completed this line, we could (if we wanted) immediately call the play method on the moviePlayer object and see the movie play.
Line 10 enables AirPlay for video playback.
Lines 11–12 sets the frame (size and location) of the movie player to the frame of the movieRegion. This is our “trick” to use IB to lay out the location of the player, even though it isn’t directly represented as an object in IB.
That handles preparing the movie player. We can now use it anywhere in our application to display the movie.m4v video file—but we know exactly where it needs to be displayed: in the playMovie method.
Tip
Wondering why we set up the movie player in viewDidAppear versus viewDidLoad where we normally do that sort of thing? The reason is that the iOS 6 Auto Layout system won’t yet return a valid frame value for the movieRegion UIView that we’re using as a placeholder. It isn’t until we get to viewDidAppear that iOS knows the coordinates where the view is being displayed.
Implementing Movie Playback
For movie playback in the MediaPlayground application to work, we need to implement the playMovie method. This is invoked by the Play Movie button we added to the interface earlier. Let’s add the method, and then walk through how it works.
Update the playMovie method in the ViewController.m file as shown in Listing 19.11.
LISTING 19.11 Initiating Movie Playback
1: - (IBAction)playMovie:(id)sender {
2: [self.view addSubview:self.moviePlayer.view];
3: [[NSNotificationCenter defaultCenter] addObserver:self
4: selector:@selector(playMovieFinished:)
5: name:MPMoviePlayerPlaybackDidFinishNotification
6: object:self .moviePlayer];
7:
8: if ([self.toggleFullscreen isOn]) {
9: [self.moviePlayer setFullscreen:YES animated:YES];
10: }
11:
12: [self.moviePlayer play];
13: }
Line 2 adds the moviePlayer’s view to our current view.
MPMoviePlayerController sends the MPMoviePlayerPlaybackDidFinishNotification when it has finished playing a piece of media. In lines 3–6, we register that notification for our moviePlayer object and ask the notification center to invoke the playMovieFinished method when it receives the notification. Put simply, when the movie player is finished playing the movie (or the user stops playback), the playMovieFinished method is called.
Lines 8–10 check to see whether the toggle switch (toggleFullscreen) is turned “on” using the UISwitch instance method isOn. If the switch is on, we use the method setFullscreen:animated to expand the movie to fill the device’s screen. If the switch is off, we do nothing, and the movie plays back within the confines of the frame we defined.
Finally, line 12 begins playback.
Handling Cleanup
To clean up after the movie playback has finished, we remove the moviePlayer object from our view. You do not have to do so if you don’t mind looking at the movie player block in the interface; but if we remove it, users can’t distract themselves by interacting with it. To handle the cleanup, implement the playMediaFinished: method (triggered by the notification center) to the ViewController.m file, as shown in Listing 19.12.
LISTING 19.12 Cleaning Up After the Movie Player
1: -(void)playMovieFinished:(NSNotification*)theNotification
2: {
3: [[NSNotificationCenter defaultCenter]
4: removeObserver:self
5: name:MPMoviePlayerPlaybackDidFinishNotification
6: object: self.moviePlayer];
7:
8: [self.moviePlayer.view removeFromSuperview];
9: }
Two things need to happen in this method. First, in lines 3–6, we tell the notification center that it can stop looking for the MPMoviePlayerPlaybackDidFinishNotification notification. Because we’re done with playback from the movie player object, there’s no point in keeping it around until we play the movie again. Second, line 8 then removes the embedded movie player view from the main application view.
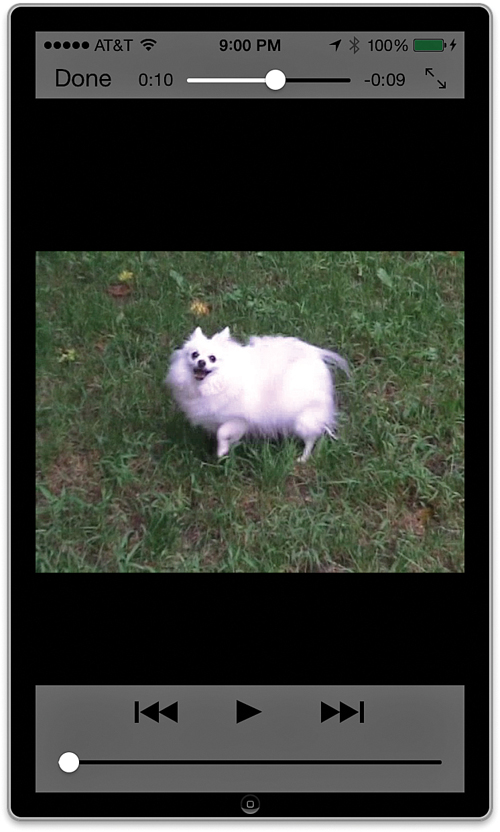
Movie playback is now available in the application, as demonstrated in Figure 19.4. Choose Run in the Xcode toolbar, press the Play Movie button, and sit back and enjoy the show.
Implementing Audio Recording and Playback
In the second part of the tutorial, we add audio recording and playback to the application. Unlike the movie player, we use classes within the AV Foundation framework to implement these features.
For the recorder, we use the AVAudioRecorder class and these methods:
![]() initWithURL:settings:error: Provided with an
initWithURL:settings:error: Provided with an NSURL instance pointing to a local file and NSDictionary containing a few settings, this method returns an instance of a recorder, ready to use.
![]() record: Begins recording.
record: Begins recording.
![]() stop: Ends the recording session.
stop: Ends the recording session.
Not coincidentally, the playback feature, an instance of AVAudioPlayer, uses some very similar methods:
![]() initWithContentsOfURL:error: Creates an audio player object that can be used to play back the contents of the file pointed to by an
initWithContentsOfURL:error: Creates an audio player object that can be used to play back the contents of the file pointed to by an NSURL object
![]() play: Plays back the audio
play: Plays back the audio
We do not implement the AVAudioPlayerDelegate protocol in this implementation because we don’t really need to know when the audio player has finished; it can take as long as it needs.
Implementing Audio Recording
To add audio recording to the project, we need to create the recordAudio: method. Before we do, though, let’s think through this a bit. What happens when we initiate a recording? In this application, recording continues until we press the button again.
To implement this functionality, the “recorder” object itself must persist between calls to the recordAudio: method. We make sure that this happens by adding an audioRecorder private property in the ViewController.m file to hold the AVAudioRecorder object. Update ViewController.m by adding the new property to the top of the file:
@property (strong, nonatomic) AVAudioRecorder *audioRecorder;
Next, we allocate and initialize the controller in the viewDidLoad method, making it available anywhere and anytime we need it. Edit ViewController.m and add the code in Listing 19.13 to viewDidLoad.
LISTING 19.13 Creating and Initializing the Audio Recorder
1: - (void)viewDidLoad
2: {
3: [super viewDidLoad];
4: //Set up the audio recorder
5: [[AVAudioSession sharedInstance]
6: setCategory: AVAudioSessionCategoryPlayAndRecord error: nil];
7:
8: NSURL *soundFileURL=[NSURL fileURLWithPath:
9: [NSTemporaryDirectory()
10: stringByAppendingString:@"sound.caf"]];
11:
12: NSDictionary *soundSetting;
13: soundSetting = @{AVSampleRateKey:@44100.0F,
14: AVFormatIDKey:@(kAudioFormatMPEG4AAC),
15: AVNumberOfChannelsKey:@2,
16: AVEncoderAudioQualityKey:@(AVAudioQualityHigh)
17: };
18:
19: self.audioRecorder = [[AVAudioRecorder alloc]
20: initWithURL: soundFileURL
21: settings: soundSetting
22: error: nil];
23:
24: }
The audio recorder implementation begins at line 5.
Starting with the basics, lines 5–6 indicate our intention to produce an application that both plays and records audio.
Lines 8–10 declare and initialize a URL, soundFileURL, which points to the sound file we are going to record. We use the NSTemporaryDirectory() function to grab the temporary directory path where your application can store its sound, and we concatenate on the name of the sound file itself: sound.caf.
Lines 12–17 create an NSDictionary object that contains keys and values for configuring the format of the sound being recorded. This is identical to the code introduced earlier in this hour.
In lines 19–22, the audio recorder, audioRecorder, is initialized with soundFileURL and the settings stored in the soundSettings dictionary. We pass nil to the error parameter because we don’t (for this example) care whether an error occurs. If we did experience an error, it would be returned in a value passed to this parameter.
Controlling Recording
With audioRecorder allocated and initialized, all that we need to do is implement recordAudio so that the record and stop methods are invoked as needed. To make things interesting, we’ll update the recordButton title to read Record Audio or Stop Recording when pressed.
Update the recordAudio method stub in ViewController.m with the code in Listing 19.14.
LISTING 19.14 Updating the Initial recordAudio Method
1: - (IBAction)recordAudio:(id)sender {
2: if ([self .recordButton.titleLabel.text
3: isEqualToString:@"Record Audio"]) {
4: [self.audioRecorder record];
5: [self.recordButton setTitle:@"Stop Recording"
6: forState:UIControlStateNormal];
7: } else {
8: [self.audioRecorder stop];
9: [self.recordButton setTitle:@"Record Audio"
10: forState:UIControlStateNormal];
11: }
12: }
Notice that I said this is in the initial implementation. We’ll be modifying this slightly when implementing the audio playback because it serves as a lovely place to load up the audio we’ve recorded and prepare to play it.
For now, let’s check out what this does.
In line 2, the method checks the title of the recordButton variable. If it is set to Record Audio, the method uses [audioRecorder record] to start recording (line 4), and then in lines 5–6, it sets the recordButton title to Stop Recording. If the title doesn’t read Record Audio, we’re already in the process of making a recording. In this case, we use [audioRecorder stop] in line 8 to end the recording and set the button title back to Record Audio in lines 9–10.
That’s it for recording, Let’s implement playback so that we can actually hear what we’ve recorded.
Implementing Audio Playback
To implement the audio player, we create a private property, audioPlayer, that we can use throughout our application. We then initialize it to a default sound in viewDidLoad so that there is something to play back even if the user hasn’t made a recording.
Begin by adding another new private property in ViewController.m:
@property (strong, nonatomic) AVAudioPlayer *audioPlayer;
Now, allocate and initialize the player in the viewDidLoad method by adding the code in Listing 19.15.
LISTING 19.15 Preparing the Audio Player with a Default Sound
1: - (void)viewDidLoad
2: {
3: [super viewDidLoad];
4: //Set up the audio recorder
5: [[AVAudioSession sharedInstance]
6: setCategory: AVAudioSessionCategoryPlayAndRecord error: nil];
7:
8: NSURL *soundFileURL=[NSURL fileURLWithPath:
9: [NSTemporaryDirectory()
10: stringByAppendingString:@"sound.caf"]];
11:
12: NSDictionary *soundSetting;
13: soundSetting = @{AVSampleRateKey:@44100.0F,
14: AVFormatIDKey:@(kAudioFormatMPEG4AAC),
15: AVNumberOfChannelsKey:@2,
16: AVEncoderAudioQualityKey:@(AVAudioQualityHigh)
17: };
18:
19: self.audioRecorder = [[AVAudioRecorder alloc]
20: initWithURL: soundFileURL
21: settings: soundSetting
22: error: nil];
23:
24: //Set up the audio player
25: NSURL *noSoundFileURL=[NSURL fileURLWithPath:
26: [[NSBundle mainBundle]
27: pathForResource:@"norecording" ofType:@"wav"]];
28: self.audioPlayer = [[AVAudioPlayer alloc]
29: initWithContentsOfURL:noSoundFileURL error:nil];
30:
31: }
The setup of the audio player begins in line 25. Here, an NSURL, noSoundFileURL, is created to reference the file norecording.wav that was added to your project when you added the Media folder.
Line 28 allocates and initializes the audio player (audioPlayer) with the contents of the noSoundFileURL. The audioPlayer object can now be used to initiate playback of this default sound.
Controlling Playback
To start playing back the audio file that is referenced by audioPlayer, all we need to do is send it the message play. Update the playAudio method to include to do just that. Listing 19.16 shows the full implementation of playAudio.
LISTING 19.16 Implementing playAudio Method
- (IBAction)playAudio:(id)sender {
[self.audioPlayer play];
}
If you run the application now, you should be able to record sounds, but every time you press Play Audio, you’ll hear the sound norecording.wav. This is because we never load the sound that has been recorded.
Loading the Recorded Sound
The perfect place to load the recording is after the user has clicked Stop Record in the recordAudio method. Update recordAudio as shown in Listing 19.17.
LISTING 19.17 Completing the recordAudio Method
1: - (IBAction)recordAudio:(id)sender {
2: if ([self.recordButton.titleLabel.text
3: isEqualToString:@"Record Audio"]) {
4: [self.audioRecorder record];
5: [self.recordButton setTitle:@"Stop Recording"
6: forState:UIControlStateNormal];
7: } else {
8: [self.audioRecorder stop];
9: [self.recordButton setTitle:@"Record Audio"
10: forState:UIControlStateNormal];
11: // Load the new sound in the audioPlayer for playback
12: NSURL *soundFileURL=[NSURL fileURLWithPath:
13: [NSTemporaryDirectory()
14: stringByAppendingString:@"sound.caf"]];
15: self.audioPlayer = [[AVAudioPlayer alloc]
16: initWithContentsOfURL:soundFileURL error:nil];
17: }
18: }
Lines 12–14 should look familiar because, once again, they grab and store the temporary directory and use it to initialize an NSURL object, soundFileURL, that points to the sound.caf file we’ve recorded.
In lines 15–16, the audio player, audioPlayer, is allocated and initialized with the contents of soundFileURL.
Try running the application again and see what happens. Now when you press the Play Audio button, you’ll hear the default sound when no recording has been made; or, if the user has recorded audio, the recording will play.
Caution: Why Don’t I Have to Clean Up After All the Audio Player Instances?
If you’re filling the memory with audio players, you might be wondering: Each time a new sound is recorded, must a new audio player be allocated and initialized? The answer is no.
Each time a new audio player is created, the reference to the old player is removed, meaning that ARC automatically makes sure that the memory used is released. If you’re really concerned, however, you can implement the AVAudioPlayer delegate method audioPlayerDidFinish Playing:successfully to set the audio player object to nil.
It’s time to move on to the next part of this hour’s exercise: accessing and displaying photos from the photo library and camera.
Implementing the Photo Library and Camera
iDevices are great for storing pictures and, with the new high-quality camera in the iPhone, great for taking pictures, too. By integrating the photo library with your apps, you can directly access any image stored on the device or take a new picture and use it within your application. In this hour’s tutorial, we interact with the library by implementing an instance of the UIImagePickerController class. We display the image picker interface using the method presentViewController:animated:completion within our main ViewController instance.
Preparing the Image Picker
To use the UIImagePickerController, we don’t need to import any new interface files, but we do need to state that our class will conform to a few protocols, specifically the UIImagePickerControllerDelegate and UINavigationControllerDelegate protocols.
Update the @interface line in ViewController.h to include these new protocols:
@interface ViewController : UIViewController
<UIImagePickerControllerDelegate, UINavigationControllerDelegate>
Now we’re set to implement the UIImagePickerController using the methods described at the start of this hour. In fact, the code we use is very similar to what you’ve already seen.
Displaying the Image Picker
When a user touches the Choose Image button, our application triggers the method chooseImage. Within this method, we will allocate the UIImagePickerController, configure the type of media (camera or library) that it will be browsing, set its delegate, and then display it.
Enter the chooseImage method shown in Listing 19.18.
LISTING 19.18 Implementing the chooseImage Method
1: - (IBAction)chooseImage:(id)sender {
2: UIImagePickerController *imagePicker;
3: imagePicker = [UIImagePickerController new];
4:
5: if ([self.toggleCamera isOn]) {
6: imagePicker.sourceType=UIImagePickerControllerSourceTypeCamera;
7: } else {
8: imagePicker.sourceType=UIImagePickerControllerSourceTypePhotoLibrary;
9: }
10: imagePicker.delegate=self;
11:
12: [self presentViewController:imagePicker animated:YES completion:nil];
13: }
In lines 2–3, imagePicker is allocated and initialized as an instance of UIImagePickerController.
Lines 5–9 set the sourceType property of the image picker to UIImagePickerController SourceTypeCamera if the toggleCamera switch is set to on or UIImagePickerController SourceTypePhotoLibrary if it isn’t. In other words, the user can use the toggle switch to choose from photo library images or the camera.
Line 10 sets the image picker delegate to be the ViewController class. This means we need to implement some supporting methods to handle when the user is finished choosing a photo.
Line 12 adds the imagePicker view controller over the top of our existing view.
Displaying the Image Picker in a Popover (iPad Only)
If you’ve just implemented the code in the preceding section in an iPad version of this project, you’ll find that it doesn’t (or at least it shouldn’t!) work. Apple explicitly prohibits the use of the image picker controller on the iPad without a popover.
To add a popover, we need a private property to hold the popover controller and a few extra lines of code added to Listing 19.18. Update the ViewController.m file with yet another private property - popoverController. Add this line to the @interface block:
@property (strong, nonatomic) UIPopoverController *popoverController;
Now, delete the last line of the existing chooseImage method and add the code you learned in Hour 11 to initialize the popover controller with the imagePicker content and present it. Listing 19.19 shows the final implementation for the iPad.
LISTING 19.19 Implementing the iPad’s Popover-Enabled chooseImage Method
1: - (IBAction)chooseImage:(id)sender {
2: UIImagePickerController *imagePicker;
3: imagePicker = [UIImagePickerController new];
4:
5: if ([self.toggleCamera isOn]) {
6: imagePicker.sourceType=UIImagePickerControllerSourceTypeCamera;
7: } else {
8: imagePicker.sourceType=UIImagePickerControllerSourceTypePhotoLibrary;
9: }
10: imagePicker.delegate=self;
11:
12:
13: self.popoverController=[[UIPopoverController alloc]
14: initWithContentViewController:imagePicker];
15: [self.popoverController presentPopoverFromRect:((UIButton *)sender).frame
16: inView:self.view
17: permittedArrowDirections:UIPopoverArrowDirectionAny
18: animated:YES];
19: }
Showing the Chosen Image
With what we’ve written so far, the user can now touch the Pick Image button, but not much is going to happen when the user navigates to an image. To react to an image selection, we implement the delegate method imagePickerController:didFinishPickingMediaWithInfo.
Add the imagePickerController:didFinishPickingMediaWithInfo delegate method shown in Listing 19.20 to the ViewController.m file.
LISTING 19.20 Handling the User’s Selection of an Image
1: - (void)imagePickerController:(UIImagePickerController *)picker
2: didFinishPickingMediaWithInfo:(NSDictionary *)info {
3: [self dismissViewControllerAnimated:YES completion:nil];
4: self.displayImageView.image=
5: info[UIImagePickerControllerOriginalImage];
6: }
After the image is chosen, we can dismiss the image picker using dismissViewController Animated:completion in line 3.
Lines 4–5 do all the remaining work. We access the UIImage that the user has chosen by grabbing the object in the info dictionary that is referenced by the UIImagePickerController OriginalImage key. This is assigned to the image property of displayImageView, displaying the image, in all its glory, in the application’s view.
If you are using an iPad and implementing the image picker as a popover, add one additional line after line 5:
[self.popoverController dismissPopoverAnimated:YES];
This makes the popover disappear as soon as the user selects an image. Without it, the users must touch outside of the popover to dismiss it.
Cleaning Up After the Image Picker
There is still a scenario that must be accounted for before we can call the image-picking portion of our MediaPlayground application complete. A user can click a “cancel” button within the image picker, leaving the picker without choosing anything. The imagePickerControllerDidCancel delegate method was made for exactly this situation. Implement this method to dismiss the image picker by calling dismissViewControllerAnimated:completion.
Listing 19.21 shows the full implementation of this simple method.
LISTING 19.21 Handling the Cancellation of an Image Selection
- (void)imagePickerControllerDidCancel:(UIImagePickerController *)picker {
[self dismissViewControllerAnimated:YES completion:nil];
}
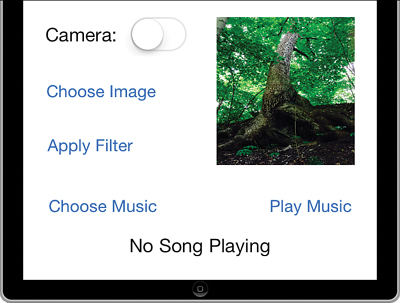
You should now run the application and use the Choose Image button to display photos from the photo library and camera, as shown in Figure 19.5.
Caution: Be Careful When Using the Simulator!
If you’re using the iOS Simulator, don’t try picking an image with the camera active; you’ll crash the app because we didn’t check for the presence of a camera.
Our next step in this hour’s lesson is implementing a Core Image filter. This is applied to the chosen image when the user presses the Apply Filter button.
Implementing a Core Image Filter
In my mind, manipulating an image should be one of the more difficult pieces of programming that you encounter. Core Image, however, makes it easy for developers to add advanced image features to their software. In fact, implementing a filter is the easiest thing you’re going to do in this hour.
Preparing and Applying a Filter
Remember that applying a filter requires that we work with an instance of a CIImage, but all we have is a UIImageView. We have to do a bit of conversion to apply the filter and then to display the result. Because we covered this earlier, the code shouldn’t be a surprise. Implement the applyFilter method, as shown in Listing 19.22.
LISTING 19.22 Applying a Filter to the Image in the UIImageView
1: - (IBAction)applyFilter:(id)sender {
2: CIImage *imageToFilter;
3: imageToFilter=[[CIImage alloc]
4: initWithImage:self.displayImageView.image];
5:
6: CIFilter *activeFilter = [CIFilter filterWithName:@"CISepiaTone"];
7: [activeFilter setDefaults];
8: [activeFilter setValue: @0.75F
9: forKey: @"inputIntensity"];
10: [activeFilter setValue:imageToFilter forKey: @"inputImage"];
11: CIImage *filteredImage=[activeFilter valueForKey: @"outputImage"];
12:
13: UIImage *myNewImage = [UIImage imageWithCIImage:filteredImage];
14: self.displayImageView.image = myNewImage;
15: }
Lines 2–3 declare a new CIImage called imageToFilter and then allocate and initialize it with the UIImage contained within the displayImageView object (UIImageView).
Line 6 declares and initializes a new Core Image filter: "CISepiaTone".
Line 7 sets the filter’s defaults. You want to do this for any filter that you use.
Lines 8–9 configure the filter’s "InputIntensity" key, setting its value to an NSNumber floating-point value of 0.75. Remember, these are documented in the Core Image Filter Reference in the Xcode documentation.
Line 10 uses the filter’s "inputImage" key to set the image that the filter will work on (imageToFilter), while line 11 grabs the filtered result in a new CIImage (filteredImage).
Finally, line 13 converts the filtered image to a new UIImage (myNewImage) using the UIImage class method imageWithCIImage. The filtered image is displayed by assigning the display ImageView’s image property to myNewImage.
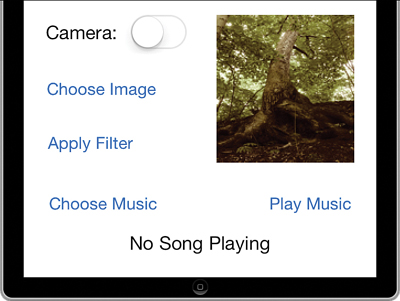
Run the application, choose a photo, and then click the Apply Filter button. The sepia filter should remove most of the saturation from the original photo and make it look all “old timey,” as shown in Figure 19.6.
Our final step in this hour’s lesson is accessing the music library and playing content. You’ll notice quite a few similarities to using the photo library in this implementation.
Accessing and Playing the Music Library
To finish off this hour’s project, we implement access to the iDevice music library—both selecting sound files and playing them. First, you use the MPMediaPickerController class to choose the music to play. We call only a single method from this class:
![]() initWithMediaTypes: Initializes the media picker and filters the files that are available in the picker
initWithMediaTypes: Initializes the media picker and filters the files that are available in the picker
We’ll configure its behavior with a handful of properties that can be set on the object:
![]() prompt: A string that is displayed to the user when choosing songs
prompt: A string that is displayed to the user when choosing songs
![]() allowsPickingMultipleItems: Configures whether the user can choose one or more sound files
allowsPickingMultipleItems: Configures whether the user can choose one or more sound files
We need to conform to the MPMediaPickerControllerDelegate protocol so that we can react when the user chooses a playlist. The method that we add as part of the protocol is mediaPicker:didPickMediaItems.
To play back the audio, we take advantage of the MPMusicPlayerController class, which can use the playlist returned by the media picker. To control starting and pausing the playback, we use four methods:
![]() iPodMusicPlayer: This class method initializes the music player as an “iPod” music player (even if you’re on an iPhone or iPad), capable of accessing the music library.
iPodMusicPlayer: This class method initializes the music player as an “iPod” music player (even if you’re on an iPhone or iPad), capable of accessing the music library.
![]() setQueueWithItemCollection: Sets the playback queue using a playlist (
setQueueWithItemCollection: Sets the playback queue using a playlist (MPMediaItemCollection) object returned by the media picker.
![]() play: Starts playing music.
play: Starts playing music.
![]() pause: Pauses the music playback.
pause: Pauses the music playback.
As you can see, when you get the hang of one of the media classes, the others start to seem very familiar, using similar initialization and playback control methods.
Preparing to Use the Media Picker
Because the media picker uses the same Media Player framework as the movie player, we’re already halfway done with our preparation; there’s no need to #import any additional files. What we do need to do, however, is state that we will be confirming to the MPMediaPickerControllerDelegate, because this enables us to react to a user’s selections. Update the ViewController.h file to include the new protocol in the @interface line:
@interface ViewController : UIViewController
<MPMediaPickerControllerDelegate, UIImagePickerControllerDelegate,
UINavigationControllerDelegate>
Preparing the Music Player
To react in a meaningful way to a selection in the media picker, we need to have a way of playing back music files. Like the movie player, audio recorder, and audio player, we want to create a new music player object that we can access from anywhere in the application.
Add a final private property variable, musicPlayer, which will hold an instance of the MPMusicPlayerController class at the top of your ViewController.m file:
@property (strong, nonatomic) MPMusicPlayerController *musicPlayer;
That sets up the property to refer to the music player, but we still need to create an instance of it. As we did with the audio player and recorder, we’ll initialize the music player in the viewDidLoad method. Update viewDidLoad one last time, using the MPMusicPlayerController class method iPodMusicPlayer to return a new instance of the music player, as demonstrated in Listing 19.23.
LISTING 19.23 The Final viewDidLoad Implementation
1: - (void)viewDidLoad
2: {
3: [super viewDidLoad];
4: //Set up the audio recorder
5: [[AVAudioSession sharedInstance]
6: setCategory: AVAudioSessionCategoryPlayAndRecord error: nil];
7:
8: NSURL *soundFileURL=[NSURL fileURLWithPath:
9: [NSTemporaryDirectory()
10: stringByAppendingString:@"sound.caf"]];
11:
12: NSDictionary *soundSetting;
13:
14: soundSetting = @{AVSampleRateKey:@44100.0F,
15: AVFormatIDKey:@(kAudioFormatMPEG4AAC),
16: AVNumberOfChannelsKey:@2,
17: AVEncoderAudioQualityKey:@(AVAudioQualityHigh)
18: };
19:
20: self.audioRecorder = [[AVAudioRecorder alloc]
21: initWithURL: soundFileURL
22: settings: soundSetting
23: error: nil];
24:
25: //Set up the audio player
26: NSURL *noSoundFileURL=[NSURL fileURLWithPath:
27: [[NSBundle mainBundle]
28: pathForResource:@"norecording" ofType:@"wav"]];
29: self.audioPlayer = [[AVAudioPlayer alloc]
30: initWithContentsOfURL:noSoundFileURL error:nil];
31:
32:
33: //Set up the music player
34: self.musicPlayer=[MPMusicPlayerController iPodMusicPlayer];
35:
36: }
The only new code is line 34, where the musicPlayer instance is created and assigned. We now have everything we need to display the media picker and handle playing any music files that a user may select.
Displaying the Media Picker
The display of the media picker in our application is triggered by the user touching the Choose Music button, which, in turn, starts the action chooseMusic.
To use a media picker, we follow steps similar to the image picker: Initialize and configure the behavior of the picker, and then show the picker’s view controller. When the user is done with the picker, we add the playlist it returns to the music player and dismiss the picker view controller. If users decide they don’t want to pick anything, we can dismiss the picker and move on.
Update the ViewController implementation file with the chooseMusic method in Listing 19.24.
LISTING 19.24 Displaying the Media Picker
1: - (IBAction)chooseMusic:(id)sender {
2: MPMediaPickerController *musicPicker;
3:
4: [self.musicPlayer stop];
5: self.displayNowPlaying.text=@"No Song Playing";
6: [self.musicPlayButton setTitle:@"Play Music"
7: forState:UIControlStateNormal];
8:
9: musicPicker = [[MPMediaPickerController alloc]
10: initWithMediaTypes: MPMediaTypeMusic];
11:
12: musicPicker.prompt = @"Choose Songs to Play" ;
13: musicPicker.allowsPickingMultipleItems = YES;
14: musicPicker.delegate = self;
15:
16: [self presentViewController:musicPicker animated:YES completion:nil];
17: }
First, line 2 declares the instance of MPMediaPickerController, musicPicker.
Next, lines 4–7 make sure that when the picker is called the music player will stop playing its current song, the nowPlaying label in the interface is set to the default string "No Song Playing", and the playback button is set to read Play Music. These lines aren’t necessary, but they keep our interface from being out of sync with what is actually going on in the application.
Lines 9–10 allocate and initialize the media picker controller instance. It is initialized with a constant, MPMediaTypeMusic, that defines the type of files (music) the user will be allowed to choose with the picker. Line 12 sets a message that will display at the top of the music picker.
In line 13, we set the allowsPickingMultipleItems property to a Boolean value (YES or NO) to configure whether the user can select one or more media files.
Line 14 sets the delegate music picker’s delegate. In other words, it tells the musicPicker object to look in the ViewController for the MPMediaPickerControllerDelegate protocol methods.
Line 16 uses the musicPicker view controller to display the music library over the top of our application’s view.
Handling a User’s Selection
To get the playlist that is returned by media picker (an object called MPMediaItemCollection) and clean up after ourselves, we add the mediaPicker:didPickMediaItems: protocol delegate method from Listing 19.25 to our growing implementation.
LISTING 19.25 Handling a User’s Music Selection
- (void)mediaPicker: (MPMediaPickerController *)mediaPicker
didPickMediaItems:(MPMediaItemCollection *)mediaItemCollection {
[self.musicPlayer setQueueWithItemCollection: mediaItemCollection];
[self dismissViewControllerAnimated:YES completion:nil];
}
When the user finishes picking songs in the media picker, this method is called and passed the chosen items in an MPMediaItemCollection object, mediaItemCollection. For all intents and purposes, you can consider the mediaItemCollection object to be the equivalent of a media file playlist.
In the first line of this implementation, the music player instance, musicPlayer, is configured with the playlist via the setQueueWithItemCollection: method.
To clean things up, the view is dismissed in the second line.
Handling an Empty Selection
We’ve got one more situation to account for before we can wrap up the media picker: the possibility of a user exiting the media picker without choosing anything (touching Done without picking any tracks). To cover this event, we add the delegate protocol method mediaPickerDidCancel. As with the image picker, we just need to dismiss view controller. Add this method to the ViewController.m file, as demonstrated in Listing 19.26.
LISTING 19.26 Handling Empty Selections in the Media Picker
- (void)mediaPickerDidCancel:(MPMediaPickerController *)mediaPicker {
[self dismissViewControllerAnimated:YES completion:nil];
}
Congratulations! You’re almost finished. The media picker feature is now implemented, so our only remaining task is to add the music player and make sure that the corresponding song titles are displayed.
Playing Music
Because the musicPlayer object was created in the viewDidLoad method of the view controller (see the start of “Implementing the Media Picker”) and the music player’s playlist was set in mediaPicker:didPickMediaItems:, the only real work that the playMusic method must handle is starting and pausing playback.
To spice things up a bit, we’ll try to be a bit clever—toggling the musicPlayButton title between Play Music (the default) and Pause Music as needed. As a final touch, we access a property of the musicPlayer MPMusicPlayerController object called nowPlayingItem. This property is an object of type MPMediaItem, which, in turn, contains a string property called MPMediaItemPropertyTitle set to the name of the currently playing media file (if one is available).
Putting this all together, we get the implementation of playMusic in Listing 19.27.
LISTING 19.27 Implementing the playMusic Method
1: - (IBAction)playMusic:(id)sender {
2: if ([self.musicPlayButton.titleLabel.text
3: isEqualToString:@"Play Music"]) {
4: [self.musicPlayer play];
5: [self.musicPlayButton setTitle:@"Pause Music"
6: forState:UIControlStateNormal];
7: self.displayNowPlaying.text=[self.musicPlayer.nowPlayingItem
8: valueForProperty:MPMediaItemPropertyTitle];
9:
10: } else {
11:
12: [self.musicPlayer pause];
13: [self.musicPlayButton setTitle:@"Play Music"
14: forState:UIControlStateNormal];
15: self.displayNowPlaying.text=@"No Song Playing";
16: }
17: }
Line 2 checks to see whether the musicPlayButton title is set to Play Music. If it is, line 4 starts playback, lines 5–6 reset the button to read Pause Music, and lines 7–8 set the displayNowPlaying label to the title of the current audio track.
If the musicPlayButton title is not Play Music (line 10), the music is paused, the button title is reset to Play Music, and the onscreen label is changed to display No Song Playing.
After completing the method implementation, run the application on your iDevice to test it. Pressing the Choose Music button opens a media picker, as shown in Figure 19.7.
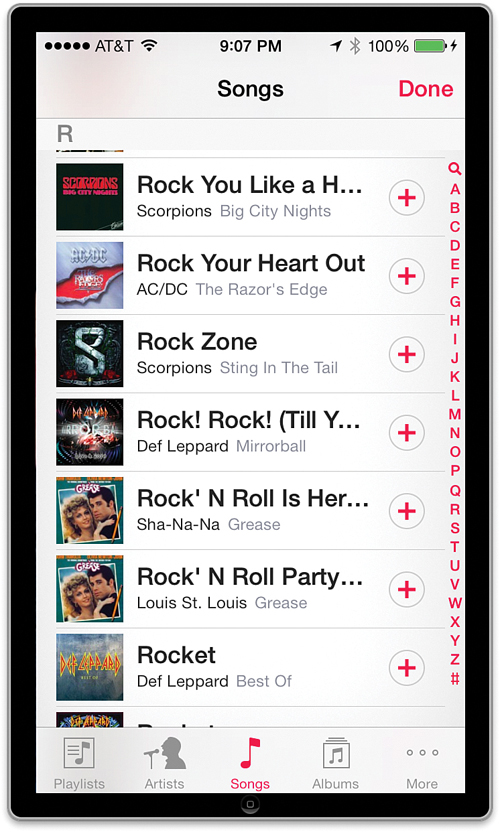
After you’ve created a playlist, press the Done button in the media picker, and then touch Play Music to begin playing the songs you’ve chosen. The title of the current track is displayed at the bottom of the interface.
Caution: The Music Library Is Not Accessible on the iOS Simulator
If you’re trying to test the music playback features on the Simulator, they will not work. You need to use a real device for this portion of the tutorial.
This hour’s lesson covered quite a bit, but consider the capabilities you’ve uncovered. Your projects can now tie into the same media capabilities that Apple uses in its own apps—delivering rich multimedia to your users with a relatively minimal amount of coding.
Further Exploration
We touched on only a few of the configuration options available for the MPMoviePlayer Controller, MPMusicPlayerController, AVAudioPlayer, UIImagePickerController, and MPMediaPickerController classes—but much more customization is possible if you dig through the documentation.
The MPMoviePlayerController class, for example, offers the movieControlMode property for configuring the onscreen controls for when the movie is playing. You can also programmatically “scrub” through the movie by setting the playback starting point with the initialPlaybackTime property. As mentioned (but not demonstrated) in this lesson, this class can even play back a media file hosted on a remote URL (including streaming media).
Custom settings on AVAudioPlayer can help you create background sounds and music with properties such as numberOfLoops to set looping of the audio playback and volume for controlling volume dynamically. You can even enable and control advanced audio metering, monitoring the audio power in decibels for a given sound channel.
On the image side of things, the UIImagePickerController includes properties such as allowsEditing to enable the user to trim video clips or edit images directly within the image picker. Check out the capability of this class to further control a device’s cameras (rear and front) and record video.
Core Image opens up new possibilities for image editing and manipulation in your apps that would have required an extensive amount of development previously. The Core Image Programming Guide is a great starting point for learning about Core Image, including filters, face detection, and more.
For those interested in going a step further, you may also want to review the documents OpenGL ES Programming Guide for iOS, Introduction to Core Animation Programming Guide, and Core Audio Overview. These Apple tutorials introduce you to the 3D, animation, and advanced audio capabilities available in iOS.
As always, the Apple Xcode documentation utility provides an excellent place for exploring classes and finding associated sample code.
Summary
It’s hard to believe, but in the span of an hour, you’ve learned about nine new media classes, three protocols, and a handful of class methods and properties. These provide much of the functionality you need to create applications that handle rich media. The AV Foundation framework gives us a simple method for recording and playing back high-quality audio streams. The Media Player framework handles streaming audio and video and can even tap into the existing resources stored in the music library. The easy-to-use UIImagePickerController class gives us surprisingly straightforward access to visual media and cameras on the device, while Core Image allows us to manipulate our images with ease.
Because many more methods are available in the Media Player and Core Image frameworks, I recommend spending additional time reviewing the Xcode documentation if you are at all interested in building multimedia applications using these technologies.
Q&A
Q. How do I make the decision between using MPMusicPlayerController versus AVAudioPlayer for sound playback in my applications?
A. Use the AVAudioPlayer for audio that you include in your application bundle. Use the MPMusicPlayerController for playing files from the music library. Although the MPMusicPlayerController is capable of playing back local files, its primary purpose is integrating with the existing music library media.
Q. I want to specifically control what camera a device is using to take a picture. How can I do this?
A. You’ll want to take a look at the cameraDevice property of the UIImagePicker Controller class. Setting this property to UIImagePickerControllerCamera DeviceFront will use the iPhone/iPad’s front-facing camera, for example.
Workshop
Quiz
1. What class can be used to implement a high-quality audio recorder?
2. What property and associated class represent the current piece of media being played by an instance of MPMusicPlayerController?
3. What do we take advantage of to determine whether an MPMoviePlayerController object has finished playing a file?
Answers
1. The AVAudioRecorder class enables developers to quickly and easily add audio recording capabilities to their applications.
2. The nowPlaying property of the MPMusicPlayerController is an instance of the MPMediaItem class. This class contains a number of read-only properties, including title, artist, and even album artwork.
3. To determine when a movie has finished playback, the MPMoviePlayerPlayback DidFinishNotification notification can be registered and a custom method called. We use this approach to release the media player object cleanly in our sample code.
Activities
1. Return to an earlier application, adding an instance of AVAudioPlayer that plays a looping background soundtrack. You need to use the same classes and methods described in this hour’s lesson, as well as the numberOfLoops property.
2. Implement image editing with the UIImagePickerController object. To do this, you need to set the allowsImageEditing property and use the UIImagePicker ControllerEditedImage key to access the edited image when it is returned by the UIImagePickerControllerDelegate protocol.
3. Experiment with implementing additional Core Image filters in the MediaPlayground application. Provide a user interface for configuring the filter’s parameters.