Hour 10. Getting the User’s Attention
,What You’ll Learn in This Hour:
![]() Different types of user notifications
Different types of user notifications
![]() How to create alert views
How to create alert views
![]() Methods for collecting input from alerts
Methods for collecting input from alerts
![]() How to use action sheets to present options
How to use action sheets to present options
![]() How to implement short sounds and vibrations
How to implement short sounds and vibrations
iOS presents developers with many opportunities for creating unique user interfaces, but certain elements must be consistent across all applications. When users need to be notified of an application event or make a critical decision, it is important to present them with interface elements that immediately make sense. In this hour, we look at several different ways an application can notify a user that something has happened. It’s up to you to determine what that something is, but these are the tools you need to keep users of your apps “in the know.”
Alerting the User
Applications on iOS are user centered, which means they typically don’t perform utility functions in the background or operate without an interface. They enable users to work with data, play games, communicate, or carry out dozens of other activities. Despite the variation in activities, when an application needs to show a warning, provide feedback, or ask the user to make a decision, it does so in a common way. Cocoa Touch leverages a variety of objects and methods to gain your attention, including UIAlertView, UIActionSheet, and System Sound Services. Unlike many of the other objects we’ve worked with, these require us to build them in code; so don’t start digging through the Interface Builder (IB) Object Library just yet.
Did you notice that I said applications typically don’t operate in the background? That’s because, with iOS 4 or later, some do. Applications running in the background have a unique set of capabilities, including additional types of alerts and notifications. You learn more about these in Hour 22, “Building Background-Ready Applications.”
Alert Views
Sometimes users need to be informed of changes when an application is running. More than just a change in the current view is required when an internal error event occurs (such as low-memory condition or a dropped network connection), for example, or upon completion of a long-running activity. Enter the UIAlertView class.
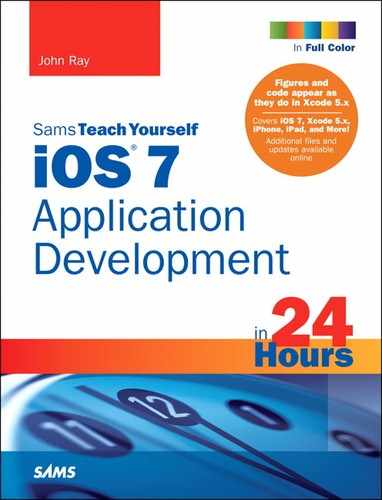
The UIAlertView class creates a translucent floating modal alert window that presents a user with a message and a few option buttons, and an optional plain or secure text entry field (or both), as shown in Figure 10.1.
Implementing an alert view takes little effort: You declare a UIAlertView object, initialize it, and show it. Consider the code fragment in Listing 10.1.
LISTING 10.1 Implementing a UIAlertView Object
1: UIAlertView *alertDialog;
2: alertDialog = [[UIAlertView alloc]
3: initWithTitle: @"Email Address"
4: message:@"Please enter your email address:"
5: delegate: self
6: cancelButtonTitle: @"Ok"
7: otherButtonTitles: @"Super",nil];
8: alertDialog.alertViewStyle=UIAlertViewStylePlainTextInput;
9: [alertDialog show];
In line 1, I declare a variable alertDialog to hold an instance of UIAlertView.
Lines 2–7 allocate and initialize the alert view. As you can see, the convenient initialization method of the alert view does almost all the work for us. Let’s review the parameters:
![]() initWithTitle: Initializes the view and sets the title that will appear at the top of the alert dialog box.
initWithTitle: Initializes the view and sets the title that will appear at the top of the alert dialog box.
![]() message: Sets the string that will appear in the content area of the dialog box.
message: Sets the string that will appear in the content area of the dialog box.
![]() delegate: Contains the object that will serve as the delegate to the alert (that is, respond to the alert). If you don’t need any actions to be performed after the user dismisses the alert, you can set this to
delegate: Contains the object that will serve as the delegate to the alert (that is, respond to the alert). If you don’t need any actions to be performed after the user dismisses the alert, you can set this to nil.
![]() cancelButtonTitle: Sets the string shown in the default button for the alert.
cancelButtonTitle: Sets the string shown in the default button for the alert.
![]() otherButtonTitles: Adds an additional button to the alert. This always ends in
otherButtonTitles: Adds an additional button to the alert. This always ends in nil.
Line 8 sets the alertViewStyle property. This property, if present, is used to configure whether the alert view contains any text entry fields. You have four possible style choices as of iOS 7:
![]() UIAlertViewStyleDefault: The default if no style is provided. No input fields shown.
UIAlertViewStyleDefault: The default if no style is provided. No input fields shown.
![]() UIAlertViewStyleSecureTextInput: A single secure (password) input field is added.
UIAlertViewStyleSecureTextInput: A single secure (password) input field is added.
![]() UIAlertViewStylePlainTextInput: A single plain-text input field is added.
UIAlertViewStylePlainTextInput: A single plain-text input field is added.
![]() UIAlertViewStyleLoginAndPasswordInput: Both a plain-text and secure field are shown.
UIAlertViewStyleLoginAndPasswordInput: Both a plain-text and secure field are shown.
Finally, in line 9, the alert is displayed to the user. Now, suppose that we want to respond to the user’s button choice or text entry. To do that, we need to declare that the class that responds to the alert view conforms to the UIAlertViewDelegate protocol.
Responding to an Alert View
When I first started using Objective-C, I found the terminology painful. It seemed that no matter how easy a concept was to understand, it was surrounded with language that made it appear harder than it was. A protocol, in my opinion, is one of these things.
Protocols define a collection of methods that perform a task. To provide advanced functionality, some classes, such as UIAlertView, require you to implement methods defined in a related protocol; doing this is called conforming to the protocol. Some protocol methods are required and others are optional; it just depends on the features you need.
To identify the button that was pressed in a multi-option alert or read from a text entry field, the class that is responding to the alert (usually just a view controller) should conform to the UIAlertViewDelegate protocol and implement the alertView:clickedButtonAtIndex method.
To declare that a class, such as a view controller, will be conforming to the UIAlertView Delegate protocol, you just modify the class’s @interface line in the interface file (.h) as follows:
@interface ViewController : UIViewController <UIAlertViewDelegate>
Next, you must set the delegate of the UIAlertView (see line 5 in Listing 10.1) to the object implementing the protocol. If this is the same object that is creating the alert, you can just use self, as follows:
delegate:self
Finally, the alertView:clickedButtonAtIndex method is implemented to handle the response. This method receives the index of the button that was pushed in the alert view. To make life easier, we can take advantage of the UIAlertView instance method buttonTitleAtIndex. This method returns the string title of a button from its index, eliminating the need to keep track of which index value corresponds to which button.
If the alert view is displaying text fields, we can access the fields in a very similar way to determining which button was pressed—through the alert view’s textFieldAtIndex method. Index 0 is the first field, and index 1 is the second.
A partial implementation of alertView:clickedButtonAtIndex that handles an alert view with multiple buttons and text fields is provided in Listing 10.2.
LISTING 10.2 Responding to an Alert View
1: - (void)alertView:(UIAlertView *)alertView
2: clickedButtonAtIndex:(NSInteger)buttonIndex {
3: NSString *buttonTitle=[alertView buttonTitleAtIndex:buttonIndex];
4: NSString *fieldOne=[[alertView textFieldAtIndex:0] text];
5: NSString *fieldTwo=[[alertView textFieldAtIndex:1] text];
6: }
Although this method doesn’t actually do anything, it provides all the setup you need to respond to an alert view with multiple buttons and two text fields. Line 3 sets the buttonTitle variable to the button that was pressed, and lines 4–5 set fieldOne and fieldTwo to any text entered into the text fields that the alert displayed.
Action Sheets
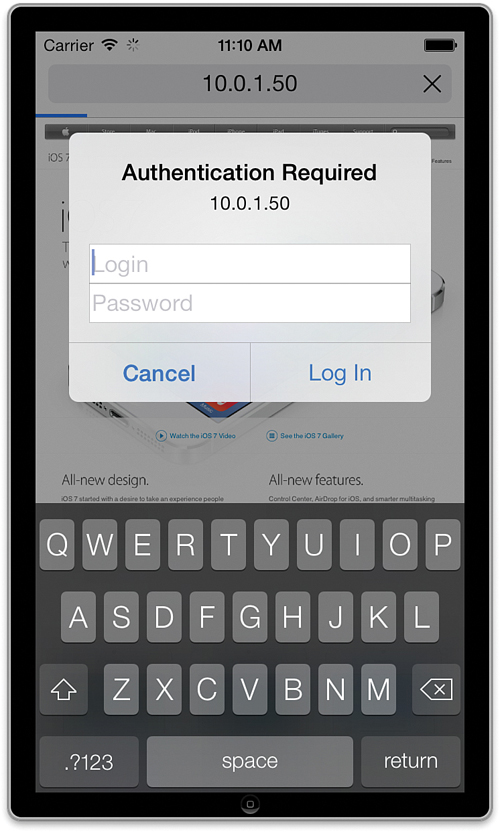
Alert views are used to display messages that indicate a change in state or a condition within an application that a user should acknowledge. Sometimes, however, a user should be prompted to make a decision based on the result of an action. For example, if an application provides the option to share information with a friend, the user might be prompted for the method of sharing (such as sending an email, uploading a file, and so on). You can see this behavior when touching and holding a link in Safari, as shown in Figure 10.2. This interface element is called an action sheet and is an instance of UIActionSheet.
Action sheets are also used to confirm actions that are potentially destructive to data. In fact, they provide a separate bright-red button label to help draw a user’s attention to potential deletion of data.
Implementing an action sheet is very (very) similar to an alert view. Initialize, configure, and display, as shown in Listing 10.3.
LISTING 10.3 Implementing a UIActionSheet Class
1: - (IBAction)doActionSheet:(id)sender {
2: UIActionSheet *actionSheet;
3: actionSheet=[[UIActionSheet alloc] initWithTitle:@"Available Actions"
4: delegate:self
5: cancelButtonTitle:@"Cancel"
6: destructiveButtonTitle:@"Delete"
7: otherButtonTitles:@"Keep",nil];
8: actionSheet.actionSheetStyle=UIActionSheetStyleDefault;
9: [actionSheet showInView:self.view];
10: }
Lines 2–7 declare and instantiate an instance of UIActionSheet called actionSheet. Similar to the setup of an alert, the initialization convenience method takes care of nearly all the setup. The parameters are as follows:
![]() initWithTitle: Initializes the sheet with the specified title string.
initWithTitle: Initializes the sheet with the specified title string.
![]() delegate: Contains the object that will serve as the delegate to the sheet. If this is set to
delegate: Contains the object that will serve as the delegate to the sheet. If this is set to nil, the sheet is displayed, but pressing a button will have no effect beyond dismissing the sheet.
![]() cancelButtonTitle: Sets the string shown in the default button for the alert.
cancelButtonTitle: Sets the string shown in the default button for the alert.
![]() destructiveButtonTitle: The title of the option that will result in information being lost. This button is presented in bright red (a sharp contrast to the rest of the choices). If set to
destructiveButtonTitle: The title of the option that will result in information being lost. This button is presented in bright red (a sharp contrast to the rest of the choices). If set to nil, no destructive button appears.
![]() otherButtonTitles: Adds additional buttons to the sheet. This list always ends in
otherButtonTitles: Adds additional buttons to the sheet. This list always ends in nil.
Line 8 sets a visual appearance for the action sheet. This has no effect in iOS 7; the operating system chooses the appearance for you. If you’re developing for earlier versions of the OS, however, you can choose from four possible styles:
![]() UIActionSheetStyleAutomatic: If a button bar appears at the bottom of the screen, it adapts to match the bar. Otherwise, it takes on the default appearance.
UIActionSheetStyleAutomatic: If a button bar appears at the bottom of the screen, it adapts to match the bar. Otherwise, it takes on the default appearance.
![]() UIActionSheetStyleDefault: The default iOS-determined action sheet appearance.
UIActionSheetStyleDefault: The default iOS-determined action sheet appearance.
![]() UIActionSheetStyleBlackTranslucent: A dark, but semitransparent style.
UIActionSheetStyleBlackTranslucent: A dark, but semitransparent style.
![]() UIActionSheetStyleBlackOpaque: A dark, nontransparent style.
UIActionSheetStyleBlackOpaque: A dark, nontransparent style.
In line 9, the action sheet is displayed in the current view controller’s view (self.view) using the UIActionSheet showInView method. In this example, the showInView method is used to animate the opening of the sheet from the current view controller’s view. If you had an instance of a toolbar or a tab bar, you could use showFromToolbar or showFromTabBar to make the sheet appear to open from either of these user interface elements.
Tip
Action sheets are very similar to alerts in how they are initialized, modified, and ultimately, acted upon. However, unlike alerts, an action sheet can be associated with a given view, tab bar, or toolbar. When an action sheet appears onscreen, it is animated to show its relationship to one of these elements.
Responding to an Action Sheet
The similarities between alert views and action sheets continue with how we react to a button press. We’ll follow almost the same steps as we did with an alert view.
First, the class that handles the action sheet response must conform to a new protocol: UIActionSheetDelegate. This only requires a simple change to the @interface line of the class’s interface file:
@interface ViewController : UIViewController <UIActionSheetDelegate>
Next, the action sheet delegate property must be set to point to the class implementing the protocol (see line 4 of Listing 10.3). If the same class that is invoking the action sheet also handles the response, the delegate is self:
delegate:self
Finally, to capture the click event, we need to implement the actionSheet:clickedButtonAt Index method. As with alertView:clickedButtonAtIndex, this method provides the button index that was pressed within the action sheet. We can also use, as we did with the alert view, a method buttonTitleAtIndex to grab the title of the button that was touched rather than having to deal with the buttons numerically.
Listing 10.4 provides a partial implementation of actionSheet:clickedButtonAtIndex.
LISTING 10.4 Responding to an Action Sheet
1: - (void)actionSheet:(UIActionSheet *)actionSheet
2: clickedButtonAtIndex:(NSInteger)buttonIndex {
3: NSString *buttonTitle=[actionSheet buttonTitleAtIndex:buttonIndex];
4: }
Typing out the method declaration actually takes more time than the entire implementation. Line 3 sets buttonTitle to the name of the button that was touched. From there, it’s up to you to make it do something useful.
System Sound Services
Visual notifications are great for providing feedback to a user and getting critical input. Other senses, however, can prove just as useful for getting a user’s attention. Sound, for example, plays an important role on nearly every computer system (regardless of platform or purpose). Sounds tell us when an error has occurred or an action has been completed. Sounds free a user’s visual focus and still provide feedback about what an application is doing.
Vibrations take alerts one step further. When a device has the ability to vibrate, it can communicate with users even if they can’t see or hear it. For the iPhone, vibration means that an app can notify users of events even when stowed in a pocket or resting on a nearby table. The best news of all? Both sounds and vibrations are handled through the same simple code, meaning that you can implement them relatively easily within your applications.
To enable sound playback and vibration, we take advantage of System Sound Services. System Sound Services provides an interface for playing back sounds that are 30 seconds or less in length. It supports a limited number of file formats (specifically CAF, AIF, and WAV files using PCM or IMA/ADPCM data). The functions provide no manipulation of the sound, nor control of the volume, so you do not want to use System Sound Services to create the soundtrack for your latest and greatest iOS game. In Hour 19, “Working with Rich Media,” we explore additional media playback features of iOS.
iOS supports three different notifications using this application programming interface (API):
![]() Sound: A simple sound file is played back immediately. If the device is muted, the user hears nothing.
Sound: A simple sound file is played back immediately. If the device is muted, the user hears nothing.
![]() Alert: Again, a sound file is played, but if the device is muted and set to vibrate, the user is alerted through vibration.
Alert: Again, a sound file is played, but if the device is muted and set to vibrate, the user is alerted through vibration.
![]() Vibrate: The device is vibrated, regardless of any other settings.
Vibrate: The device is vibrated, regardless of any other settings.
Accessing Sound Services
To use System Sound Services from a project, you must add the AudioToolbox framework and any sound files you want to play. Since AudioToolbox is an Apple-provided framework and supports being imported as a module, we can prepare an application to use it by adding a single line to our code:
@import AudioToolbox;
Unlike most of the other development functionality discussed in this book, the System Sound Services functionality is not implemented as a class. Instead, you use more traditional C-style function calls to trigger playback.
To play audio, the two functions you use are AudioServicesCreateSystemSoundID and AudioServicesPlaySystemSound. You also need to declare a variable of the type SystemSoundID. This represents the sound file that we are working with. To get an idea of how it all comes together, look at Listing 10.5.
LISTING 10.5 Loading and Playing a Sound
1: SystemSoundID soundID;
2: NSString *soundFile = [[NSBundle mainBundle]
3: pathForResource:@"mysound" ofType:@"wav"];
4: AudioServicesCreateSystemSoundID((__bridge CFURLRef)
5: [NSURL fileURLWithPath:soundFile]
6: , &soundID);
7: AudioServicesPlaySystemSound(soundID);
This might seem a bit alien after all the Objective-C we’ve been using. Let’s take a look at the functional pieces.
Line 1 starts things off by declaring a variable, soundID, that refers to the sound file. (Note that this is not declared as a pointer, as pointers begin with an asterisk, *.) Next, in line 2, we declare and assign a string (soundFile) to the path of the sound file mysound.wav. This works by first using the NSBundle class method mainBundle to return an NSBundle object that corresponds to the directory containing the current application’s executable binary. The NSBundle object’s pathForResource:ofType method is then used to identify the specific sound file by name and extension.
After a path has been identified for the sound file, we use the AudioServicesCreateSystem SoundID function in lines 4–6 to create a SystemSoundID that represents this file for the functions that actually play the sound. This function takes two parameters: a CFURLRef object that points to the location of the file, and a pointer to the SystemSoundID variable that we want to be set. For the first parameter, we use the NSURL fileURLWithPath class method to return an NSURL object from the sound file path. We preface this with (__bridge CFURLRef) to cast the NSURL object to the CFURLRef type expected by the system. The unusual __bridge keyword is necessary because we’re casting from a C structure to an Objective-C object. The second parameter is satisfied by passing &soundID to the function.
Tip
Recall that &<variable> returns a reference (pointer) to the named variable. This is rarely needed when working with the Objective-C classes because nearly everything is already a pointer.
After soundID has been properly set up, all that remains is playing it. Passing the soundID variable to the AudioServicesPlaySystemSound function, as shown in line 7, makes the magic happen.
Alert Sounds and Vibrations
The difference between an alert sound and a system sound is that an alert sound, if muted, automatically triggers a phone vibration. The setup and use of an alert sound is identical to a system sound. In fact, playing an alert is just a matter of substituting the function AudioServicesPlayAlertSound in place of AudioServicesPlaySystemSound.
Vibrations alone are even easier. To vibrate a compatible device (currently iPhones), you just provide the constant kSystemSoundID_Vibrate to AudioServicesPlaySystemSound:
AudioServicesPlaySystemSound(kSystemSoundID_Vibrate);
Now that you understand the different alert styles we have to work with, it’s time to implement them for real. We’ll test several variations of alert views, action sheets, and sounds in this hour’s tutorial.
Tip
Attempting to vibrate a device without vibration capabilities (like an iPad) will fail silently. You can safely leave vibration code in your app regardless of the device you are targeting.
Exploring User Alert Methods
Because all the logic for implementing alerts, action sheets, or System Sound Services is contained in small, easy-to-understand chunks of code, this hour’s project is a bit different from what you’ve seen in other hours. We treat this hour’s project like a sandbox. We set it up, and then spend a good amount of time talking about the code that needs to be written to make it work, and we test it along the way.
You’ll generate alert views, alert views with multiple buttons, alert views with fields, action sheets, sounds, and even vibrate your device (if it’s an iPhone or a yet-unreleased iPad, that is).
Implementation Overview
Unlike other projects where our UI design was intimately tied to the code, this tutorial’s interface is rather inconsequential; we’re simply interested in creating buttons to trigger actions that demonstrate the different alert methods and providing a single output area so we can see how the user responded. Everything to generate alert views, action sheets, sounds, and vibrations is handled entirely in code, so the sooner we get the framework set up for the project, the sooner we can get to the implementation logic.
Setting Up the Project
To practice using these alert classes and methods, we need to create a new project with buttons for activating the different styles of notifications. Open Xcode and create a new project based on the Single View Application template. Name the project GettingAttention.
Several resources that we need in this project aren’t there by default, notably the sounds that we will be playing with System Sound Services and framework required to play those sounds. Let’s add these important resources now.
Adding the Sound Resources
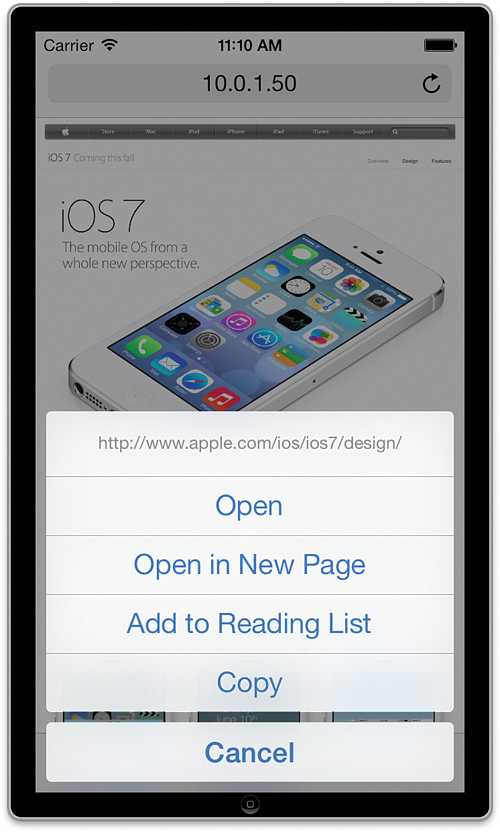
With your project open in Xcode, return to the Finder and navigate to the Sounds folder within this hour’s project folder. Drag the folder into your Xcode project folder, choosing to copy the files and create groups when prompted.
You should now see the files listed in your project group, as shown in Figure 10.3.
Planning the Properties and Connections
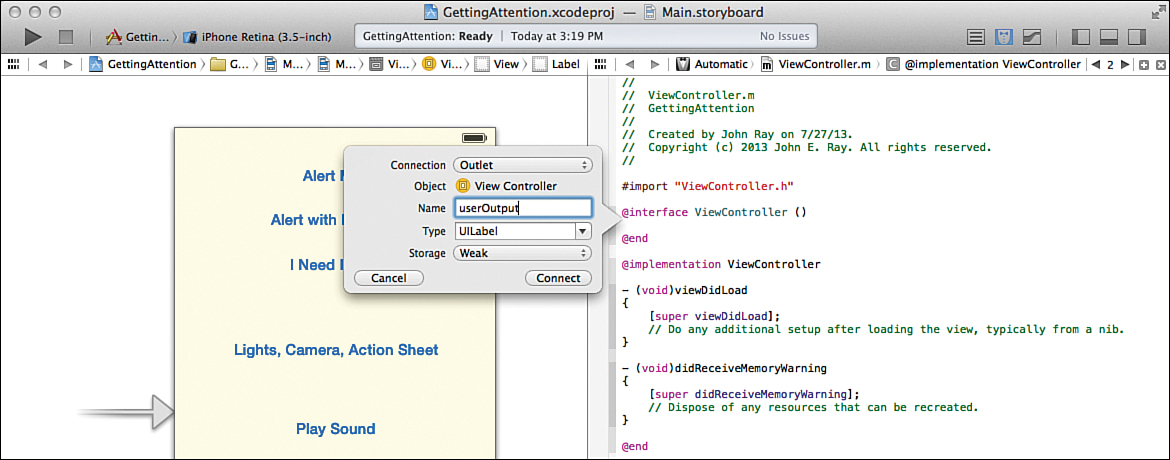
The last step before we can create our GettingAttention application is to figure out what outlets and actions we need to fully test everything that we want. As mentioned earlier, this is a barebones app, nothing flashy. The only outlet we need is for a single label (UILabel) that provides some feedback to what the user has done. This will be named userOutput.
In addition to the outlet, we need a total of seven different actions, all to be triggered by different buttons in the user interface: doAlert, doMultiButtonAlert, doAlertInput, doActionSheet, doSound, doAlertSound, and finally, doVibration.
That’ll do it. Everything else is handled in code. Let’s create the interface and make our connections.
Designing the Interface
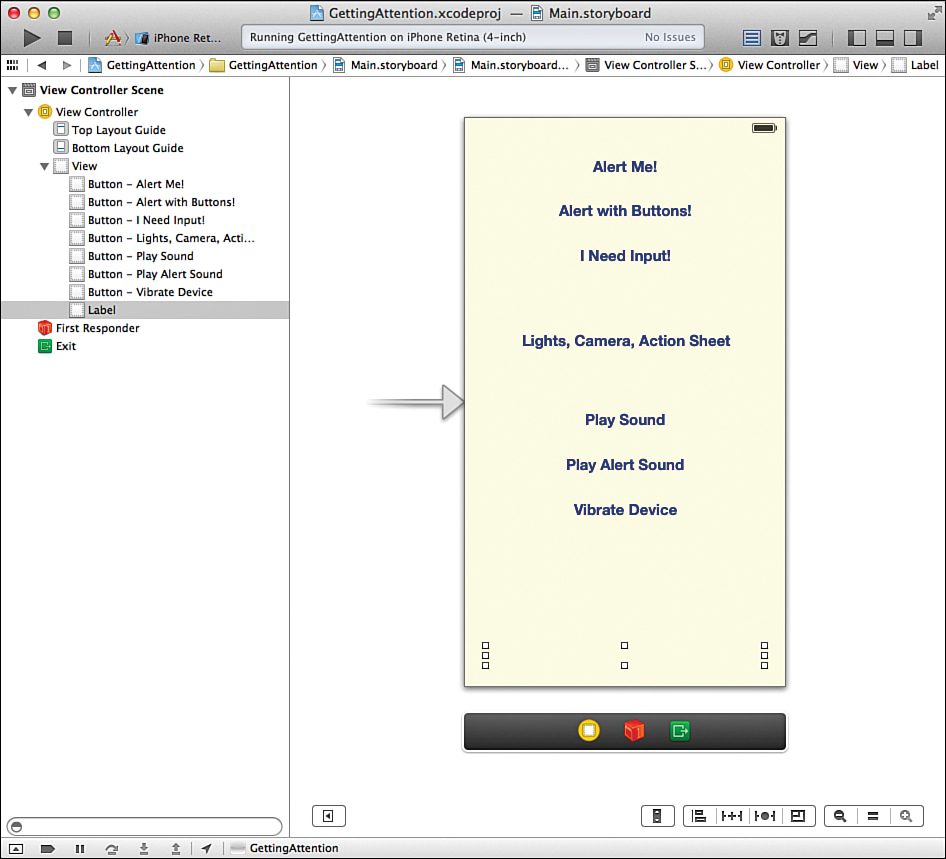
Open the Main.storyboard file in Interface Builder (IB). We need to add seven buttons and a text label to the empty view. You should be getting quite familiar with this process by now.
Add a button to the view by opening the Object Library (View Utilities, Show Object Library) and dragging a button (IUButton) to the View window. Add six more buttons using the library or by copying and pasting the first button.
Change the button labels to correspond to the different notification types that we’ll be using. Specifically, name the buttons (top to bottom) as follows:
![]() Alert Me!
Alert Me!
![]() Alert with Buttons!
Alert with Buttons!
![]() I Need Input!
I Need Input!
![]() Lights, Camera, Action Sheet
Lights, Camera, Action Sheet
![]() Play Alert Sound
Play Alert Sound
![]() Vibrate Device
Vibrate Device
Drag a label (UILabel) from the library to the bottom of the view. Remove the default label text and set the text to align center. The interface should resemble Figure 10.4. I’ve chosen to cluster my buttons based on their function. You can arrange yours however you want.
Creating and Connecting the Outlets and Actions
The interface itself is finished, but we still need to make the connection between the objects and our code. It’s probably self-explanatory, but the connections you will be building are listed here.
![]() User Output Label (UILabel):
User Output Label (UILabel): userOutput
And then the actions:
![]() Alert Me! (UIButton):
Alert Me! (UIButton): doAlert
![]() Alert with Buttons! (UIButton):
Alert with Buttons! (UIButton): doMultiButtonAlert
![]() I Need Input! (UIButton):
I Need Input! (UIButton): doAlertInput
![]() Lights, Camera, Action Sheet (UIButton):
Lights, Camera, Action Sheet (UIButton): doActionSheet
![]() Play Sound (UIButton):
Play Sound (UIButton): doSound
![]() Play Alert Sound (UIButton):
Play Alert Sound (UIButton): doAlertSound
![]() Vibrate Device (UIButton):
Vibrate Device (UIButton): doVibration
With the Main.storyboard file selected, click the assistant editor button, and then hide the project navigator and document outline (Editor, Hide Document Outline) to make room for your connections. The ViewController.m file should be visible to the right of your interface.
Adding the Outlet
Control-drag from our single lonely label to just below the @interface line in ViewController.m. When prompted, choose to create a new outlet named userOutput, as shown in Figure 10.5.
Adding the Actions
Now, Control-drag from the Alert Me! button to just below the @property declaration in the ViewController.m file, connecting to a new action named doAlert, as shown in Figure 10.6.
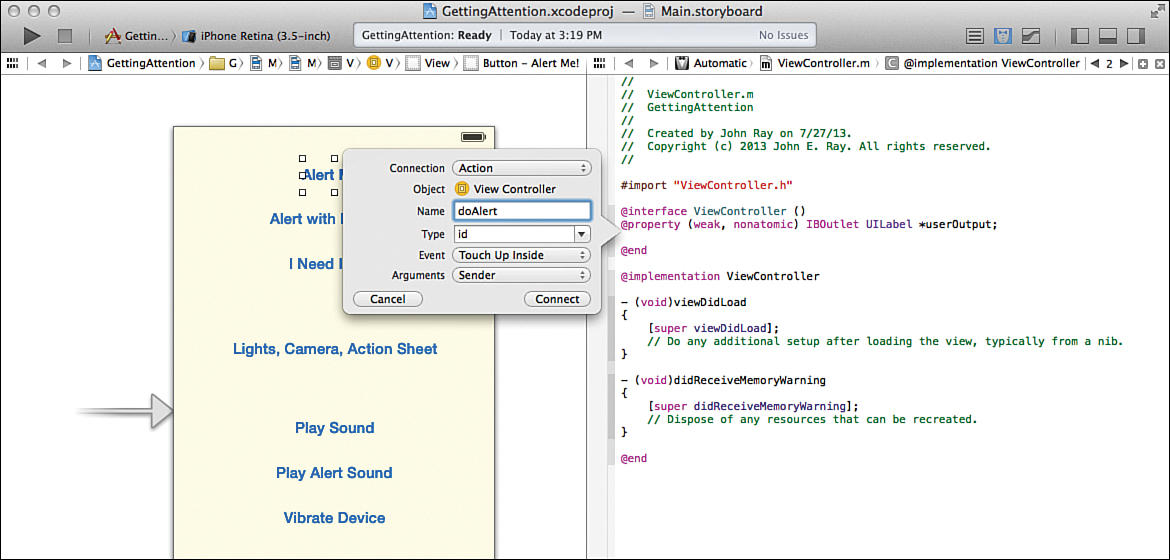
Repeat this process for the other six buttons. Alert with Buttons! connects to doMulti ButtonAlert; I Need Input! should connect to the doAlertInput method; Lights, Camera, Action Sheet to doActionSheet; Play Sound to doSound; Play Alert Sound to doAlertSound; and Vibrate Device to doVibration.
The framework for our test of notifications is finished, and we’re ready to jump into code. Switch back to the standard editor and display the project navigator (Command-1). Open the ViewController.m file; we start by implementing a simple alert view.
Implementing Alert Views
The simplest case of an alert that a user can encounter (and that a developer can develop) is an alert that is displayed and dismissed without changing the flow of the application at all. In other words, the alert is simply that: an alert. When the user presses the button to dismiss it, nothing else changes.
Edit ViewController.m and enter the code shown in Listing 10.6 for the doAlert implementation.
LISTING 10.6 Implementing the doAlert Method
1: - (IBAction)doAlert:(id)sender {
2: UIAlertView *alertDialog;
3: alertDialog = [[UIAlertView alloc]
4: initWithTitle: @"Alert Button Selected"
5: message:@"I need your attention NOW!"
6: delegate: nil
7: cancelButtonTitle: @"Ok"
8: otherButtonTitles: nil];
9: [alertDialog show];
10: }
If you were paying attention at the start of this hour’s lesson, this method should look familiar.
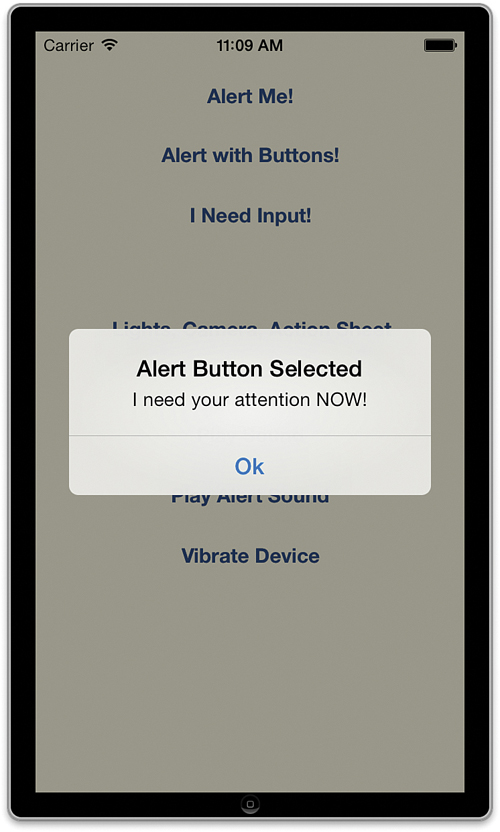
In lines 2–8, we declare and instantiate our instance of UIAlertView in a variable called alertDialog. The alert is initialized with a title (Alert Button Selected), a message (I need your attention NOW!), and a “cancel” button (Ok). No other buttons are added, and a delegate is not provided, so no response to the alert is implemented.
After alertDialog has been initialized, it is displayed onscreen in line 9.
Note
If you prefer to set the alert message and buttons independent of the initialization, the UIAlertView class includes properties for setting the text labels (message, title) individually and methods for adding buttons (addButtonWithTitle).
You can now run the project and test the first button, Alert Me! Figure 10.7 shows the outcome of your first alert implementation.
Tip
An alert doesn’t have to be a single-use object. If you’re going to be using an alert repeatedly, create an instance when your view is loaded and show it as needed, but remember to free up its memory when you have finished using it.
Creating Multibutton Alerts
An alert with a single button is easy to implement because you do not have to program any additional logic. The user taps the button, the alert is dismissed, and execution continues as normal. If you need to add additional buttons, however, your application needs to be able to identify the button pressed and react appropriately.
In addition to the single-button alert that you just created, two additional visual configurations are possible. The difference between them is how many buttons you’re asking the alert to display. A two-button alert places buttons side by side. When more than two buttons are added, the buttons are stacked.
Creating an alert with multiple buttons isn’t difficult: We just take advantage of the otherButtonTitles parameter of the initialization convenience method. Instead of setting to nil, provide a list of strings terminated by nil that should be used as the additional button names. The cancel button is always displayed on the left in a two-button scenario or at the bottom of a longer button list.
Tip
At most, an alert view can display five buttons (including the button designated as the cancel button) simultaneously. Attempting to add more may result in some unusual onscreen effects, such as display of clipped/partial buttons.
To test this, write an updated version of the doAlert method within the doMultiButtonAlert method stub created earlier. Listing 10.7 shows the first implementation.
LISTING 10.7 Implementing the Initial doMultipleButtonAlert Method
1: - (IBAction)doMultiButtonAlert:(id)sender {
2: UIAlertView *alertDialog;
3: alertDialog = [[UIAlertView alloc]
4: initWithTitle: @"Alert Button Selected"
5: message:@"I need your attention NOW!"
6: delegate: nil
7: cancelButtonTitle: @"Ok"
8: otherButtonTitles: @"Maybe Later", @"Never", nil];
9: [alertDialog show];
10: }
In this new implementation, the buttons Maybe Later and Never are added to the alert view using the otherButtonTitles parameter. Pressing the Alert with Buttons! button should now open the alert view displayed in Figure 10.8.
Try pushing one of the alert buttons. The alert view is dismissed. Push another. The same thing happens. All the buttons do exactly the same thing: absolutely nothing. Although this behavior was fine with a single button, it’s not going to be very useful with our current configuration.
Responding to an Alert View Button Press
As you learned earlier, to respond to an alert view, we must implement the AlertView Delegate protocol within the class that is going to handle the response. We’ll use our main application’s view controller class for this purpose, but in larger projects it may be a completely separate class. The choice is entirely up to you.
To identify the button that was pressed in a multibutton alert, our ViewController class must conform to the UIAlertViewDelegate protocol and implement the alertView:clicked ButtonAtIndex method.
Edit the ViewController.h interface file to declare that the class will conform to the necessary protocol by modifying the @interface line as follows:
@interface ViewController : UIViewController <UIAlertViewDelegate>
Next, update the initialization code of the alert view in doMultiButtonAlert so that the delegate is pointed to the class that implements the UIAlertViewDelegate protocol. Because this is the same object (the view controller) that is creating the alert, we can just use self:
alertDialog = [[UIAlertView alloc]
initWithTitle: @"Alert Button Selected"
message:@"I need your attention NOW!"
delegate: self
cancelButtonTitle: @"Ok"
otherButtonTitles: @"Maybe Later", @"Never", nil];
The alertView:clickedButtonAtIndex method that we write next receives the index of the button that was pushed and gives us the opportunity to act on it. We take advantage of the UIAlertView instance method buttonTitleAtIndex to provide us with the button title, rather than a numeric index value.
Add the code in Listing 10.8 to ViewController.m to display a message when a button is pressed. Note that this is a brand-new method; there is no stub already in the file.
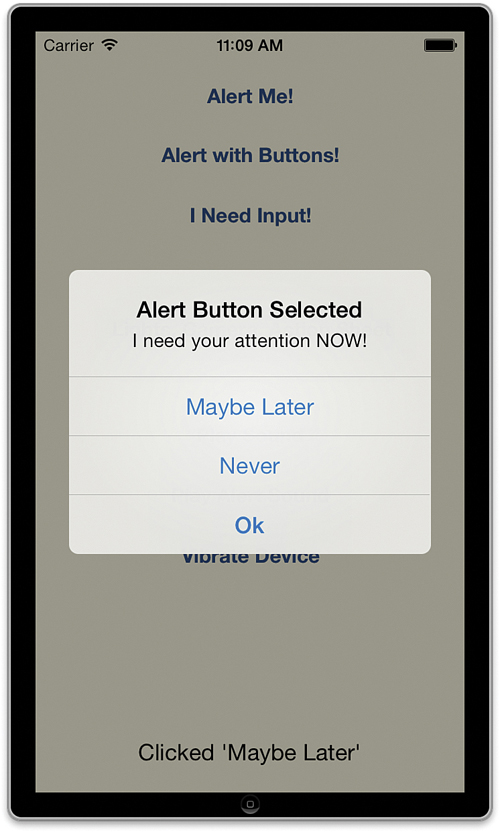
LISTING 10.8 Responding to an Alert View Button Press
1: - (void)alertView:(UIAlertView *)alertView
2: clickedButtonAtIndex:(NSInteger)buttonIndex {
3: NSString *buttonTitle=[alertView buttonTitleAtIndex:buttonIndex];
4: if ([buttonTitle isEqualToString:@"Maybe Later"]) {
5: self.userOutput.text=@"Clicked 'Maybe Later'";
6: } else if ([buttonTitle isEqualToString:@"Never"]) {
7: self.userOutput.text=@"Clicked 'Never'";
8: } else {
9: self.userOutput.text=@"Clicked 'Ok'";
10: }
11: }
To start, in line 3, buttonTitle is set to the title of the button that was clicked. Lines 4–10 test the value of buttonTitle against the names of the buttons that we initialized when creating the alert view. If a match is found, the userOutput label in the view is updated to something appropriate.
Feel free to run and test the application again—the alert button press should be detected. This is just one way to implement the button handler for your alert. In some cases (such as dynamically generated button labels), it might be more appropriate to work directly with the button index values. You may also want to consider defining constants for button labels.
Caution: Always Active
Don’t assume that application processing stops when the alert window is on the screen. Your code continues to execute after you show the alert. You might even want to take advantage of this by using the UIAlertView instance method dismissWithClickedButtonIndex to remove the alert from the screen if the user does not respond within a certain length of time.
Adding Fields to Alert Views
Although buttons can be used to generate user input from an alert, you might have noticed that some applications actually present text fields within an alert box. The App Store, for example, prompts for your Apple ID password before it starts downloading a new app.
To add fields to your alert dialogs, you set the alertViewStyle property of your alert view to either UIAlertViewSecureTextInput or UIAlertViewStylePlainTextInput for a single-password or plain-text entry field, respectively. A third option, UIAlertViewStyleLoginAnd PasswordInput style, shows both a plain-text and single-password entry field.
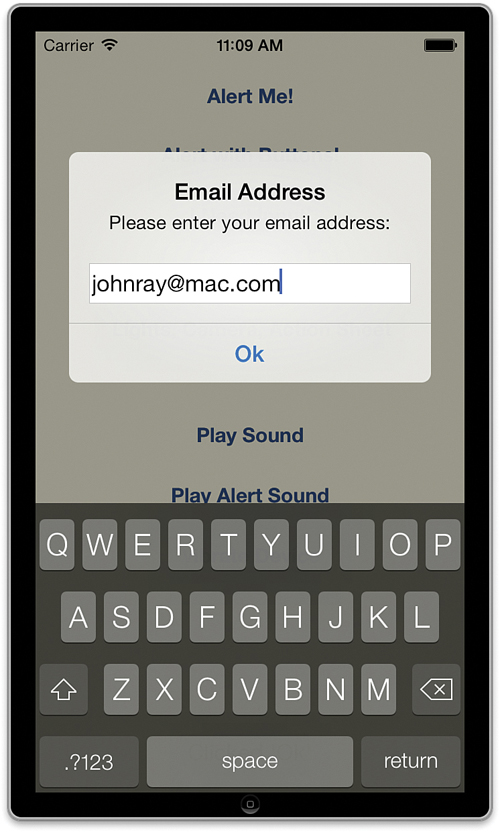
Using the doAlert method as a starting point, implement doAlertInput so that it prompts for an email address, displays a single plain-text field and a single OK button, and uses the ViewController class as its delegate. Listing 10.9 shows the final implementation.
LISTING 10.9 The doAlertInput Implementation
1: - (IBAction)doAlertInput:(id)sender {
2: UIAlertView *alertDialog;
3: alertDialog = [[UIAlertView alloc]
4: initWithTitle: @"Email Address"
5: message:@"Please enter your email address:"
6: delegate: self
7: cancelButtonTitle: @"Ok"
8: otherButtonTitles: nil];
9: alertDialog.alertViewStyle=UIAlertViewStylePlainTextInput;
10: [alertDialog show];
11: }
Setting the property is all that’s necessary to display the field. Run the application and touch the I Need Input! button. You should see the alert, as demonstrated in Figure 10.9. All that remains is being able to do something with the contents of the field, and that part is easy.
Accessing an Alert View Text Field
As you learned earlier, handling the user’s input into the alert view’s fields is accomplished by the alertView:clickedButtonAtIndex method.
“Ah ha,” you say, “but didn’t we already use that method to handle the alert view from doMultiButtonAlert?” Yes, we did, but if we’re clever, we can tell the difference between which alert is calling that method and react appropriately.
Because we have access to the view object itself within the alertView:clickedButtonAt Index method, why don’t we just check the title of the view and, if it is equal to the title of our input alert (Email Address), we can set userOutput to the text the user entered in the field. This is easily accomplished by a simple string comparison using the title property of the alert view object passed to alertView:clickedButtonAtIndex.
Update the method by adding the highlighted lines shown at the end of Listing 10.10.
LISTING 10.10 Handling the Alert View Input Fields
1: - (void)alertView:(UIAlertView *)alertView
2: clickedButtonAtIndex:(NSInteger)buttonIndex {
3: NSString *buttonTitle=[alertView buttonTitleAtIndex:buttonIndex];
4: if ([buttonTitle isEqualToString:@"Maybe Later"]) {
5: self.userOutput.text=@"Clicked 'Maybe Later'";
6: } else if ([buttonTitle isEqualToString:@"Never"]) {
7: self.userOutput.text=@"Clicked 'Never'";
8: } else {
9: self.userOutput.text=@"Clicked 'Ok'";
10: }
11:
12: if ([alertView.title
13: isEqualToString: @"Email Address"]) {
14: self.userOutput.text=[[alertView textFieldAtIndex:0] text];
15: }
16: }
Lines 12–13 compare the title property of the incoming alertView object to Email Address. If it matches, we know that the method was called from the alert view with the text input field.
Line 14 grabs the text input field object using the method textFieldAtIndex. Because there is only one field, the index is 0. The text message is then sent to the object to return the string the user typed into the field. The userOutput label is set to this value.
Run the application with these changes in place. When the alert view with the text field is dismissed, the delegate method is called and the user output label is properly set to the text the user entered.
Implementing Action Sheets
Now that you’ve implemented several types of alert views, action sheets will pose no difficulty at all. The setup and handling of an action sheet, in fact, is much more straightforward than an alert view because action sheets can do one thing and only one thing: show a list of buttons.
Tip
Action sheets can take up to seven buttons on a 3.5-inch iPhone (including “cancel” and the “destructive” button) while maintaining a standard layout. If you exceed seven, however, the display automatically changes into a scrolling list. This gives you room to add as many options as you need.
To create your first action sheet, we implement the method stub doActionSheet created within the ViewController.m file. Recall that this method is triggered by pushing the Lights, Camera, Action Sheet button. It displays the title Available Actions and has a cancel button named Cancel, a destructive button named Destroy, and two other buttons named Negotiate and Compromise. The ViewController class is used as the delegate.
Add the code in Listing 10.11 to the doActionSheet method.
LISTING 10.11 Implementing the doActionSheet Method
1: - (IBAction)doActionSheet:(id)sender {
2: UIActionSheet *actionSheet;
3: actionSheet=[[UIActionSheet alloc] initWithTitle:@"Available Actions"
4: delegate:self
5: cancelButtonTitle:@"Cancel"
6: destructiveButtonTitle:@"Destroy"
7: otherButtonTitles:@"Negotiate",@"Compromise",nil];
8: actionSheet.actionSheetStyle=UIActionSheetStyleDefault;
9: [actionSheet showFromRect:[(UIButton *)sender frame]
10: inView:self.view animated:YES];
11: }
Lines 2–7 declare and instantiate an instance of UIActionSheet called actionSheet. Similar to the setup of an alert, the initialization convenience method takes care of nearly all the setup.
Line 8 sets the alert view’s style to UIActionSheetStyleDefault, the iOS 7 standard.
In lines 9–10, the action sheet is displayed in the current view controller’s view (self.view).
Run the application and touch the Lights, Camera, Action Sheet button to see the results. Figure 10.10 demonstrates the display. Note that you may see a warning until you conform to the action sheet delegate protocol (which we do in the next section); this won’t prevent you from testing the app now.
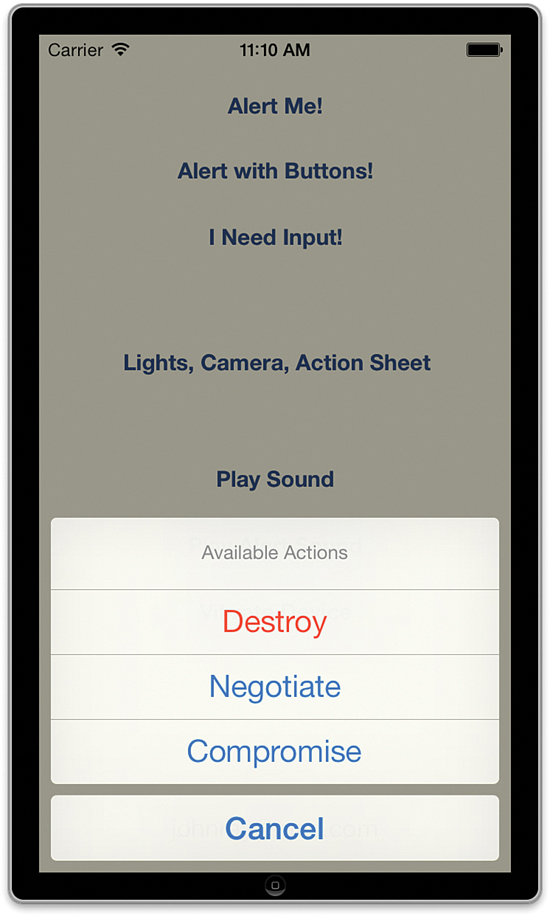
FIGURE 10.10 Action sheets can include cancel and destructive buttons, as well as buttons for other options.
Responding to an Action Sheet Button Press
For our application to detect and respond to a button press in the action sheet, our ViewController class must conform to the UIActionSheetDelegate protocol and implement the actionSheet:clickedButtonAtIndex method.
Edit the ViewController.h interface file to declare that the class will be conforming to the necessary protocol by modifying the @interface line as follows:
@interface ViewController : UIViewController <UIAlertViewDelegate,
UIActionSheetDelegate>
Notice that our ViewController class is now conforming to two protocols: UIAlertView Delegate and UIActionSheetDelegate. A class can conform to as many protocols as it needs.
Next, to capture the click event, we need to implement the actionSheet:clickedButtonAt Index method. This provides the button index that was pressed within the action sheet. Add the code in Listing 10.12 to ViewController.m.
LISTING 10.12 Responding to an Action Sheet Button Press
1: - (void)actionSheet:(UIActionSheet *)actionSheet
2: clickedButtonAtIndex:(NSInteger)buttonIndex {
3: NSString *buttonTitle=[actionSheet buttonTitleAtIndex:buttonIndex];
4: if ([buttonTitle isEqualToString:@"Destroy"]) {
5: self.userOutput.text=@"Clicked 'Destroy'";
6: } else if ([buttonTitle isEqualToString:@"Negotiate"]) {
7: self.userOutput.text=@"Clicked 'Negotiate'";
8: } else if ([buttonTitle isEqualToString:@"Compromise"]) {
9: self.userOutput.text=@"Clicked 'Compromise'";
10: } else {
11: self.userOutput.text=@"Clicked 'Cancel'";
12: }
13: }
We use buttonTitleAtIndex (line 3) to get the titles used for the buttons based on the index provided. The rest of the code follows the same pattern created for handling alert views. Lines 4–12 test for the different button titles and update the view’s output message to indicate what was chosen.
Implementing Alert Sounds and Vibrations
Recall that to use System Sound Services from a project, you need the AudioToolbox framework and any sound files you want to play. Because we already included the sound resources, we just need to add the framework. To import the AudioToolbox framework and make our code aware of its existence, add an @import line to the ViewController.h interface file. Insert this line immediately following the existing #import directive:
@import AudioToolbox;
We’re now ready to play sounds and vibrate the device. Very little changes from the example code that we covered earlier this hour.
Playing System Sounds
The first thing that we want to implement is the doSound method for playing system sounds. These are short sounds that, when muted, will not result in an accompanying vibration. The Sounds folder that you added to the project during the setup contains a file soundeffect.wav that we will use to implement system sound playback.
Edit the ViewController.m implementation file and complete doSound, as shown in Listing 10.13.
LISTING 10.13 Implementing the doSound Method
1: - (IBAction)doSound:(id)sender {
2: SystemSoundID soundID;
3: NSString *soundFile = [[NSBundle mainBundle]
4: pathForResource:@"soundeffect" ofType:@"wav"];
5:
6: AudioServicesCreateSystemSoundID((__bridge CFURLRef)
7: [NSURL fileURLWithPath:soundFile]
8: , &soundID);
9: AudioServicesPlaySystemSound(soundID);
10: }
Line 2 declares soundID, a variable that refers to the sound file.
In line 3, we declare and assign a string (soundFile) to the path of the sound file soundeffect.wav.
In lines 6–8, we use the AudioServicesCreateSystemSoundID function to create a SystemSoundID that represents this file for the functions that actually play the sound.
Line 9 uses the AudioServicesPlaySystemSound function to play the sound.
Run and test the application. Pressing the Play Sound button should now play back the sound effect WAV file.
Caution: Beware the __bridge!
It has come to my attention that the two underscores (_) in front of the bridge keyword frequently look like a single underscore in some versions of this book. If you’re having problems getting your project to run, make sure that you’ve typed two underscores.
Playing Alert Sounds with Vibrations
As mentioned earlier this hour, the difference between an alert sound and a system sound is that an alert sound, if muted, automatically triggers a vibration. The setup and use of an alert sound is identical to a system sound. In fact, to implement the doAlertSound method stub in GettingAttentionViewController.m, use the same code as the doSound method in Listing 10.13, substituting the sound file alertsound.wav and using the function AudioServicesPlayAlertSound rather than AudioServicesPlaySystemSound:
AudioServicesPlayAlertSound(soundID);
After implementing the new method, run and test the application. Pressing the Play Alert Sound button plays the sound, and muting an iPhone causes the device to vibrate when the button is pressed.
Vibrating the Device
For our grand finale, we implement the final method in our GettingAttention application: doVibration. As you’ve already learned, the same System Sound Services that enabled us to play sounds and alert sounds also create vibrations. The magic we need here is the kSystemSoundID_Vibrate constant. When this value is substituted for the SystemSoundID and AudioServicesPlaySystemSound is called, the device vibrates. It’s as simple as that! Implement the doVibration method, as shown in Listing 10.14.
LISTING 10.14 Implementing the doVibration Method
- (IBAction)doVibration:(id)sender {
AudioServicesPlaySystemSound(kSystemSoundID_Vibrate);
}
That’s all there is to it. You’ve now explored seven different ways of getting a user’s attention. These are techniques that you can use in any application to make sure that your user is alerted to changes that may require interaction and can respond if needed.
Further Exploration
Your next step in making use of the notification methods discussed in this hour is to use them. These simple, but important, UI elements will help facilitate many of your critical user interactions. One topic that is beyond the scope of this book is the ability for a developer to push notifications to an iDevice.
Even without push notifications, you might want to add numeric badges to your applications. These badges are visible when the application isn’t running and can display any integer you want—most often, a count of items identified as “new” within the application (such as new news items, messages, events, and so on). To create application badges, look at the UIApplication class property applicationIconBadgeNumber. Setting this property to anything other than 0 will create and display the badge.
Another area that you might like to explore is how to work with rich media (Hour 19). The audio playback functions discussed in this hour are intended for alert-type sounds only. If you’re looking for more complete multimedia features, you need to tap into the AVFoundation framework, which gives you complete control over recording and playback features of iOS.
Finally, this hour covered notifications that occur when your application is running. For information about generating notifications when your app is stopped, check out Hour 22.
Summary
In this hour, you learned about two types of modal dialogs that can be used to communicate information to an application user and to enable the user to provide input at critical points in time. Alerts and action sheets have different appearances and uses but very similar implementations. Unlike many of the UI components we’ve used in this book, you cannot instantiate these with a simple drag and drop in IB.
We also explored two nonvisual means of communicating with a user: sounds and vibrations. Using the System Sound Services (by way of the AudioToolbox framework), you can easily add short sound effects and vibrate your iDevice. Again, you have to implement these in code, but in fewer than five lines, you can have your applications making noises and buzzing in your users’ hands.
Q&A
Q. Can sounds be used in conjunction with alert views?
A. Yes. Because alerts are often displayed without warning, there is no guarantee that the user is looking at the screen. Using an alert sound provides the best chance for getting the user’s attention, either through an audible noise or an automatic vibration if the user’s sound is muted.
Q. Why aren’t action sheets and alert views interchangeable?
A. Technically, unless you’re providing a large number of options to the user, you could use them interchangeably, but you’d be giving the user the wrong cues. Unlike alerts, action sheets animate and appear as part of the current view. The idea that the interface is trying to convey is that the actions that can be performed relate to what appears onscreen. An alert is not necessarily related to anything else on the display.
Workshop
Quiz
1. Alert views are tied to a specific UI element. True or false?
2. You can add as many fields to an alert as you want. True or false?
3. System Sound Services supports playing back a wide variety of sound file formats, including MP3s. True or false?
4. Vibrating an iPhone requires extensive and complicated coding. True or false?
Answers
1. False. Alert views are displayed outside the context of a view and are not tied to any other UI element.
2. False. Up to two text fields (one secure, one plain text) can be added to an alert view.
3. False. System Sound Services supports only AIF, WAV, and CAF formats.
4. False. Once the AudioToolbox framework is loaded, a single function call is all it takes to give an iPhone the shakes.
Activities
1. Rewrite the alert view handler to determine button presses using the button index values rather than the titles. This will help you prepare for projects where buttons may be generated and added to the view/sheet dynamically rather than during initialization.
2. Return to one or more of your earlier projects and add audio cues to the interface actions. Make switches click, buttons bing, and so on. Keep your sounds short, clear, and complementary to the actions that the users are performing.