6. View, Organize, Edit, and Share Pictures Using the Photos App
In This Chapter
![]() Organize photos using the Photos app
Organize photos using the Photos app
![]() Edit and enhance your photos
Edit and enhance your photos
![]() Share and print photos stored on your mobile device
Share and print photos stored on your mobile device
Both the Camera and Photos apps come preinstalled with iOS 7. Although the Camera app is used to control the cameras built in to your iPhone or iPad, the purpose of the Photos app is to help you organize, edit, enhance, print, and share the images that are stored in your iOS mobile device.
If you’re serious about digital photography using your iPhone or iPad, or you want an even more powerful toolset to work with as you organize, edit, enhance, share, and print your photos, consider upgrading to Apple’s optional iPhoto app. If you’ve purchased a new iPhone or iPad with iOS 7, the iPhoto app is available for free from the App Store and is the focus of the next chapter. (Otherwise, the app costs $4.99.)
There are also literally hundreds of third-party apps that can be used with or instead of the Camera and Photos apps to provide you with comprehensive digital photography solutions for your iOS mobile device. You’ll learn about some of these apps in Chapter 8, “Photography Apps That Enhance Your Picture-Taking Capabilities,” and Chapter 9, “Photography Apps That Expand Your Photo Editing and Enhancement Capabilities,” respectively.
If you’re new to using the Photos app, you’ll discover it’s designed to help you manage your digital images when they’re stored on your iPhone or iPad. Thus, you can use this app to manage images you take using the cameras built in to your iOS mobile device, or work with images that you transfer into or sync with your iPhone or iPad (but that were taken using other photography equipment).
When it comes to sharing and syncing your photos, the nice thing about the Photos app is that it fully integrates with the AirDrop, Mail, Messages, Facebook, Twitter, and Flickr functionality that’s built in to iOS 7. In addition, it’s fully compatible with Apple’s online-based iCloud service, so you can access and manage images stored in the My Photo Stream or Shared Photo Streams that are part of your personal iCloud account. (You learn more about using iCloud to back up, sync, and share photos in Chapter 13, “Discover iCloud’s My Photo Stream and Shared Photo Stream.”)
Organize Your Digital Images Using the Photos App
The iOS 7 edition of the Photos app has been redesigned to offer new ways to easily, and in some cases automatically, organize and sort your images. By default, when you take a photo using the Camera app, in addition to capturing the image itself, your iPhone or iPad also records the time and date when each photo was taken, as well as the location where it was taken. The iPhoto app uses this information, called metadata, to help automatically sort your images.
Each time you take a new photo using the Camera app, by default, it gets stored in the Camera Roll album (folder), which is readily accessible from the Photos app. When you transfer images into your iOS mobile device, separate folders are automatically created for them.
Meanwhile, at anytime, you can manually create new folders, with custom names, and then move selected images into those folders.
View the Images Stored on Your iPhone or iPad
The Photos app enables you to sort and organize your images in a variety of ways. If you want to begin by viewing thumbnails of all images stored in your iPhone or iPad, tap on the Photos icon that’s displayed at the bottom-left corner of the Photos app screen.
You’ll then notice that the Photos app automatically sorts your images using the dates and times they were taken. (If no relevant metadata is included with the images, the date and time the images were transferred into the iPhone or iPad is used.)
Note
Images are stored (saved) within albums. However, when you access the Years, Collections, or Moments view, the Photos app sorts and displays thumbnails for the images based on the dates and locations each was taken. The image files themselves, however, continue to be stored in their respective albums.
Tip
Tapping on the Photos icon offers different viewing modes for quickly perusing thumbnails of your images. To work with a specific album folder, tap on the Albums icon that’s displayed in the bottom-right corner of the Photos app screen.
The Years View
After tapping on the Photos icon (see Figure 6-1), you can quickly peruse the thumbnails for all the images stored in your iOS mobile device. The Years view, shown in Figure 6-2, collects all the images taken within a particular year and displays tiny thumbnails for each of them. Next to each year heading, a condensed listing of where the photos were taken is displayed.
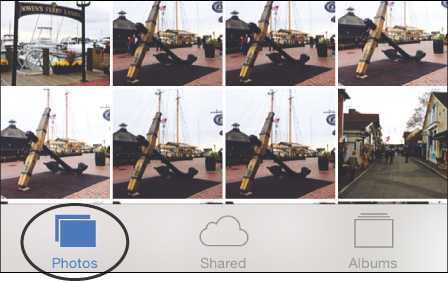
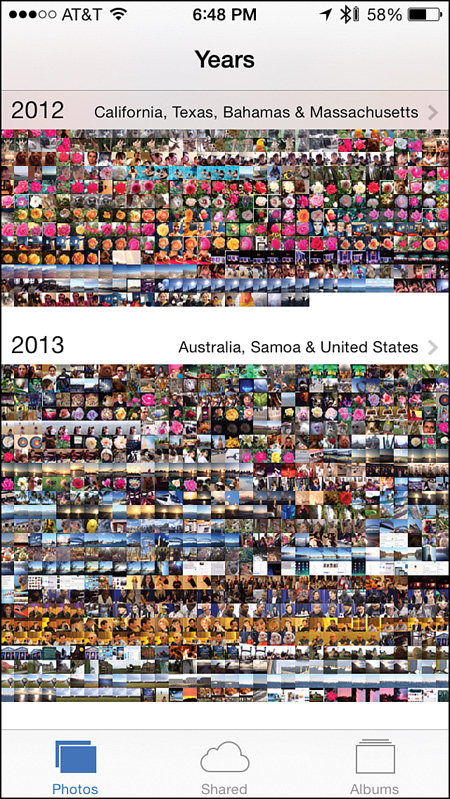
FIGURE 6-2 The Years view in the Photos app displays tiny thumbnails for all images taken within a particular year.
While accessing the Years view, tap on any image thumbnail to switch to the Collections view. However, if you tap on the Year heading or the location names where the images were taken, a Map view is displayed. It shows on a map where photos were shot (see Figure 6-3). As you look at the Map view, the number displayed in the blue circle indicates how many images were shot at that geographic location.
Tap on any of the thumbnails that are displayed on the map to switch to a view that displays slightly larger thumbnails of all images shot at that location, in that year (see Figure 6-4). At this point, tap on any image thumbnail to view a larger version of the image and then be able to work with it using the various tools offered by the Photos app.
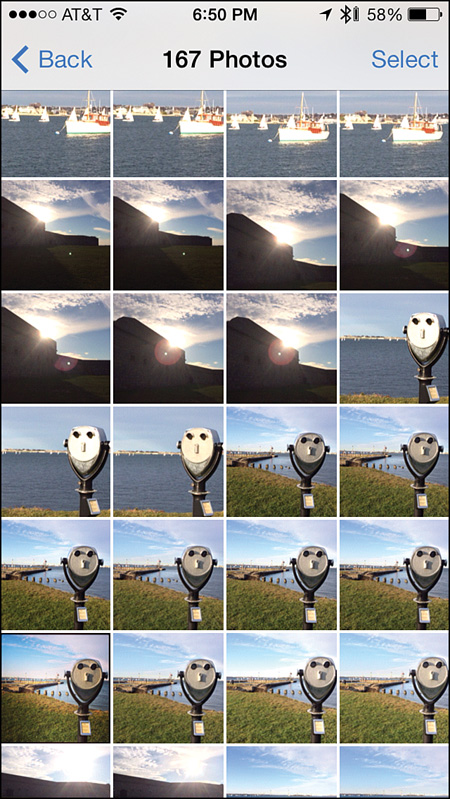
FIGURE 6-4 Tap on an image thumbnail displayed in the Map view to see slightly larger thumbnails of the images taken at that location, within that year.
Tip
When looking at the Map view, to zoom in or out, use a reverse-pinch or pinch finger gesture. To move around on the map, hold your finger on the map and drag it in any direction.
The Collections View
After tapping on the Photos icon, another way to view your images is using the Collections view (shown in Figure 6-5). This viewing mode automatically sorts images based on date ranges and locations where the images were taken.
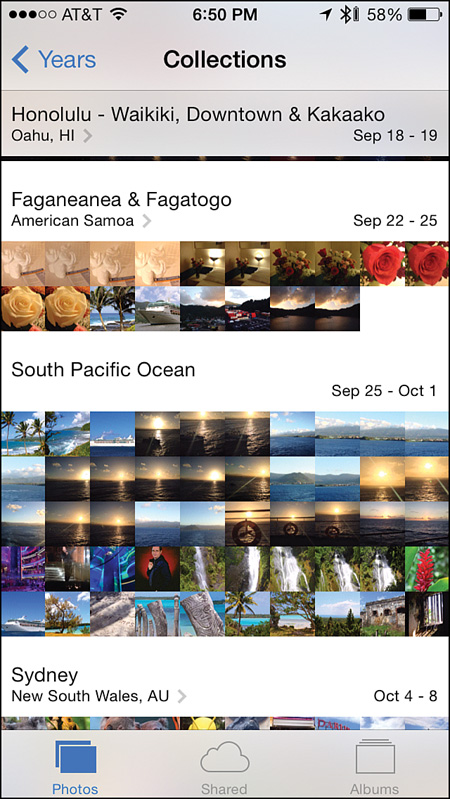
FIGURE 6-5 The Collections view sorts your images by location, based on date ranges, and displays tiny thumbnails for each group of related images.
From this viewing mode, tap on the heading for any group of photos to switch to the Map view. However, it’s also possible to tap on any image thumbnail and switch from the Collections view to the Moments view, which provides slightly larger individual image thumbnails, with images sorted by the specific day they were shot, not by date ranges.
To switch from the Collections view to the Years view, tap on the Years option that’s displayed near the top-left corner of the screen. To switch from the Collections view to the Moments view, tap on any image thumbnail. To switch to the Map view, tap on the Location/Date Range heading that displays above each group of thumbnails.
The Moments View
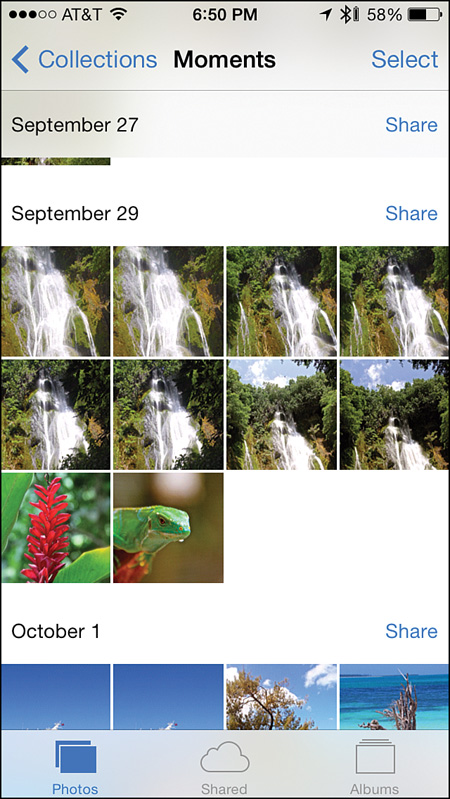
Again, after tapping on the Photos icon, the Moments view, shown in Figure 6-6, offers yet another way to view thumbnails of your images displayed based on location and a specific date (as opposed to a date range).
As you’re viewing the thumbnails displayed as part of the Moments view, you have several options for switching views, including the following:
![]() Tap on the Collections option that’s displayed at the top-left corner of the screen to switch to the Collections view.
Tap on the Collections option that’s displayed at the top-left corner of the screen to switch to the Collections view.
![]() Tap on the Location part of the heading to switch to the Map view.
Tap on the Location part of the heading to switch to the Map view.
![]() Tap on the Date part of the heading to access a Share menu, shown in Figure 6-7, that enables you to either Share This Moment (meaning all images grouped within that Moment) or Share Some Photos (enabling you to pick which images you want to share from a Moments collection).
Tap on the Date part of the heading to access a Share menu, shown in Figure 6-7, that enables you to either Share This Moment (meaning all images grouped within that Moment) or Share Some Photos (enabling you to pick which images you want to share from a Moments collection).
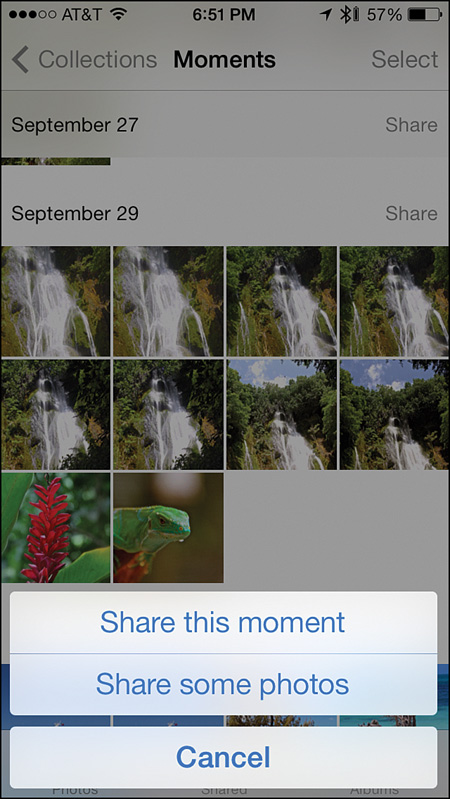
FIGURE 6-7 This menu enables you to share all images within a Moment, or specifically selected images within that image collection.
![]() Tap on an individual image thumbnail to view a larger version of that single image and be able to work with it using the Photos app’s various editing, enhancing, sharing, and printing tools.
Tap on an individual image thumbnail to view a larger version of that single image and be able to work with it using the Photos app’s various editing, enhancing, sharing, and printing tools.
![]() Tap on one of the other two command icons displayed along the bottom of the Photos app screen—Shared or Albums—to switch viewing options altogether.
Tap on one of the other two command icons displayed along the bottom of the Photos app screen—Shared or Albums—to switch viewing options altogether.
From the Moments view, if you tap on the Share option and select the Share This Moment option, a version of the Photos app’s Share menu is displayed. You can then send those images to others via AirDrop, Messages, Mail, iCloud, Facebook, or Flickr, as well as copy or print the images. The share options that become available will depend on how many images are selected. How to use these features is explained later in this chapter.
However, if you tap on the Share Some Photos menu option, the Select Items screen is displayed. From here, tap on the individual thumbnails for the images you want to share to select them. Then, tap on the Share option that’s displayed in the top-right corner of the screen. When a thumbnail is selected, a blue-and-white check mark icon appears in the bottom-right corner of the thumbnail.
While using the Moments view, tap on the Select option that’s displayed in the top-right corner of the screen to select images from one or more separate Moments. Upon doing this, the Share icon, Add To option, and Trash icon are displayed at the bottom of the screen.
Tap on the Share icon to access the Photos app’s Share menu and be able to share the selected images with others, as well as access the Copy and Print commands. Tap on the Add To option to move the selected images from the album they’re currently stored in, and place them in another album of your choosing. Tap on the Trash icon to delete the images from the Photos app altogether.
Create and View Albums
Using the Albums view, it’s possible to see a directory of separate albums currently stored in your iOS mobile device. To access the Albums view, launch the Photos app and tap on the Albums icon that’s displayed at the bottom-right corner of the screen (see Figure 6-8).
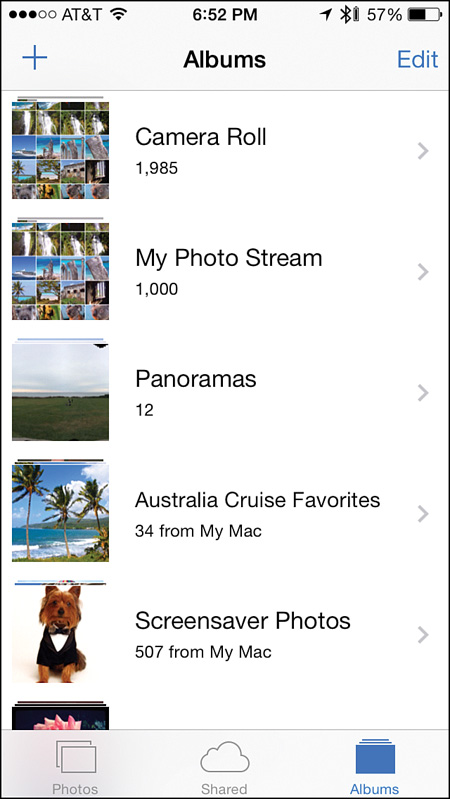
FIGURE 6-8 To view a list of albums that contain your images and that are stored in your iPhone or iPad, tap on the Albums icon.
From the Albums screen, you see listings for each separate album that’s stored on your iPhone or iPad. Each listing is composed of one thumbnail, the album’s name, and a number that indicates how many images are stored within that album.
To switch from the Albums screen (which lists the individual albums) to a screen that displays all the thumbnails for images stored within a particular album, tap on one album listing.
Tip
To create a new album, from the Albums screen, tap on the + icon that’s displayed at the top-left corner of the screen. When the New Album pop-up window appears (see Figure 6-9), enter a name for the new album, and then tap on the Save button. You can then manually move images into that newly created album using the Add To option.
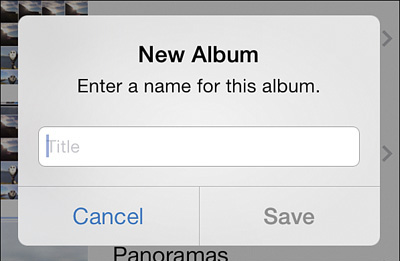
FIGURE 6-9 To create a new album, from the Albums screen, tap on the + icon, and then manually enter the name you want to give to the newly created album in the pop-up window that appears.
Move Images Between Albums
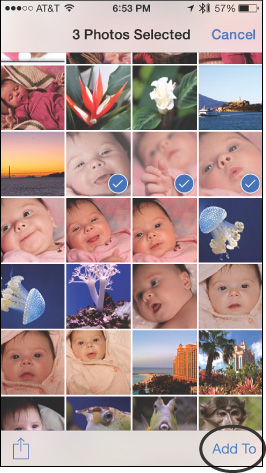
To move images from one album into another, tap on the Albums icon at the bottom of the screen and access the album where the images you want to move are currently stored. As you’re viewing those image thumbnails, tap on the Select option (found at the top-right corner of the screen), and then tap on each thumbnail that you want to move to select it.
When one or more images are selected, tap on the Add To option that can be found in the bottom-right corner of the screen (see Figure 6-10). Then, from the Add To Album screen, choose which album you want to move the selected images to. Keep in mind that you can only move images into albums created on the iOS mobile device you’re using, not into albums that have been imported, transferred, or synced into your iPhone or iPad. Instead of choosing an existing album, tap on the New Album option to create a new album from scratch and move the selected photos into it.
Tip
One way to keep images well organized is to manually create albums for specific groups of photos, such as individual vacations, parties, or related groups of photos. Be sure to name the albums with an obvious title, such as Christmas Vacation 2013, Natalie’s Birthday, or The Kids.
Delete or Reorder an Album
Albums that were created on the iPhone or iPad you’re using can be deleted from that device. To do this, as you’re viewing the Albums screen, tap on the Edit option that’s found in the top-right corner of the screen. To delete an album (and all of its contents), tap on the circular, red-and-white, negative sign icon that’s displayed to the left of an album’s listing. Press the Done option (that’s displayed in the top-right corner of the screen) to save your changes.
To reorder the album listing displayed on the Albums screen, tap on the Edit option, and then place your finger on a Move icon that’s displayed to the right of an album listing. Drag that listing either upward or downward, to the desired location. Press the Done option (that’s displayed in the top-right corner of the screen) to save your changes.
Tip
Albums that were created on another computer or device, and then transferred or synced to the iPhone or iPad you’re using, cannot be deleted or moved from the device you’re using. You must manage these albums from the iPhoto app running on your primary (Mac) computer, or using the iCloud-related options on the computer or device from which the album originated. Then, when you make changes to those albums on the Mac or iOS mobile device on which they were created, and then sync that computer or device with the one you’re using, the albums on the iPhone or iPad you’re using are modified accordingly.
Work with Shared Images via iCloud
The Photos app is designed to work seamlessly with your online-based iCloud account. To manage the My Photo Stream collection of images being synced with your iCloud account, or to create, manage, and view images that are part of shared photo streams you’ve created or that you’ve been invited to access, tap on the Shared icon that’s displayed near the bottom center of the Photos app screen.
From the Shared Streams screen (see Figure 6-11), you can access all photo streams that are stored or accessible via your iCloud account. You can also create new shared photo streams and manage existing shared photo streams.
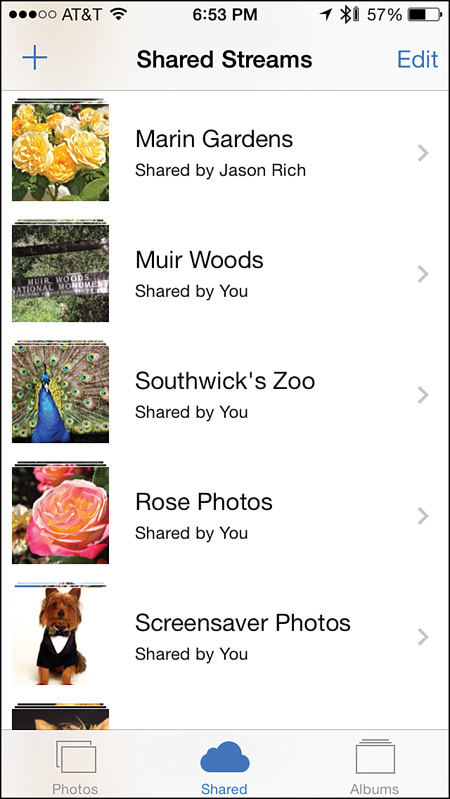
FIGURE 6-11 Tap on the Shared icon at the bottom of the screen to manage the My Photo Stream and shared photo streams associated with your iCloud account.
Note
Be sure to read Chapter 13 to learn all about how to work with the iCloud-related features when using the Photos app and optional iPhoto app.
Any changes you make to your My Photo Stream or any shared photo streams from the iOS mobile device you’re using will have an almost immediate impact on those images that are also accessible from your other computers and/or iOS mobile devices that are linked to the same iCloud account.
For example, if you delete images from your My Photo Stream, or from a shared photo stream from your iPhone, those images are also deleted from all the other computers and iOS mobile devices that have access to that photo stream. There is no Undo button for this feature.
Likewise, if you create a new shared photo stream on your iPhone, the images within that album become accessible on all of your other computers and iOS mobile devices that are linked to the same iCloud account (assuming all the computers and iOS mobile devices have Internet access).
As you’ll discover, to work with any photo stream-related features from your iOS mobile device, a Wi-Fi Internet connection is required.
Edit and Enhance Your Images
In addition to helping you organize and share the images stored in your iPhone or iPad, the Photos app can also be used to view, edit, and enhance each image. To use any of these editing or enhancement tools, first select the image you want to work with. This can be done in a variety of ways. For example, tap on the Photos, Albums, or Shared icon that’s displayed at the bottom of the screen, and then tap on the thumbnail for the image you want to work with. When you can see the large version of that image, tap on the Edit option that’s displayed at the top-right corner of the screen (see Figure 6-12).

FIGURE 6-12 Select one image at a time to edit or enhance by tapping on its thumbnail, and then tap on the Edit option that’s displayed in the top-right corner of the screen.
When you edit an image, the edited version of it is stored in the album from which it originally came. The edited version of the image replaces the original version. If the image was selected from your My Photo Stream or a shared photo stream (which is stored online, as opposed to on your iOS mobile device), the edited version of that image is automatically stored in the Camera Roll folder on your iPhone or iPad. Depending on how you have your iCloud functionality set up in your iOS mobile device, the edited image can then automatically be synced with your iCloud account.
As you’re looking at the image you selected (not its thumbnail) on your iPhone or iPad’s screen, tap on the Edit option to begin using the tools built in to the Photos app to edit and enhance the image. When you tap the Edit option, the Edit Photo screen is displayed (see Figure 6-13 for the iPad version).
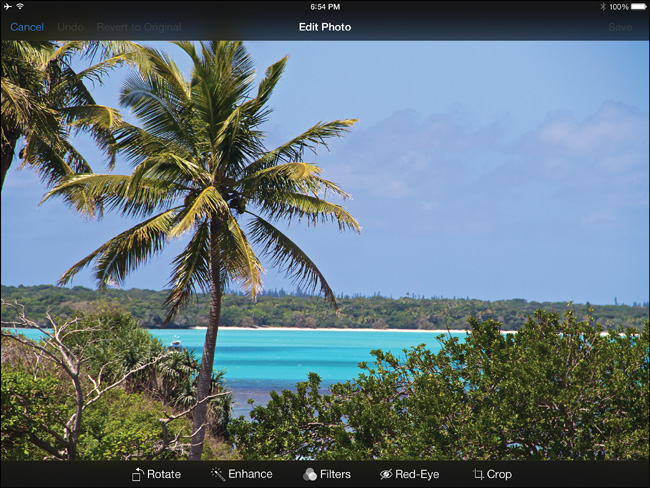
FIGURE 6-13 The Edit Photo screen offers five editing and image enhancement tools you can utilize on the photo you’re currently viewing. These tools are displayed as command icons along the bottom of the screen.
The Photos App’s Image Editing and Enhancement Tools
The image editing and photo enhancement tools that are built in to the Photos app are basic but powerful. One drawback to these tools is that when you use them, they impact the entire image. It’s not possible using the Photos app to edit or enhance only a portion of an image. In addition, the Photos app lacks some editing and image enhancement tools that many other photography apps offer.
Tip
Optional photography apps, including Apple’s iPhoto app, along with many offered by third parties (some of which are showcased in Chapter 9) are far more useful when it comes to adding a more professional touch to your images after they’ve been shot.
Displayed from left to right at the bottom of the Edit Photo screen (refer to Figure 6-13), the tools available include Rotate, Enhance, Filters, Red-Eye, and Crop. As soon as you tap one of these icons, that tool will be used on the selected image.
To immediately undo the edits or enhancements you make on an image, tap on the Cancel option that’s displayed at the top-left corner of the screen. To save your edits and enhancements, tap on the Save option displayed at the top-right corner of the screen. In some cases, an Undo option also becomes available that enables you to remove the last edit you made to the image.
Tip
To undo the Enhance feature, before tapping on the Save option, tap on the Enhance icon again to turn it off. To undo a filter effect, tap on the Filters icon again, but this time, select the None option. To undo a red-eye edit, tap a second time on the subject’s eyes. To undo a crop, tap again on the Crop icon, and then readjust the crop grid so that it surrounds the entire image.
Keep in mind, while many of the editing and enhancement tools in the Photos app can either be turned on or off, you can mix and match these tools as needed to create a highly personalized image. For example, you can turn on the Enhance tool, crop the image, and also add one special effect filter—all within seconds while viewing an image from the Edit Photo screen.
The Rotate Tool
When editing a photo in the Photos app, upon tapping on the Rotate icon, the entire image rotates 90 degrees counterclockwise and is displayed sideways (see Figure 6-14). Thus, if you tap on the Rotate icon twice, the image rotates 180 degrees (and is then upside down). If you tap the Rotate icon four times, the image returns to its original orientation.
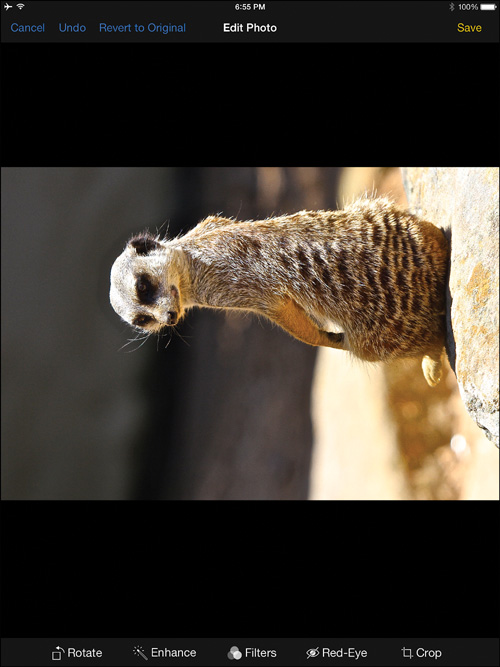
FIGURE 6-14 Each time you tap on the Rotate icon, it rotates the image 90 degrees in a counterclockwise direction.
After rotating the image, tap on the Save option (displayed at the top-right corner of the screen) to save the changes you’ve made and then return to the Edit Photo screen.
The Enhance Tool
The capabilities of the Enhance tool offered by the Photos app are somewhat limited. This feature often improves the brightness and contrast of an image and brightens its colors, but it has only an On or Off setting. It’s not adjustable, and the enhancements impact the entire image. If an image appears overexposed or underexposed, for example, the Enhance tool can often help compensate for this and improve the overall appearance of the image. However, in some cases, the impact this tool has on a photo is very subtle.
The Filters Tool
When taking photos using the Camera app on the iPhone, it’s possible to tap on the Filters option and automatically add a special effect filter to your images as you’re shooting them. However, whether you’re using an iPhone or iPad, from the Photos app, you can add any one of eight special effect filters after the fact, while you’re editing a photo.
To select and add a filter, from the Edit Photo screen, tap on the Filters icon. Then, if you’re using an iPhone, with your finger, swipe horizontally along the filter icons to scroll through your options. Select the one you want to add by tapping on it. On the iPad, all the filters are displayed along the bottom of the screen (see Figure 6-15).
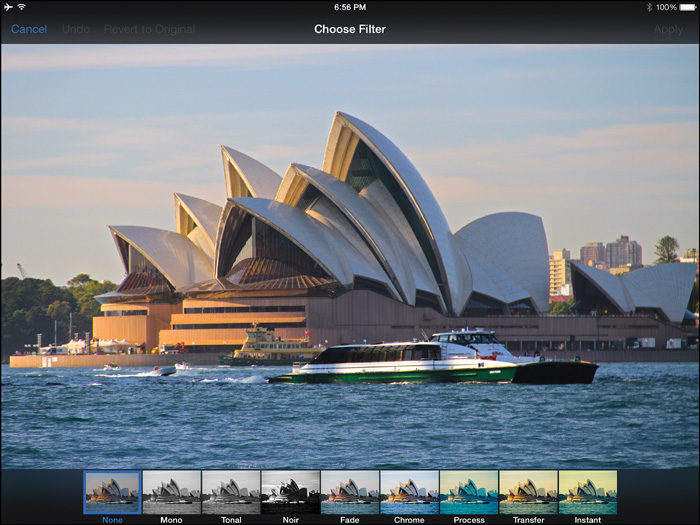
FIGURE 6-15 Select the filter you want to add to an image. There are eight to choose from via the Photos app.
Your Filter options include None, Mono, Tonal, Noir, Fade, Chrome, Process, Transfer, and Instant. If you tap on the None option, no filter is used. However, if you want to transform your full-color image into a black-and-white image, use either the Mono, Tonal, or Noir filters. Each takes a different approach to removing the colors from your image.
The Fade option subdues the vivid colors displayed in your image, while the Chrome, Process, and Transfer special effect filters alter the colors in an image to create entirely different visual effects. The Instant filter transforms your modern-day digital image into one that looks like it was shot using a Polaroid Instant Camera.
Once you select a filter you want to use by tapping on it, your image is transformed immediately. To save the image, tap on the Apply option that’s displayed in the top-right corner of the screen. To remove the filter, either tap on the None or Cancel option. Keep in mind that only one filter can be added to an image using the Photos app; however, if you want access to a broader selection of special effect filters, as well as the option to apply multiple filters to a single image, consider using another photography app when editing your photos.
Figure 6-16 shows the same image as what’s seen in Figure 6-15, but with the Tonal special effect filter selected.
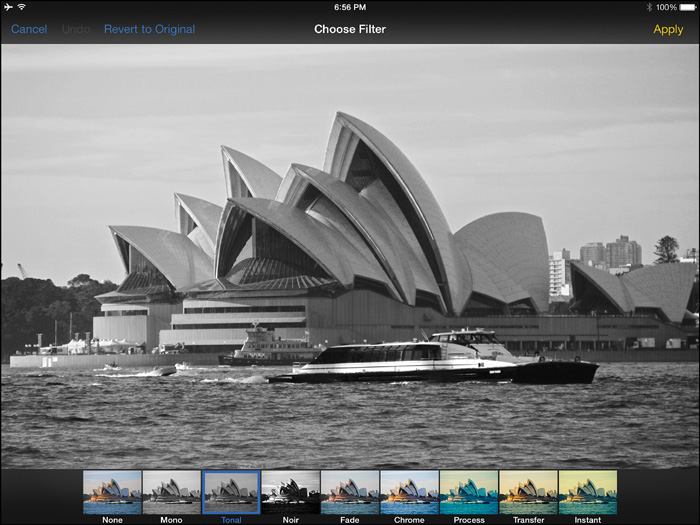
FIGURE 6-16 The Tonal filter has been added to transform this full-color image into black and white.
Tip
If you use Instagram to share your photos, the official Instagram app offers a wonderful collection of special effect filters, as well as image borders and easy-to-use photo editing tools that can be applied to images taken or stored on your iOS mobile device before they’re uploaded to the Instagram service.
Chapter 12, “Share Your Digital Photos Online,” offers more information about how to use the Instagram app and online service to share your photos online, directly from your iOS mobile device.
To simply edit your photos using a vast selection of tools and special effect filters (that can be applied to an entire image or a portion of an image), consider using the optional Adobe Photoshop Touch app, which you’ll learn more about in Chapter 9.
The Red-Eye Tool
Red-eye in photos of people is caused when you use the flash built in to your camera (in this case, your iPhone) and the subject’s pupils are not able to adjust fast enough to compensate for the sudden burst of light that’s flashed into their eyes when a photo is taken. As a result, bright red dots appear in their eyes within the photos. How close you are to your subject when the iPhone’s flash is used, as well as the natural color of the subject’s eyes, impacts the severity of the red-eye that winds up being captured within a photo.
Note
If you’re using the True Tone flash that’s built in to the iPhone 5s with the Camera app, you’ll discover that in many situations, the unwanted red-eye effect is automatically reduced and compensated for. This improved flash system, which is not available in other iPhone models, does not always eliminate red-eye altogether, however.
As you’re taking photos, to reduce or eliminate red-eye, consider moving farther away from your subject and then using the zoom. You also can turn on HDR mode and turn off the iPhone’s flash altogether (to utilize the existing and ambient light). If you can somehow increase the natural light where you’re taking the photo, this too can help reduce red-eye when the flash is used.
However, if you wind up with the unwanted red-eye effect in your photos, which makes the person’s eyes look bright red, this can also be fixed after the fact using the Red-Eye tool that’s built in to the Photos app. To use this tool, load the photo that showcases the unwanted red-eye, and then tap on the Edit option. Next, tap on the Red-Eye tool. Using your finger or a stylus, tap on the subject’s eyes, one at a time, directly over the unwanted red dots. The Red-Eye tool digitally fixes the image.
Unfortunately, the Red-Eye tool does not compensate for a person’s natural eye color. It simply removes the unwanted bright red dots and gives your subject’s eyes a darker, more natural looking appearance.
The Crop Tool
The Crop tool that’s built in to the Photos app (and many other photography apps) is used to resize, reframe, and reposition your image after it’s been taken. For example, it can be used to remove some unwanted background in an image after it has been shot, to simulate the zoom, to readjust the focal point of an image, or to change the image’s dimensions.
From the Edit Photo screen, tap on the Crop tool to access it. Upon doing this, a crop grid is superimposed over your image (see Figure 6-17). Notice that the corners of the grid have darker corners. Using your finger, drag any one of these corners inward at a diagonal (toward the center of the image), or drag it upward, downward, or to the side (depending on its current position) to adjust the size and shape of the crop grid.
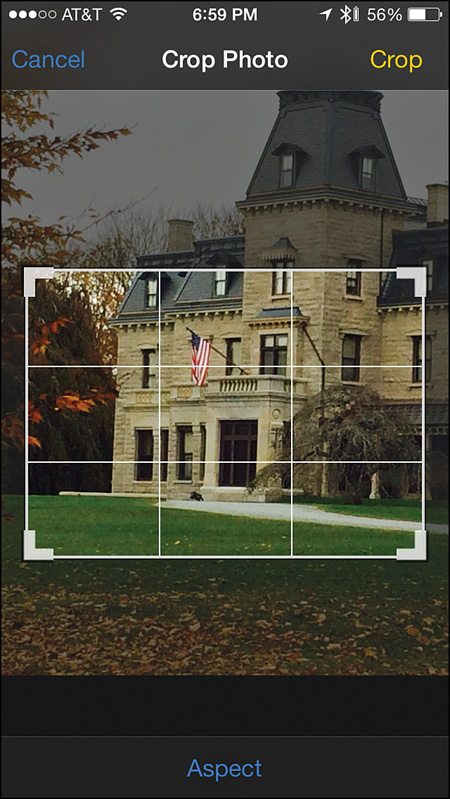
FIGURE 6-17 The Crop tool can be used to resize, reframe, or reposition an image. What appears in the crop grid is the portion of your image that will automatically be saved.
Whatever portion of your image that appears within the crop grid is what will be saved when you tap on the Crop option (that’s found in the top-right corner of the screen).
Move around one or more of the crop grid’s corners to reframe and resize your image as you see fit. It’s then possible to place your finger near the center of the grid and drag it around to reposition the image itself within the grid.
As you’re repositioning an image within the crop grid, it’s also possible to use a reverse-pinch finger motion to zoom in on a portion of the image. Using this tool enables you to add a zoom effect to your photos after they’ve been shot, and enables you to focus in more on your intended subject. Figure 6-18 shows an image before it’s been edited using the Crop tool, whereas Figure 6-19 shows that same image after it’s been cropped, repositioned, and a reverse-pinch finger gesture was used to zoom in.
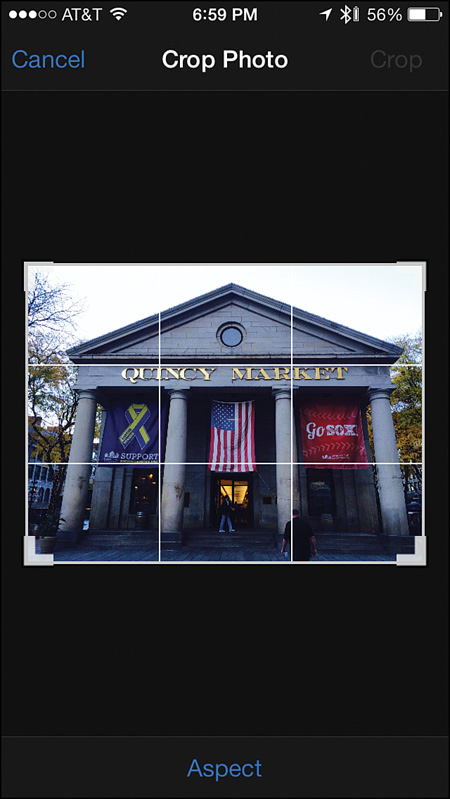
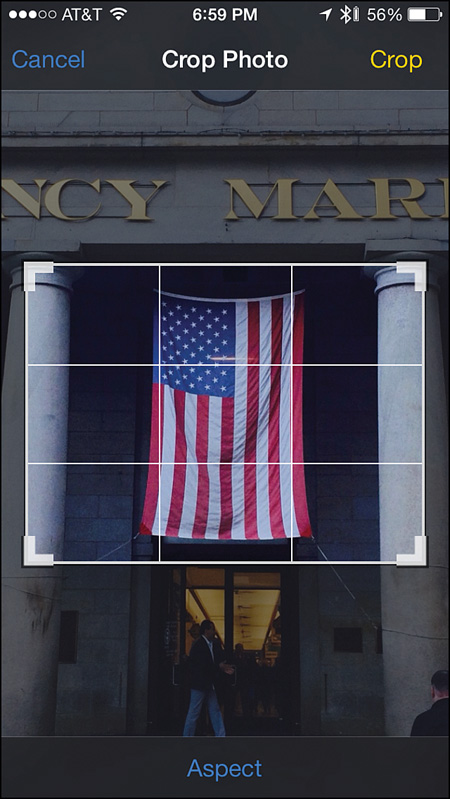
FIGURE 6-19 In the crop grid, you can hold down your finger near the center of the grid to reposition the image within the grid, and/or use a reverse-pinch finger gesture to zoom in digitally.
Tip
After you’ve reframed, resized, and/or repositioned your image using the Crop tool, tap on the Crop option (that’s found in the top-right corner of the screen) to save your changes. From the same iOS mobile device, you can always reopen the cropped photo using the Photos app, access the Crop tool, and reedit the image later, even after it’s been saved.
When the Crop tool is activated, the Aspect option is displayed at the bottom center of the screen. Tap on this to manually resize the image or adjust its aspect ratio accordingly, based on how you plan to use the digital image once it’s been edited.
Tap on the Original option from the Aspect menu (see Figure 6-20) to retain the image’s original, rectangular aspect ratio. However, if you want to change the rectangular image and crop it into a square shape (for use on Instagram, for example), tap on the Square option.
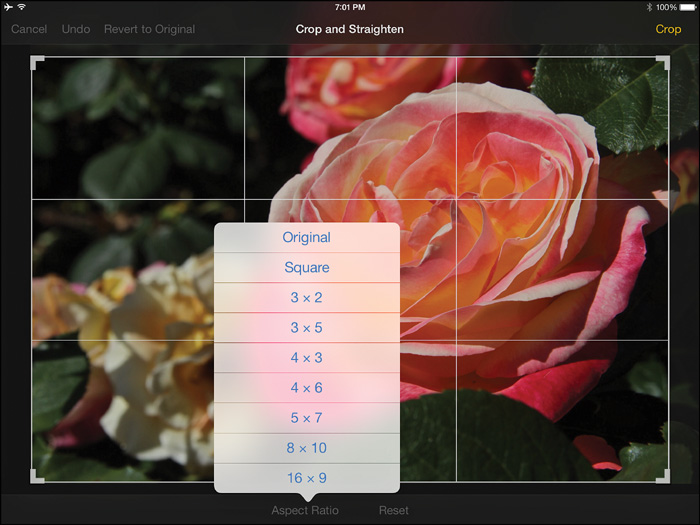
If you ultimately plan to create a print of the image in a specific size, such as 4" × 6", 5" × 7", or 8" × 10", select that aspect ratio from the menu. If you change the aspect ratio for a specific print size, but then attempt to make a different size print from that edited digital image, the image showcased in the print is typically distorted or does not fit properly within the selected print size.
Tip
Unless you need to create a specific size print, keep the aspect ratio set to Original as you use the Crop tool. Later, after the image is cropped and saved, when you attempt to create prints, you can often temporarily readjust the cropping, if needed, to compensate for the different print dimensions.
Share Images from the Photos App
The Photos app utilizes a wide range of new iOS 7 features to provide iPhone and iPad users with a greatly expanded Share menu. When you’re ready to share one or more images with others, copy an image into another app, print an image, or use one of the other photo management tools offered by the Photos app, simply tap on the Share menu option or icon that’s displayed.
Note
What options are available to you from the Share menu depend on how you have your iPhone or iPad set up. For example, if you don’t have an email address set up to work with the Mail app, you cannot send images via email from the Photos app. Likewise, if you don’t have Facebook, Twitter, or Flickr integration already turned on in Settings, these Share options are not available to you from the Photos app.
Be sure to set up the Mail, Messages, iCloud, Facebook, Twitter, and/or Flickr integration options offered by iOS 7 from within Settings before attempting to share images via the Photos app. To set up Facebook integration, for example, launch Settings and tap on the Facebook option. When prompted, add the email address and password for your existing Facebook account so that your iPhone or iPad can then access your account from various apps, including Photos.
After tapping on the Photos, Shared, or Albums icon (displayed at the bottom of the Photos screen), depending on how you’re viewing your images, either a Share option or the Share Menu icon is often available to you, as shown in Figure 6-21, Figure 6-22, and Figure 6-23.
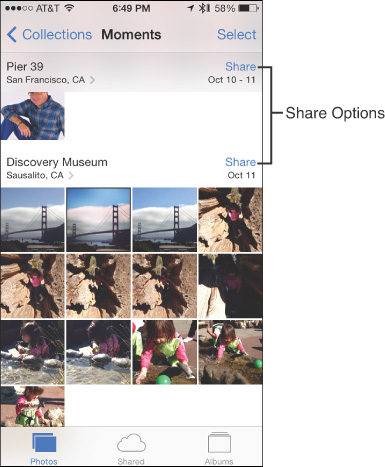
FIGURE 6-21 Shown here are the Share options displayed as part of the Moments view, accessible when you tap on the Photos icon at the bottom of the screen.
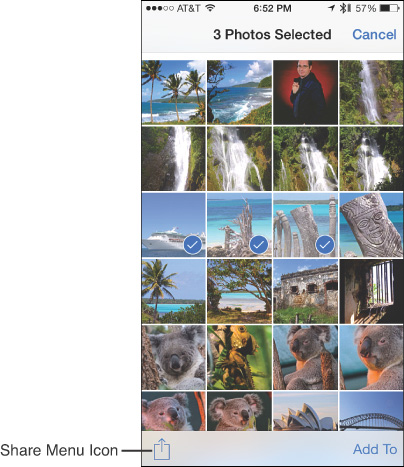
FIGURE 6-22 Upon tapping on the Albums icon, selecting a specific album, pressing the Select option (in the upper-right corner of the screen), and then selecting one or more images in an album, the Share Menu icon becomes visible and active at the bottom-left corner of the screen (iPhone) or the top-left corner of the screen (iPad).

FIGURE 6-23 When viewing a single image, after it’s been edited or enhanced, for example, the Share Menu icon is displayed near the bottom-left corner of the screen.
The Share Menu
Again, depending on which iOS mobile device you’re using and how you have it set up, the options available from the Share menu will vary. At the top of the Share Menu screen, you see thumbnails for one or more preselected images that are about to be shared. Selected images have a blue-and-white check mark icon displayed in the bottom-right corner of their thumbnail. From this screen, it’s possible to select additional images by tapping on their thumbnails.
Below the image thumbnails (on compatible iPhone and iPad models) is the AirDrop option. If this feature is available and turned on, images can be sent wirelessly to other iOS mobile devices in your immediate vicinity. How to use this feature is explained shortly; see the upcoming “Use AirDrop to Wirelessly Share Images” section.
Beneath the AirDrop section of the Share menu is a row of icons representing the available ways you can share the selected image(s) from your iPhone or iPad. Your options may include the following:
![]() Messages—The Photos app automatically integrates with the Messages app that comes preinstalled on your iOS mobile device. Use this option to send selected images to one or more recipients via text message or Apple’s iMessage instant messaging service. Tap on the Messages option and fill in the To field, as prompted (see Figure 6-24). Tap the Send option to send the message with your selected photos embedded.
Messages—The Photos app automatically integrates with the Messages app that comes preinstalled on your iOS mobile device. Use this option to send selected images to one or more recipients via text message or Apple’s iMessage instant messaging service. Tap on the Messages option and fill in the To field, as prompted (see Figure 6-24). Tap the Send option to send the message with your selected photos embedded.
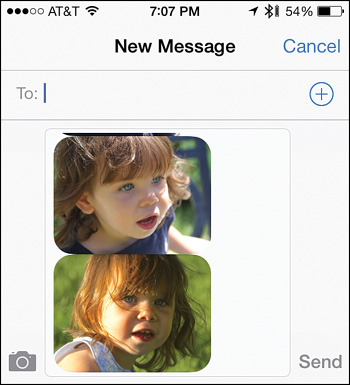
FIGURE 6-24 Send photos to one or more other people via text message or instant message using functionality built in to the Messages app. This can be done from the Photos app, without having to manually launch the Messages app.
![]() Mail—Preselect and then email one or more recipients up to five separate images that can automatically be embedded into an outgoing email message from within the Photos app. After tapping on the Mail icon, fill in the To and Subject fields, and if you want, add some text to the body of the outgoing email message. The selected images are automatically embedded in the outgoing email (see Figure 6-25). Tap on the Send option to send the email.
Mail—Preselect and then email one or more recipients up to five separate images that can automatically be embedded into an outgoing email message from within the Photos app. After tapping on the Mail icon, fill in the To and Subject fields, and if you want, add some text to the body of the outgoing email message. The selected images are automatically embedded in the outgoing email (see Figure 6-25). Tap on the Send option to send the email.
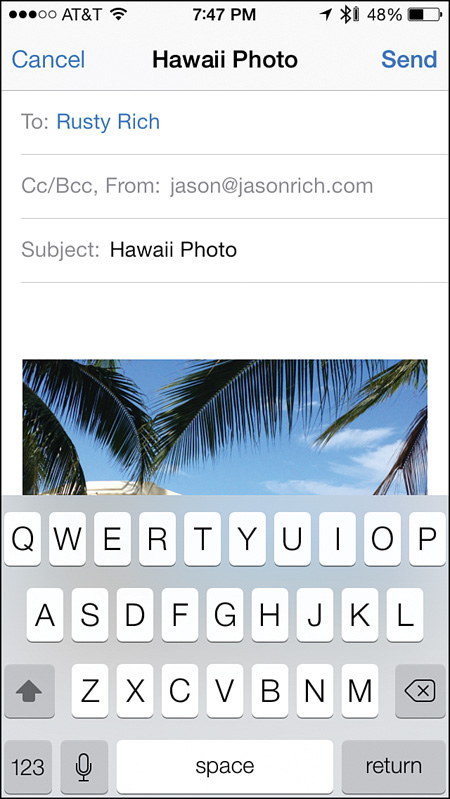
FIGURE 6-25 From the Photos app, fill in the prompts displayed in the New Message screen to send out an email that contains up to five preselected images.
![]() iCloud—Select this option to add the preselected images to an existing shared photo stream (which is accessible from your iCloud account) or to create a new shared photo stream using the preselected images. How to do this is explained in Chapter 13.
iCloud—Select this option to add the preselected images to an existing shared photo stream (which is accessible from your iCloud account) or to create a new shared photo stream using the preselected images. How to do this is explained in Chapter 13.
![]() Twitter—With only one image selected, you can publish it online as a tweet, so it becomes part of your Twitter feed if you have a Twitter account. To do this, select one image and tap on the Twitter icon. Next, when the Twitter window appears (see Figure 6-26), add a text-based caption to your image. The character counter in the lower-left corner of the text window tells you how many characters your outgoing tweet already contains. You can use up to 140 characters per tweet. If necessary, select which Twitter account you want to send the tweet from by tapping on the Account field. Tap on the Location field to enter a location and to publicly post the location where the photo was taken along with the photo. Tap on the Post option to publish your image on Twitter.
Twitter—With only one image selected, you can publish it online as a tweet, so it becomes part of your Twitter feed if you have a Twitter account. To do this, select one image and tap on the Twitter icon. Next, when the Twitter window appears (see Figure 6-26), add a text-based caption to your image. The character counter in the lower-left corner of the text window tells you how many characters your outgoing tweet already contains. You can use up to 140 characters per tweet. If necessary, select which Twitter account you want to send the tweet from by tapping on the Account field. Tap on the Location field to enter a location and to publicly post the location where the photo was taken along with the photo. Tap on the Post option to publish your image on Twitter.
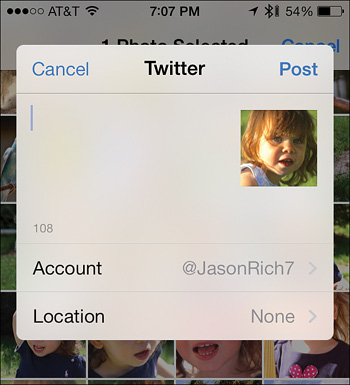
FIGURE 6-26 Tweet one photo at a time and publish it as part of your Twitter feed, directly from the Photos app.
![]() Facebook—Using the Facebook integration built in to the Photos app, it’s possible to upload one or more images from your iPhone or iPad directly to your Facebook wall. However, if you want to create albums on Facebook, you must use the official Facebook app. From the Photos app, after tapping on the Facebook icon, fill in the fields displayed as part of the Facebook pop-up window (see Figure 6-27). Tap the Post option to publish the preselected photos online. From the Facebook window, you can add a caption to the photo(s), select in which online album they’ll be stored, add a location where the photos were shot, and/or choose who can view the photos on Facebook.
Facebook—Using the Facebook integration built in to the Photos app, it’s possible to upload one or more images from your iPhone or iPad directly to your Facebook wall. However, if you want to create albums on Facebook, you must use the official Facebook app. From the Photos app, after tapping on the Facebook icon, fill in the fields displayed as part of the Facebook pop-up window (see Figure 6-27). Tap the Post option to publish the preselected photos online. From the Facebook window, you can add a caption to the photo(s), select in which online album they’ll be stored, add a location where the photos were shot, and/or choose who can view the photos on Facebook.

FIGURE 6-27 In the Photos app, select and publish one or more photos at a time directly to your Facebook wall.
![]() Flickr—If you use Flickr as an online service to store and showcase your photos, you can upload one or more preselected images from your iPhone or iPad directly to your Flickr account. This can be done from within the Photos app. Tap on the Flickr icon in the Share menu, and fill in the onscreen prompts. Once again, be sure to configure your Flickr account in Settings before attempting to use this feature.
Flickr—If you use Flickr as an online service to store and showcase your photos, you can upload one or more preselected images from your iPhone or iPad directly to your Flickr account. This can be done from within the Photos app. Tap on the Flickr icon in the Share menu, and fill in the onscreen prompts. Once again, be sure to configure your Flickr account in Settings before attempting to use this feature.
Tip
For more control over how you manage your Flickr account from your iOS mobile device, be sure to install the official Flickr app. To configure your Flickr account to work with iOS 7, and/or to download the Flickr app, launch Settings, and from the main Settings menu, tap on the Flickr option.
Near the bottom of the Share Menu screen are additional command icons that enable you to utilize the selected images in a variety of ways (see Figure 6-28). Depending on how your iOS mobile device is set up, the command icons available from here may include the following:
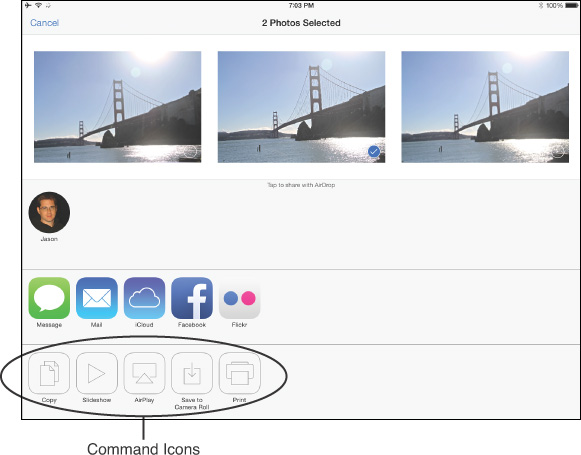
FIGURE 6-28 Near the bottom of the Share menu are a handful of additional command options used to manage photos from the Photos app.
![]() Copy—Use this command to copy the selected image into iOS 7’s virtual clipboard. Then, when using another app, use the Paste command to insert the image into the app you’re now using. This is one way to incorporate a photo into a Pages document, Numbers spreadsheet, or Keynote digital slide presentation, for example.
Copy—Use this command to copy the selected image into iOS 7’s virtual clipboard. Then, when using another app, use the Paste command to insert the image into the app you’re now using. This is one way to incorporate a photo into a Pages document, Numbers spreadsheet, or Keynote digital slide presentation, for example.
![]() Slideshow—Display selected images as an animated slideshow on your iOS mobile device’s screen, or on an external HD television set if you use an optional cable. You can also use AirPlay (with an Apple TV) to showcase an animated slideshow on a television set. When you choose the Slideshow option, tap on the Transitions option to choose which animated slide transition you want to use as part of your slideshow. You can also add background music. (The music you choose must be stored on your iOS mobile device, in the Music app.)
Slideshow—Display selected images as an animated slideshow on your iOS mobile device’s screen, or on an external HD television set if you use an optional cable. You can also use AirPlay (with an Apple TV) to showcase an animated slideshow on a television set. When you choose the Slideshow option, tap on the Transitions option to choose which animated slide transition you want to use as part of your slideshow. You can also add background music. (The music you choose must be stored on your iOS mobile device, in the Music app.)
![]() AirPlay—Turn on and use this feature to wirelessly display individual images or animated slideshows on an HD television set via an Apple TV device.
AirPlay—Turn on and use this feature to wirelessly display individual images or animated slideshows on an HD television set via an Apple TV device.
![]() Save To Camera Roll—This option enables you to save the image in the Camera Roll folder, which is accessible using the Photos and iPhoto app, as well as many other apps that enable you to access and utilize your images. By default, the Camera Roll folder is where images you take using the Camera app are stored.
Save To Camera Roll—This option enables you to save the image in the Camera Roll folder, which is accessible using the Photos and iPhoto app, as well as many other apps that enable you to access and utilize your images. By default, the Camera Roll folder is where images you take using the Camera app are stored.
![]() Assign to Contact—Insert one selected image to be the profile photo used in a specific Contacts entry. Tap on the Assign to Contact option, from the All Contacts menu, choose which contact entry you want to associate the photo with, adjust the photo from the Move and Scale screen, and then tap on the Choose option to insert that image into the Contacts app and associate it with a specific contact.
Assign to Contact—Insert one selected image to be the profile photo used in a specific Contacts entry. Tap on the Assign to Contact option, from the All Contacts menu, choose which contact entry you want to associate the photo with, adjust the photo from the Move and Scale screen, and then tap on the Choose option to insert that image into the Contacts app and associate it with a specific contact.
![]() Use as Wallpaper—Use the selected image as the wallpaper image on your iPhone or iPad’s Lock screen and/or Home screen. Tap on the Use as Wallpaper option, move and scale the image as needed, and then tap on the Set button. Next, select the Set Lock Screen, Set Home Screen, or Set Both option. Your new Lock screen and/or Home screen wallpaper will now be displayed.
Use as Wallpaper—Use the selected image as the wallpaper image on your iPhone or iPad’s Lock screen and/or Home screen. Tap on the Use as Wallpaper option, move and scale the image as needed, and then tap on the Set button. Next, select the Set Lock Screen, Set Home Screen, or Set Both option. Your new Lock screen and/or Home screen wallpaper will now be displayed.
![]() Print—If you have an AirPrint-compatible home photo printer linked to your iPhone or iPad, use this command to create prints from your digital images that are stored in your iOS mobile device. Be sure to see Chapter 11, “Create Prints from Your iPhone/iPad Photos,” for complete directions on how to do this.
Print—If you have an AirPrint-compatible home photo printer linked to your iPhone or iPad, use this command to create prints from your digital images that are stored in your iOS mobile device. Be sure to see Chapter 11, “Create Prints from Your iPhone/iPad Photos,” for complete directions on how to do this.
Use the Mail App to Send Images
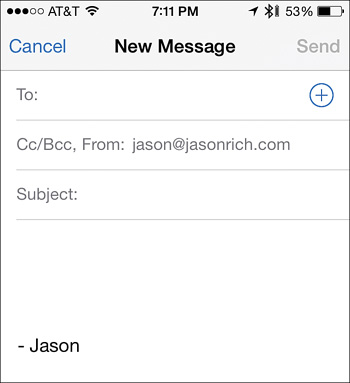
It’s also possible to send photos within an email directly from the Mail app. To do this, launch the Mail app and tap on the Compose icon. When the New Message screen is displayed (see Figure 6-29), fill in the To and Subject fields, and then add text to the body of your outgoing email message.
To then embed a photo within that outgoing message, press and hold your finger in the body text area of the New Message window, where you want to insert one or more images. When the menu bar appears just above where you held down your finger, tap on the right-pointing arrow icon, and then tap on the Insert Photo or Video tab (see Figure 6-30). From the Photos menu, locate the image you want to embed within the outgoing email. Upon selecting and tapping on its thumbnail, the image appears in the New Message window.
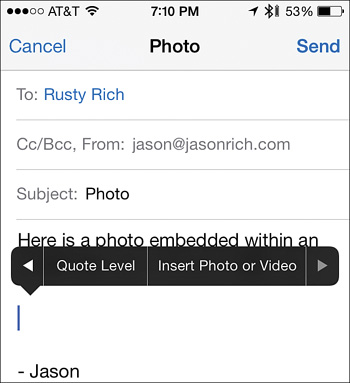
FIGURE 6-30 Tap on the Insert Photo or Video tab, and one at a time, select up to five images to embed within the outgoing email message.
You can repeat this process up to five times to embed five separate images into a single outgoing email message. When you’re ready to send the message, tap on the Send option. A pop-up menu appears, asking you to choose a file size for the outgoing images. Your options include Small, Medium, Large, or Actual Size. Not only does this determine the file size of the images being sent, it also impacts what the recipient can do with the image files once received because the resolution of the photos is impacted.
For the maximum flexibility and to retain the highest resolution, leave the images at their Actual Size. This results in larger image files and takes a bit longer for you to upload and for the recipient to download.
Tip
If you’re using a cellular Internet connection and trying to conserve use, select the Small option to reduce the amount of data you’ll use up to send the images.
Use AirDrop to Wirelessly Share Images
One of the new features added to iOS 7 is the capability to wirelessly send photos and certain other app-specific content to other iPhone or iPad users who are in close proximity to you. This can be done using the AirDrop feature. Keep in mind that this feature works only with the more recent iPhone and iPad models and is not compatible with the AirDrop feature offered for the Mac (as part of OS X Mavericks).
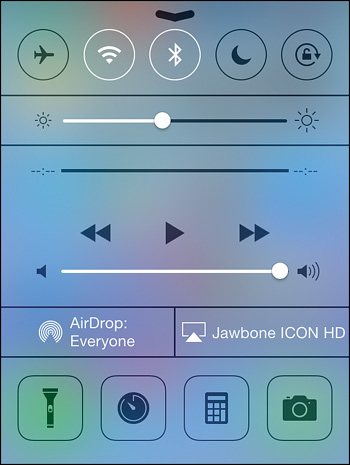
To turn on AirDrop, access the Control Center. To do this, place your finger near the bottom of the iPhone or iPad’s screen and flick upward. Next, tap on the AirDrop button. A Control Center menu appears, shown in Figure 6-31, that enables you to turn on this feature, plus decide who you’ll be able to use it with. Your options include Contacts Only (meaning people with entries in your Contacts database) or Everyone (meaning any iPhone/iPad user in your proximity).
When AirDrop is turned on, when you access the Share menu in the Photos app, tap on the AirDrop option. Thumbnails representing iPhone or iPad users who are nearby and who have AirDrop on their device turned on are displayed in the Share Menu screen (shown in Figure 6-32).
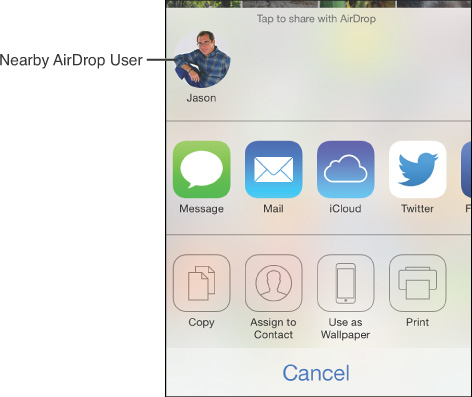
FIGURE 6-32 When AirDrop is available, icons representing nearby iPhone or iPad users are displayed in your Share menu.
Preselect the images you want to send in the Photos app, and then tap on the person’s thumbnail image. A wireless connection between the two devices is established. On the recipient’s screen, an AirDrop pop-up window appears, asking whether he or she wants to accept or decline your images (see Figure 6-33). If the recipient taps the Accept button, the images are sent from your iOS mobile device to the recipient’s device. This AirDrop pop-up window appears in the center of the screen, regardless of what the other person is currently using the device for.
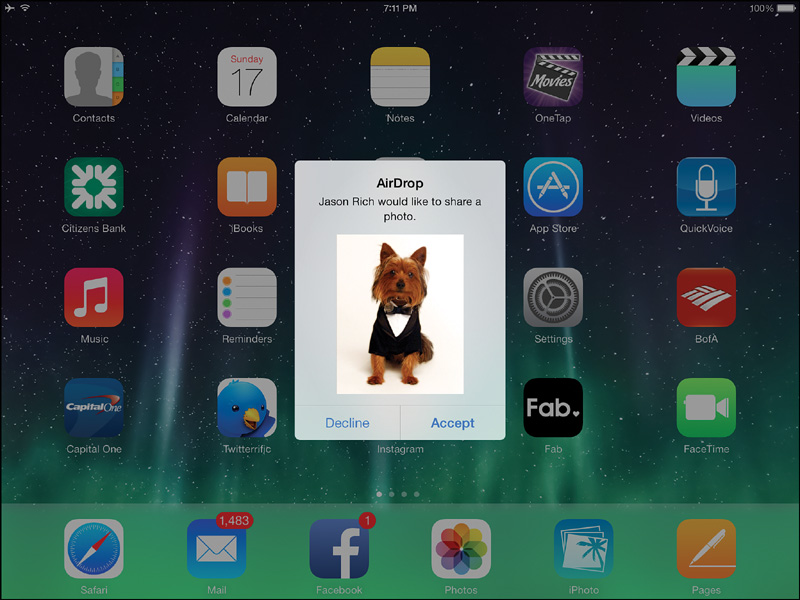
FIGURE 6-33 When you send someone photos via AirDrop, a pop-up window allowing the recipient to accept or decline the images is displayed on the device’s screen.
When the images are transferred, the word Sent appears on your iPhone or iPad, immediately below the other person’s thumbnail. If the images are declined by the other person, the word Declined appears below that person’s thumbnail.
Note
When sent using AirDrop, the images on your iPhone or iPad remain intact; however, the recipient receives a copy of the images on his or her own iOS mobile device.
Import Images into the Photos App from Your Digital Camera or Its SD Memory Card
There are several ways to import individual images or entire albums into the Photos app. For example, images can be imported from iCloud’s My Photo Stream or a shared photo stream (see Chapter 13).
Tip
If one or more images are embedded within an incoming email, press and hold down your finger on those images, and then select the Save to Camera Roll option. This also works for images received via the Messages app.
To import a collection of images directly from the memory card of your point-and-shoot or digital SLR camera, you need the optional Lightning to USB Camera Adapter ($29.00), Lightning to SD Card Camera Reader ($29.99), or the Apple iPad Camera Connection Kit ($29.99). These adapters are available from Apple Stores, Apple.com, and authorized Apple dealers.
Note
These adapters work with either the iPhone or iPad. Just make sure you purchase the right adapter, based on whether your iOS mobile device has a Lightning port or a 32-pin Dock Connector port on the bottom of it.
Attach the Lightning to USB Camera Adapter to your iPhone or iPad (if it has a Lightning port on the bottom), and then plug in the USB cable that came with your digital camera. Plug in the opposite end of the camera’s USB cable to the camera itself. Turn on your digital camera and set it to Image Transfer mode. When the connection between your iPhone/iPad and your digital camera is established, follow the onscreen prompts offered by the Photos app, which includes an Import All option.
If your iPhone/iPad has a Lightning port on the bottom and your digital camera supports SD memory cards, connect the Lightning to SD Card Camera Reader to your iOS mobile device, and then insert your camera’s SD memory card into the card reader. When the connection between your iPhone/iPad and your digital camera is established, follow the onscreen prompts offered by the Photos app, which includes an Import All option.
The Apple iPad Camera Connection Kit is designed for older iPhone and iPad models that have a 32-pin Dock Connector port (as opposed to a Lightning port). This kit comes with two separate adapters: one for connecting your digital camera directly to the iPhone/iPad via the USB cable that came with your digital camera, and the other for plugging in the camera’s SD memory card directly to the card reader adapter that plugs into the 32-pin Dock Connector port of your iOS mobile device.
Note
When images are imported from your digital camera or its memory card into your iPhone or iPad, the Photos app automatically splits the images into separate albums, based on the date the images were shot.
Tip
For more information on how to use the optional iPad Camera Connection Kit or one of the adapters described in this section to import image files from your digital camera (or its memory card) into your iPhone or iPad, visit Apple’s Support website (http://support.apple.com/kb/HT4101).
Apple’s iPhoto App Offers Even More Functionality
As of November 2013, Apple’s more powerful iPhoto app is available to iPhone and iPad users for free via the App Store. If you’re a Mac user, you’re probably already familiar with the iPhoto app. The iOS version of iPhoto offers many of the same features and functions as its Mac counterpart, including much more powerful image editing and enhancement tools. How to use the iPhoto app is the focus of Chapter 7, “Expand Your Photo Editing Toolbox with iPhoto.”