
1. Managing Your Desktop
In this chapter, you learn how to make efficient use of your screen space.
![]() Organizing files using the Dock
Organizing files using the Dock
![]() Navigating folders within the Dock’s Grid view mode
Navigating folders within the Dock’s Grid view mode
![]() Customizing the Finder sidebar and toolbar
Customizing the Finder sidebar and toolbar
![]() Creating Finder tabs
Creating Finder tabs
![]() Organizing with File Tags
Organizing with File Tags
![]() Viewing the contents of files with Quick Look
Viewing the contents of files with Quick Look
![]() Searching for files and information with Spotlight
Searching for files and information with Spotlight
![]() Keeping track of application events with Notifications
Keeping track of application events with Notifications
Your Mac is a powerful machine, capable of working with hundreds of different types of files and managing gigabytes upon gigabytes of data. Back when I got my first 128K Mac (w/floppy), you barely needed folders because only a few files fit on a disk. Today, if you try to count the number of files on your system at any given point in time, the numbers will come back in the hundreds of thousands. The world is more complex, and so are our computers.
To keep things tidy, you can take advantage of a variety of time-and space-saving tools built into Yosemite that will help keep your desktop clean, make working with files and applications fun and efficient, and keep you up-to-date on how your system and applications are performing. You’ll see that, no matter the size of your screen, Yosemite can make working with your computer easier and more intuitive.
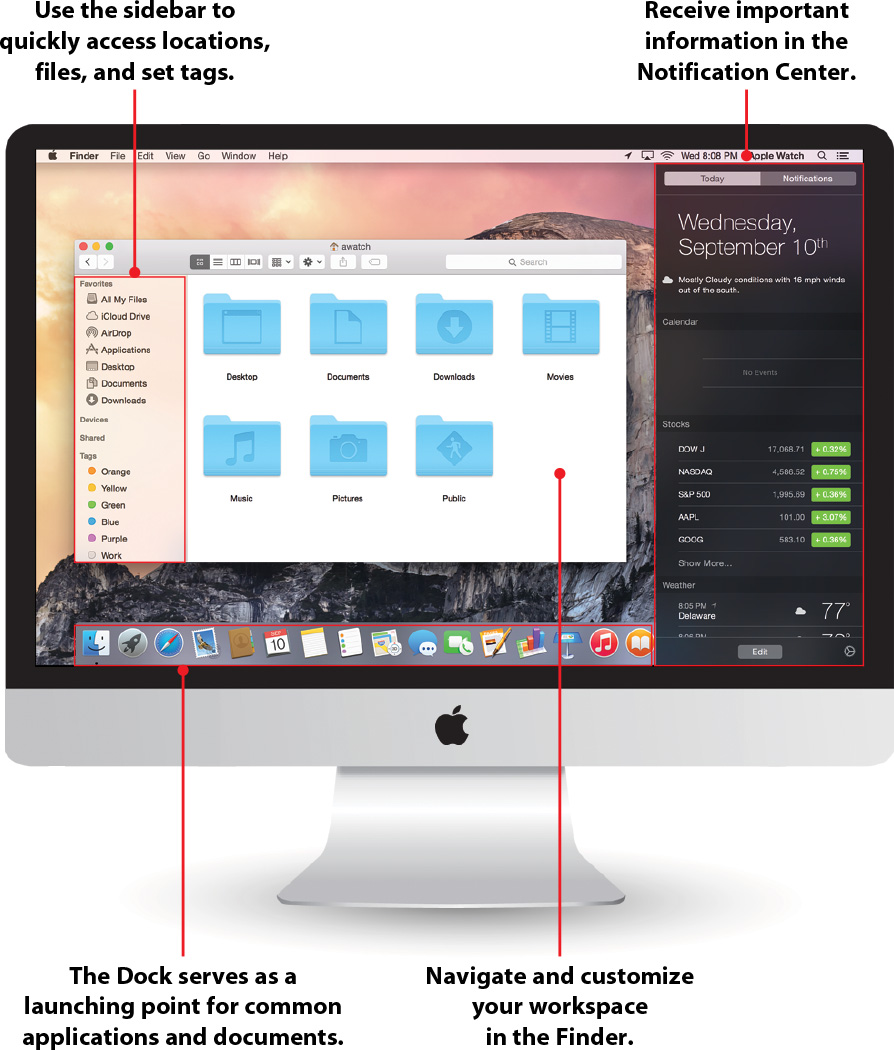
Organizing in the Dock
The Yosemite Dock serves as application launcher, filer, and process manager. It enables you to launch applications and documents with a single click, place documents in folders, and even navigate the contents of folders without using the Finder. It also displays running applications so you can easily switch between them. Configuring your Dock to suit your working style and habits can be a big time saver because you don’t have to dig through folders within folders just to find a single file.
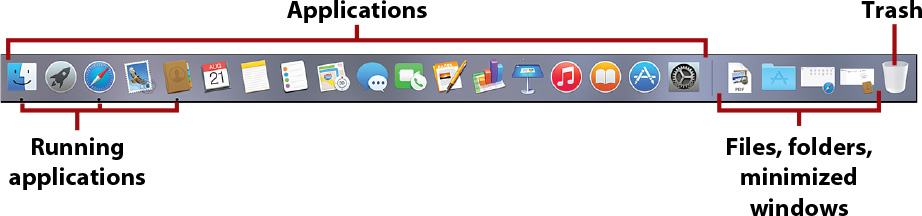
The Dock is divided into two parts—applications, and files and folders. Applications are on the left of the faint broken line; files and folders are on the right (or top/bottom, if the Dock is oriented vertically).
Adding and Removing Items from the Dock
Adding files and folders to the Dock is a simple process of dragging and dropping.
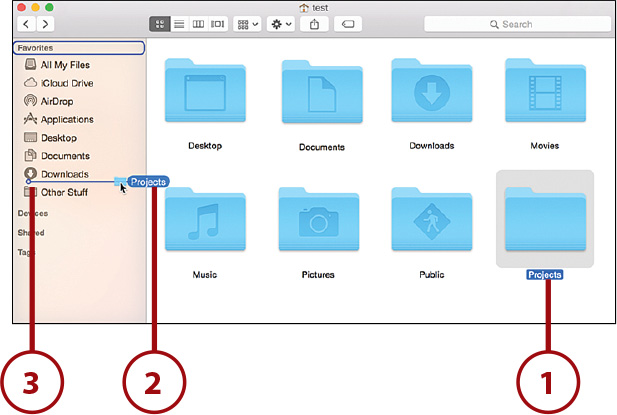
1. Use the Finder to locate the icon you want to add to the Dock.
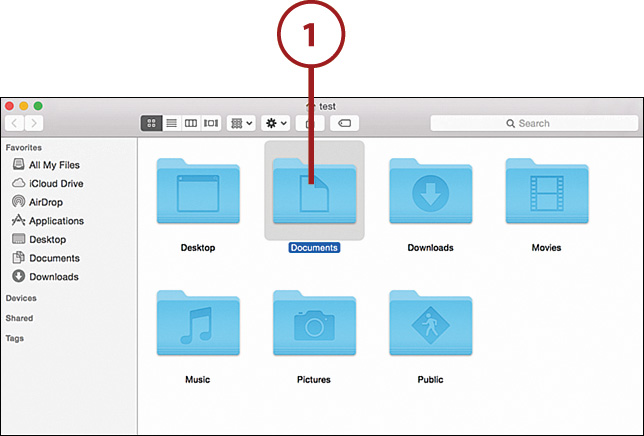
2. Drag the item from the Finder window to the appropriate side of the Dock (apps on the left, docs and folders on the right). As you drag the icon into the Dock, the existing icons move to make room for the addition. Release your mouse when you’re happy with the new location.
3. You can rearrange Dock items at any time by dragging them to another position in the Dock.

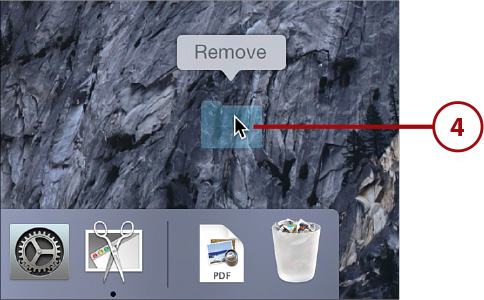
4. To remove an icon from the Dock, click and drag the icon out of the Dock.
Keep Your Apps Handy
If you start an application and decide you want to keep it in the Dock, click and hold the icon of the running application, and then choose Options, Keep in Dock from the menu that appears.
Using Folders and Stacks in the Dock
Folders that are added to the Dock behave differently from files or applications. When you click a folder residing on the Dock, the contents of the folder are displayed above it in one of three different styles—a Fan, Grid, or List. Additionally, the folder icons themselves can be shown as a simple folder or a stack of files, with your most recent file at the top.
Configuring Folders and Stacks
You can dramatically change the behavior of folders and stacks in the Dock by using the configuration options.
1. After adding a folder to the Dock, right-click or Control-click the folder to open the menu to configure its behavior.
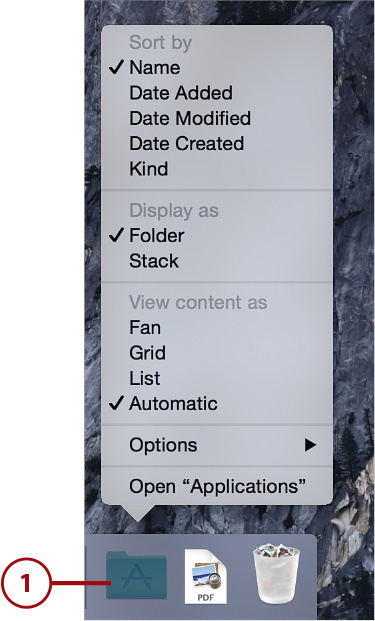
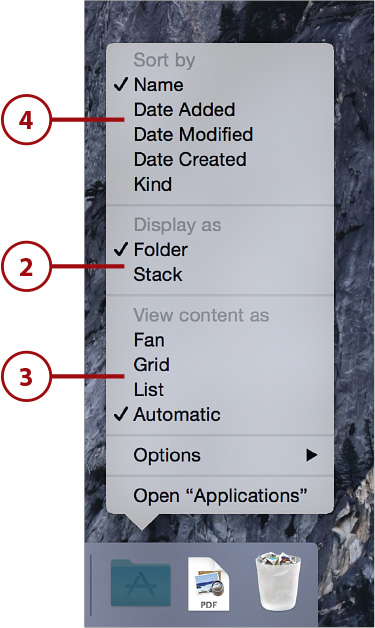
2. Choose to Display as a Folder or Stack to customize the appearance of the icon on the Dock.
3. Choose Fan, Grid, List, or Automatic to set how the content will be displayed when you click the icon in the Dock. The Automatic setting will choose the best option based on the number of items in the folder.
4. Finally, to customize the sorting of the displayed items, choose an option from the Sort By menu.
Navigating Files and Folders in Grid Mode
In Yosemite, the Folder Grid mode offers the most functionality for navigating your files. You can navigate through a scrolling list of files, and you can open additional folders.
1. Click a Folder in the Dock that has been configured to Grid mode. A grid popover appears above the folder icon.
2. Scroll through the available files, if needed.
3. To navigate into a folder, click the folder’s icon.
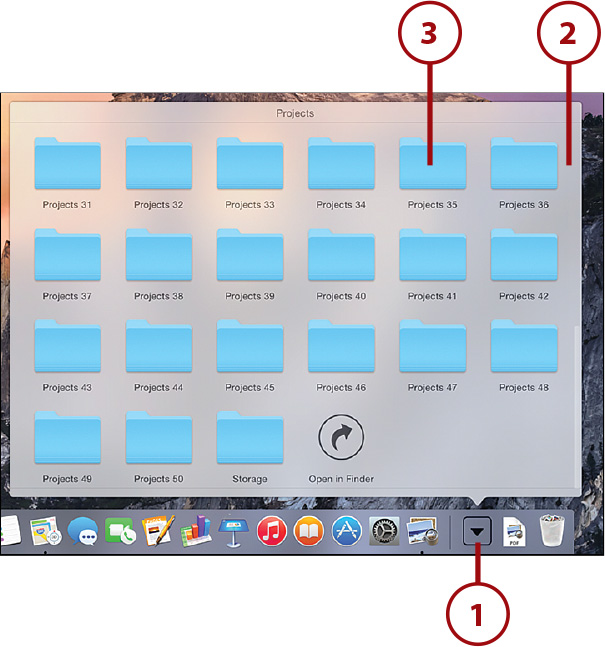
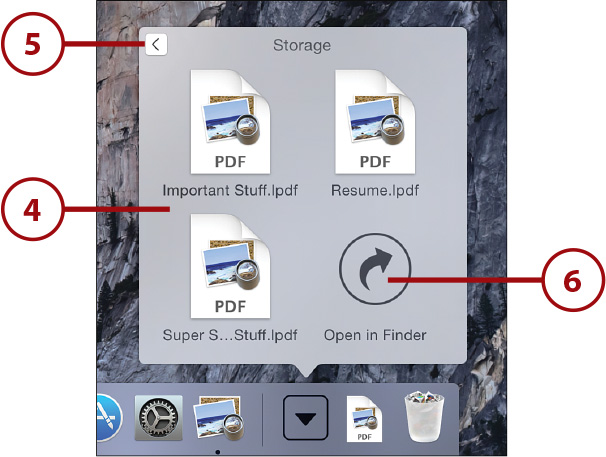
4. The Grid refreshes to show the contents of the folder.
5. Click the back arrow in the upper-left corner to return to the previous “parent” folder.
6. Click Open in Finder if you wish to open the current folder as a window in the Finder.
Customizing the Dock’s Appearance
The Dock helps keep your desktop nice and tidy by giving you a place to put your commonly used files and folders, but it also takes up a bit of screen space. You can easily customize the Dock’s appearance to make it as unobtrusive as possible.
1. Open the System Preferences panel, and click the Dock icon.

2. Use the Size slider to change the size of the Dock.
3. Click the Magnification checkbox. Use the corresponding slider to set the magnification of the icons as you mouse over them in the Dock.
4. Use the radio buttons to control the position of the Dock on the screen.
5. To control the way windows animate to and from the Dock, click the Minimize Windows Using drop-down menu to choose between the Genie and Scale effects.
6. Choose Double-click a Window’s Title Bar to Minimize to provide a quick means of minimizing a window into the Dock without having to click the minimize button.
7. Check the Minimize Windows into Application Icon checkbox to help conserve space in the Dock by putting minimized windows into their applications’ Dock icons.
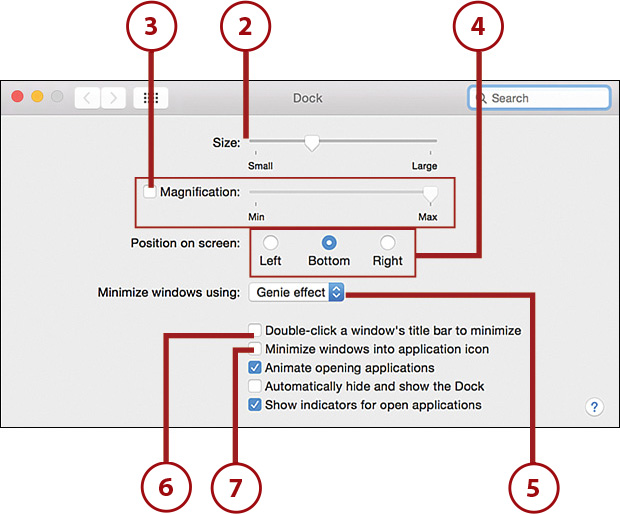
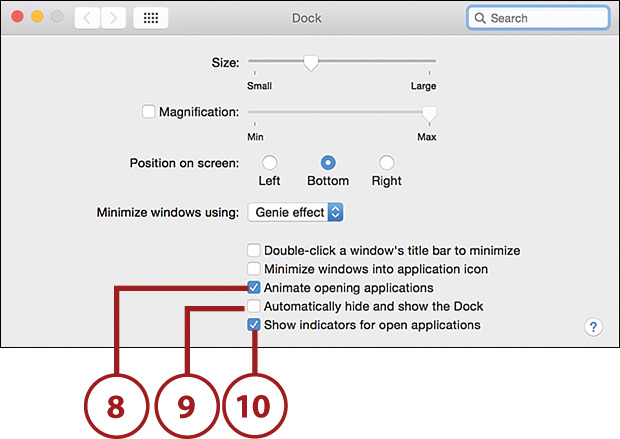
8. By default, application icons “bounce” in the Dock while they’re opening. Uncheck the Animate Opening Applications checkbox to disable this behavior.
9. Click Automatically Hide and Show the Dock if you’d like the Dock to disappear altogether when you’re not using it.
10. Check Show Indicator Lights for Open Applications if you’d like a dot to appear under applications that are running.
Dark-Themed Dock
You can switch your Dock and menu bar from the frosted glass look to a dark theme using the General Preferences panel. Open the panel and check the Use Dark Menu and Dock option.
Hiding the Dock
To quickly hide the Dock, press Command+Option+D.
Customizing Finder Windows
Like the Dock, Finder windows provide an opportunity to configure shortcuts to information that are accessible via a single click. The Finder sidebar and toolbar can be customized with your own files as well as default system shortcuts.
Configuring the Sidebar’s System Shortcuts
To change the sidebar’s default shortcuts, you need to use the Finder preferences.
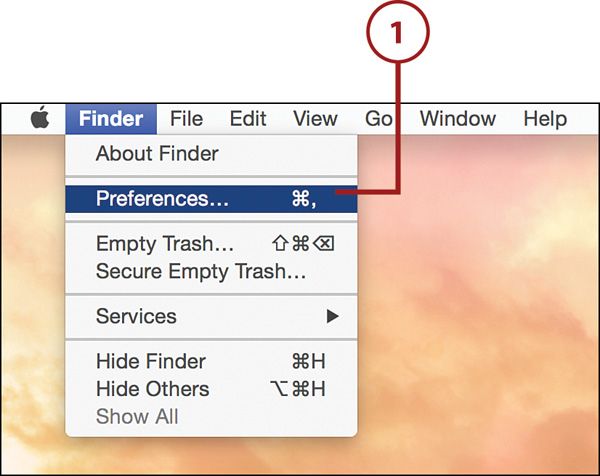
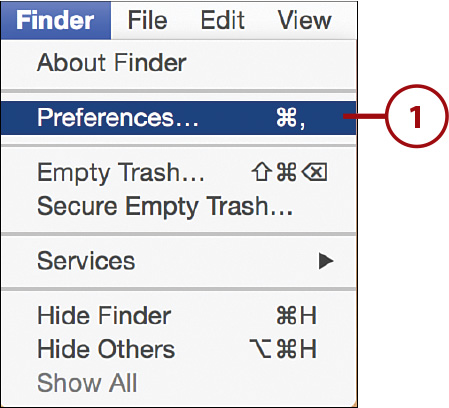
1. Open the Finder using its icon in the Dock and choose Finder, Preferences.
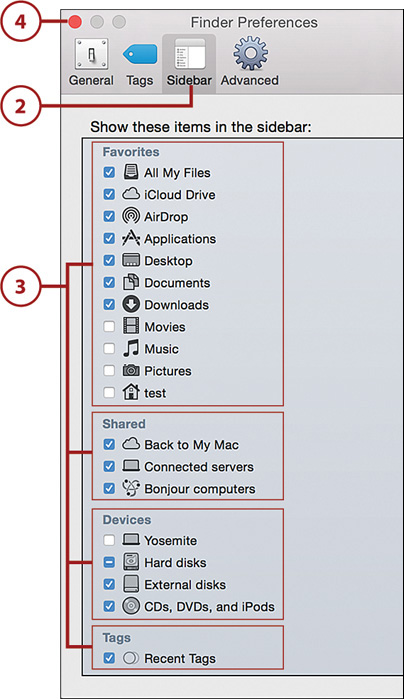
2. Click the Sidebar icon at the top of the Finder Preferences window.
3. Use the checkboxes beside Favorites, Shared, Devices, and Tags to configure which folders, network computers, connected hardware, and file tags should be displayed.
4. Close the Finder Preferences window.
Manually Modifying the Sidebar
In addition to the predefined shortcuts, you can easily add your own icons to the sidebar.
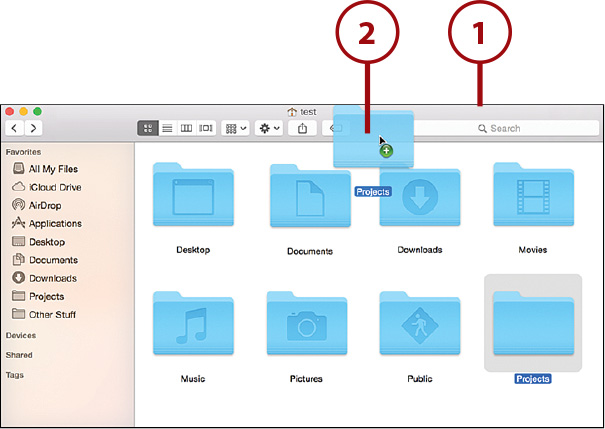
1. To add an icon to the sidebar, first make sure the item’s icon is visible in a Finder window.
2. Drag the icon to the Favorites area in the sidebar. If you are not dragging a folder, hold down the Command key while dragging.
3. A blue line appears to show where the item will be placed. Release your mouse button to add the item to the list.
4. The icon appears in the sidebar.
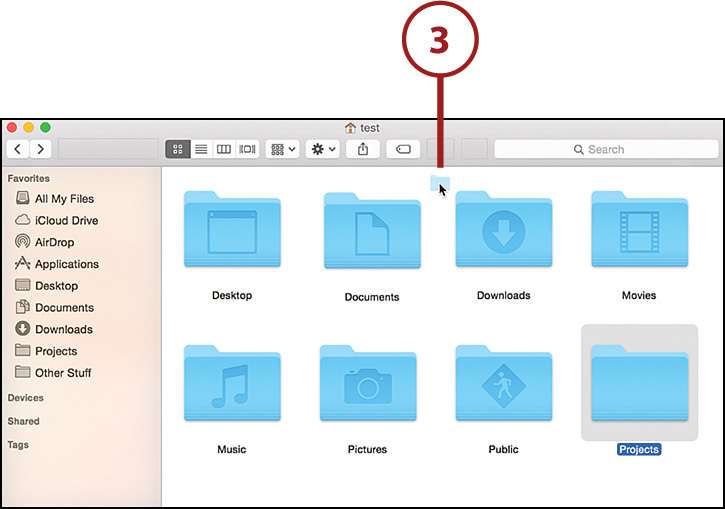
5. Rearrange the icons in the sidebar by clicking and dragging them up and down.
6. Remove existing sidebar entries by right-clicking (or Control-clicking) their icons and choosing Remove from Sidebar. Alternatively, just click and drag them from the sidebar.

Modifying the Finder Toolbar
Like the sidebar, the Finder window’s toolbar can hold shortcuts to files, folders, and applications.
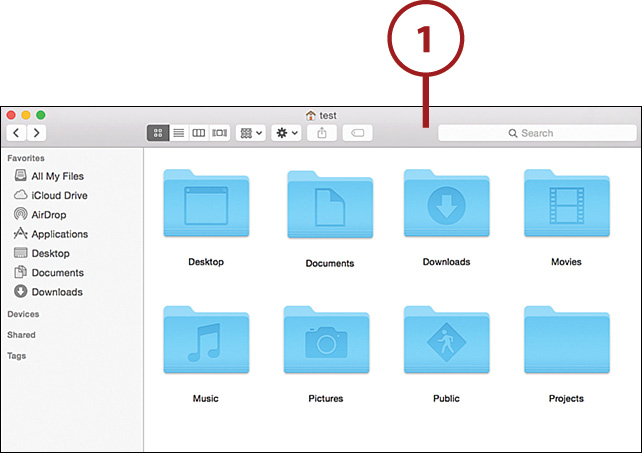
1. Open the Finder window containing the file or folder you want to work with.
2. Drag the icon you wish to add into the toolbar while holding down the Command key. The other interface elements shift to make room for the new addition.
3. To move an icon to a new location on the toolbar, hold the Command key down, and then click and drag. Drag the icon off the toolbar to remove it altogether.
Dragging Allowed!
Toolbar and sidebar items can serve as drag destinations as well as clickable shortcuts. For example, to file a document in a folder, you can drag it to a folder in the sidebar. To save a document to a file server, you can drag it onto a shared drive, and so on.
Using Finder Window Tabs
For years your web browser has had tabs to help you browse without having dozens of windows open at a time. In Yosemite, the Finder offers the same feature. You can open a new tab in a Finder window by following these steps.
1. Make sure that a Finder window is open. It doesn’t matter what view it is showing.
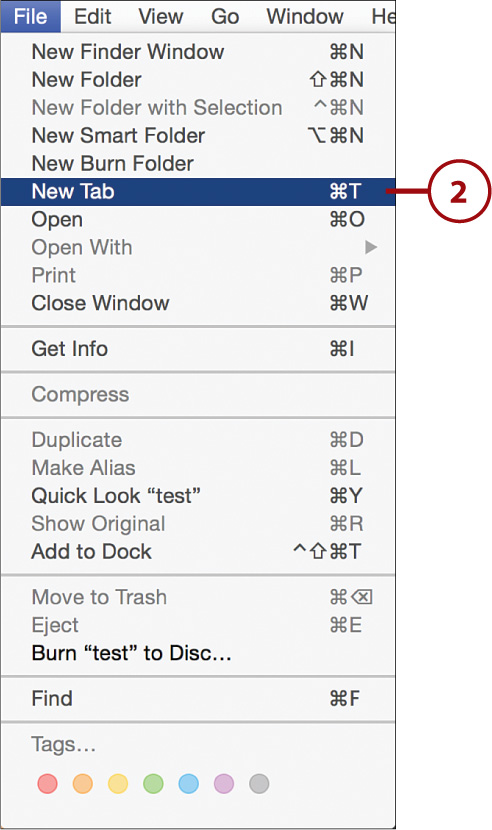
2. Choose File, New Tab (Command+T) from the menu bar.
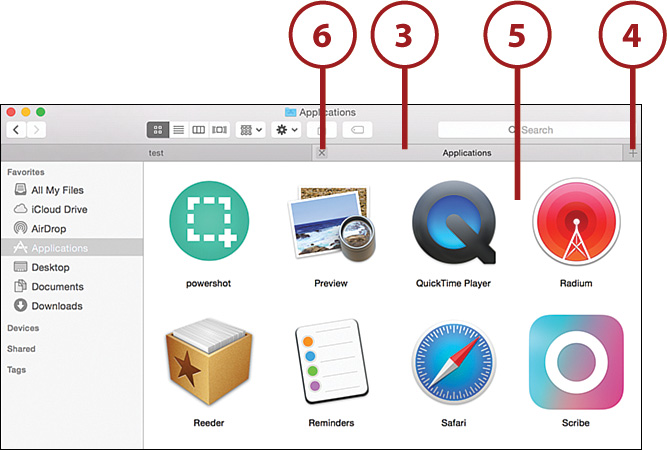
3. A new tab appears in the Finder window.
4. After the first tab appears, you can add new tabs by clicking the + icon at the right of the tab bar.
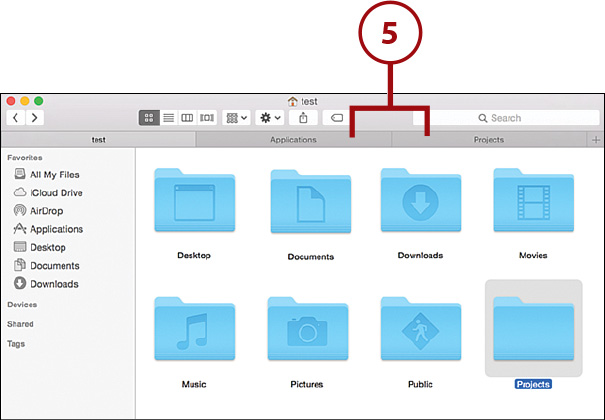
5. You can use each tab as a unique window, browsing different parts of the file system in each.
6. Close a tab by positioning your cursor near its left side and clicking the X box that appears.
Ever-Present Tabs
If you like seeing the tab bar all the time (even if you don’t have multiple tabs open), you can choose Show Tab Bar from the Finder’s View menu. This makes the + icon always visible, so adding new tabs becomes easier.
Opening Tabs with a Click
In the Safari web browser (read about it in Chapter 5, “Accessing Email and the Web”), you can open new tabs just by holding Command and clicking. You can do the same with the right preferences set in the Finder. To do this, just complete the following:
1. Choose Finder, Preferences from the menu bar.
2. Make sure the General tab is selected.
3. Check Open Folders in Tabs Instead of New Windows.
4. Close the Finder Preferences window.

5. From this point forward, when you hold Command while clicking a folder, the folder opens in a new tab rather than a window.
Tabs Are a Drag
Although it may not seem intuitive, you can drag files from one tab to another. Just drag the file into the tab where you want to drop it, keep holding, and after a few seconds the other tab opens, enabling you to continue your drag. Additionally, when you grab a tab itself and drag it out of the window, a new Finder window is created.
Arranging and Grouping Files
You might have noticed that this book doesn’t take a bunch of time to tell you about how to sort files, open folders, and all the typical things you do on a computer. Why? Because they work exactly the way you’d expect on a modern operating system. That said, Yosemite has some interesting ways of looking at files that you might not be aware of.
Using All My Files
If you’ve ever wanted to view all the files you have, the All My Files group will help you. This feature displays, quite literally, all your files in your personal account, including files stored in iCloud (see Chapter 4, “Setting Up iCloud and Internet Accounts,” for more details). To view your files, follow these steps:
1. Make sure the Favorites section of the Finder sidebar is expanded.
2. Click the All My Files icon, or choose Go, All My Files from the menu bar.
3. All the files that belong to you are shown in the Finder window.
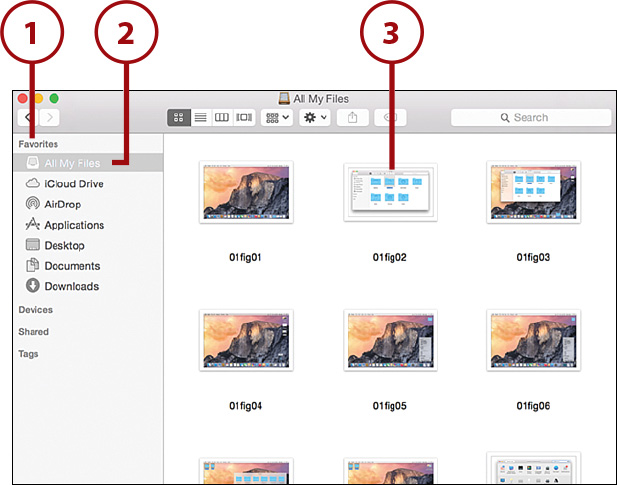
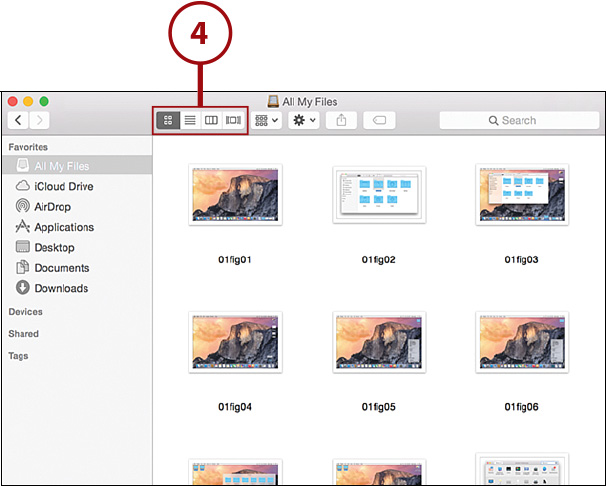
4. Use the view icons to change between icon, list, column, and cover flow views, respectively.
Granted, this isn’t the most exciting feature in the world, but when coupled with the Arrange By feature (covered in the next task), it becomes far more interesting.
Arranging a Finder View
You’re probably used to clicking a column heading and sorting files by name, date, modified, or other attributes. This is expanded in OS X with the Arrange By feature. Using Arrange By, you can view your files arranged by more “human” categories, such as the files you’ve opened today, in the last week, and so on.
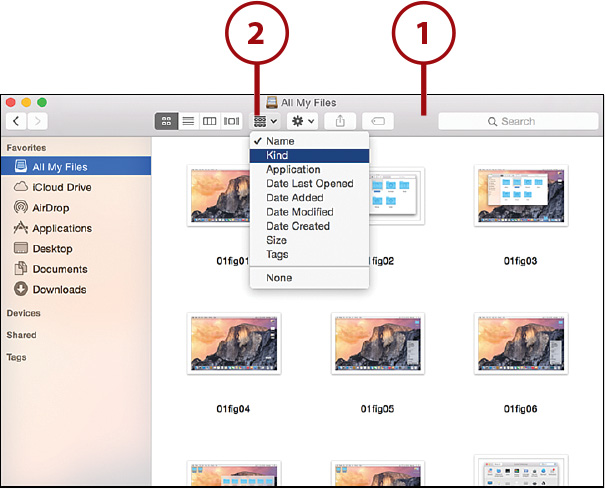
1. Open the finder view you want to arrange.
2. Use the Arrange By menu to select a category for grouping your files.
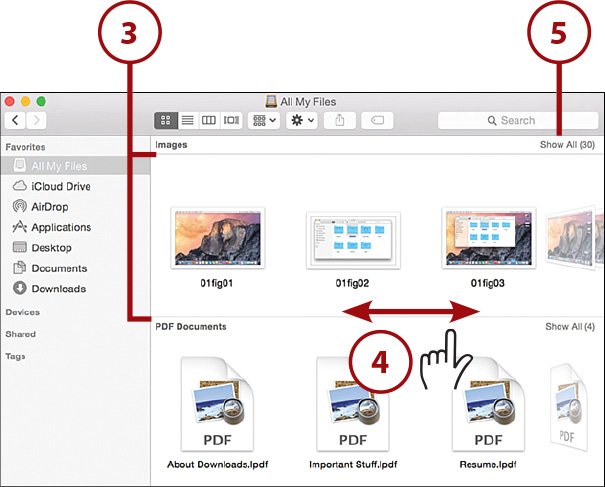
3. Different groups are separated by horizontal lines.
4. When in icon view mode, swipe left or right on a multitouch trackpad or Magic Mouse to scroll through a cover flow-like view of the icons within a grouping.
5. Click the Show All link to turn off the cover flow scrolling and show all the items within the window.
Making Arrangements
To set a default arrangement (among other things) for a folder, choose View, Show View Options from the menu bar when viewing the folder.
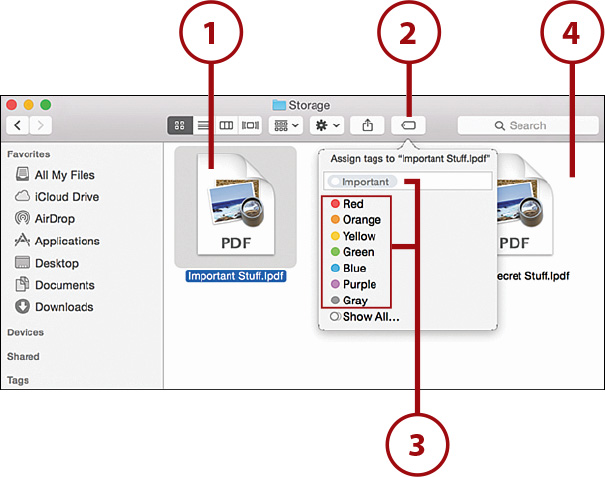
Assigning Tags
When choosing an arrangement for a view, you may notice a Tags category. This is a new feature to Yosemite that offers the ability to assign tags to your files and folders. These can be anything you want—“Important,” “Projects,” and so on. They are arbitrary text descriptions that you establish and can use to label any of your files or folders, no matter where they exist on your system.
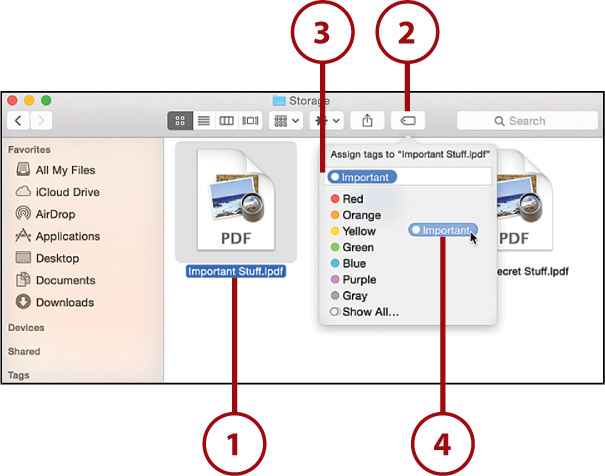
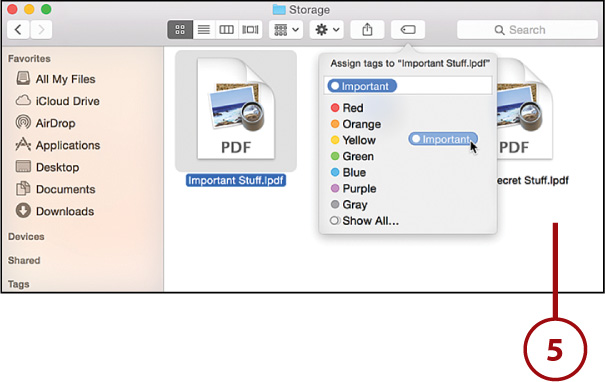
1. Select a file or folder in a Finder window.
2. Click the Tags button in the Finder toolbar.
3. Either type in a new tag, or choose an existing tag from the menu.
4. Click outside the menu to assign the tag.
Yosemite Loves Tags
Truth be told, there are a million and one ways to assign tags in Yosemite. You can do it using the method just described; you can add tags by clicking the file name on a window in many Yosemite applications; you can assign tags by choosing Finder, Get Info when a file or folder is selected. I could write a whole chapter on adding tags, but I suggest you find a method you prefer and stick with it.
Removing Tags
After you start adding tags in Yosemite, you’ll quickly discover that you can add as many tags to an individual file or folder as you want. As a result, you might want to remove a tag you added in error.
1. Select a file or folder in a Finder window.
2. Click the Tags button in the Finder toolbar.
3. All of the assigned tags appear in the field at the top of the drop-down menu.
4. Click to highlight a tag, and either press delete or drag it to the trash.
5. Click outside of the menu to save the new tag list.
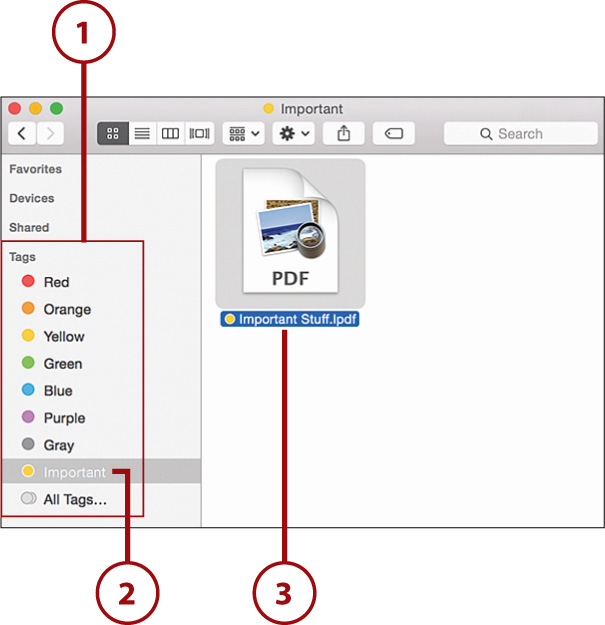
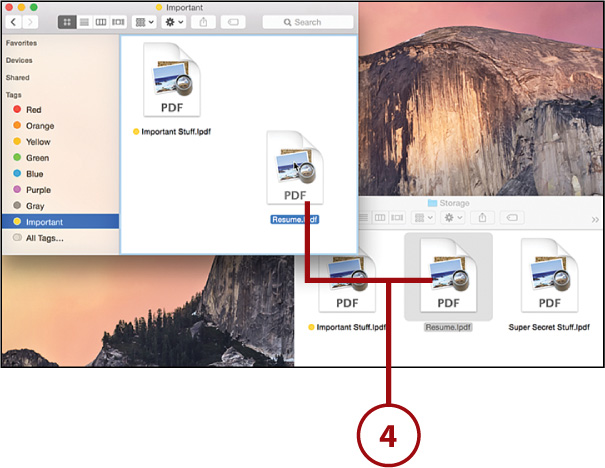
Viewing Tags
After you’ve assigned tags, you can view them using the Tags section in the Finder sidebar.
1. Make sure the Tags section is visible.
2. Click the tag you want to view or All Tags if your tag list is long and the one you want isn’t visible.
3. Files and folders matching the tag are displayed. Note that if the tag has an assigned color, it will be displayed as a color-coded dot beside the file in many of the standard Finder views.
4. You can drag new files and folders into the window to assign them to the tag. (I told you there were a million ways to assign tags!)
Tags—Seriously, They’re Everywhere
When you open files, notice that Tags now appear in the sidebar within the File Open dialog box. You can use these to quickly view all the files matching a tag and open a file without having to find its folder.
The “Finding Information with Spotlight” section later in this chapter explains how Spotlight can be used to search for files matching certain tags and other criteria (for example, “All images with the tag ‘Vacation’ created between the dates of June 2014 and August 2015”).
Managing Tags
To see, edit, and assign colors to your tags, use the Finder preferences.
1. Choose Finder, Preferences from the menu bar.
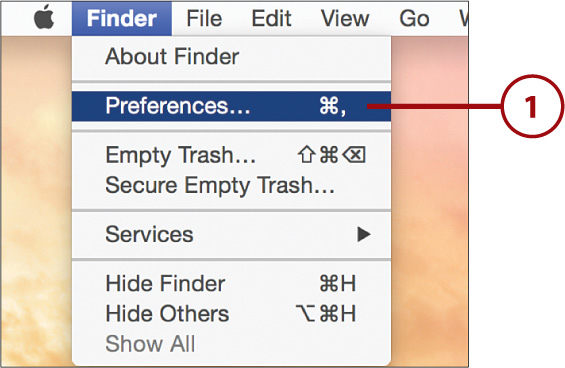
2. Click the Tags tab at the top of the Preferences window.
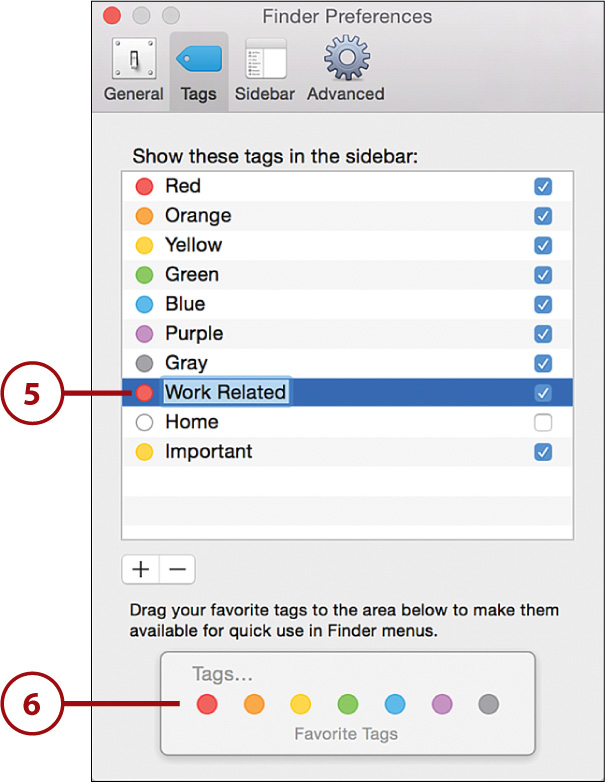
3. Use the checkboxes to control which tags are visible in the Finder sidebar.

4. Click the circle beside a tag to choose a color for it.
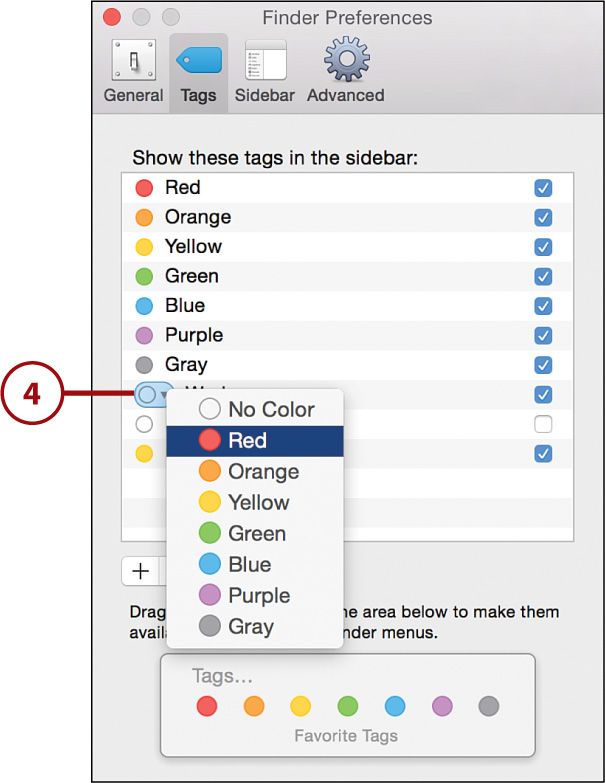
5. Click a tag’s name to edit it.
6. Drag Tags to the rectangular list of Tags at the bottom to have quick access to them through Finder contextual menus or the Finder’s File menu (yet another way to add tags to files and folders!).
Missing Tags?
If the Tags section is missing from your Finder sidebar, you might have disabled it accidentally. You can add the Tags section back using the Sidebar Finder preferences (Finder, Preferences).
Previewing Document Contents with Quick Look (New!)
Launching applications takes time and resources. Frequently, when you want to open a file, all you really want is to see the contents of the file. Using the equivalent of X-Ray vision, called Quick Look, you can view many of your documents without the need to open an application.
Viewing a File with Quick Look
Using Quick Look doesn’t require anything more than your mouse and a press of the spacebar.
1. Select a file from the Finder or desktop by clicking once, but don’t open it!
2. Press the spacebar to open Quick Look.
3. Click the circle with double arrows to expand Quick Look to fullscreen.
4. Use the Share menu to send the file via email, add images to iPhoto, etc.

5. Some files might show additional controls above the preview or below when in fullscreen mode. When multiple images are selected, for example, fullscreen mode includes a button to play a slideshow.
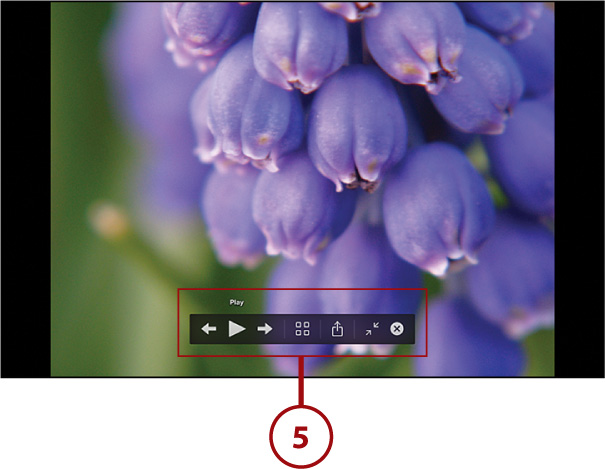
6. Press the spacebar again to exit Quick Look (not shown). Note that if you are in fullscreen mode, you need to press Escape (Esc) on your keyboard or press the onscreen X button to exit fullscreen mode before exiting Quick Look.
If you start Quick Look on multiple files, you can run a slideshow. The fullscreen Quick Look window includes play, forward, and backward arrows to start and control the slideshow. You can also use an index sheet icon (four squares) to show previews of all the files in a single Quick Look window (also available in windowed mode).
Quick Look even works on music and video files, enabling you to play back media without opening a dedicated application.
Previewing Files Using Finder Icons
The Finder includes Quick Look-like capability for some files just by mousing over them.
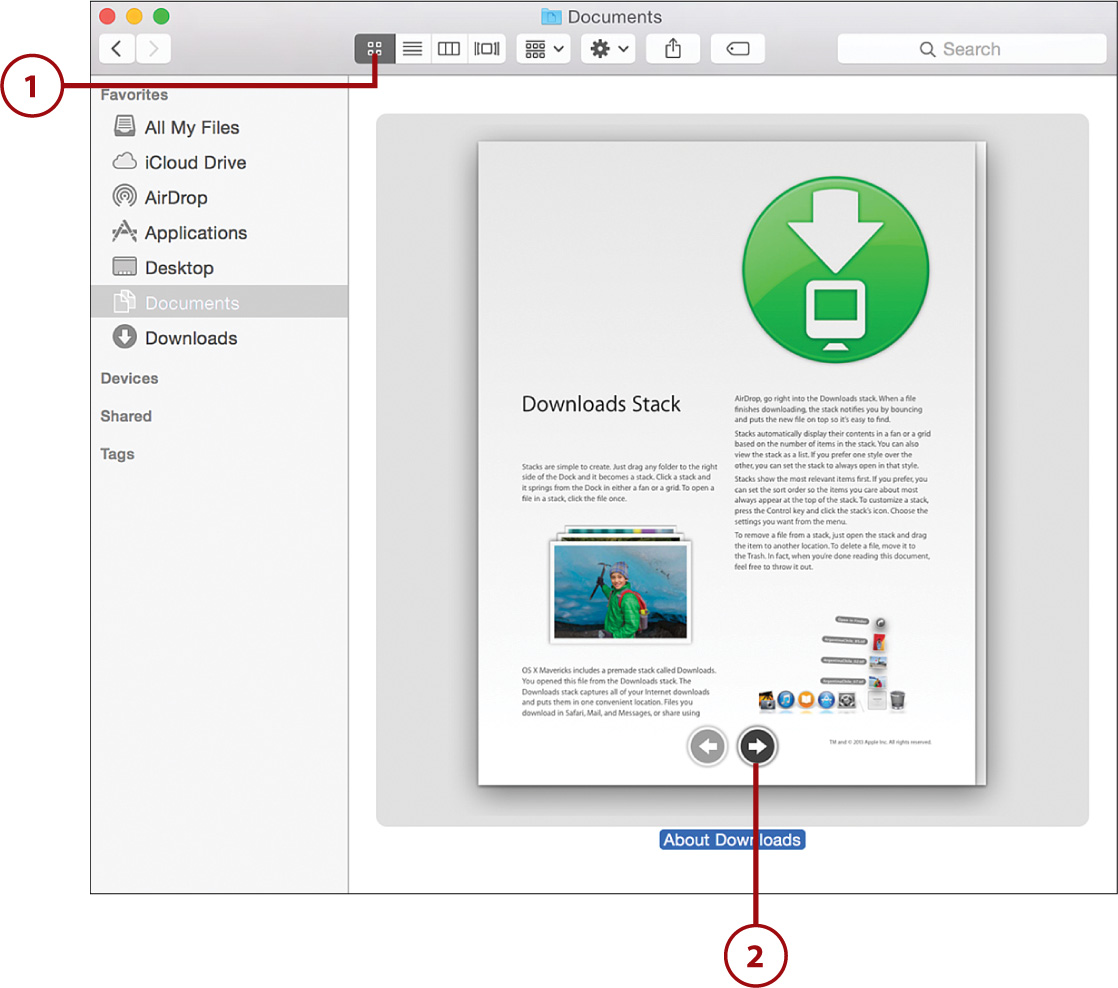
1. To preview a file using icons in Yosemite, make sure you’re in icon view mode.
2. Mouse over the file, and use the controls that appear to navigate the contents of the file. As with Quick Look, even media files can be played in this manner.
For quick access to a slider for changing your icon sizes, choose View, Show Status Bar from the menu bar. Alternatively, you can adjust a window’s icon size by choosing View, Show View Options from the menu bar.
Finding Information with Spotlight (New!)
When the Finder’s file organization features can’t help you find what you want, the amazing Spotlight search system in Yosemite makes it simple. Spotlight can search across files, email messages, the built-in dictionary, and even Internet resources to find information.
Searching for Files and Information
Spotlight searches can be started at any time, without needing to launch any additional applications.
1. To start a search, press Command+Space, or click the magnifying glass icon in the upper-right corner of your screen. A search field appears in the center of the screen.
2. Begin typing in the search field.
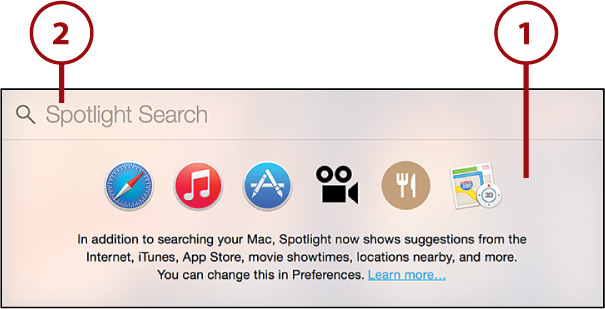
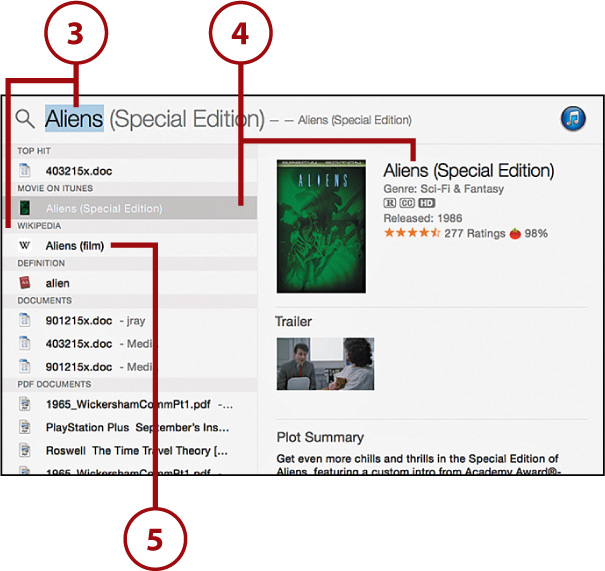
3. As you type, files, images, folders, and even Internet sources that match your terms are displayed in a list.
4. Click a result to see a preview on the right.
5. Double-click a matched item in the list to open the item.
You can use Spotlight searches to quickly launch applications. Begin typing the name of the application in the search, wait until a match appears, and then press Return. Your application launches!
Customizing Spotlight Searching
Spotlight searches can turn up tons of information. More, perhaps, than you’d like. To choose exactly what you want to display, you need to configure the Spotlight System Preferences panel.
1. Open the Spotlight System Preferences panel.
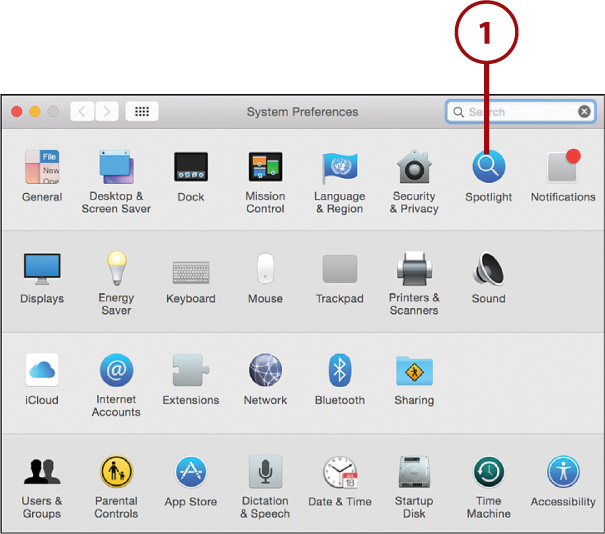
2. Within the Search Results panel, check items you want to be returned as part of the search results. Uncheck the items you want to exclude.

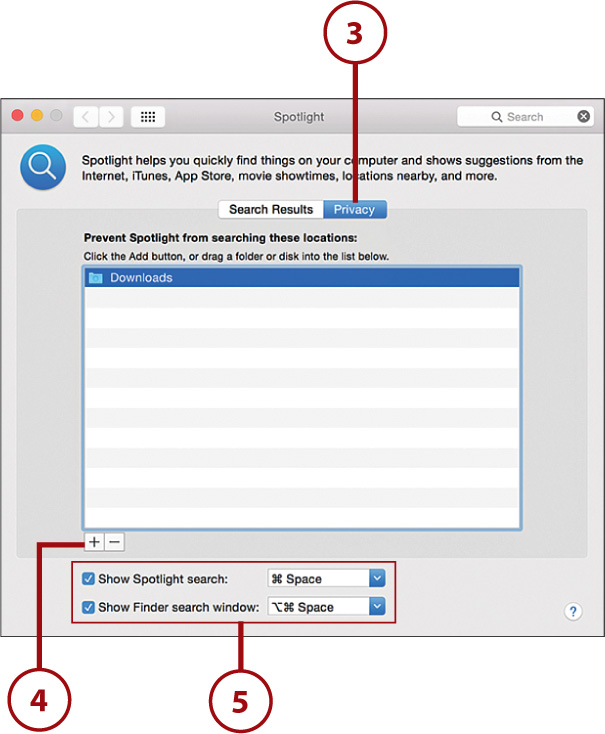
3. To restrict what volumes are searched, click the Privacy button. You can choose to have Spotlight ignore specific folders or disks.
4. Click the + button to choose a folder or disk that you don’t want to be searchable. Alternatively, drag folders directly from the Finder into the Privacy list.
5. Use the checkboxes to change how Spotlight is started or disable keyboard shortcuts altogether.
Saving Searches as Smart Folders in the Finder
Spotlight searches for files can be saved and reused in the form of Smart Folders. If you’d like to create a search that shows all your image files—regardless of where they are stored, for example—you can create and save a Show All Images search.
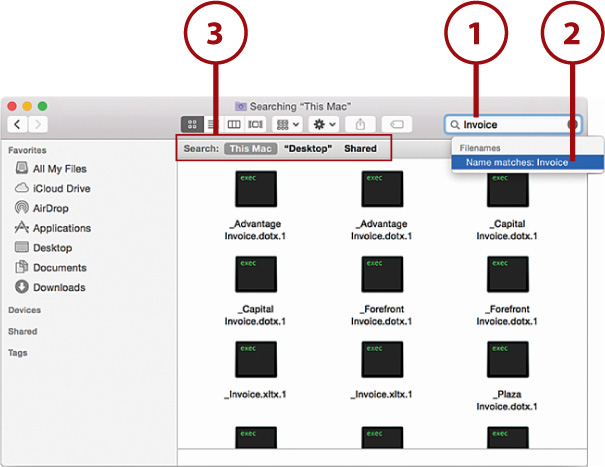
1. Use a Finder window’s search field to type the name or content of a file you want to find.
2. Choose what the search should include (such as a filename). The default is to include file content, kinds, and other metadata.
3. Adjust whether you want to search your entire Mac (indicated by the words “This Mac”) or just the folder you’re currently in.
4. Use the + and – buttons below the search field to add or subtract additional search criteria lines.
5. Use the pop-up menu at the start of each search line to configure search attributes such as file, kinds, or size.
6. To add even more search criteria, choose Other. A window listing the available search attributes displays. Choose an attribute and click OK.
7. When you’re satisfied with your search, click the Save button.

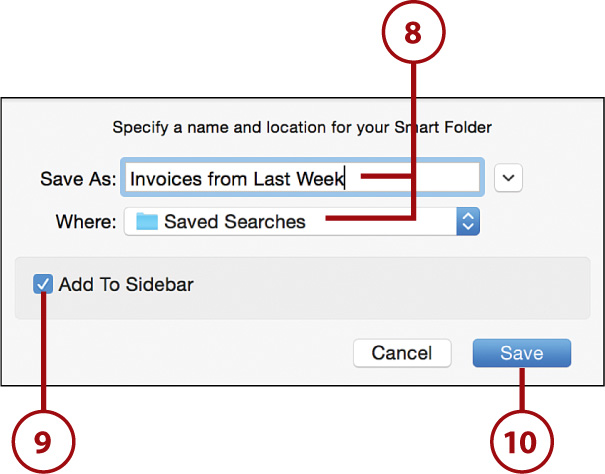
8. You are prompted for a name for the search and where it should be saved.
9. Click Add to Sidebar.
10. Click Save.
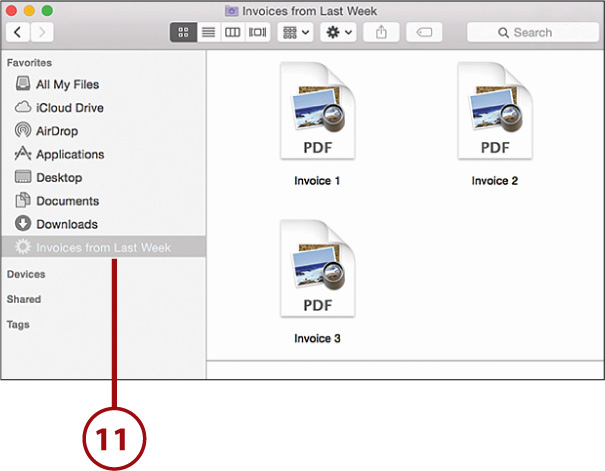
11. If you choose to add the search to your sidebar, it is accessible immediately from your Finder window. Otherwise you need to navigate to the saved location and double-click the search’s Smart Folder icon to run it again.
Less Is More
After you’ve configured a few search criteria beyond the text for the file name or file content, you can erase the search text and Yosemite includes all of the files that match your other criteria.
Managing Your “Today” and Notifications (New!)
At any given time, both you and your computer have quite a bit going on—mail being checked, potential FaceTime invites, software updates, bills to calculate, calendars to watch, and so on.
Yosemite’s Notification Center contains a view of system notifications (alert messages, warnings, and so on) along with a Today view that you can customize with information and tools you use everyday. The Notification Center keeps you in touch with your virtual and real lives—without needing to leave the Yosemite Finder.
Receiving Notifications
To receive a notification, you technically don’t need to do anything, but you should know what to expect:
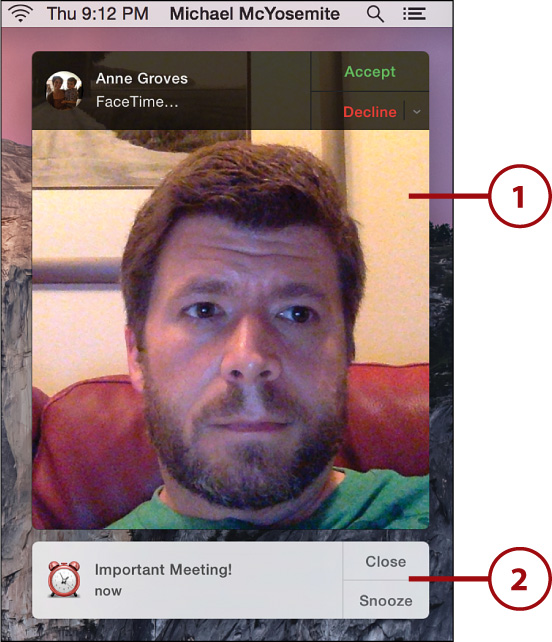
1. Notifications, as they occur, appear along the right side of the display.
2. Most notifications go away after a few seconds and require no interaction. Some might include options to immediately react to the notification. Clicking the buttons performs the action described.
Viewing Notifications in Notification Center
If a notification “goes away” before you have a chance to read it, you can catch up with the latest notifications in the Notification Center.
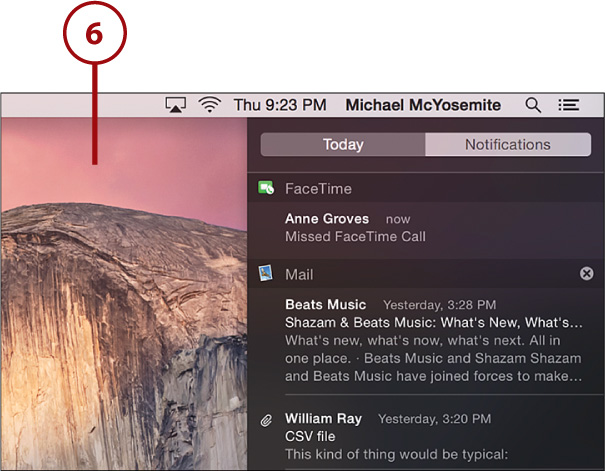
1. Click the bulleted list icon in the upper-right corner of the menu bar. You can also open the Notification Center with a trackpad gesture by sliding two fingers to the left, starting off the right side of the trackpad.
2. The desktop slides over to reveal the Notification Center.
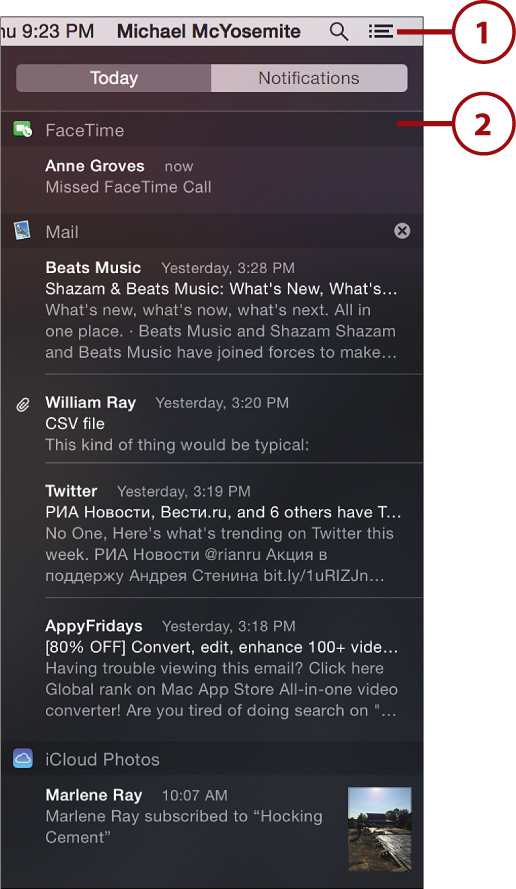
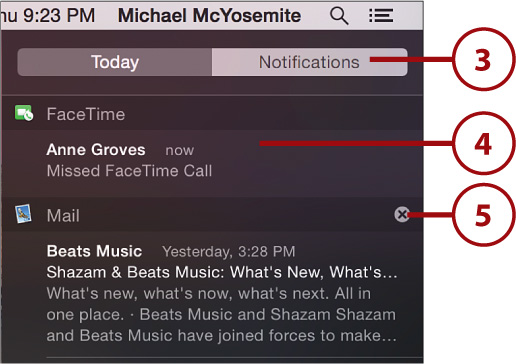
3. Switch to the notifications view by clicking the Notifications button at the top.
4. Clicking a notification reacts appropriately—clicking a missed FaceTime call, for example, opens FaceTime and returns the call.
5. To dismiss an application’s notifications, click the X icon in the upper-right corner of its list of notifications.
6. To close the Notification Center, click on the desktop, or slide two fingers to the right on the trackpad.
Customizing the Notification Display
How each application presents notifications (or if they present notifications at all) can be customized in OS X.
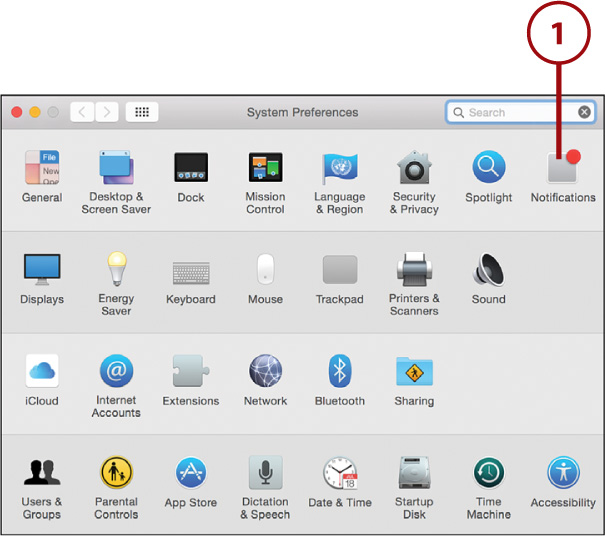
1. Open the Notifications System Preferences panel.
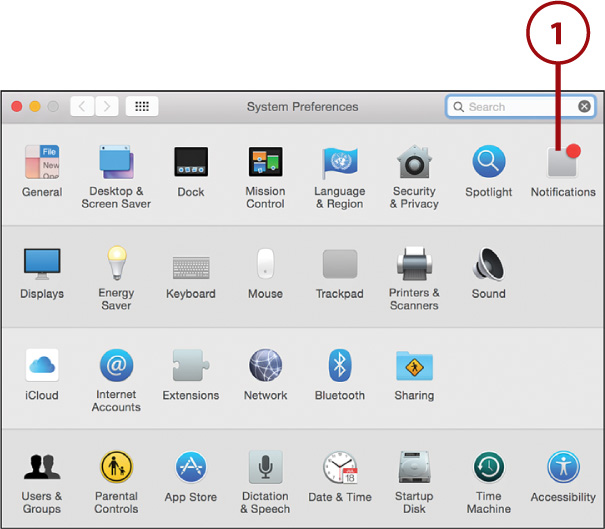
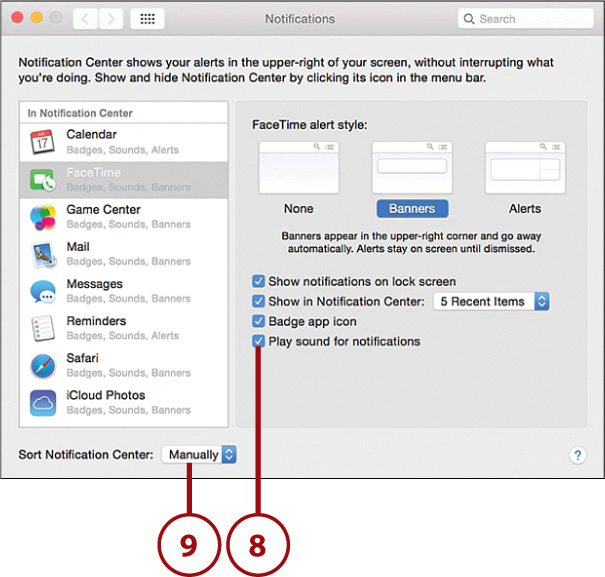
2. Choose an Application to customize from the list on the left.
3. Use the alert style buttons to choose from None (no visual at all), Banners (automatically close), and Alerts (stay on the screen until manually dismissed).
4. Check Show Notifications on Lock Screen if you want to see the notifications when your Mac’s screen is locked.
5. Uncheck Show in Notification Center if you prefer to not receive any notifications (visual or audio) from the application.
6. Use the Recent Items pop-up menu to choose how many notifications are shown at a time.
7. Check the Badge App Icon to show the count of notifications (such as new messages) on the application’s icon.

8. Check Play Sound for Notifications to enable the application to provide an audio alert.
9. Select whether to Sort Notification Center manually or according to the time a notification was received. If sorting manually, you can drag the icons up and down in the application list to choose how they appear in the Notification Center.
Gone but Not Lost
If you uncheck “Show in Notification Center” for an application, it disappears from the list of applications to configure. What if you want to get it back? Never fear—it didn’t really disappear—it was just placed at the bottom of the app list, in a section titled “Not In Notification Center.”
Quick Settings Access Within Notification Center
In the lower-right corner of the Notification Center itself is a button labeled with a small gear icon. Clicking this button opens the Notification Center preferences.
Activating Do Not Disturb Mode
If you’re like me, you probably have a zillion different things happening on your computer and (potentially) several dozen apps wanting to tell you something via notification. For the times you’d prefer not to hear all the sounds and see the notification windows, you can activate a Do Not Disturb mode that lasts until the next morning. Begin by opening the Notification Center, and then follow these steps:
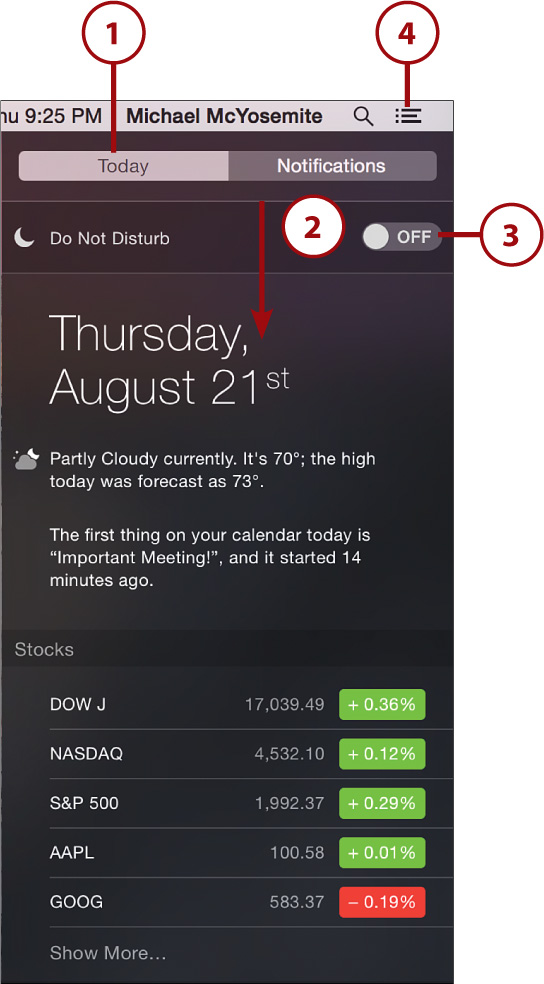
1. Click the Today button at the top of the Notification Center.
2. Scroll the Notification Center content down.
3. An On/Off button is revealed. Click Off to quiet your notifications or On to let them be seen and heard.
4. The Notification Center icon becomes dimmed when in Do Not Disturb mode.
Do Not Disturb Me NOW!
Want to activate Do Not Disturb mode in a flash? Just hold the option key and click the Notification Center icon in the menu bar. The icon will gray to show it is disabled. Repeat the process to turn it back on.
Customizing Do Not Disturb Mode
It’s simple to activate Do Not Disturb when you need it, but you can customize the feature to automatically activate in situations where you typically don’t want notifications to be appearing.
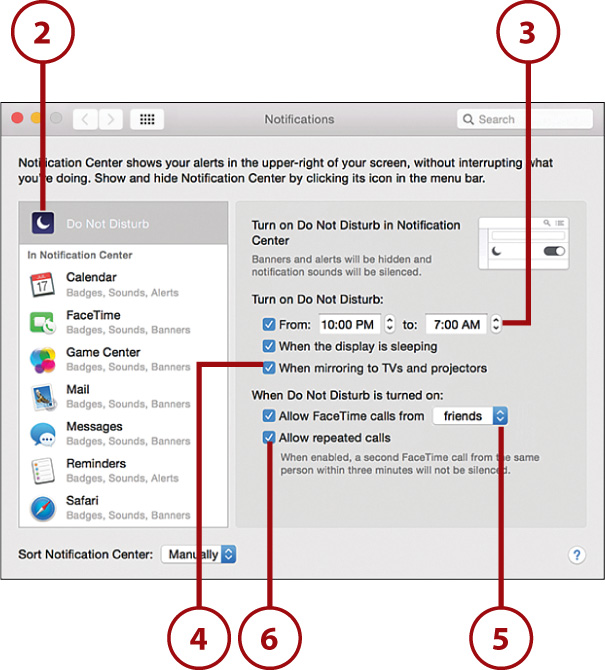
1. Open the Notifications System Preferences Panel.
2. Select the Do Not Disturb option.
3. Provide a time range (and check the checkbox) to automatically apply Do Not Disturb during a common time period (for example, night time).
4. Check When Mirroring to TVs and Projectors to keep notifications from showing up when you’re displaying content on a TV or a projector.
5. Use the Allow FaceTime calls drop-down menu and checkbox to choose a group of people that should be allowed to call you during Do Not Disturb hours.
6. Click the Allow Repeated Calls checkbox to disable Do Not Disturb for individuals who have called repeatedly (in case of potential emergencies).
Using Notification Center’s Today View (New!)
New in Yosemite is the Notification Center’s Today view. The Today view doesn’t show you system notifications, but it does keep you up-to-date on your real world events, and it gives you access to commonly used utilities for communicating with social networks, checking your calendar, and much more.
Working in the Today View
You can access the Today view anytime the menu bar is visible. Just follow these steps:
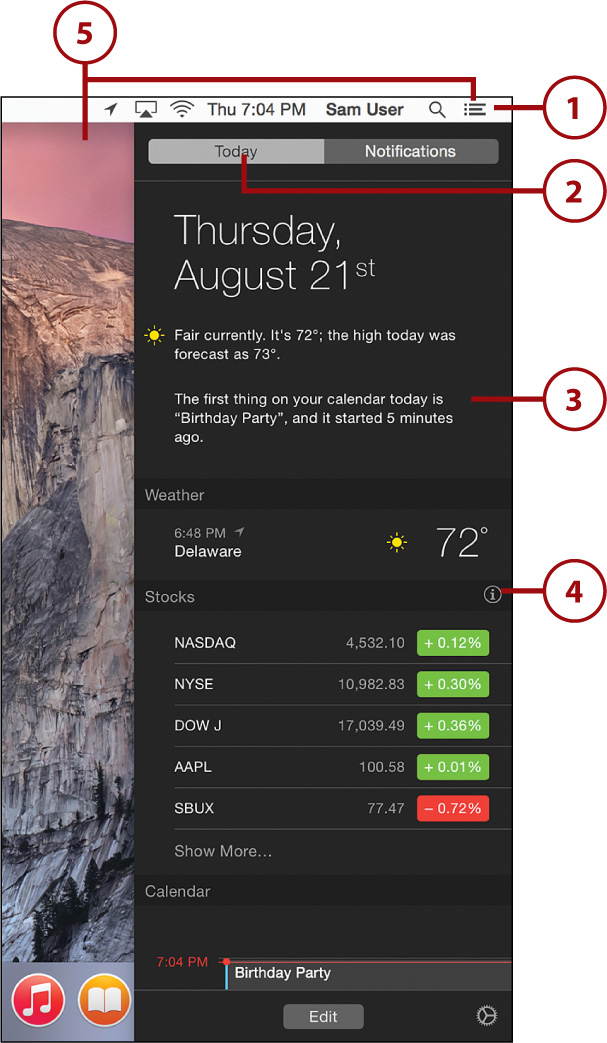
1. Open the Notification Center.
2. Click the Today button at the top of the Notification Center column.
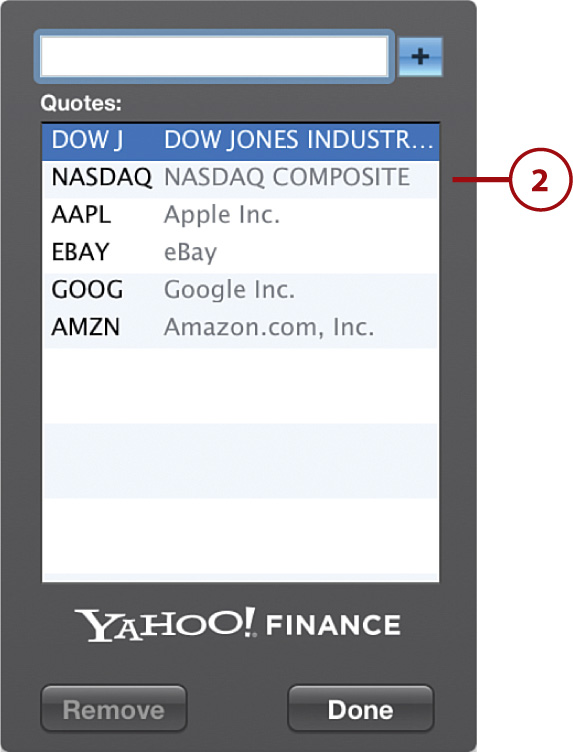
3. Widgets are included to show you a summary of your day, the weather, stocks, and calendar events. If widgets are off your screen, you can scroll up and down to view them.
4. Position your cursor over a widget’s name (here, Stocks) to reveal an “i” icon that, when clicked, configures features of that widget.
5. Close the Today view by clicking the desktop or the Notification Center icon in the upper-right of the screen.
Your Social Center
The Notification Center’s Today view can serve as your interface to social media. If you add social networking accounts (see Chapters 4 and 7), you’ll automatically get a widget added to the Today view for interacting with those accounts.
Managing Today View Widgets
The Today view isn’t static. You can customize it by rearranging widgets and adding new widgets from the Mac App Store. To manage the Today view, follow these steps:
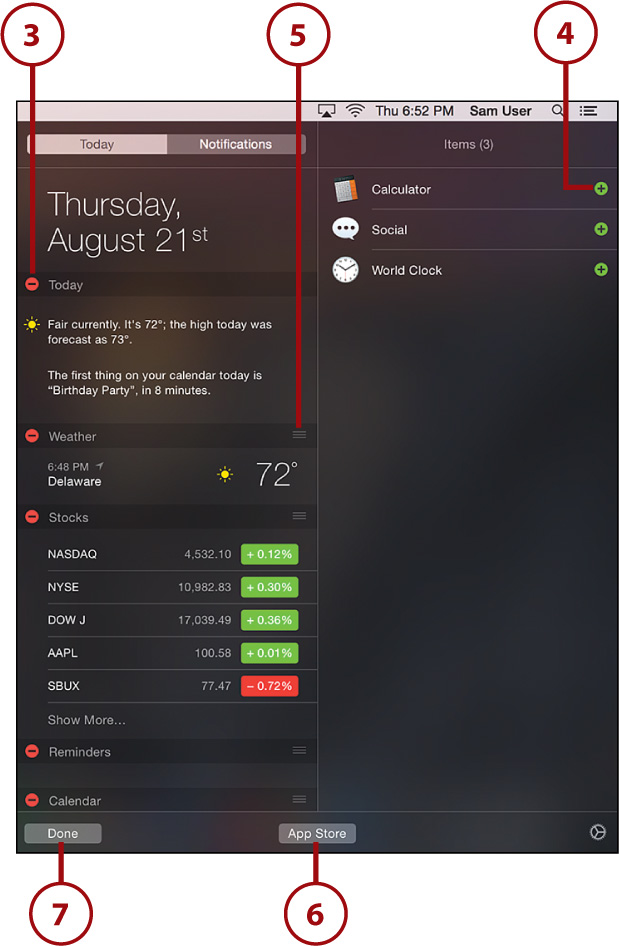
1. Open the Notification Center and click Today to switch to the Today view.
2. Click the Edit button at the bottom of the view; an additional column appears.

3. Click the – buttons to remove widgets.
4. The right column displays available widgets to add. Click + beside a widget name to add it to your Today view.
5. To the right of each widget within the Today view is an icon consisting of three lines. Click and drag on these icons to move widgets up and down in the view.
6. To find and download new widgets, click the App Store button in the bottom center of the Notification Center.
7. Click Done to save your edits.
Using Utilities in the Dashboard
The Today view in the Notification Center is the future of OS X widgets. The past, however, is a feature called Dashboard. Although I have my doubts about the longevity of the Dashboard, it remains a useful tool. So, what is this thing...?
The Dashboard is an overlay of widgets you can call up and dismiss with a single keystroke. Widgets you add to the Dashboard persist between reboots, so when you’ve configured your Dashboard the way you like it, it’s there to stay!
1. To activate the Dashboard, click the Dashboard icon in the Dock (or in the Applications folder), or, even easier, swipe with four fingers to the right across your Magic Trackpad (not shown).
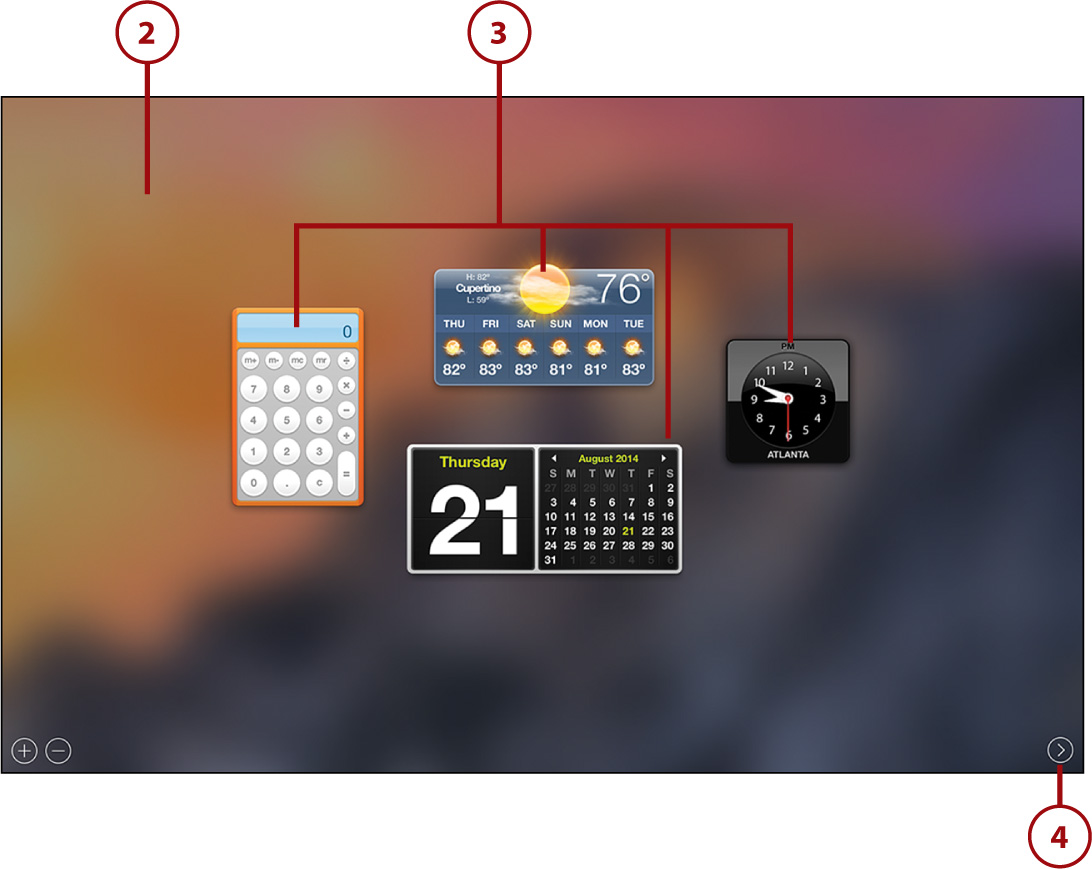
2. The desktop slides out of the way and a default set of Dashboard widgets displays.
3. You can now interact with any of the widgets, including dragging them around to rearrange them, just as you would with normal applications.
4. Exit Dashboard by clicking the arrow in the lower right of the Dashboard or swiping with four fingers to the left.
Tweaking Your Shortcuts
To configure additional shortcuts to the Dashboard, you can visit the Mission Control System Preferences panel. Read more in Chapter 2, “Making the Most of Your Screen Space.”
Adding and Removing Dashboard Widgets
One of the best things about widgets is that you can keep adding them to your screen, and they’ll always be there until you choose to remove them.
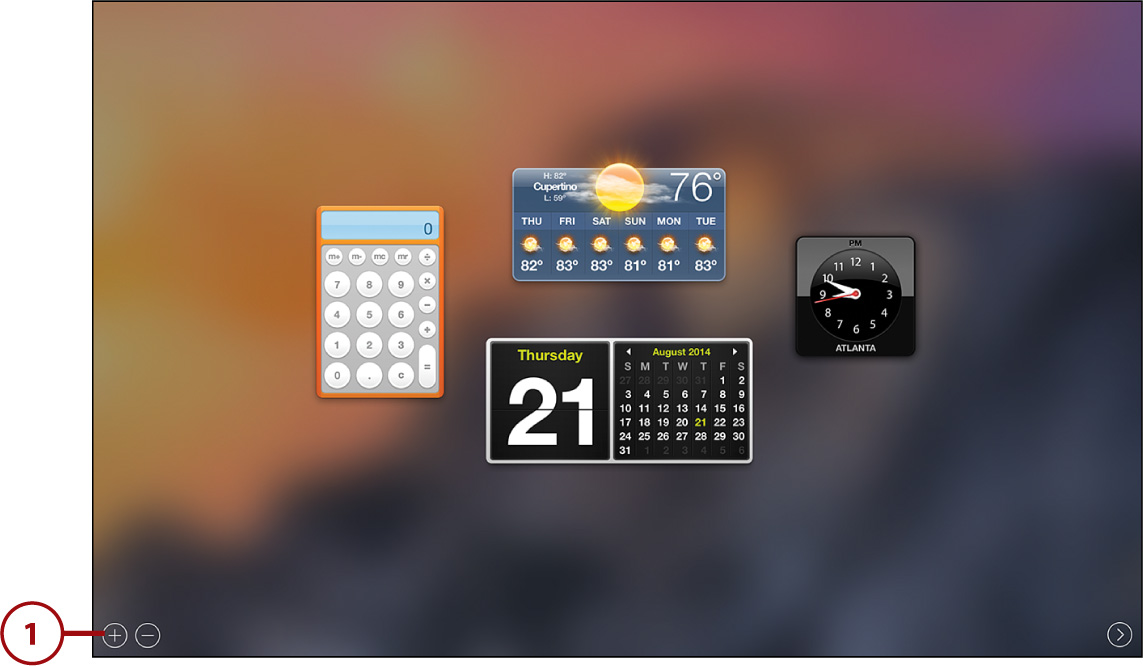
1. To add (or remove) a widget in the Dashboard, start the Dashboard and click the + icon in the lower-left corner. A screen of widgets displays.
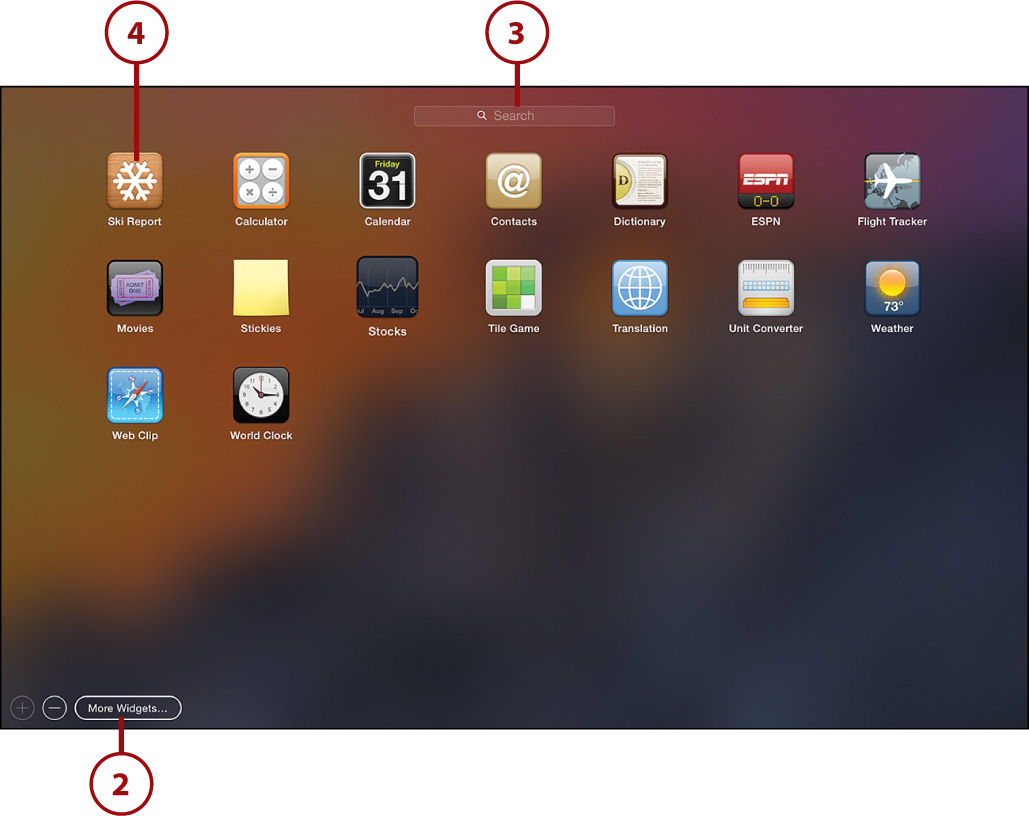
2. Click More Widgets to open a web browser with a page listing additional downloadable widgets.
3. If you have many widgets, use the search field, if needed, to find what you are looking for.
4. To add a widget to your desktop, click its icon. The list of widgets disappears and you return to the Dashboard with the new widget visible.
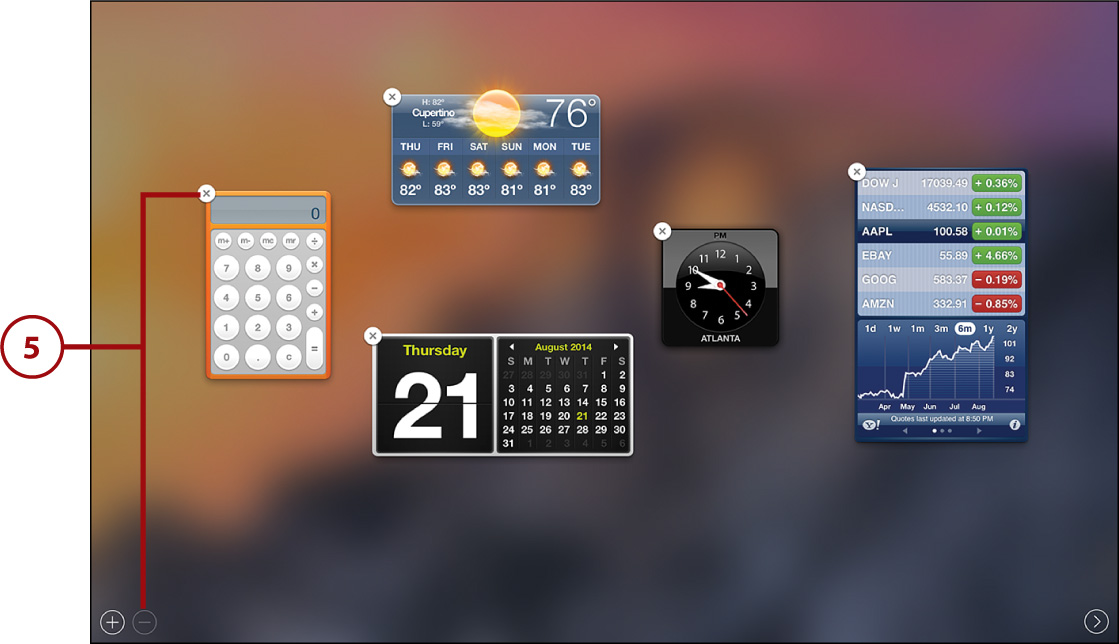
5. To remove widgets, click the – icon in the lower-left corner, and all the widgets display the X icon in their corner. Tap the X for each widget you want to remove.
Configuring Dashboard Widgets
Widgets are unique applications that each behave differently, but, in general, you configure them one of two ways. Some widgets, when you add them to your screen, automatically prompt you with the information they are expecting. Other widgets must be configured to show the proper results, as follows:
1. Mouse over a widget you want to configure. A small “i” appears in the corner of the widget. Click the “i” icon.

2. The widget flips over, revealing the configuration details.
Installing Widgets
When you download a widget (see “Adding and Removing Dashboard Widgets”), it will download a file in your Downloads folder. To install the download, just double-click the icon; OS X takes care of the rest.
Launchpad in Disguise
The view for adding widgets to the Dashboard is really just a feature called Launchpad but customized to only show Dashboard widgets. You can use the same techniques you’ll learn about Launchpad in Chapter 2 to organize and manage your widget library.