
4. Setting Up iCloud and Internet Accounts
In this chapter, you learn about iCloud services and unified account management in Yosemite, including:
![]() What iCloud is and does
What iCloud is and does
![]() Interesting iCloud services
Interesting iCloud services
![]() How to navigate iCloud Drive
How to navigate iCloud Drive
![]() How to manage your myriad of Internet accounts
How to manage your myriad of Internet accounts
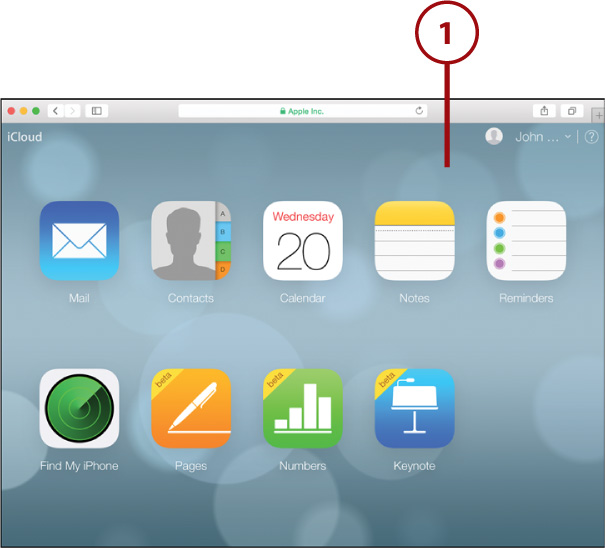
One of the coolest features of Yosemite isn’t really located on your Mac—it’s “in the cloud.” iCloud enables you to keep all of your information in sync in your digital life. Your iPhones, iPads, and Mac—coupled with iCloud—make up the perfect digital workplace and playground.
In this chapter, you find out how to establish and configure iCloud accounts and get to know some of the basics of using iCloud services—including the all-new iCloud Drive. You also learn how Yosemite manages all of the accounts that you may use on popular social network sites, email, and online sharing services.
Setting Up iCloud
One of the most convenient features of using multiple Apple devices is the difficult-to-describe iCloud service. iCloud provides data synchronization between your computers and iOS devices (such as synchronizing your files, web browser bookmarks, passwords, and even credit card information). It also gives you free email, contact storage, beautiful online office applications, and it even provides the ability to connect to your home Macintosh from your work computer. Best of all, all you need to do to use iCloud is establish an account and click a few checkboxes.
Integrated iCloud
I mention iCloud where relevant throughout this book, but keep in mind that Apple is continuously upgrading iCloud services and adding new features. The goal is for your computing life to be more intuitive and seamless without having to worry about what is going on in the background.
Configuring iCloud for the First Time
The first step in using iCloud is configuring your Mac to log into your account. If you have an Apple ID, chances are you already have an iCloud account. If not, the setup process guides you along the way. Note that you only need to follow these steps once—after that, you remain logged in even if you reboot your Mac.
To access your iCloud account, follow these steps:
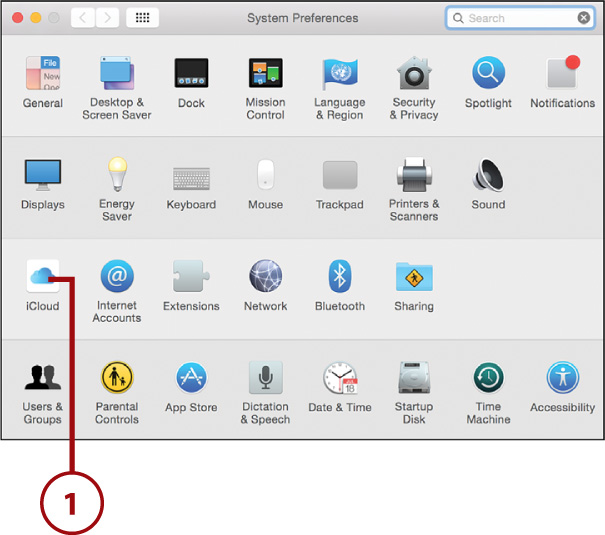
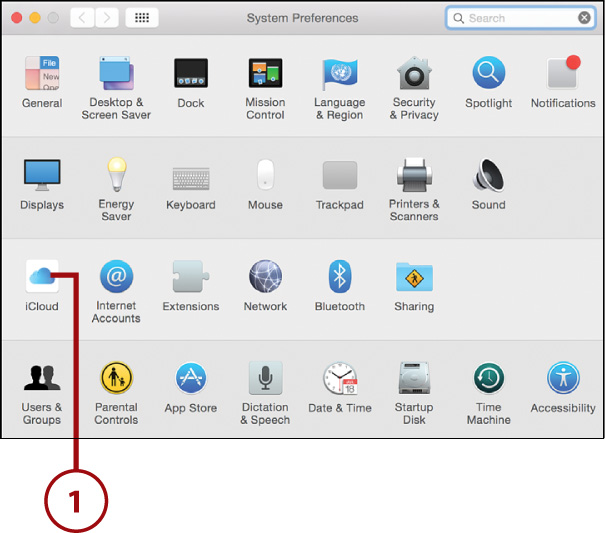
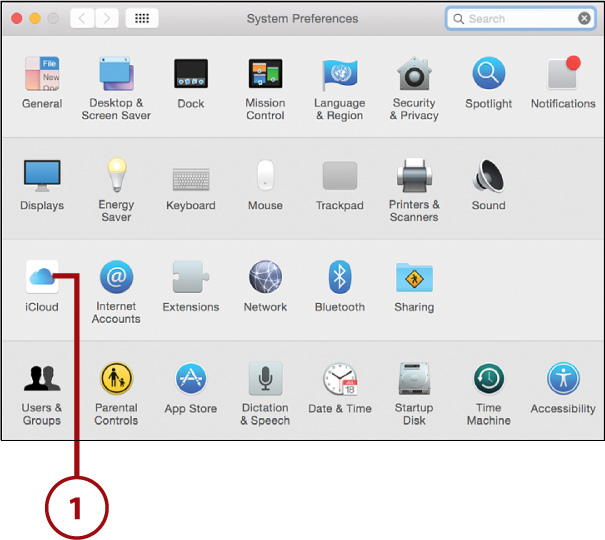
1. Open the iCloud System Preferences panel. A sign-in window displays.
2. Enter your Apple ID and Password, or click Create Apple ID to generate a new safe ID.
3. Click Sign In to log in to the iCloud service.

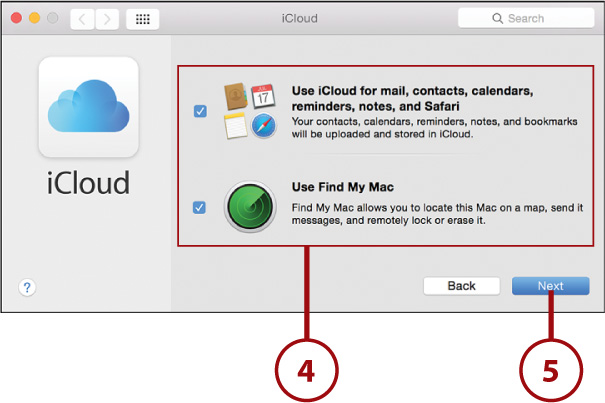
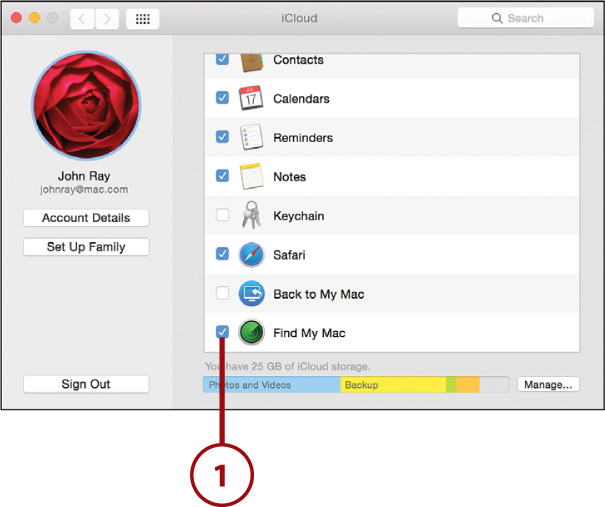
4. iCloud prompts to automatically install basic services—contacts, calendar, reminders, notes, and bookmark syncing as well as Find My Mac. You can either enable these now, or you can do it later by following the instructions in the “Activating iCloud Services” task.
5. Click Next.
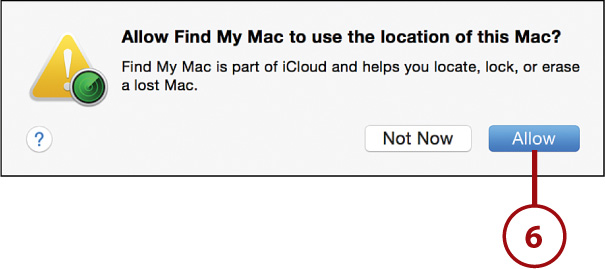
6. You might be prompted for information as some services start. If you’re using Find My Mac, for example, you’re prompted to allow Location Services. Click Allow to move on.
7. You are shown the list of active iCloud services. Close the System Preferences, or proceed to the next section to learn more about the available services.
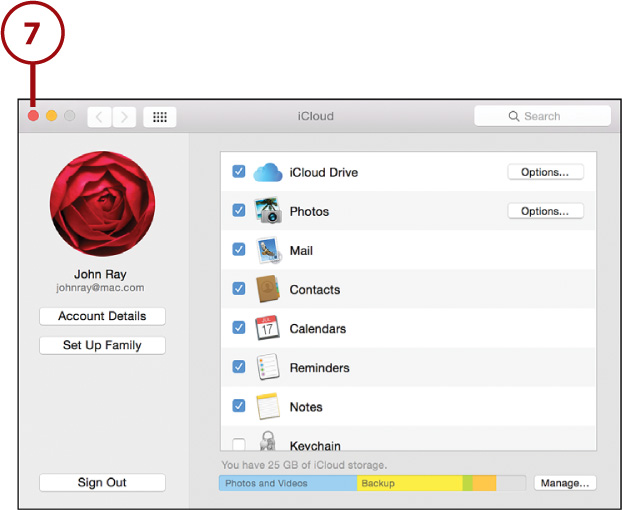
Activating iCloud Services
Your iCloud account comes with many free services that work across your OS X systems and iOS (iPhone/iPad) devices. The following list summarizes the available services at the time of this writing:
• iCloud Drive—This makes it possible to save files to iCloud rather than your local hard drive. Using this feature, you can start editing a document on one machine and finish it up on another (discussed later in this chapter in the “Using iCloud Drive” task).
• Photos—If you have iPhoto installed on your Mac, Photos automatically makes the photos you take on your iPhone or iPad available on your Mac (and vice versa) and enables you to share albums with anyone. (This is discussed later in this chapter in the “Using Photo Sharing” task.)
• Mail—When activated, Mail sets up a Yosemite email account associated with your iCloud account. This will be an @icloud.com address that you established when registering for an Apple ID (discussed in Chapter 5, “Accessing Email and the Web”).
• Contacts—Moves your contacts to iCloud storage, making them accessible and editable on any device that has iCloud configured. (See Chapter 8, “Managing Who, Where, When, and What,” for more details.)
• Calendars—Sets up shared calendars between all iCloud devices. (See Chapter 8 for more details.)
• Reminders—Creates shared lists—everything from shopping lists to to-do lists that are shared between all iCloud devices. (See Chapter 8 for more details.)
• Notes—Connects your Mac Notes application to iCloud storage, making all your notes available across all your Macs and iPhone/iPad (see Chapter 8 for more details).
• Keychain—Enables syncing of secure passwords and credit card information between your devices. This will be used for auto-fill data in Safari. Note that when enabling this feature, you’ll need to bounce back and forth between your Mac and iOS devices to ensure that they are all properly authorized to share the data. (Read more in Chapter 5.)
• Safari—Enables syncing of your Safari bookmarks and your reading list across devices as well as providing a list of open Safari tabs on other devices. This makes it possible to start browsing in one location and finish in another. (Read more in Chapter 5.)
• Back to My Mac—When activated, this unique iCloud feature makes your computer visible to any other computer where you have activated Back to My Mac. Using this, you can access your home computer from any other network-connected Mac—no network configuration required. (See Chapter 6, “Sharing Files, Devices, and Services,” for details.)
• Find My Mac—If your Mac is lost or stolen, Find My Mac attempts to locate it. Using the icloud.com website, you can track your Mac on a map and even lock or erase it. (This is discussed later in this chapter in the “Using Find My Mac” task.)
To activate an iCloud service, first make sure you have completed the task “Configuring iCloud for the First Time” and then follow these simple steps:
1. Open the iCloud System Preferences panel.
2. Click the checkboxes in front of the services you want to use. If prompted to provide access to additional system services (Find My Mac requires you to grant access to your location, for instance), click the appropriate response.
3. Close System Preferences when satisfied with your selections.

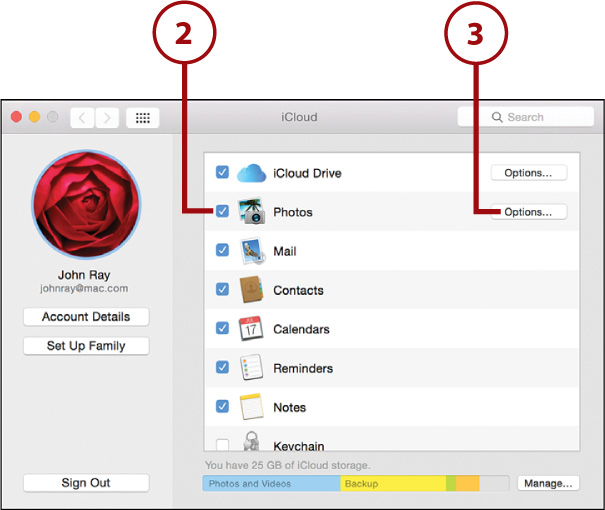
At the bottom of the service list is a bar showing how much storage you have left. By default, iCloud includes several gigabytes of free storage—but storing documents and data, backups of your iOS devices, and other information can eat the space up quickly. Click the Manage button to buy more storage if needed.
Exploring Unique iCloud Services
It’s pretty easy to describe the use of features like Contacts and Safari bookmark syncing, and they fall neatly into place in many of this book’s chapters. There are a few “unique” iCloud services that are important to cover, but don’t quite fit as cleanly elsewhere. One such service, for example, enables you to find your Mac on a map, should it be lost or stolen. Another provides direct access to your contacts, events, and mail from a web interface no matter where you are. Rather than leave these topics out, they are covered in the following tasks.
Accessing iCloud Applications Online
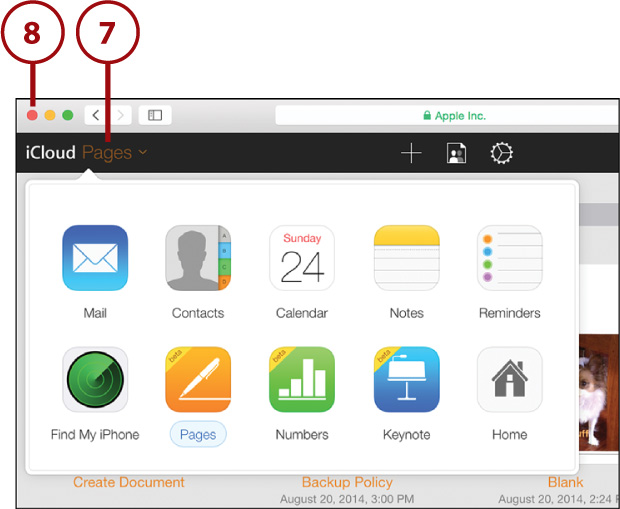
After you activate iCloud services like Mail, Calendar, and Reminders, you can log into Apple’s online iCloud service and use web applications that resemble their Mac counterparts. To access iCloud applications, do the following:
1. Open a current version of a web browser (Safari, Internet Explorer 8+, Firefox, or Chrome) and browse to www.icloud.com.
2. Enter your Apple ID and Password.
3. Click the Keep Me Signed In checkbox if you’d like to be able to access iCloud from your computer without logging in again.
4. Click the arrow to log in.
5. Click the icon of the application you want to launch.
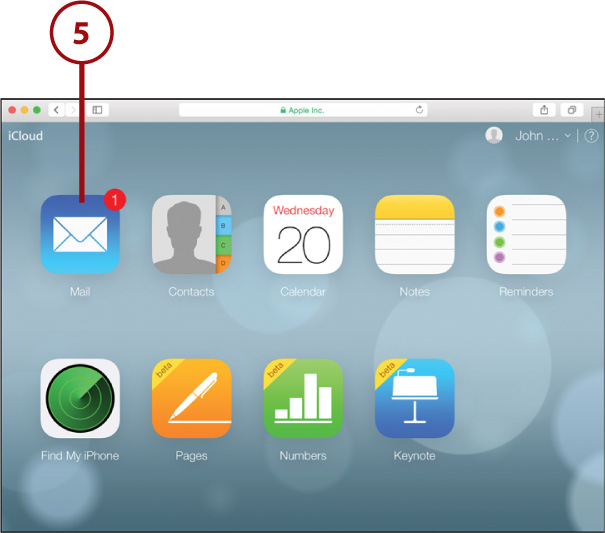
6. Use the web application as you would the desktop version. If your app makes changes to data, those changes will be pushed out to all your iCloud-connected devices.
7. Click the iCloud menu (upper-left corner) to jump to other applications.
8. Close your browser when finished.
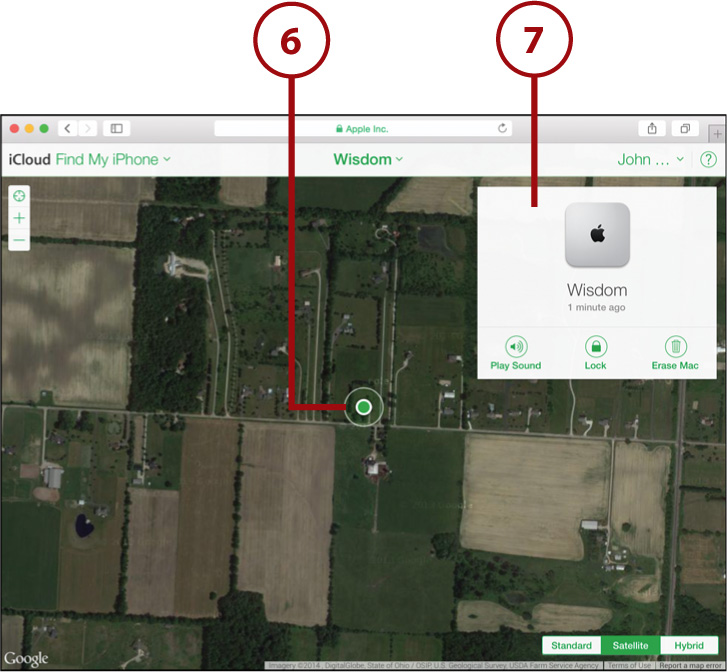
Using Find My Mac
To turn on Find My Mac and make your Mac location available via the iCloud website, follow these steps:
1. If you haven’t already, activate Find My Mac using the technique described in “Activating iCloud Services,” earlier in this chapter.
2. If prompted, click Allow on the Allow Find My Mac to Use the Location dialog.

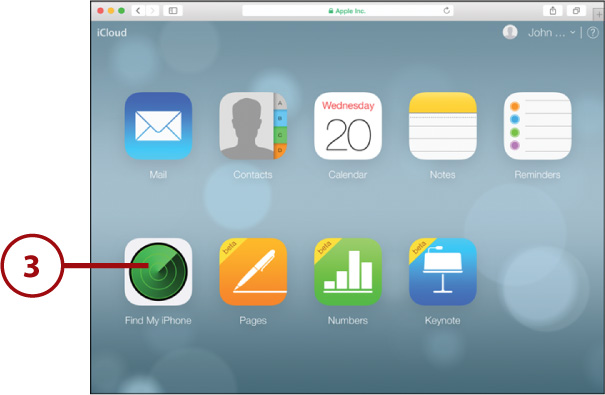
3. If you need to find your Mac, go to iCloud.com in a browser on any Internet-connected device and log in. Click Find My iPhone.
4. Click All Devices to show the list of tracked devices.
5. Click the name of your Mac in the list.
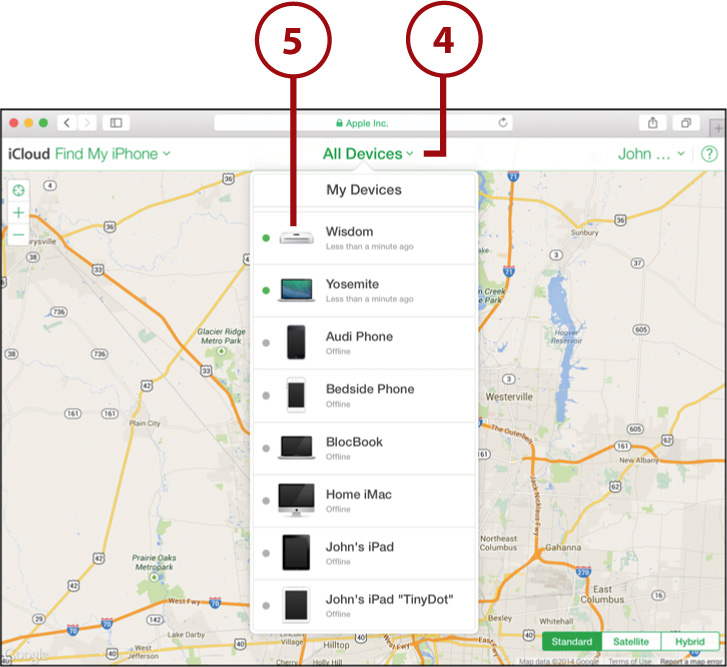
6. The Mac’s location is highlighted on the map.
7. The web app displays options for sending a message/playing a sound on the computer, locking it, or wiping the contents of the hard drive.
Using iCloud Drive (New!)
The iCloud Drive feature of iCloud makes it easy to work on a document in one location, and then open it again in another. If you’ve used other “cloud drives” like Box, Dropbox, or OneDrive, this works in much the same way.
Before starting, be sure to activate iCloud Drive using the steps described at the end of the “Activating iCloud Services” section, earlier in this chapter.
Navigating the iCloud Drive
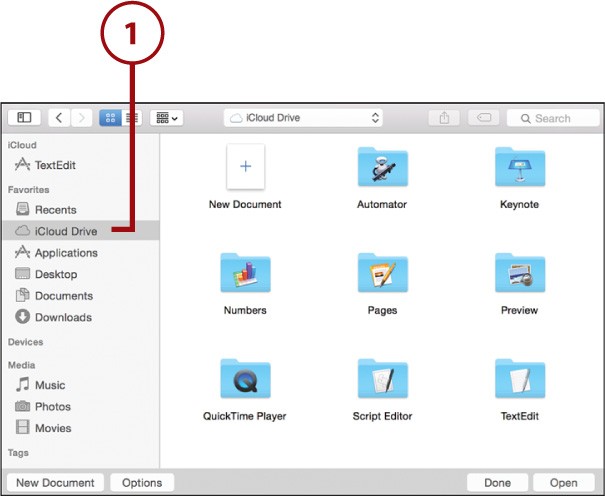
The iCloud Drive is fully integrated into the Yosemite Finder. Access it by following these steps:
1. Click iCloud Drive in the Finder sidebar or via the Go menu.
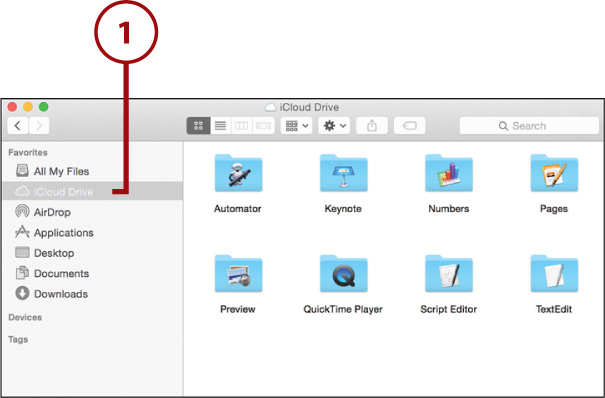
2. Within the iCloud Drive, you’ll see folders for each application you use. By default, files created by these applications are saved within their own folders.
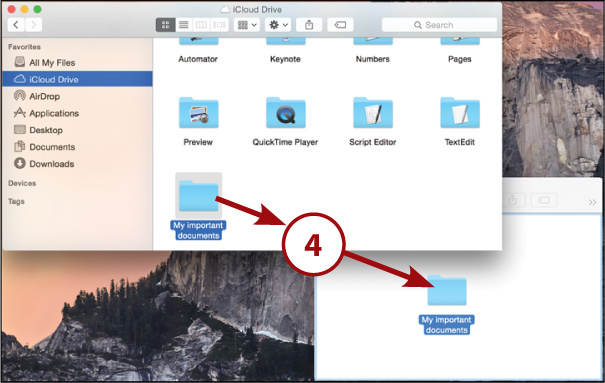
3. Drag folders and files from outside the iCloud Drive into the iCloud Drive, and they will appear on your other iCloud-connected devices.

4. Drag folders and files out of the iCloud Drive to move them to your local computer.
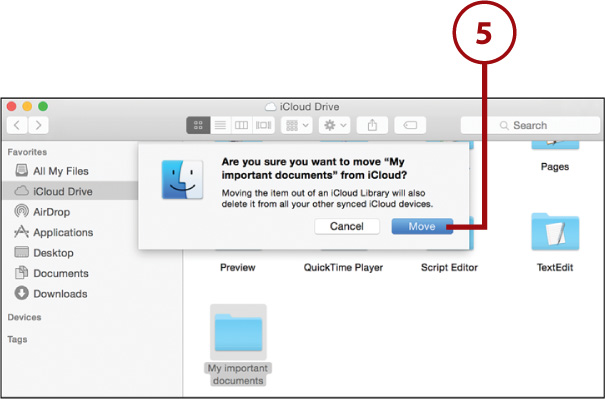
5. When prompted, click Move to confirm that you really want to move the files out of iCloud Drive.
Arrange as Needed
Organize your iCloud Drive as you see fit. You don’t have to save files within folders named for your applications (or within any folder at all, for that matter). This is simply how Apple keeps things arranged by default.
Pick and Choose
If you find yourself running low on space and don’t want to buy more, you can pick and choose which applications can interact with iCloud Drive by clicking the Options button beside it in the iCloud Preferences panel.
Opening iCloud Files Within an Application
iCloud Drive files can always be opened by double-clicking in the Finder, the same as any other file—but when you go to open them in an application, things look a bit different. To open a file that you’ve saved in iCloud (from any iCloud-connected device), first complete the actions you normally would to open a file within an application of your choosing and then follow these steps:
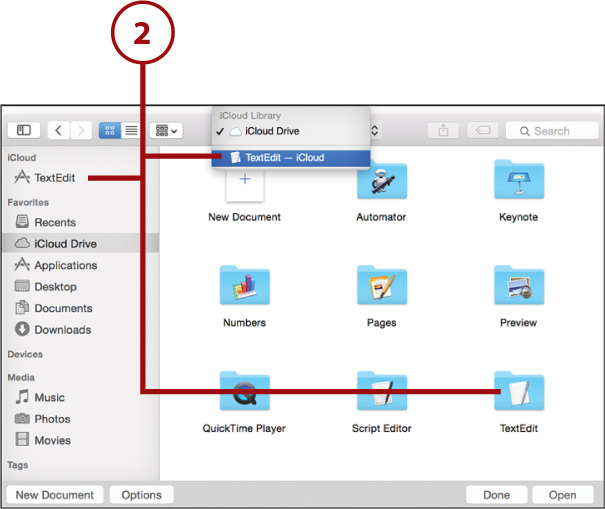
1. Use the sidebar to select iCloud Drive.
2. Double-click the folder for the application that created the file (if following Apple’s default organization), use the drop-down menu at the top of the dialog box to choose the application name, or click the application name under the “iCloud” heading in the sidebar.
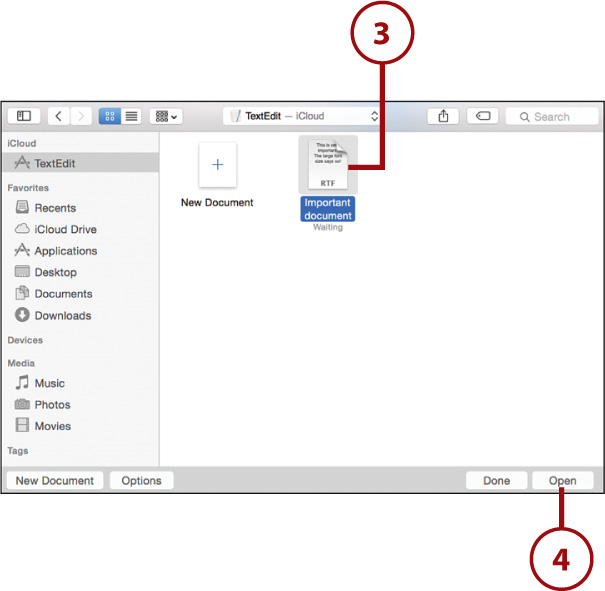
3. Select the file you want to open.
4. Click Open. The file opens and you can begin working with it wherever you left off, no matter which device you were using.
When It’s in iCloud, It’s in iCloud
When you open and edit a file in iCloud, it stays in iCloud. You don’t need to worry about moving it from your local computer to iCloud after editing it, or anything of the sort. Just think of iCloud storage like any other disk, except that you have access to it no matter where you are or what iCloud-enabled device you are using.
Saving iCloud Files from an Application
To save a file to iCloud from within an application, just edit the file as you normally would and then follow these steps when it’s time to save.
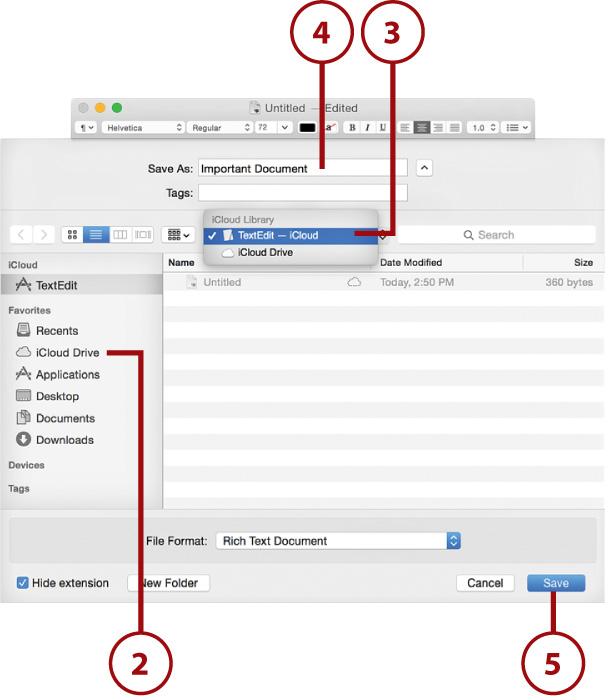
1. Choose File, Save (or Save As/Move if editing a file you’ve already saved).

2. Use the sidebar to pick iCloud Drive. (Expand the dialog box, if needed.)
3. Double-click the folder for the application that created the file (if following Apple’s default organization), use the drop-down menu at the top of the dialog box to choose the application name, or click the application name under the “iCloud” heading in the sidebar. This will store the file in a directory specifically for that application.
4. Provide a name for the file.
5. Click Save.
Upload Delays
If you aren’t connected to the Internet (or have a slow connection), Yosemite will delay uploading changes in your iCloud Drive files until the connection improves. You’ll still be able to make changes; you just won’t see them reflected on other devices immediately.
You can tell when a file hasn’t been uploaded by the “Waiting” label displayed underneath the file in the Finder.
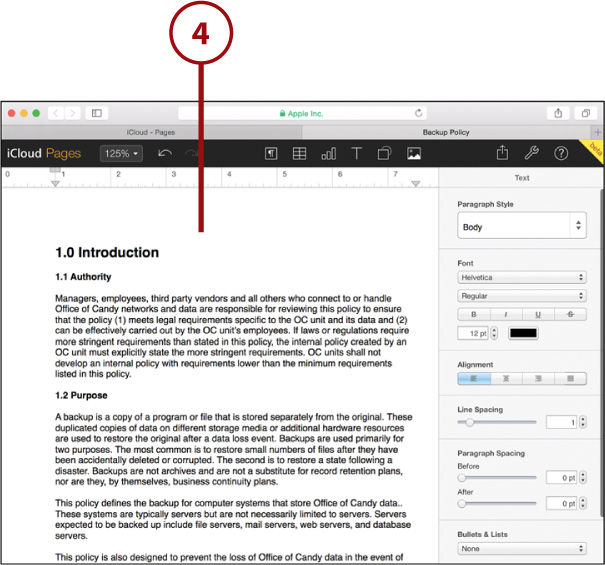
Opening iCloud Files on the Web
If you save a file to iCloud using Pages, Keynote, or Numbers on your Mac or iOS device, you can open and edit the file with nothing more than your web browser. To do this, make sure you’ve added the files you want to access to iCloud Drive and then follow the steps in the earlier task “Accessing iCloud Applications Online.”
1. Use the iCloud webpage to choose the application whose files you want to open.
2. The application opens, displaying all the files you saved to iCloud from your Mac.
3. Double-click a file you want to work with.

4. The file opens and you can begin working with it directly in your browser.
Using Photo Sharing
Another extremely useful (and fun) feature of iCloud is Photo Sharing. Photo Sharing automatically keeps copies of your most recent 1,000 photos taken using iOS devices and makes sure that your Mac has copies of them all. It also enables you to share collections of photos with anyone you’d like.
Enabling Photo Sharing
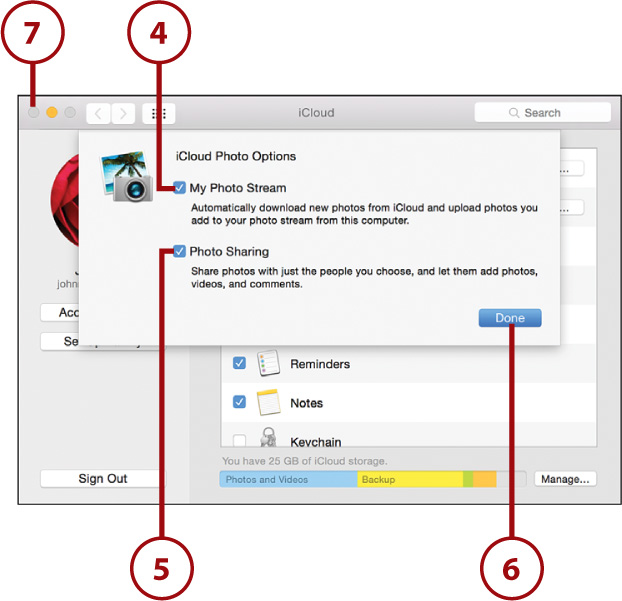
To get started, enable and configure Photo Sharing in iCloud. To enable the service, follow these steps:
1. Open the iCloud System Preferences panel.
3. Click the Options button beside the Photos line.
4. Click the My Photo Stream checkbox to keep all of your latest photos synced between devices.
5. Enable the Photo Sharing option to share photos with individuals that you select.
6. Click Done.
7. Close the Preferences window.
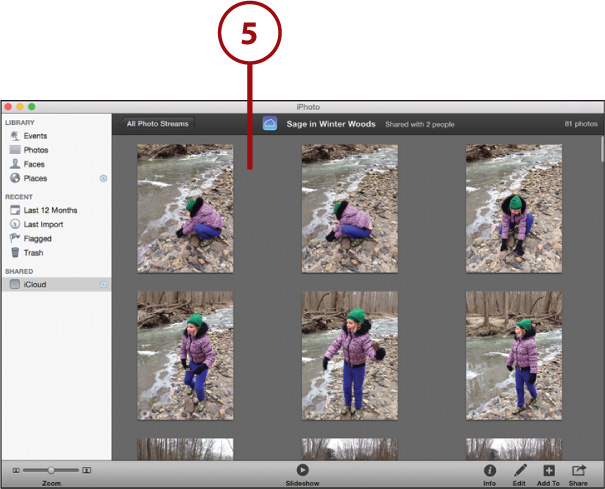
Viewing Shared Photos
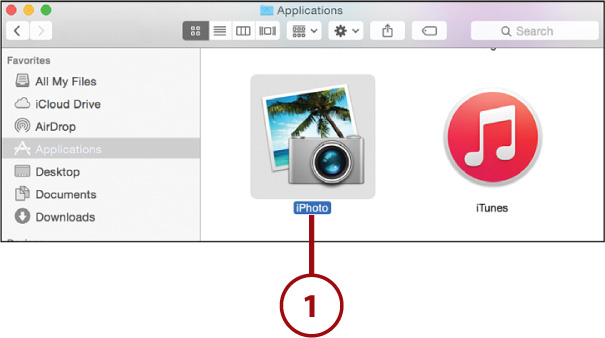
To view your shared photos and photo stream, you need to use iPhoto. If you don’t have it installed, you can download it from the App Store.
1. Open iPhoto from the Applications folder or Launchpad.
2. Click the iCloud icon in the left iPhoto navigation pane.
3. Your shared photos are displayed.
4. Double-click an album.

5. The album opens and the pictures display.
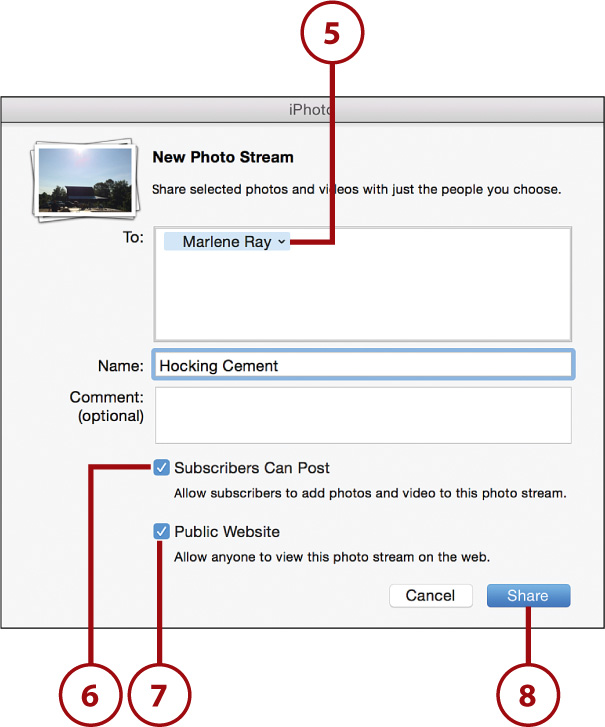
Sharing Photos
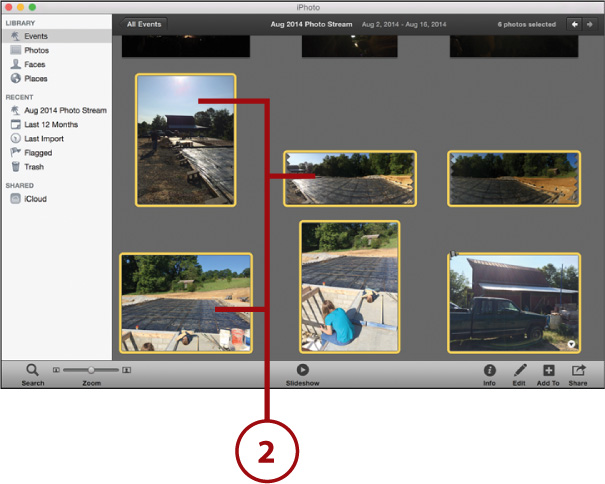
To share your photos with others, you also use iPhoto.
1. Open iPhoto from the Applications folder or Launchpad.

2. Navigate to a photo collection (Events, Albums, Faces, Places, and so on) or select a group of photos from the Photos section.
3. Click the Share button and choose iCloud.

4. Choose an existing shared album, or click the + icon to create a new shared album.
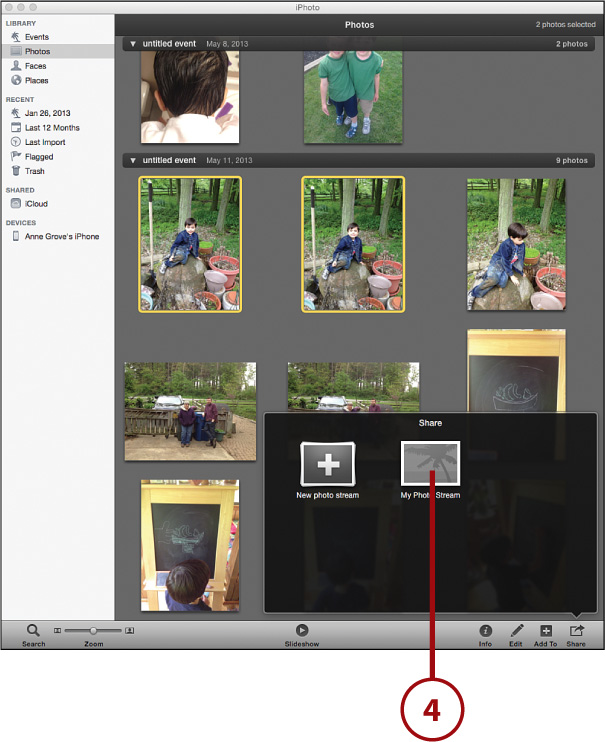
5. Enter the addresses for people who should be able to access the shared album, the name of the album, and any comments.
6. Check Subscribers Can Post to allow comments from people viewing your photos.
7. Check Public Website to publish a publicly accessible version of your photos.
8. Click Share to begin sharing!
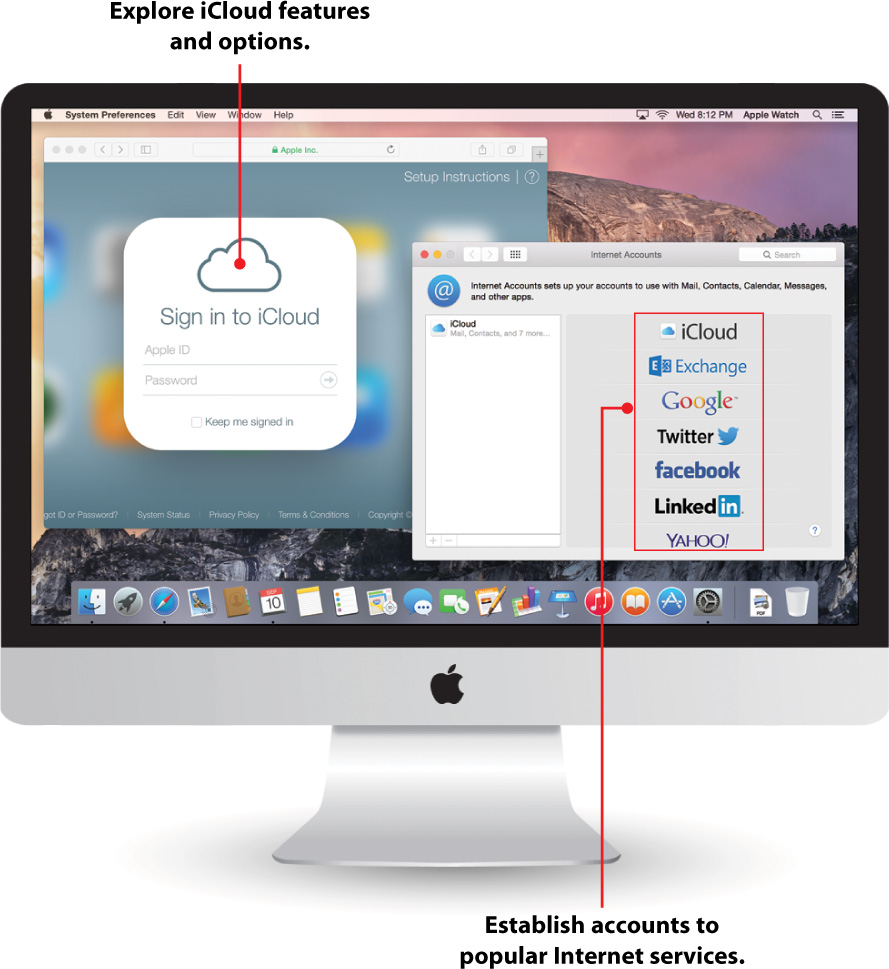
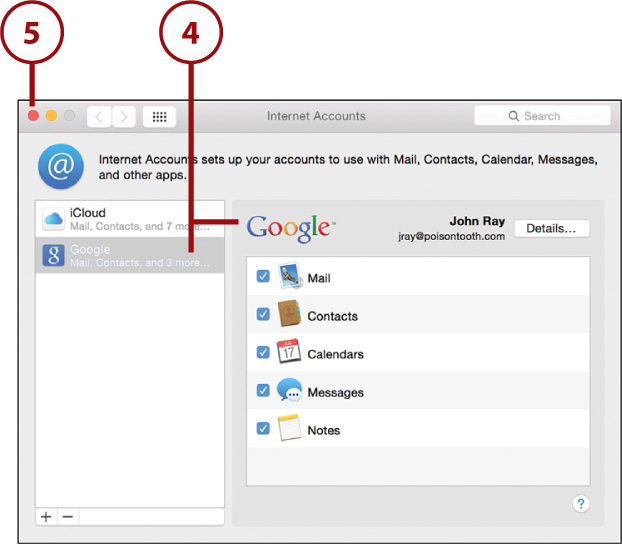
Getting Started with Accounts
For all the fun and information the Internet has brought us, it has also created a mess in terms of managing all the accounts we use to communicate online. If you’re like many people, you have multiple email accounts—possibly one through iCloud, one from work, and one at home. You have accounts for chatting with instant messenger. You have accounts for sharing contacts and calendars. In other words, you’ve got multiple usernames and passwords that need to be configured in different applications, just so you can be connected.
In OS X, Apple has recognized the problem of account overload and worked to consolidate all your online account management in a single centralized preference panel—Internet Accounts. Here you can set up email, instant messenger, Exchange, Calendar, and other account types—without needing to figure out where they’re managed in your individual applications.
I show the use of this panel as needed in the relevant chapters, but let’s take a very brief look at how you interact with this tool on your Mac.
When you use the Internet Accounts panel to manage your accounts, you’ll notice that it also includes iCloud. The iCloud settings in this panel are identical to what you configured in the iCloud panel shown earlier in this chapter—this is just a different way to access them.
Adding an Account
To add an account for an online service (email, contacts, calendars, Exchange, etc.), follow these steps.
1. Open the Internet Accounts System Preferences panel.

2. Choose an online service provider that you want to configure by clicking its name. Select Add Other Account from the bottom of the list to pick from additional service types.

3. Fill in the requested information in the setup wizard that appears.

4. The completed account is listed in the preferences panel with its settings available on the right.
5. Close System Preferences when finished.
Exploration Is Rewarded!
While the Internet Accounts panel is a great place for establishing new accounts and performing high-level configuration, you might still find yourself needing to dig for various esoteric settings (such as specific server addresses, proxies, and other technical tweaks) within your individual Internet applications.