5. Accessing Email and the Web
In this chapter, you learn how to use your Mac for common Internet uses, including:
![]() Connecting to email servers
Connecting to email servers
![]() Using VIP and Smart Mailboxes
Using VIP and Smart Mailboxes
![]() Browsing the Web
Browsing the Web
![]() Creating web clippings
Creating web clippings
![]() Using Safari extensions
Using Safari extensions
The Internet (for better or worse) is everywhere we turn. To be effective in our professional (and frequently social) lives, we need best-of-breed Internet tools on our Mac. The good news is that we’ve got ’em.
In this chapter, you find out how to use some of the unique features of the Mail and Web applications in Yosemite. Even if you’re working in a Microsoft-centric environment, you’ll find that your Mac’s tools are up to the job.
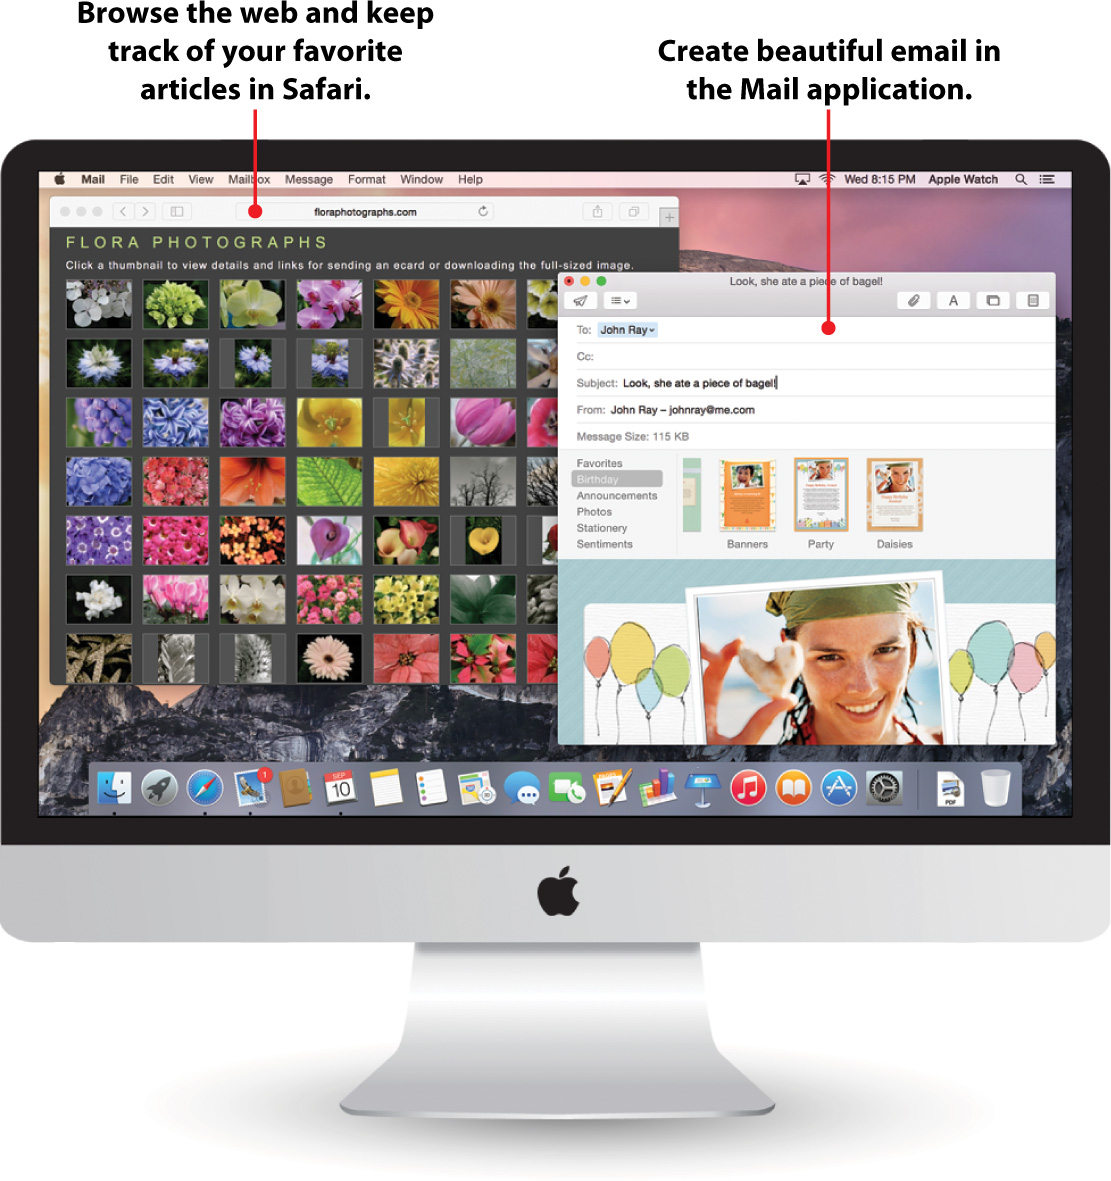
Using Mail
The first thing that many of us do when we have an Internet connection is check our email. Email is now a way to exchange rich media—such as photos, files, and movies—in addition to a way to exchange written messages. The email application, Mail (found in the Dock or Applications folder), is provided with your Mac. With Mail, you can connect to a variety of different mail servers, including Microsoft Exchange, with only a few clicks of your mouse.
Things You Need Before Setting Up an Email Connection
As with the networking information in the last chapter, configuring your email account isn’t a matter of guessing. Apple’s Mail application can automatically set up several popular email services (such as Google and Yahoo!), but if you’re connecting to a corporate email server, you should collect as much information as possible from your email system administrator or ISP before proceeding. This includes your email address, password, email server, email server type (POP, IMAP, or Exchange), and SMTP server:
• Incoming Mail Server—The server that you connect to when retrieving your email.
• Incoming Mail Server Type—The type of server that you’re connecting to. Apple’s Mail application supports Exchange, IMAP, and POP servers.
• Outgoing (SMTP) Server—The server that sends your messages.
• Authentication—Typically, a user name and password required to retrieve or send messages.
Adding an Email Account
If you have an email account that Yosemite recognizes, configuration couldn’t be easier—you just need your email address, name, and password to make a connection. Yosemite attempts to identify and configure your account. If for some reason it fails, you can continue with an advanced manual configuration (see the next task).
Note that if you’ve already activated iCloud email, your account is already set up! You don’t need to do anything else.
1. Open the Internet Accounts System Preferences Panel.
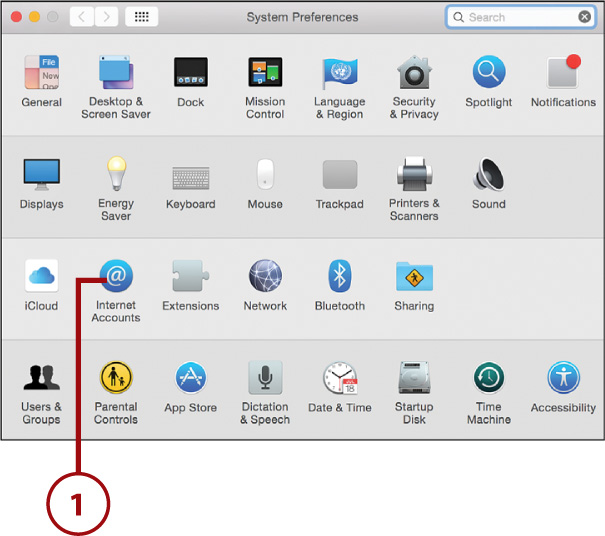
2. Choose an email service that you want to configure by clicking its name on the right.

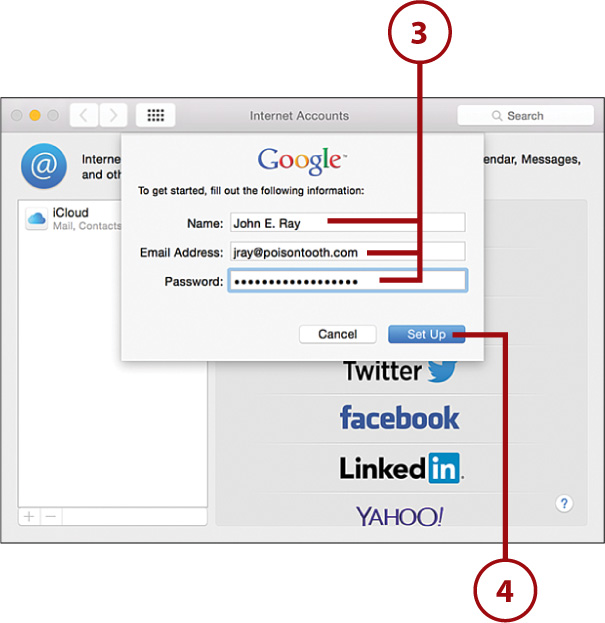
3. The Add Account window displays. Type your name (as you want it to appear in outgoing messages), email address, and password for the account.
4. Click Set Up.
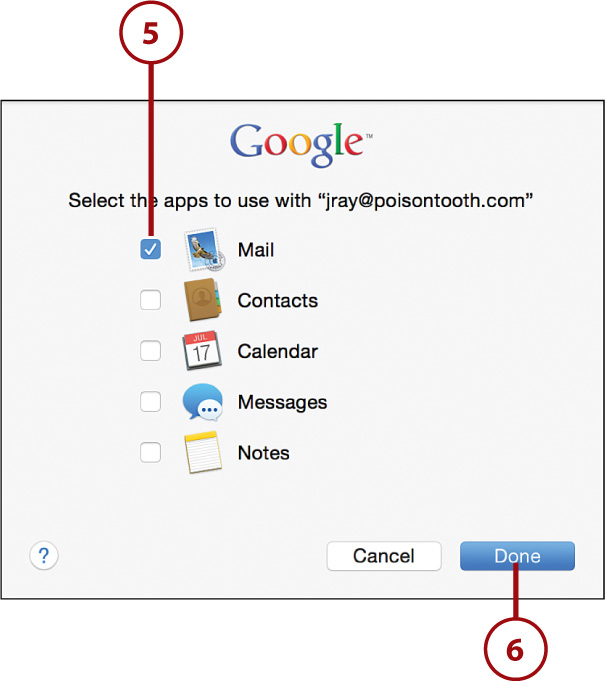
5. Yosemite attempts to automatically configure your account. If additional features are determined to be available from the email provider, they are listed in the window. Choose which services you want to use by checking/unchecking the checkboxes.
6. Click Done to finish adding the account.
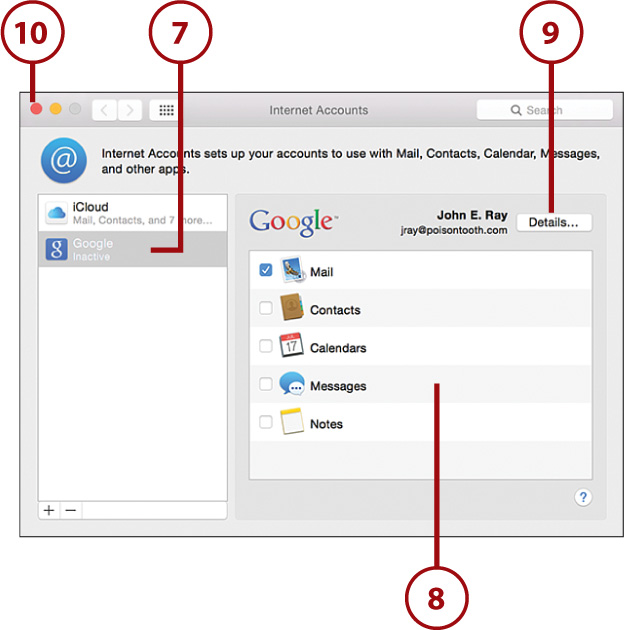
7. If it’s successful, the newly configured email account appears in the account list. If the setup fails, cancel setup and skip ahead to the next section, “Configuring Advanced Account Settings.”
8. Clicking the account name in the list displays the account details on the right.
9. You can click Details to edit the basic account settings if, for example, you want to change your display name or the name of your account.
10. Close System Preferences and begin using your account in Mail.
Configuring Advanced Account Settings
Email accounts that aren’t immediately recognized by Yosemite require more information to be entered before they can be used. This is the case for some ISP email accounts, corporate, and educational systems. Be sure you have all the information listed previously in the “Things You Need Before Setting Up an Email Connection” section and then start by setting up an account as best you can using the process described in the previous task.
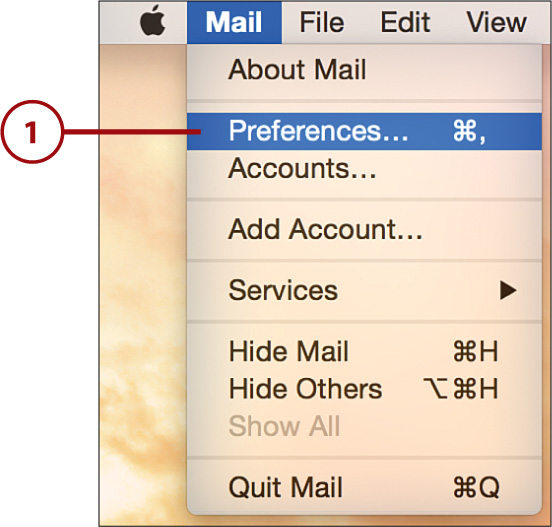
1. Open the Mail application from the Dock or Applications folder.

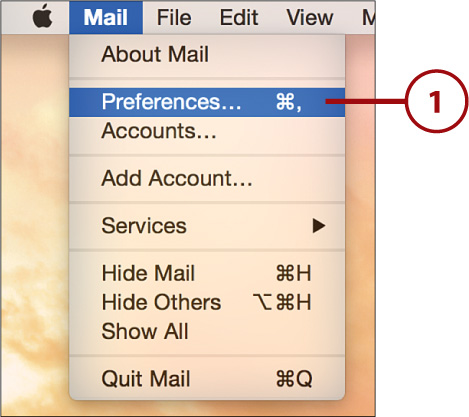
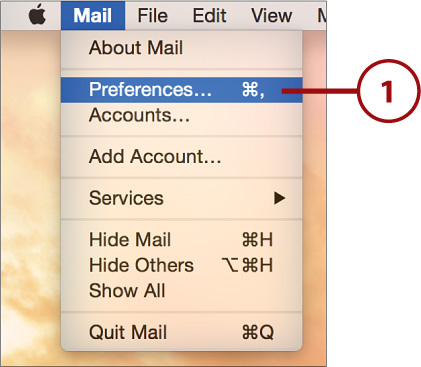
2. Choose Preferences from the Mail menu.

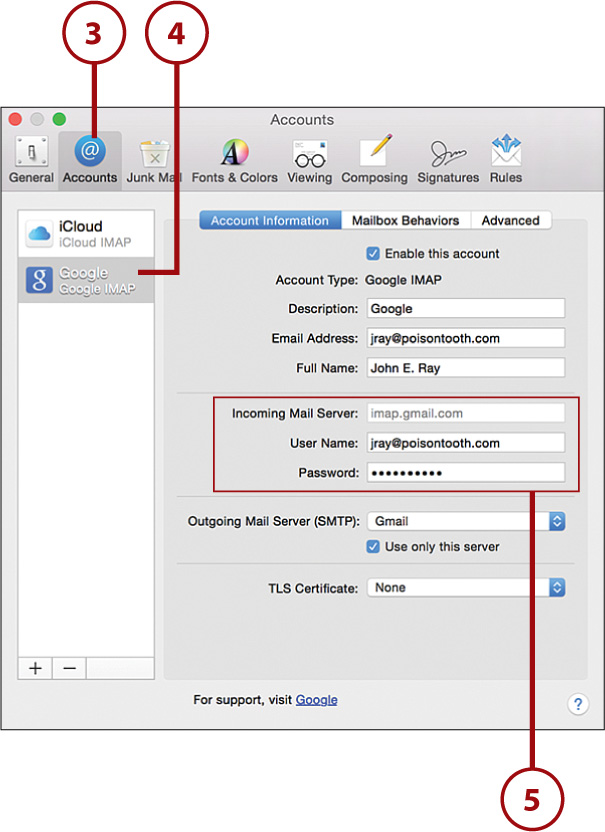
3. Click the Accounts button within the Mail preferences window.
4. Click the account that you want to configure with advanced settings.
5. Use the Incoming Mail Server fields to set a specific server that will handle your incoming messages.
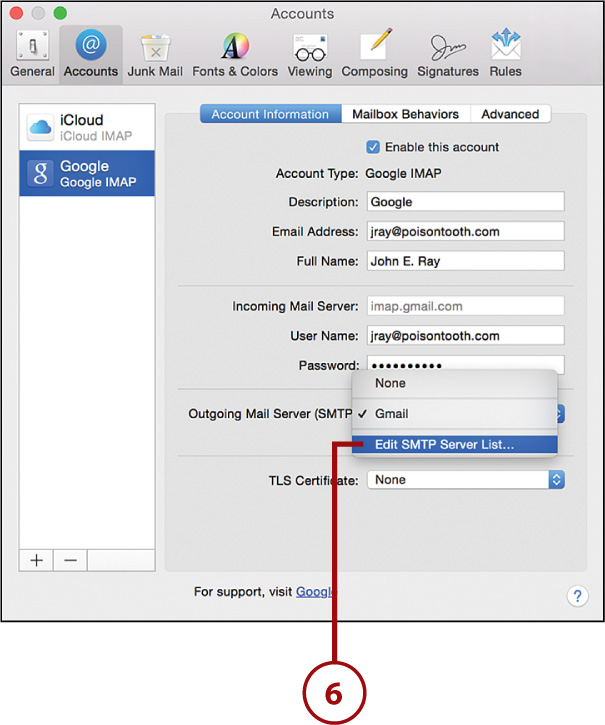
6. To set an SMTP server, Choose Edit SMTP Server List from the Outgoing Mail Server (SMTP) drop-down menu.
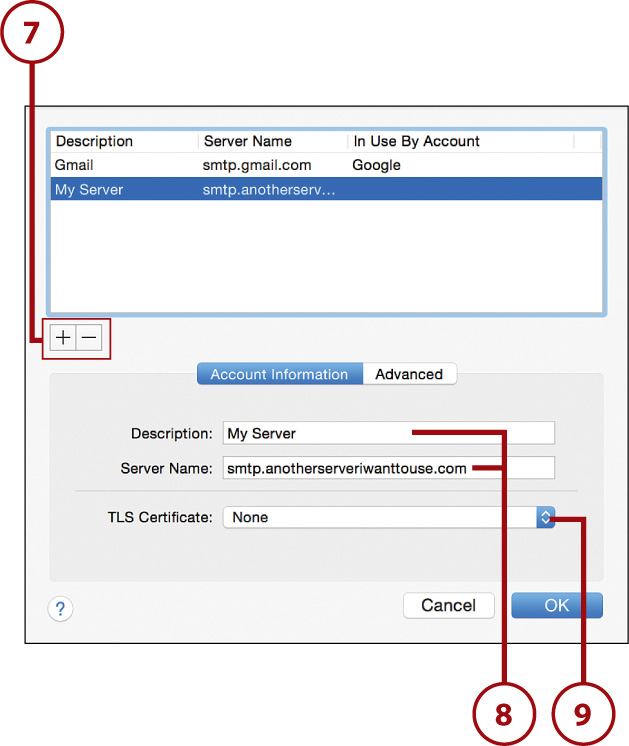
7. Use the +/– buttons to add and remove servers.
8. Configure the server by setting the description and address (Server Name) in the fields below the list.
9. Choose a security certificate, if any, using the TLS Certificate drop-down menu.
Troubleshooting Your Connection
To troubleshoot your account settings, from within Mail choose Window, Connection Doctor. Your Mac tests all your email account settings and shows you exactly where any errors are occurring.
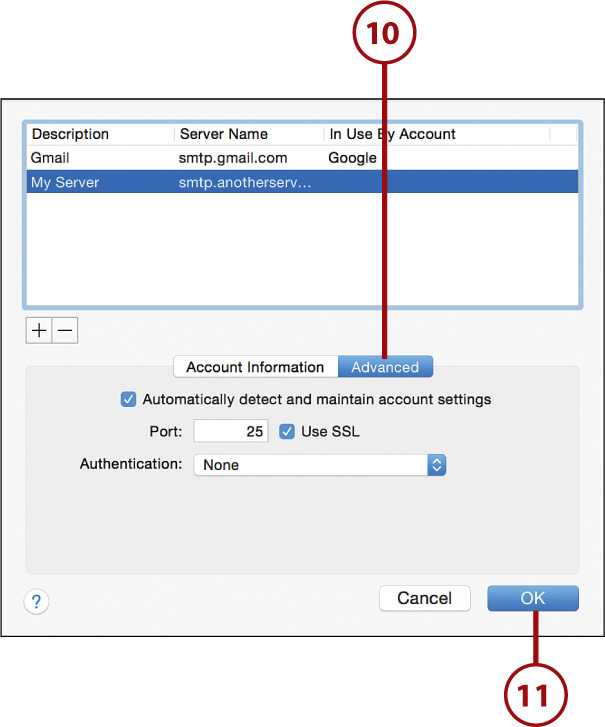
10. Click Advanced to access port and authentication settings.
11. Click OK when finished. The server you configured will be accessible from the Outgoing Mail Server (SMTP) menu.
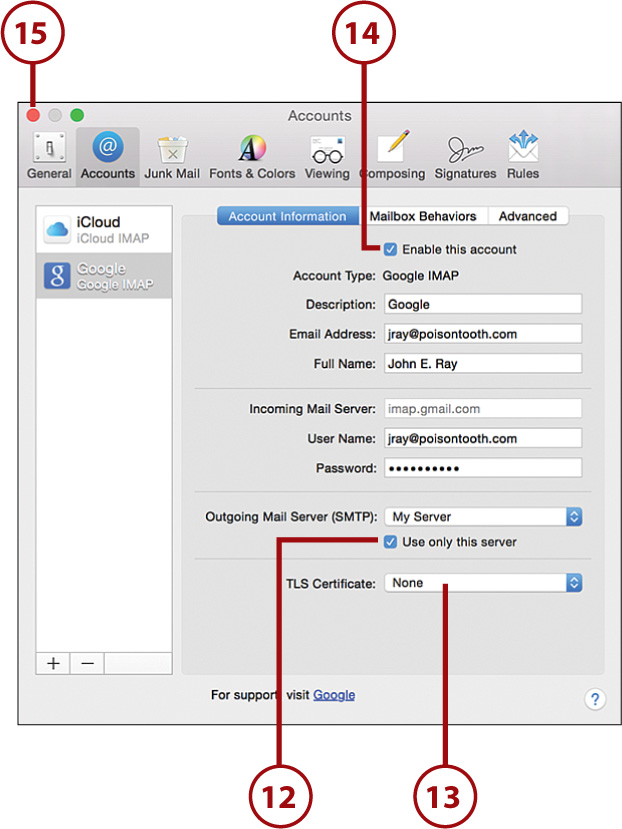
12. Check Use Only This Server if you want to force all messages from this address to go through the chosen SMTP server.
13. Set a TLS certificate for your incoming mail server (if any) using the TLS Certificate.
14. Finally, make sure that the Enable This Account checkbox is selected so you can begin using your account settings.
15. Close the Mail Preferences.
Multiple Email Addresses, One Account
It isn’t uncommon for one email account to have multiple addresses associated with it. I might have a single account with addresses, such as [email protected] or [email protected], which I want to appear when I send a message. To configure multiple addresses for a single account, open Mail’s preferences, click Accounts, and then click the account you want to add an alias to. Enter the alias email addresses, separated by commas, in the Email Address field in the account details. The email addresses are then available in a pop-up menu when you compose a new message.
Finding Your Way Around Mail
After your email account is configured, Mail connects and retrieves your messages. The Mail application workspace is split into three columns, from left to right: mailboxes, a message list, and message content.
On the left, the mailbox list shows different mailboxes (or folders) for categorizing your messages. Apple has decided to conserve as much space as possible by hiding the mailboxes by default. There’s also a quick hide/show mailboxes button to show the mailbox column and links to the important mailboxes (Inbox, Sent, and so on) directly below the toolbar.
When you click a mailbox, the message list refreshes to show all of the email within the mailbox, including a several-line preview of the contents. Any message that you click in the Message list is displayed in the message content area on the right.
Now that you know the basics of finding your way around Mail, take a look at the common tasks you should familiarize yourself with.

Reading Email
Reading messages is typically a matter of finding a message in the message list, clicking it, and reading. Even so, you can improve the experience by taking advantage of several tools built into Mail.
Sorting Mail
You’re certainly used to sorting information by clicking column headings, right? In the Mail application, however, the message list doesn’t have columns, so you need to follow this approach:
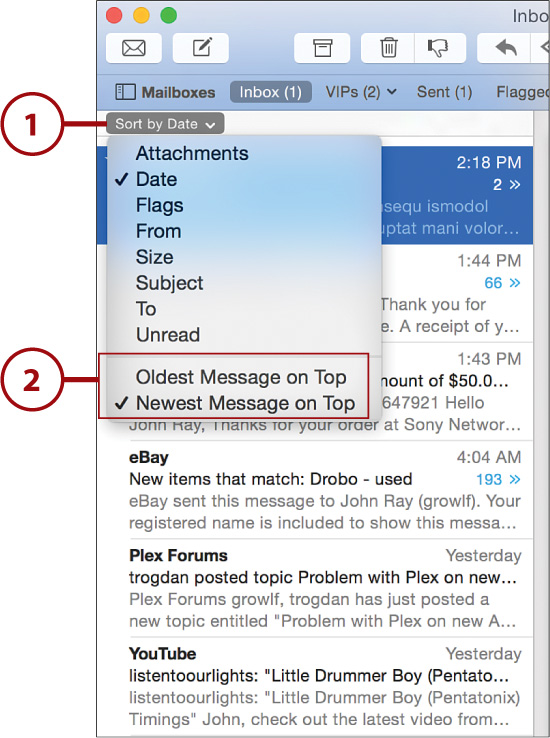
1. Use the Sort By drop-down menu above the message list to choose a message attribute to use as your sorting criteria.
2. Use the same menu to set the order of your sorting preferences.
Viewing Additional Attributes
Much as you can set the mail attributes you want to use for sorting, you can also set the attributes displayed in the message list. Use the View, Message List menu to set which attributes will be visible in the message list items.
Previewing Attachments
In Chapter 1, “Managing Your Desktop,” you learned about the Quick Look system for previewing files in the Finder. In Mail, if your message contains an attachment, you can also use the Quick Look system.
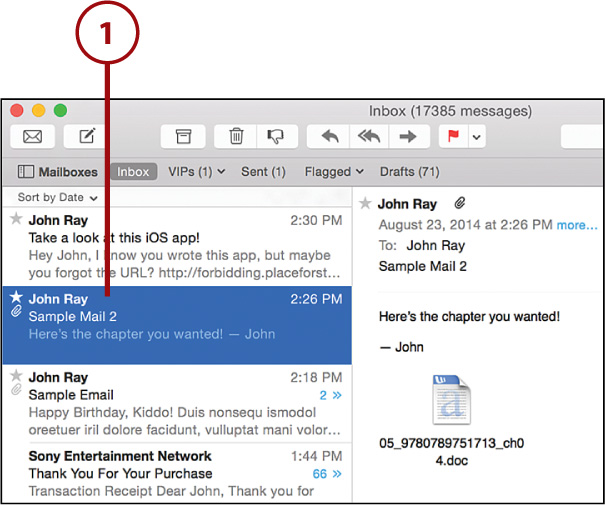
1. Choose a message with an attachment—represented by a paperclip in the message list.

2. Position your cursor near the top of an email to show buttons for interacting with the message.
3. Click the Attachment button.
4. Select Quick Look from the menu that appears.
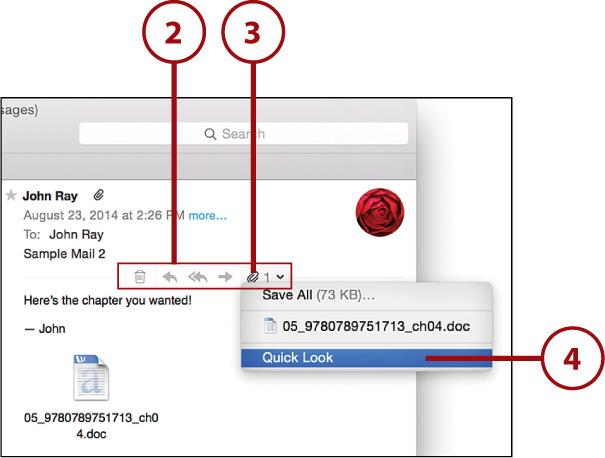
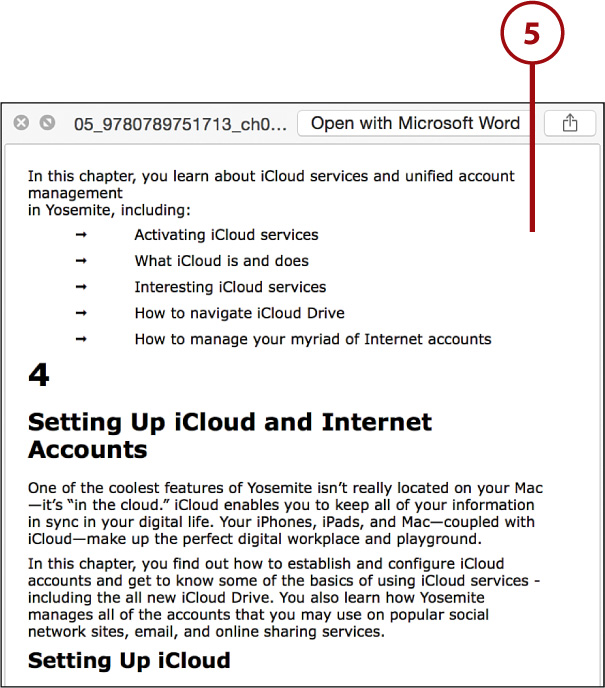
5. A Quick Look window appears, displaying the selected content.
Saving Attachments
You can easily save one or more attachments to your Mac’s hard drive, and even add images to iPhoto, directly from Mail.
1. Choose a message with an attachment—represented by a paperclip in the message list.
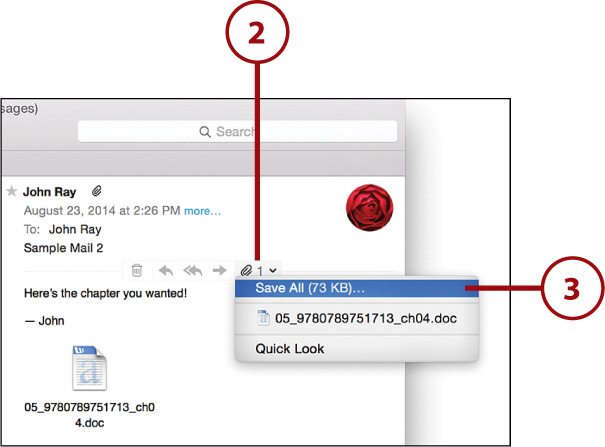
2. Position your cursor near the top of the message and click the Attachment button.
3. A menu appears, enabling you to Save All, choose an individual file to save, or, if applicable, add the file to iPhoto.
Viewing Web Pages within an Email
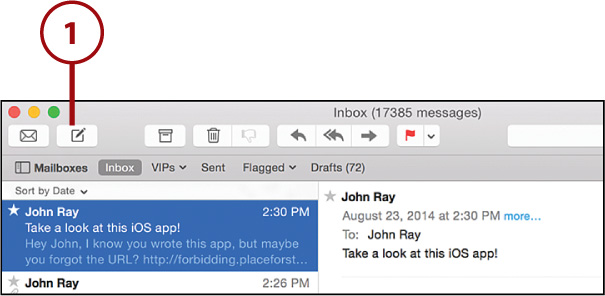
Have you ever gotten a link to a web page in email and wanted to view it without having to launch Safari? In Yosemite, you can. To preview a web link directly in Mail, follow these steps:
1. Position your cursor over the link within the message content, but do not click!
2. A small downward-pointing arrow appears to the right of the link. Click it.
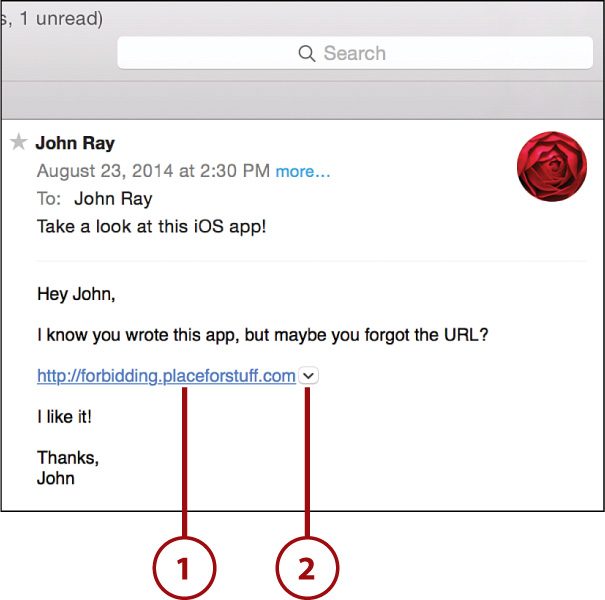
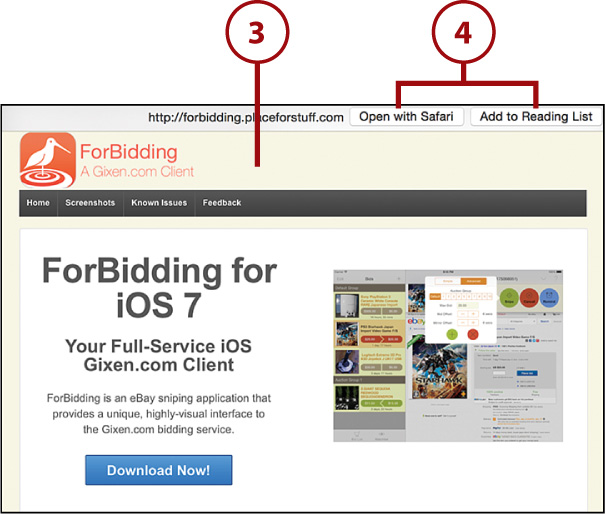
3. A pop-over window appears displaying the web page.
4. Click Open with Safari to open the full page in your web browser, or Add to Reading List to save the page to your Safari reading list.
Using Data Detectors
The icon that appears at the end of a web link in mail (and the subsequent preview of the page) is an example of a Yosemite “Data Detector” in action. You may notice other icons beside dates, addresses, phone numbers, and so on. Clicking these icons will do similar helpful actions, such as setting appointments, adding information to a contact, or tracking shipments.
Organizing with Email Conversations
Email conversations can grow quite lengthy with back-and-forth replies. To help keep long conversations under control, Mail, by default, collapses your conversations into a single entry in your message list. You can expand the entry to show the individual messages whenever you need to see one.
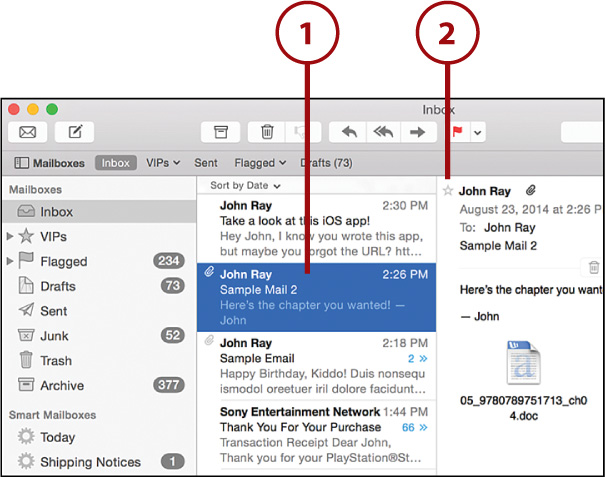
1. Conversations are denoted by a number within an entry in the message list.
2. Click the message list entry to show all the messages in the conversation within the content area.
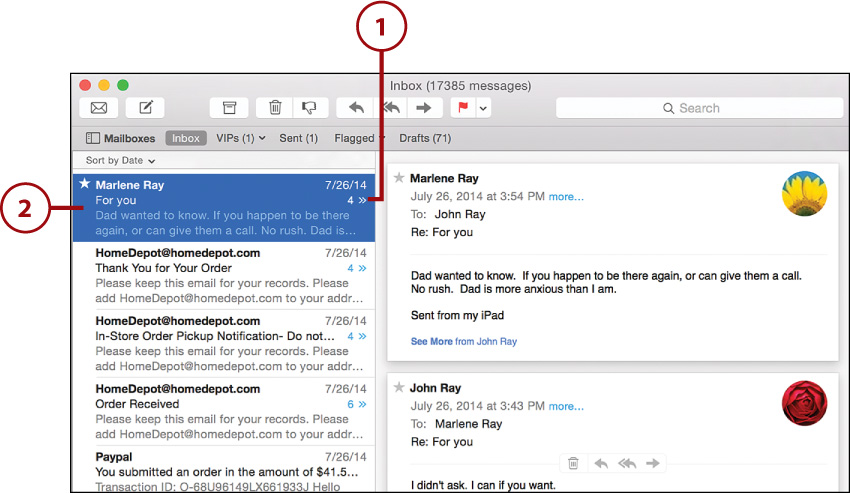
3. To focus on a single message, click the arrow beside the number in the message list to show a list of individual senders and dates.
4. Click the individual name/date to show only that message.

See My Smiling Face!
To see your friends’ (and other contacts’) photos beside each message summary in the message list, open Mail’s preferences (Mail, Preferences from the menu), and within the Viewing section, click the Show Contact Photos in the Message List checkbox.
Managing Spam Filtering
Mail can learn (with some help) which messages in your inbox are spam and then filter similar messages so you don’t have to see them. To manage your spam filtering, follow these steps:
1. Choose Mail, Preferences from the menu bar.
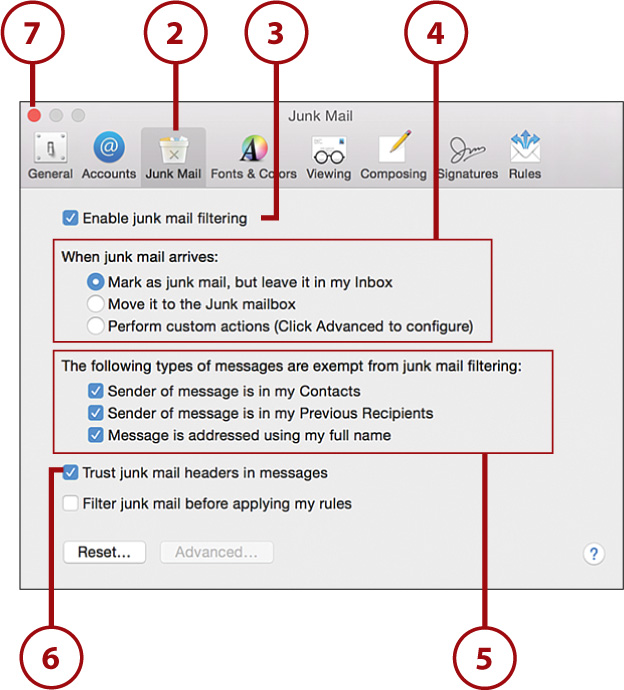
2. Click the Junk Mail toolbar icon.
3. Click Enable Junk Mail Filtering to turn on spam filtering. You can disable it by unchecking this box at any time.
4. Choose where Mail should file spam messages. Moving messages to the Junk mailbox is a good choice.
5. To help prevent getting false positives, use the spam exemptions to identify types of messages that you don’t consider to be spam.
6. If your ISP offers spam filtering (and you trust it), make sure the Trust Junk Mail Headers in Messages option is set.
7. Close the Mail Preferences.
Classifying Spam
If you receive spam mail, select it and click the Junk icon (thumbs down) in the Mail toolbar. This classifies messages as spam. When new messages recognized as spam come in, they are automatically placed in the Junk folder. If good mail is accidentally classified as spam, use the thumbs up icon in the toolbar to tell Mail it made a mistake.
Changing How Often Mail Is Retrieved
You can force Mail to retrieve messages using the Get Mail toolbar button, but to change the frequency with which it forces a check, you need to access the preferences.
1. Choose Mail, Preferences from the menu bar.
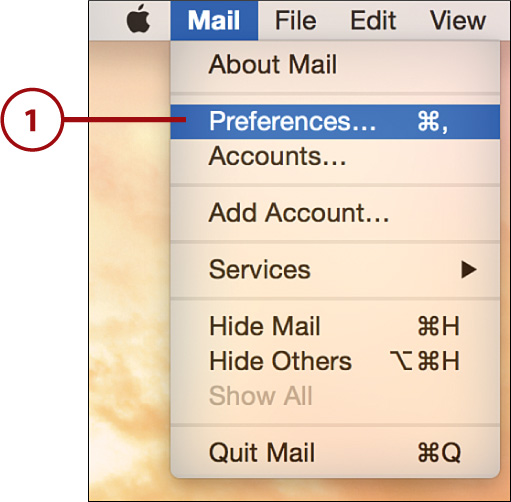
2. Click the General icon in the preferences toolbar.
3. Use the Check for New Messages pop-up menu to set how frequently Mail looks for new messages.

Composing Email (New!)
Email today is a bit more than just typing a message—it can include sending photos, files, or even professionally designed invitations and announcements. Mail on your Mac enables you to do all of these things.
Sending Messages with Attachments
Mail can attach virtually any type of file to your messages with ease. Follow these steps to add Windows-compatible attachments to a Mail message.
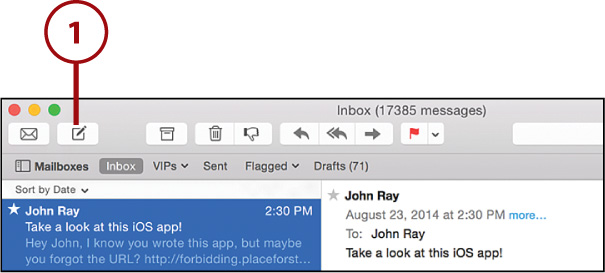
1. Start a new message by clicking the new message icon (pencil and paper) in the Mail toolbar.
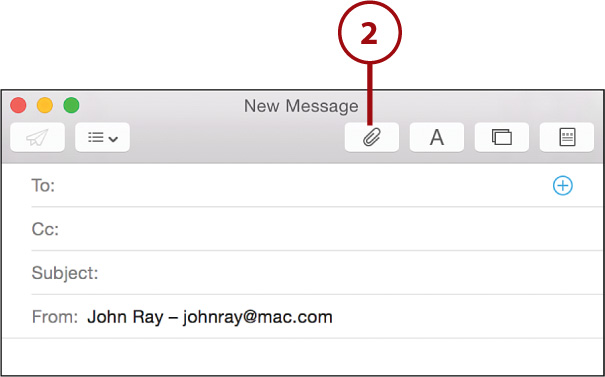
2. Click the Attach icon (paperclip) in the New Message window.
3. Choose the files or folders to send from the file chooser dialog. Select multiples by holding down the ![]() key and clicking.
key and clicking.
4. Check the Send Windows-Friendly Attachments checkbox to ensure that anyone (regardless of their platform choice) can open the attachments.
5. Click Choose File to add the attachments.

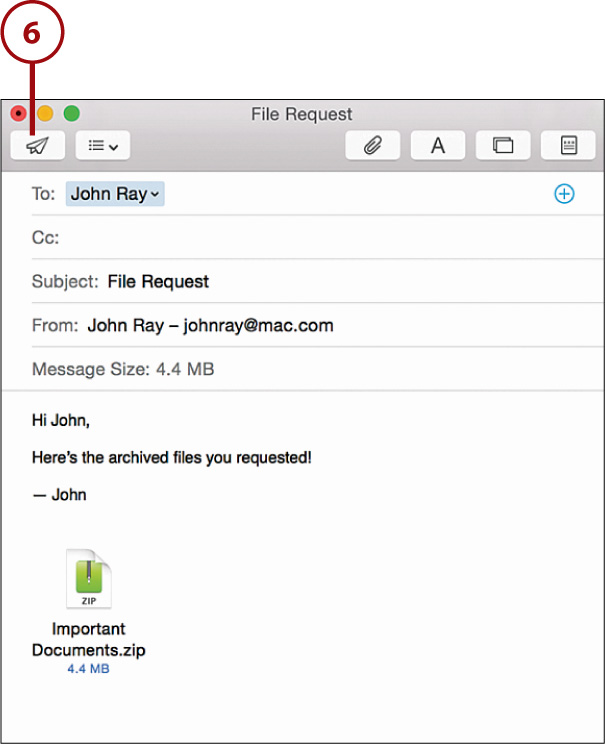
6. Compose the message as normal and then click the send icon (paper airplane).
Attaching Pictures from iPhoto
To quickly attach photos from iPhoto, click the Photo Browser button to open a small window that shows your iPhoto galleries. Choose your photos and drag them into the message to attach them!
Annotating Attachments with Markup
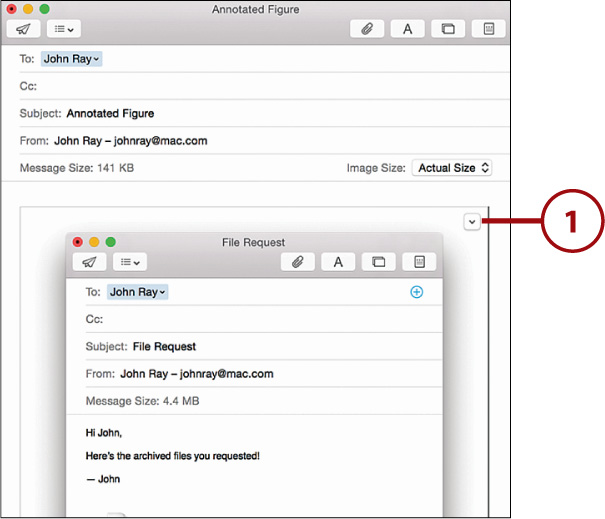
New to Yosemite is the Markup extension for images. When working with an image in an email (added as an attachment or automatically included when replying to a message with an image), you can access tools to quickly annotate the image without leaving Mail.
1. Position your cursor over the image; a down arrow appears in the upper-right corner. Click the arrow.
2. Choose Markup from the menu that appears.
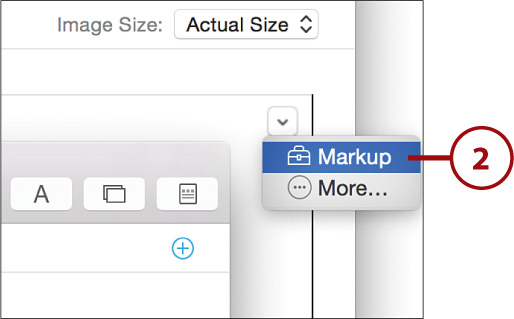
3. The Markup window displays.
4. Use the Freehand tool to add freehand drawings and fancy arrows to the image.
5. Use the Shapes tools to access a variety of geometric shapes along with a magnifying loupe.
6. Click the T icon to insert a line of text over the image.
7. Use the signature tools to add your signature to the image.
8. All these tools’ appearances can be modified using the line width, line color, fill color, and font menus located to the right of the tool icons.
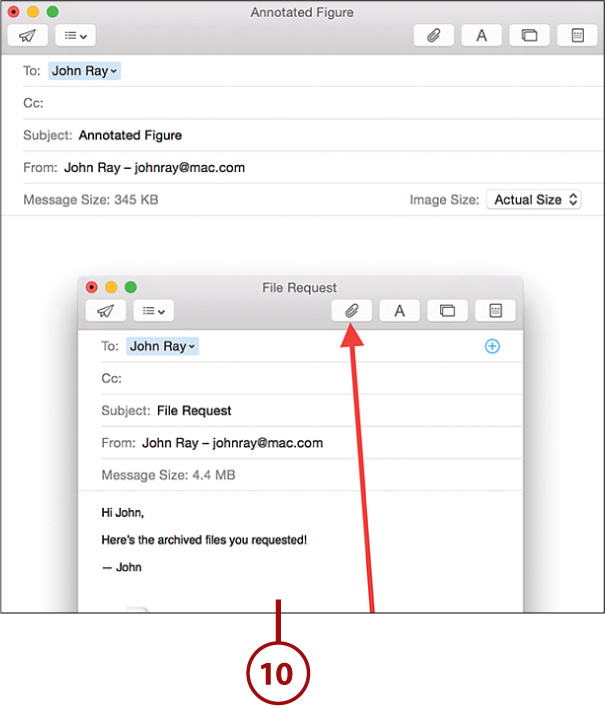
9. When finished annotating, click Done.

10. The modified image is inserted into the message and is ready to send!
Extend Yourself
The Markup tool is an example of a Yosemite extension. It adds features to an application without changing the application itself. You can find and download additional extensions from the App Store. Read Chapter 10, “Installing and Managing Applications and Extensions on Your Mac,” for more details!
Using Stationery Templates
If you’d like to send an invitation or a fancy greeting, you can make use of prebuilt templates, called “Stationery,” that come with the Mail application. Stationery is available whenever you’re composing a message:
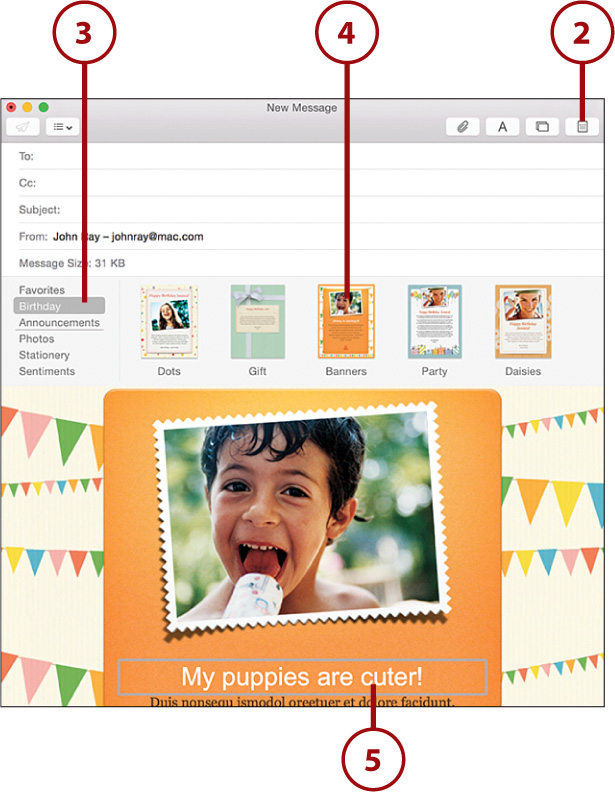
1. Start a new message by clicking the new message icon (pencil and paper) in the Mail toolbar.
2. Click the Show Stationery icon (paper with dots) in the New Message toolbar.
3. Choose a category of templates on the left side of the Stationery bar.
4. Click the thumbnail of the template you want to apply.
5. Click to edit the text within the template.
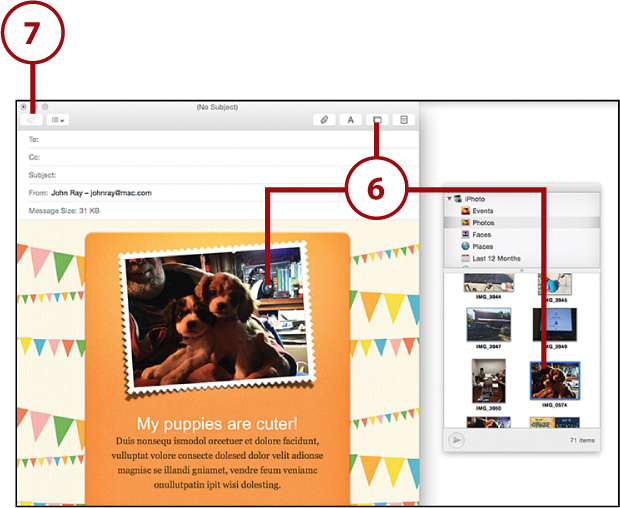
6. If the template contains images, replace them by dragging photo files from the Finder onto the template image or use the Photo Browser button to locate an image and drag it in.
7. Click the send icon (paper airplane) when you are finished with the message.
Changing Templates
After you change the content of a template, you can choose another template and your changes will be maintained as much as possible.
Creating Signatures
When you send a lot of email, you probably get a bit tired of typing the same thing at the end of each message—your name, email, and other contact information. To add this information automatically to the end of each message you write, create a signature.
1. Choose Mail, Preferences from the menu bar.
2. Click the Signatures icon in the preferences toolbar.
3. Choose an account that the signature should be used with, or choose All Signatures to not associate the signature with a specific account.
4. Click + to add a new signature.
5. Type a name for the signature.
6. Enter the text for the signature in the space to the right.
7. Click Always Match My Default Message Font so that the signature always matches the font you’re using.
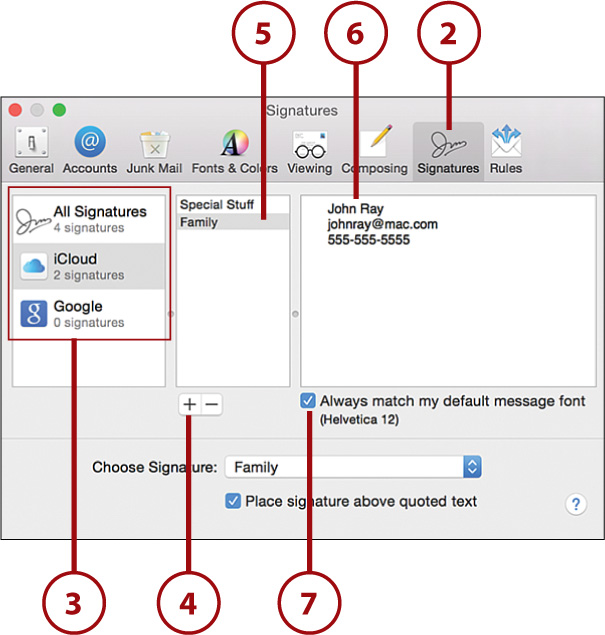
8. If you’re adding the signature to an account, use the Choose Signature pop-up menu to choose which signature is automatically added when you write a message. You can also manually choose a signature using the Choose Signature pop-up menu in the message composition window.
9. Click Place Signature Above Quoted Text to have Mail position your signature above earlier (quoted) text when replying to messages.
10. Close the Mail Preferences window.

Adding a vCard
To attach your personal information to your signature as a virtual business card, you can drag a card out of your Contacts application into the signature.
Managing Your Email
Email can be overwhelming, especially if you have several different accounts and dozens of incoming messages each day. To help you cope with the incoming mail, you can create mailboxes in which to file or copy messages. You can also set up smart mailboxes that automatically display messages that match certain criteria.
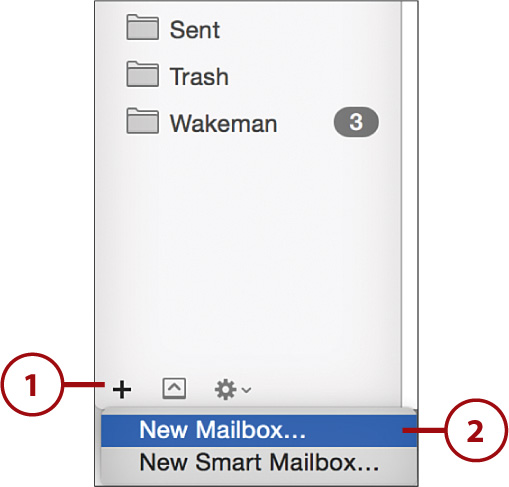
1. Click the + button at the bottom of the mailbox list.
2. Choose New Mailbox.
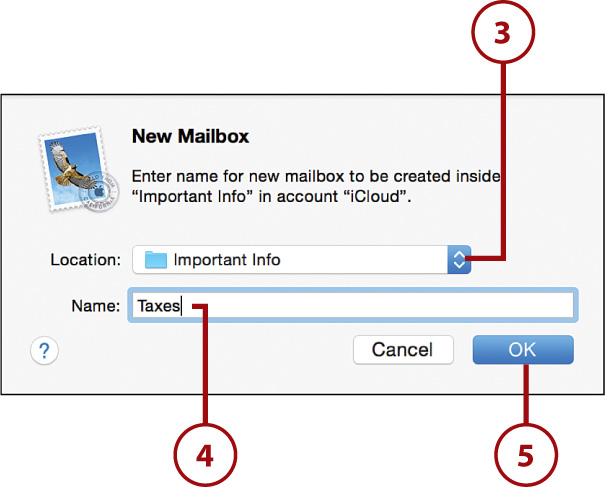
3. Using the Location pop-up menu, choose where the mailbox should be stored. You see all of your existing Mailboxes in the menu, as well as On My Mac. Choosing an existing location creates the new mailbox inside of that location.
4. Enter a name for the new mailbox.
5. Click OK.
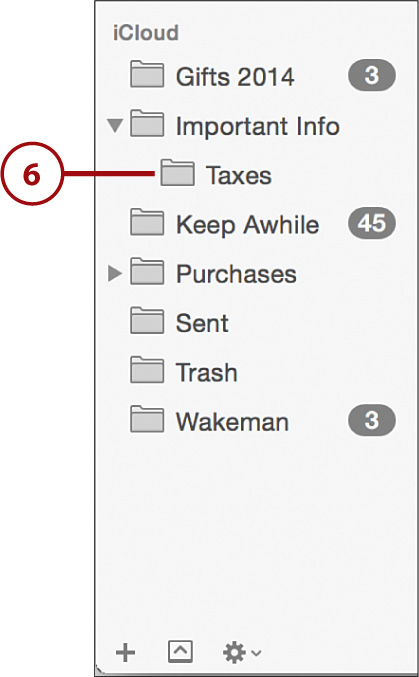
6. The new mailbox is created and displayed in the mailbox list.
Make Room for Your Mail
Remember: Because the mailbox display eats up a bunch of room on your screen, Apple has made it simple to hide and show the mailbox column using the Mailboxes button in the upper-left corner of the Mail window. In addition, you can quickly change between your Inbox, Sent, Drafts, and Flagged folders using the links directly in the Mail toolbar.
Deleting and Renaming Mailboxes
If you find yourself with extra mailboxes or mailboxes that are no longer serving their original purposes, you can delete or rename them.
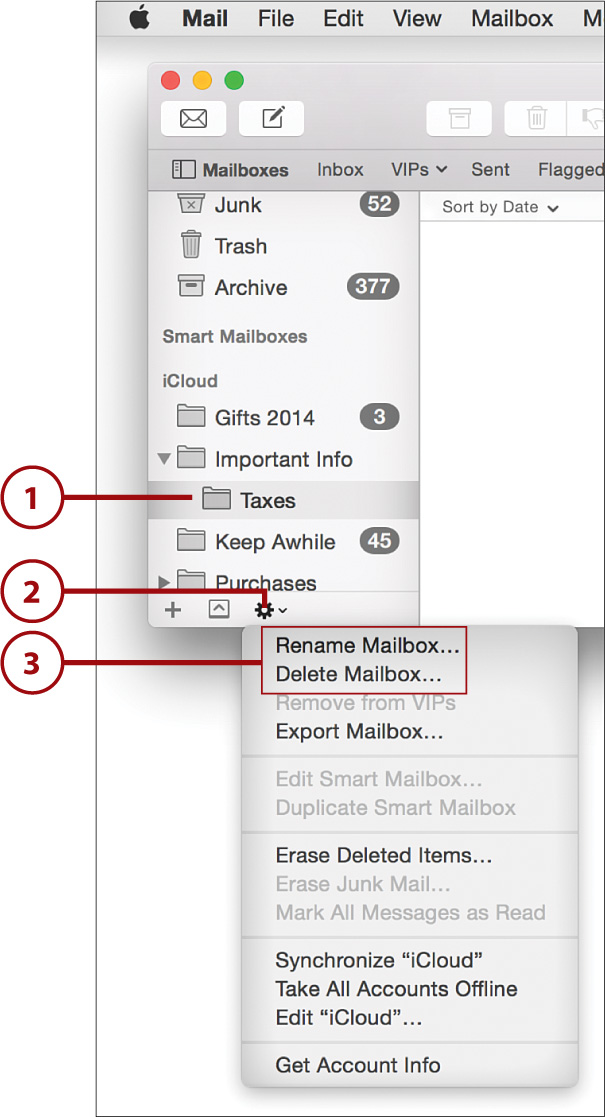
1. Select the mailbox you want to change in your mailbox list.
2. Click the Action icon (the gear) at the bottom of the mailbox list.
3. Choose Delete Mailbox or Rename Mailbox as needed. Any messages stored in a mailbox being deleted are also deleted.
Nesting Folders
Even though you chose where to put your mailbox when it was first created, you can move it within your mailbox hierarchy easily. Mailboxes can be moved inside of other mailboxes by clicking and dragging their folder icons into (or out of) another mailbox.
Filing Messages in Mailboxes
Mailboxes are only useful if you file your messages in them. You can copy or move messages one at a time or en masse to a mailbox. You can do this either manually, as described here, or automatically using Smart Mailboxes or Email Rules, discussed in the tasks following this one.
1. Select a message by clicking it in the message list. You can select a contiguous range of messages by holding down Shift and clicking another message, or select several scattered messages by holding down the Command key, ![]() , and clicking multiple messages.
, and clicking multiple messages.
2. Move the messages to a mailbox by dragging them onto the desired mailbox. To copy—rather than move—the messages, hold down the Option key while you’re dragging the messages. The messages are moved (or copied) to the other mailbox.

Filing Without Dragging
If you have a large number of mailboxes, or just find the process of dragging to the mailbox list to be cumbersome, you can select the messages and then use Move To or Copy To from the Messages menu to file the email without any dragging required.
Automatic Email Organization with Smart Mailboxes
Much as smart folders in the Finder can help you keep track of files that share certain attributes, Smart Mailboxes can do the same for your email. Using information such as the sender, recipient, and even attachment names, you can group messages together in a Smart Mailbox, regardless of what mailbox, or even what email account, they’re associated with. Apple includes one Smart Mailbox by default—“Today”—showing all the messages you’ve received today.
1. To create a new Smart Mailbox, click the + button at the bottom of the mailbox list and choose New Smart Mailbox.

2. Type a name for the mailbox.
3. Choose whether the mailbox should match any or all conditions.
4. Configure your search criteria. Use the first pop-up menu to choose a message attribute (such as Subject), the second to choose a comparison, and the field (where applicable) to provide the value that you are comparing against.
5. Use the + and – buttons to add or remove additional criteria.
6. To include messages from the Trash mailbox or Sent mailbox, click the appropriate Include Messages checkboxes.
7. Click OK when you’re finished configuring the Smart Mailbox.

8. The new mailbox is created and displayed in the Smart Mailboxes section within the mailbox list.

Nesting Smart Mailboxes
Smart Mailboxes can’t be arranged hierarchically inside one another as normal mailboxes can. To create a hierarchy of Smart Mailboxes, you must create a Smart Mailbox Folder (Mailbox, New Smart Mailbox Folder). This special folder will be added to the Smart Mailboxes section and can be used to organize any Smart Mailboxes you create.
Keeping Track of Your Very Important People with VIP Mailboxes
Mail includes a feature that makes it very simple to track and view all messages from a specific person—the VIP Mailbox. VIP Mailboxes are like smart folders, but with a targeted purpose—showing you all messages from an individual person. To create a VIP mailbox, follow these steps:
1. Choose a message from a sender you want to designate as a VIP.
2. Position your mouse beside the sender’s name in the content window and click the star that appears.
3. The sender is added to a new VIP mailbox.
4. Clicking the VIP mailbox shows all messages from the sender.

5. Click the star in the content view again, or select the new VIP mailbox and choose Remove from VIPs from the Action pop-up menu (gear) to remove VIP status (and the corresponding VIP mailbox).

Searching for Messages
Mail makes it easy to quickly search all of your email for particular content, and to turn that search into a Smart Mailbox for future reference.
1. Type the text you are looking for into the search field in the upper-right corner.
2. Using the links below the toolbar, click the mailbox where the search should be performed.
3. Potential search options appear in a drop-down list for matched people, mailboxes, subjects, and message content. Choose what best matches what you want to find.
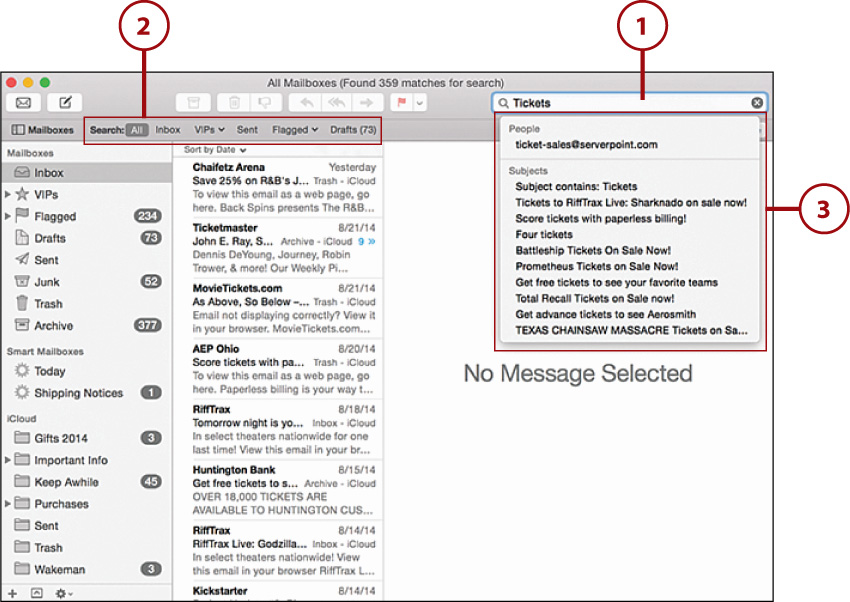
4. The results appear in the message list.
5. Click Save to save the search as a Smart Mailbox. (See steps 2–8 of the “Automatic Email Organization with Smart Mailboxes” task.)
6. Alternatively, click the X button in the search field to clear the search results.

Writing Email Rules
If you’d prefer to have messages filed to actual mailboxes rather than Smart Mailboxes, you can write email rules. Email rules can file messages, highlight messages in the message list, and even forward them to another account. To write a rule, follow these steps:
1. Choose Mail, Preferences from the menu bar.
2. Click the Rules icon in the Preferences toolbar.
3. Click Add Rule.
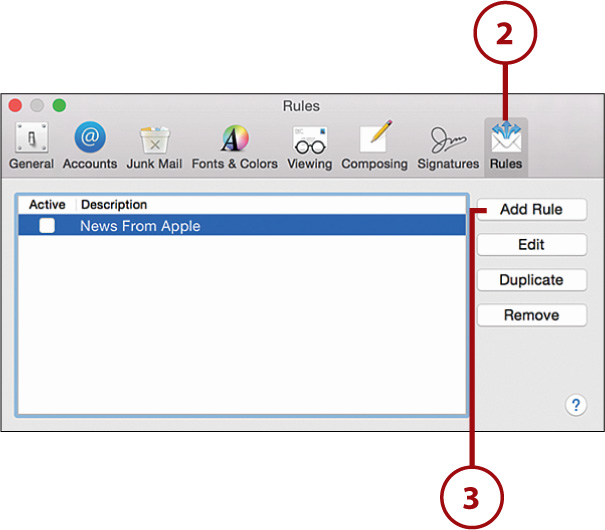
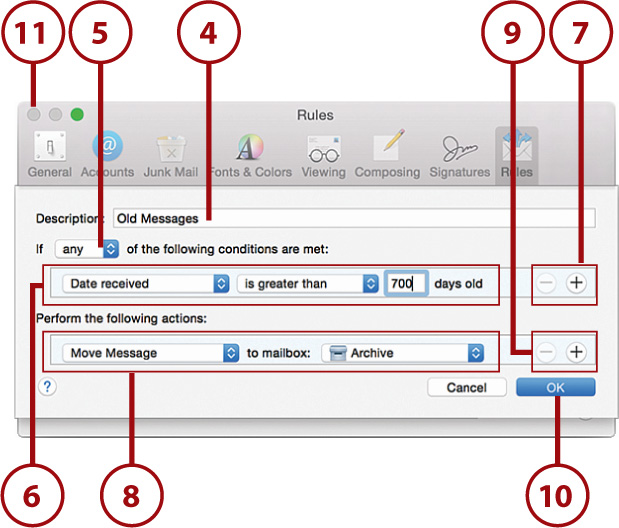
4. Enter a description for the rule so that you can identify it later.
5. Use the Any pop-up menu to choose where any or all rules must evaluate as “true” in order for the rule’s actions to be carried out.
6. Configure the conditions under which the rule executes. The first pop-up menu chooses what is evaluated, the second the comparison to be made, and field is the value that should be used in the comparison.
7. Use + or – to add or remove additional conditions.
8. Configure the actions that are performed when the conditions are met.
9. Use + or – to add or remove actions.
10. Click OK to save the rule.
11. Close the Mail Preferences.
Web Browsing in Safari
Although similar in many ways to other web browsers, Safari offers a few unique features that set it apart. You can open Safari from its icon on the Dock or Launchpad, or in the Applications folder.
Safari has seen dramatic improvements over the past few years. Safari uses a web browsing engine called Webkit that was, although not an Apple product, engineered by mostly Apple developers. This engine is the same engine on many platforms, including WebOS, some versions of Android, Adobe Air, and others. This means that Safari is quickly becoming a web browsing standard, rather than an exception.
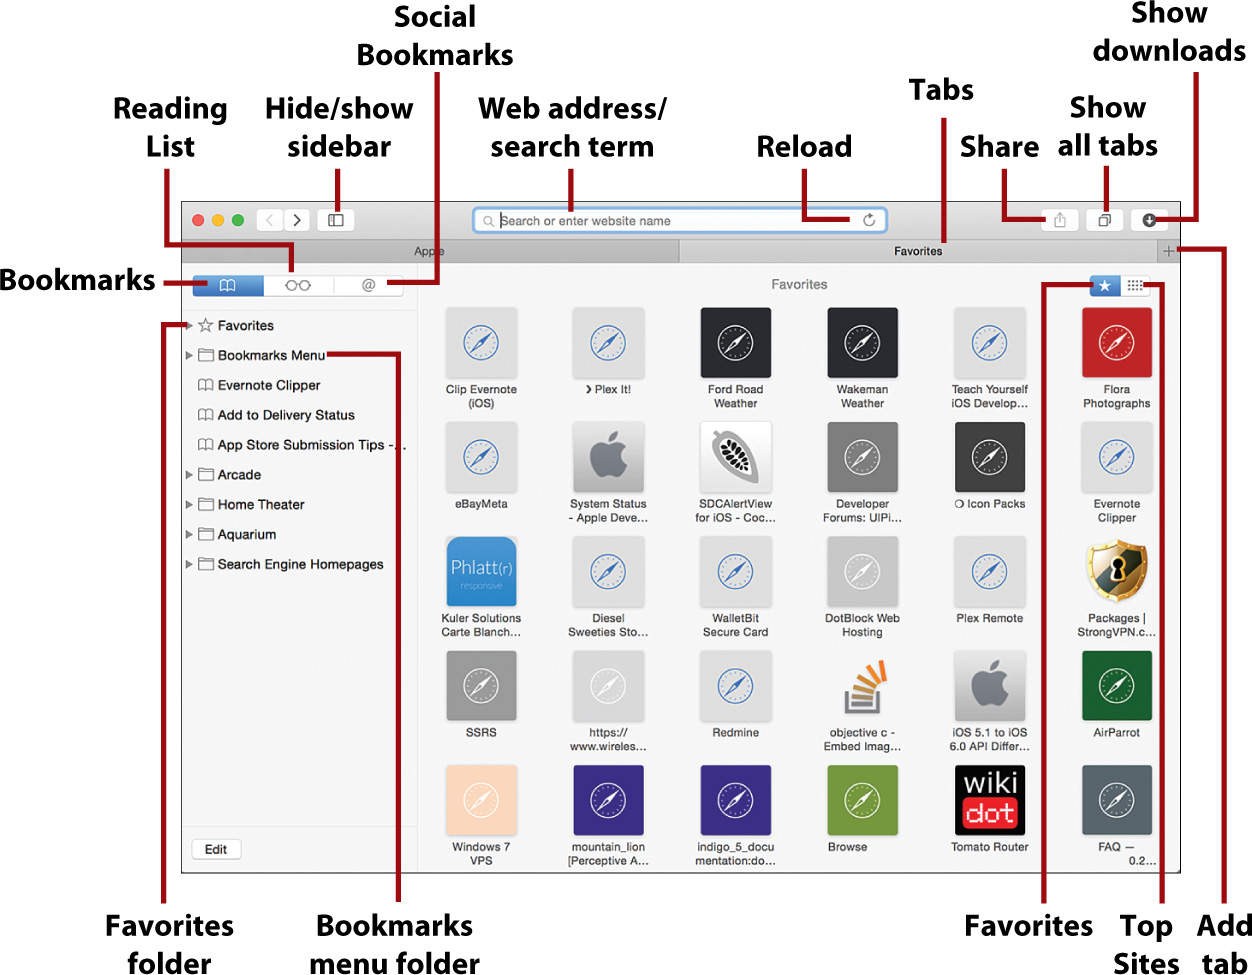
Managing Your Bookmarks, Bookmarks Menu, Favorites, Top Sites, and Reading List (Whew!) (New!)
In Safari, there are many areas where you can store links to content for easy access. Understanding them can be a bit of a challenge.
First, there is the Bookmarks menu, which appears under the Bookmarks menu item.
Next are Favorites displayed in the main Safari window when opening a new window (and under the URL when you’ve clicked within it). These are intended to be “quick” access items that you use frequently.
Third, you have the Top Sites list, which shows the sites you (or Safari) have identified as being frequently visited. Access this list by clicking the grid-of-dots icon when viewing Favorites.
Fourth is a sidebar that contains a master view of bookmarks. This includes groups for your favorites, the Bookmarks menu, and anything else you want to add that shouldn’t be included in the Favorites or Bookmarks menu view.
Think we’re done? Nope. There’s still more!
The sidebar, in addition to the master Bookmarks view, also contains the Reading List (denoted by an icon of eyeglasses). It holds pages and links that you want to visit at a later time, but aren’t planning to keep as a permanent bookmark.
When Safari first starts, it displays the Favorites view with the sidebar active.
If you set up access to a social networking site via Yosemite (see Chapter 7, “Being Social with Messages, FaceTime, Twitter, and Facebook”), your sidebar takes on an additional type of information—shared bookmarks. Bookmarks posted by friends on your social networking accounts will automatically be visible in the sidebar.
Adding a Web Page to Bookmarks, Bookmarks Menu, Favorites, Reading List, or Top Sites
To add a web page to the Reading List, Bookmarks, or even Top Sites, you simply need to know what site you want to bookmark, and then follow these steps:
1. Visit the site you want to bookmark by typing its address into the URL field.
2. Click and hold the + button to the left of the URL.
3. Choose where to file the bookmark (Reading List, Top Sites, Favorites, Bookmarks, Bookmarks menu, or a folder within one of these areas).

Organizing Bookmarks (New!)
After you’ve added a few bookmarks, you can re-categorize them using these steps:
1. Click the button to show the sidebar.
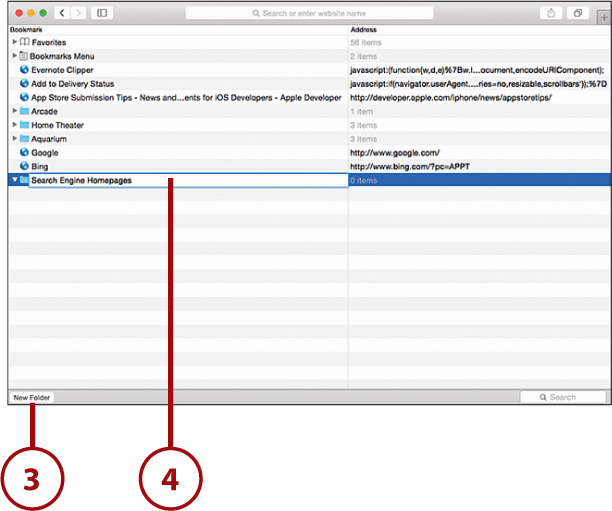
2. Click the Edit button to display a view for managing bookmarks.
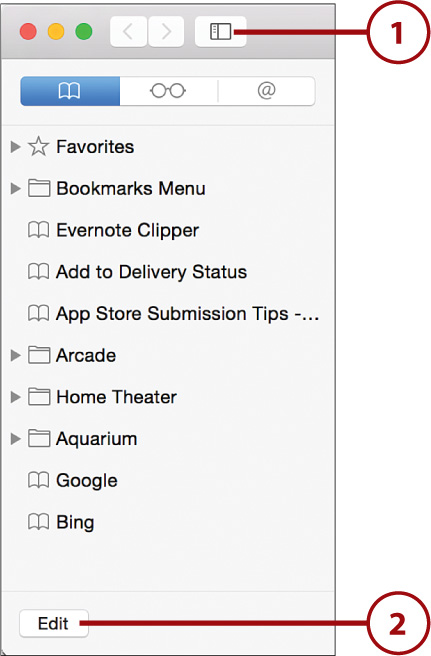
3. Click the New Folder button at the bottom of the window to add a new folder, if desired.
4. Provide a name for the folder by clicking and typing the highlighted field.
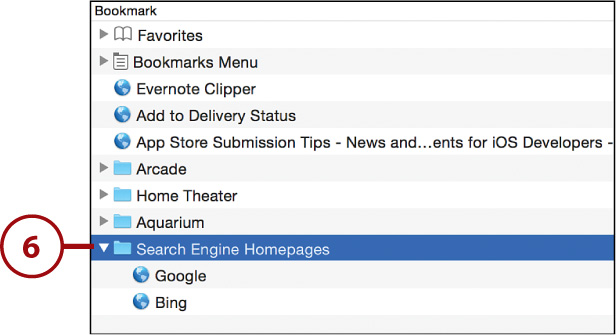
5. Drag bookmarks from anywhere in the list into the order you want. You can drag them into folders, or even place folders inside other folders.

6. To view the contents of a folder, simply click the arrow beside it and the bookmarks contained are displayed.
Organizing Top Sites
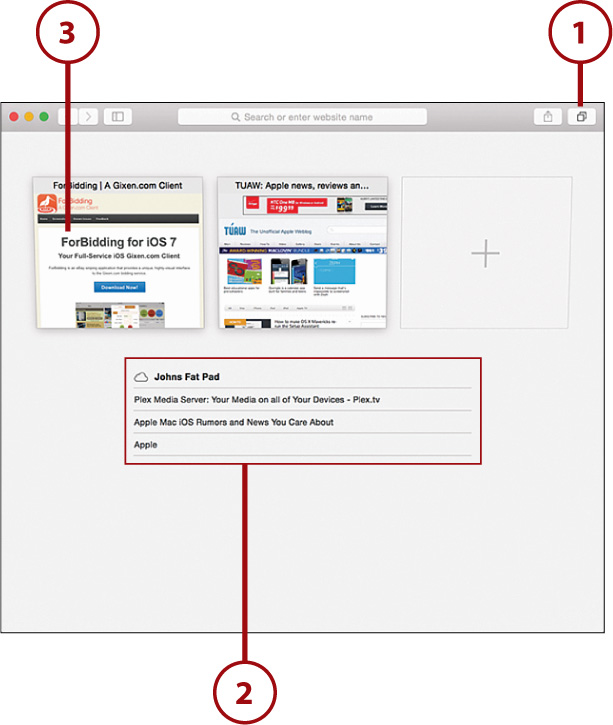
As you browse, Safari identifies your “top sites.” The Top Sites button switches to display previews and marks sites that have updates with a star. Clicking a site opens it in Safari.
To manage the ordering and display of the Top Sites in Safari, follow these steps:
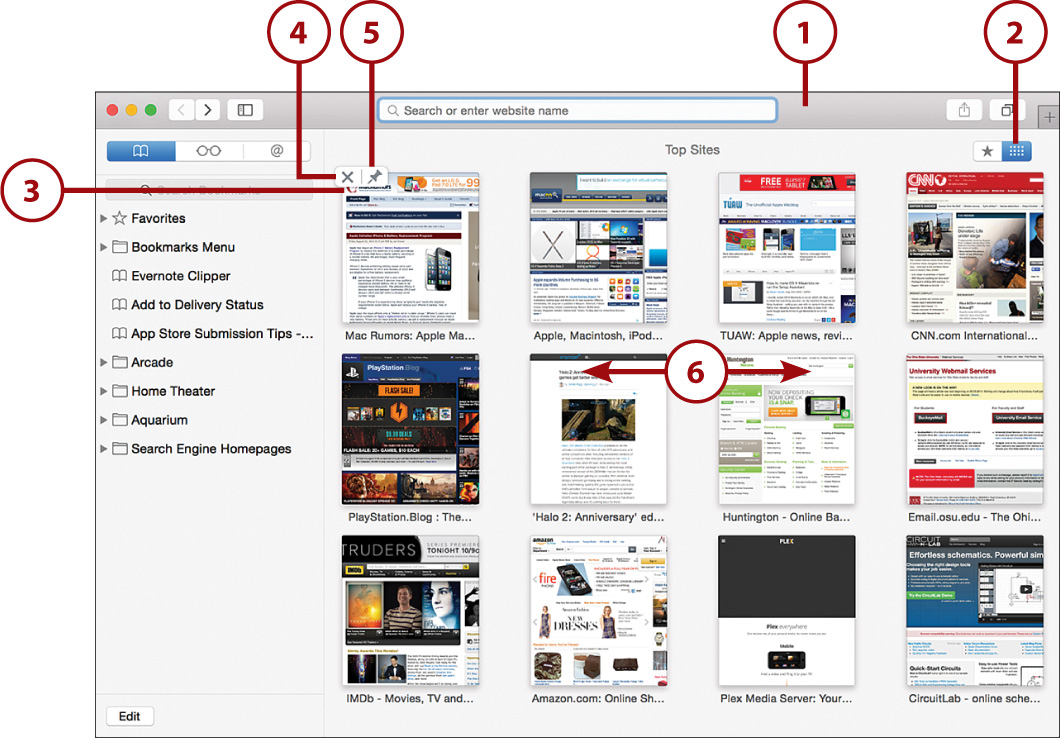
1. Open a new Safari window.
2. Click the Top Sites button (grid of dots).
3. Position your cursor near the top left of one of the Top Sites to show the management controls.
4. Click the X button by a site to remove it.
5. Click the pin button to make sure the site always stays on the screen.
6. Rearrange the sites by clicking and dragging their preview images.
You can add to your Top Sites by dragging items from the URL field, sidebar, and so on—pretty much anywhere you see a URL.
A History Lesson
You can access (and search) your browsing history through the History menu. For a more detailed view (with search), choose History, Show History from the menu bar. For fast access to recently browsed sites, click in the URL and scroll to the bottom of your favorites list. Your recent browsing history is displayed there.
Managing Your Reading List
After you add things to your list, you want to read them, right? To manage your list, just follow these steps:
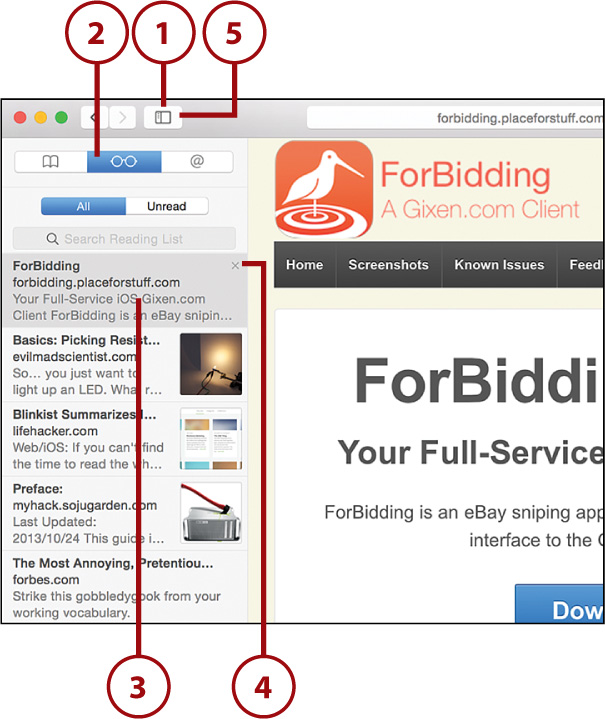
1. Open the Safari sidebar.
2. Open the Reading List by clicking the Reading List icon.
3. Click a Reading List entry to load the page in Safari.
4. While hovering over an entry, click the X icon in the upper-right corner to remove it from the list.
5. Click the hide/show sidebar icon again to hide the list when you’re finished.
Sidebar-Free Reading List Additions
If you get in the habit of using the Reading List, Apple provides some shortcuts to make additions while you’re browsing. Shift-click links to add them to the Reading List, or press Shift-![]() -D to add your current page to the list. If you’re more of a click-and-drag person, you can drag individual links to the sidebar.
-D to add your current page to the list. If you’re more of a click-and-drag person, you can drag individual links to the sidebar.
Advanced Browsing Features (New!)
Although “web browsing” as a pastime is only a little more than a decade old, it’s a skill it almost seems we were born with. Little by little, browser developers have been refining the process to add additional features. Safari is no different.
Using Tabbed Browsing
Originally, web browsers created a new window for each page you visited. In Safari, all these windows can be combined under a single window with tabs representing individual websites within that window. To use tabbed browsing in Safari, follow these steps:
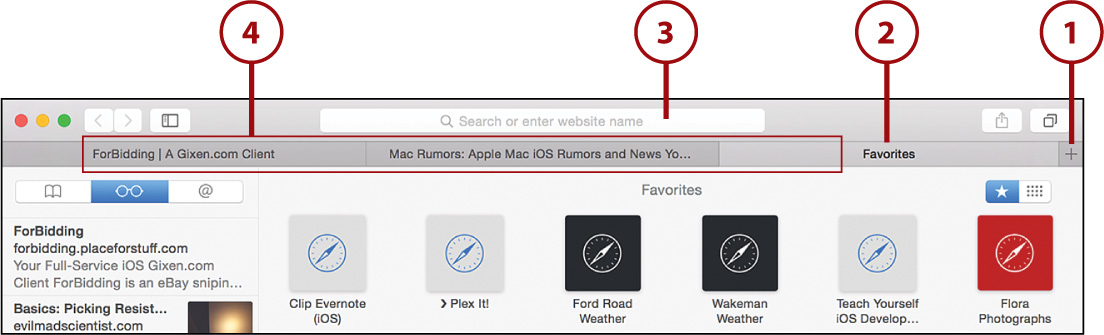
1. Click the + button near the far right of the Safari toolbar.
2. A new tab is added with your homepage (by default, the Favorites view).
3. Enter a URL (or choose a bookmark) to browse to a new site in that tab.
4. Use the tabs to quickly switch between web pages. Note that while you’re browsing, you can hold down Command as you click links. The links create a new tab in the Safari browser window.
Fine-Tune Your Tabs
To fine-tune your tabbed browsing behavior (or disable it entirely), use the Tabs section of the Safari Preferences. (Choose Safari, Preferences, from the menu bar.)
Viewing All Tabs
If you find yourself lost in tabs, not knowing what they all are, you can view all the tabbed web pages at once in a pretty scrolling view. To do this, follow these steps:
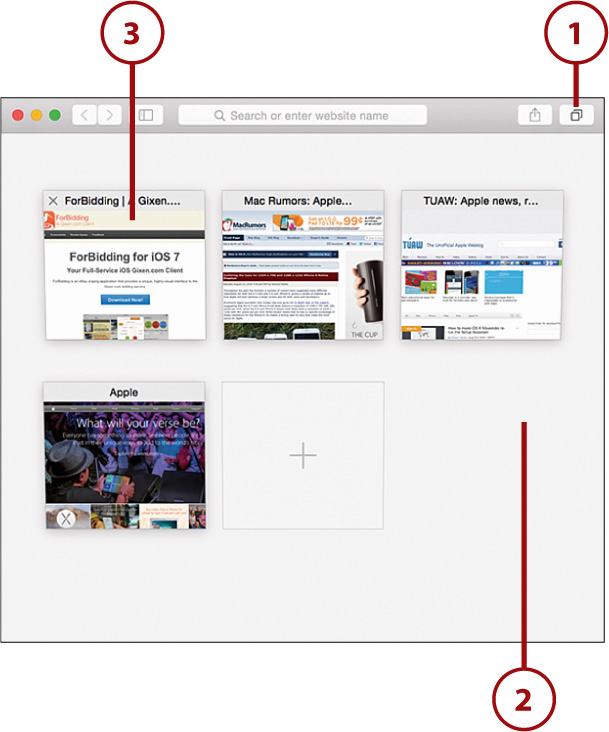
1. Click the Show All Tabs icon at the far right of the Safari toolbar, or perform a pinch gesture on the Magic Trackpad.
2. The tabs appear in a grid view so you can easily identify your content.
3. Click within a page to go to that page, or click the Show All Tabs icon again to return to where you were.
Viewing PDFs Online
In Yosemite, Apple has included a helpful PDF viewer that makes reviewing PDF documents a breeze. When you click a PDF link, the viewer opens. To control the viewer, follow these steps:
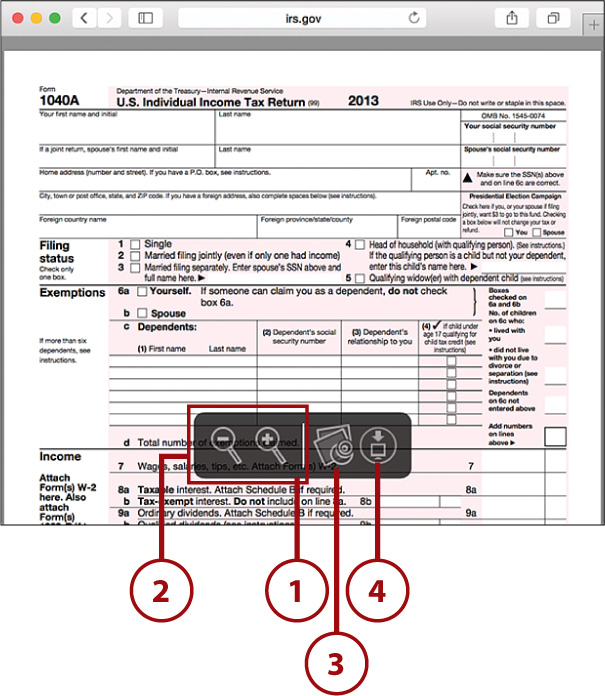
1. Position the cursor near the bottom center of the browser window to show the PDF controls.
2. Click + or – to zoom in and out.
3. Click the Preview icon to open the PDF in the Yosemite Preview (an Image/PDF viewer) application.
4. Click the Download button to save the PDF to your Downloads folder.
Distraction-Free Reading with Reader
Web pages, unfortunately, are rarely dedicated to getting you just the information you need. They are filled with ads and other distracting content, and frequently require you to click multiple links to get the whole story. To provide a distraction-free reading experience, Apple includes a Reader feature with Safari that strips out all the unnecessary cruft. To use Reader, follow these instructions.
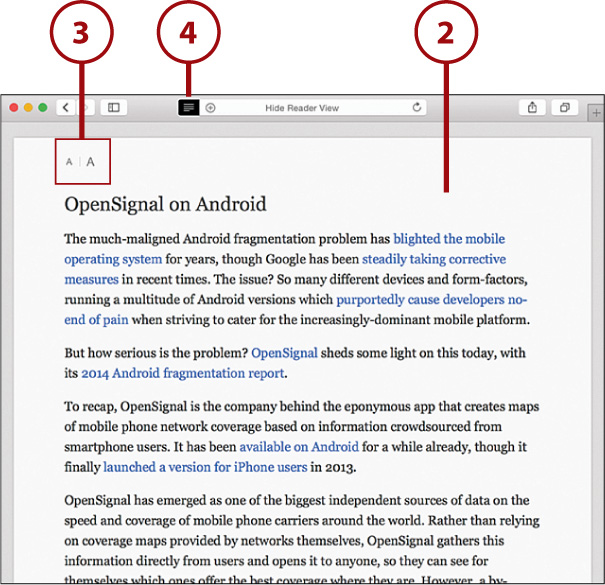
1. When viewing a web page with a story you want to read, check to see if the Reader icon (four horizontal lines) is visible on the left of the URL field. Click it.

2. You are now viewing a clean version of the content.
3. Click the A icons to increase or decrease the size of the text.
4. Click the Reader icon again to close Reader.
Continuing Browsing with iCloud Tabs (New!)
Ever start reading something on one computer or iOS device and want to pick it up somewhere else? Instead of having to remember to add things to your Reading List (or email yourself a bookmark), you can use the iCloud tabs button. This simple feature makes it easy to see what tabs are open on your other devices and quickly open them wherever you are.
1. Click the Show All Tabs button in the Safari toolbar.
2. Scroll to the bottom of the local tab thumbnails to see a list of tabs open on your other devices.
3. Click an entry to open it in your local browser.
Enable the Safari iCloud Service
This feature requires the Safari service to be active on your iCloud account, as described earlier in this chapter.
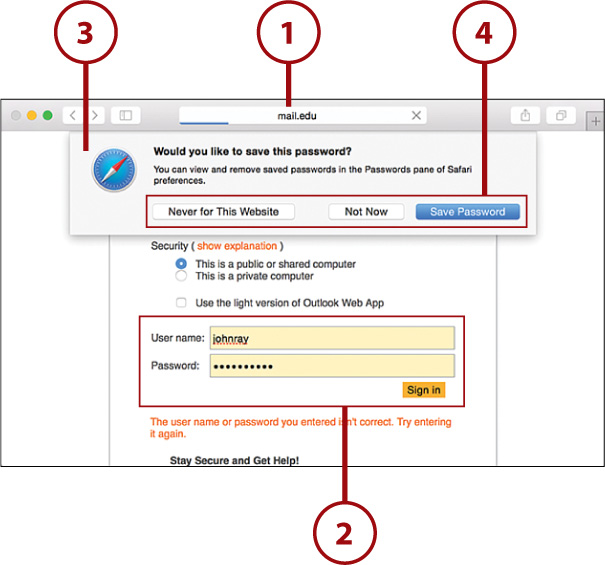
Saving and Sharing Account Information
In Yosemite, if you’ve enabled the Keychain option in iCloud (see Chapter 4, “Setting Up iCloud and Internet Accounts”), Safari tracks auto-completion information, stores credit cards, and shares all of the data between all your devices.
1. Browse to a login form on a website where you’d like to log in.
2. Enter your login information.
3. Safari prompts to save your information.
4. Choose to save the information, or not.
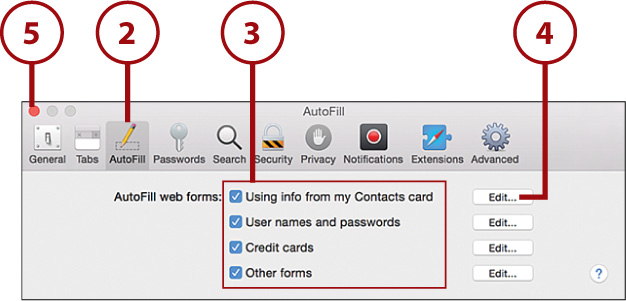
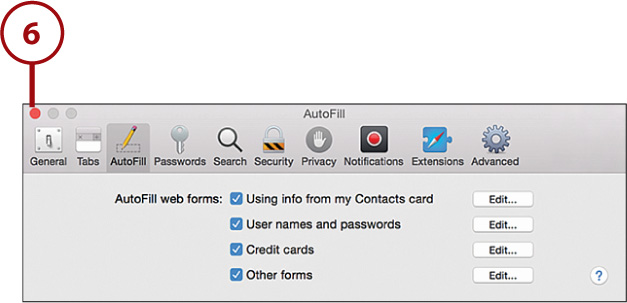
Managing AutoFill Data
In addition to the information stored as you browse, Safari can also fill in forms using your Address Book data, or credit card information that you store. To manage all of this data, you need the Safari Preferences:
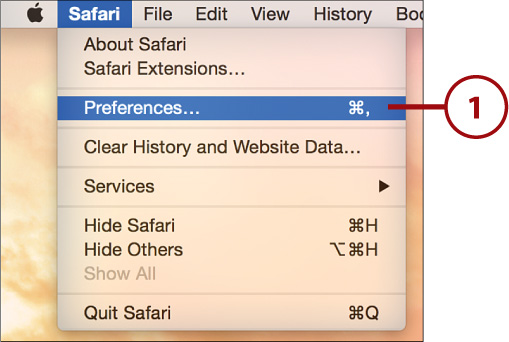
1. Choose Preferences from the Safari menu.

2. Select Autofill from the toolbar.
3. Check the sources of information you want to use for auto-completing web forms.
4. Click the Edit button to edit that category of information. (Editing the Contacts information opens Address Book.)
5. Close the preferences.
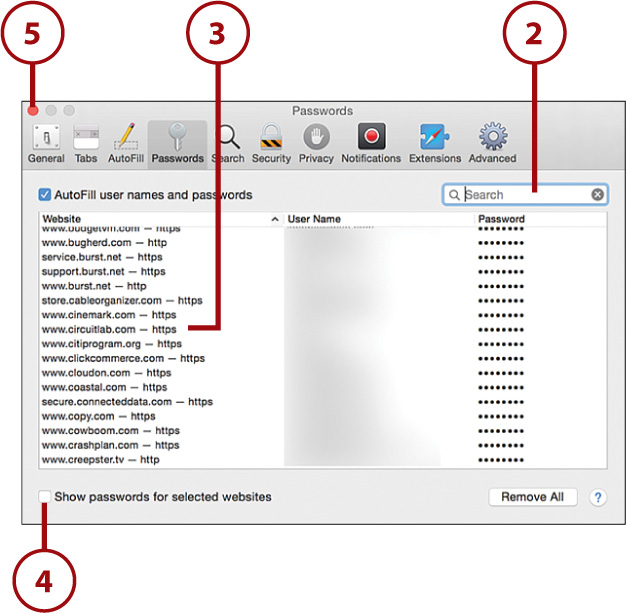
Editing AutoFill User Names and Passwords
To edit user names and passwords that you’ve stored while browsing, complete the steps in “Managing AutoFill Data” and then do the following:
1. Click the Edit button beside User Names and Passwords.
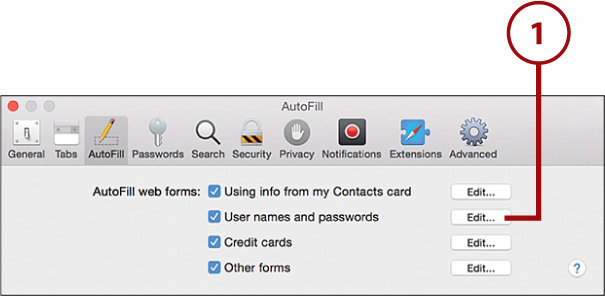
2. Use the search field to locate stored information.
3. Click a stored URL and press delete to remove it.
4. Click Show Passwords for Selected Websites to display passwords in clear text.
5. Close the preferences.
Editing AutoFill Credit Cards
While you’re checking out in popular online websites, Safari may prompt you to save credit card details. To edit and manage the saved information, complete the steps in “Managing AutoFill Data” and then follow these additional steps:
1. Click the Edit Button beside Credit Cards.

2. Select a card and click Remove to delete it.
3. Click Add to create a new card entry.
4. Fill in the data for each field.
5. Click Done to save the card.
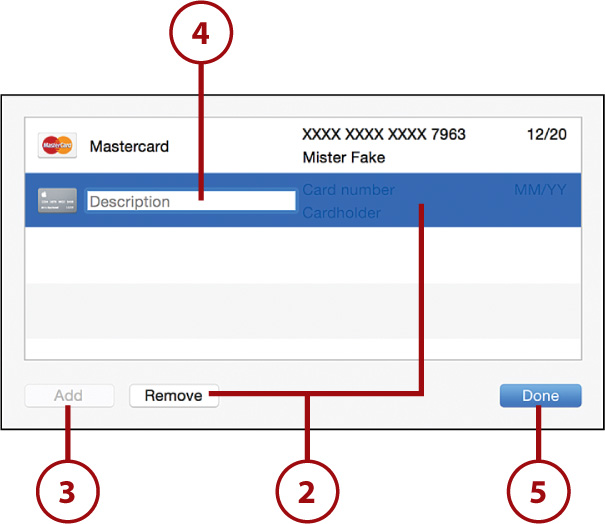
6. Close the preferences.
And All the Rest...
The final type of AutoFill information you can edit is Other forms. This is just other information that Safari stores as you provide data on various web forms. If you click the Edit button for Other forms, you have the ability to browse for web addresses and remove stored data, not edit or view the data.
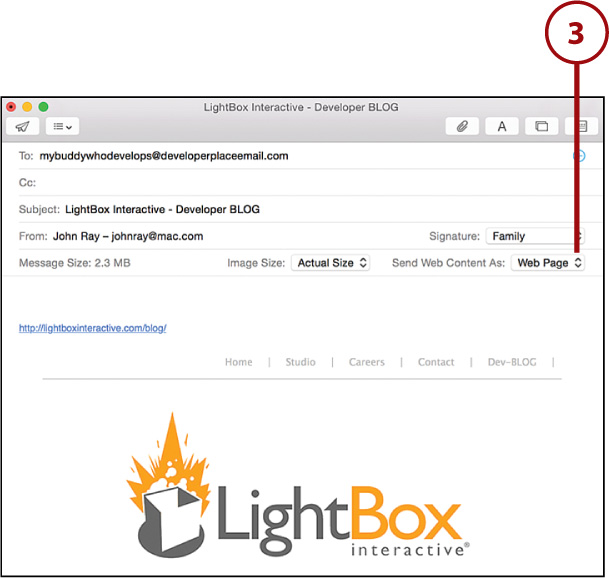
Sharing with Others
To share the page that you are currently reading with someone else via email or Messages, you can use the Safari Share icon. Sharing is covered in more detail in Chapters 6, “Sharing Files, Devices, and Services,” and 9, “Entertainment on the (Big) Little Screen.” For now, follow these steps:
1. Click the Share icon when browsing a page you like.
2. Choose to share the page via one of the methods displayed.
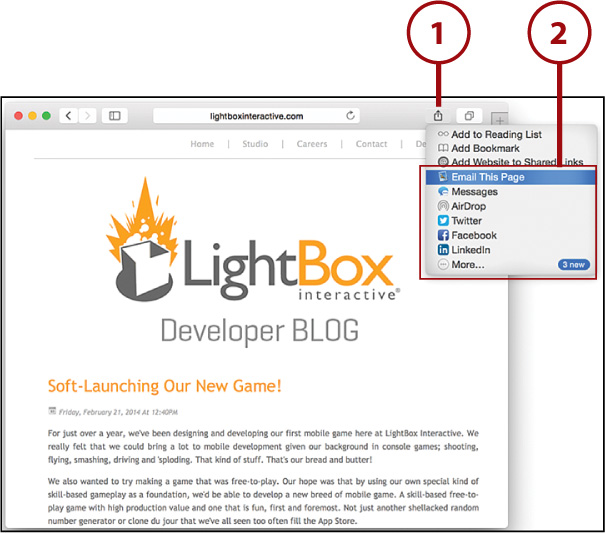
3. When sharing via email, a new email is created and you can choose whether to share a reader version of the page, the full web page, a PDF of the page, or just the link!
Tweet-Ready Sharing
In Chapter 6 you find out how to add Twitter to the Share menu, making it simple to quickly tweet the current URL to your followers.
Enabling Private Browsing
If you share a computer with other people, and there’s a chance that they might stumble upon something in your web history that you’d prefer they didn’t (holiday gift orders, for example), you can enable private browsing.
When private browsing is enabled, no website content is saved to your Mac—it’s as if you were never there:
1. Choose File, New Private Window from the menu bar.
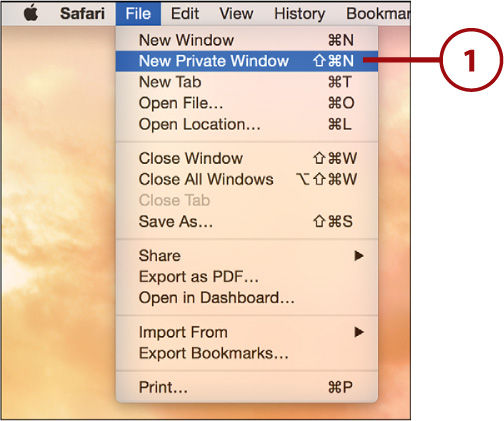
2. Use the new Safari window as you would normally, but your session is private—as indicated by a dark background in the URL field.
3. Close the window when finished browsing.

Protecting Your Mac and Yourself Online
Safari offers several tools to help protect you from fraudulent activity online. To ensure that you have the most secure browsing experience possible, complete the following configuration:
1. Choose Safari, Preferences from the menu.
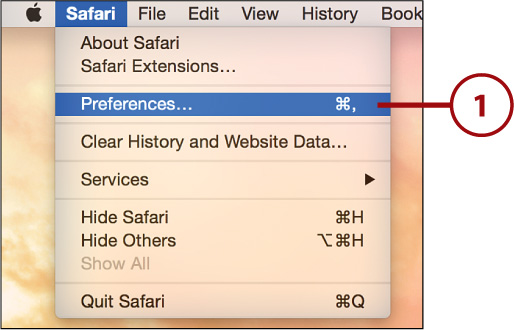
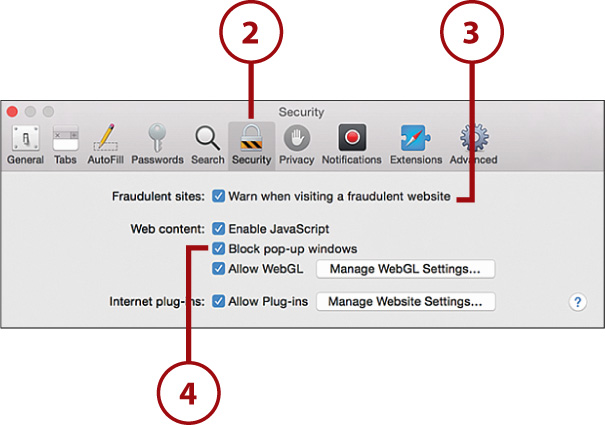
2. Click the Security toolbar icon.
3. Check the checkbox beside Warn When Visiting a Fraudulent Website.
4. Check the checkbox beside Block Pop-up Windows.
5. Click the Privacy toolbar icon.
6. Be sure that the Cookies and Website Data option is set to Allow from Websites I Visit.
7. Choose whether Safari should deny all access to your location information, or to prompt you if a website requests it. Note that some online services can provide valuable customized information using your location.
8. Click Ask Websites Not to Track Me to request that your website visits be logged as little as possible. Note that web service providers may not pay attention to this setting.
9. To remove all information stored on your computer by the sites you’ve visited, click Remove All Website Data. You might want to repeat this from time to time.
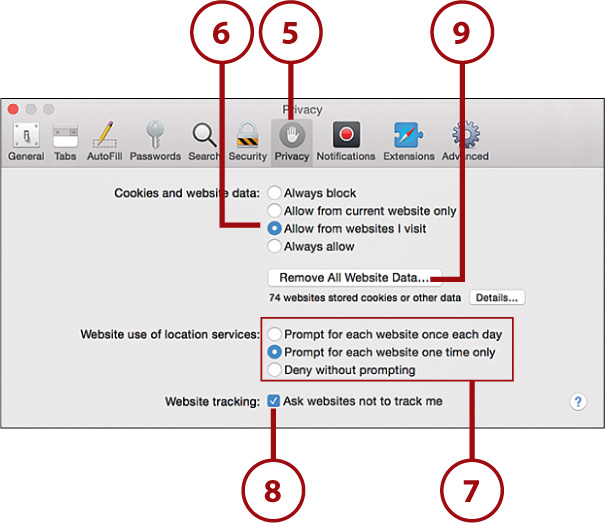
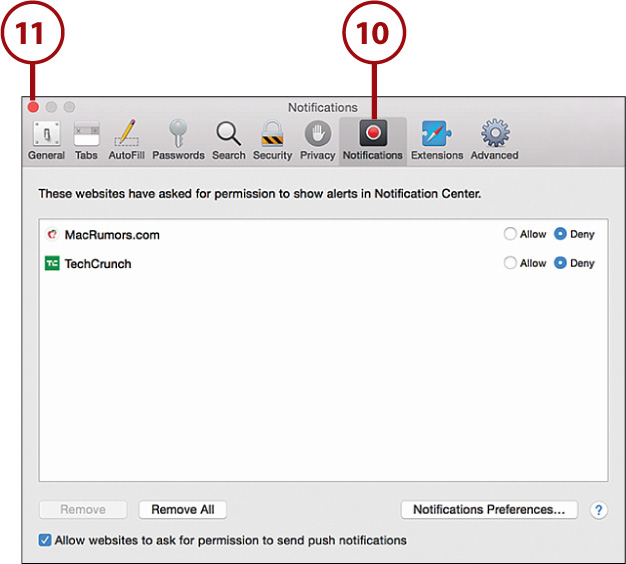
10. Use the Notifications Preferences section to manage which websites can post notifications to the Yosemite Notification Center.
11. Close the Safari Preferences.
Go With What You Know
As a general rule, you should never download files online unless you trust the source. By default, Safari opens files that it has identified as safe. If you prefer to prevent Safari from opening any file it downloads, you can find this option under the General Safari Preferences.
Adding Web Content to the Dashboard
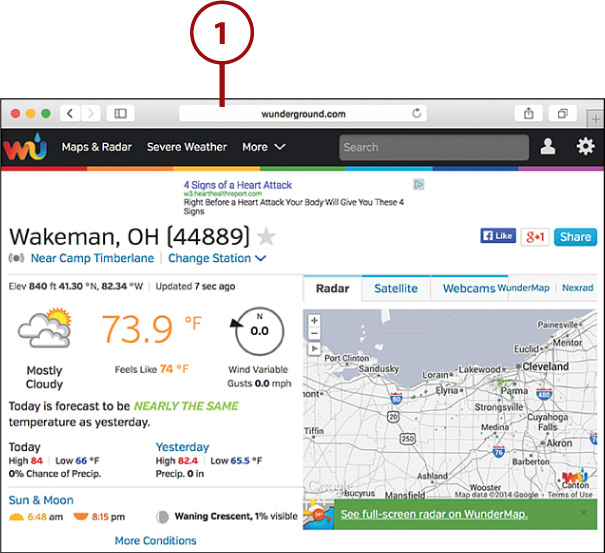
Many of us visit a web page just to see a tiny piece of content, such as the latest weather report or breaking news. With Safari and the Dashboard, you can create your own widget, called a web clipping, that is accessible directly from your Mac’s Dashboard. This gives you instant access to information you like without needing to open Safari. The content even updates automatically as long as you are connected to the Internet.
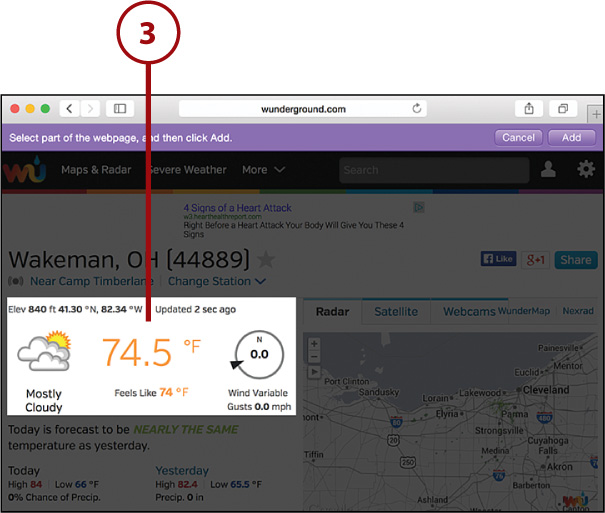
1. Visit the web page with the content you want to add to the Dashboard.
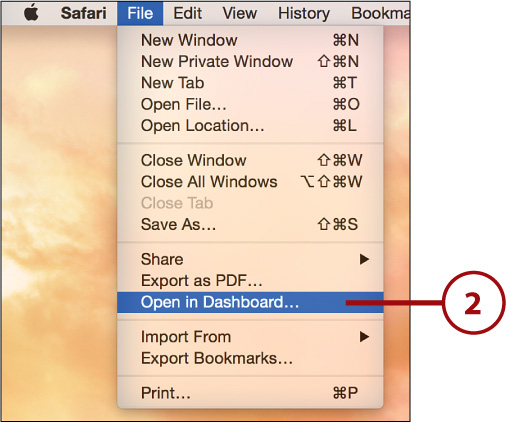
2. Choose File, Open in Dashboard.
3. Position the box on the page so that the content you want to capture is highlighted as best as possible, and then click your mouse.
4. Fine-tune the selected area by dragging it within the Safari window and using the handles on the sides to resize it.
5. Click Add when you are satisfied with the results.
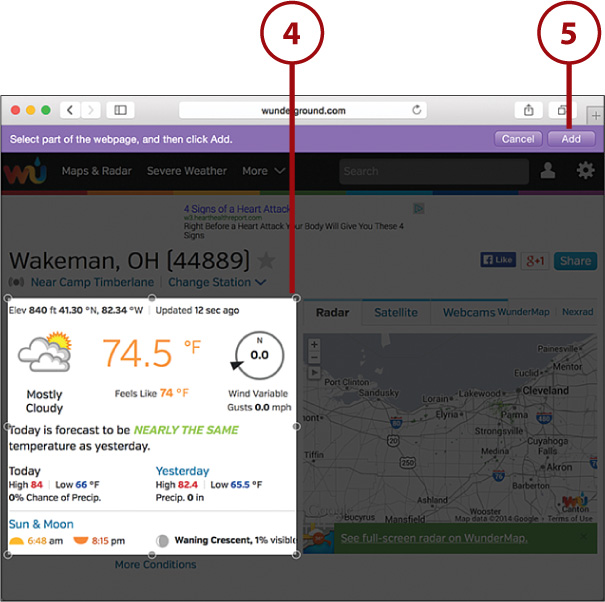
6. The Dashboard opens and the new web clipping widget is displayed.

Changing the Clipping Appearance
To customize the web clipping even more, click the i icon in the lower-right corner of the widget in Dashboard. You are given the option of several different borders that can be applied to stylize the clipping.
Extending Safari’s Capabilities with Extensions
Safari supports developer-created extensions that can add additional functionality to your browsing experience—such as the ability to quickly access Twitter, eBay, and other services without leaving your current web page. Safari extensions are supported by the individual developers, so after you install one, you need to refer to the documentation for further support.
Installing an Extension
Installing extensions doesn’t require anything more than clicking a link on a website.
1. Choose Safari, Safari Extensions from the menu bar.
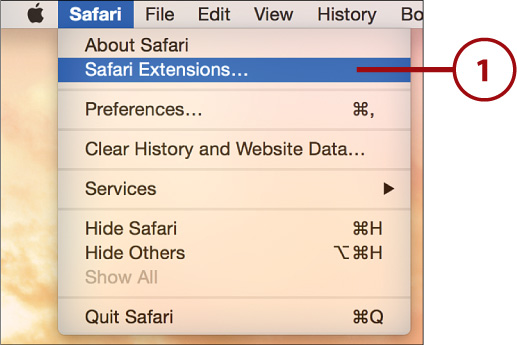
2. An Apple website opens listing all registered extensions.
3. Use the website to browse to an extension you are interested in, and then click the Install Now button beside the extension.
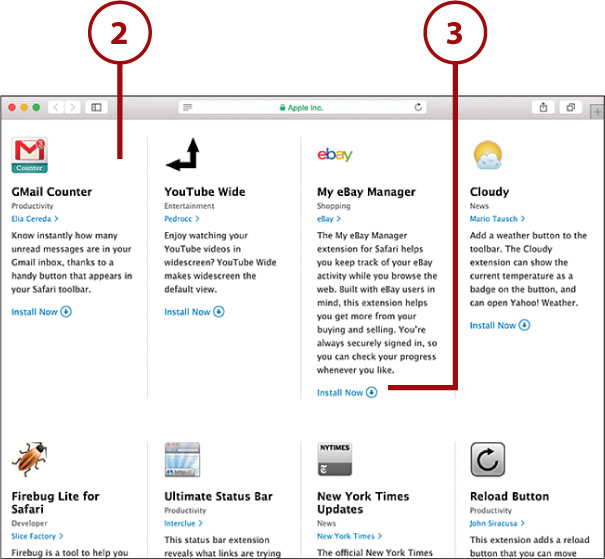
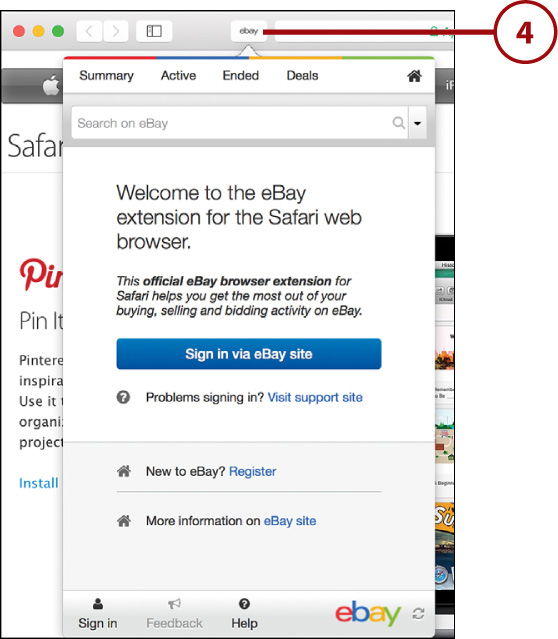
4. After a few seconds, the extension is installed and activated. Depending on how it works, you might see a new button or area added to the Safari toolbar. Follow the developer’s instructions to use the extension.
Managing Extensions
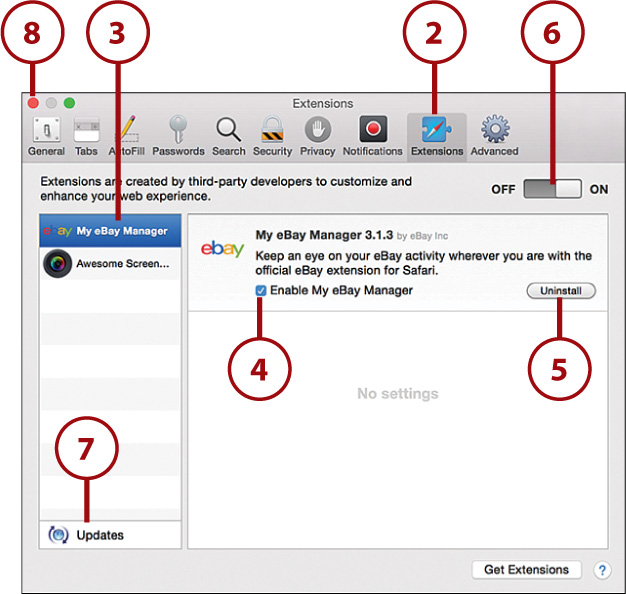
To manage the extensions you’ve installed—including configuring them, if configuration is necessary—use Safari Preferences. Follow these steps to access your extension preferences:
1. Open the Safari Preferences by choosing Safari, Preferences from the menu bar.
2. Click the Extensions button in the top of the Preferences window.
3. Click an individual extension to view its configuration options.
4. Use the Enable checkbox to enable or disable individual extensions.
5. Click Uninstall to remove the extension entirely.
6. Use the On/Off switch to disable all extensions.
7. Click the Updates button to look for and install updates to any installed extensions.
8. Close the Preferences panel when finished.