
6. Sharing Files, Devices, and Services
In this chapter, you learn how to use your Mac to share and access resources over a network, including:
![]() Sharing files and folders using AirDrop and File Sharing
Sharing files and folders using AirDrop and File Sharing
![]() File sharing with Windows computers
File sharing with Windows computers
![]() Setting Share Permissions
Setting Share Permissions
![]() Using the Share menu to quickly share files online
Using the Share menu to quickly share files online
![]() Sharing and accessing network printers
Sharing and accessing network printers
![]() Sharing your screen and viewing remote systems
Sharing your screen and viewing remote systems
![]() Turning your Mac into an Internet Access Point
Turning your Mac into an Internet Access Point
Your Mac is a self-contained workstation that packs all the power you need into a highly integrated package—and one that is fully capable of integrating with new or existing networks. Yosemite can share and access a variety of resources with other computers on your network. Files and folders can be shared with other Macs and Windows PCs; printers can be shared with other Macs; even your screen can be made available to other computers on your network.
To make the most use of the information in this chapter, the assumption is that you’ve already established a network connection and have connected any printers or scanners to either your Mac or another Yosemite-based Macintosh on your network. You might want to refer to Chapter 3, “Connecting Your Mac to a Network,” and Chapter 12, “Using Yosemite with Your iDevices,” for more details on networking and peripherals, respectively.
File Sharing on Your Mac
The most common network activity (beyond email and web surfing) is file sharing. Your Mac comes ready to share files using several popular protocols—AFP (Apple Filing Protocol) and SMB (Simple Message Block) are the most popular. AFP, as the name suggests, is a Mac-to-Mac file sharing protocol, but with Yosemite, Apple has switched to SMB as the preferred protocol. SMB has traditionally been used primarily in Windows environments and offers significant performance improvements over AFP.
In addition to the protocols for sharing files, you also have different methods for how you share them. Traditional file sharing requires that you turn on file sharing, choose what you want to share, tell another person how to connect, and so on. With Yosemite, your Mac includes a zero-configuration version of file sharing called AirDrop. AirDrop enables you to wirelessly share files with other users who are in your vicinity—with no setup required!
Authenticate to Make Changes!
Many of the settings in this chapter require you to authenticate with Yosemite before the settings can be made. If you find yourself in a situation where a setting is grayed out, click the padlock icon in the lower-left corner of the window to authenticate and make the necessary change.
Using AirDrop to Wirelessly Share Files and Folders
AirDrop is a fast and easy file-sharing system that enables you to send files to another Macintosh without any setup—no usernames, no passwords, nothing except a Wi-Fi adapter that is turned on! Unlike traditional file sharing, AirDrop’s simplicity does present a few challenges that might make it less than ideal for your particular file-sharing situation. Specifically, AirDrop requires the following:
• All computers sharing files must be using the Lion (or later) operating system.
• All systems must have recent wireless-AC or N Wi-Fi hardware—2011 or later Macs will work fine.
• Your computer will not be able to browse the contents of other systems, only send files.
Configuring AirDrop
Before you get started using AirDrop, you might want to make a few changes to help restrict or open access to the service. To modify who can see you (and whom you can see!), complete the following:
1. Open a new Finder window and make sure the Favorites sidebar section is expanded.
2. Click the AirDrop icon.
3. Click the Allow Others to Find Me option to choose whether you are visible to everyone, just people in your contacts, or no one.
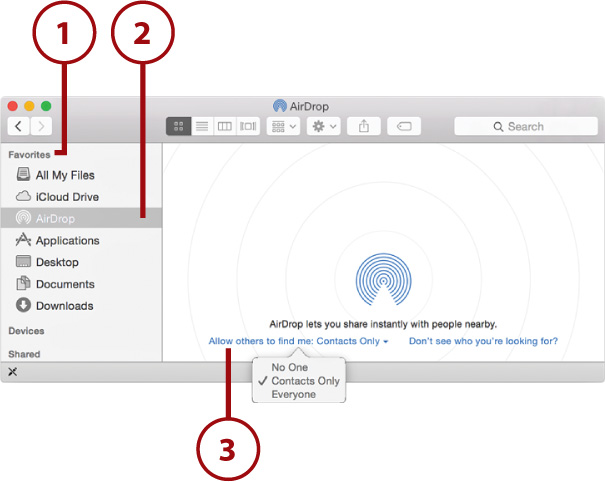
4. Click the Don’t See Who You’re Looking For? link to enable support for some older Macs.

5. After making your changes, you should see other AirDrop clients begin to appear in the AirDrop window.

Sending Files with AirDrop
To use AirDrop, be sure that your Wi-Fi adapter is turned on (see Chapter 3 for details), identify the files that you want to share with another person, and then follow these steps:
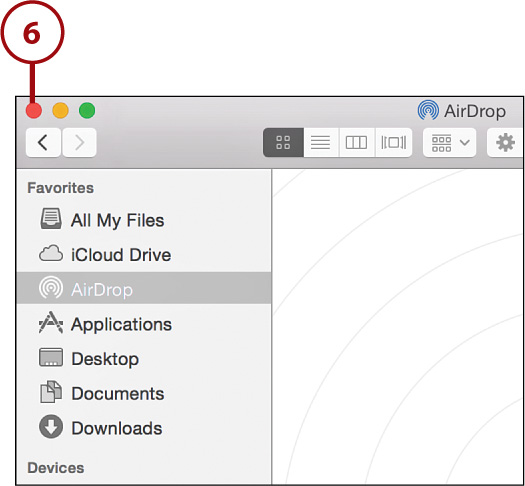
1. Open a new Finder window and make sure the Favorites sidebar section is expanded.
2. Click the AirDrop icon to browse for other OS X computers.
3. Other computers are shown using the owner’s avatar picture (set in Address Book) as their icon.
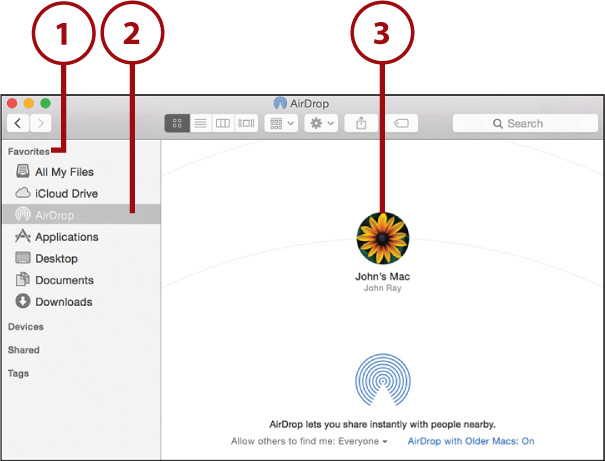
4. Drag the files you want to transfer to the icon of another computer.

5. You will see “Waiting” shown below the remote computer’s icon while the receiving user confirms the transfer.
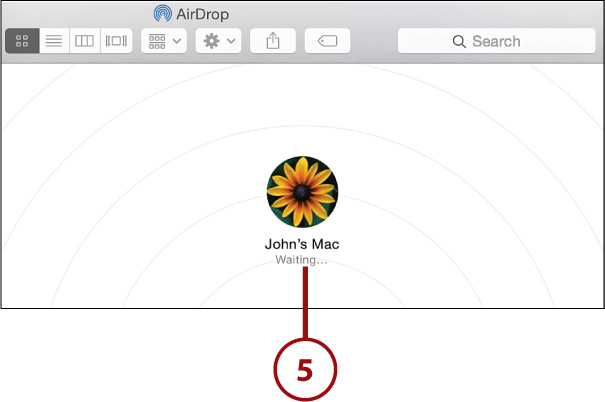
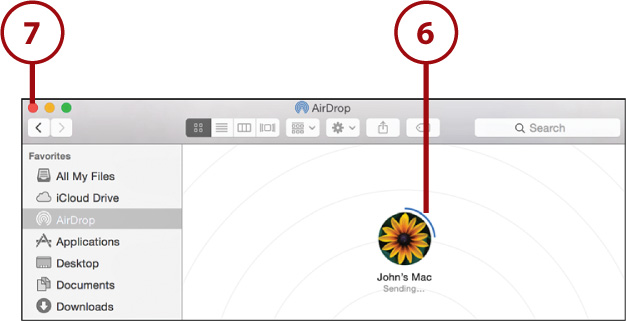
6. The files are copied to the remote system. A blue circle around the receiving computer indicates progress.
7. Close the AirDrop window to stop being visible on the network. After you’ve closed the AirDrop window, you can go your merry way. You don’t need to disconnect or change your network settings. You’re done!
Receiving Files with AirDrop
Receiving files with AirDrop is even easier than sending them. When a nearby Yosemite user wants to send files to your Mac, follow these steps:
1. Open a new Finder window and make sure the Favorites sidebar section is expanded.
2. Click the AirDrop icon to become visible to other AirDrop users.
3. When prompted to receive files, click Save or Save and Open to accept the transfer, or Decline to cancel.

4. The files are transferred to your Downloads folder.
5. Click the X on the downloading file or folder to cancel the download.

6. Close the AirDrop window to stop being visible on the network. That’s it! Your AirDrop session is automatically ended when the window closes.
No AirDrop? Your Mac Might Be Too Old.
AirDrop uses peer-to-peer ad hoc wireless networking, which is only supported in recent Macs (2011 and later). Although this may seem limiting, this hardware is what makes it possible to communicate with zero configuration and without using a common Wi-Fi access point.
Using the Share Menu to Send via AirDrop
The Share menu is a relatively new user interface (UI) element and feature in OS X. It enables applications to share files and folders from almost anywhere—even file open and save dialog boxes, as you’ll see here.
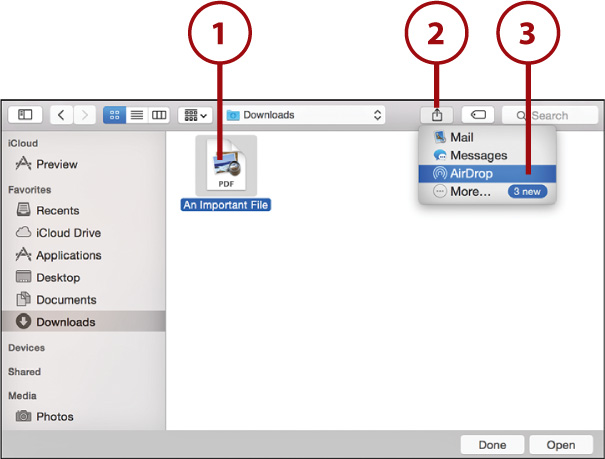
1. Select a file (or open a file) within an application.
2. Look for the Share icon. Click it to show the Share menu.
3. Select AirDrop from the list of sharing options.
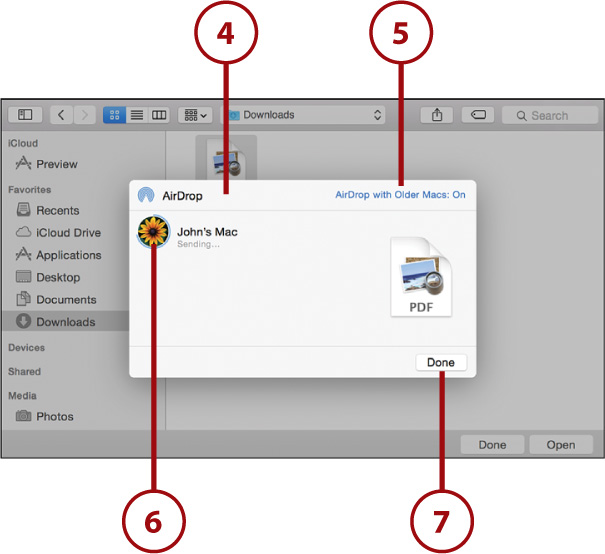
4. A new window appears listing all nearby users with AirDrop open in the Finder.
5. Enable support for older Macs, if necessary.
6. Click the person or machine you want to send the file to.
7. The copy begins as soon as the recipient accepts the transfer. Click Done to exit and the copy will continue in the background.
Beyond the ’Drop
The Share menu is much more powerful than just sharing via AirDrop. We look at a few other sharing scenarios that use this feature later in this chapter.
Configuring Traditional File and Folder Sharing
When AirDrop won’t do (you need to browse another computer’s files or share with Windows/older Macs), you need to turn to the traditional file sharing features built into OS X. Yosemite provides consolidated controls for sharing files, regardless of what type of computer you want to share them with. You set up file sharing by first enabling sharing for your Mac and then choosing the protocols available for accessing the files. Finally, you decide which folders should be shared and who should see them.
Enabling File Sharing
Before your Mac can make any files or folders available over a network, you must enable File Sharing.
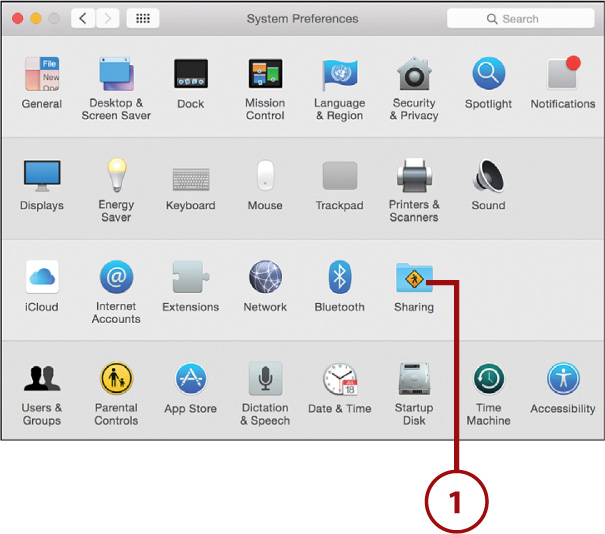
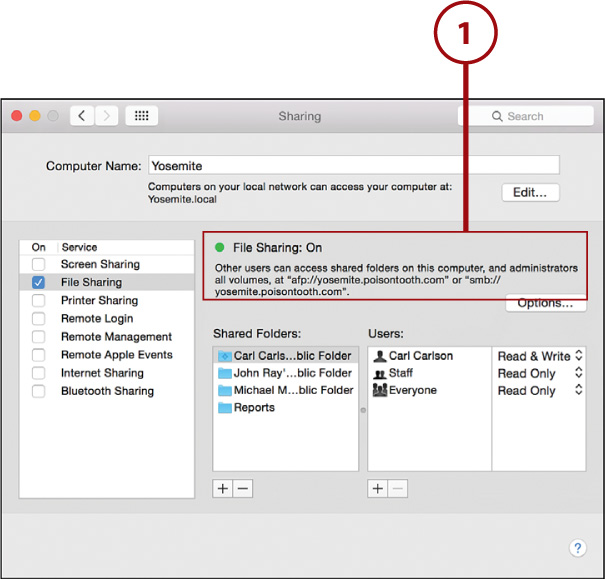
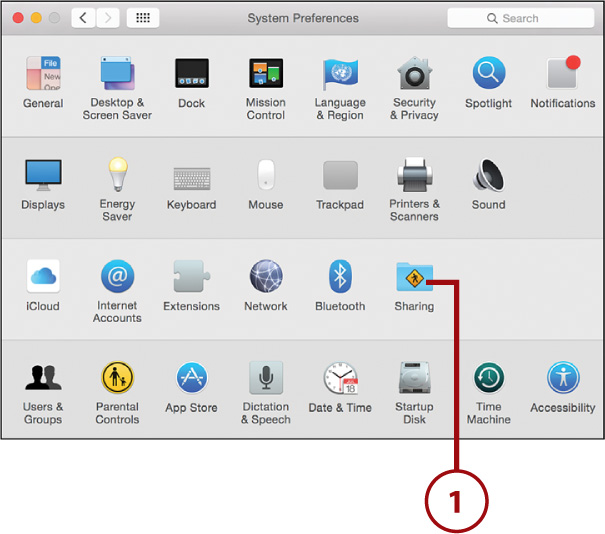
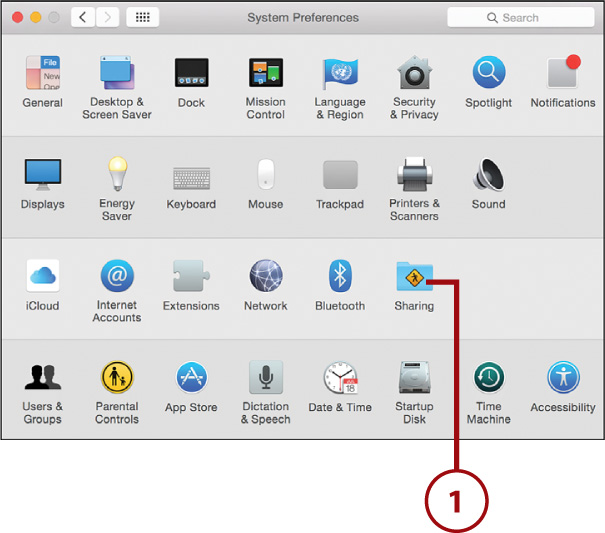
1. In the System Preferences, click the Sharing icon.
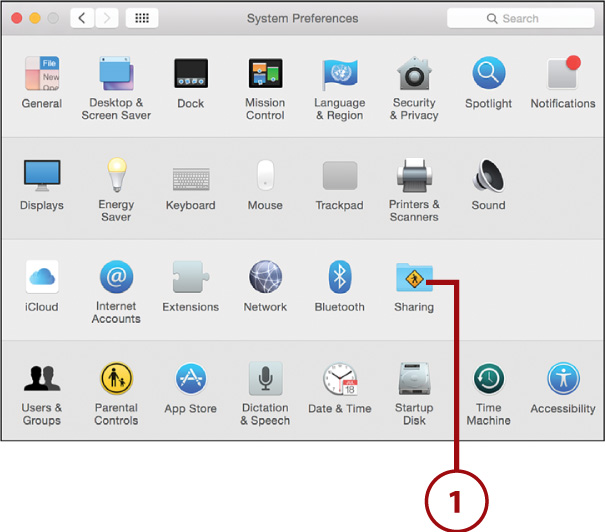
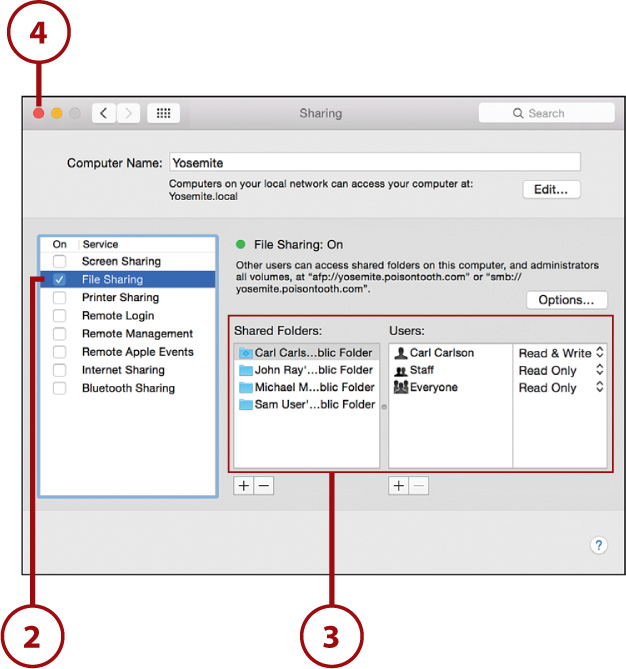
2. Click the checkbox in front of the service labeled File Sharing.
3. The details about your sharing configuration are displayed on the right side of the sharing window.
4. Close the Sharing Preferences panel, or continue configuring other sharing options.
Choosing File Sharing Protocols
Files can be shared over AFP (Legacy OS X) or SMB (Yosemite and Windows). If possible, stick to SMB for the best speeds.
To choose which protocols can be used to access the files on your Mac, follow these steps:
1. In System Preferences, click the Sharing icon.

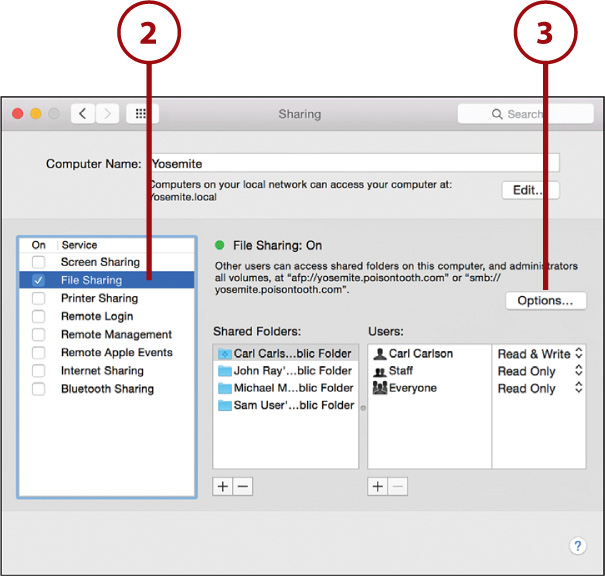
2. Click the File Sharing service label.
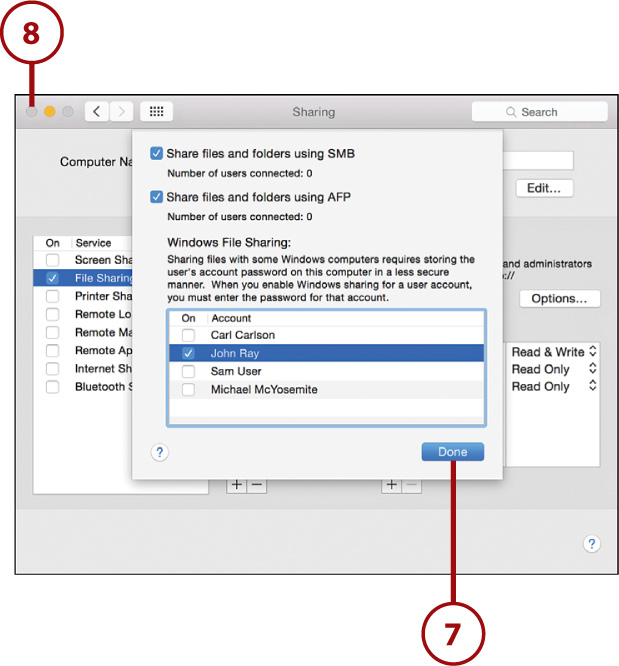
3. Click the Options button to display the available sharing protocols.
4. Check or uncheck the protocols that you want to use. If you are only sharing between Yosemite machines, all you need is SMB.
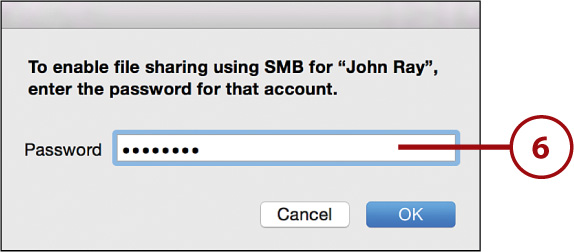
5. If you want to use SMB to share specifically with Windows systems, you must enable each account for access. Within the Windows File Sharing section, check the box in front of each user that should be allowed to connect.
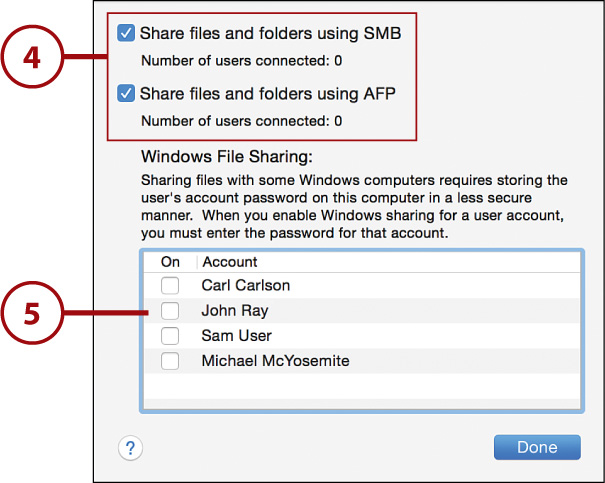
6. Enter the password for each account.
7. Click Done.
8. Close the Sharing Preferences, or continue configuring sharing options.
Selecting Folders and Permissions
After enabling file sharing and choosing the protocols that are used, your next step is to pick the folders that can be shared. By default, each user’s Public folder is shared and accessible by anyone with an account on your computer. (See Chapter 14, “Securing and Protecting Your Mac,” for configuring user accounts.)
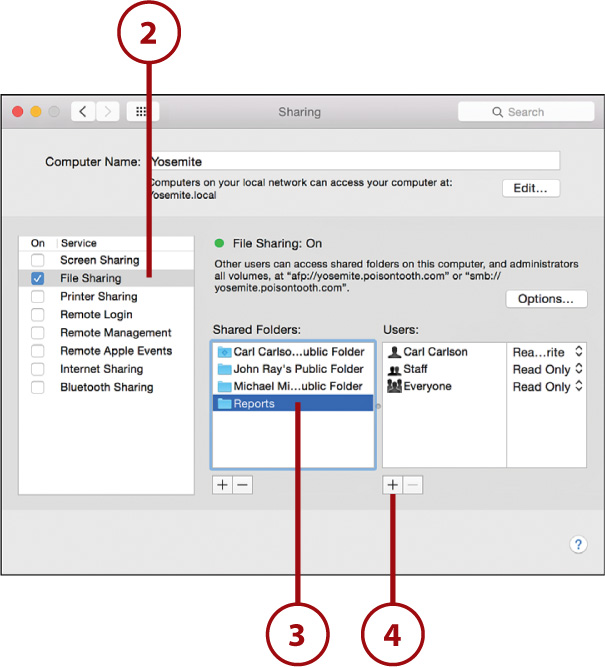
1. In the System Preferences, click the Sharing icon.
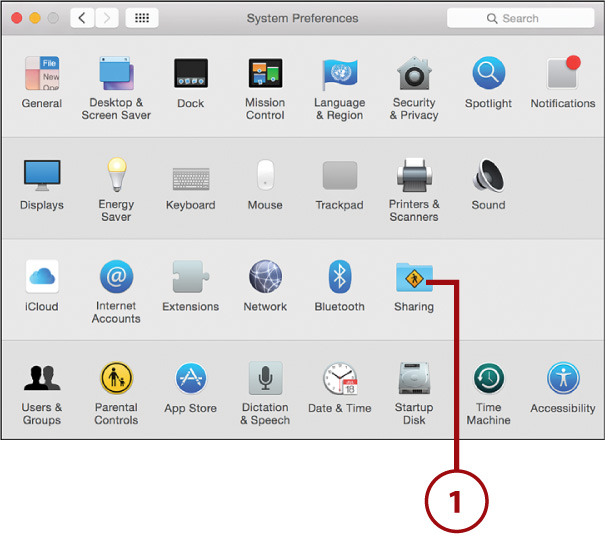
2. Click the File Sharing service label.
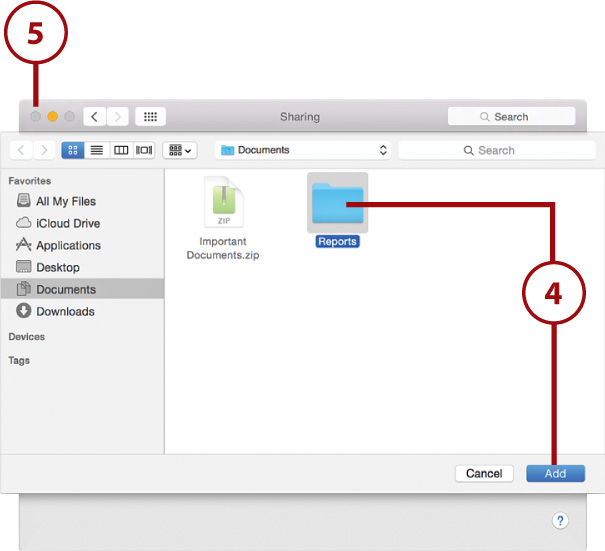
3. Click the + button under Shared Folders to share a new folder.

4. Find the folder you want to make available and then click the Add button.
5. Close the System Preferences, or continue configuring sharing options.
Setting Folder Access Permissions
By default, your user account has full access to anything that you share. The default user group named Staff, and everyone with an account on the computer, has read-only access.
To change who can access a file share, complete the following steps:
1. In the System Preferences window, click the Sharing icon.
2. Click the File Sharing service label.
3. Click the Shared Folder name that you want to modify.
4. Click the + button under the Users list to add a new user (or – to remove access for a selected user).
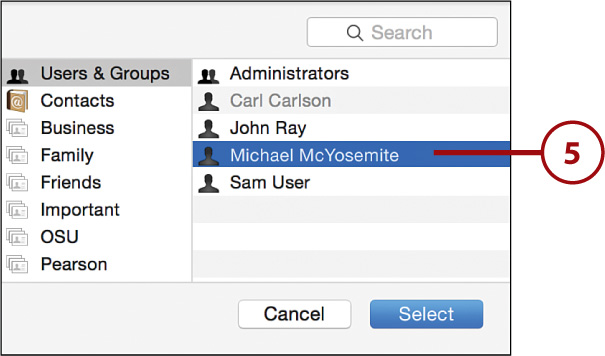
5. A window for selecting a user displays. Within the Users & Groups category, pick the user or group and click Select.
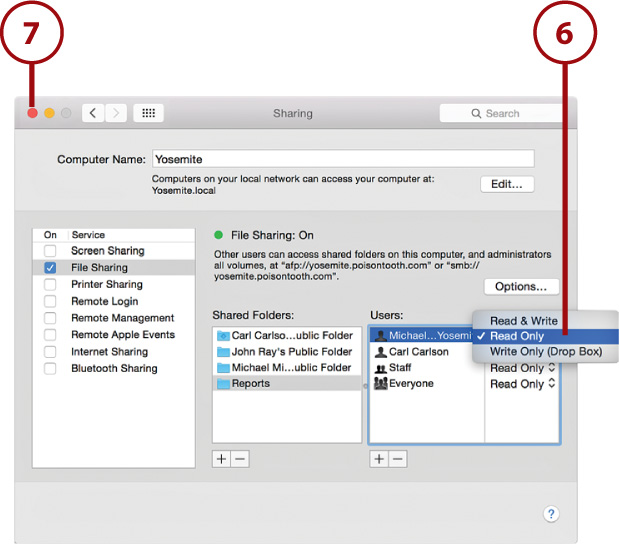
6. Use the pop-up menu to the right of each user in the Users list to choose what the user can do within the shared folder.
7. Close the System Preferences.
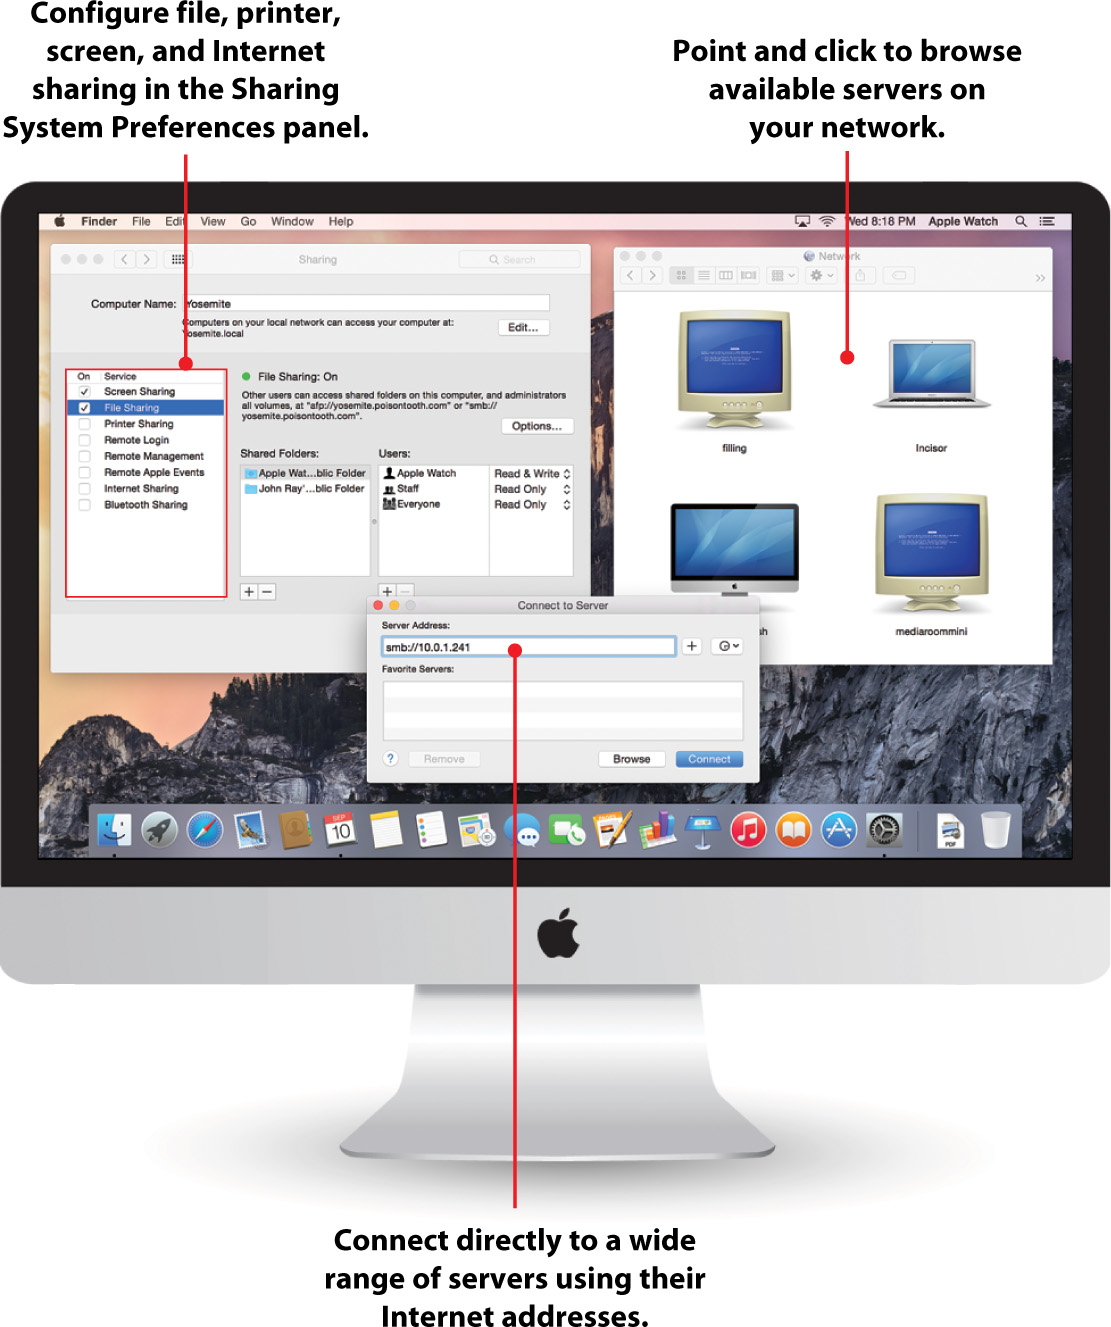
Accessing Shared Files
Shared files are only useful if you can access them! Your Mac provides two methods of connecting to shared folders: by browsing for them on your local network and by entering a URL to connect directly to the shared resource.
Browsing and Connecting to Network Shares
Browsing and connecting to a local network share is similar to browsing through the folders located on your Mac. To browse for available network shares, do the following:
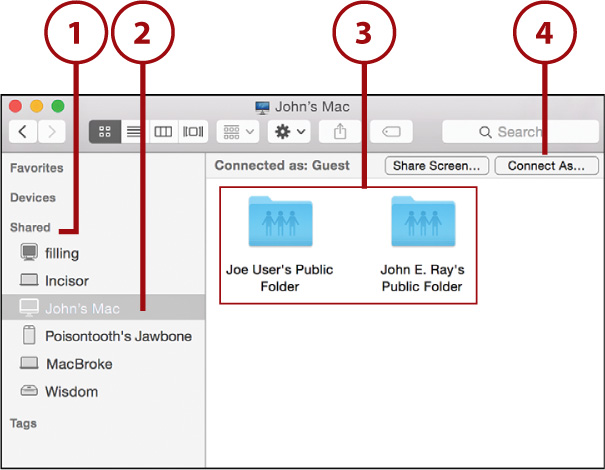
1. Open a new Finder window and make sure the Shared sidebar section is expanded.
2. Click the computer that is sharing the folders and files that you want to access.
3. If you have not logged into the computer before and saved your password, a list of the publicly accessible file shares is displayed in the Finder window.
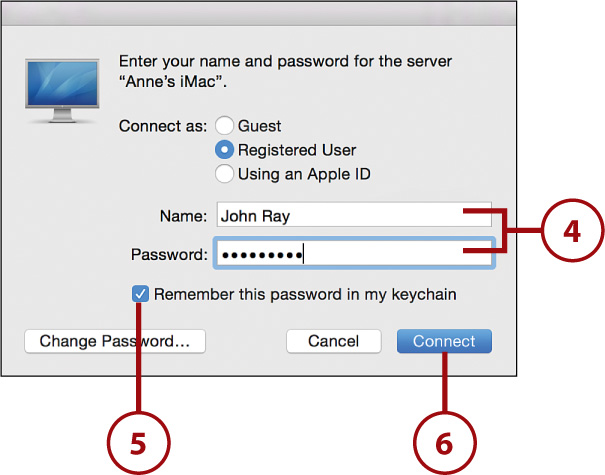
4. Click the Connect As button on the upper right of the Finder window.
5. Enter the username and password that you have established for accessing files on the server.
6. Click Remember This Password in My Keychain to enable browsing directly to the file shares in the future.
7. Click Connect.

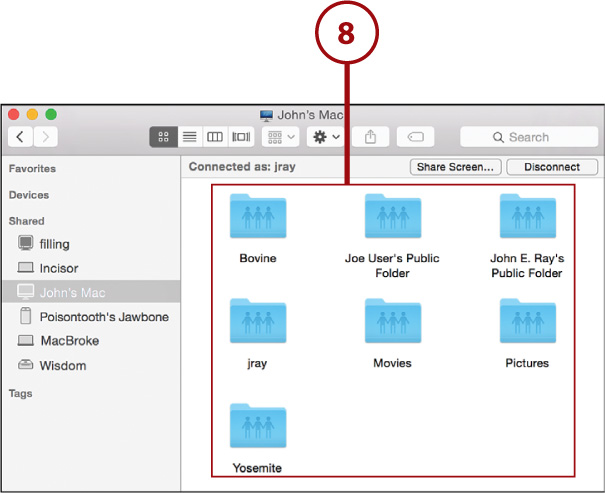
8. The file share list updates to display all the shares that your user account can access. Double-click the share you want to use.
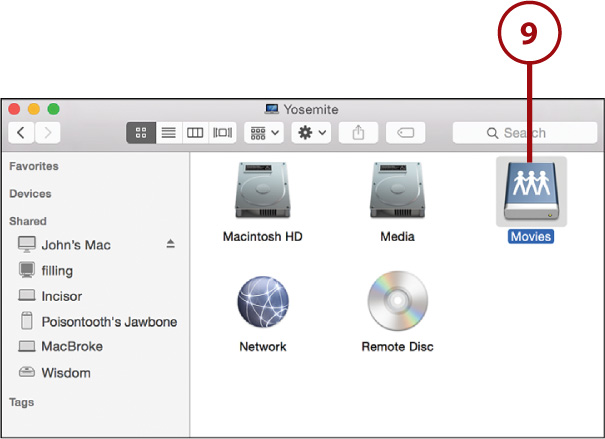
9. The share is mounted as a disk and can be used as if it were local to your Mac.
One Password to Rule Them All
You may notice when connecting to other Yosemite or Mountain Lion servers that you are given the option of connecting with your Apple ID. This will work if your account has had an Apple ID associated with it on the remote server. This association is made by selecting a user within the Users & Groups System Preferences panel and then clicking the Set button that is next to the Apple ID field.
Browsing Large Networks
If there are many different computers sharing files on your network, you can browse them in a Finder window rather than the Finder sidebar. To open a Finder window that browses your network, choose Go, Network from the menu bar, or click the All... icon within the Shared section of the Finder sidebar.
Connecting to Remote Shares
Sometimes file shares aren’t directly browseable because they’re hiding their available shares, or they are located on a different network from your Mac. To access remote shares by URL, follow these steps:
1. When you create a new file share on your Mac, Yosemite provides you with a list of URLs that can be used to access that file share (see step 3 of “Enabling File Sharing”). You can use these URLs to directly access a file share rather than browsing.
2. Choose Go, Connect to Server from the Finder menu.
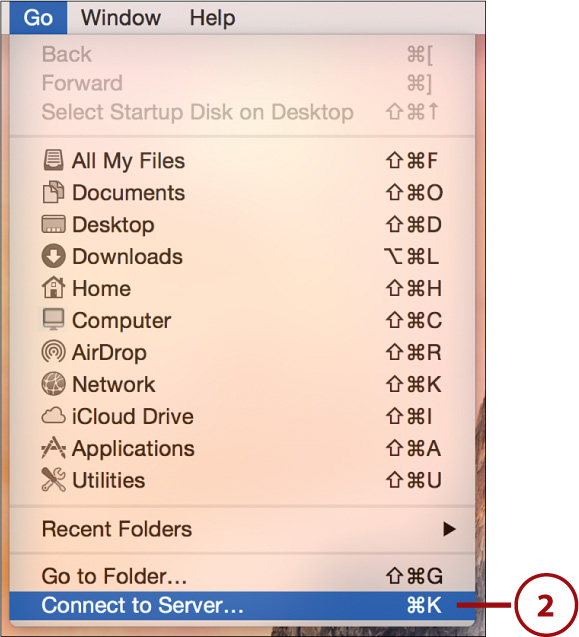
3. Enter the URL for the file share in the Server Address field.
4. Click + if you want to add the server to the list of favorite servers.
5. Click Connect to connect to the server and view the available shares.
Talking the (Windows) Talk
Your Windows friends might give you network shares to connect to in the format \servernamesharename. You can translate this into a “Mac-friendly” URL by adding the prefix smb: and reversing the direction of the slashes—that is, smb://servername/sharename.
Sharing Files via the Share Menu
Yosemite includes a way of sharing files from almost anywhere via Share menu. You can use a Share menu (indicated by an icon of an arrow pointing out of a rectangle) to quickly send a file through a variety of different means, including AirDrop (discussed earlier in this chapter), Messages, and other online services.
Sharing Files via Messages
A simple example of the Share menu is using it to share a file via Messages. To do this, either open the file or select it in the Finder, and then follow these instructions:
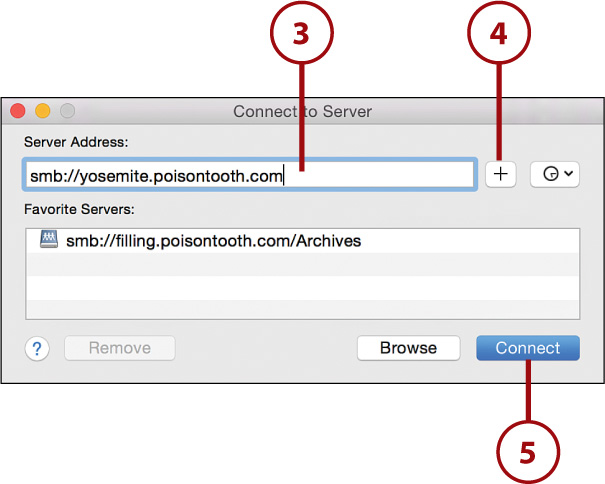
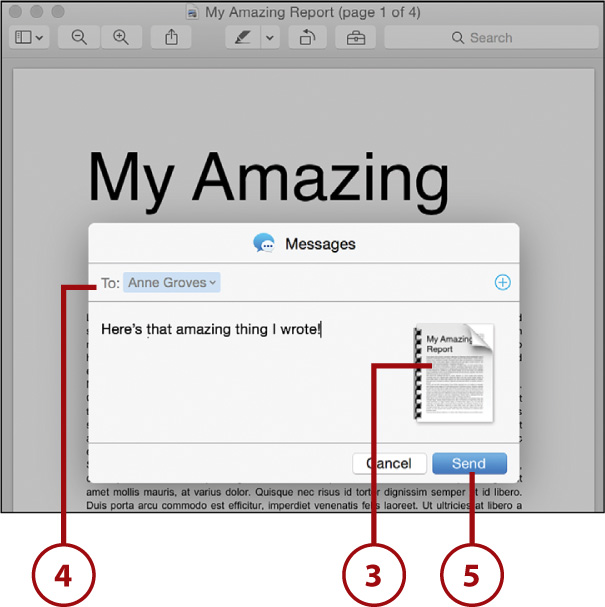
1. Click the Share icon.
2. Choose Messages from the drop-down menu.
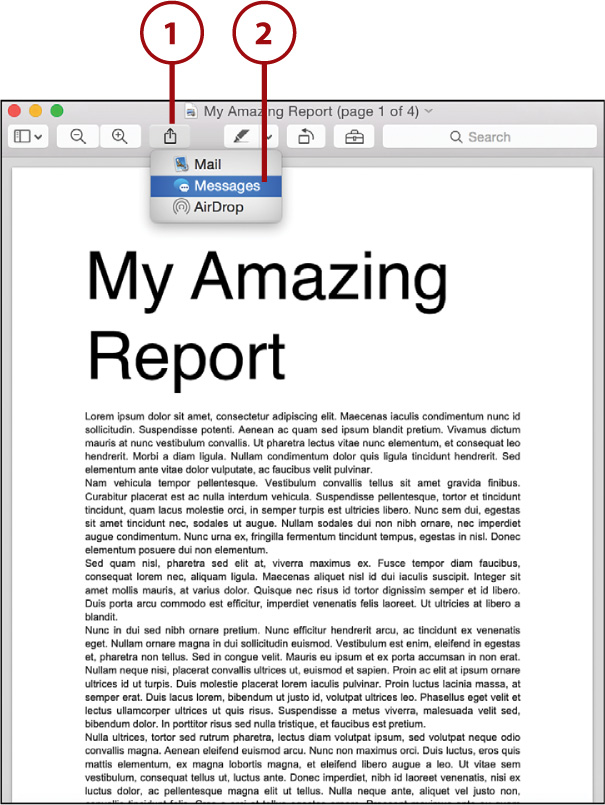
3. A panel appears with the file added as an attachment.
4. Add the user that you want to send the file to.
5. Click Send to send the file and get back to work!
Uploading Files to an Online Service
Using Yosemite, you can now share your files with the world via a number of online services—such as Facebook, Vimeo, and Flickr—without even needing to touch a web browser. Vimeo is a great popular destination for videos on the Internet, so we’ll use that as our example. To upload a video to the online service of your choice, first make sure you’ve added an account for the service as described in Chapter 4, “Setting Up iCloud and Internet Accounts,” and then follow these steps:
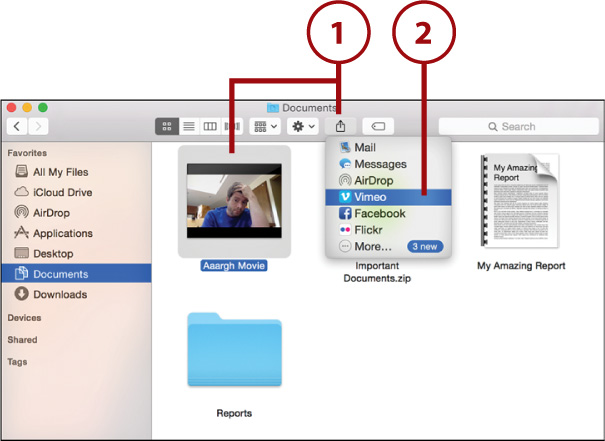
1. Locate the movie file you want to upload, and click the Share icon.
2. Choose the online destination (in this case, Vimeo) from the pop-up menu.
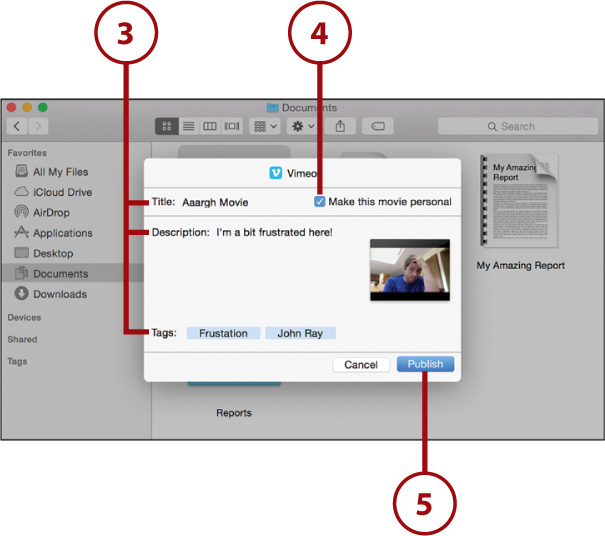
3. Enter a title, description, and a set of keywords (called Tags) to describe the video.
4. Set the video as Personal, if desired. This limits viewing of the video to individuals who you share it with via the Vimeo website. Please note that these settings may vary between the various online services supported in Yosemite.
5. Click Publish.
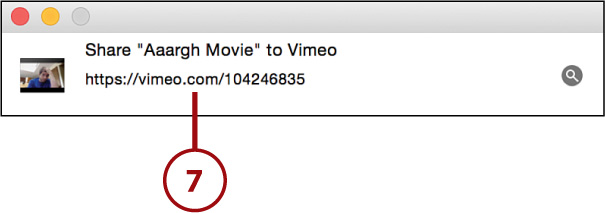
6. The Movie Export window appears and displays the status of the encoding process.

7. When finished, a link to the video is displayed. Your movie is available online.
To trim a video before sharing it, click the Share icon and choose Edit, Trim from the menu bar. You can move the start and end points of your video clip to wherever you’d like and then trim off the extra.
Sharing Printers
Sharing a printer is a convenient way to provide printing services to your Mac without having to connect any physical wires. With Yosemite, printer sharing just takes a few clicks and then your system acts as if it has a physical printer attached.
Enabling Network Printer Sharing
To share a printer, you must first have the printer connected and configured on another Macintosh (see Chapter 12 for details). After the printer is set up and working, follow these steps to make it available over a local network:
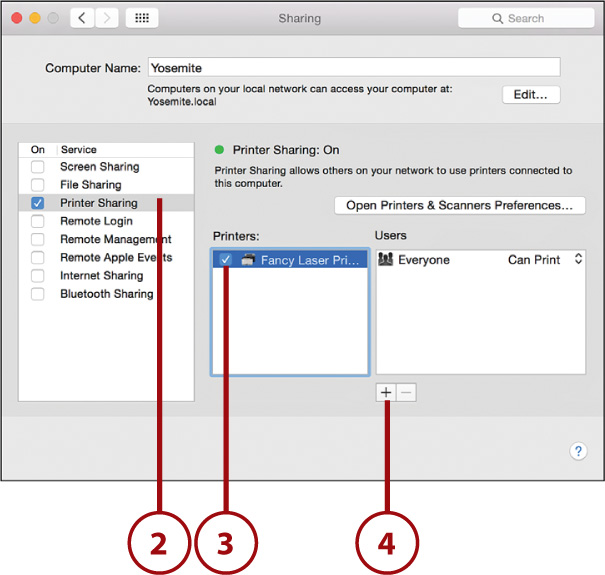
1. In the System Preferences window, click the Sharing icon.

2. Click the checkbox in front of the Printer Sharing service.
3. Within the Printers list, click the checkboxes in front of each printer you want to share. The printers are immediately made available to everyone on your network.
4. Close the System Preferences, or continue setting sharing preferences.

Setting Printer Sharing Permissions
Any shared printer is initially available to anyone with a computer connected to your network. To restrict access to specific user accounts on your computer, do the following:
1. In the System Preferences window, click the Sharing icon.
2. Click the label for the Printer Sharing service.
3. Highlight the name of the shared printer that you want to configure.
4. Click the + button to select a user that can print to your printer. (Use – to remove access for a user you added previously.)
5. A window is displayed to select a user. Choose the user or group and click Select.

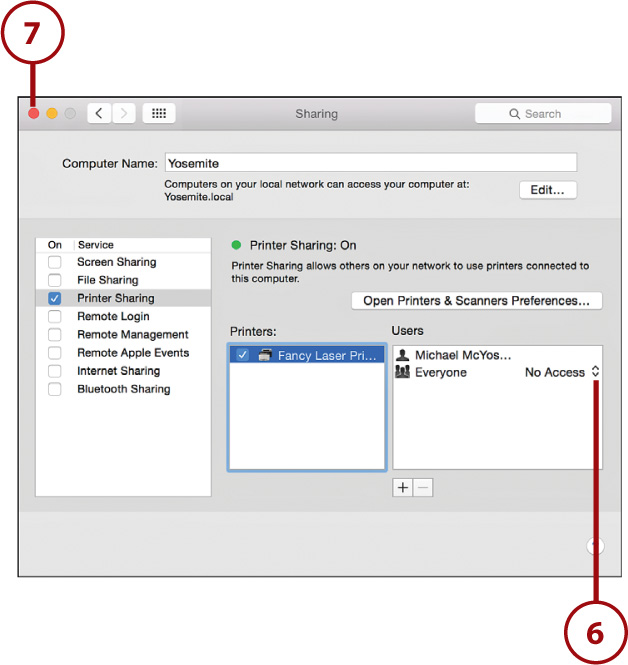
The Everyone group can’t be removed from the Users list. To remove access for Everyone, the group must be toggled to No Access.
6. Toggle the pop-up menu beside the Everyone group to No Access to keep everyone except the listed individuals from being able to access the printer.
7. Close the System Preferences.
Accessing a Network Printer
To access a printer that is being shared by another Mac, first make sure that both computers are on and connected to the same network and then follow these steps:
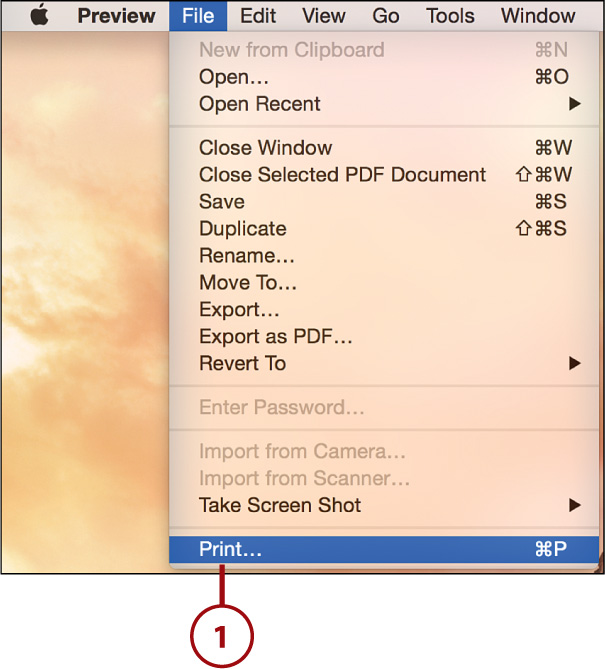
1. Choose File, Print from the menu bar within an application of your choice.
2. The Printer dialog box appears. Click the Printer drop-down menu to see the options.
3. If you haven’t used the shared printer before, select the printer from the Nearby Printers section of the drop-down menu.
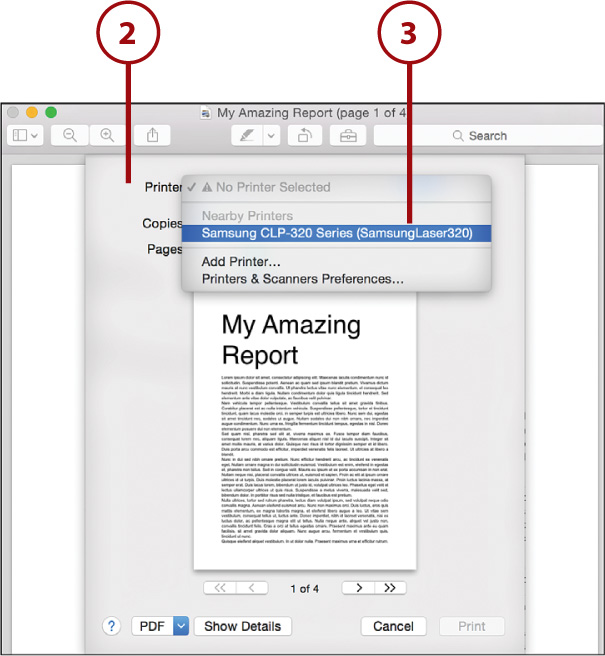
4. Yosemite automatically connects your Mac to the printer and configures it.
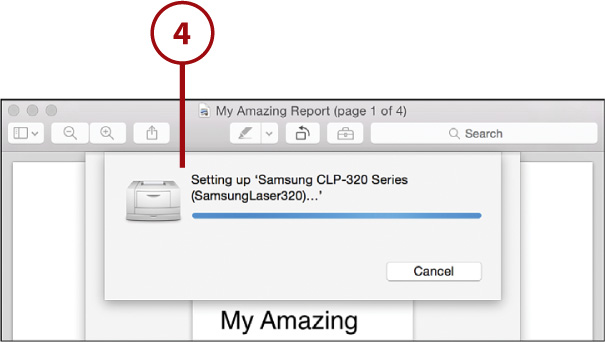
5. Choose the options for the document you are printing and then click Print. The printer behaves exactly as if it is connected directly to your computer. The next time you print, the printer will be available directly in your main printer list.

Printing to Protected Printers
If you set up specific user accounts that can access the printer, you are prompted for a username and password the first time you print. You can, at that time, choose to save the printer connection information to your keychain, which eliminates the need to authenticate for subsequent use.
Sharing an Optical Drive
If you’re using a DVD-less Mac (which is most of them!) you can use another Macintosh on your network to share a CD or DVD inserted into its drive. This gives you the ability to install software and access files even if you don’t have a physical drive connected.
Enabling DVD Sharing
From a Macintosh with a DVD drive available, follow these steps to turn on optical drive sharing:
1. In the System Preferences window, click the Sharing icon.
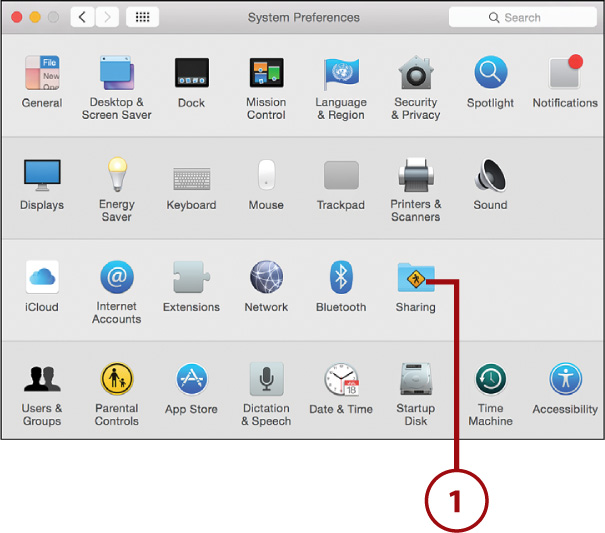
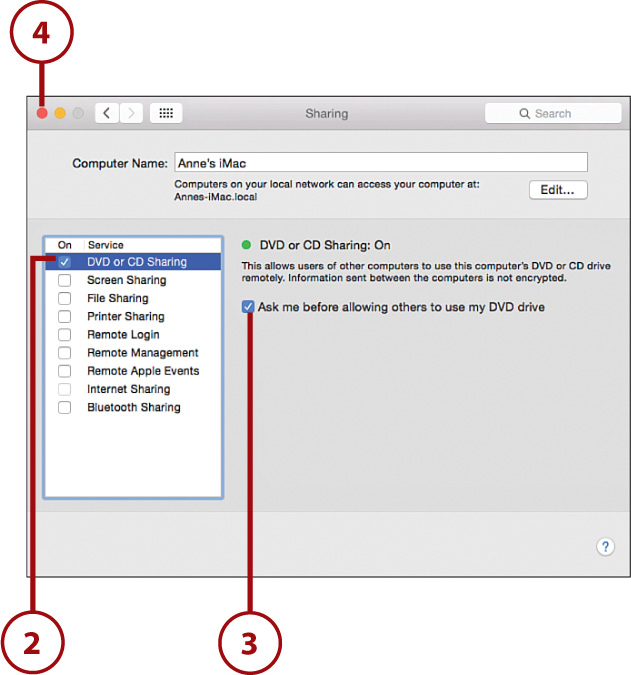
2. Click the checkbox in front of the DVD or CD Sharing service.
3. Click the Ask Me Before Allowing Others to Use My DVD Drive checkbox to prompt you when other people attempt to access your optical drive.
4. Close the System Preferences.
Accessing a Shared Optical Drive
To access a shared optical drive from your DVD-free Mac, do the following:
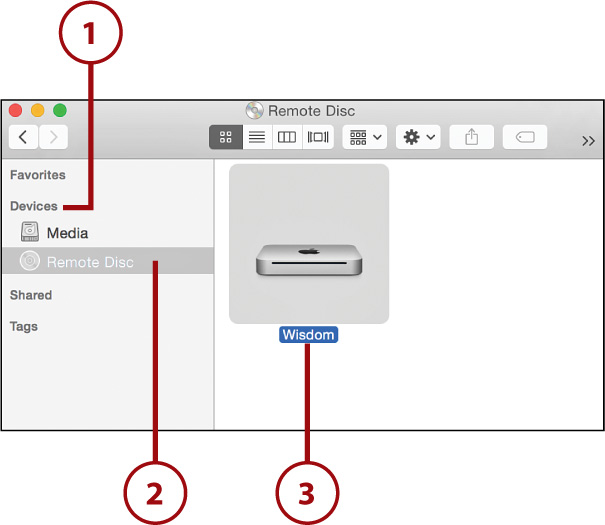
1. Open a new Finder window and make sure the Devices section in the Finder sidebar is expanded.
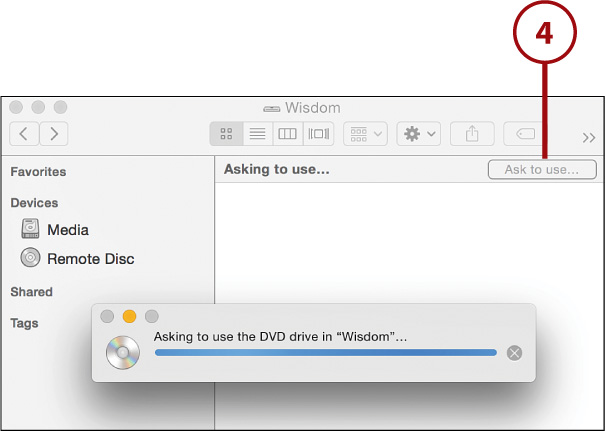
2. Click the Remote Disc item in the Devices sidebar area.
3. Double-click the computer that is sharing the DVD you want to use.
4. If the DVD is not immediately visible, click Ask to Use to prompt the host computer that you’d like to use its drive.
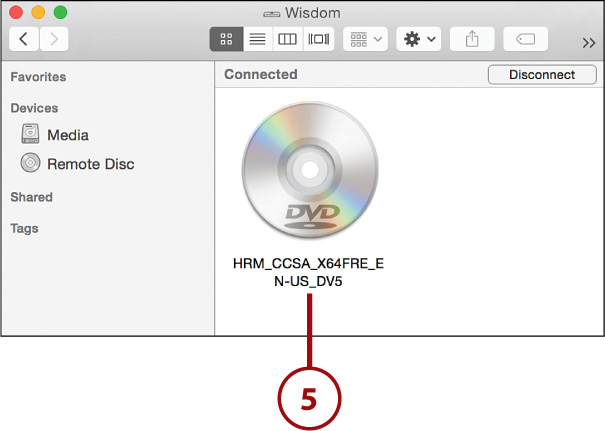
5. After access has been granted, the available DVD or CD is listed. Double-click the DVD or CD to begin using it.
Can I Access a Shared Optical Drive Even if My Mac Has a DVD Drive?
Yes, but not without a few changes. You need to open the Terminal application (found in the Utilities folder in the Applications folder) and then type in the following two lines to enable optical drive sharing:
defaults write com.apple.NetworkBrowser EnableODiskBrowsing -bool true
defaults write com.apple.NetworkBrowser ODSSupported -bool true
Reboot your computer after entering these commands.
Sharing Your Mac Screen
Chapter 8, “Managing Who, Where, When, and What,” includes instructions on how to share your Macintosh’s screen using Messages, but there are many instances where you might want to access another Mac’s display without having to start a chat.
Built into Yosemite is a standards-based screen-sharing system. Using screen sharing, you can access your Mac’s display from anywhere on your local network or, in some cases, from anywhere in the world. Yosemite even has the ability to share a computer’s “screen” even if someone else is using the computer. The screen sharing software can now automatically create a virtual screen that you can see and use while the person sitting in front of the computer continues to see their own desktop!
Enabling Screen Sharing
To configure another Mac so that you can access its screen from your Mac, you initially need direct access to the computer:
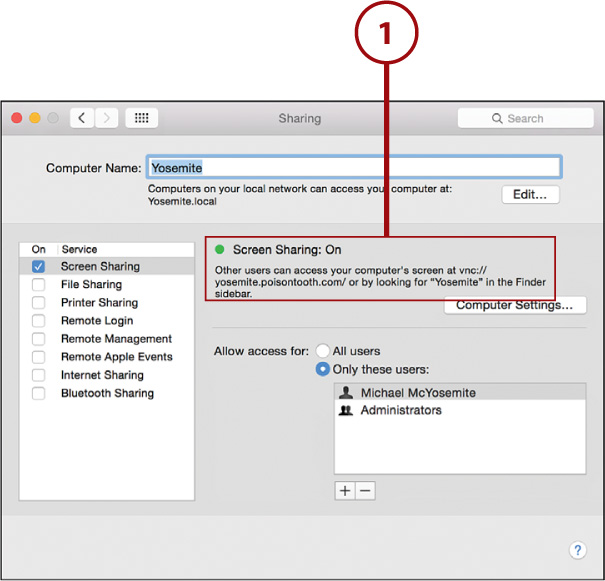
1. In the System Preferences window, click the Sharing icon.
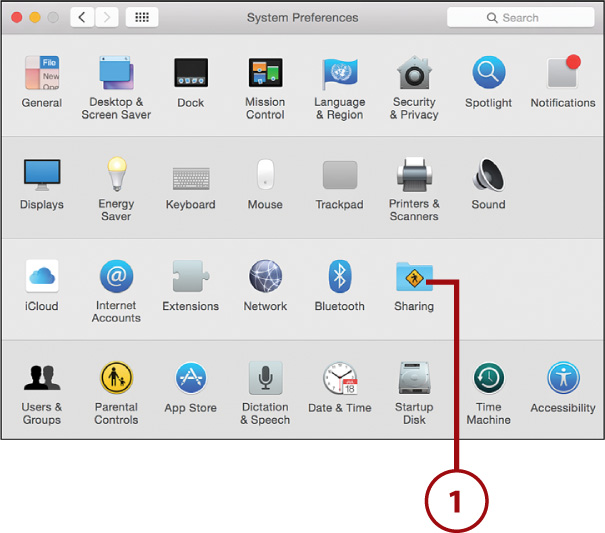
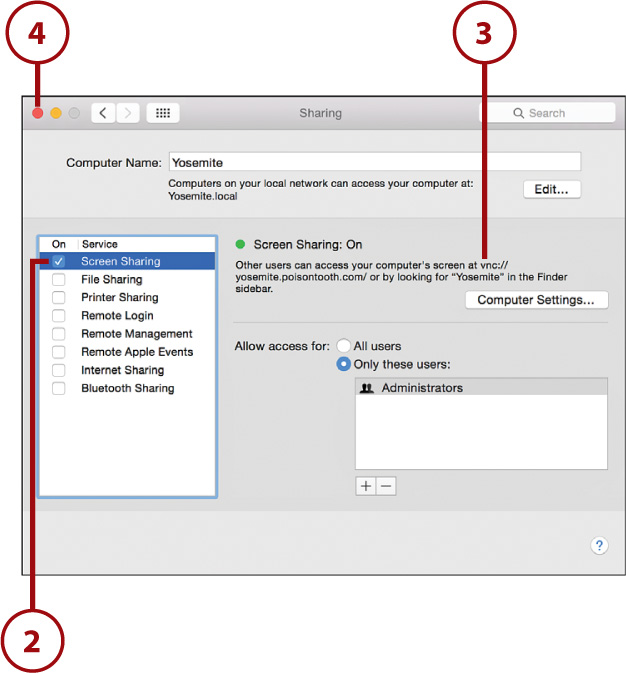
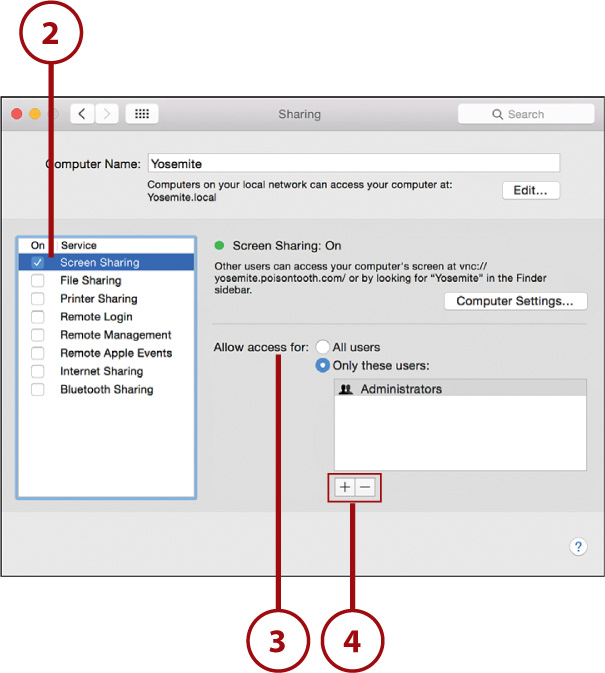
2. Click the checkbox in front of the Screen Sharing service.
3. A URL that you can use to connect to your computer is displayed on the right side of the sharing pane.
4. Close the System Preferences, or continue setting sharing preferences.
Setting Screen Sharing Permissions
After screen sharing is enabled, choose who can access the display. Initially, only administrative users can view your screen.
1. In the System Preferences window, click the Sharing icon.
2. Click the Screen Sharing service label.
3. Choose whether All Users on the computer can access its screen, or click Only These Users to restrict access to specific individuals or groups.
4. Use the + button to choose a user or group that should be granted access, or use – to remove a user or group that you had previously added.
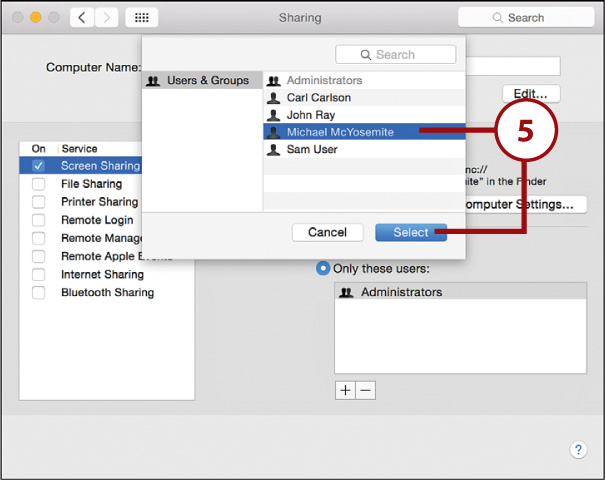
5. A window for selecting a user displays. Choose the user or group and click Select.
6. For additional control, click the Computer Settings button.
7. In the dialog box that appears, click Anyone May Request Permission to Control Screen to allow anyone to access the display if the person sitting in front of the computer grants them access.
8. To provide access to your Mac’s screen using a standard VNC (Virtual Network Computing) client, click the VNC Viewers May Control Screen with Password checkbox and provide a password that grants access to those users.
9. Click OK.
10. Close the System Preferences.

VNC Is Everywhere
There are VNC clients available for Windows, Linux, and even platform-independent Java. If you want to access your Mac’s screen from another operating system, check out TightVNC (www.tightvnc.com).
Accessing the Screen of a Local Mac
To access the shared screen of a Mac on your local network, make sure that your Mac is connected to the network and then follow these steps:
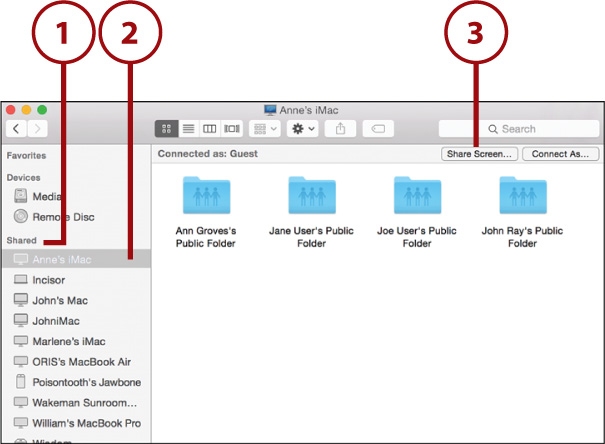
1. Open a new Finder window and make sure the Shared sidebar section heading is expanded.
2. Click the computer whose screen you want to access.
3. Click Share Screen in the upper-right corner of the Finder window.
4. Enter your username and password on the remote system, if prompted.
5. Click Remember This Password in My Keychain to store the password and enable password-less connections in the future.
6. Click Connect to begin using the remote display.
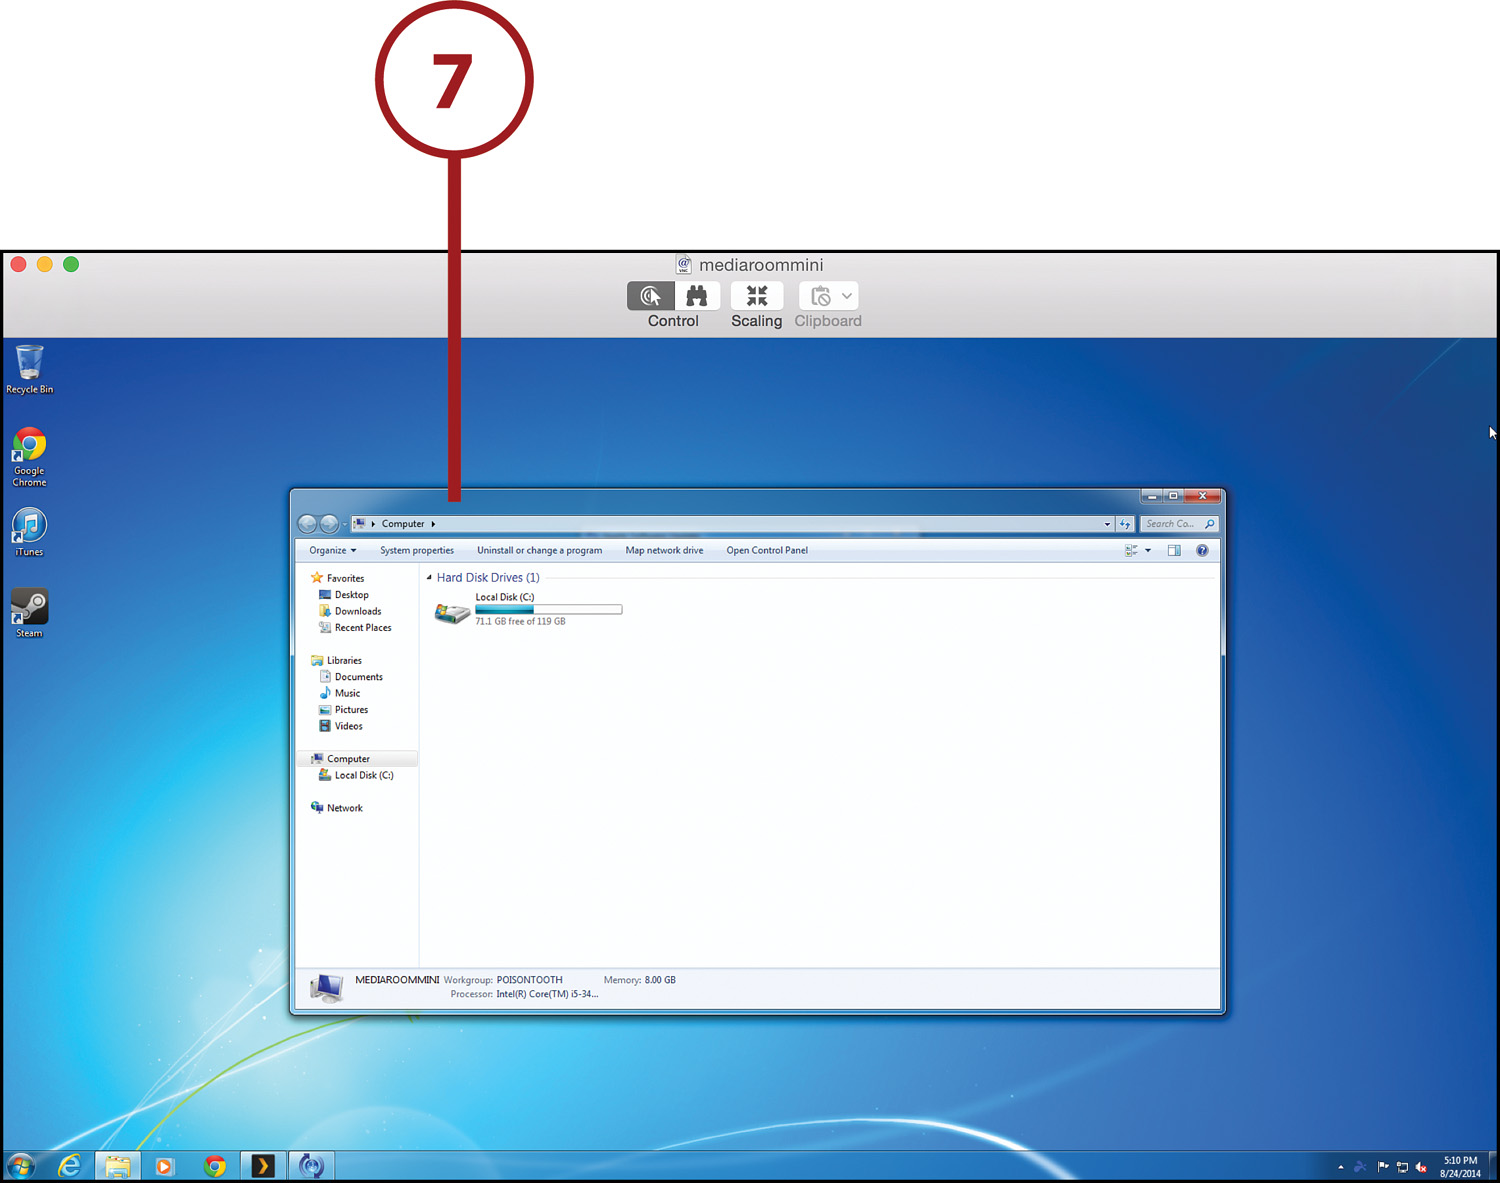
7. If another person is using the computer, you can ask to share the display with them, or connect to a new virtual display. Click whichever approach you prefer and click Share Screen.

8. The remote display is shown in a window on your Mac.

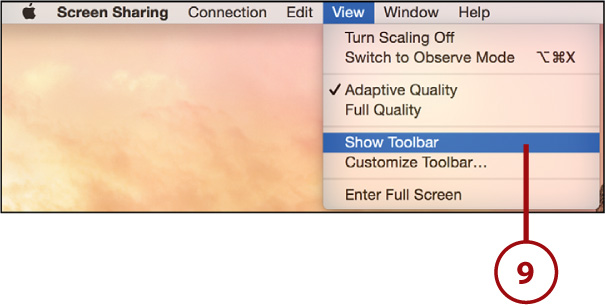
9. Choose View, Show Toolbar to access a few customization options.
10. Toggle between controlling and observing with the Control Mode icons in the toolbar.
11. Use the Scaling Mode icon to view the screen fullsize or shrink it to fit your window.
12. Use the Clipboard icon to choose how to transfer your clipboard to and from the remote system, or simply share the clipboard.
13. Drag files to and from the remote system to transfer them to (and from!) your computer.
14. Close the window when you’re finished using the remote system.


Capture the Moment
If you’d like to take screenshots of the remote system, you can add a screenshot button to the toolbar by choosing View, Customize Toolbar from the menu bar. You can also take a screenshot directly by choosing Connection, Save Screen Capture As.
Accessing Remote Computers and Non-Macs
If you can’t browse to a computer to access its screen, or you need to connect to a non-Macintosh computer, you can do so using almost the same process as you used to connect to a remote file share:
1. When you’re sharing a screen on your Mac, Yosemite provides you with a URL that can be used to access your screen, even if you can’t browse to it on the network.
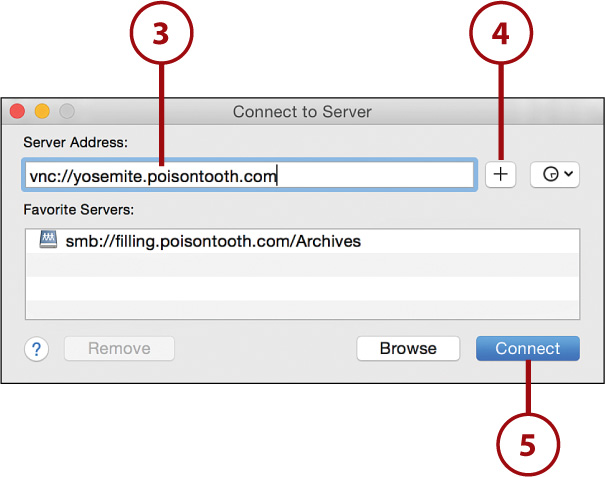
2. Choose Go, Connect to Server from the Finder menu bar.

3. Enter the screen-sharing URL in the Server Address field. Alternatively, if you only have an IP address (such as 192.168.1.100), prefix the IP address with vnc:// to create a properly formed URL (for example, vnc://192.168.1.100).
4. Click + if you want to add the server to the list of favorite servers.
5. Click Connect to connect to the remote server’s screen.
6. Enter a username (and/or password), if prompted, and click Connect.

7. The remote display is shown in a window on your Mac.
VNC for Windows/Linux
To connect to a Windows or Linux computer, you need to first install a VNC server (Virtual Network Computing) on the computer whose display you want to share. TightVNC (www.tightvnc.com) is an entirely free Open Source option that works on both Windows and Linux platforms.
Sharing Your Internet Connection
Your Mac is a perfect Internet-sharing platform because it includes both Ethernet and wireless network connections. You can, in a matter of minutes, create a wireless network using just your computer and a cable or DSL modem.
Sharing Your Connection
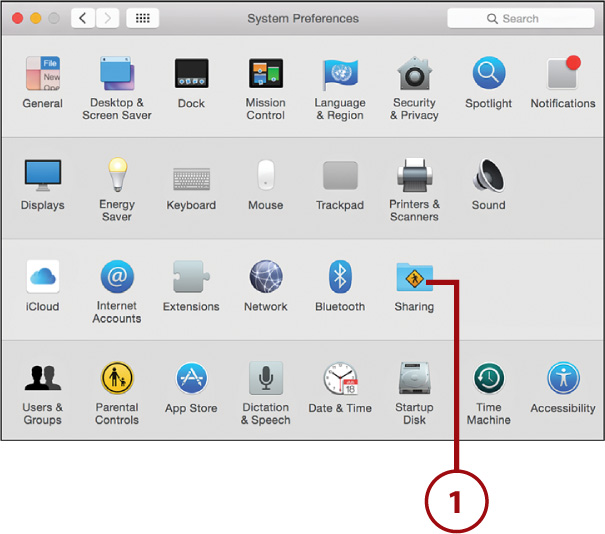
1. In the System Preferences window, click the Sharing icon.
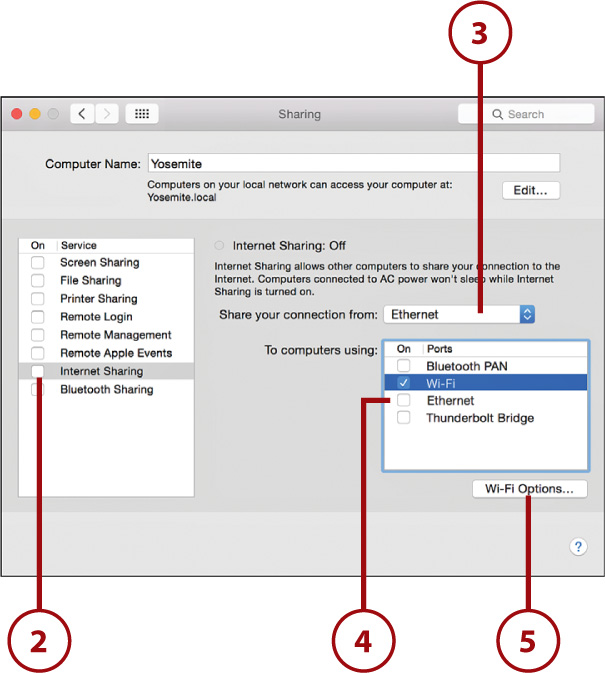
2. Click the Internet Sharing service label. (Note: The checkbox is initially disabled!)
3. Use the Share Your Connection From drop-down menu to choose how you are connected to the Internet (Ethernet, Airport, iPhone, and so on).
4. Within the To Computers Using list, click the checkboxes in front of each of the interfaces where the connection should be shared.
5. If you’re sharing a connection over your Wi-Fi card, a Wi-Fi Options button appears. Click this button to configure how your computer presents itself wirelessly.
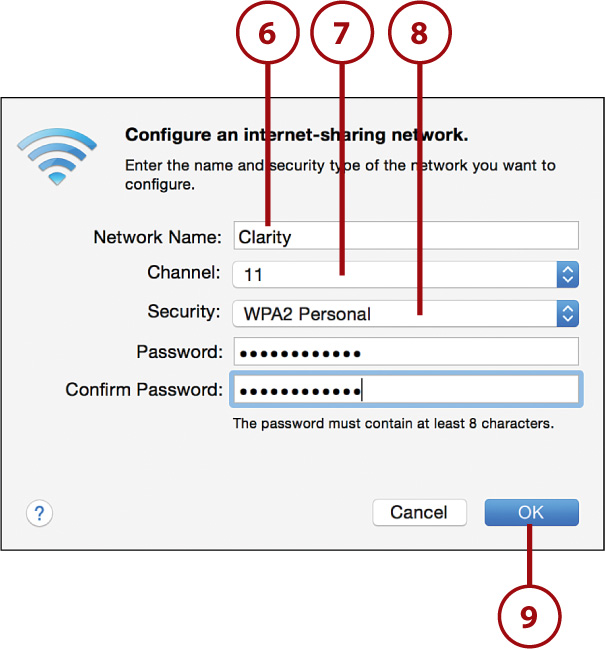
6. Set the name of the wireless network you are creating.
7. Leave the channel set to the default.
8. If you want to enable password protection for the network, choose WPA2 Personal from the Security drop-down, and then provide a password.
9. Click OK to save your settings.
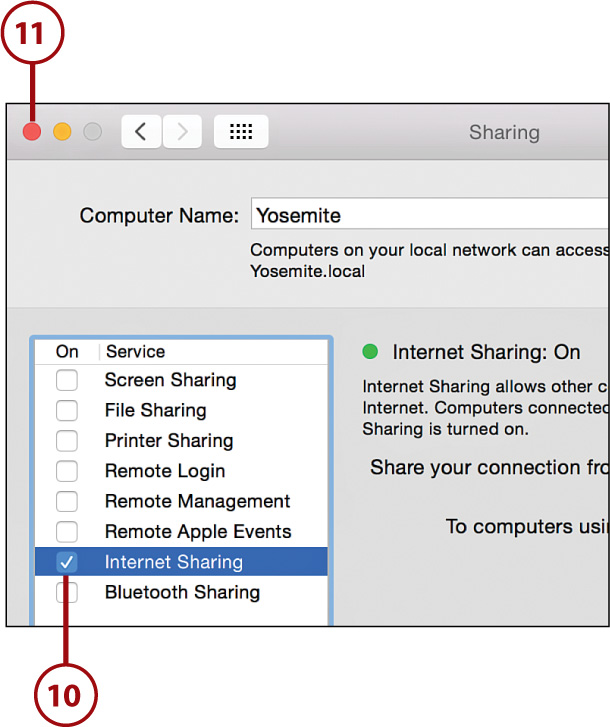
10. Click the checkbox in front of the Internet Sharing service.
11. Close the System Preferences.
12. Connect to the new wireless network from other computers as described in Chapter 3. You should set the other computers to configure themselves automatically rather than manually configuring the network (not shown).
Keep a Switch Handy
If you’re sharing your connection over Ethernet, you need to connect a switch to your Mac’s Ethernet port and then connect the other computer systems/devices to the switch.