
8. Managing Who, Where, When, and What

In this chapter, you learn how to use your Mac to manage everything from contacts and meetings to road trips.
![]() Adding contacts to Contacts
Adding contacts to Contacts
![]() Organizing contacts into groups
Organizing contacts into groups
![]() Creating calendars in Calendar
Creating calendars in Calendar
![]() Adding appointments to calendars
Adding appointments to calendars
![]() Scheduling meetings
Scheduling meetings
![]() Making lists in Reminders
Making lists in Reminders
![]() Keeping your thoughts in order with Notes
Keeping your thoughts in order with Notes
One of the joys of owning a Mac is that it is productive “out of the box.” You can integrate with enterprise calendaring and address book systems, plan meetings, even get directions—all using the built-in utilities. Yosemite makes these tools accessible to everyone, regardless of skill level. If you’ve ever been intimidated by Microsoft Outlook, don’t worry—Yosemite will make you just as productive without needing an encyclopedic reference book.
In this chapter, you get the hang of the basics of the Contacts, Maps, Calendar, Reminders, and Notes apps. This suite of tools helps us keep our digital lives in tune with our real lives, and does so in a simple and elegant way.
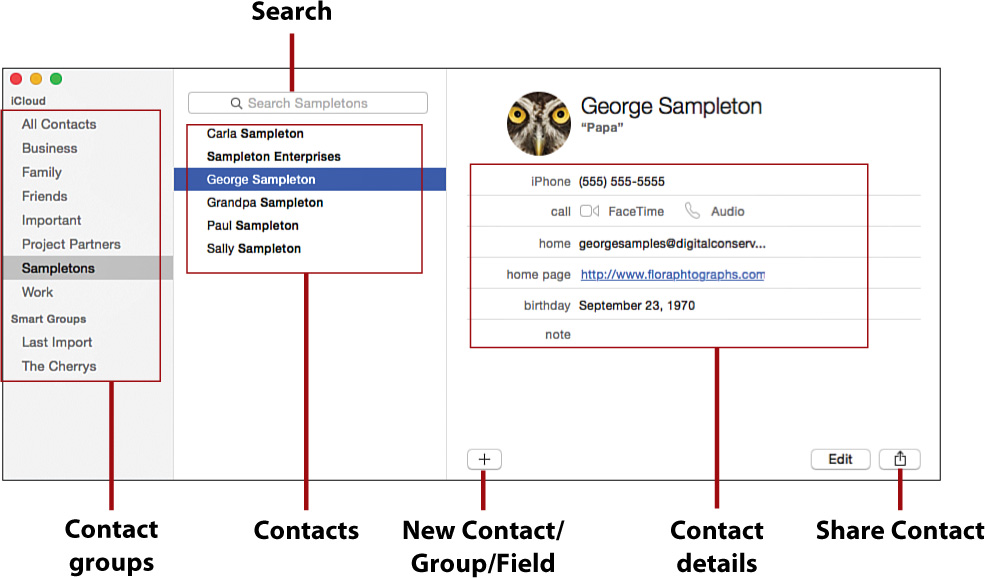
Managing Contacts
Many of the applications you use on your Mac send information to, or receive information from, other people. Yosemite offers a central contact database that you can access in Mail, Calendar, Messages, FaceTime, and other programs. Appropriately enough, you manage this database through an application called Contacts (found in the Applications folder).
Contacts acts as a digital Rolodex, pulling together personal and business contacts. With it you can also connect to enterprise directory servers for accessing centralized company personnel listings. The Contacts application is similar to many other Yosemite applications, providing a drill-down view from a group list, to a contact list, and, finally, to contact details.
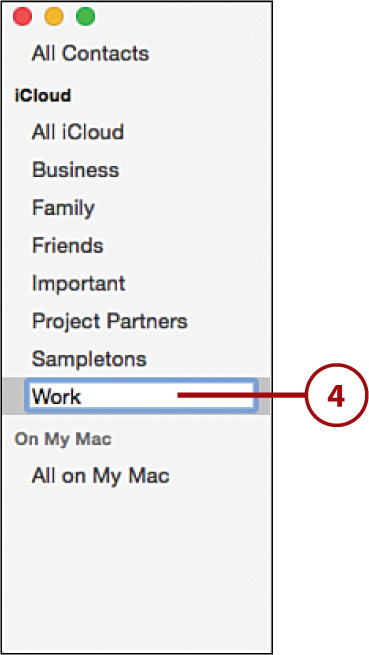
Adding Groups
When you first start Contacts, there is a single pseudo-group available: All Contacts. The group displays any contact available in Contacts. To make the most efficient use of Contacts, you should add groups for the different types of contacts you use—businesses, coworkers, family, friends, doctors, and so on. Like Mail, Contacts can use rules to create Smart Groups.
Emailing to a Group
Contacts groups are more than just organizational tools; they also add functionality to applications that support them. After you’ve defined a group, you can use it in Mail as your message recipient, effectively sending the email to everyone in the group!
Creating a Group
To create a new group, decide what you’d like it to be called, and then follow these steps:
1. Open Contacts from the Dock, Launchpad, or Applications folder.
2. Click and hold the + button at the bottom of the Contacts window.
3. Choose New Group.
4. A new “untitled group” is added. Type a name for the group.
Creating a Smart Group
If you’d like to use search criteria to define your Contacts groups, you’re in luck! Contacts supports Smart Groups, capable of pulling contacts together from multiple different groups and even network accounts:
1. Choose File, New Smart Group from the menu bar.

2. Enter a name for the new Smart Group.
3. Use the first pop-up menu from the selection lines to choose a contact attribute.
4. Use the second pop-up menu to set criteria.
5. Enter the value to use in the comparison in the text field at the end of the selection line.
6. Use the + and – buttons to add or remove additional selection criteria.
7. Click OK when you’re satisfied with your group definition.
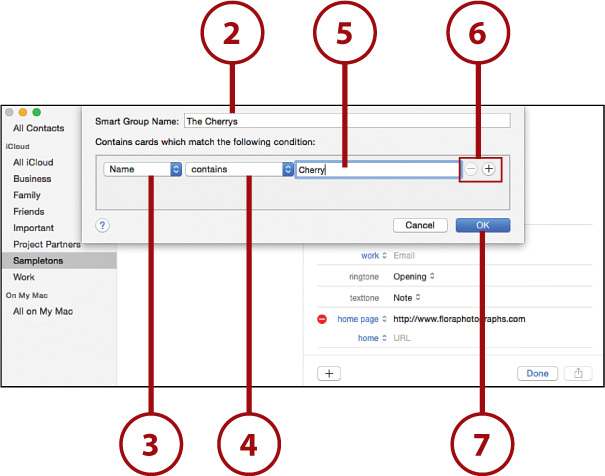
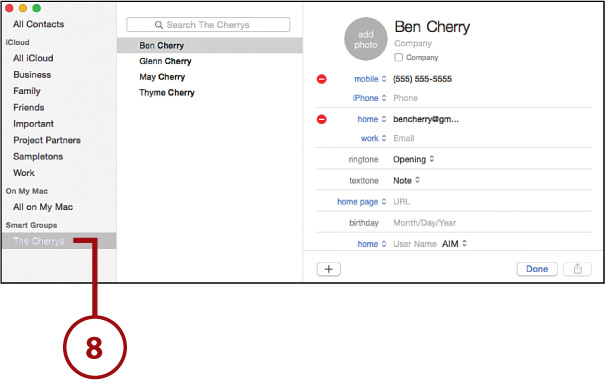
8. The new group is added and automatically shows the contacts based on the criteria you defined.
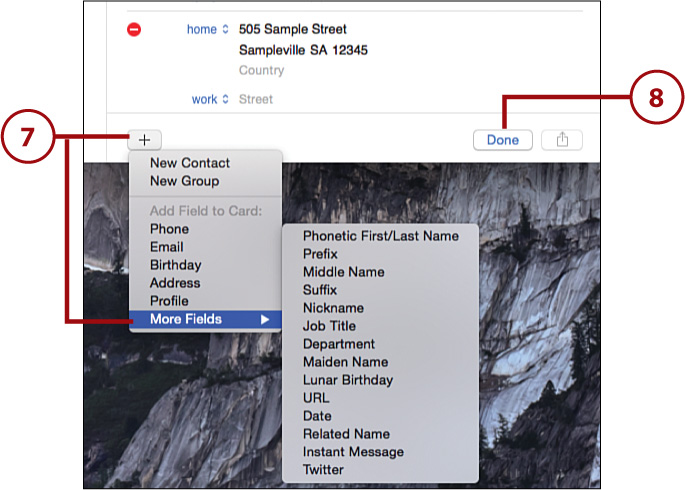
Adding Contacts
The bulk of what you’ll do with Contacts is entering contacts. When it comes to people, one size contact does not fit all. For your family, you might want to store email addresses, instant messaging screen names, and birthdays. But for business contacts, you might only be interested in an address and a phone number. Contacts adapts to the information that you want to store.
Creating a New Contact
To create a new contact, gather all the information you have available for the person, then do the following:
1. Click the group name that the contact should be added to.
2. Click the + button at the bottom of the window.
3. Choose New Contact from the pop-up menu.
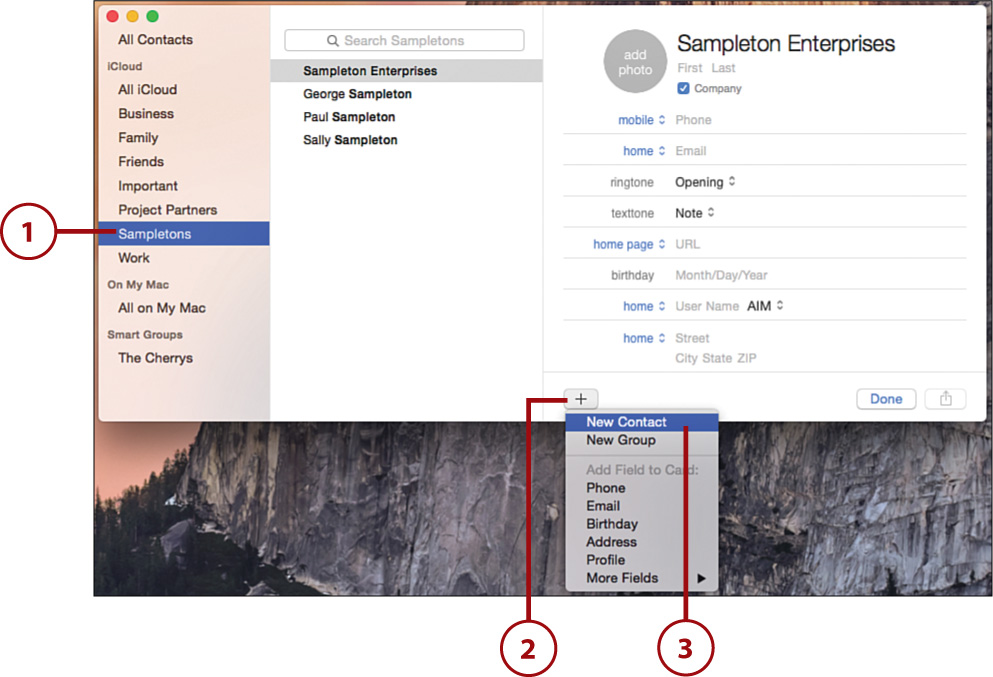
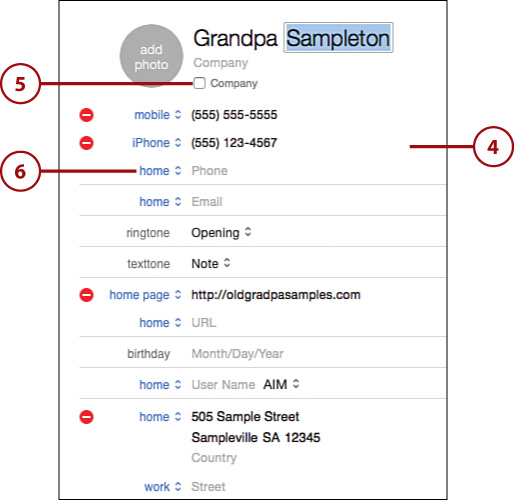
4. A new No Name contact is added, and the empty contact details display. Use the fields in the detail view to enter information for the contact.
5. Click Company to classify the entry as a business rather than a personal contact.
6. Set the context for the card’s fields (for example, choose home, work, or cell for a phone number) using the pop-up menu in front of each field.
7. If you’d like to store additional information for the contact, click and hold the + button again, choose More Fields, and choose the type of field to add.
8. Click the Done button at the bottom of the contact details to save changes to the contact.
If you find that you’ve filed your contact in the wrong group, just drag and drop the contact name into another group. You can re-edit contact details at any time by selecting them and clicking the edit button below the details pane.
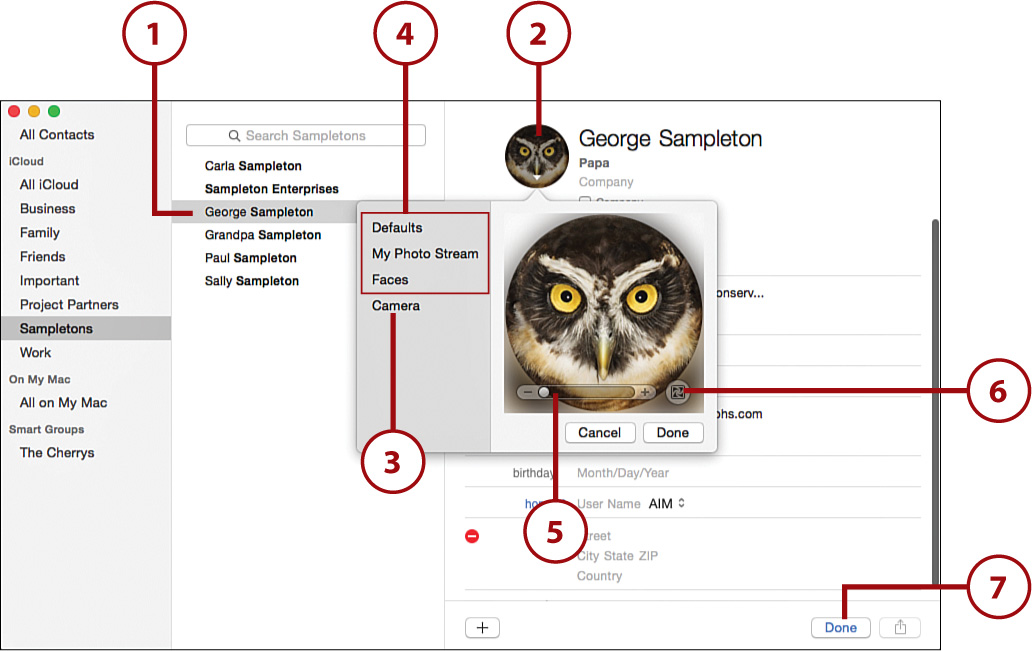
Setting a Contact Image
Contact images can help you visually identify individuals in your Contacts and are even displayed in Mail or shown on your iOS device if you sync Contacts. To set an image for a contact, complete these steps:
1. Find and select the contact that you want to associate with an image.
2. Click the picture within the card details.
3. Click the Camera label to take a new picture, or see step 4 to use an existing picture.
4. Alternatively, use the Defaults, Photo Stream, and Faces options to select from default OS X images, iCloud Photo Stream photos, or iPhoto Faces.
5. Set cropping and size for the picture by dragging it within the image window and adjusting the zoom slider.
6. Apply effects, if desired, using the Effects button.
7. Click Done to finalize the contact’s custom image.
Creating “My” Card
Many system applications and utilities need to identify information about you. To tell Contacts who you are, enter a new contact for yourself, and then follow these steps:
1. Find and select your name in the Contacts.
2. Choose Card, Make This My Card from the menu bar.

The Importance of Me
You need a functional “My” card to fully use Calendar, so be sure to set this if you have any intention of using Calendar.
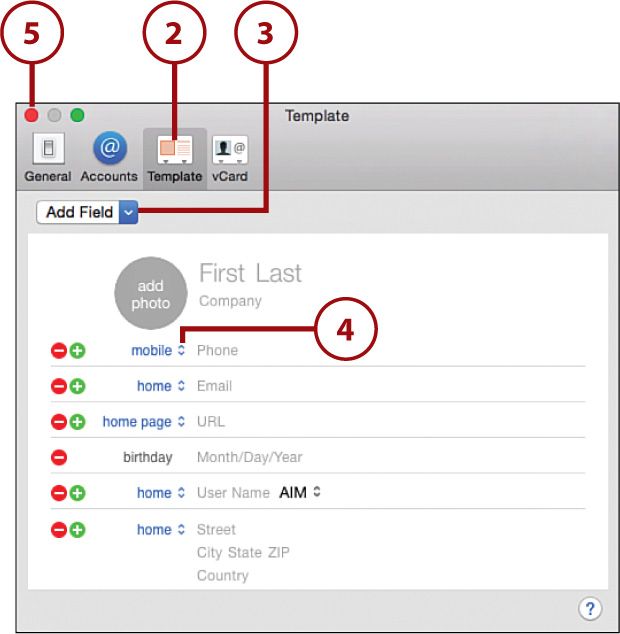
Editing the Contact Template
If you find that you constantly need to add new fields to contacts, you might want to consider modifying the default contact template. Changing the default gives you a starting place for all future contacts.
1. Choose Contacts, Preferences from the menu bar.

2. Click the Template icon in the Preferences toolbar.
3. Use the Add Field drop-down menu to add additional fields to the contact template.
4. Click the double arrows to open the pop-up menus in front of each field to set the context for fields displayed in the template.
5. Close the Contacts Preferences window when you’re finished.
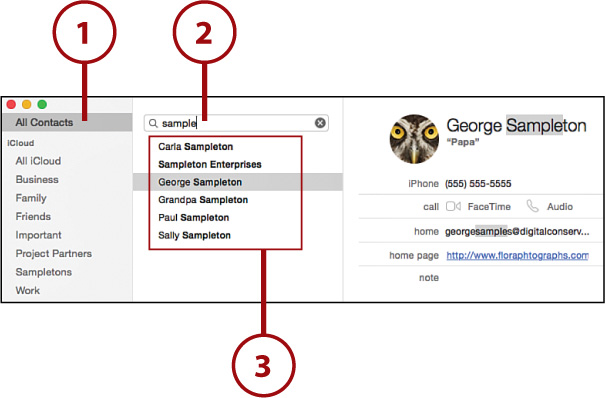
Searching Contacts
When you aren’t sure of an exact name, or where you filed a contact, you can quickly search across all your groups and contact data.
1. Click the name of the address group to search.
2. Type into the search field.
3. As you type, the contact list is filtered to show only matching contacts.
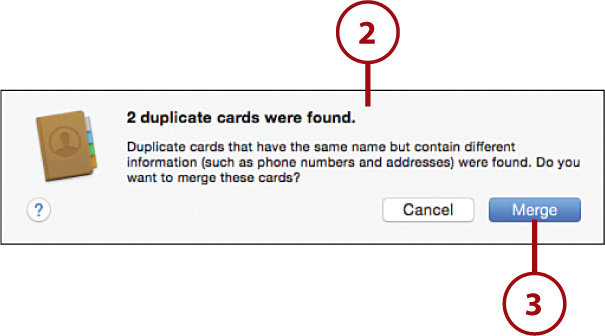
Detecting and Merging Duplicates
Over time you might find that you’ve created several Contacts entries for a single person. To identify and merge duplicate cards, follow these steps:
1. Choose Card, Look for Duplicates from the menu bar.

2. Contacts analyzes your contacts and presents you with the option to merge identified duplicates.
3. Click Merge to fix the duplicates.
Merging Cards
If you manually identify two or more cards that need to be merged, select the cards, and then choose Card, Merge Selected Cards from the Contacts menu bar.
Using iCloud and Server-Based Contacts
Contacts isn’t just limited to keeping information on your Mac; it can also synchronize with Google, Yahoo! contacts, and connect to enterprise directory servers such as Exchange, standard LDAP servers, as well as Apple’s iCloud service. In fact, if you’ve already configured iCloud (see Chapter 4), you’re probably already storing your contacts “in the cloud.”
Connecting to iCloud Contacts Syncing
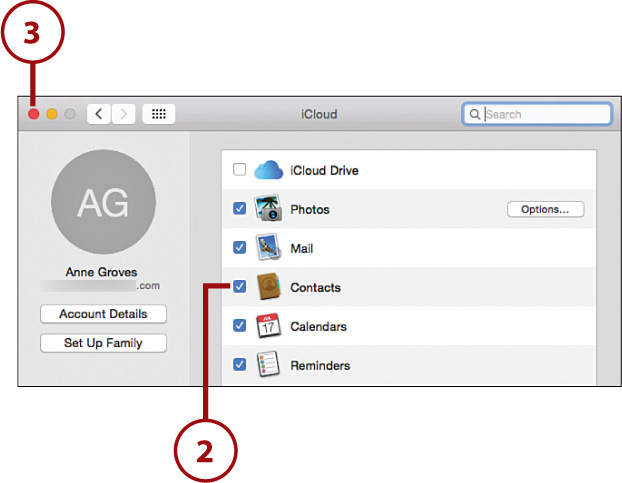
To connect to iCloud, or verify that your Contacts app is using iCloud to store and sync contacts across your devices, follow these steps.
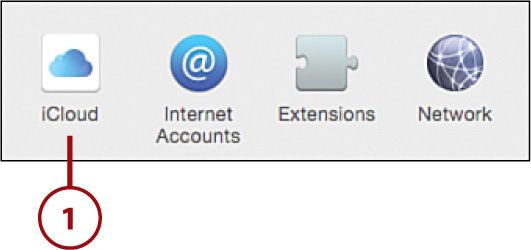
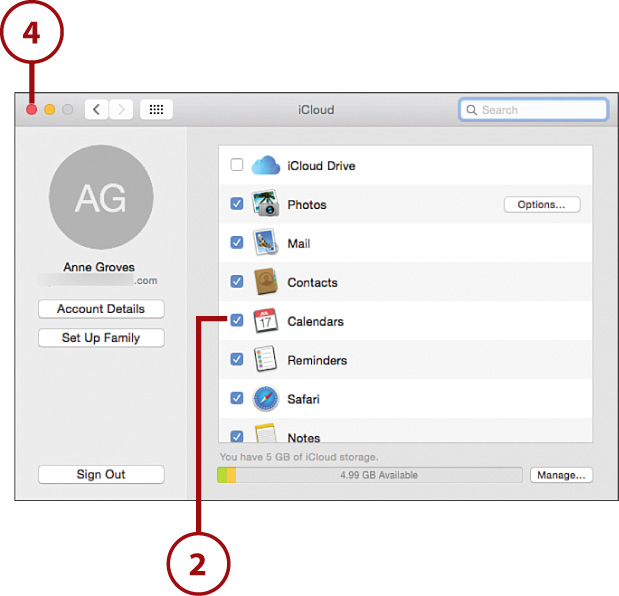
1. Click the System Preferences icon on the Dock and then click iCloud.
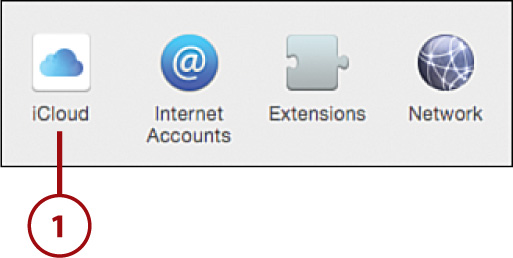
2. Check the box beside Contacts.
3. Close the System Preferences. Your Contacts application is now connected to iCloud.
Connecting to Other Contact Servers
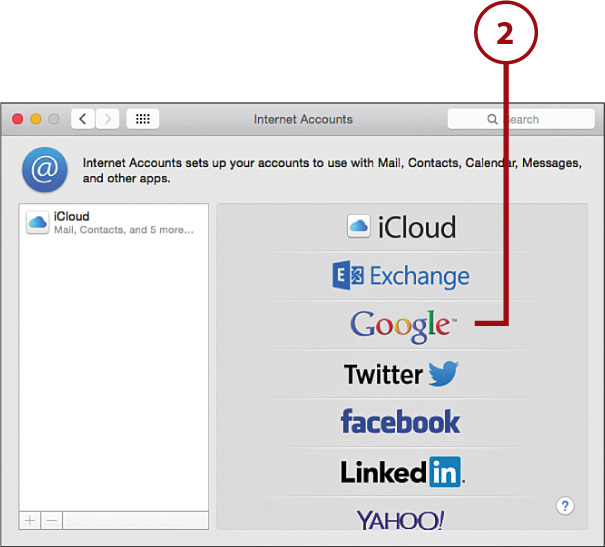
While iCloud is consumer-friendly, many organizations provide central enterprise contact directories that you can access via Contacts. Contacts supports several standards, including Google and Yahoo! contacts as well as Exchange servers and social networking sites like Facebook and Twitter. Using a central server means that changes and updates are available immediately for everyone who is connected.
To configure server-based contacts, follow these steps:
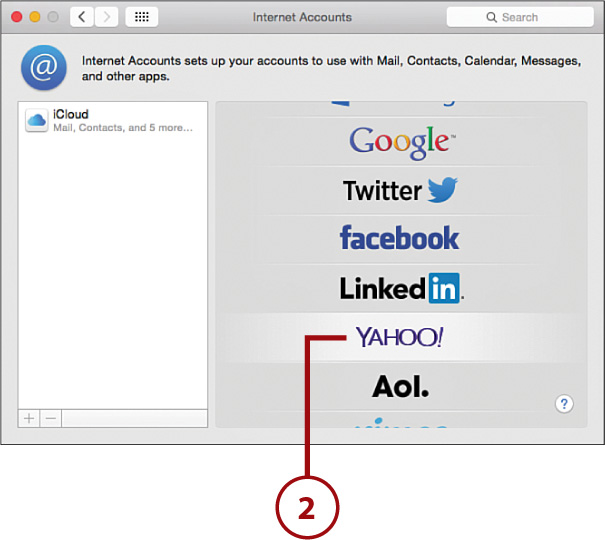
1. Click the System Preferences icon on the Dock and then click Internet Accounts.

2. Choose the service providing contact information from the list on the right. Alternatively, click Add Other Account (at the bottom of the list) to add LDAP, CardDAV, or OS X Server accounts.

3. The account creation window appears. Use the fields in the window to configure your account information.
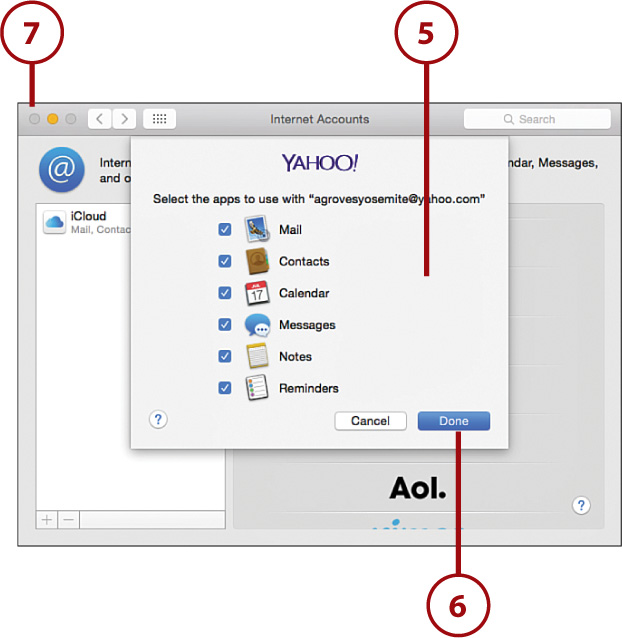
4. Click Set Up or Continue (the button name depends on your service provider) to walk through the account setup wizard.
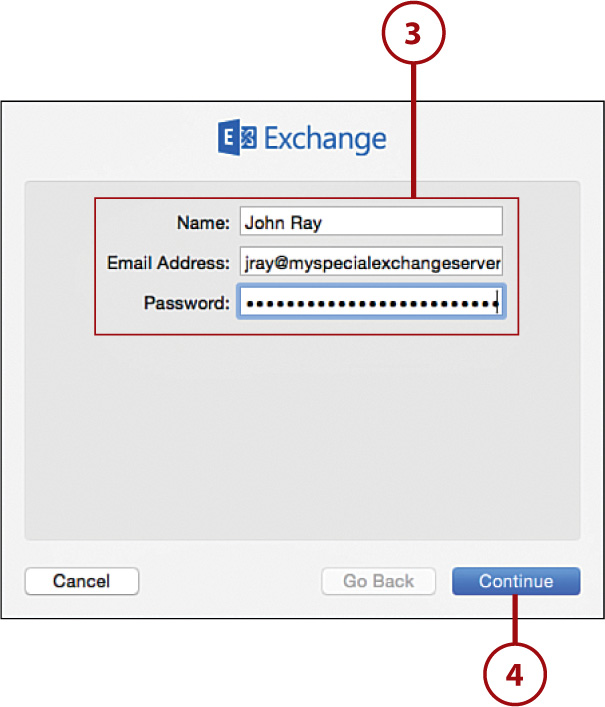
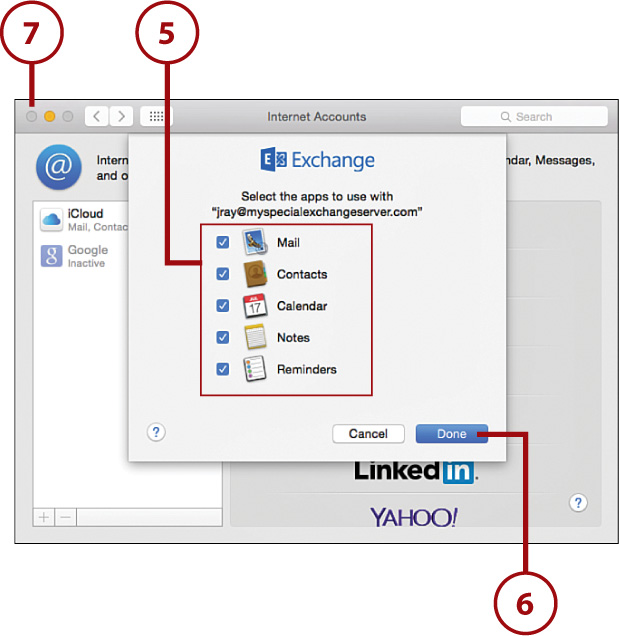
5. If you’re setting up a service that provides more than just contacts (such as Exchange), you are prompted to automatically set up corresponding email accounts and calendars.
6. Click Done or Create to configure your Mac to connect to the server.
7. Close the System Preferences.
Settings, Settings, Everywhere!
Apple includes the ability to add contact servers directly within the Contacts app’s Preferences (the same goes for the Calendar app, which we’ll cover next). If you happen to stumble upon these, you can use them (it’s the same as using the Internet Accounts Preferences panel), but I’d suggest using the central preferences to be consistent.
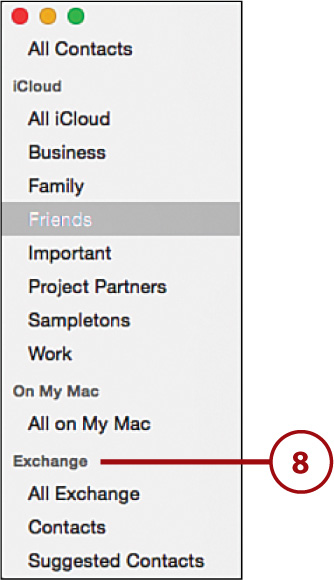
8. The new server appears in the Contacts group list. You can click to select groups within it, and from there, create new groups if desired.
Sharing Contacts via Email, Messages, and AirDrop (New!)
To share a contact via email, messages, or AirDrop, you can use a Yosemite Share button. For detailed information on Share buttons, refer to Chapter 6, “Sharing Files, Devices, and Services.” For now, be aware that the basic process works like this:
1. Navigate to a contact that you want to share.
2. Click the Share button to show the sharing options.
3. Choose the method of sharing that you’d like to use.
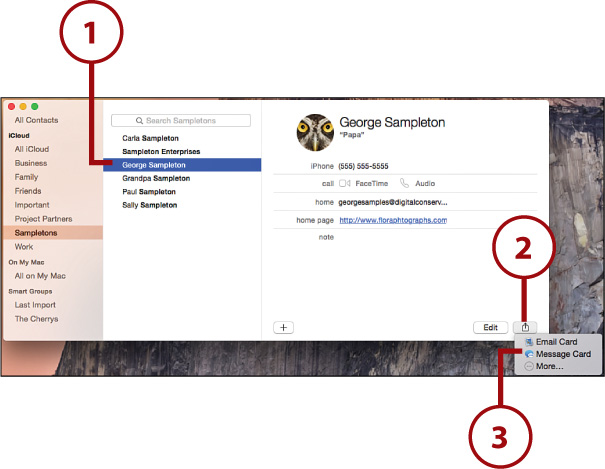
4. Your choice launches the appropriate supporting application and attaches the note for sending.

Exporting and Importing vCards
In addition to sharing contacts, you can also export the contact information directly to a vCard. These are small files that store all the information for one or more contact entries. Just highlight the entries in Contacts, and then drag them to your desktop. A vCard file is created with all of the contact data.
To import a vCard, reverse the process. Drag a received vCard into Contacts (or double-click it in the Finder), and it is imported automatically.
Printing Addresses
When you need to use actual paper for your communications, Contacts provides several useful print options for printing your contacts onto envelopes or labels.
1. Select individual contacts or contact groups to print.

2. Choose File, Print from the menu bar.
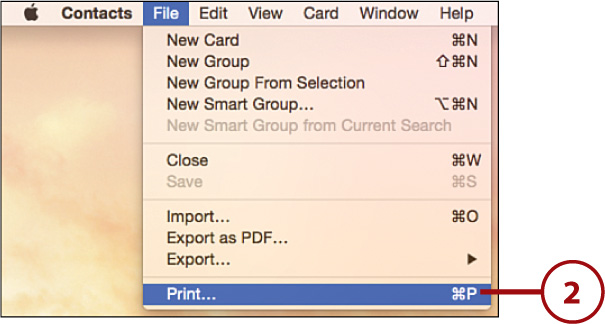
3. Click the Hide/Show Details button so that the full print dialog window appears.
4. Use the Style pop-up menu to select an output format (Mailing Labels, Envelopes, and so on).
5. Set any of the additional configuration options for the style you’ve chosen.
6. Click Print to output the contact information in the selected style.

Finding Your Way with Maps
Yosemite continues the tradition of OS X in providing great software for managing your who, when, and what—but it now can help you with the where. OS X uses Maps, a simple, fun, and fast way to access mapping information on your Mac.
Starting and Navigating Maps
To start using Maps, you need an active Internet connection and your Wi-Fi needs to be enabled if you want your system to automatically locate your current position. To get started, follow these steps:
1. Start Maps from the Applications folder, Dock, or Launchpad.
2. After a few seconds, a basic map loads in standard view.
3. You can pan the map by clicking and dragging—or by dragging two fingers on a trackpad.
4. Use the +/– buttons to zoom in and out.
5. Click and drag within the compass to rotate the entire view.

Using Map Views
If you’ve ever used Google Maps (or any other online mapping service) you’ll be right at home with Maps. There are a variety of different views that you can access—from the Maps toolbar and Show menu.
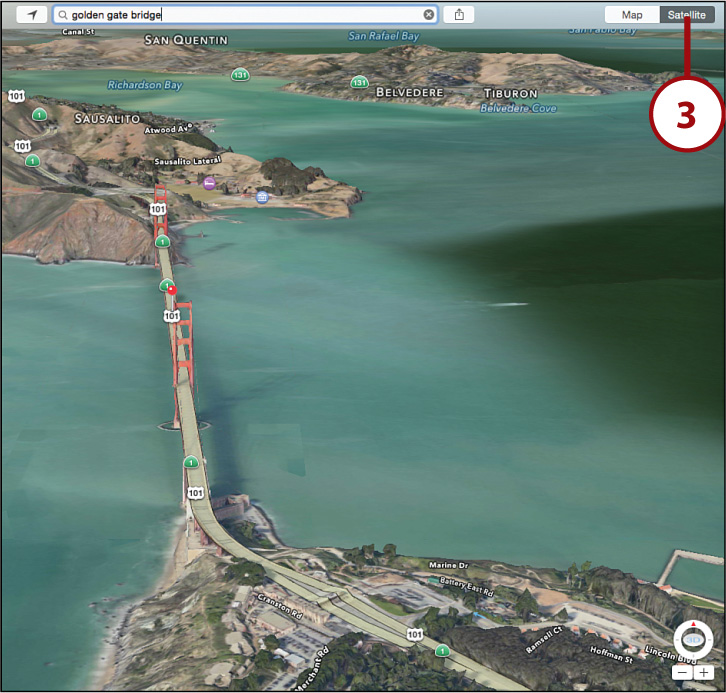
Choosing a View Mode (New!)
Like your maps flat, like a book? Want to see photography of a given area? How about a combination? Using Maps, you can have all of this, just by clicking a button.
1. Click the Map button to show a traditional “atlas” style map with roads, points of interest, and so on.

2. Click Satellite to show the area using satellite photography.
3. Use the Show menu in the lower left to add labels. This is similar to Google Maps and will show a combination of satellite photography with overlaid roads and points of interest.

Viewing Maps with 3D Flyover
In addition to the standard map views, you can also look at many large cities in full 3D. To see the map in 3D, follow these instructions:
1. Navigate to a point you want to view in 3D.
2. Click the 3D button in the compass to toggle the display to 3D.
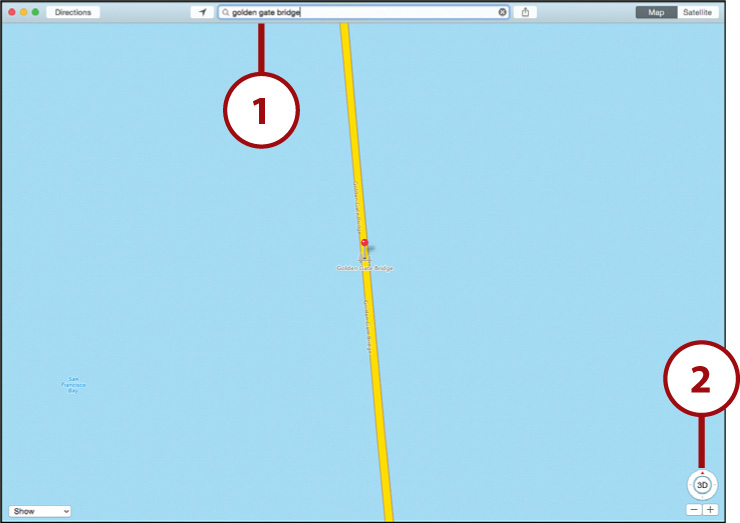
3. Switch to Satellite mode to view a nearly photo-realistic image of the location.
Tilting Your 3D World
While viewing a map in 3D, you can click and drag up and down in the compass to change the amount of “tilt” with which the map is displayed. You can also hold Option and click and drag anywhere on the map to tilt the view.
Taking a Virtual Tour
When viewing some 3D locations (Try Golden Gate Bridge, for example), you’ll notice a message at the bottom of the window that reads 3D Flyover Tour with a Start button beside it. Click Start to see an animated tour of the location. Click End to stop the tour and return to the normal map.
Finding Places
How good would a map be if you couldn’t find things on it? Using Apple Maps, you can quickly locate your position, companies, points of interest, people, and so on.
Finding Yourself
Without needing to be a Zen guru, Apple Maps can help you find yourself in the world. Although not as precise as GPS, your Yosemite computer can use Wi-Fi to find its general location (usually within a few blocks). To use this feature, follow these steps:
1. While viewing any map, click the arrow icon at the left of the Search field.
2. The map zooms in, placing a blue dot on your location.
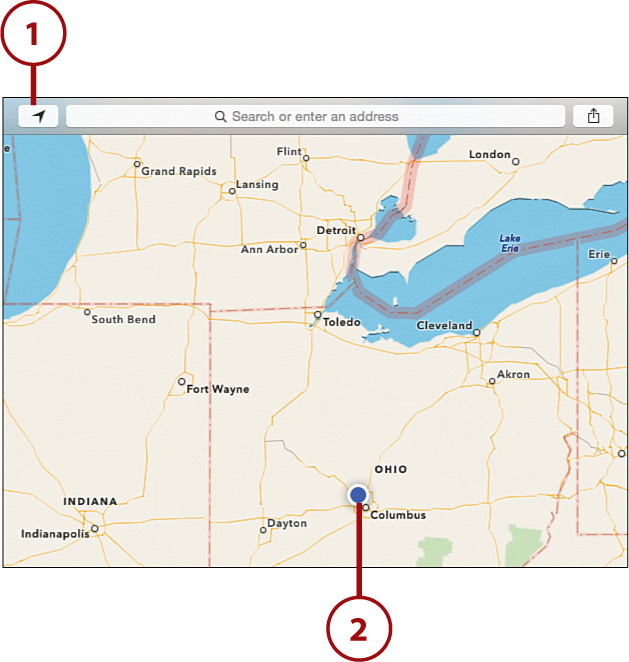
Closer Please
Don’t worry—the map does zoom closer than shown in this example. I manually zoomed out to reduce the amount of competing clutter on the screen.
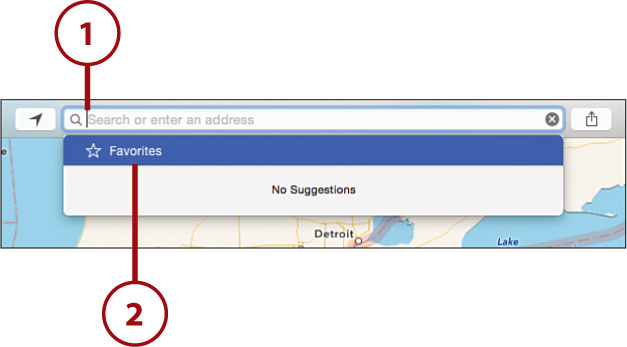
Finding Contact Entries
Although finding yourself can be handy, finding others is likely more useful. To locate any address (personal or business) stored within the Contacts application, complete the following:
1. Click the Search field in the Maps toolbar.
2. Click the Favorites entry at the top of the list that appears.
3. Choose an entry in the Address Book and click it.
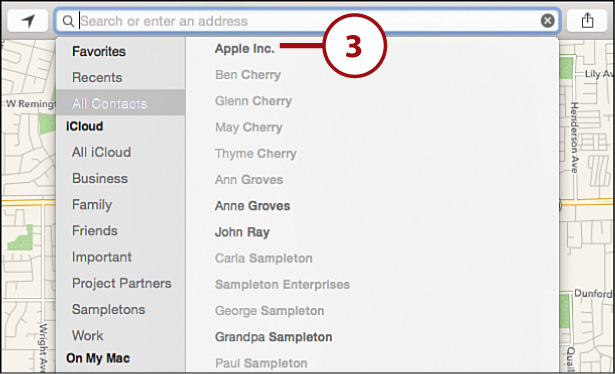
4. Click the address for the entry that you want to view.
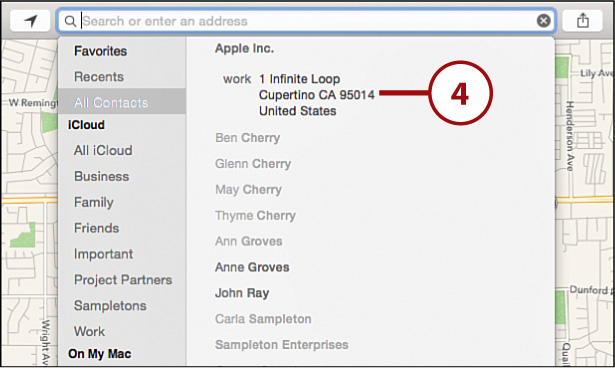
5. The map zooms in and highlights the chosen address.
Searching the Map
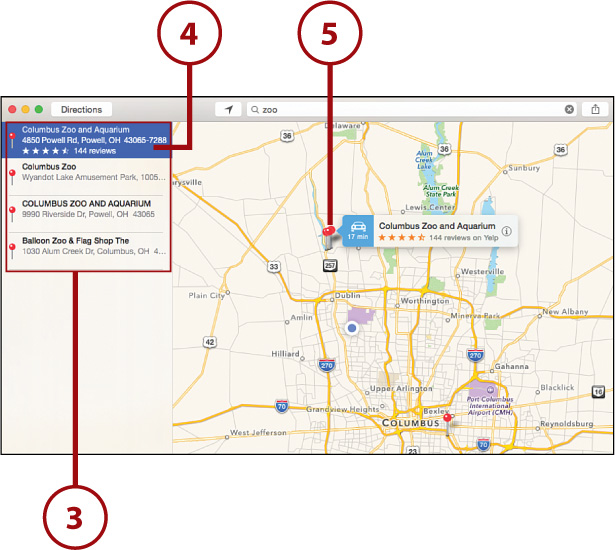
If the place you want to locate isn’t in your Address Book, you can just search for it.
1. Type into the search field at the top of the Maps window.
2. As you type, potential matching searches appear below. Choose one, or press return when finished typing.

3. The search results are displayed on the left.
4. Click one you want to view.
5. The chosen location is highlighted on the map.
Working with Points of Interest
You’ve seen how to find places, but how about finding out about places? Maps can help you with that as well. You may be surprised at how much Maps can do for you!
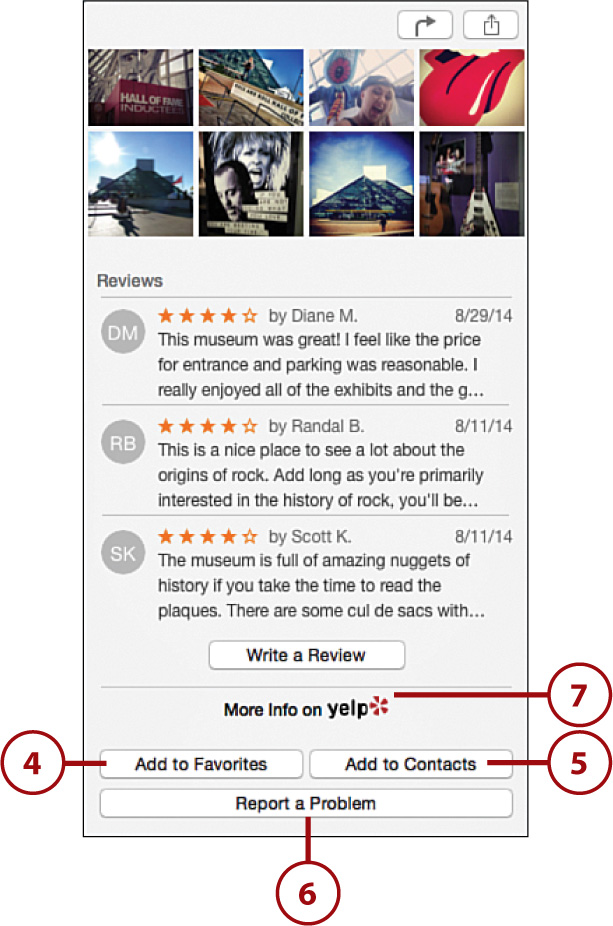
Seeing Point of Interest Details
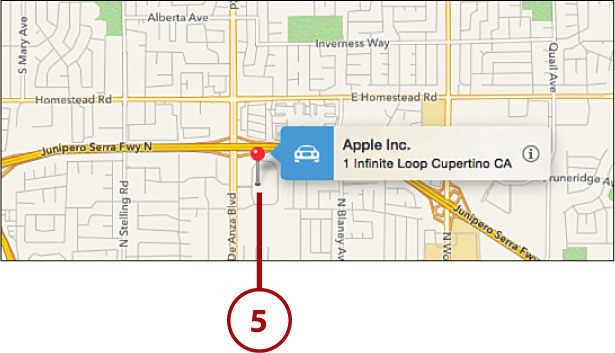
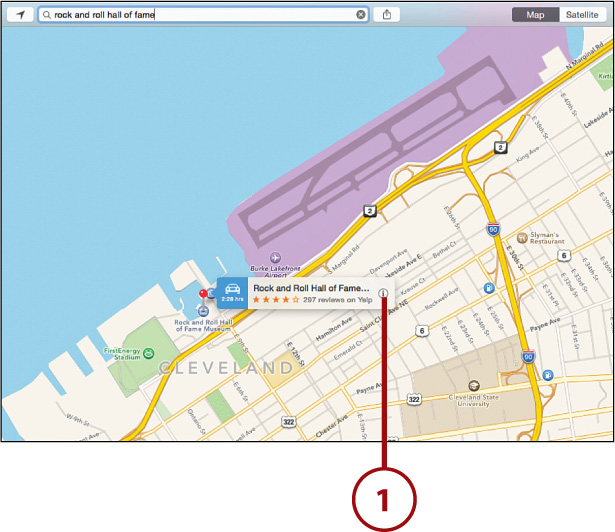
There’s more to a location than just a marker on a map. To see more detail for any point on the map, follow these instructions:
1. Find a location on the map that you want to view. Click the i icon.
2. The location window expands to show a photo and additional information.
3. Use the Directions to Here or Directions from Here buttons to get turn by turn directions to or from the location.
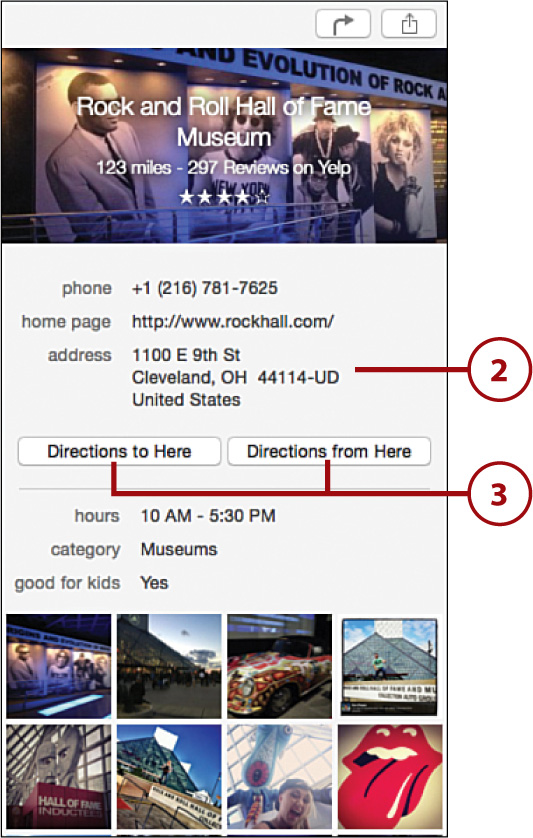
4. Click Add to Favorites to add a bookmark to the location (accessible by scrolling down in the information window).
5. Click Add to Contacts to add a new contact to your Address Book for the location. Depending on the amount of information on the screen, you might need to scroll down to see the button.
6. Click Report a Problem if there is an error in the listing.
7. Click More Info on Yelp to view Yelp reviews of the location (if available).
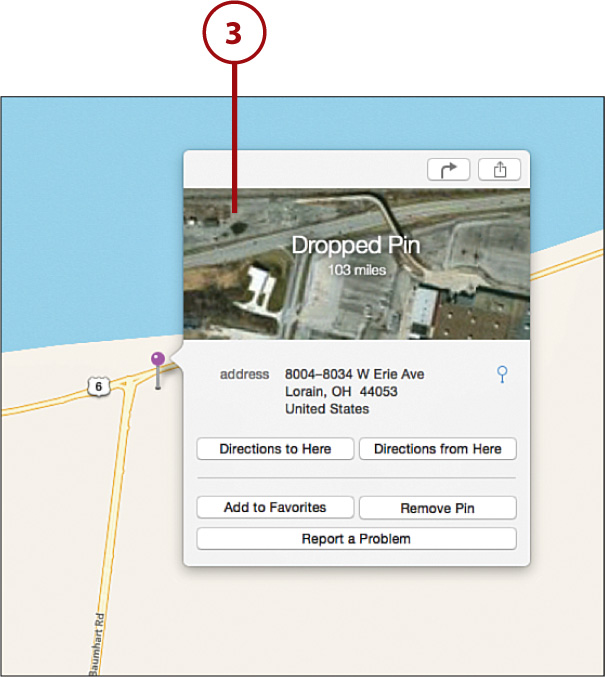
Making Your Own Point of Interest
Sometimes Apple Maps won’t have the information that you want. Apple, for example, doesn’t know your favorite fishing hole, or in which tree you hid the ransom money. To accommodate your activities, you can create your own points on the map by following these steps:
1. Right-click on the map where you want a point to be located.
2. Choose Drop Pin from the pop-up menu that appears.
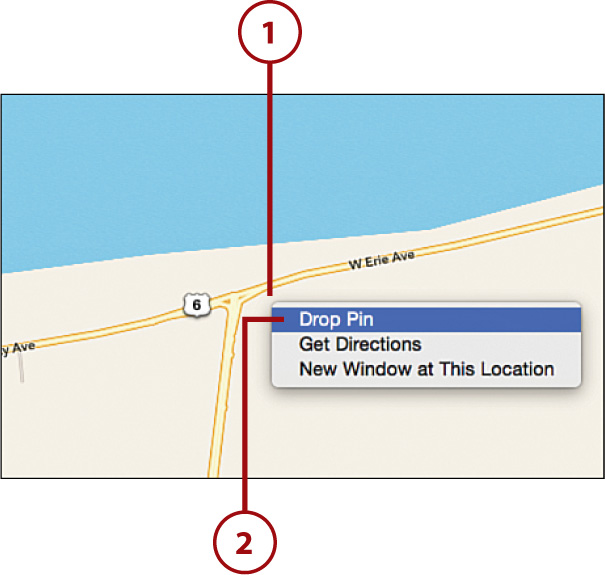
3. A new point of interest window appears that you can interact with like any other point.
Sharing a Point of Interest
If you find yourself viewing something on your Mac and want to see it on your iOS device, no problem. You can use the Share button to share a location via email, or just send it directly to your phone or iPad. To do this, just follow these steps:
1. Locate the point of interest you want to use.
2. Click the Share button.
3. Choose the method or device that you want to use to share.
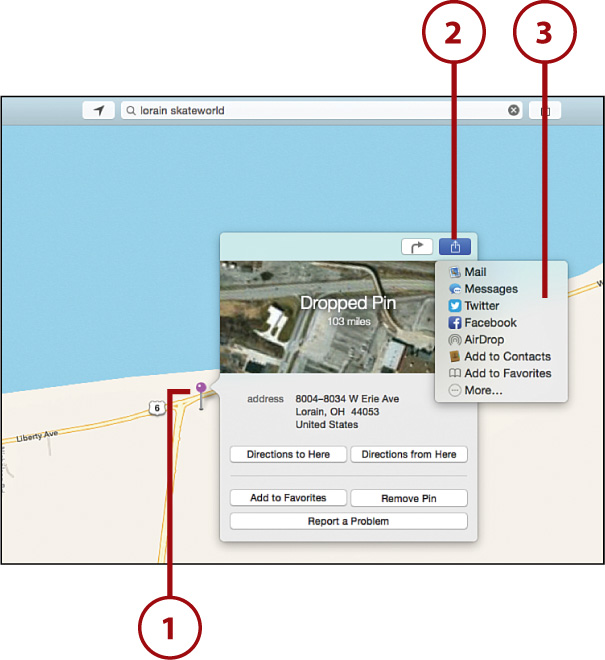
Share Your Anywheres, Anytime
You can share what you are looking at in the Maps window at any time by using the Share button in the Maps window.
Traveling with Maps
The last trick that Maps has up its sleeve is the ability to view turn-by-turn directions—and even the traffic that you’ll encounter if you follow them. Let’s start by looking at directions.
Getting Directions
To get directions from point A to point B, you only need to click. Follow these steps to get where you need to be:
1. Click the Directions button to show the directions panel on the left.
2. Enter an address or location in the Start field (or leave it blank to use your current location).
3. Enter an address or location in the End field.
4. Use the Drive and Walk buttons to choose between driving and walking directions.
5. If multiple paths are shown, click the path you want to take.
6. The turn-by-turn instructions are shown on the left.
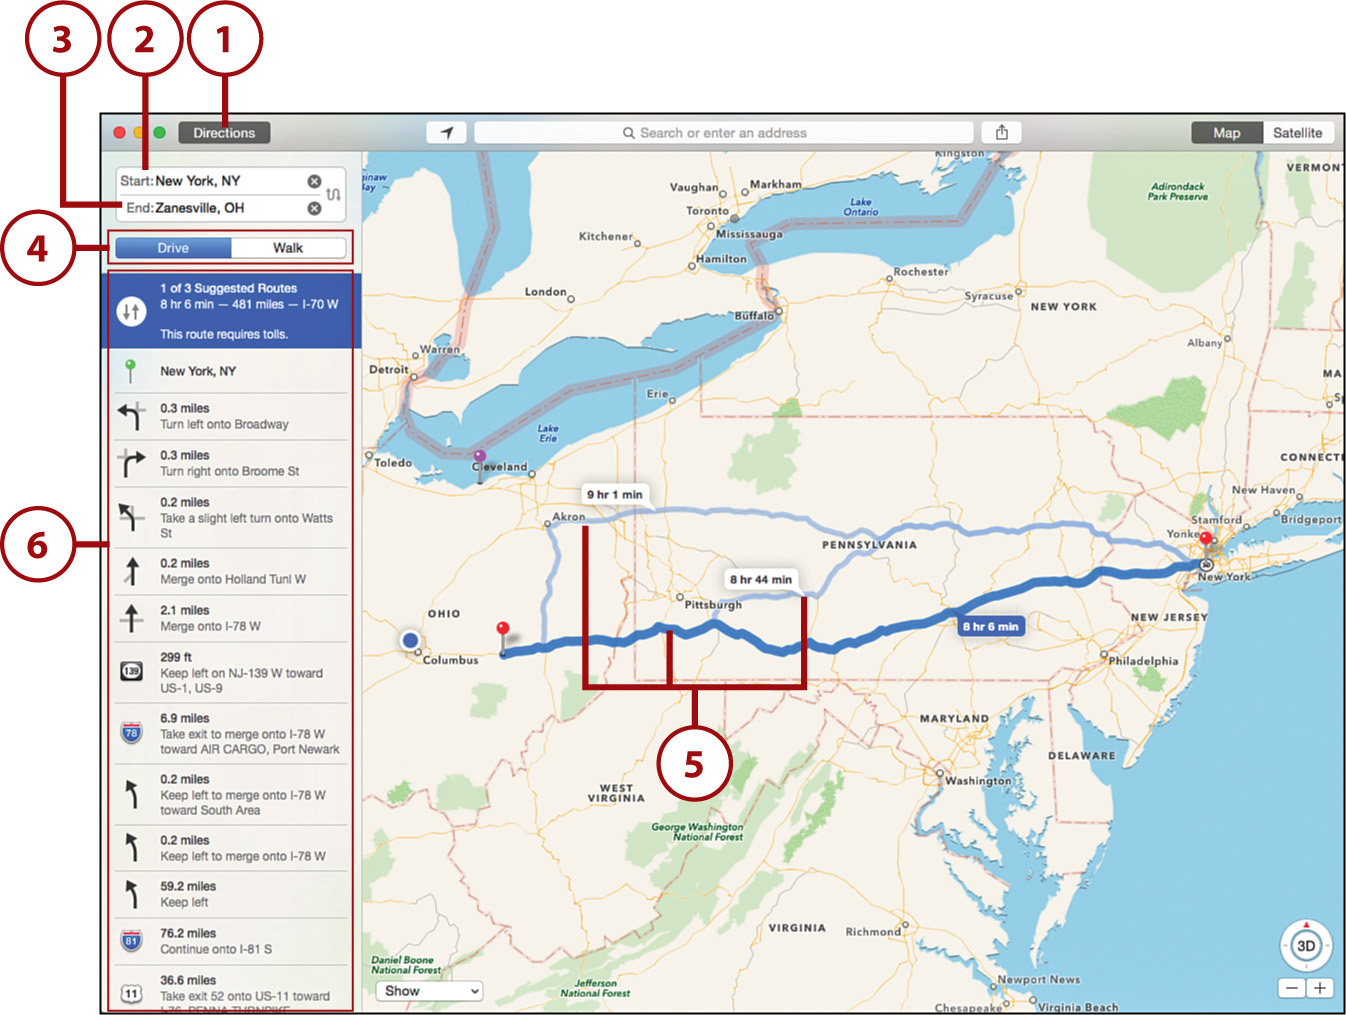
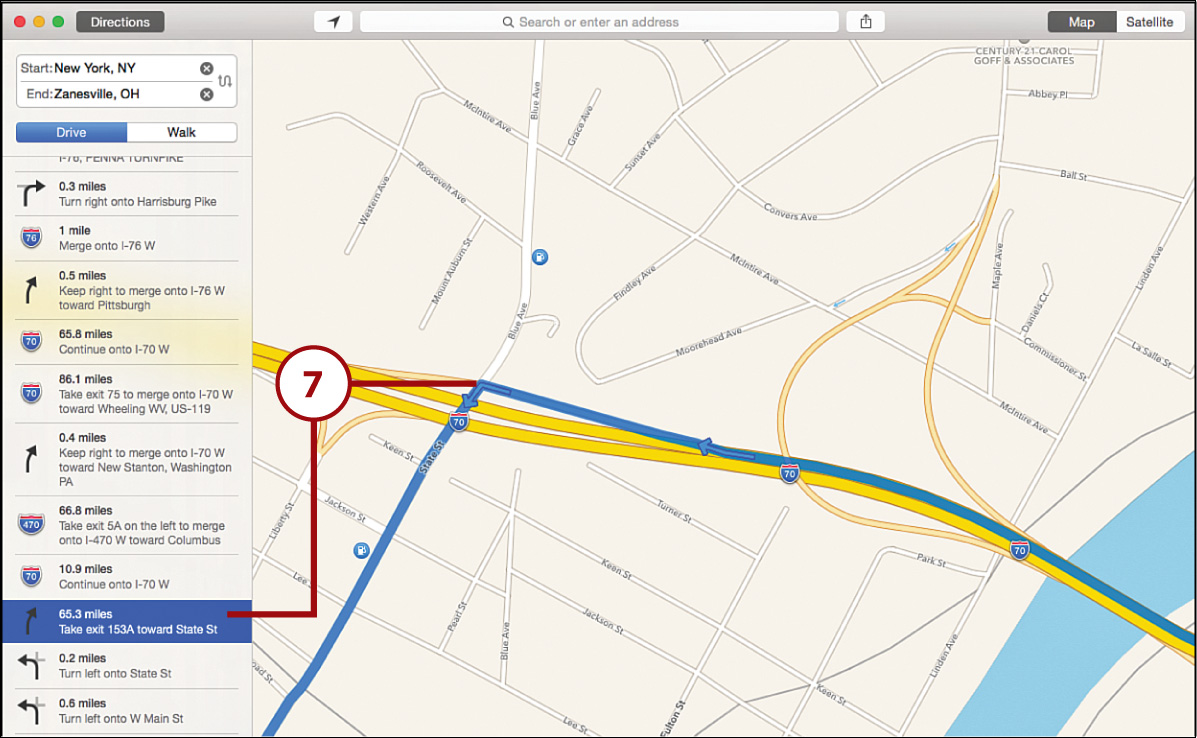
7. Click an individual step of the directions to show a close-up of your route—including lane guidance.
Share the Path!
Remember, using the Share button at the top of the Maps window, you can share your location and complete route with your iOS device.
Showing Traffic Indicators (New!)
If you’re wondering about the traffic on your favorite road, Maps has you covered. Use this simple process to see when it’s safe to leave your house.
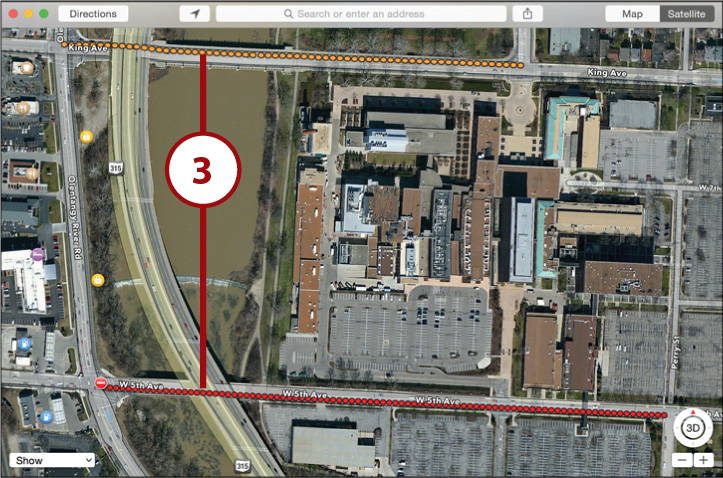
1. Navigate to the road you want to check for traffic conditions.
2. Use the Show menu in the lower left to add Traffic.
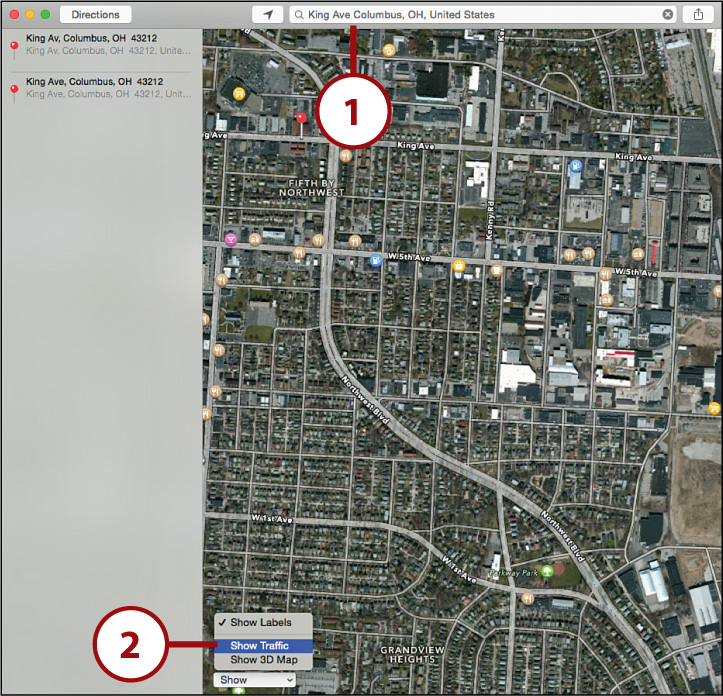
3. Orange and red dotted lines indicate slow or stopped traffic.
Working with Schedules in Calendar
Much of our lives revolve around adhering to a schedule. Calendars, in whatever form we use them, keep us informed of upcoming appointments, holidays, birthdays, and anniversaries. Your Mac can serve as your scheduling work center. The Calendar application (found in the Applications folder) is a fast and well-connected way to keep your life in order.
Unlike applications such as Microsoft Outlook, Calendar is an unimposing application that shows you everything you need within a single window.
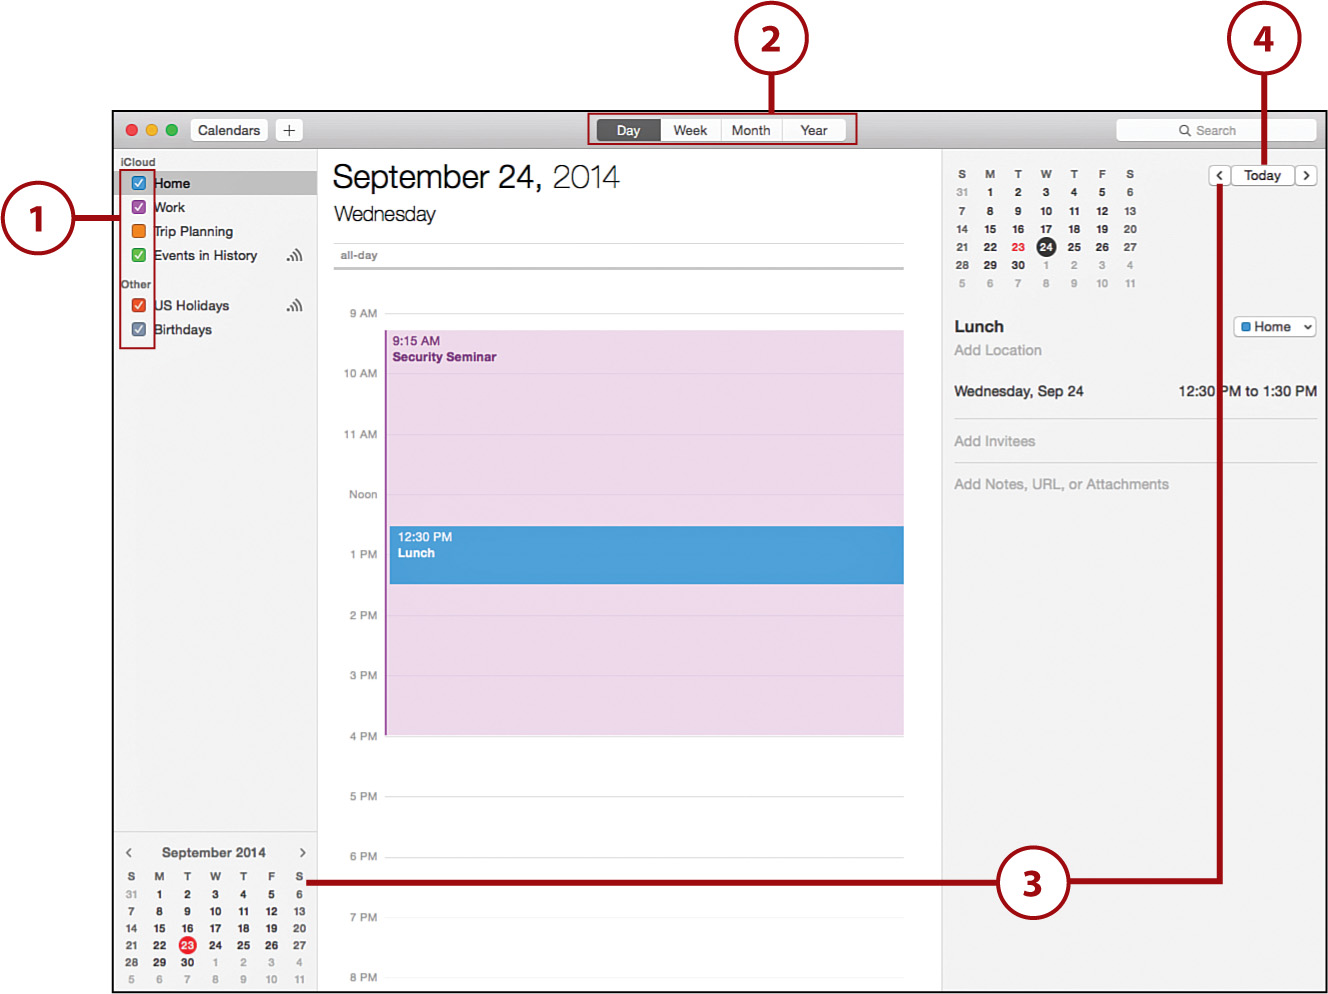
Calendar’s general operation is similar to other Yosemite applications. Clicking the Calendar button displays a list of calendars you have access to. Selecting a calendar in the calendar list displays the content of the calendar to the right. Double-clicking a calendar entry shows the details of the entry. The four buttons at the top (Day, Week, Month, Year) coupled with the View menu control the appearance of the calendars.

Despite its simple styling, Calendar works just as well for managing calendars located on your Mac as it can interacting with Exchange, iCloud, Facebook, Google, and other standards-based enterprise calendaring systems.
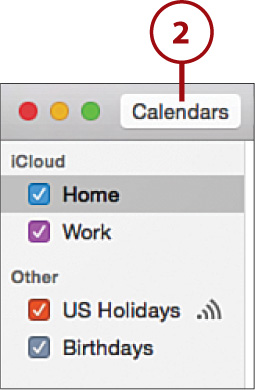
Adding Calendars
The first step in using Calendar is to create the calendars that you use to store your events. Two calendars are already created: Home and Work. If you’ve established an iCloud account and turned on Calendar syncing, these are iCloud-based calendars. If not, they are stored locally on your Mac. Use these default calendars or create new calendars, depending on how you want to categorize your events.
Creating New Calendars
To create a new calendar (locally or on a server), follow these instructions:
1. Open the Calendar application from the Dock, Launchpad, or Applications folder.
2. Click the Calendars button to show the list of calendars (if they are hidden) on your Mac.
3. Click File, New Calendar from the main menu bar. You might have to choose iCloud (or another calendar provider) if you’ve already set up a calendar account.
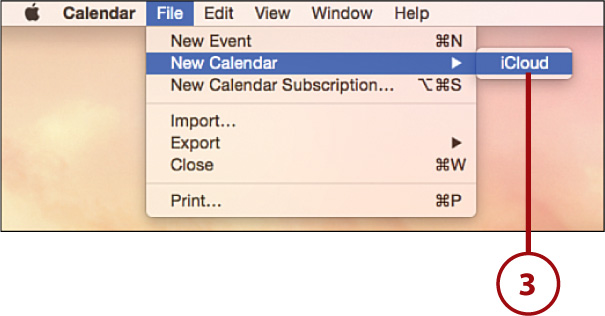
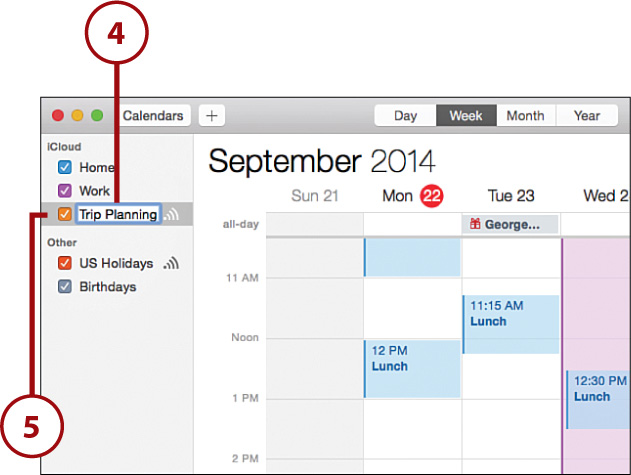
4. A new Untitled calendar is added at the bottom of the calendar list. Type to replace Untitled with whatever name you’d like.
5. Verify that the checkbox next to the calendar is selected so that the calendar entries are visible.
Connecting to iCloud and Server-Based Calendars
Server-based calendars are stored on a central network location rather than on your Mac. You can access and modify network calendars on multiple computers. Many businesses use Exchange Server, for example, to provide shared calendars and scheduling. Apple’s iCloud service provides free shared calendaring that you can use across your Mac and iOS devices. Another option, Google Calendar, is also free and can be used on virtually any desktop or mobile device.
Connecting to iCloud Calendar Syncing
iCloud is the easiest and fastest way to create shared network calendars on all your devices. To use iCloud to store your calendars, follow these steps:
1. Click the System Preferences icon on the Dock and then click iCloud.
2. Check the box beside Calendars.
3. You might be prompted to merge any existing calendars with your iCloud calendars. Click Merge to move their information to iCloud (not shown).
4. Close the System Preferences window.
Connecting to Other Calendar Servers
Most server-hosted calendars are associated, in some way, with an email account. To configure a server-based calendar, you probably only need an email account and password. If you know, however, that your calendar is hosted somewhere else, you should collect the server name in addition to your username and password before proceeding. As you’d expect, calendar services are configured through the Mail, Contacts, and Calendars panel, as you’ve become accustomed to seeing.
1. Click the System Preferences icon on the Dock and then click Internet Accounts.

2. Choose the service providing the calendar information from the list on the right. Alternatively, click Add Other Account (at the bottom of the list) to manually add a CalDAV account. If you aren’t sure, ask your ISP or network administrator.
3. The account creation window appears. Use the fields in the window to configure your account information.
4. Click Set Up or Continue (the button name depends on your service provider) to walk through the account setup wizard.

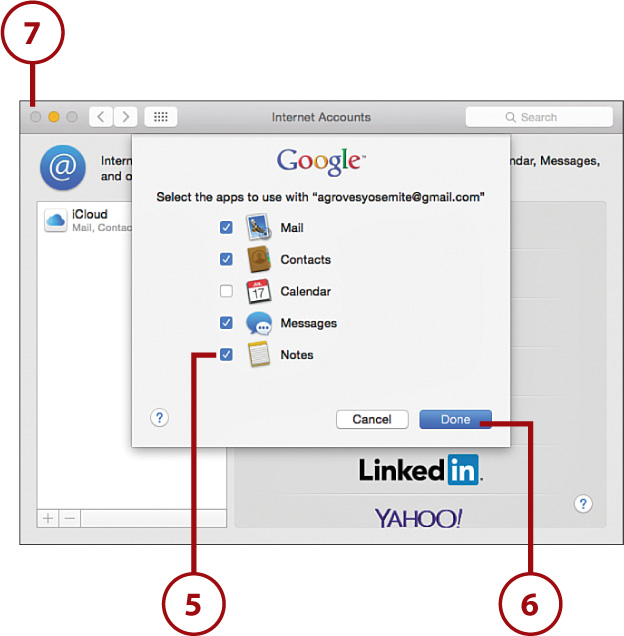
5. If you’re setting up a service that provides more than just calendars (such as Exchange, Yahoo!, or Gmail), you are prompted to automatically set up corresponding email accounts and contact servers. Be sure to choose Calendar & Reminders.
6. Click Done.
7. Close the System Preferences when finished.
8. The calendar list displays a new section with any calendars that are located on the server.
Subscribing to a Public Shared Calendar
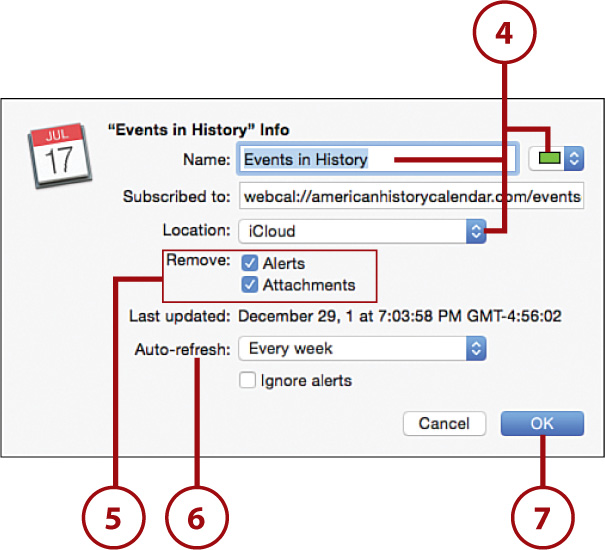
Another calendar type is a shared calendar. These read-only Internet-published calendars are available for TV show schedules, holidays, sports team game dates, and other useful information. To subscribe to a shared calendar, copy the URL for the calendar and then follow these steps:
1. Choose File, New Calendar Subscription from the Calendar menu bar.

2. Enter the URL for the calendar you are subscribing to.
3. Click Subscribe. If prompted, enter a login name and password to access the calendar, and then click OK to continue.

4. Set a name, color, and storage location for the calendar.
5. If there are any embedded Alerts or Attachments in the calendar (this depends entirely on the person making the calendar available), you may want to strip them out. Click the Remove checkboxes to make sure you get only calendar data.
6. To enable the calendar to automatically update, choose an Auto-refresh time.
7. Click OK.
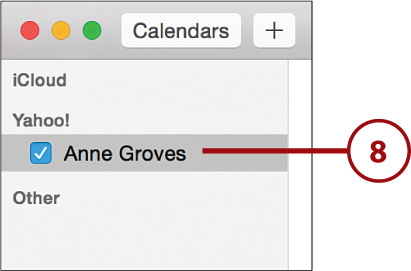
8. Depending on whether you’re connected to a network calendar (like iCloud), the shared calendar appears either under your main calendar list or in a section called Other.

It’s Your Birthday (or a Holiday)!
By default, Calendar shows two Other calendars, even if you haven’t added any. The first is the US Holidays calendar, which displays holidays in the United States. There is a second special calendar added by default—Birthdays—that displays birthdays for the individuals in your Contacts (address book) application.
Viewing Calendars
After you’ve set up one or more calendars in Calendar, you can view their contents. To view a calendar in the calendar list, follow these steps.
1. Click the checkbox in front of the calendars you want to view.
2. Use the Day, Week, Month, and Year buttons to narrow or expand your calendar view.
3. Use the arrows to move forward or backward by day, week, month, or year, depending on the current view. You can always navigate by month using the arrows by the mini-calendar in the lower-left corner.
4. Click Today to jump to today’s date.
Working with Events
What good is a calendar if you don’t have the ability to add events? In Calendar, events can be anything you’d like—birthdays, outings, reminders, anything—as long as they are associated with a date. If you’d like to include other people in the event, you can even send out invitations that are compatible with other calendaring systems, such as Exchange.
Creating a New Event
Events can hold a large number of attributes that describe what the events are, when they are, where they are located, and so on. All you need to know to create an event, though, is the date and a name for the event:
1. Navigate to the day on which the event takes place.
2. Switch to Day or Week view.
3. Click and drag from the start time to the end time to create the event. The default event name, New Event, is highlighted automatically.
4. Type a name and location for the event.
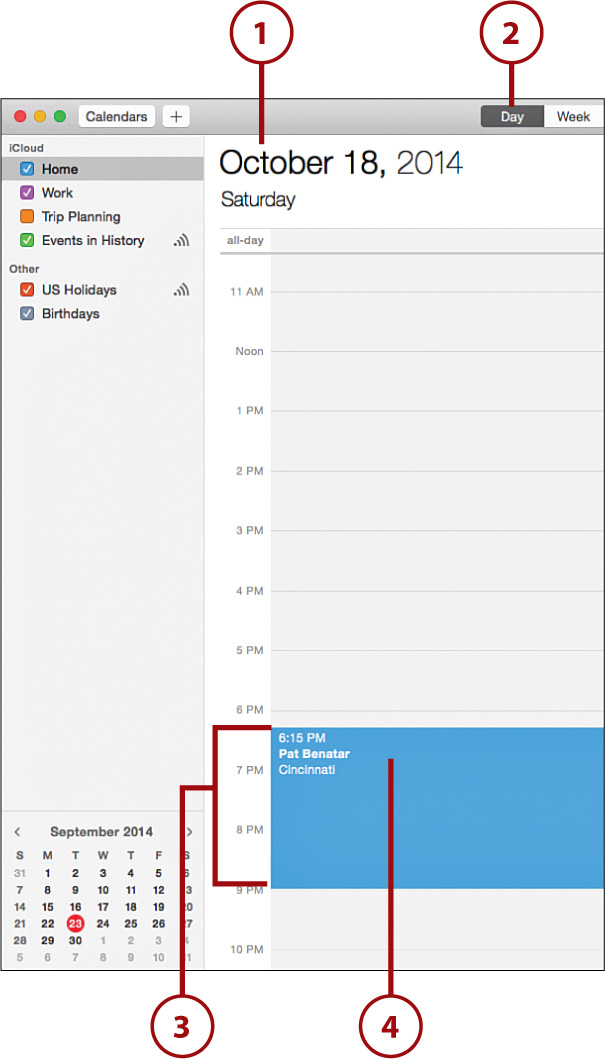
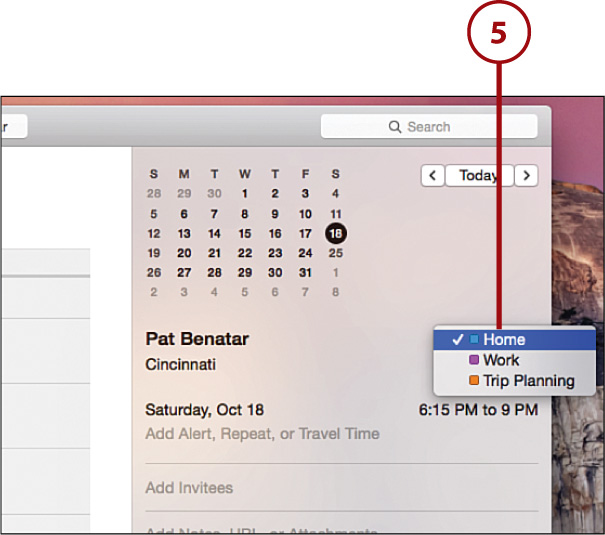
5. Click the drop-down in the upper-right corner of the event information to choose which calendar should hold the event.
Double-Click to Add
You can add an event in the month view of the calendar by double-clicking a day. This method, however, does not let you define the start and end time of the event initially, so you need to edit it later to add that information.
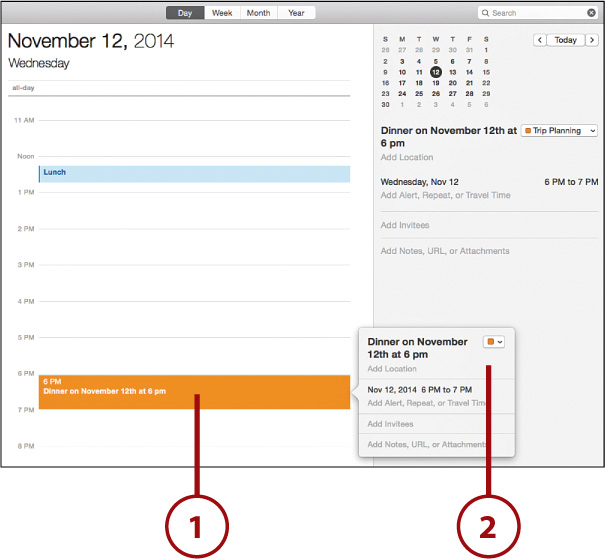
Using the Quick Event Feature
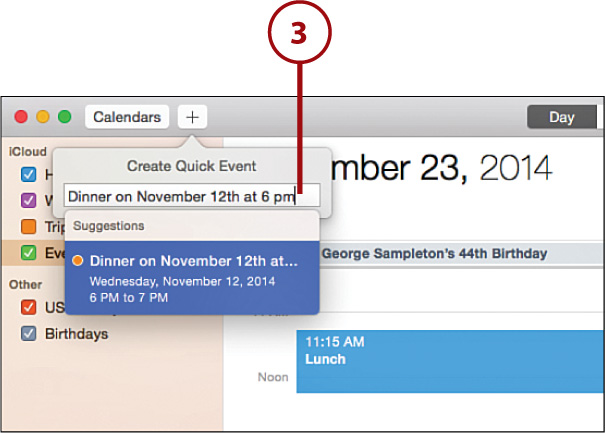
The Calendar application also supports a simple way of creating events without any calendar navigation at all. Quick Event provides simple, plain-text entry of new events directly from the Calendar toolbar. To use this feature, follow these steps:
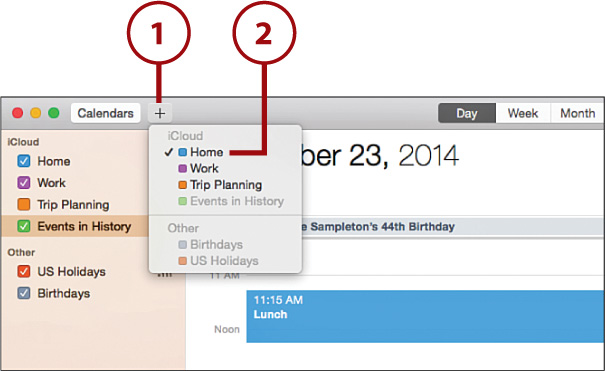
1. Click and hold the + icon in the Calendar toolbar.
2. Choose the calendar that should contain the new event.
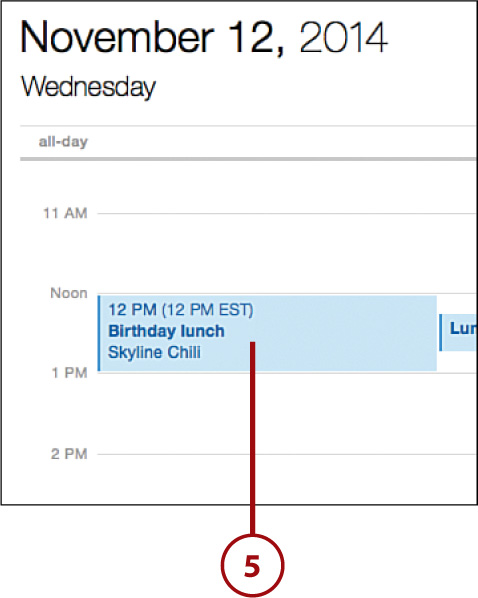
3. In the Create Quick Event field that appears, type a description of the event, such as “Dinner on November 12th at 6pm,” and press return.
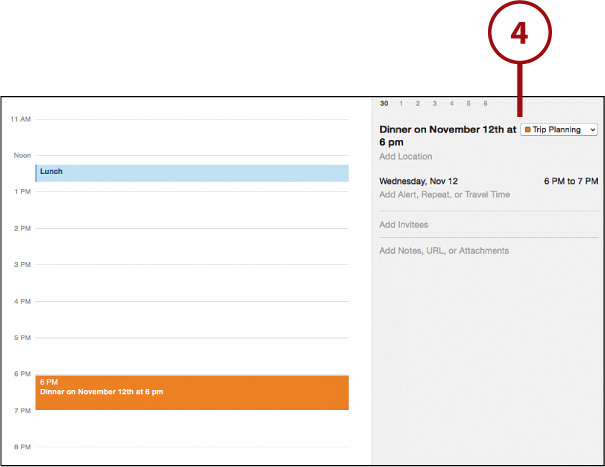
4. A new event is added and opened for additional editing.
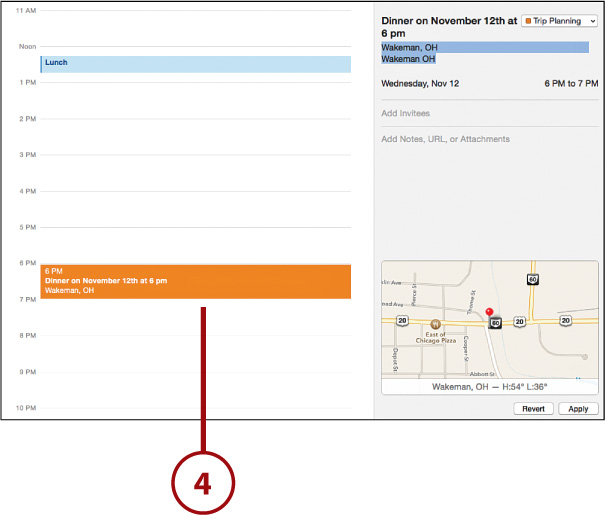
Editing Event Information
To edit the information for an event that you’ve created, first find the event on the calendar where you added it, and then follow these steps:
1. Find and double-click the event you want to edit.
2. An event summary window appears.
3. Click any of the available fields to change values such as start or end times, location, notes, and so on.

4. Click off of the event when you are finished editing to see the changes.
Browse and Schedule
Need to browse your calendar while editing an event? No problem. To turn the edit event pop-over window into a separate window, just click near the top and drag off of the calendar.
Sending Event Invitations
Calendar can work directly with Mail to send invitations for your events. When the invitees respond, their attendance status is updated directly in Calendar. Use the previous task to find and start editing an event, and then follow these steps to send invitations for that event:
1. Click the Add Invitees link.
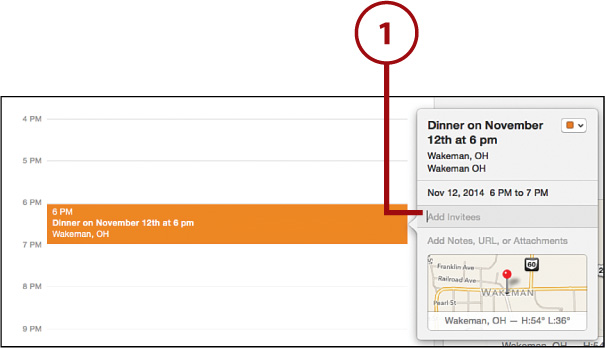
2. Enter email addresses in the field that appears, just as you would in Mail, pressing return after each one. Add as many as you’d like.
3. Click Send to send the invitations.
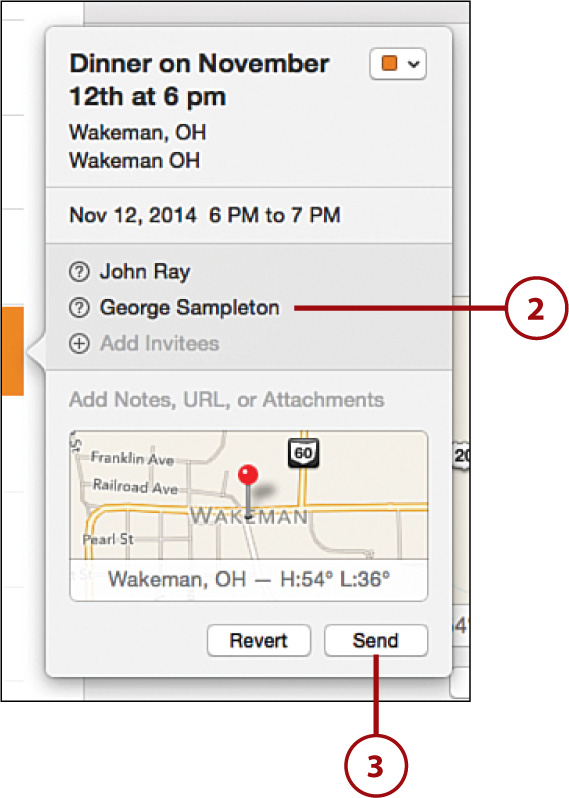
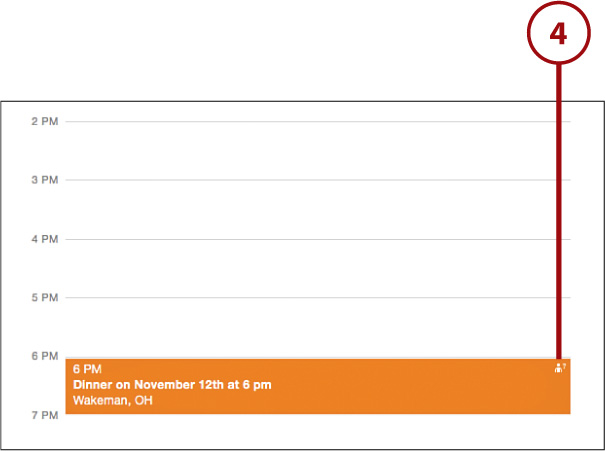
4. An icon appears in the upper-right corner of the event to show that invitations have been sent. A question mark indicates that responses haven’t been received from all invitees.
Setting Optional Attendees and Resending Invitations
After you’ve added an invitee to an event, you can click the name in the event summary or edit screen to show a drop-down menu that enables you to flag the person as an optional attendee or to re-send an invitation.
Checking Availability
If supported by your calendar server (such as Exchange), you can view an individual’s availability for events by selecting an event and then choosing Window, Availability Panel from the menu bar.
Accepting Invitations
You can easily add to your calendar invitations that you receive. Even though invitations are sent through email, Yosemite’s Mail program works with Calendar to automatically transfer the invitations to the Calendar Notifications area where you can act on them.
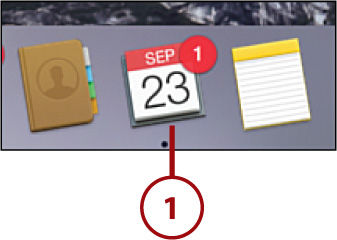
1. When a new invitation arrives, the Calendar application icon updates to show the count of invitations in the Dock.
2. The event is shown with diagonal lines through it in the Calendar to indicate it has not yet been added.
3. Click the Notification button to show the notification panel in Calendar. This is only visible when invitations are pending.
4. Use the Maybe, Decline, and Accept buttons to respond to the invitation.

5. Declined invitations are removed from your calendar; accepted and tentative invitations are added.
Changing Your Event Status
If you change your mind about an event, you can edit it in Calendar and change the My Status field to Accept, Maybe, or Decline.
Searching Events
If you’re a heavy scheduler, or have dozens of enterprise calendars to manage, sometimes it’s useful to be able to quickly search for events, which is a breeze in Calendar.
1. Make sure the checkboxes are selected for the calendars you want to search.
2. Enter your search terms in the Search field.
3. As you type, search options are displayed; pick the best option from the drop-down list or just press Return.
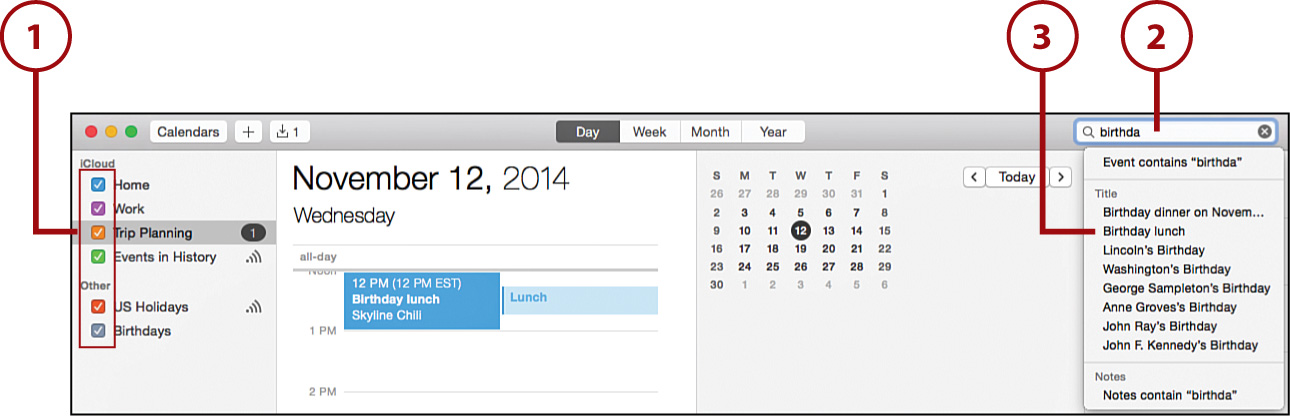
4. The results of the search are displayed in a pane at the right of the Calendar window. Click an entry to jump to that event.
5. Click the X in the search field to hide the search results.

Printing Calendars
Despite our best efforts, sometimes we can’t take our Macs (or even our iPads and iPhones) everywhere. When you need your calendar information in paper form, Calendar does an amazing job of printing calendar and itinerary views.
1. Choose File, Print from the Calendar menu bar item.
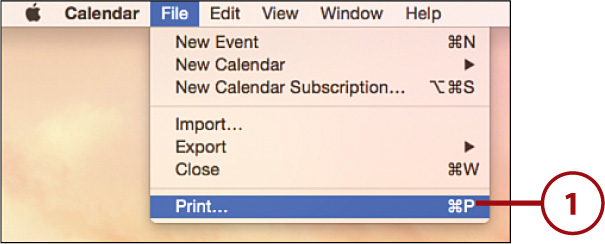
2. Set the view you want to print.
3. Set a time range for the calendar being printed.
4. Click the checkboxes beside each calendar to print.
5. Select which options should be added to the printed page.
6. Click Continue, which takes you to available printing options; after selecting options, you are ready to print.

Remembering with Reminders
Beyond simple events that happen on a given date, day-to-day life often requires that you keep track of multiple to-do lists in your head—from home repairs that need to be done to birthday shopping lists to grocery store visits. Using the Reminders app, you can create your own digital to-do lists and even make them contextually aware of your location—prompting you with reminders that apply only at home or the office.

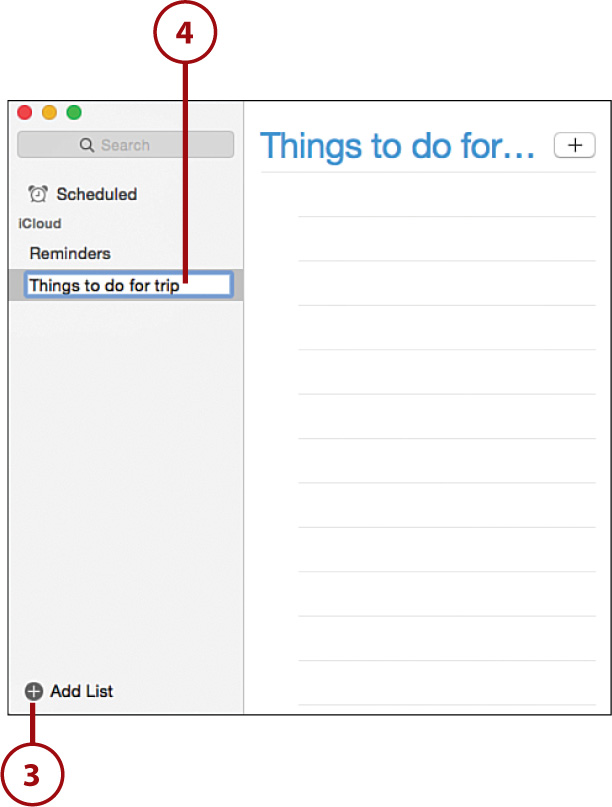
Creating a List (New!)
Reminders are organized into lists of related items. You can have as many lists as you want, but you need to have at least a single list to contain reminders at any given point in time. By default, you start with a single list called Reminders, but you can add as many as you’d like. To create a new reminder list, follow these steps:
1. Open Reminders from the Dock, Launchpad, or Applications folder.

2. If the Lists aren’t visible, click the arrow in the lower-left corner of the window.
3. Click the + Add List button near the bottom of the Reminders window.
4. A new list appears with the name selected. Type a new name and press return. The list is added and ready to be used.
Nothing Is Set in Stone
To rename a list, click its name in the left column in Reminders—it immediately becomes editable. Delete lists by clicking to select them and then pressing your Delete key.
Adding a Reminder
After you’ve created a list, you’ll want to fill it with individual reminders. To create a new reminder within a list, complete the following actions:
1. Click to select the list you want to add a reminder to.
2. Click the + button in the upper-right corner of the Reminders window.
3. The cursor moves to a new line in the reminder list. Type the name for your reminder.
4. Press return to add additional reminders, or click on an empty line to end editing.

Setting Reminder Attributes, Including Location
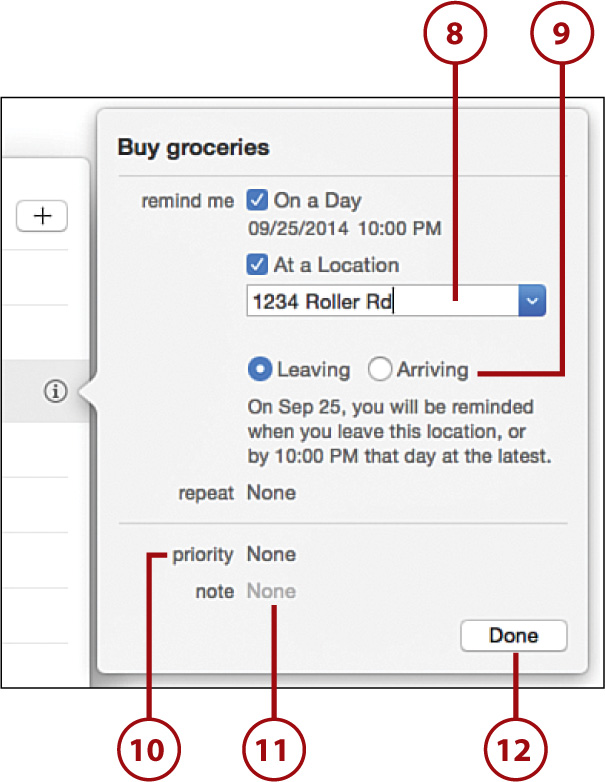
A reminder can be more than just a title in a list—it can contain a date, a location, a repeating schedule, and more. Set the attributes for a reminder by doing the following:
1. Hover your pointer over a reminder item. An i icon appears near the right side of the reminder.
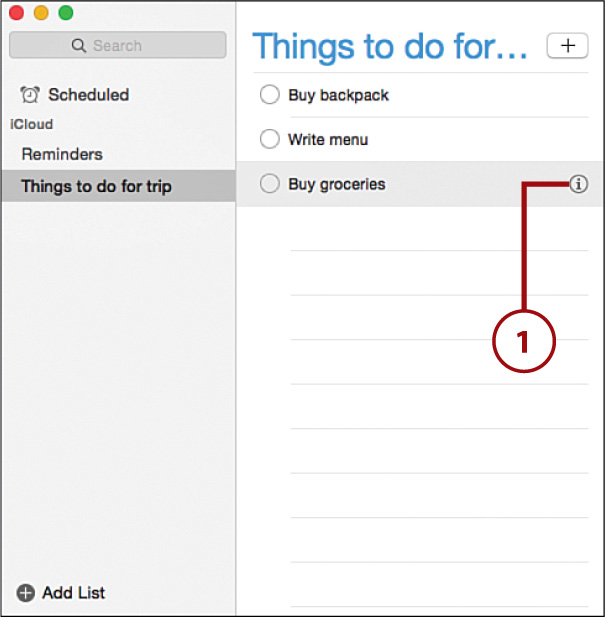
2. Click the i to show the reminder settings.
3. Use the title field to change the name of the reminder.
4. Click the On a Day checkbox to set a specific date/time for the reminder.
5. Use the date/time field to configure when the reminder is shown.
6. Use the Repeat drop-down list to set a repetition schedule.
7. Click the At a Location checkbox to receive the reminder when leaving or arriving at a given location.
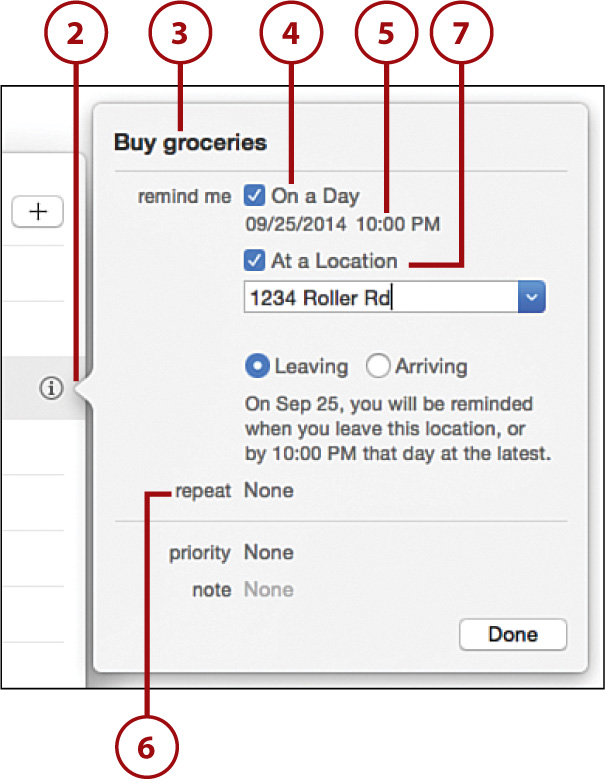
8. Use the drop-down list/field to choose a contact’s address, or enter a new address to be used in conjunction with the location-aware reminders.
9. Set whether the reminder occurs when arriving or leaving.
10. Set a priority for the reminder using the priority pop-up menu.
11. Use the Note field to set any additional notes related to the reminder.
12. Click Done to save the reminder.
Location Reminders Require Your Location!
The first time you use reminders based on a location, you might be prompted to enable Location services. Click Open Privacy Preferences when prompted, or follow the instructions in Chapter 14, “Securing and Protecting Your Mac.”
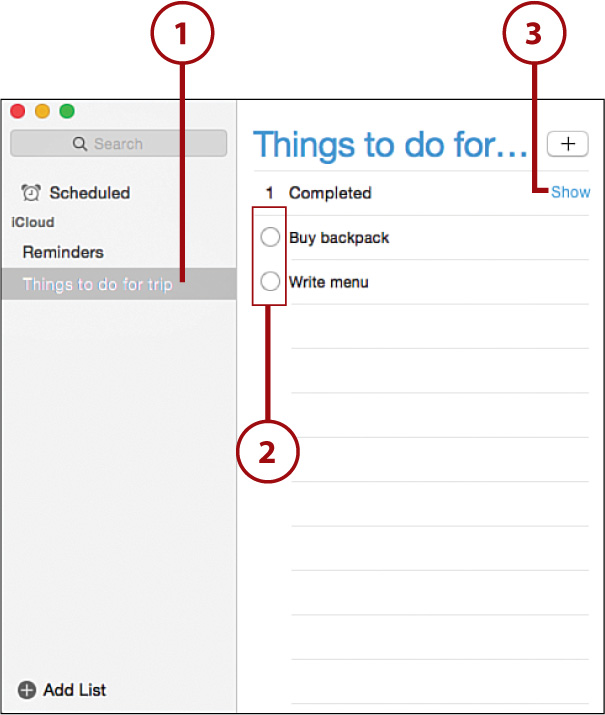
Completing Reminders
When you’re done with a reminder, you’ll want to indicate that it is completed. To set the completion status of a reminder, follow these steps:
1. Click the list that contains the reminder you want to complete.
2. Click the checkbox to the left of the reminder.
3. The reminder moves to a Completed section of the list, which you access by clicking Show.
Don’t Want to Do It? Just Delete It!
To delete a reminder or a reminder list (rather than having to actually follow through on it), just highlight it and press your Delete key.
Finding Reminders
Because reminders can be created across many different lists and many different dates, it’s helpful to be able to quickly search your lists to figure out what you are supposed to be remembering, and when you should be remembering it. Thankfully, Reminders makes it easy to search all your lists and all your reminder dates very quickly.
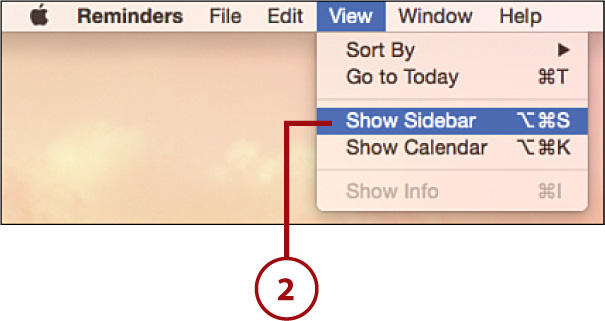
Viewing Reminders by Date (New!)
If you’ve set dates for reminders, it’s easy to see what reminders are associated with what dates (across all your lists) using the built-in mini-calendar in the Reminders application:
1. Show the mini-calendar (if hidden), by choosing Show Calendar from the View menu.
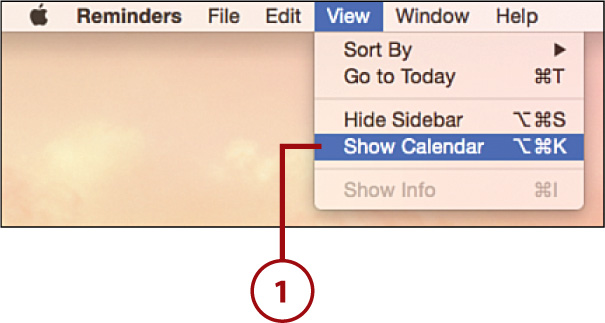
2. Use the forward and backward arrows to navigate the calendar.
3. Click an individual date to show reminders associated with that day.
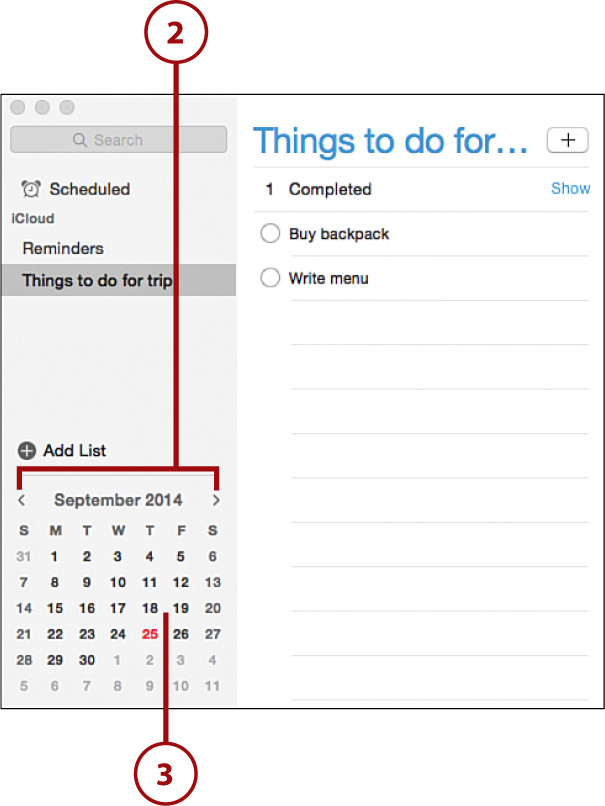
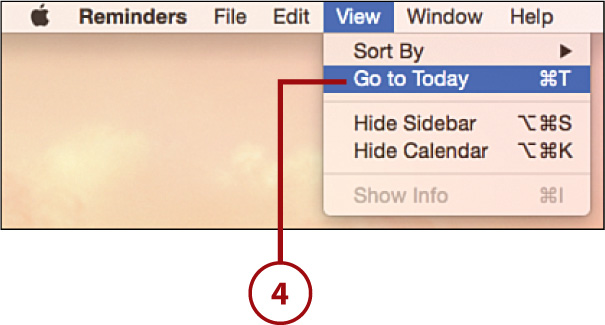
4. Choose View, Go to Today from the menu bar to quickly jump to the current date.
All Scheduled Reminders, All in One Place
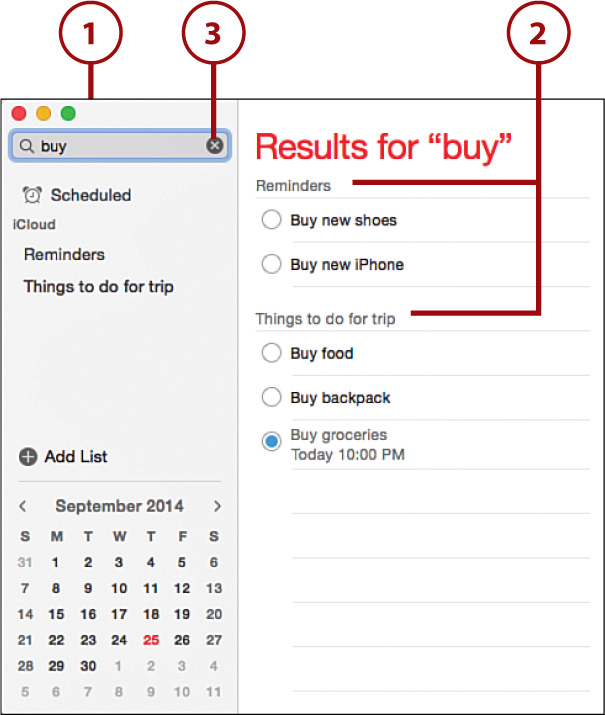
To show all the scheduled reminders in all your lists, click the Scheduled item that appears at the top of the sidebar. This entry is only visible when scheduled reminders have been added.
1. Type a search term in the Search field at the top of the sidebar.
2. The results are shown, organized by list, on the right side of the window.
3. Click the X in the search field to clear the results.
Using iCloud and Server-Based Reminders
As you might have noticed, reminders are very similar to Calendar entries. They’re so similar, in fact, that they use the same server connections to manage their information. To learn how to configure Reminders to use an iCloud account, follow the instructions in “Connecting to iCloud Calendar Syncing” earlier in this chapter. Similarly, to connect to a different server for your reminders (Exchange or Google, for instance), follow the instructions in “Connecting to Other Calendar Servers.”
Choosing Servers When Creating a New List
If you are connected to several different servers that each provide Reminder storage, you can choose which one a new reminder list is created on by clicking and holding the + icon in the bottom-right corner when you create a new list.
Keeping Track with Notes
Calendars and reminders capture much of our hectic schedules, but life can also be less structured—with new information and ideas coming at us from a dozen different directions. To keep us from losing our idea for “the next big thing,” Yosemite includes a simple and effective note-taking application—Notes. Like the other apps in this chapter, Notes is also iCloud/server-connected, meaning that no matter where you take your notes, they’ll be seamlessly accessible across all your devices.

Managing Folders
Thoughts and ideas are rarely truly random. Chances are, you take notes about things you want to do at home, at work, with the kids, and so on. To create a sense of order, you’ll want to start your OS X note-taking by setting up some folders for yourself.
Adding Folders
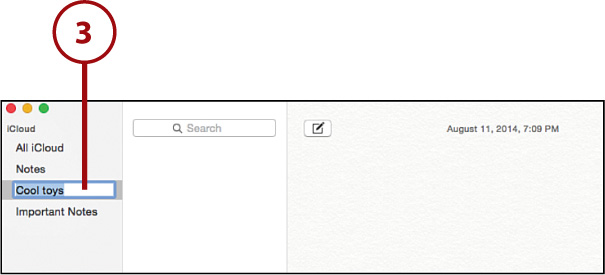
By default, notes are added to a default folder called Notes. To add a new folder of notes, do the following:
1. Open Notes using the icon in the Dock, Launchpad, or Applications folder.
2. Choose File, New Folder from the menu bar, or right-click (Control-click) in the folder list and choose New Folder.
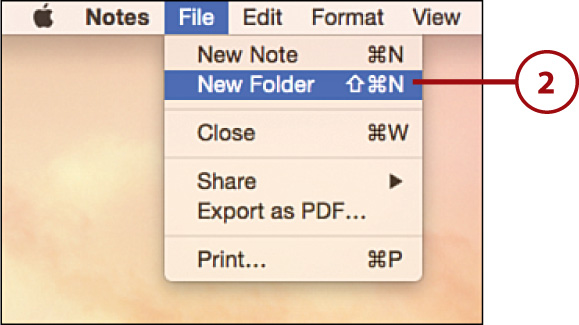
3. A new folder appears with its name selected and editable. Type a new name for the folder and press return to save it.
Delete to Delete
Deleting a folder in Notes is the same as deleting a List in Reminders. Click to select its name, and then press the Delete key.
All On My Mac
The “All” folders (All On My Mac, All iCloud) can’t be removed. They contain all the notes stored on that device and appear after you have created multiple note folders.
Adding Notes
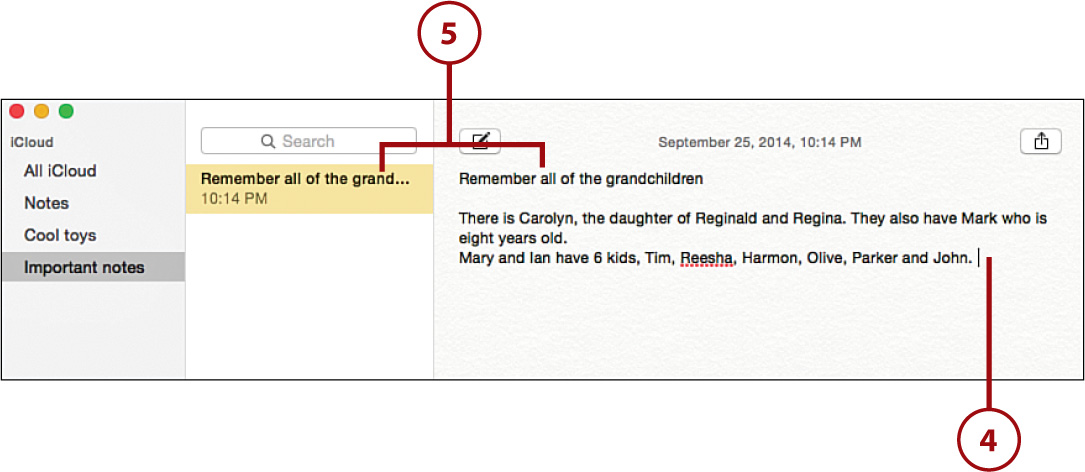
The most import aspect of using the Notes application is also the easiest—adding notes. To add a new note, follow these steps:
1. Select the folder that should contain the note.
2. Click the Compose icon.
3. A New Note title appears at the top of the list, and the text entry cursor appears in the content area, ready to edit.

4. Type your note as you see fit.
5. The top line of the note automatically becomes the title for the note in the column to the left of the content.
6. If you decide you don’t want a note, select it and press the Delete key to remove it (not shown).
Prettify Your Most Mundane Notes
Your notes don’t have to be plain text—you can drag or paste in pictures or other media. You can also use the Format menu to apply fonts, add lists, or indent your text.
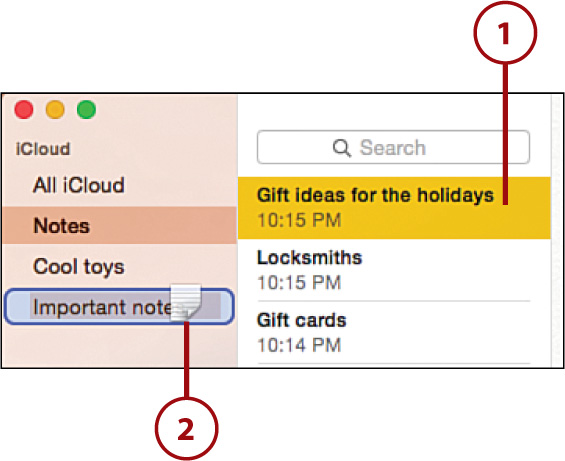
Moving Notes Between Folders
If you’ve created notes in one folder that you later want to move to another, this is easily accomplished with a simple drag and drop. Do the following to move notes between folders:
1. Click a note title to select it. Hold the Command key to select multiple notes at a time.
2. Click and drag from the selected note to a folder in the folder list. The notes are immediately transferred to the folder.
Searching and Displaying Notes
Notes can contain quite a bit of information, and after you’ve amassed a library of hundreds of notes, you might find yourself trying to track down a single tiny bit of information within a note. To search the available notes (in all note folders), just follow these steps:
1. Choose a folder of notes to search or view, or All Notes to access all folders.
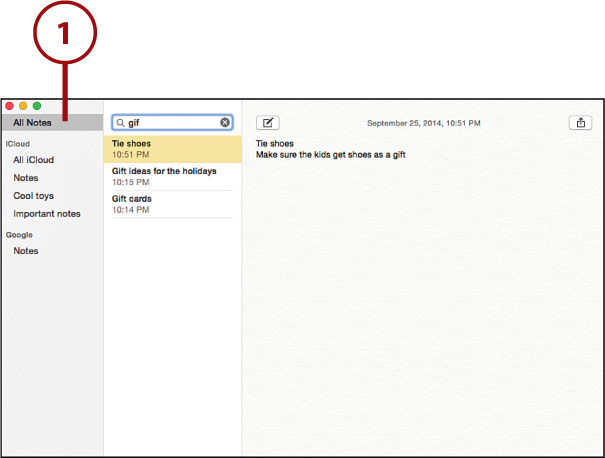
2. Type a search term in the search field to filter the notes being displayed (if desired).
3. The results are shown in the center column of the window.
4. Click a result to show that note’s content to the right of the search results.
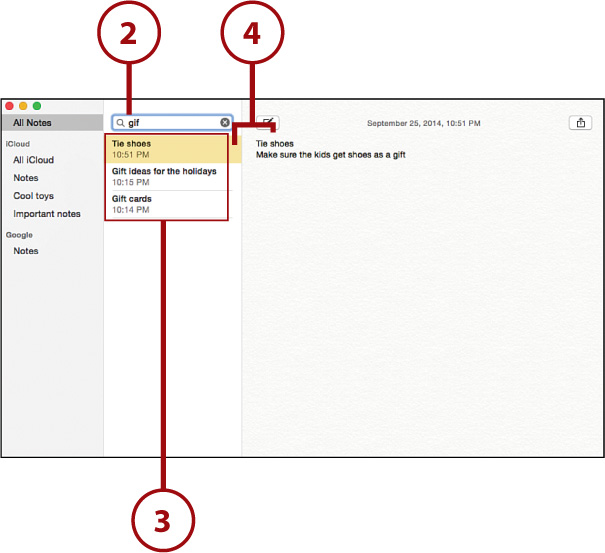
5. Double-click a note’s title to show it in a new window.
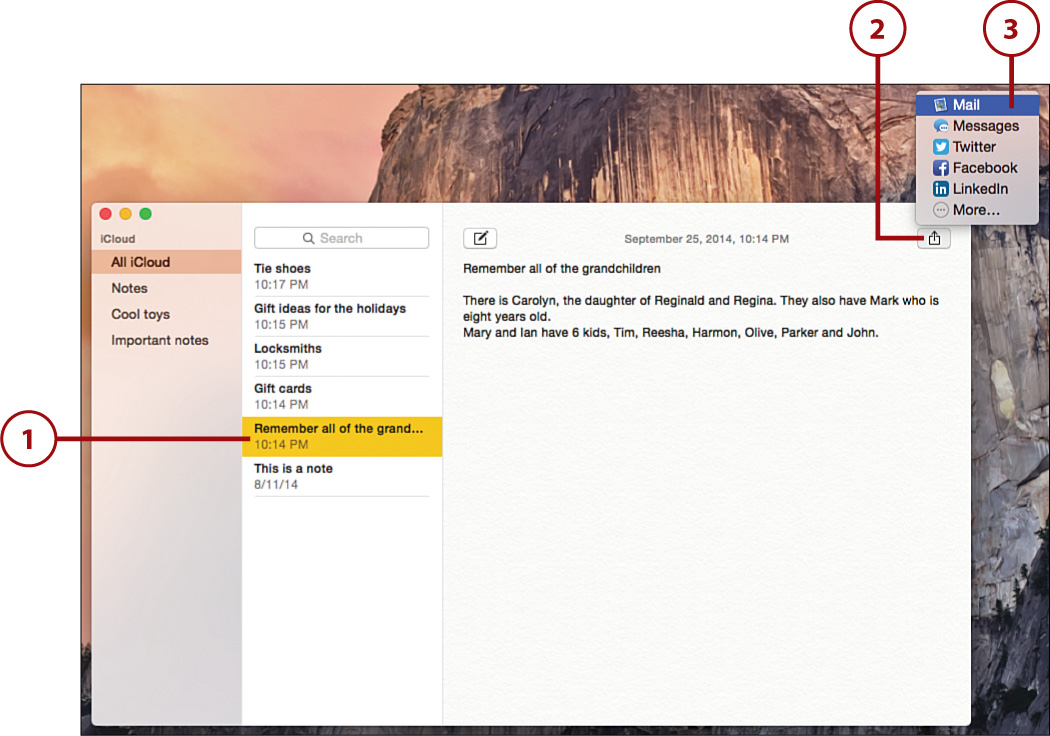
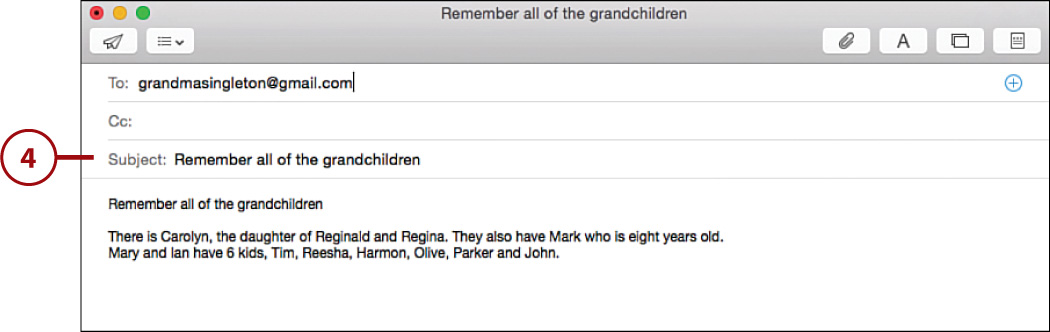
Sharing Notes via Email and Messages
To share a note via email or Messages, you can use a Yosemite Share button. For detailed information on the process, refer to Chapter 6. The basic process works like this:
1. Navigate to a note you want to share.
2. Click the Share button to show the sharing options.
3. Choose the method of sharing that you’d like to use.
4. Your choice launches the appropriate supporting application and attaches the note for sending.
Using iCloud and Server-Based Notes
Notes, like the other utilities in this chapter, are stored, by default, on an available server account—iCloud, if configured. To set up or verify an existing server setup for your notes, you can use the instructions in the next two sections.
Connecting to iCloud Note Syncing
If you’ve already established an iCloud account, connecting Notes to iCloud is just a matter of clicking the right checkbox. If you do not have an iCloud account, you should review Chapter 4 for information on setting one up.
1. Click the System Preferences icon on the Dock and then click iCloud.

2. Check the box beside Notes.
3. Close the System Preferences. Your Notes application is now connected to iCloud.

Connecting to Other Note Servers
As you’ve probably guessed, Exchange servers and Google accounts can also provide shared note storage. To use one of these servers to share notes between your computers or devices, follow these steps:
1. Click the System Preferences icon on the Dock and then click Internet Accounts.
2. Choose the service providing note storage from the list on the right.
3. The account creation window appears. Use the fields in the window to configure your account information.
4. Click Set Up or Continue to proceed.

Choose a Folder to Set Your Server
If you have multiple servers set up, the process of creating a new folder is a bit ambiguous as to what server it will be created on. To force the folder to be created on a specific server, first make sure the Notes folder list is visible and then click a folder name on the server you want to use. Subsequent new folders will be created on that server.
5. If you’re setting up a service that provides more than just calendars (such as Exchange, Yahoo!, or Gmail), you are prompted to automatically set up corresponding email accounts and contact servers. Be sure to click the checkbox beside Notes.
6. Click Done.
7. Close the System Preferences when finished.
Your Utilities, Everywhere
Wish you had access to the suite of utilities described in this chapter wherever you may be? You do! You can access Calendars, Contacts, Notes, and Reminders using Apple’s iCloud web service. Just sign in at http://www.icloud.com/ to use Apple’s meticulously crafted and stunningly beautiful web versions of these useful tools.