
14. Working with the Cordova APIs
So far I’ve shown you a lot about Cordova, how to set up a Cordova development environment and use the tools provided by the Cordova team and the mobile platform vendors. Now it’s time, in this chapter and the two that follow, to talk more about how to build Cordova applications. In this chapter, I introduce you to the Cordova APIs and show you how to use them in your applications.
I don’t go too deeply into each API. The Cordova documentation is a lot better than it used to be, but I show you at a high level how the APIs work and how to use them in your applications. There’s simply not enough room here to do more, especially considering how useful the API docs are today. If you are looking for more detailed coverage of APIs as well as more complete examples, you will find them in this book’s companion, the Apache Cordova API Cookbook (www.cordovacookbook.com).
In the next chapter (“Cordova Development End to End”), I describe the end-to-end Cordova development process with a complete example. In Chapter 16, “Creating Cordova Plugins,” I show you how to write your own Cordova plugins and use them in your applications.
The Cordova Core APIs
Hybrid applications become much more powerful when they can do things that simply cannot be done within the mobile browser directly. As mentioned in the first chapter, one of the purposes behind Cordova was to provide mobile web applications running within the Cordova container access to native APIs. Cordova provides access to only a subset of the APIs available on a mobile device; the current suite of core Cordova APIs consists of
![]() Battery Status
Battery Status
![]() Camera
Camera
![]() Console
Console
![]() Device
Device
![]() Device Motion (Accelerometer)
Device Motion (Accelerometer)
![]() Device Orientation (Compass)
Device Orientation (Compass)
![]() Dialogs
Dialogs
![]() FileSystem
FileSystem
![]() File Transfer
File Transfer
![]() Geolocation
Geolocation
![]() Globalization
Globalization
![]() InAppBrowser
InAppBrowser
![]() Media
Media
![]() Media Capture
Media Capture
![]() Network Information (Connection)
Network Information (Connection)
![]() Splashscreen
Splashscreen
![]() StatusBar
StatusBar
![]() Vibration
Vibration
In some cases, an API mimics a capability that is already provided in modern mobile browsers. In most cases, applications simply use the existing API exposed through the native browser WebView embedded in the Cordova container. For devices whose browser does not expose the API, the Cordova team will implement the API so it is available across all supported mobile device platforms. You can see examples of this in the Geolocation and File APIs; they’re pretty much standard on most mobile devices, so there’s little the Cordova team has to do with them. As an example, take a look at the documentation for the Geolocation API:
This API is based on the W3C Geolocation API Specification. Some devices (Android, BlackBerry, bada, Windows Phone 7 and webOS, to be specific) already provide an implementation of this spec. For those devices, the built-in support is used instead of replacing it with Cordova’s implementation. For devices that don’t have geolocation support, the Cordova implementation adheres to the W3C specification.
Because the File API is a standard that is already available in the mobile browser, I’m not going to cover it in this chapter. The Geolocation API falls into the same category, but in the hardware section of the chapter, I’ll be covering other APIs that work just like it, so Geolocation will get some coverage there as well. The Contacts API is also based on a standard, but I’ll give it some coverage here as it’s unique in how it works compared to other Cordova APIs.
As mentioned in previous chapters, instead of APIs being readily available to any Cordova application, most of the core APIs are implemented as plugins. So, before your Cordova application can use any of the Cordova APIs, you will usually need to add the associated plugin to your project. To do this, open a terminal window, navigate to a Cordova project folder, and issue a command similar to the following:
cordova plugin add <path_to_plugin>
So, for example, to use the Camera API in your Cordova application, you must add the camera capabilities using the following command:
cordova plugin add org.apache.cordova.camera
This will pull the Camera plugin from the public plugin repository (currently www.npmjs.org). If you want to use the Camera plugin from a local installation, you can pass in instead the local file path pointing to where the plugin files are located as shown here:
cordova plugin add d:plugin_folderplugin_id
You can find more information about how to use the CLI to manage plugins in Chapter 4, “Using the Cordova Command-Line Interfaces.”
Working with the Cordova API Documentation
To access the Cordova API documentation, point your browser of choice to www.cordova.io, then click the Documentation link at the top of the page. When I select that link, I am redirected to http://cordova.apache.org/docs/en/4.0.0/, which points to the appropriate language (English) version and to the latest and greatest released version of the framework.
On the Documentation page, use the drop-down menu in the upper-right corner to switch to the documentation for previous Cordova versions. The drop-down provides access to the documentation for the current Cordova version, previous versions, and even one future release of the framework called Edge. The Cordova dev team is working hard at adding support for additional languages, so you will see languages other than English represented in the docs.
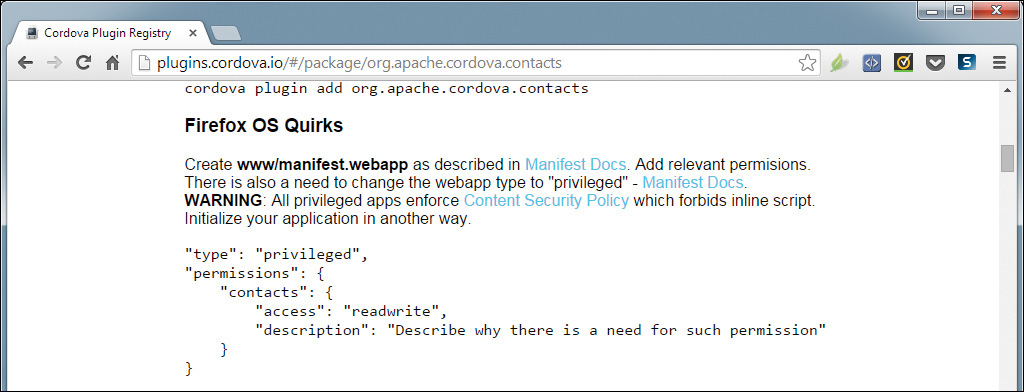
At the bottom of the main docs page is a link to the Plugin APIs documentation. Click on that link to view the list of Cordova APIs. When working with the APIs, you will want to pay special attention to the “Quirks” section of the documentation for each exposed API; an example is the Camera API page shown in Figure 14.1.

Many of the APIs display different behavior on certain hardware platforms. As hard as the Cordova development team works to ensure consistency across all platforms, on some platforms an API needed to implement some feature simply isn’t available or doesn’t work as needed for the Cordova API. If you’re trying something with a Cordova API and it is not working the way you expect, check out the quirks for that particular API.
Checking API Availability
If you try to use one of the Cordova APIs and the API isn’t available, either because you forgot to add the appropriate plugin or because the API hasn’t been implemented for the particular platform, you usually won’t see any error messages as the Cordova container doesn’t surface errors. To get around this, one of the approaches you can use is to manually check for the existence of the API before trying to use it. Listing 14.1 shows a sample application I created to highlight this approach.
<!DOCTYPE html>
<html>
<head>
<title>Test Application</title>
<meta charset="utf-8" />
<meta name="format-detection" content="telephone=no" />
<meta name="viewport" content="user-scalable=no, initial-scale=1,
maximum-scale=1, minimum-scale=1, width=device-width,
height=device-height" />
<script src="cordova.js"></script>
<script>
function onBodyLoad() {
document.addEventListener("deviceready", onDeviceReady, false);
}
function onDeviceReady() {
navigator.notification.alert("Cordova is ready!");
}
function doTest() {
if (navigator.camera) {
navigator.notification.alert("Houston, we have a Camera!");
} else {
navigator.notification.alert("No Camera, sorry.");
}
}
</script>
</head>
<body onload="onBodyLoad()">
<h1>Test Application</h1>
<p>This is a Cordova application that illustrates how to check for Cordova API
availability.</p>
<button onclick="doTest()">Click Me!</button>
</body>
</html>
In the application, the doTest function includes the following code:
if (navigator.camera) {
navigator.notification.alert("Houston, we have a Camera!");
} else {
navigator.notification.alert("No Camera, sorry.");
}
What this is doing is checking to see if the camera object exists. If it does, the application does whatever it wants to do with the Camera API. If the check fails, the application displays an alert (described later in the chapter) that lets the user know the Camera functionality isn’t available.
What you can do is maintain a list of the different key APIs your application needs, then in the function that executes when the deviceready event fires (described in Chapter 2, “Anatomy of a Cordova Application”) check to see that the API is available. Then, for APIs that aren’t available, you can tell the user or, more appropriately, disable the application capabilities that utilize the unsupported APIs.
Catching Errors
One of the biggest sources of frustration for me as a Cordova developer is that I’ll do something in my application’s code and nothing will happen when the application runs. As I’ve described before, the Cordova container fails silently when it encounters an error in the application’s JavaScript. When this happens, you might see something written to the console indicating the source of the error, but most often you won’t. To get around this problem, you can add an onerror function to the application:
window.onerror = function (msg, url, line) {
var idx = url.lastIndexOf("/");
if (idx > -1) {
url = url.substring(idx + 1);
}
//Build the message string we'll display to the user
var errStr = "ERROR in " + url + " (line #" + line + "): " + msg;
//Write the error to the console
console.error(errStr);
//Tell the user what happened
alert(errStr);
return false;
};
Put this code anywhere within your application’s JavaScript code, but outside of any functions, and when an error is encountered, an error message is written to the console and the same error message is displayed in a dialog.
My biggest issue with testing new Cordova applications is that I often forget to add one or more critical plugins to the project. Using the onerror code shown above, I at least get an indication that a particular API isn’t available when I run the application for the first time.
You may be wondering why I didn’t use the Cordova alert method in this code. That’s because if an error occurred before the deviceready event fired, the Cordova alert dialog wouldn’t show because Cordova wouldn’t have initialized all of its plugins yet, especially the Dialogs plugin.
Setting Application Permissions
Because most of the Cordova APIs leverage native APIs and many of them have security restrictions placed on them, in order to protect the user and/or device, developers using some Cordova APIs must set special configuration settings for their applications before deploying them to devices. These settings configure the native application container so that it informs the mobile OS during installation that it uses specific restricted APIs. This causes the mobile OS for some platforms to prompt the user of the application during installation to allow or disallow the restricted API or APIs for the application.
As an example of how this will appear to users, take a look at Figure 14.2, which shows the security prompt displayed when installing the default HelloCordova application (described in Chapter 2) on an Android device.

On many mobile device platforms, if a particular API or feature isn’t enabled for a Cordova application as shown in this section, or if the user disables the feature by canceling the dialog shown in Figure 14.2, the portion of the application that uses the feature will simply fail silently when the application runs.
You would think that the application would throw some sort of error when it tries to use a disabled or restricted API, but that’s not the case—the application simply stops the execution of the JavaScript code and you’re left scratching your head as to why the feature isn’t working. If you’ve implemented a feature and it’s simply not working and not telling you why, be sure to check your application permissions.
The good news is that the Cordova CLI manages setting application permissions for you. If there are special settings you must set in order to use a specific feature, you can find the information you need in the API docs. Figure 14.3 shows a portion of the documentation page for the Contacts API. Here you can see the specific application permissions that must be set on Firefox OS to enable a particular feature.
OK, now that I’ve covered all of the background information, let’s start talking about the APIs.
Cordova Objects
Some of the Cordova APIs are not necessarily APIs; instead, they’re useful objects that are exposed to a Cordova application through the plugin. In this section, I’ll describe the connection and device objects and show you how to use them in your Cordova applications.
Connection Type
There are times when a mobile application needs to know what type of network connection it has available to it. With many mobile carriers capping data usage, the application should be careful when doing large updates to make sure it is doing so, for example, on a lower-cost (free) Wi-Fi connection rather than a cellular connection. As a best practice, mobile developers should categorize an application’s data usage patterns and write their code in order to minimize the impact on the device and the device user’s data plan costs.
To accommodate this, the Cordova framework exposes a connection object that can be used to determine the network connection type currently in effect. To leverage the information exposed by the connection object, you must first add the Network Information plugin to a project by opening a terminal window, navigating to the Cordova project folder, and issuing the following command:
cordova plugin add org.apache.cordova.network-information
With that in place, a Cordova application can determine the connection type by executing the following JavaScript code:
var ct = navigator.connection.type;
Next, you can compare the value of ct against the possible connection types exposed through the following properties:
![]()
Connection.CELL
![]()
Connection.CELL_2G
![]()
Connection.CELL_3G
![]()
Connection.CELL_4G
![]()
Connection.ETHERNET
![]()
Connection.NONE
![]()
Connection.UNKNOWN
![]()
Connection.WIFI
So, if you want to make sure the application has a network connection before you do something networky, your application can do something like this:
ct = navigator.connection.type;
if (ct != Connection.NONE) {
console.log("You have a connection");
//do whatever you want to do with the connection
} else {
//Warn the user that they can't do that without a
//network connection
alert("No connection available!");
}
Warning
Your application has to query the connection object every time it wants to know what the current network status is. The ct variable shown in the previous example won’t maintain a valid status value as the network status changes. When I cover events later in the chapter, you will see how you can monitor network connectivity.
If you are looking for a specific network type, your application can do something like this:
ct = navigator.connection.type;
if (ct == Connection.WIFI) {
console.log("You have a WI-FI connection");
//do whatever you want to do over the connection
} else {
//Warn the user that they can't do that without a WI-FI
//network connection
alert("Function requires WI-FI network connection!");
}
An application can also monitor the network status in real time using the online and offline events described later in the chapter.
device
The Cordova framework also exposes a device object that can be used to determine a limited amount of information about the device. The available device properties are shown in the following list:
![]()
device.cordova
![]()
device.platform
![]()
device.uuid
![]()
device.version
![]()
device.model
To leverage the information exposed by the device object, you must first add the Device plugin to your project by opening a terminal window and issuing the following CLI command from the Cordova project folder:
cordova plugin add org.apache.cordova.device
To see an example of the device object in action, take a look at the Hello World #3 application described in Chapter 2.
Alerting the User
There are often times when developers will want to notify their application users of some activity. A web application can display some information on a page within the application or even open up an HTML popup, but in both cases, the management of the notification (and its removal from view) is the responsibility of the developer. To make this easier, the Cordova API includes some JavaScript functions a developer can use to provide a notification to users. There are two types of notifications: what I call hardware notifications and visual notifications. Each will be described in the following two sections.
Hardware Notifications
Any modern smartphone provides APIs that allow a developer to have an application make the device beep or vibrate; Cordova exposes similar methods an application can call to make the device beep or vibrate as well.
To leverage hardware notifications in your Cordova applications, you must first add the Vibration plugin to your project by opening a terminal window and issuing the following CLI command from the Cordova project folder:
cordova plugin add org.apache.cordova.vibration
beep
To cause a mobile device to beep, a Cordova application should make a call to the navigator.notification.beep method. To have the device vibrate, a Cordova application should make a call to the navigator.notification.vibrate method. Each takes a parameter that controls how many times or for how long the notification lasts as shown in the examples below.
The beep method accepts a parameter that controls how many times the device beeps when the method is called:
navigator.notification.beep(quantity);
To have a device beep three times, simply pass in a 3 as shown in the following example:
navigator.notification.beep(3);
vibrate
The vibrate method accepts a duration parameter instead that controls how long the vibration lasts:
navigator.notification.vibrate(duration);
Duration is expressed in milliseconds, so to make the device vibrate for half a second, you would pass a value of 500 to the vibrate method as shown in the following example:
navigator.notification.vibrate(500);
To make the device vibrate for a second, do the following:
navigator.notification.vibrate(1000);
Visual Notifications
Cordova exposes a number of methods a web application can call to allow the application to interact with the user. Web developers have always had access to the synchronous JavaScript alert(), confirm(), and prompt() methods that can be used to interact with the user, but the Cordova versions of these functions are asynchronous and allow for additional control over the content in the dialog that is displayed to users.
To leverage visual notifications in your Cordova applications, you must first add the Dialogs plugin to your project by opening a terminal window and issuing the following CLI command from the Cordova project folder:
cordova plugin add org.apache.cordova.dialogs
alert
To display an alert dialog in a web application, a web developer could execute the following JavaScript code:
alert("This is a JavaScript alert.");
When the code runs in a Cordova application, you will see something similar to what’s shown in Figure 14.4.

Cordova exposes its own alert method that you can execute using the following code:
navigator.notification.alert("This is a Cordova Alert.",
myCallback, "Alert Test", "Click Me!")
When the code runs, you will see a dialog similar to the one shown in Figure 14.5.

Notice that I was able to set the title for the dialog as well as the text on the button the user taps to close the dialog.
I mentioned that the JavaScript alert is synchronous and the Cordova alert is asynchronous; this means that the JavaScript alert will stop application execution until the user taps the OK button. The Cordova alert will display and program execution will continue.
Now, in that example, I didn’t tell you a lot about the format of the call to alert; in the following example, you can see the descriptive names of the parameters:
navigator.notification.alert(message, [callback], [title], [buttonLabel])
Note
In this example, the brackets around a parameter indicate that the parameter is optional.
Notice the callback parameter; it’s there to allow you to define the function that is executed when the user taps the button on the alert dialog. The way you use the Cordova alert is to execute the alert method, then use the callback function to continue program execution after the user taps the button. Any code you have after the call to alert is executed by the container, perhaps finishing out the code in a JavaScript function. The application will continue to run or may sit idle until the user taps the button, then the code in the callback function is executed.
If you want, you can pass in a null value for the callback parameter:
navigator.notification.alert("This is a Cordova Alert.",
null, "Alert Test", "Click Me!")
In this scenario, by not telling alert what function to call after the user taps the button, the Cordova container will render the specified alert dialog, then continue executing the JavaScript code that follows the call to alert and not act when the user taps the button.
The values for callback, title, and buttonLabel are optional; the value for title passed to the method will be used as the title for the dialog, and the buttonLabel value will be used as the text on the single button on the dialog.
confirm
The Cordova confirm method is similar to alert except that it allows you to specify more than one button label, and the callback function is passed a numeric value indicating which button was tapped by the application user. Here’s the method signature:
navigator.notification.confirm(message, [callback], [title],
[buttonLabels]);
The following code snippet shows how to use the Cordova confirm method:
navigator.notification.confirm('Do you want to continue?',
doContinue, 'Please confirm', 'Yes, No'),
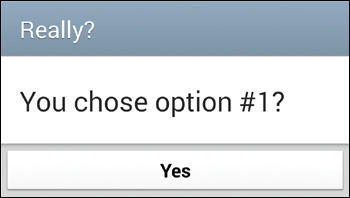
function doContinue(buttonNum){
navigator.notification.alert('You chose option #' +
buttonNum + '?', null, 'Really?', 'Yes'),
};
The value passed to the callback function is a numeric value indicating which button was tapped. The callback function will receive a 1 if the first button was clicked, a 2 for the second button, and so on. Figure 14.6 shows confirm in action on an Android device.
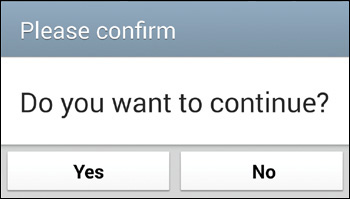
Figure 14.7 shows the results of the doContinue function being executed, indicating that the Yes button was tapped in Figure 14.6.
prompt
Often a Cordova application will need to collect information from the application user outside of a web form; Cordova provides the prompt method to accommodate this requirement. The method works just like the other methods discussed in this section and has the following method signature:
navigator.notification.prompt(message, [callback], [title],
[buttonLabels], [defaultText]);
To use prompt in your Cordova applications, make a call to the prompt method as shown here and provide the necessary callback function to process the user’s input:
navigator.notification.prompt('Please enter your nickname',
gotData, 'Nickname?', ['Cancel', 'OK'], 'Jimmy'),
function gotData(res) {
navigator.notification.alert('You chose option #' +
res.buttonIndex + '
You entered: ' + res.input1, null,
'Results', 'OK'),
};
Notice that prompt uses a different format for button labels than confirm. prompt expects an array of strings as shown in the previous example, and confirm expects a single string with the button labels separated by a comma.
Figure 14.8 shows the example code in action on an Android device.

Figure 14.9 shows the results displayed by the gotData function.

Cordova Events
The Cordova framework exposes a set of events a developer can use to react to certain things that happen on the device running the Cordova application. In some cases, the exposed events deal with hardware-related activities such as changes in the battery status or a physical button being pressed by the user. In other cases, the exposed events deal with application status changes such as the application being paused or resumed. The purpose of these events is to expose to a web application the same device status events that are available to native applications.
The complete list of supported events is provided in Table 14.1.
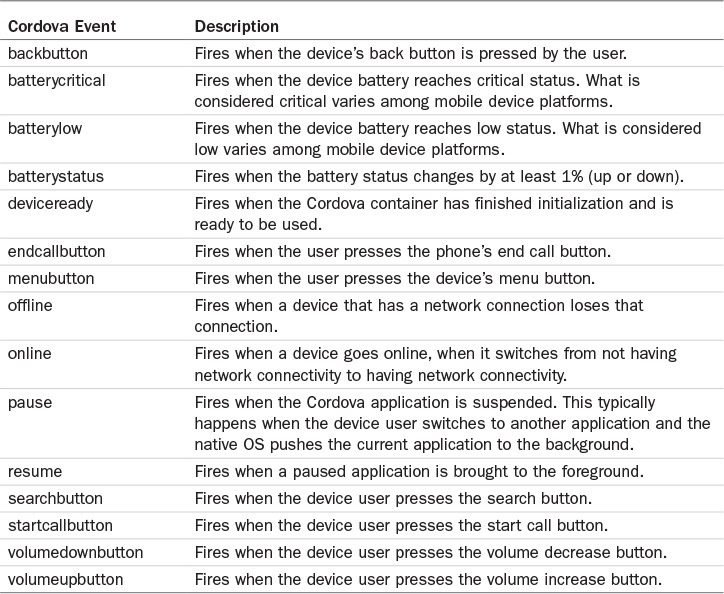
The majority of the listed events are built into the Cordova container. Only battery status is implemented as a plugin. To enable an application to monitor battery events, you must first add the Battery Status plugin to your project by issuing the following CLI command from the Cordova project folder:
cordova plugin add org.apache.cordova.battery-status
The deviceready event was discussed at length in Chapter 2; to see examples of that event in action refer to the Hello World #2 applications highlighted in that chapter.
To monitor one of these events, you simply have to have an application register a listener for it:
document.addEventListener("eventName", eventFunction, false);
As an example, to listen for the loss of network connectivity, you would register an offline event listener using the following code:
document.addEventListener("offline", isOffline, false);
function isOffline() {
//Do whatever you want to do when the device goes offline
}
The isOffline function is called whenever the Cordova application that has a network connection detects that it has lost the network connection. No information is passed to the callback function; all your application knows is that the event has fired.
Battery event listeners are defined a little differently:
window.addEventListener("batterystatus", batteryCallback, false);
For battery events, the callback function is passed an object that can be queried to determine which battery event fired, the current battery charge level, whether the device is plugged in, and more. The object consists of the following values:
{
"cancelBubble": false,
"returnValue": true,
"srcElement": null,
"defaultPrevented": false,
"timeStamp": 1416348013457,
"cancelable": false,
"bubbles": false,
"eventPhase": 0,
"currentTarget": null,
"target": null,
"type": "batterystatus",
"isPlugged": true,
"level": 50
}
You can display information about the battery status in the console using the following:
function batteryCallback(batInfo) {
console.log('%s event fired', batInfo.type);
console.log(JSON.stringify(batInfo));
}
Warning
The events might not fire exactly when you expect them to on different mobile platforms. Be sure to test your application on different physical devices to make sure your application works as expected.
Hardware APIs
Cordova exposes a few APIs that allow developers to build applications that interact with common hardware components found in most modern smartphones. These APIs help make Cordova applications feel more like native applications as they let a Cordova application interact with the outside world in some way.
There’s no specific grouping of these APIs in the Cordova documentation; bundling them together under the banner of hardware APIs is just my way of keeping things organized. The APIs that will be discussed in this section are
![]() Accelerometer
Accelerometer
![]() Camera
Camera
![]() Compass
Compass
![]() Geolocation
Geolocation
![]() Media Capture
Media Capture
The Accelerometer, Compass, and Geolocation APIs all work in essentially the same manner; your application can measure the current value for the particular metric, or you can set up a watch that allows your application to monitor the particular metric as it changes over time. Both the Camera and Media Capture APIs allow you to capture photographs using the device camera, but they operate differently, plus the Media Capture API allows you to record video and audio files as well.
The World Wide Web Consortium has worked on defining specifications for some of these capabilities. The Compass API is defined at http://goo.gl/d1ptMV, the Geolocation API specification is defined at http://goo.gl/5q1bZc, and the Device Orientation specification is defined at http://goo.gl/Ivb6dA.
What you’ll find is that some of the Cordova APIs align closely with the W3C specifications and others do not. For example, the Cordova Compass API has a getCurrentHeading method while the W3C specification uses getCurrentOrientation. I assume that the Cordova APIs will align with the standards over time; you will need to monitor progress and update your applications accordingly.
In the sections that follow, I will show you a little about how each of the APIs operates. Some of the APIs support a lot of options, so deep coverage is beyond the scope of this book; you can find complete examples of how to use each of these APIs in Apache Cordova API Cookbook (www.cordovacookbook.com).
Accelerometer
The Cordova Accelerometer API allows an application to determine the device’s orientation in a three-dimensional space (using a three-dimensional Cartesian coordinate system of x, y, and z). To enable an application to use the Accelerometer API you must first add the Device Motion plugin to your project by opening a terminal window, navigating to a Cordova project folder, and issuing the following command:
cordova plugin add org.apache.cordova.device-motion
The API exposes three methods:
![]()
accelerometer.getCurrentAcceleration
![]()
accelerometer.watchAcceleration
![]()
accelerometer.clearWatch
The getCurrentAcceleration method allows an application to query the device’s current orientation. The watchAcceleration and clearWatch methods are used to allow an application to capture device orientation over a period of time, taking repeated measurements from the accelerometer at a specific time interval.
To measure the device’s current orientation, you would use something like the following:
navigator.accelerometer.getCurrentAcceleration(onSuccess, onFailure);
In this example, the call to getCurrentAcceleration includes the names of two functions: onSuccess is executed after the orientation has been measured, and onFailure is executed if an error occurs. Here are examples of some functions that can be used for this purpose:
function onSuccess(res) {
x = res.x;
y = res.y;
z = res.z;
var d = new Date(res.timestamp);
timestamp = d.toLocaleString();
}
function onFailure() {
alert('I have no idea why this failed, but it did.'),
}
The onSuccess function is passed an object that represents the different parts of the accelerometer measurement. The x, y, and z values represent the device’s orientation in a three-dimensional coordinate system, and the timestamp value indicates the date/time when the measurement was made. If you write those values out to an application’s screen, you will see something similar to what is shown in Figure 14.10, captured on an Android device.
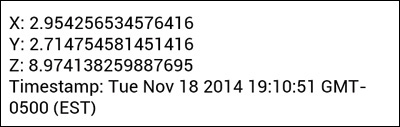
On an Android device, with the device lying flat on a tabletop, the accelerometer will return approximately the following values: z: 0, y: 0, z: 10. As the device is flipped so it’s standing on its left edge, the values will adjust to approximately x: 10, y: 0, z: 0. If you instead move the device so it’s standing on its bottom edge, the values will adjust to approximately x: 0, y: 10, z: 0. Standing the device on its top edge will result in approximate accelerometer values of x: 0, y: –10, z: 0. An application uses these values to determine how a user is holding the device, which is most useful for games and interactive applications.
Unfortunately, Cordova doesn’t tell you anything about any errors that occur, when the onFailure function is called and nothing is passed to it (an error code or error message), that can be used to identify the source of the error. So, it either works or it doesn’t; but as the app is talking directly to a physical device API that doesn’t have much complexity, if you try to determine the orientation and the call fails, it’s most likely because the device doesn’t have an accelerometer.
getCurrentAcceleration is useful if you want a quick check of a device’s orientation before doing something within your application. If you want to monitor a device’s orientation over time, in a game, for example, getCurrentAcceleration isn’t that useful. To use it in a game, you would have to write code that manually checks the orientation periodically. To help developers in this situation, the Cordova API allows a developer to periodically read the accelerometer by watching it using the accelerometer.watchAcceleration method.
To use accelerometer.watchAcceleration, an application sets up a watch using the following code:
var options = {frequency : 1000};
watchID = navigator.accelerometer.watchAcceleration(onSuccess,
onFailure, options);
In this particular example, the code uses the same onSuccess and onFailure functions from the previous example.
The options object defines the frequency of the accelerometer measurement in milliseconds. So, to measure the current accelerometer values every second you would use 1000 as shown in the example. To measure every half-second, use a frequency of 500.
In the code, the result of the call to watchAcceleration is assigned to a variable called watchID that is used later to cancel the watch as shown in this example:
navigator.accelerometer.clearWatch(watchID);
With all of this in place, the application will read the accelerometer every second and pass the values to the onSuccess function to process the results.
Compass
The Compass API allows a developer to read the mobile device’s heading (using the device compass if available). The API works almost the same as the Accelerometer API; you can either query the heading value once or define a watch to periodically measure the heading value. The only differences between the two are in the results object that is passed to the onSuccess function and options that can be set when creating the watch.
To enable an application to read the heading, you must first add the Device Orientation plugin to your project by opening a terminal window, navigating to a Cordova project folder, and issuing the following command:
cordova plugin add org.apache.cordova.device-orientation
Like the Accelerometer API, the Compass API exposes three methods:
![]()
compass.getCurrentHeading
![]()
compass.watchHeading
![]()
compass.clearWatch
The getCurrentHeading method allows an application to query the compass’s current orientation. The watchHeading and clearWatch methods are used to allow an application to capture the compass heading over a period of time, taking repeated measurements from the compass at a specific time interval.
To measure the compass’s orientation, you would use the following:
navigator.compass.getCurrentHeading(onSuccess, onFailure);
In this example, the call to getCurrentHeading includes the names of two functions: onSuccess is executed after the heading has been measured, and onFailure is executed when an error occurs. Here are examples of functions that can be used for this purpose:
function onSuccess(res) {
magneticHeading = res.magneticHeading;
trueHeading =res. res.trueHeading;
headingAccuracy = res.headingAccuracy
var d = new Date(res.timestamp);
timestamp = d.toLocaleString();
}
function onFailure(err) {
alert("Error: " + err.code);
}
The heading object (res in the example) returned to the onSuccess function has the properties described in Table 14.2.

When an error occurs, the onFailure function is passed an error code that can be queried to determine the cause of the error. Possible values are CompassError.COMPASS_INTERNAL_ERR and CompassError.COMPASS_NOT_SUPPORTED.
To use compass.watchHeading, an application sets up a watch using the following:
var options = {frequency : 1000};
watchID = navigator.compass.watchHeading(onSuccess, onFailure, options);
In this particular example, the code uses the same onSuccess and onFailure functions from the previous example. The options object defines the frequency of the heading measurement in milliseconds. So, to measure the current heading values every second you would use 1000 as shown in the example. To measure every half-second, use a frequency of 500.
You can also specify a filter value that defines a minimum degree value change that must occur before the watch is fired. As compass values fluctuate pretty rapidly, you will want to set a filter to reduce the number of times the heading measurement is made (and returned to your program) so your program can respond only to more dramatic changes in heading.
In the code, the result of the call to watchHeading is assigned to a variable called watchID that is used later to cancel the watch as shown in this example:
navigator.compass.clearWatch(watchID);
With all of this in place, the application will read the compass every second and pass the values to the onSuccess function to process the results. To see a complete application using the Compass API refer to Chapter 15, “Cordova Development End to End.”
Geolocation
The Cordova Geolocation API allows an application to determine the physical location of the device running the application. The API is based on the W3C’s Geolocation API and works almost the same as the Accelerometer and Compass APIs; you can either query the location once or define a watch to periodically measure the current location. The only differences between them are in the object that is passed to the onSuccess function and options that you can set when creating a watch.
To enable an application to determine the device’s location, you must first add the Geolocation plugin to your project by opening a terminal window, navigating to a Cordova project folder, and issuing the following command:
cordova plugin add org.apache.cordova.geolocation
The Geolocation API exposes three methods:
![]()
geolocation.getCurrentPosition
![]()
geolocation.watchPosition
![]()
geolocation.clearWatch
The getCurrentPosition method allows an application to determine the device’s current location. The watchPosition and clearWatch methods are used to allow an application to periodically calculate the device’s location, making repeated calculations at a specific time interval.
When the Geolocation API returns a location object, the object exposes coordinates and timestamp properties. The timestamp property contains the date and time when the measurement was made in number of milliseconds since midnight, January 1, 1970. The coordinates property is another object that includes the properties described in Table 14.3.

Refer to the Accelerometer and Compass sections for details on how this API works.
Camera
The Cordova framework provides two APIs for working with the device camera. One is the Camera API that provides developers with direct access to the native camera APIs, and the other is the Media Capture API described in the next section. The difference between the two options is that the Camera API exposes only the ability to take pictures with the camera, while the Media Capture API provides an interface to the camera that includes photos as well as videos plus the ability to record audio files. In this section, I will show you how to use the Camera API to capture pictures from a Cordova application; refer to the Media Capture API section for information on the other options.
To enable an application to take photos using the Camera API, you must first add the Camera plugin to your project by opening a terminal window, navigating to a Cordova project folder, and issuing the following command:
cordova plugin add org.apache.cordova.camera
From a programming standpoint, getting a Cordova application to take a picture is pretty simple; all you have to do is have the program call the Camera API using the following code:
navigator.camera.getPicture(onCameraSuccess, onCameraError);
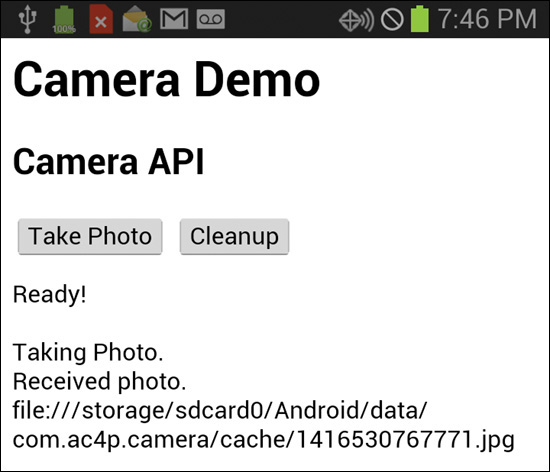
To show how this works, I created a simple Camera application that makes that call to getPicture, then displays the data returned from the camera. You can see a screen shot of the application in Figure 14.11.

As soon as you click the Take Photo button, the device’s native camera application opens as shown in Figure 14.12. Manipulate the camera and image any way you want, then take the picture; in this example, you would click the camera image on the right. What you will see here will vary depending on the mobile device platform on which the application is running.

Notice in Figure 14.12 that there isn’t a way to cancel taking the photo. Even if you decide not to capture a photo, you will have to snap one here, then you can cancel it in the next step.
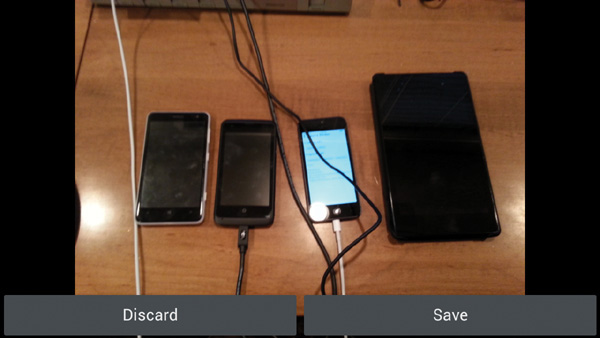
Depending on the mobile device, you may be prompted to approve the photo as shown in Figure 14.13. In this example, you can tap Save to select the photo and return to the Cordova application or tap Discard to cancel returning the photo information to the Cordova application. On some devices, you will see graphical icons representing the select, cancel, and retake options the camera might expose.
When you accept a photo (by tapping the Save button in this example), the device camera application will close and return information about the selected photo to the Cordova application as shown in Figure 14.14. In this case, since I didn’t tell getPicture anything about how to take the picture or what to do with it, the API used its default settings and simply returned a file URI pointing to the image file. At this point, the Cordova application can access the file using the URI it received from the API and render the image on the screen, upload it to a server, or do anything else it wants.
If you choose to cancel the photo you’ve taken, the Camera API will return an error message of Camera Cancelled to the Cordova application.
Now that’s not all there is to the Camera API; I was just showing you the API’s default behavior. You can also call getPicture and pass in an options object that tells the API what to do and how to do it. Here’s an alternate way to call getPicture:
navigator.camera.getPicture(onCameraSuccess, onCameraError,
cameraOptions);
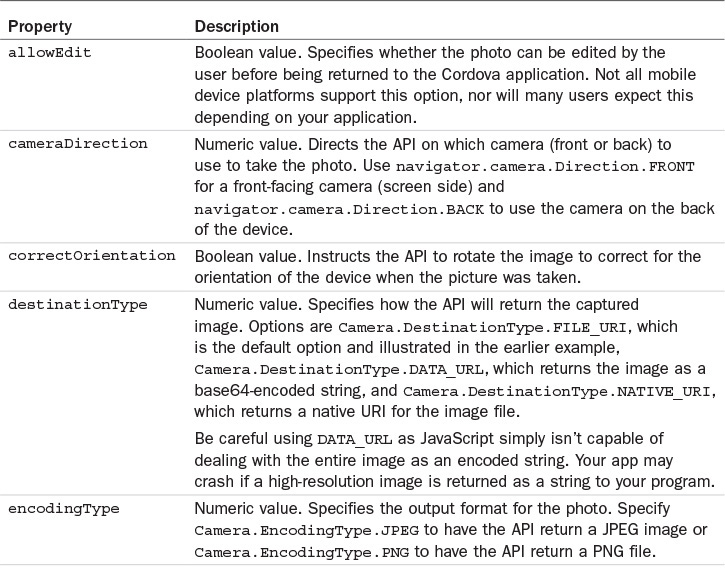
The cameraOptions shown in the example is a JavaScript object that contains the following properties:
var options = {
quality : 75,
destinationType : Camera.DestinationType.DATA_URL,
sourceType : Camera.PictureSourceType.CAMERA,
allowEdit : true,
encodingType: Camera.EncodingType.JPEG,
targetWidth: 100,
targetHeight: 100,
popoverOptions: CameraPopoverOptions,
saveToPhotoAlbum: false
};
Warning
Different platforms ignore some of these properties, so be sure to check the “Quirks” section in the Cordova documentation before using them in your applications.
A developer will use some or all of these properties to control the picture capture process using the Camera API. Each of the possible options is described in Table 14.4.

Note
The camera options targetHeight and targetWidth properties have always perplexed me; when I wrote PhoneGap Essentials almost three years ago, I wrote the following:
The targetHeight & targetWidth parameters are supposed to control the height and width of the image obtained using getPicture. In my testing though, the parameters did not affect the resulting picture. The documentation says as well that the parameters must be used in conjunction with each other and that aspect ratio is maintained. This further reinforces that these options cannot work as documented (which my testing has proven) since it doesn’t make sense that you have to set both height and width while at the same time maintaining an aspect ratio for the picture. If it truly was maintaining aspect ratio, then I’d expect that only one of the values would need to be provided.
About a year ago I posted a question about this on the Cordova dev list, and from the responses I got back it was clear that it wasn’t known how this should work. So, I tested all of the possible options and published the results to https://github.com/johnwargo/camera_res_test. The Cordova dev team is looking at this and will implement a fix someday.
Since the camera is a separate, independent application and an application user could take several photos before finally getting the one he or she wants to return to the Cordova application, there could be quite a few photos left lying around. In PhoneGap Essentials, I described how a developer could go into the file system and clean up the orphan photos manually. Since then, the Cordova team has added a cleanup method that can be used to clean up the orphaned photos. To use this method, call the method and pass in the names of success and failure callback functions as shown in the following example:
navigator.camera.cleanup(onCameraCleanupSuccess, onCameraCleanupError);
Unfortunately the method is currently supported only on iOS. When you try to perform the cleanup on an Android device, you will receive an Invalid Action error message.
Capturing Media Files
The Media Capture API is like the Camera API in that you can use it to capture photographs, but you can also use it to capture video and audio files. The API was originally based on the W3C Media Capture API (http://goo.gl/zypViK), but at the time, the PhoneGap team didn’t or wasn’t able to implement some of the API’s features. The W3C stopped work on that specification as the Device API Working Group focused instead on the Media Capture and Streams API (http://goo.gl/B3d7g7) that isn’t like the Media Capture API at all.
To enable an application to use the Media Capture API, you must first add the Media Capture plugin to your project by opening a terminal window, navigating to a Cordova project folder, and issuing the following command:
cordova plugin add org.apache.cordova.media-capture
The API exposes the following methods:
![]()
capture.captureAudio
![]()
capture.captureImage
![]()
capture.captureVideo
![]()
MediaFile.getFormatData
The first three work exactly the same; I’ll show you how in a minute. The getFormatData is supposed to allow you to retrieve information about a media file, but because of limitations on mobile devices, very little or no information is available through this method.
Using the Media Capture API is pretty simple: you make a call to one of the three capture methods (audio, image, video) using the following method signature:
navigator.device.capture.captureAudio(onSuccess, onFailure, options);
Like many of the other APIs I’ve discussed in this chapter, the onSuccess and onFailure functions are called after the capture has completed successfully or when it fails.
The onSuccess function is passed a fileList object that can be iterated through to access the path pointing to each captured file as shown in the following example:
function onSuccess(fileList) {
var len, I, path;
//See how many files are listed in the array
len = fileList.length;
//Make sure we had a result; it should always be
//at least greater than 0, but you never know!
if(len > 0) {
//Media files were captured, so let's process them...
for( i = 0, len; i < len; i += 1) {
//get the path to the file
path = fileList[i].fullPath;
//do something with the file here
}
} else {
//This will probably never execute
alert("Error: No files returned.");
}
}
Once you have the path to each media file, you can upload the file to a server, play or display it within the app, and more.
When called, the onFailure function will be passed an object that can be queried to determine the error code as shown in the following example:
var onError = function(err) {
alert('Capture error: ' + err.code);
};
The possible error codes are
![]()
CaptureError.CAPTURE_INTERNAL_ERR
![]()
CaptureError.CAPTURE_APPLICATION_BUSY
![]()
CaptureError.CAPTURE_INVALID_ARGUMENT
![]()
CaptureError.CAPTURE_NO_MEDIA_FILES
![]()
CaptureError.CAPTURE_NOT_SUPPORTED
The optional options parameter controls how many media files are captured and, for audio captures, a duration property dictates the length of the audio capture:
var options = { limit: 3, duration: 10 };
Some platforms ignore some options, so be sure to check the “Quirks” section of the Cordova Media Capture API documentation and test on an appropriate sampling of devices to make sure you understand how this API works. The limit option works on my Android device, but my iPhone ignores it and captures only one file no matter what is passed in limit.
Globalization
Many mobile applications target audiences who speak and read different languages. If you create a popular Cordova app, it probably won’t be long before you need to make it available in multiple languages. To make the globalization of a mobile application easier for developers, the Cordova team added a Globalization API that allows an application to query the OS for locale settings. Developers can use this API to determine the user’s preferred language, then load the content in the appropriate language, but can also use methods in the API to better understand how to display dates, times, numbers, and currency appropriately for the user’s preferred language.
To enable an application to leverage this API, you must first add the Globalization plugin to your project by opening a terminal window, navigating to a Cordova project folder, and issuing the following command:
cordova plugin add org.apache.cordova.globalization
The globalization methods all work in a similar manner; like most of the Cordova APIs, they’re asynchronous, so you call the method and pass in success and failure functions as shown in the following example:
navigator.globalization.getPreferredLanguage(onSuccess, onFailure);
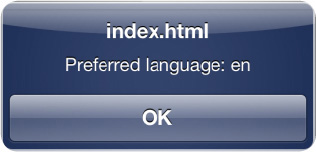
The success function is passed an object your application can query to access the value or values that are returned from the method. For most generic methods like the getPreferredLanguage method highlighted above, the method returns a string value that can be accessed as shown in the following example:
function onSuccess(lang) {
alert("Preferred language: " + lang.value);
}
In this example, when the call to getPreferredLanguage is made, the onSuccess function executes and will display the dialog shown in Figure 14.15.
Finishing out the getPreferredLanguage example, the failure function is passed an object that can be queried to determine an error code and an error message as shown in this example:
function onFailure(err) {
alert("Error: " + err.code + " - " + err.message);
}
The possible error codes are
![]()
GlobalizationError.UNKNOWN_ERROR
![]()
GlobalizationError.FORMATTING_ERROR
![]()
GlobalizationError.PARSING_ERROR
![]()
GlobalizationError.PATTERN_ERROR
Table 14.5 lists all of the Globalization API methods as well as the parameters passed to the method and the results that are returned.


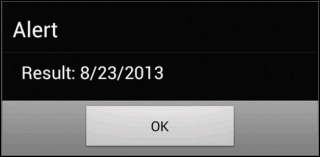
As you can see from the table, some of the methods accept a properties object that allows a developer to control how a method operates. For example, to use the dateToString method to convert a date object into a string, a Cordova application would do the following:
var d = new Date();
navigator.globalization.dateToString(d, onSuccess, onFailure);
The onSuccess function is called after the date conversion has completed and is passed an object that can be queried to display the result as shown in the following example:
function onSuccess(res) {
alert("Result: " + res.value);
};
When the application runs, on the Android platform it will display results similar to what is shown in in Figure 14.16.

The dateToString method also supports an options parameter that a developer can use to change the format of the output as shown in the following example:
var d = new Date();
var options = {
formatLength : 'short',
selector : 'date'
};
navigator.globalization.dateToString(d, onSuccess, onFailure,
options);
In this example, the options object is specifying formatLength and selector properties that are used to control how long the resulting string is and whether it should include date and/or time values (in this case I’m asking for only date). When I executed that code more than a year ago, my Android device displayed the dialog shown in Figure 14.17. When I executed the code today, the device displayed the result that is shown in Figure 14.16. Clearly something has changed with the API implementation on Android. Because of this, you’ll need to make sure you validate the results on a range of devices just to make sure the API works the way you expect it to.
You can use an options object that specifies long format, as shown in the following example:
var options = {
formatLength : 'long',
selector : 'date
}
Using long date format will change the application’s output to what is shown in Figure 14.18.

Warning
In my testing, on iOS I get the same results no matter what I pass in for options.
In this example, the success function is passed an object with only a single property, value, but several methods will return an object with multiple properties. The stringToDate method, for example, returns an object with separate properties for each date component as shown here:
{
"month":7,
"second":0,
"millisecond":0,
"day":20,
"year":2014,
"hour":9,
"minute":47
}
When you use the Globalization API in your applications, refer to Table 14.5 and the corresponding Cordova documentation to understand exactly what any method accepts and what is returned.
Working with the Contacts Application
The Cordova Contacts API allows a developer to build an application that interacts with the address book or contacts application on a mobile device. The Cordova Contacts API is based on the W3C Contacts API (http://goo.gl/2unFyr). You would use this API if you wanted to build an application that read from the contacts list and used contact data within the application or used data from within the application to write a new contact to the contacts list.
To enable an application to access a device’s contact list, you must first add the Contacts plugin to your project by opening a terminal window, navigating to a Cordova project folder, and issuing the following command:
cordova plugin add org.apache.cordova.contacts
The Contacts API is sometimes challenging to use because the contacts capabilities available on each mobile platform differ; so some of the contact fields you might use on an Android device will differ from what you would use on iOS. Additionally, the implementation of the Contacts API is a little different from what we’ve seen with the other APIs.
The Contacts API exposes three methods and a contacts object. The methods are used to create new contacts objects, search for contacts on a device, and display a contact picker your application can use to allow the user to more easily locate a contact. The contacts object is the representation of a contact record on the device.
To create a new contact, an application makes a call to the API’s create method as shown in the following example:
var newContact = navigator.contacts.create();
Unlike the other API methods we’ve discussed so far, this particular call is synchronous, so instead of having to provide success and failure callbacks, this operation happens immediately. This method call doesn’t actually create a contact in the device’s contacts application; instead, all it does is create a new contact object, using the Contacts object’s constructor. In this example, it’s creating a new, empty contact object called newContact; nothing is saved to the contacts application until you call the object’s save method which I’ll describe a little later.
You can also populate the contact object during the creation process by passing in a contact object to the create method as shown in the following example:
var newContact = navigator.contacts.create ({"displayName": "John M. Wargo"});
In this example, I’m populating the contact object’s displayName property when I create the new contact object. The contact object consists of the following properties; you can set some or all of these properties for a contact:
![]()
addresses: an array containing of all the contact’s different addresses
![]()
birthday: the contact’s birthday
![]()
categories: an array containing all of the user-defined categories associated with the contact
![]()
displayName: the display name for the contact
![]()
emails: an array containing all of the email addresses for the contact
![]()
id: a globally unique identifier for the contact
![]()
ims: an array containing all of the contact’s Instant Messaging addresses
![]()
name: an object representing each of the components of the contact’s name
![]()
nickname: the nickname for the contact
![]()
note: any notes associated with the contact
![]()
organizations: an array containing all of the organizations associated with the contact
![]()
phoneNumbers: an array containing all of the phone numbers associated with the contact
![]()
photos: an array containing images associated with the contact
![]()
urls: an array containing the web pages associated with the contact
Notice that some of the properties are arrays of other properties. A contact can typically have two or more mailing addresses, home and work at a minimum. Additionally, many contacts have more than one email address, so the contact object has to be able to accommodate a dynamic number of properties.
Note
I could spend about ten pages here describing all of the different arrays that are associated with the contact object, but that’s really beyond the scope of this chapter. Instead, let me show you how to save the contact, then I’ll show you how to search for contacts and dump the contact information to the console so you can more easily see how the contact object looks in the real world on different devices. If you need more detailed examples of how to use this API, don’t forget that there’s an entire chapter dedicated to this topic in my Apache Cordova API Cookbook (www.cordovacookbook.com).
There are some inconsistencies in how different mobile devices store contact information, so seeing this in real-world scenarios is better anyway.
You can populate the contact object when you create the object as shown in the earlier example, or you can create the contact object, then populate the object’s properties as shown in the following:
var newContact = navigator.contacts.create();
//Populate the contact object with values
var fullName = "John M. Wargo";
newContact.displayName = fullName
newContact.nickname = "John";
//Populate the Contact's Name entries
var tmpName = new ContactName();
tmpName.givenName = "John";
tmpName.familyName ="Wargo";
tmpName.formatted = fullName;
//Then add the name object to the contact object
newContact.name = tmpName;
In this example, I’ve created a new contact object, then started populating it with values. When it comes to populating the contact’s name information, the code populates a ContactName object (defined within the Contacts object), then adds it to the newContact object. The ContactName object includes the following properties:
![]()
familyName
![]()
formatted
![]()
givenName
![]()
honorificPrefix
![]()
honorificSuffix
![]()
middleName
There are many different object types and arrays of objects that can be added to a contact record; this is only a small example of what can be done. Be sure to use the Contacts API documentation for details on all of the supported options.
Once you have all of the contact object properties set, you must call the contact object’s save method to write the changes to the actual contact record:
newContact.save(onSuccess, onFailure);
The save method accepts the typical success and failure functions that you’ve seen with most of the other Cordova APIs. The failure function is passed an object you can use to identify the cause of an error and respond accordingly as shown in the following example:
function onFailure(err) {
console.log("Error Saving Contact: " + err.code);
};
To manipulate an existing contact, you can use the Contacts API find method to locate the record as shown in the following example:
navigator.contacts.find(contactFields, onSuccess, onFailure, options);
In this example, the contactFields object represents an array of field names:
var contactFields = ["displayName", "name", "phoneNumbers", "emails", "addresses"]
The find method defines the field values that are returned in the search results; it does not define which fields are searched. Not what you expected, right? Me too!
The options object defines parameters around how the search is performed; a sample options object is shown here:
var options = {filter: "Wargo", multiple: true};
The filter property is used to provide the find method with the search string to use when searching records. The multiple property is a Boolean value that controls whether only a single (false) contact is returned or multiple (true) contacts are returned.
Let’s take a look at a complete example. The following code sample shows how to call find and pass in a list of contact fields and search options. In the onSuccess function, the code simply writes the contact details to the console.
function findContact() {
var contactFields = ["displayName", "name", "phoneNumbers", "emails", "addresses"];
var contactOptions = {
filter : "Wargo",
multiple : true
};
navigator.contacts.find(contactFields, onSuccess, onFailure, contactOptions);
}
function onSuccess(contacts) {
for (var i = 0; i < contacts.length; i++) {
console.log("Contact[" + i + "]: " + JSON.stringify(contacts[i]));
}
}
Remember that I mentioned that there was a way to see how every aspect of a contact record was structured? Well, the following chunk of JSON is the result (slightly modified to hide my real identity) of the previous example code running against the contacts database on my personal Android device. You can run the application, search for a particular contact, then grab the JSON text returned from the call to find and analyze it to see how to populate these fields within your application.
{"id":"1370", "rawId":"109", "displayName":"Wargo, John M.",
"name":{"middleName":"M.", "familyName":"Wargo", "formatted":"John M. Wargo",
"givenName":"John"}, "nickname":"John", "phoneNumbers":[{"type":"mobile",
"value":"(555) 555-3333", "id":"58", "pref":false}, {"type":"work", "value":
"(555) 555-4444", "id":"59", "pref":false}, {"type":"home", "value":"(555) 555-
6666", "id":"12860", "pref":false}], "emails":[{"type":"custom", "value":john@
somedomain.com ,"id":"901", "pref":false}], "addresses":[{"region":"CA",
"streetAddress":"99 Cordova lane ", "id":"902", "formatted":"99 Cordova Lane
nSan Francisco, CA 99215
United States of America", "postalCode":"99215",
"locality":"San Francisco", "type":"home", "pref":false, "country":"United
States of America"}, {"region":"CA", "streetAddress":"One Sybase Drive",
"id":"12861", "formatted":"One Sybase Drive
Dublin, CA 94568
United States of
America", "postalCode":"94568", "locality":"Dublin", "type":"work", "pref":false,
"country":"United States of America"}], "ims":null, "organizations":null,
"birthday":null, "note":null, "photos":null, "categories":null, "urls":
"www.johnwargo.com"}
You can see, for example, how phone numbers are managed within the contacts application in this example:
"phoneNumbers":[
{"type":"mobile", "value":"(555) 555-3333", "id":"58", "pref":false},
{"type":"work", "value":"(555) 555-4444", "id":"59", "pref":false},
{"type":"home", "value":"(555) 555-6666", "id":"12860", "pref":false}
]
Each phone number has a specific type, value, ID, and preferred status value. The ID should be created automatically by the device-side API when adding the phone number to the contact record.
The Cordova team recently added a mechanism an application can use to allow the user to pick a contact that is used by the application. When an application executes the following:
navigator.contacts.pickContact(onSuccess, onFailure);
the application will display a dialog similar to the one shown in Figure 14.19. If your application needs to prompt the user for a contact, it may be easier to use pickContact than to display an input field and use the value a user types to try to locate the contact. With pickContact, the user does all the work for you; all you have to do is process the result within your application.

The dialog displays the list of all contacts stored in the device’s contacts application. When the user makes a selection, the success callback function is passed an object representing the selected contact, just as the find method does. Notice that the user can filter the results by typing in a portion of the contact’s name.
Different mobile device platforms manage contact data differently, so be sure to test the contact format on each mobile device you will be supporting—you might have to deal with each platform differently.
Once you have a contact object returned from the call to find, you can change the properties of the object and write the changes back to the contacts application using the save method discussed earlier. To remove the contact, first get a handle to the contact object and make a call to remove as shown here:
foundContact.remove(onSuccess, onFailure);
There’s a lot more to the Contacts API; I’ve only touched the surface. Be sure to leverage the Cordova documentation for more information.
Playing/Recording Media Files
The Cordova APIs include a Media API an application can use to record and play media files. This is the API you would use to play audio files in the background of a smartphone or tablet video game, for example. You could also use this API to build an application that records voice notes for playback, but most smartphones already have a dedicated app for this. At SAP, we’re using this API to enhance a web-based customer relationship management (CRM) application running in a Cordova container with voice note capabilities.
To enable an application to work with media files, you must first add the Media plugin to your project by opening a terminal window, navigating to a Cordova project folder, and issuing the following command:
cordova plugin add org.apache.cordova.media
The Media API is like most of the other Cordova APIs in that the API’s methods are asynchronous, but what triggers the callback functions is a little different. To use this API, an application starts by creating a Media object:
var mediaObj = new Media(srcFile, onSuccess, onFailure, onStatus);
The code creates a mediaObj object that points to the media file specified in the srcFile parameter shown in the example. The application doesn’t open or connect to the file yet; it merely creates an object that refers to the file, nothing more. Other methods I’ll show in a little while are used to actually play the file.
The onSuccess and onFailure functions shown in the example are the success and failure callback functions you should be familiar with by now, but they don’t fire when you might expect. Since the code I’ve shown is only creating an object, there are no real callback functions that need to be executed as part of that process. The onSuccess, onFailure, and onStatus callback functions shown in the example are involved when any of the following methods are called against the media object just created:
![]()
getCurrentPosition
![]()
getDuration
![]()
pause
![]()
play
![]()
release
![]()
seekTo
![]()
setVolume
![]()
startRecord
![]()
stop
![]()
stopRecord
So, to play a media file called soundtrack.mp3, an application would use
srcFile = 'soundtrack.mp3';
var mediaObj = new Media(srcFile, onSuccess, onFailure, onStatus);
mediaObj.play();
function onSuccess() {
console.log("Media: Success");
}
function onFailure(error) {
alert('Media Error: ' + error.code + ': ' + error.message);
}
function onStatus(statCode) {
console.log("Media Status: " + statCode);
}
To stop a media file from playing, simply call mediaObj.stop(). This example is using my example mediaObj; you would use whatever object you used to define your local Media object.
As you can see in the example, the onStatus function is passed a status code parameter that allows an application to understand what’s currently going on with media playback or recording. The supported codes are
![]()
Media.MEDIA_NONE
![]()
Media.MEDIA_STARTING
![]()
Media.MEDIA_RUNNING
![]()
Media.MEDIA_PAUSED
![]()
Media.MEDIA_STOPPED
With all of the methods and callbacks available with the Media API, you can build a complete media player application, or you can simply load up an audio file and play it without any UI; the API provides the flexibility a developer needs to do either.
Warning
The location where a Cordova application stores the media files packaged with the application varies among the different mobile device platforms. Android files are located in the /android_asset folder whereas on iOS, files are located within the root of the application’s file area.
InAppBrowser
The InAppBrowser is a more recent addition to the Cordova APIs. It allows a web application to load content into a separate window. Originally created as independent Cordova plugins called ChildBrowser for Android and iOS, it was added to the Cordova project as InAppBrowser, then expanded to support other mobile device platforms. It turns out that this plugin is pretty popular with Cordova developers as developers often need to open ancillary windows with content, and this plugin enables that to be done pretty easily.
Say, for example, that you want to show your application users additional web content. You could easily load additional content within your application and manage transitions to and from the content within your application. This is something that jQuery Mobile and other frameworks (demonstrated in Chapter 17, “Using Third-Party UI Frameworks with Cordova”) can manage pretty well. Sometimes, however, you will want a different experience for your users. You could load the content in the system browser, but on iOS, for example, the user would have to perform manual steps to navigate back to your application after looking at the content in the browser. InAppBrowser loads web content in such a way that your application users can more easily return directly to the main application.
Warning
The InAppBrowser can be a bit flaky, not always doing things the way you expect them to work. The Cordova dev team periodically discusses a complete rewrite of this thing or possibly abandoning it, but nothing ever happens. I think a re-architecture and new implementation would be a good thing for everyone.
To enable an application to use the InAppBrowser, you must first add the InAppBrowser plugin to your project by opening a terminal window, navigating to a Cordova project folder, and issuing the following command:
cordova plugin add org.apache.cordova.inappbrowser
Loading Content
With the plugin added to your project, you can now open web content in a window using the following:
var ref = window.open('http://www.johnwargo.com', '_blank',
'location=yes'),
In this example, the application will open my personal web site and return an object that represents the browser window. You can later use the returned object to interact with the browser window.
You could also create the browser window but not display it by using the following:
var iabRef = window.open('http://www.johnwargo.com', '_blank',
'hidden=yes'),
Later on, when you’re ready to display the browser window, use
iabRef.show();
Notice that there are no callback functions that we’re used to seeing with the other Cordova APIs.
Of the parameters passed to the call to window.open, the _blank tells the application to open the content in its own window; you could also use _self, which tells it to open the page within the current window, and _system, which tells it to open the content in the system’s default web browser (leaving the current application context).
The problem with a target of _self is that the page that is being loaded replaces the current web content for the application. For application users this means that there’s no going back—there isn’t an iOS button to use for that anyway, and on Android the device’s Escape button won’t take you back either.
The 'location=yes' tells the InAppBrowser to display the target location within the browser window. There are several other options that can be used when loading a page, but the options vary depending on the mobile device platform; refer to the Cordova documentation for more details.
If you run the example on an Android device, you will see a screen similar to the one shown in Figure 14.20; I’ve cropped the screen to show only the top portion of the window. In this case, the browser window opens with an address bar a user can use to navigate to other sites as well. The user should tap the Done button (not shown) to return to the original program.

When the same application is executed on an iOS device, the user will see the web page and at the bottom iOS will display the page address (without the ability to manipulate it or navigate to other sites) plus the Done button to close the window as shown in Figure 14.21.

Figure 14.21 highlights one of the key benefits of using InAppBrowser on an iOS device. When done reading the content, all the user has to do here is tap the Done button to return to the main application. If the page were loaded by spawning the system browser to open the page, the user would have to double-tap the device’s Home button to bring up a list of running applications, then tap on the application name to return to the application—not the best user experience.
To turn off display of the page address, open a page with the following code:
var ref = window.open('http://www.johnwargo.com', '_blank',
'location=no'),
On Android, the page will load as in the previous examples but will not display the address bar as shown in Figure 14.22.
On iOS, the Done button remains, but the page address is removed as shown in Figure 14.23.

You can also use InAppBrowser to load local content as shown in the following example:
var ref = window.open('help.html', '_blank'),
In this case, I’ve added an HTML file called help.html to the Cordova project’s www folder. The Cordova prepare command makes sure the file is copied over to the right location for each supported mobile platform project and available to be loaded by the application as needed. You can see an example of the page loading on an Android device in Figure 14.24.

To close an InAppBrowser window, simply call the close method on the window object:
ref.close();
As fun and interesting as it is to load web content into another window, there are also ways that an application can interact with the window. In the next few sections, I will highlight the different ways of interacting with the browser window from within a Cordova application.
Browser Window Events
There are many scenarios where an application will want to know what is going on within an InAppBrowser window. To accommodate those requirements, the InAppBrowser API fires different events at different times in the InAppBrowser window lifecycle. The supported events are
![]() loadstart: fires when the InAppBrowser begins to load a URL
loadstart: fires when the InAppBrowser begins to load a URL
![]() loadstop: fires when the InAppBrowser completes loading a URL
loadstop: fires when the InAppBrowser completes loading a URL
![]() loaderror: fires when the InAppBrowser encounters an error while loading a URL
loaderror: fires when the InAppBrowser encounters an error while loading a URL
![]() exit: fires when the InAppBrowser window is closed (either by the user or by the application calling the
exit: fires when the InAppBrowser window is closed (either by the user or by the application calling the close method)
To flesh out my example from earlier, here’s a block of code that opens a local HTML file using InAppBrowser, then defines event listeners for each of the new window’s events:
var ref = window.open('help.html', '_blank'),
ref.addEventListener('loadstart', onEvent);
ref.addEventListener('loadstop', onEvent);
ref.addEventListener('loaderror', onLoadError);
ref.addEventListener('exit', onEvent);
Notice that instead of having a separate event callback function for each, I have implemented only two callback functions, one for errors and another for everything else. This is because when anything but an error event fires, the callback function is passed an event object that describes the event that was fired as is illustrated in the following code:
function onEvent(event) {
console.log('Type: ' + event.type);
console.log('URL: ' + event.url);
//do something based on event.type
}
Developers can query event.type and do whatever is appropriate for the particular event that has fired and dramatically simplify the code being executed.
When an error occurs, the error callback function is passed an object that includes code and message properties as illustrated in the following code. Developers can then query event.code and display an appropriate error message or perform the appropriate recovery steps as needed:
function onLoadError(event) {
console.log('onLoadError: ' + event.code + ' - ' + event.message));
}
Execute Scripts
There are times when simply loading web content in a separate window isn’t enough; you might need to modify content or execute some JavaScript within the page. To accommodate this need, the InAppBrowser includes a method that allows an application to execute JavaScript code within the InAppBrowser window. To make use of this feature in your application, you have your application execute the executeScript method:
ref.executeScript(scriptInfo, onSuccess);
The onSuccess function passed to the method is the standard success callback function you’ve seen used throughout this chapter; in this case, the function is executed after the code has been injected into the web page loaded in the InAppBrowser. The scriptInfo parameter in the example defines what JavaScript code is executed and where the code is obtained from: either passed directly to the method or loaded from a file.
To execute a specific piece of JavaScript code, you would pass in a JavaScript object with a property of code and a value that consists of a string containing the JavaScript code being executed:
{code : "$('#heading').replaceWith('<h2>This is some injected text</h2>'),"}
In this example, the code is using the jQuery replaceWith function to replace some of the content within the loaded web page.
You can’t execute your JavaScript code until the page has finished loading, so you will most likely add the call to executeScript to some part of your code that you know will execute after the page has completed loading like the loadstop event listener:
var ref = window.open('help.html', '_blank', 'location=no'),
ref.addEventListener('loadstop', function() {
ref.executeScript({
code : "$('#heading').replaceWith('<h2>This is some injected text</h2>'),"
}, onSuccess);
});
To illustrate this example, I added a div called heading to the top of the local help.html file I used in a previous example. Then, when the example code provided above executes, after the page loads, you will see the div’s content update as shown in Figure 14.25.
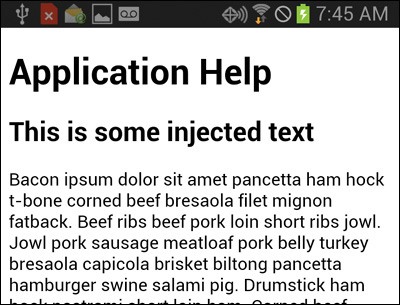
Instead of passing in your JavaScript code directly to the executeScript method, you can save your code to a file and pass the file name to executeScript via the scriptInfo parameter as shown here:
{file : "myscript.js"}
The end result is the same; only the source of the JavaScript code changes in the example code shown earlier.
Insert CSS
Along with the ability to execute a script within an InAppBrowser window, you can also use a method exposed by the InAppBrowser to insert CSS into its window. Say, for example, the page you’ve loaded into the InAppBrowser window came from an external source and you wanted to change the styling of the page to match the rest of your application; you can easily change the CSS for the page on the fly. To do this, code the application to call the InAppBrowser’s insertCSS method and pass in either the CSS or a reference to a CSS file you want inserted as shown in the following example:
ref.insertCSS(cssInfo, onSuccess);
The onSuccess function passed to the method is the standard success callback function you’ve seen used throughout this chapter. The cssInfo parameter in the example defines what CSS is inserted and where the CSS is obtained from: either passed directly to the method or loaded from a file.
To pass in a specific piece of CSS, you would pass in a JavaScript object with a property of code and a value that consists of a string containing the CSS being inserted as shown here:
{code : "body {background-color:black; color:white}"}
You can’t insert your CSS until the page has finished loading, so you will most likely add the call to insertCSS to some part of your code that you know will execute after the page has completed loading, like the loadstop event listener shown in the following example:
var ref = window.open('help.html', '_blank', 'location=no'),
ref.addEventListener('loadstop', function() {
ref.insertCSS({
code : "body {background-color:black; color:white}"
}, onSuccess);
});
Figure 14.26 shows the page loaded with the modified CSS; notice how I switched page colors, making the background black and the text color white.

Instead of passing in your CSS directly to the insertCSS method, you can save your CSS to a file and pass the file name to insertCSS via the cssInfo parameter as shown here:
{file : "mystuff.css"}
The end result is the same; only the source of the CSS changes in the example code shown earlier.
Splashscreen
Cordova provides a Splashscreen API an application can use to display a custom splash screen when a Cordova application launches. To enable an application to use the Splashscreen API, you must first add the Splashscreen plugin to your project by opening a terminal window, navigating to a Cordova project folder, and issuing the following command:
cordova plugin add org.apache.cordova.splashscreen
There’s a bit of work a developer needs to do to create the appropriate splash screen graphic files configured and scaled to support the variety of mobile device platforms as well as the multiple form factors per mobile OS. On the Android platform, there are some config.xml settings you can use to control the splash screen.
From a coding standpoint, once you have the appropriate graphics created and added to your Cordova and platform projects, you can display and hide your application’s splash screen using the following code:
function showSplash() {
navigator.splashscreen.show();
setTimeout(hideSplash, 2000);
}
function hideSplash() {
navigator.splashscreen.hide();
}
In this example, the showSplash function displays the splash screen, then sets up a timer to have the splash screen hide itself after 2 seconds.
StatusBar
A relatively new Cordova plugin is the StatusBar plugin. The plugin has been around for a while but was only recently added to the Cordova core set of plugins. The plugin allows you to control the status bar displayed at the top of any mobile device screen. Native developers have the ability to control whether their applications run in full screen (hiding the status bar) or with the status bar showing. The plugin was created so that Cordova developers would have an easy way to achieve the same thing.
To enable an application to use the StatusBar plugin, you must first add the plugin to your project by opening a terminal window, navigating to a Cordova project folder, and issuing the following command:
cordova plugin add org.apache.cordova.statusbar
With this in place, you’re ready to start customizing the way your application displays on the screen. The plugin is supposed to work on Android, iOS, and Windows (today), but there are many features of the plugin that work only on iOS and Windows.
Some of the iOS settings can be applied to the application by making changes to the application’s config.xml file. To have the status bar overlay the application’s WebView, add the Boolean StatusBarOverlaysWebView preference to the config.xml:
<preference name="StatusBarOverlaysWebView" value="true" />
You can also set the background color for the status bar using the StatusBarBackgroundColor preference:
<preference name="StatusBarBackgroundColor" value="#000000" />
Use the StatusBarStyle preference to set the style for the status bar; you can see some examples of this in use later in the section:
<preference name="StatusBarStyle" value="lightcontent" />
You can programmatically hide or unhide the status bar within your application’s JavaScript code. However, if you want to have the status bar hidden at startup, you have to modify the application’s Xcode project info.plist file to include Status bar is initially hidden set to Yes and View controller-based status bar appearance set to No.
This plugin exposes a global object called StatusBar you can use to control the status bar.
To show the status bar, use
StatusBar.show();
On an iOS 8 device, you will see something similar to what is shown at the top of Figure 14.27.

To hide the status bar, use
StatusBar.hide();
The status bar will disappear as shown in Figure 14.28.
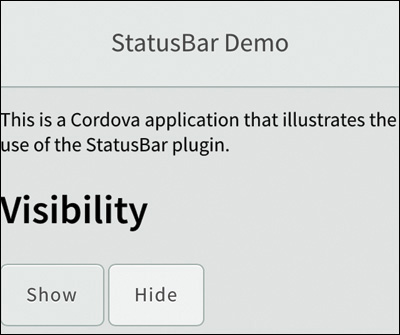
On iOS, the status bar can overlay the application’s WebView, causing the application’s content to scroll underneath the status bar as shown in Figure 14.29. Notice how the application’s header bar becomes unreadable when it’s underneath the overlaid status bar.

To enable this feature, use
StatusBar.overlaysWebView(true);
To disable it, use
StatusBar.overlaysWebView(false);
For some reason, the default status bar style isn’t set correctly on iOS. If you look at Figure 14.27, you’ll see that the status bar is white text against the application’s grey background. You can switch the status bar to its default setting using
StatusBar.styleDefault();
The status bar will display black text against the application’s background as shown in Figure 14.30.

You can even set specific background colors in the status bar using
StatusBar.backgroundColorByName('orange'),
In Figure 14.31 I’ve done this, but for some reason it is not updating correctly. The black background you see in the figure is the result of setting the background color to orange.

There are more capabilities provided by this plugin. Keep in mind that some of the capabilities are supported on only a limited number of platforms and as I showed, they didn’t work very well in my testing.
Wrap-Up
There was a lot going on in this chapter; I introduced most of the Cordova APIs and showed you how to leverage them in your Cordova applications. I didn’t go into a lot of detail for each but tried to show you enough for you to understand how the APIs work and get you started with the way they’re invoked and what the responses look like. You will need to spend some time digging into the Cordova documentation for additional information about all of the options supported by each API. Your best and most complete overview for the Cordova APIs and how they operate on different devices can be found in my Apache Cordova API Cookbook (www.cordovacookbook.com).