
Chapter 8. Virtual Machine Management
This chapter covers the following topics:
1.0 Cloud Infrastructure Administration and Reporting
1.2 Perform virtual machine operations
1.2.a Configure live migrations of VMs from host to host
1.2.b Edit VM
1.2.c Configure VM snapshots
1.2.d Describe reverting a VM to a snapshot
3.0 Cloud Provisioning
3.2 Describe provisioning verification
3.2.c Access VMs and applications that have been provisioned
As of the writing of this book, many organizations are well on their way to virtualizing workloads within their environments. In the experience of the authors working with many organizations, nearly all of our customers tell us they are over 75 percent virtualized in their x86 compute workloads.
Many organizations have a guiding principle of “virtualization first” whereby new business requirements and projects that are brought to IT are immediately assumed to be candidates for virtualization unless a very compelling business case (performance, throughput, criticality, scale, etc.) can be made for that application to reside on bare metal. By approaching workloads and projects in this way, many organizations have come to rely on x86 server virtualization as one of the core tenants of provisioning new compute workloads in their data centers and remote locations.
The Cisco ONE Enterprise Cloud Suite stack offers a comprehensive set of products and tools to help you handle the challenges of managing virtualization as a service within your organization. This chapter provides an overview of virtualization and why automating it is important. It describes the idea of a service catalog as being paramount to the end-user experience when ordering and consuming virtual assets. It discusses both the end-user and administrator experiences available within Cisco ONE Enterprise Cloud Suite.
“Do I Know This Already?” Quiz
The “Do I Know This Already?” quiz allows you to assess whether you should read this entire chapter thoroughly or jump to the “Exam Preparation Tasks” section. If you are in doubt about your answers to these questions or your own assessment of your knowledge of the topics, read the entire chapter. Table 8-1 lists the major headings in this chapter and their corresponding “Do I Know This Already?” quiz questions. You can find the answers in Appendix A, “Answers to the ‘Do I Know This Already?’ Quizzes.”
The goal of self-assessment is to gauge your mastery of the topics in this chapter. If you do not know the answer to a question or are only partially sure of the answer, you should mark that question as wrong for purposes of the self-assessment. Giving yourself credit for an answer you correctly guess skews your self-assessment results and might provide you with a false sense of security.
1. UCS Director can provide automation and orchestration of which of the following? (Choose all that apply.)
a. VMware ESXi
b. Citrix XenServer
c. Red Hat KVM
d. A Nexus switch
e. StorageTek tape libraries
f. AmigaOS
2. Which of the following statements correctly describes Cisco Intercloud Fabric?
a. Allows an organization to securely connect two private clouds together
b. Securely connects two companies together so they can pass traffic in a secure, encrypted fashion
c. Creates a secure, encrypted connection between your on-premises data center and one of many public cloud offerings and helps your IT organization to become the “organizational broker” to the consumption of virtual machines in public cloud offerings
d. Securely connects two public clouds together so an organization can easily migrate machines from one public cloud offering directly to another public cloud offering
3. Which of the following is an important goal of the Cisco ONE Enterprise Cloud Suite?
a. Give you as an architect or administrator a flexible set of tools to offer an e-commerce/shopping-cart like experience to your internal IT users
b. Give you a central location to do asset reporting and trouble ticketing
c. Give you as an architect or administrator the ability to automate the installation of desktops within your organization
d. Give you the ability to centralize and control access to consumer-based cloud services from within your network for all of your end users
4. True or False. UCS Director provides a default way for end users to select and mount an ISO image as a CD/DVD drive into a virtual machine that they own.
a. True
b. False
5. Which of the following tasks could be performed as an advanced or custom VM operation within UCS Director? (Choose all that apply.)
a. Run a PowerShell script
b. Run a Python script
c. Query for custom VM performance statistics
d. Order pizza
e. Provision mainframe LPAR services
6. Which of the following hypervisors has the most administrative workflows available out of the box within UCS Director?
a. Microsoft Hyper-V
b. Red Hat KVM
c. VMware ESXi
d. Dec Alpha
7. Which of the following are common administrative workflows on Hyper-V VMs in UCS Director? (Choose all that apply.)
a. Add VM disk
b. Add VM NIC
c. Create VM snapshot
d. Delete VM disk
e. Delete VM NIC
8. True or False. UCS Director is a full-fledged, end-user-friendly service catalog.
a. True
b. False
9. UCS Director provides which of the following? (Choose all that apply.)
a. An IT-focused experience that is tightly coupled with technical IT task automation
b. An end-user-focused experience that is highly polished and focuses on end-user usability
c. A way to provision virtual machines in popular public cloud services such as AWS and Azure
d. A, B, and C
e. None of the above
10. In Prime Service Catalog, “My Stuff” refers to:
a. A list of all IT assets assigned to you, such as your laptop, monitor, any personal printers, etc.
b. A location for you to store all of your documents centrally within the organization
c. A list of all the backups made for any systems you manage
d. A list of assets that have been provisioned within Prime Service Catalog, such as VMs
Foundation Topics
Understanding VM Virtualization in Cisco ONE Enterprise Cloud Suite
While the need for bare-metal applications still exists, virtualization is here to stay. Furthermore, many organizations are now adopting a “dual hypervisor” strategy to hedge their bets and ensure that there is no sort of longer-term vendor lock-in concerns. Add to that the fact that most organizations are also leveraging compute in public cloud offerings such as Amazon Web Services (AWS) and Microsoft Azure, as well as in other public cloud providers such as Cisco Powered clouds and other third-party offerings, and the landscape of solutions to support in the data center with regard to virtualization becomes fairly vast.
While virtualization does increase asset utilization by carving up a single physical system into a system that can run multiple virtual workloads, it also adds complexity to IT operations (see Figure 8-1).
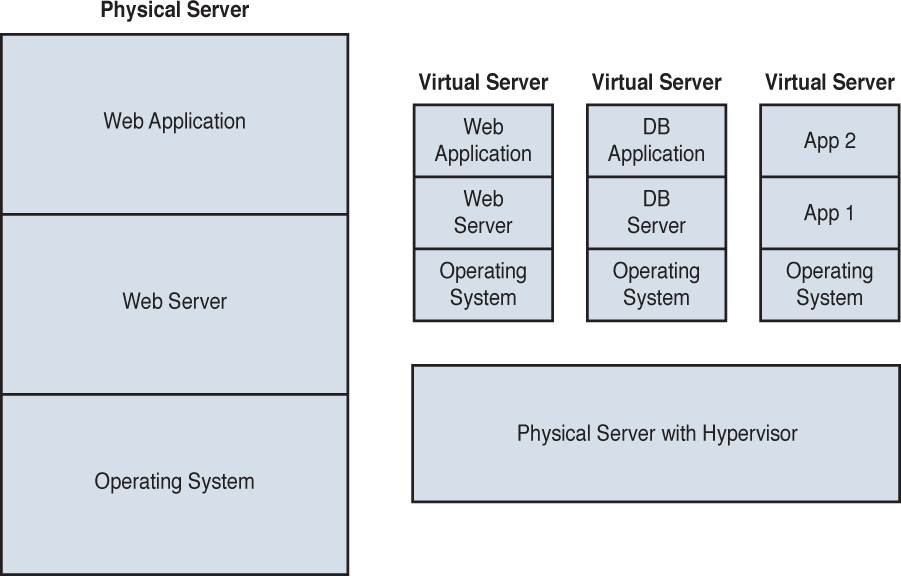
With this added complexity comes added work for IT to operate and maintain the virtual environment. Add in a second hypervisor and the need to keep track of public cloud options for your internal IT customers, and the workload can get busy very quickly.
Luckily, automating and orchestrating multiple virtual environments are cornerstone capabilities of the Cisco ONE Enterprise Cloud Suite of products. Two products in particular that help are
![]() UCS Director: Assists in the automating and orchestration tasks of virtual machines running on VMware ESXi, Microsoft Hyper-V, Red Hat KVM, and Citrix Xen. With the ability to create common workflows and to easily add provisioning of VMs from these environments to the UCS Director Service Catalog, you have a very agile toolset for automating many of the daily functions required of IT when it comes to virtual machine provisioning.
UCS Director: Assists in the automating and orchestration tasks of virtual machines running on VMware ESXi, Microsoft Hyper-V, Red Hat KVM, and Citrix Xen. With the ability to create common workflows and to easily add provisioning of VMs from these environments to the UCS Director Service Catalog, you have a very agile toolset for automating many of the daily functions required of IT when it comes to virtual machine provisioning.
![]() Intercloud Fabric: Assists your IT department in understanding what workloads are being provisioned into public cloud solutions such as Cisco Powered cloud providers, Amazon AWS, and Microsoft Azure. Intercloud Fabric creates a secure, encrypted connection between your on-premises data center and one of many public cloud offerings and helps your IT organization to help become the “organizational broker” to the consumption of virtual machines in public cloud offerings. This gives you additional visibility and control that allows IT to understand the consumption and usage patterns of public cloud usage in the organization while still providing the governance, security, and control of those virtualized workloads.
Intercloud Fabric: Assists your IT department in understanding what workloads are being provisioned into public cloud solutions such as Cisco Powered cloud providers, Amazon AWS, and Microsoft Azure. Intercloud Fabric creates a secure, encrypted connection between your on-premises data center and one of many public cloud offerings and helps your IT organization to help become the “organizational broker” to the consumption of virtual machines in public cloud offerings. This gives you additional visibility and control that allows IT to understand the consumption and usage patterns of public cloud usage in the organization while still providing the governance, security, and control of those virtualized workloads.
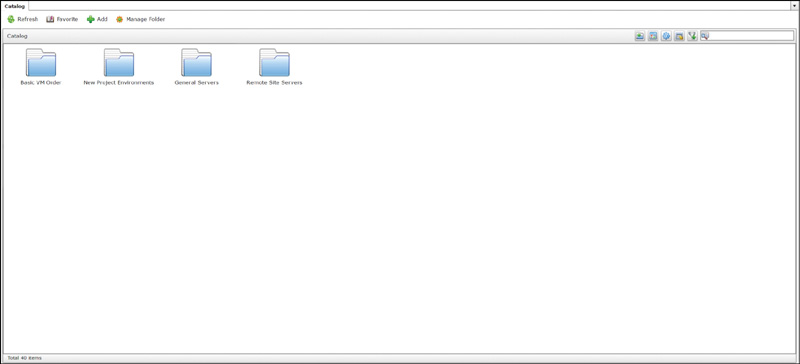
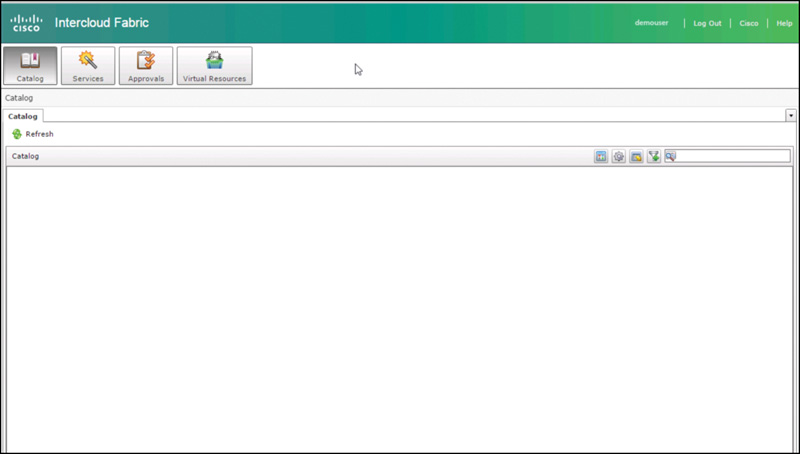
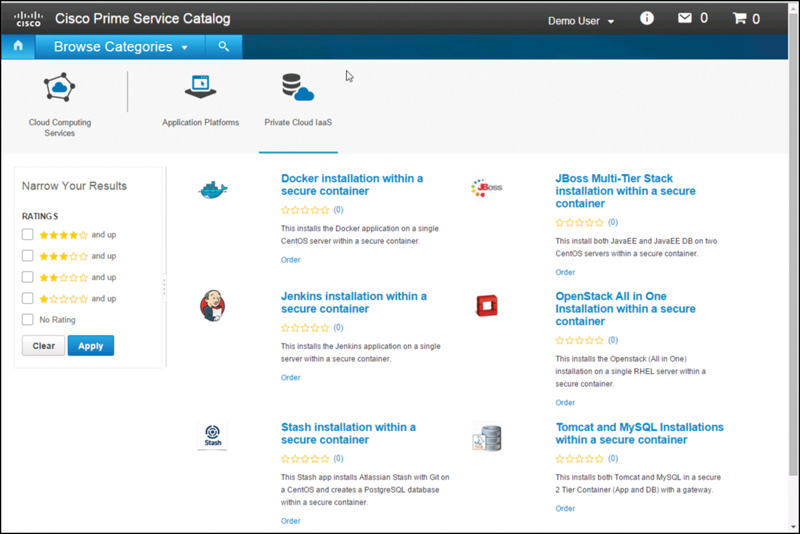
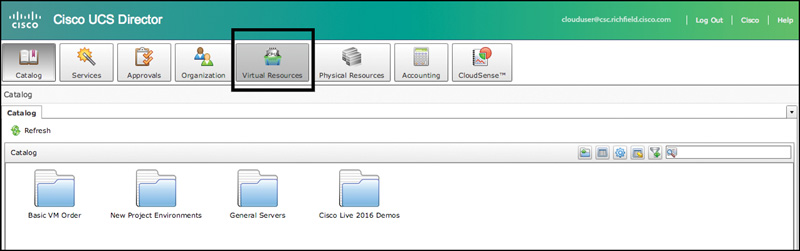
Both UCS Director and Intercloud Fabric maintain separate service catalogs that show, for example, a list of VMs that can be created on premises (with UCS Director) and a list of VMs that could be created in the public cloud (with Intercloud Fabric). Figures 8-2 and 8-3 show these two catalogs. Note that these figures depict a new installation where folders have been created but no virtual machines have been added to the catalog for the user to order (see Figure 8-3).
With the goal of simplification of the environment and creating a single self-service portal for viewing and accessing VMs both within UCS Director and via Intercloud Fabric, both products can be connected to Cisco Prime Service Catalog (PSC) to give a unified experience to your end users to see their VMs (regardless of whether they’re in the private cloud or public cloud), take common actions on those VMs, and potentially (if given permissions) perform cold migration of those VMs from on premises to off premises or vice versa (see Figure 8-4).
This gives you the flexibility of offering both on-premises and off-premises virtualized workloads from a single catalog, which will streamline workload provisioning, lower overall organizational costs, and give IT visibility into public cloud usage within the organization.
Overview of End-User VM Operations in UCS Director
An important goal of Cisco ONE Enterprise Cloud is to give you as an architect or administrator a flexible set of tools to offer more of an e-commerce/shopping-cart like experience to your internal IT users, giving IT the tools to efficiently provision and manage workloads across any cloud. Today’s manual IT processes of provisioning infrastructure and applications for users are cumbersome, lengthy, and often prone to error. As the responsibilities increase for many IT administrators, just keeping things running becomes a greater and greater challenge. By moving to automation and orchestration with a self-service catalog for your internal users, you are moving IT into the Industrial Revolution factory-line processes of the IT World. Ensuring that your users have a flexible and consistent experience in this new world is the ultimate goal. If your users aren’t happy with how easy it is to consume IT processes and Infrastructure as a Service (IaaS) internally, they’ll simply circumvent the IT department and go straight to public cloud offerings, reducing your organizational effectiveness and making management question just what sort of value IT is providing for the organization.
UCS Director will enable your end to perform many functions that would normally require IT intervention, such as
![]() Browsing for and ordering virtual machines (from many hypervisors, as previously discussed)
Browsing for and ordering virtual machines (from many hypervisors, as previously discussed)
![]() Selecting options for VMs ordered, such as number of virtual CPUs (vCPUs), RAM amount, and volume size
Selecting options for VMs ordered, such as number of virtual CPUs (vCPUs), RAM amount, and volume size
![]() Common VM functions such as powering on or off a virtual machine, performing a snapshot on a virtual machine, adding additional virtual NICs (vNICs) to the VM, and much, much more
Common VM functions such as powering on or off a virtual machine, performing a snapshot on a virtual machine, adding additional virtual NICs (vNICs) to the VM, and much, much more
Let’s look at some of the operations you need to perform as an administrator to connect hypervisors into UCS Director. Then we’ll look at actions that your end users will be able to perform within UCS Director. Note this assumes that pods have already been created in UCS Director and that you’ll be adding these accounts to existing pods.
Adding a Virtual Hypervisor to UCS Director
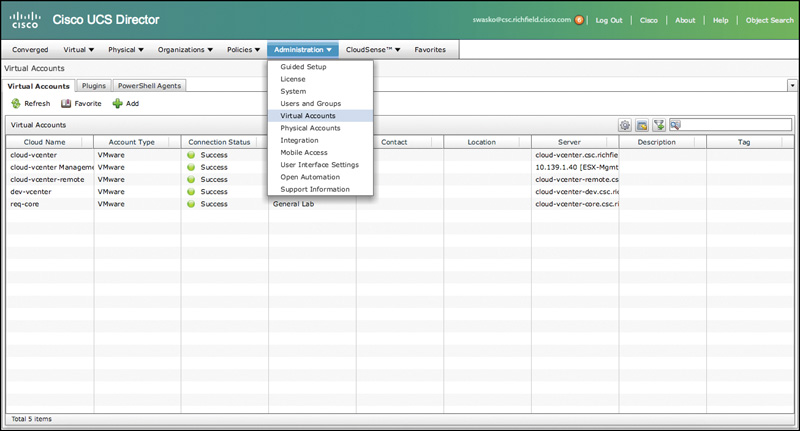
Before you can begin modifying actions an end user can take on their virtual machines, you first have to connect hypervisor accounts to UCS Director in the pod of your choice. To do this, select the pod you want to add the hypervisor account to; then choose Administration > Virtual Accounts, as shown in Figure 8-5.
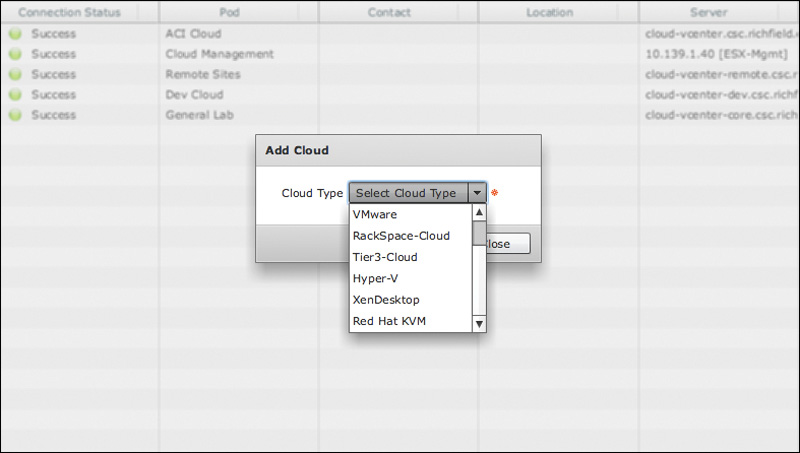
On the Virtual Accounts tab, click the Add button to open the Add Cloud dialog box. Choose a cloud type from the Cloud Type drop-down menu, as shown in Figure 8-6. For purposes of this example, we’ll select a Hyper-V account to add.
Once the Hyper-V account has been selected, fill in the following details in the resulting Add Cloud dialog pane:
![]() Cloud Type: Hyper-V should be selected.
Cloud Type: Hyper-V should be selected.
![]() Cloud Name: A friendly name for the cloud.
Cloud Name: A friendly name for the cloud.
![]() PowerShell Agent: For Hyper-V, this is the link to a system running the UCS Director PowerShell Agent (PSA). This is a system that UCS Director can point to that will run PowerShell commands. The PowerShell Agent will be discussed in additional detail in the following section.
PowerShell Agent: For Hyper-V, this is the link to a system running the UCS Director PowerShell Agent (PSA). This is a system that UCS Director can point to that will run PowerShell commands. The PowerShell Agent will be discussed in additional detail in the following section.
![]() Server Address: The IP address or fully qualified domain name of the hypervisor you are looking to add to UCS Director.
Server Address: The IP address or fully qualified domain name of the hypervisor you are looking to add to UCS Director.
![]() Server User ID: Administrator ID to connect UCS Director to the hypervisor to allow it to control actions of that hypervisor through API calls.
Server User ID: Administrator ID to connect UCS Director to the hypervisor to allow it to control actions of that hypervisor through API calls.
![]() Server Password: The password on the hypervisor for the ID in the previous field.
Server Password: The password on the hypervisor for the ID in the previous field.
![]() Domain: The NTLM/AD domain the server resides in.
Domain: The NTLM/AD domain the server resides in.
![]() Pod: The Pod you are adding this hypervisor account to.
Pod: The Pod you are adding this hypervisor account to.
![]() Optional information: Description, Contact Email, Location, Service Provider.
Optional information: Description, Contact Email, Location, Service Provider.
Installing PowerShell Agent
As an administrator, being able to leverage Microsoft PowerShell commandlets from within UCS Director opens up immense possibilities to extend automation and orchestration to many Windows systems, services, and applications. Once this is done, you have the ability to add PowerShell scripts at will to your automation and orchestration workflows. As an example, it is common to call a PowerShell script toward the end of VM provisioning to automatically add a record to Active Directory DNS with the hostname of the new virtual machine that was just created into DNS. The following steps explain how to set up PowerShell access from within UCS Director.
The whole reason a PowerShell agent is needed within UCS Director is because the UCS Director appliance is based on CentOS and not Windows and, as such, cannot directly execute PowerShell commands as there was no native PowerShell interpreter available on CentOS/Linux at the time this functionality was included in UCS Director.
Step 1. Navigate to Administration > Virtual Accounts.
Step 2. Click the PowerShell Agents tab, which is shown in Figure 8-7.
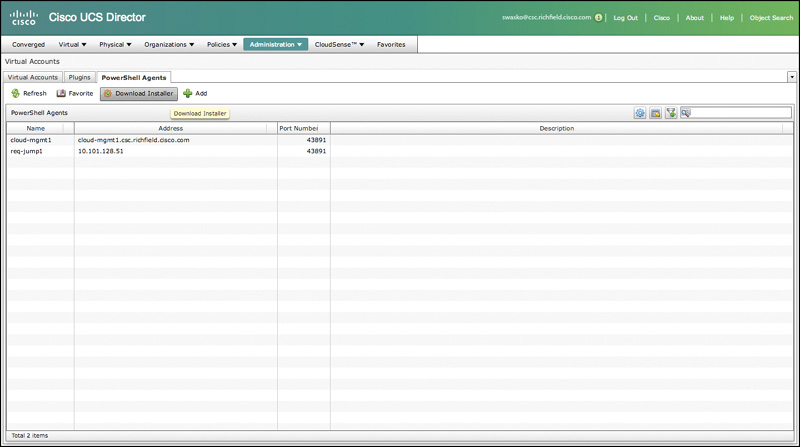
Step 3. Click the Download Installer button, which opens the Download Agent Installer dialog box shown in Figure 8-8.

Step 4. Click Submit to install that file on a remote system that meets the requirements defined in the UCS Director PSA documentation.
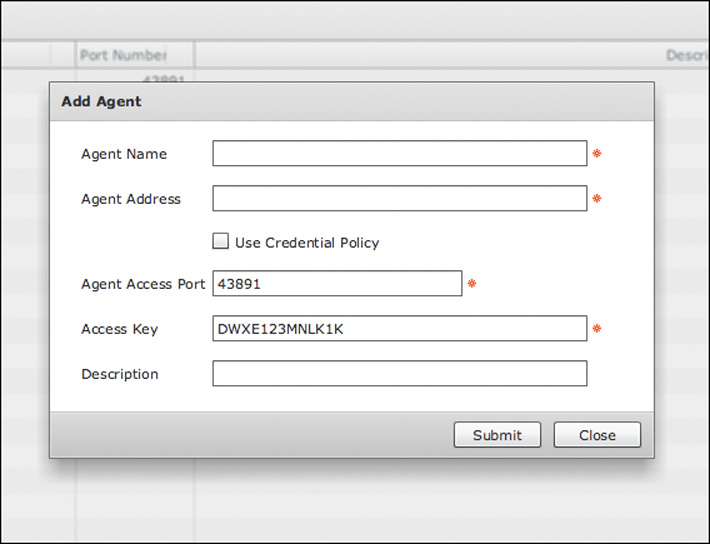
Step 5. After the installation is complete, return to UCS Director and click the Add button. Fill in the following details of the Add Agent dialog box, as shown in Figure 8-9:
![]() Agent Name: A system-friendly name for the PSA connection. You can have multiple PSA connections.
Agent Name: A system-friendly name for the PSA connection. You can have multiple PSA connections.
![]() Agent Address: The IP address or fully qualified domain name of the PSA server installed on the remote server that you previously installed.
Agent Address: The IP address or fully qualified domain name of the PSA server installed on the remote server that you previously installed.
![]() Agent Access Port: The UDP port used to communicate between UCS Director and the PSA running on the remote server.
Agent Access Port: The UDP port used to communicate between UCS Director and the PSA running on the remote server.
![]() Access Key: A unique value that must be entered in both the UCS Director Add Agent dialog box and in the PSA screen during installation of the agent.
Access Key: A unique value that must be entered in both the UCS Director Add Agent dialog box and in the PSA screen during installation of the agent.
![]() Description: An optional description for the PSA.
Description: An optional description for the PSA.
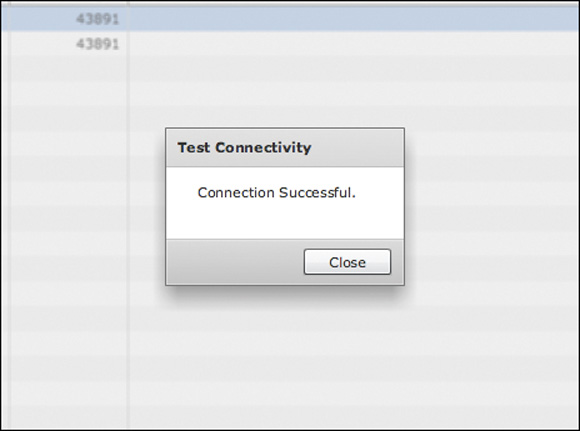
Step 6. After you have successfully installed the PowerShell Agent and entered the access key both in UCS Director and in the PSA screen, click the connection you created and click the Test Connection button to verify communication between UCS Director and the PSA server. Upon success, you should see the dialog box shown in Figure 8-10.
Once you’ve added one or more virtual accounts to UCS Director in their respective pods, you can explore what can be exposed to end users via VM actions.
Standard VM Operations
As the administrator of Cisco ONE Enterprise Cloud Suite, you have the ability to expose certain tasks to end users. Normally, many of these tasks may require administrative interruption to accomplish. By creating an End User Self-Service Policy, you can tailor the actions end users can take on VMs that they create. Note that policies are applied to a virtual data center (vDC), not to a pod. vDCs are covered in Chapter 4, “Cisco Cloud Automation/Orchestration Suites.”
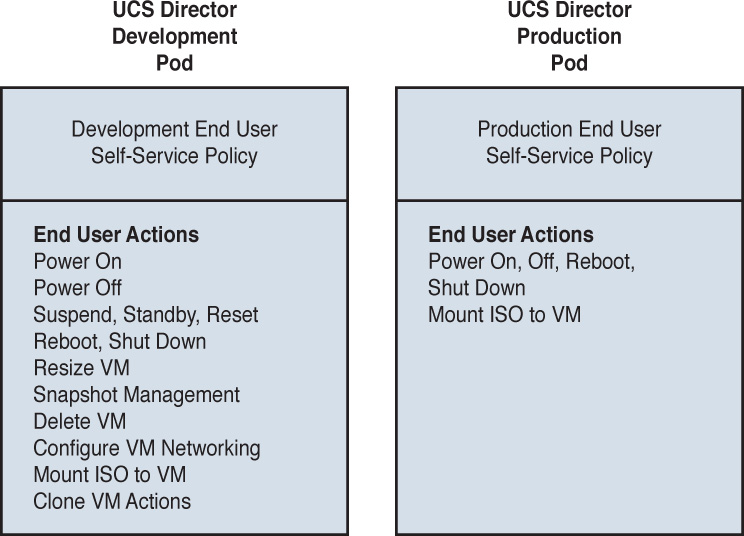
The ability to create multiple End User Self-Service Policies gives you a lot of flexibility. For example, you can create different policies for different vDCs of infrastructure within a UCS site. Let’s say that, for example, your main site where you’re using UCS Director has both a Development pod and a Production pod of infrastructure. Let’s develop policies for each pod that give the rights shown in Figure 8-11.
To begin, let’s create a policy for our Development pod:
Step 1. In UCS Director, navigate to Policies > Virtual/Hypervisor Policies > Service Delivery.
Step 2. Click End User Self-Service Policy.
Step 3. Click Add.
Step 4. For the Development pod, check all the items listed, as shown in Figure 8-12. You will be checking all available options to give users in the Development pod access to do all actions on VMs, including
![]() VM Power Management: Power ON, Power OFF, Suspend, Standby, Reset, Reboot, Shutdown Guest
VM Power Management: Power ON, Power OFF, Suspend, Standby, Reset, Reboot, Shutdown Guest
![]() VM Resizing: Resize VM
VM Resizing: Resize VM
![]() VM Snapshot Management: Create Snapshot, Revert Snapshot, Mark Golden Snapshot, Delete Snapshot, Delete All Snapshots
VM Snapshot Management: Create Snapshot, Revert Snapshot, Mark Golden Snapshot, Delete Snapshot, Delete All Snapshots
![]() VM Deletion Management: Delete VM
VM Deletion Management: Delete VM
![]() VM Disk Management: Create VM Disk, VM Disk Resize, Delete VM Disk
VM Disk Management: Create VM Disk, VM Disk Resize, Delete VM Disk
![]() VM Network Management: Add vNICs, Delete vNICs, VM Resync
VM Network Management: Add vNICs, Delete vNICs, VM Resync
![]() VM Lease Expiry: Configure Lease Time
VM Lease Expiry: Configure Lease Time
![]() VM Console Management: Launch VM Client, Configure VNC, Test VNC, Enable/Disable VMRC Console
VM Console Management: Launch VM Client, Configure VNC, Test VNC, Enable/Disable VMRC Console
![]() VM Clone and Template Management: Clone, Clone VM as Image, Convert VM as Image, Move VM to VDC, and Assign VMs to VDC
VM Clone and Template Management: Clone, Clone VM as Image, Convert VM as Image, Move VM to VDC, and Assign VMs to VDC
![]() VM ISO Management: Mount ISO Image as CD/DVD Drive
VM ISO Management: Mount ISO Image as CD/DVD Drive
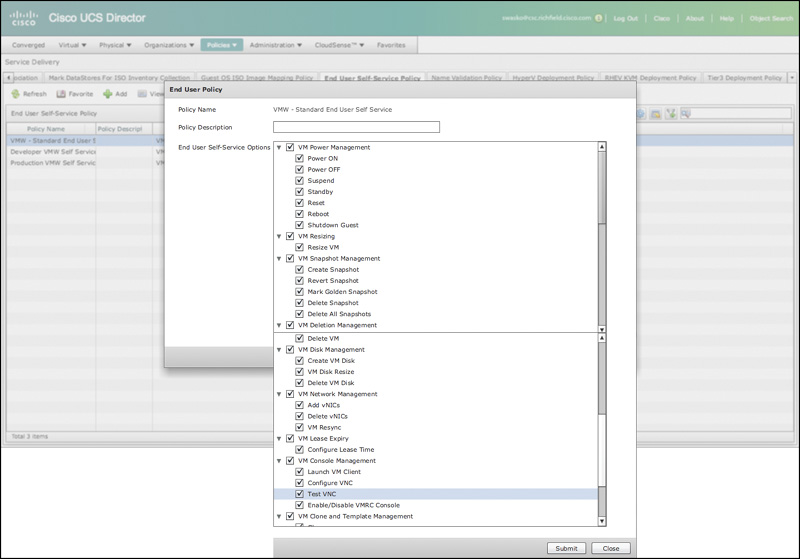
Step 5. After you have checked all of these options, click Submit.
The resulting policy will enable all users in the Development pod to perform all available standard actions on VMs that they create in that environment. Note that this assumes that a single vDC applies to the Development pod, but that isn’t necessarily always the case.
Many organizations have much more stringent rights and access policies for what can be done in production. So let’s create a new policy for our Production pod.
To create the policy for the Production pod:
Step 1. Within UCS Director, navigate to Policies > Virtual/Hypervisor Policies > Service Delivery.
Step 2. Click End User Self-Service Policy.
Step 3. Click Add.
Step 4. For the Production pod, check the items as shown in Figure 8-13. You will be checking the following selections to give users in the Production pod access to do a much more limited set of actions on VMs:
![]() VM Power Management: Power ON, Power OFF, Reboot, Shutdown Guest
VM Power Management: Power ON, Power OFF, Reboot, Shutdown Guest
![]() VM ISO Management: Mount ISO Image as CD/DVD Drive
VM ISO Management: Mount ISO Image as CD/DVD Drive
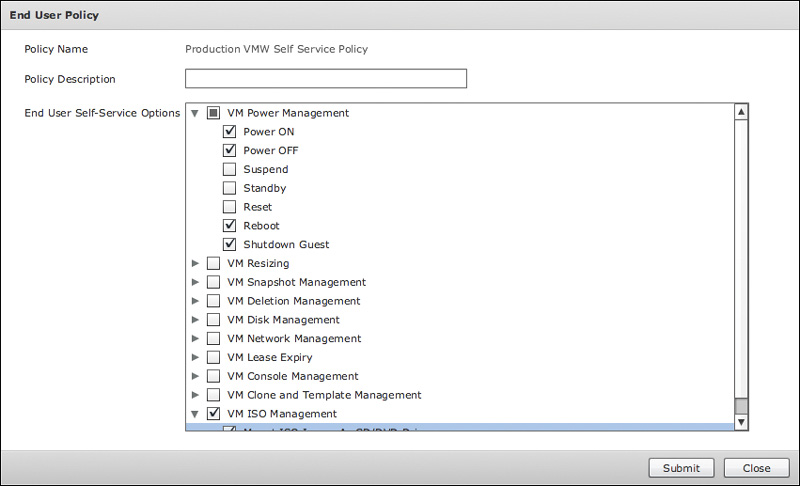
Step 5. After you have checked all of these options, click Submit.
As you can see, End User Self-Service Policies give you the flexibility to give the necessary access to end users based on the environments in which they are operating their virtual machines. You can put the proper, granular controls in place to limit users’ abilities to perform actions that may be undesirable in production environments while giving them complete abilities to do things in a development or test environment and offering tremendous amounts of flexibility.
But what if your end users require even more advanced options for their virtual machines? Good news! UCS Director offers even more capabilities by enabling you to create custom VM operations that can be attached to a user’s virtual machines, giving them even more flexibility.
Advanced or Custom VM Operations
Beyond the actions discussed in the previous section, you may desire to give your users the ability to perform even greater actions on virtual machines. UCS Director enables you to set custom or advanced virtual machine options for end users. This can dramatically extend the use cases that can be solved in your organization with UCS Director. Custom VM Action Policies can be used to execute a custom workflow against a provisioned VM. What task that actual workflow executes is highly variable. The following are a couple of use cases that come to mind:
![]() Give Windows virtual machine users the ability to register their newly created VMs with Microsoft System Center Configuration Manager (SCCM) so that those VMs can be remediated post provisioning to include any relevant operating system patches or applications that have been advertised to different SCCM collections. A representative use case of where this could be helpful would be to give the end user the ability to create a generic Windows Server virtual machine and then, after creation, give them custom icons that offer the ability to add the VM to the Web, Application, or Database SCCM collection so that Internet Information Services (IIS), .NET, or SQL Server gets installed to that VM.
Give Windows virtual machine users the ability to register their newly created VMs with Microsoft System Center Configuration Manager (SCCM) so that those VMs can be remediated post provisioning to include any relevant operating system patches or applications that have been advertised to different SCCM collections. A representative use case of where this could be helpful would be to give the end user the ability to create a generic Windows Server virtual machine and then, after creation, give them custom icons that offer the ability to add the VM to the Web, Application, or Database SCCM collection so that Internet Information Services (IIS), .NET, or SQL Server gets installed to that VM.
![]() Give Linux virtual machine users the ability to register their newly created VMs with different Puppet classes so that those VMs can be remediated post provisioning to include any relevant operating system patches or applications that have been assigned to different Puppet classes. An example of this would be to give the end user the ability to create a generic Linux virtual machine and then, after creation, give them custom icons that offer the ability to add that VM to a Web, Application, or Database Puppet class so that Apache, Java, or MySQL gets installed to that VM.
Give Linux virtual machine users the ability to register their newly created VMs with different Puppet classes so that those VMs can be remediated post provisioning to include any relevant operating system patches or applications that have been assigned to different Puppet classes. An example of this would be to give the end user the ability to create a generic Linux virtual machine and then, after creation, give them custom icons that offer the ability to add that VM to a Web, Application, or Database Puppet class so that Apache, Java, or MySQL gets installed to that VM.
In both of these examples, custom VM operations enable your end users to move beyond an Infrastructure as a Service model (a bare, generic VM) into more of a Platform as a Service model (a VM with a complete app stack installed on it). This dramatically increases the use cases for UCS Director as a tool in your IT automation framework and provides VM customization capabilities to end users while allowing for complete automation, orchestration, and self-service capabilities to end users of both VMs and the applications within those VMs.
Some other examples that come to mind of custom actions that may be applicable to your end users include
![]() Registering a VM via PowerShell to an Active Directory domain.
Registering a VM via PowerShell to an Active Directory domain.
![]() Giving end users a button to click in the UCS Director catalog for their VM to redirect them to your organization’s internal change management database system (CMDB) to open a ticket on potential issues they may be experiencing with that VM or applications within the VM.
Giving end users a button to click in the UCS Director catalog for their VM to redirect them to your organization’s internal change management database system (CMDB) to open a ticket on potential issues they may be experiencing with that VM or applications within the VM.
![]() Providing a custom policy button to allow the end user to request archives of the VM (in a test/development environment) in a situation where you are not utilizing lease durations within UCS Director on VMs. This would allow your users to request archives of the VM to a lower tier of storage or to an offline storage option so that it could be preserved for a duration of time for either development purposes, future access purposes, or government and regulatory purposes (for cases where nonactive VMs may need to be preserved for a period of time in case future access is required).
Providing a custom policy button to allow the end user to request archives of the VM (in a test/development environment) in a situation where you are not utilizing lease durations within UCS Director on VMs. This would allow your users to request archives of the VM to a lower tier of storage or to an offline storage option so that it could be preserved for a duration of time for either development purposes, future access purposes, or government and regulatory purposes (for cases where nonactive VMs may need to be preserved for a period of time in case future access is required).
These are just some examples of how custom VM operations can be added within UCS Director to drastically extend the functionality and usefulness of available actions for end users in a self-service fashion, allowing them to perform the actions automatically without taking up valuable time and resources of your IT staff. Next, let’s discuss how to set custom virtual machine policies.
Custom VM Action Policies
Within UCS Director, we have looked at how straightforward it is to create policy to allow a wide variety of functions that end users can take on virtual machines they’ve ordered through UCS Director’s catalog, actions such as powering on or off the VM, creating snapshots, changing attributes of the VM such as resizing it or adding a vNIC, etc.
Creating custom VM policies gives you an easy way to enable users to add additional, custom capabilities to their VMs and their UCS Director user dashboard.
At a high level, this is accomplished in four parts:
1. Create a custom workflow action.
2. Test and execute the custom workflow.
3. Assign that custom workflow action to a custom user VM policy.
4. Assign the custom user VM policy to a vDC.
Create a Custom Workflow Action
You first create a custom workflow action in UCS Director that executes the custom policy action you desire. After that workflow has been created, it can then be accessed via a User VM Action Policy that you create. Let’s look at an example where you can create a very simple workflow that runs a shell command on a Linux system.
Step 1. Within UCS Director, choose Policies > Orchestration. The Orchestration window opens with the Workflows tab displayed.
Step 2. On the Workflows tab, click the Add Workflow button (see Figure 8-14). Note that Figure 8-14 shows the Edit Workflow properties because the example included here was created previously; therefore, the option to Add is not available, only Edit. The first time you create a workflow, you will see Add Workflow displayed.

Step 3. On the Workflow Details page, give the workflow a name. In this example, use Show free disk space.
Step 4. Give the workflow an optional description.
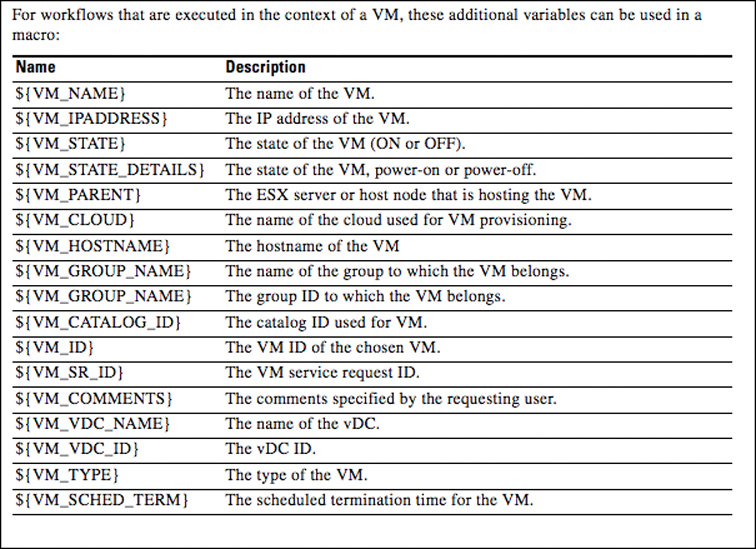
Step 5. Select where the workflow can run. In this case, set Workflow Context to Selected VM. When Selected VM is the context, the shell command is permitted to run within the particular VM that will be selected by the end user. Note that when Selected VM is chosen, this allows a whole bunch of predefined variables to be exposed about the VM, which we will use later when we create the workflow for this example. A complete list of these workflows is shown in Figure 8-15.
Step 6. In the Save Options section, use the Select Folder field to choose a folder in which to save the workflow. Folders give you a way to conveniently organize workflows within UCS Director in a way that makes the most sense for your organization. Some larger organizations will have a very large folder structure for categorizing workflows within UCS Director, while others may find it simpler to put everything in a single folder. It is better to create folders from the start, though, for organizational purposes (see Figure 8-16). Note that Figure 8-16 shows the Edit Workflow properties because the example included here was created previously; therefore, the option to Add is not available, only Edit. The first time you create a workflow, you will see Add Workflow displayed.
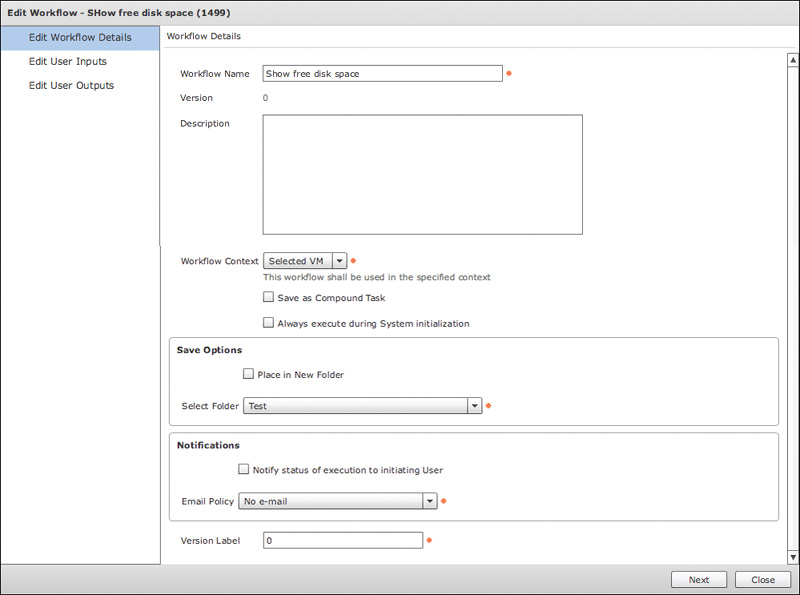
Step 7. In the Notifications section, select an email policy for the workflow. In this case, as you won’t require any email notifications for this example, leave Email Policy set to No e-mail.
Step 8. Click Next.
Step 9. On the Edit User Inputs screen, click the green plus sign to add an input label. Create three total input labels, as listed next and shown in Figure 8-17. Pay particular attention to the Type for each label.
a. Input Label of Email address with a Type of email_address_list
b. Input Label of Username with a Type of gen_text_input
c. Input Label of Password with a Type of password
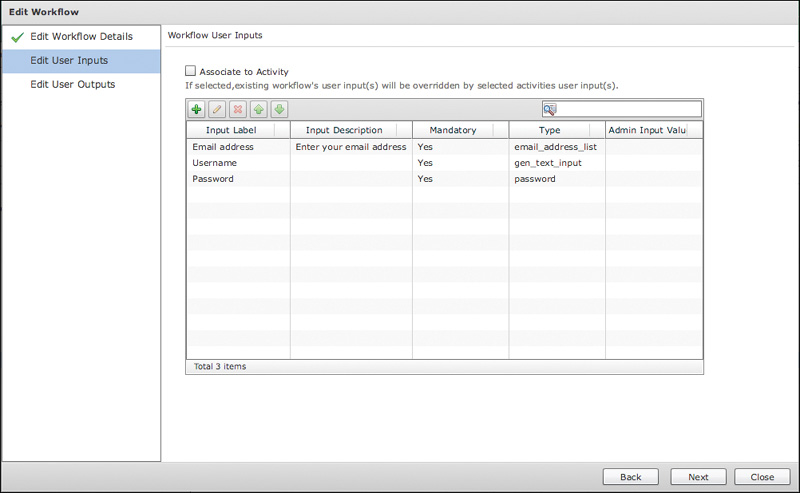
Step 10. Click Next to move to the final screen, Edit User Outputs. No outputs need to be specified, so click Submit.
Step 11. The workflow now appears under the folder named Test, as shown in Figure 8-18.

Step 12. Double-click the workflow name to launch the Workflow Designer application within UCS Director. For the purposes of this example, we will be creating a workflow that has two steps:
a. Execute a VIX script to show free disk space
b. Email the results to the end user
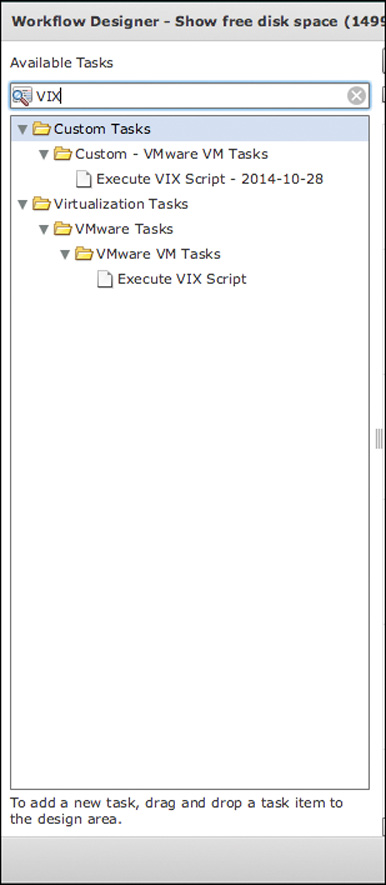
Step 13. Using the upper-left search pane of the Workflow Designer, search for VIX (see Figure 8-19).
Step 14. From the search results, drag and drop the Execute VIX Script action onto the Workflow task pane. The Add Task wizard opens with the Task Information page displayed. Give the task a name such as Show free disk space, as shown in Figure 8-20.
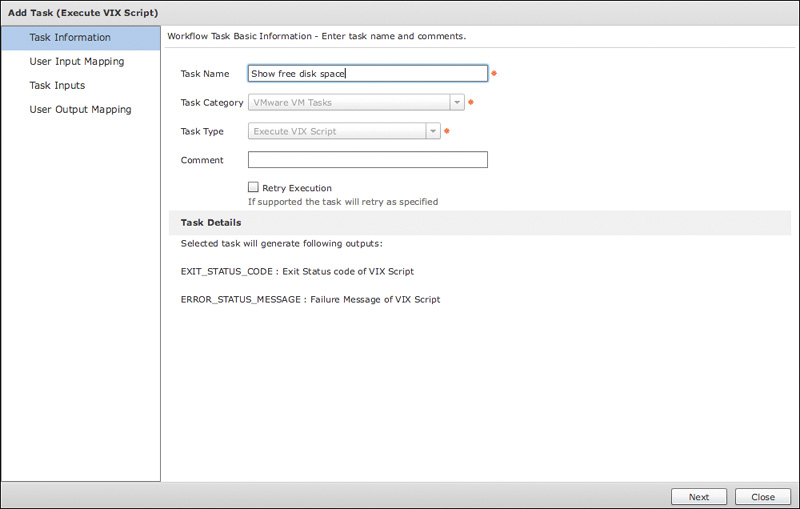
Step 15. Click Next.
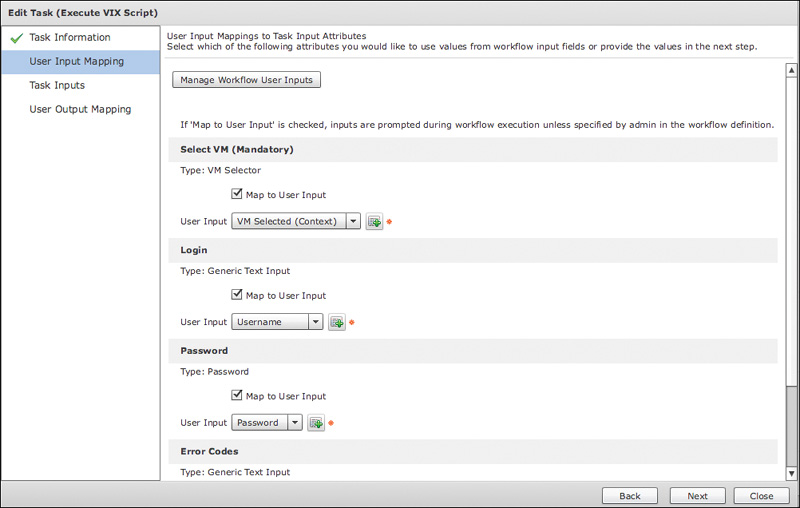
Step 16. On the User Input Mapping page, make the following configurations, as shown in Figure 8-21:
![]() Under Select VM (Mandatory), check the Map to User Input check box and set the User Input field to VM Selected (Context).
Under Select VM (Mandatory), check the Map to User Input check box and set the User Input field to VM Selected (Context).
![]() Under Login, check the Map to User Input check box and set the User Input field to Username.
Under Login, check the Map to User Input check box and set the User Input field to Username.
![]() Under Password, check the Map to User Input check box and set the User Input field to Password.
Under Password, check the Map to User Input check box and set the User Input field to Password.
Note that no additional information needs to be provided on this page.
Step 18. On the Task Inputs page, set the Credential Type field to Login. In the Script pane, enter the simple Linux command to look at disk free space, df-h, as shown in Figure 8-22.
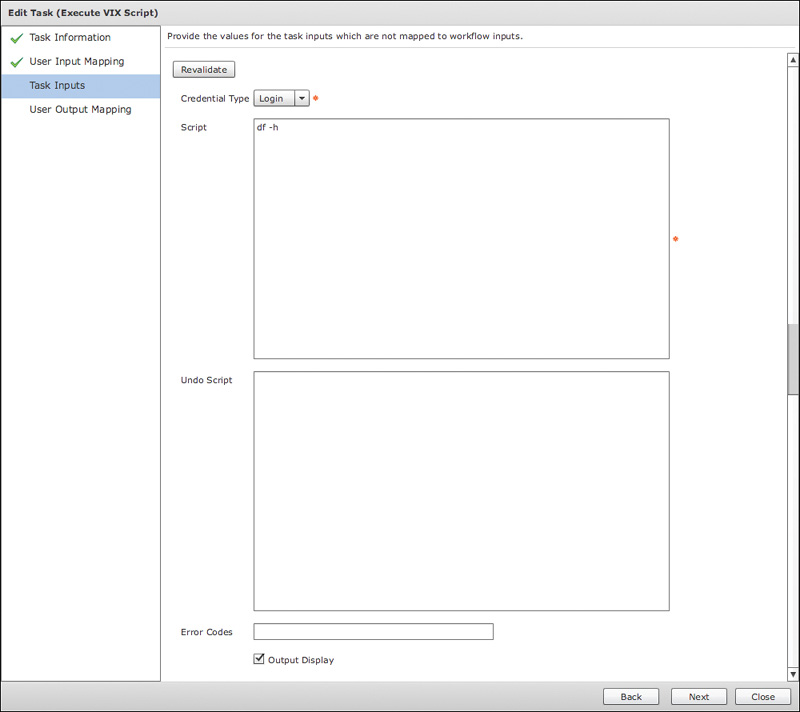
Step 19. Click Next.
Step 20. No changes are required on the User Output Mapping page, so simply click Submit to save the workflow.
Test and Execute the Custom Workflow
Step 1. You should now test the workflow and monitor the results of running this single VIX script, as we’ll need an output variable for the second task that we create a bit later.
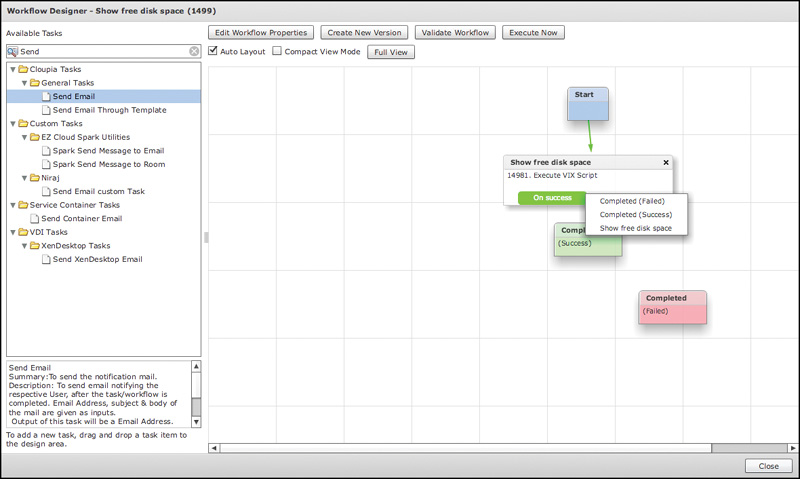
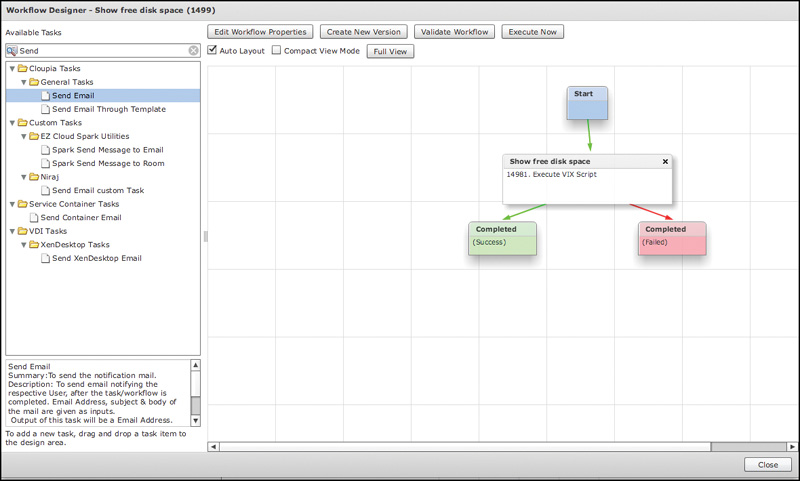
Step 2. Before testing the workflow, drag your cursor over the bottom edge of the “Show free disk space” task in the Workflow Designer. Note that as you move your cursor from left to right, you will see the ability to define where the workflow should go on success or failure. Click the On Success option to display what is shown in Figure 8-23. Select the drop-down menu option Completed (Success) and notice that a green arrow now connects the task to the green Completed (Success) box, as shown in Figure 8-24.
Step 3. Complete Step 2 for the On Failure option, clicking the Completed (Failed) menu option for the task to connect it with a red arrow to the red Completed (Failed) box.
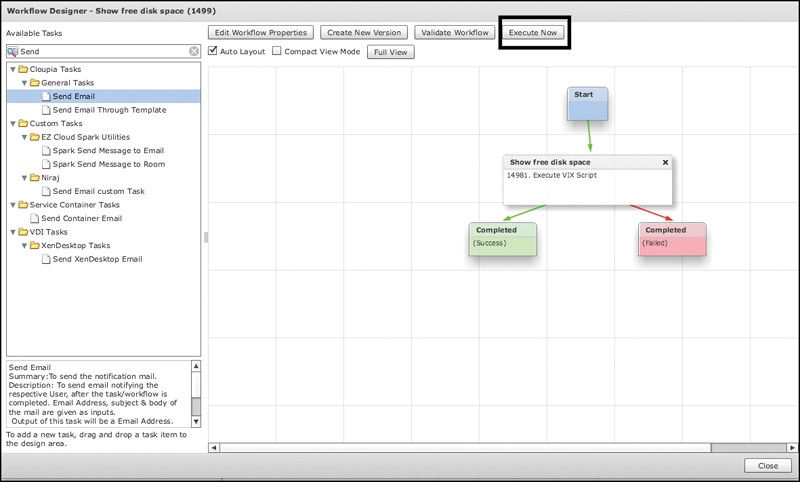
Step 4. Click the Execute Now button (see Figure 8-25).
Step 5. In the Executing Workflow: Show free disk space dialog box, shown in Figure 8-26, select a target VM (y4040 for this example), email address, username, and password (used to run this command on the selected Linux VM); then click Submit.

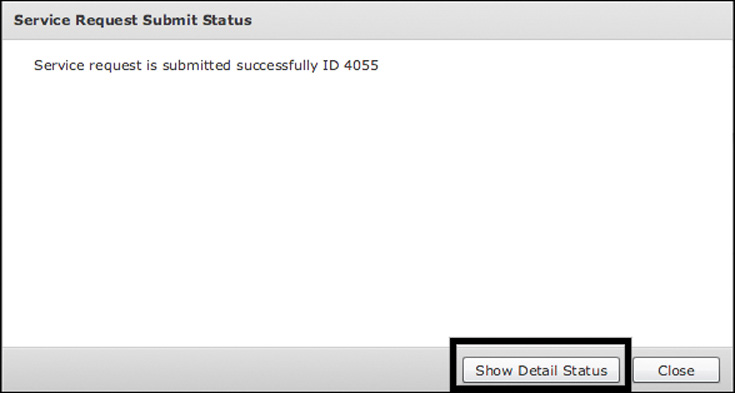
Step 6. In the Service Request Submit Status dialog box (see Figure 8-27), click the Show Detail Status button.
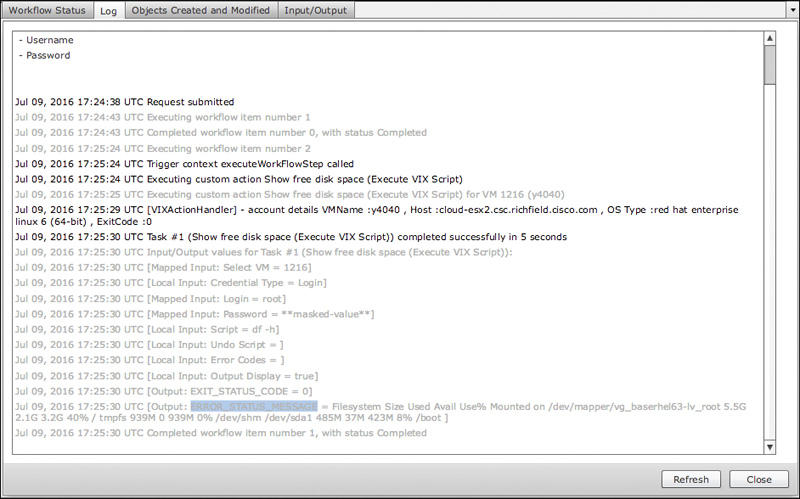
Step 7. Click the Log tab and, toward the bottom, search for the words ERROR_STATUS_MESSAGE (see Figure 8-28). Write down this variable exactly as it appears, including capital letters and underscores, for use in the second step of our workflow. Once noted, click Close to return to the Workflow Designer.
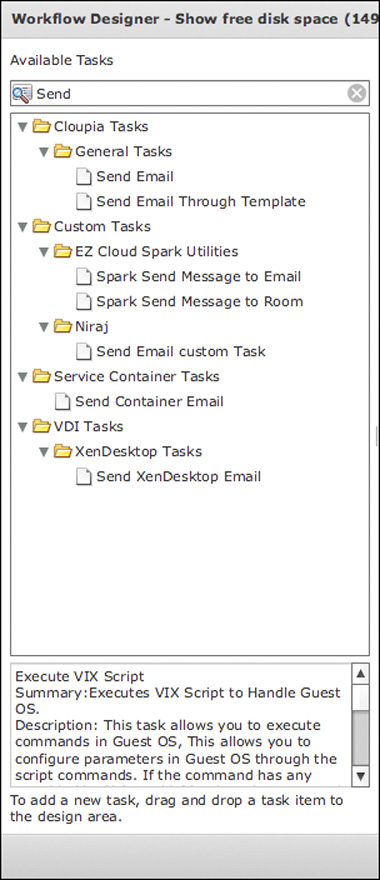
Step 8. Using the upper-left search pane of the Workflow Designer application, search for either send or email. You are searching for an action to send an email, so experiment with different searches to become more familiar with different tasks in UCS Director (see Figure 8-29).
Step 9. From the search results, drag the Send Email task onto the workflow pane. The Edit Task wizard will automatically open for editing the task.
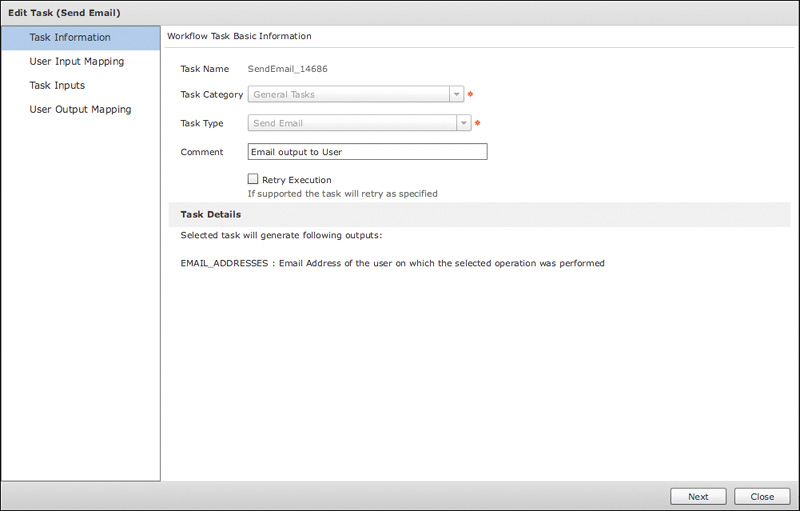
Step 10. If you want, on the Task Information page, give the task a name and a comment (see Figure 8-30). Note that in the figure, the task isn’t editable because it was previously created in the making of the workflow for this chapter.
Step 11. Click Next.
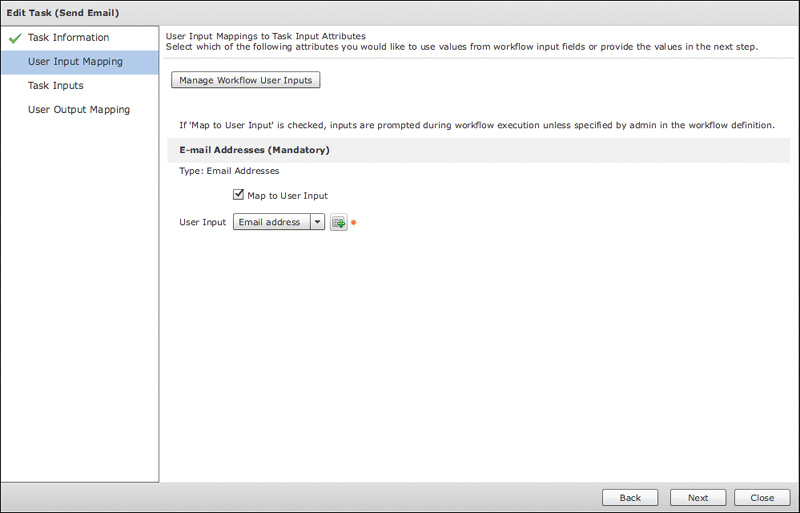
Step 12. On the User Input Mapping page, under the section titled E-mail Addresses (Mandatory), check the Map to User Input check box and set the User Input field to Email address (see Figure 8-31).
Step 13. Click Next.
Step 14. On the Task Inputs page, you set up a subject line and body message. Notice in the Body field shown in Figure 8-32 the use of the ERROR_STATUS_MESSAGE variable that you wrote down in Step 27 from Figure 8-28. Enter an appropriate subject and body, ensuring that you copy the variable information ${Show free disk space.ERROR_STATUS_MESSAGE} exactly as shown in Figure 8-32. Note that Figure 8-32 shows the Add Task Wizard as opposed to the Edit Task Wizard as shown in Figures 8-30 and 8-31. The dialog box will always show Add Task if a new task is being created or Edit Task if an existing task is being modified.

Step 15. Click Next. No entries are required on the User Output Mapping page, so click Submit.
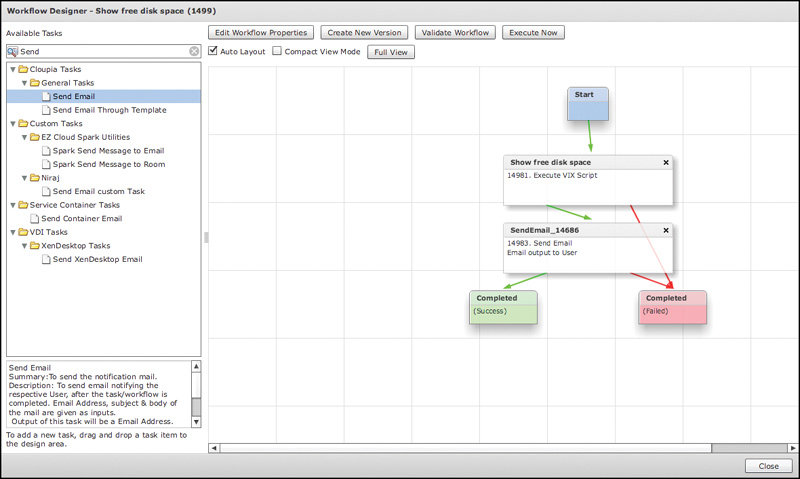
Step 16. Back in the Workflow Designer, we now want to modify where our On Success and On Failure options for the “Show free disk space” command point. The new hierarchy of order should flow from Start > Task 1 > Task 2 > Completed. Modify the arrows so that your task flow looks like that shown in Figure 8-33.
Step 17. Click Execute Now to run the workflow. As previously done in Step 5, select the target VM, username, and password for that VM, as well as the email address where the output should be sent. Click Submit. Optionally, feel free to then click the Show Detail Status dialog box and monitor the Log tab for progress on the workflow. Or simply wait for the email to arrive in your inbox with the requested information.
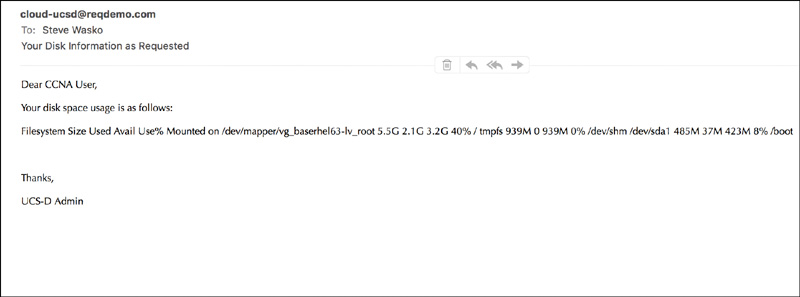
Step 18. Check your email inbox for the address you entered in Step 17. If all worked well, you should find an email similar to the one shown in Figure 8-34.
Assign the Custom User VM Policy to a vDC
Step 1. Now that the workflow has been created and has run successfully, we must make it available to one or more vDC(s) within UCS Director, and then add the custom action to end-user virtual machines in that particular vDC. To do this, navigate to Policies > Virtual/Hypervisor Policies > Virtual Data Centers.
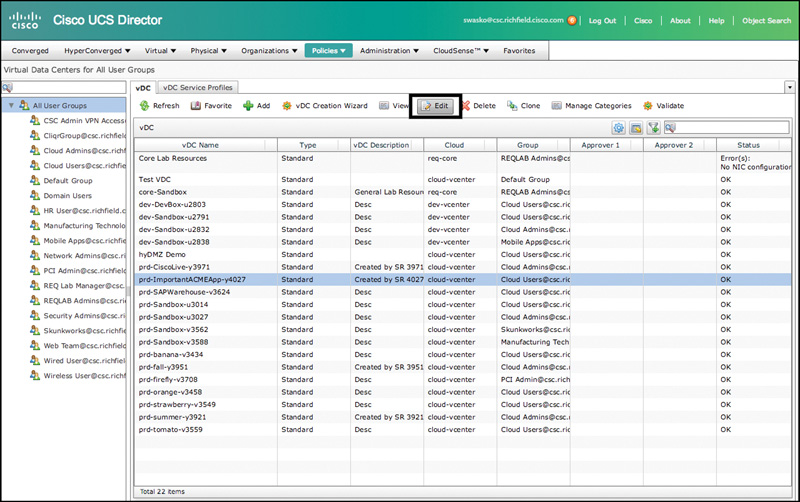
Step 2. Select the vDC name you want to map the policy to. In the example shown in Figure 8-35, the vDC named prd-ImportantACMEApp-y4027 has been selected. Click the Edit button.
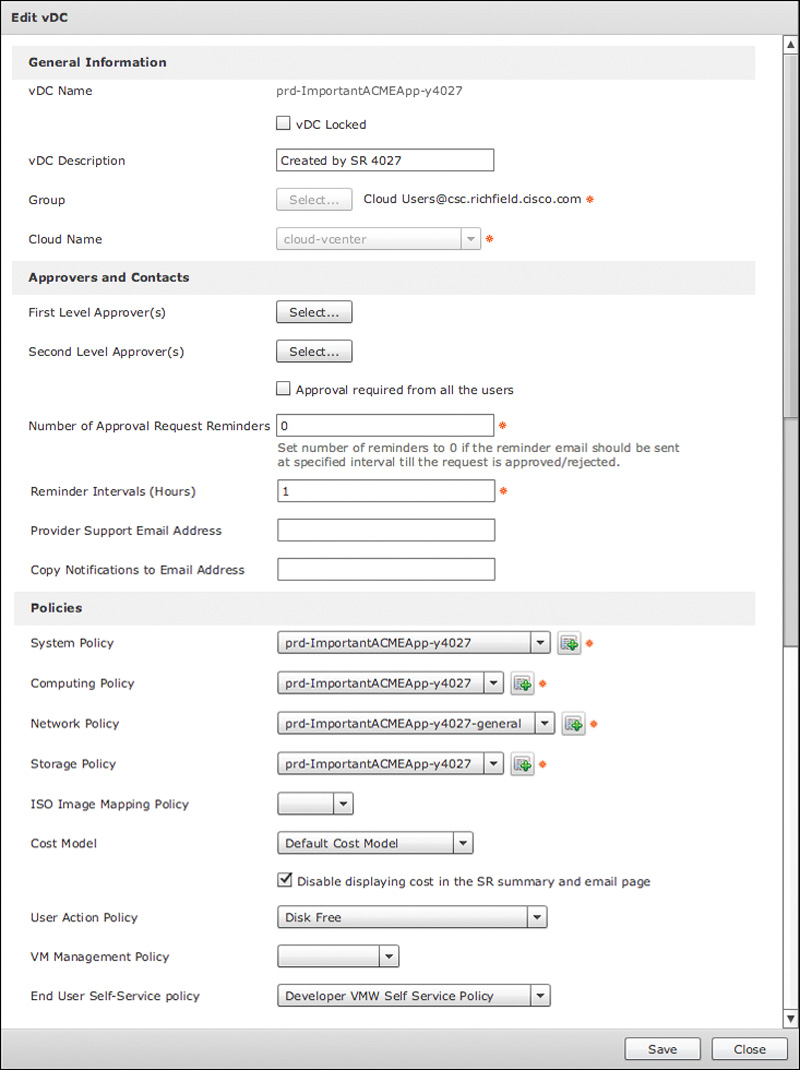
Step 3. In the Edit vDC dialog box, scroll down to the Policies section and look for the User Action Policy drop-down list box. From the drop-down list, choose Disk Free, as shown in Figure 8-36, and then click Save.
Assign the Custom Workflow Action to a Custom User VM Policy
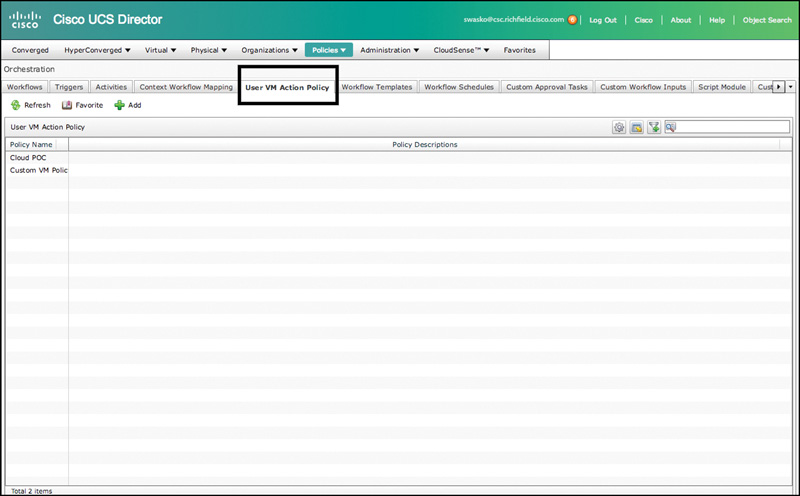
Step 1. Now that the policy has been assigned to a vDC, let’s add the Custom User VM Policy to VMs in that vDC. Navigate to Policies > Orchestration and then click the User VM Action Policy tab, as shown in Figure 8-37.
Step 2. Click the Add button.
Step 3. On the Create New Policy page, give the policy a name and choose 1 in the Select No. of Actions drop-down list (as shown in Figure 8-38).
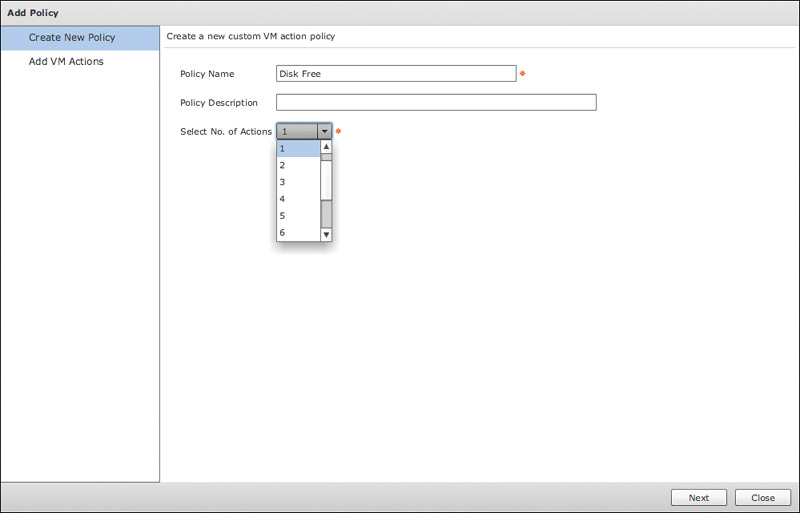
Step 4. Click Next.
Step 5. On the Add VM Actions page, give the button a label in the Action Label field, select the workflow to perform when the button is clicked (1499 Show free disk space in this example), and then select the Authorized User Types by clicking on the Select button next to Authorized User Types and then choosing Service End-User, as shown in Figure 8-39.
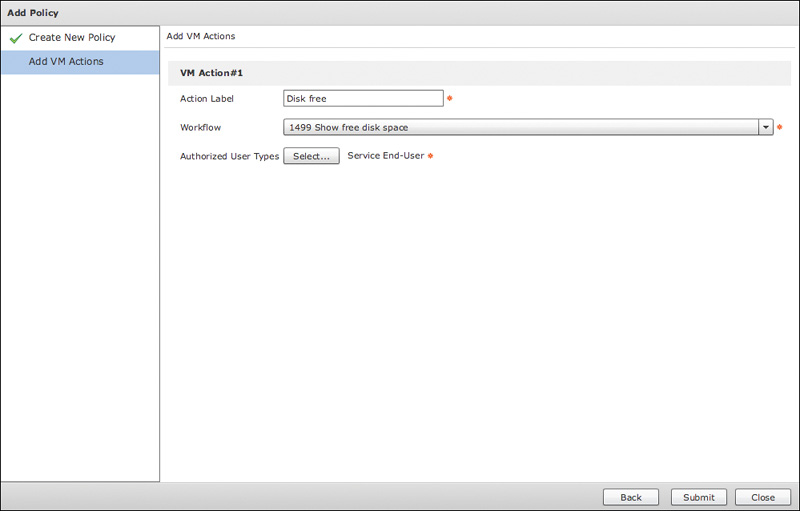
Step 6. Click Submit.
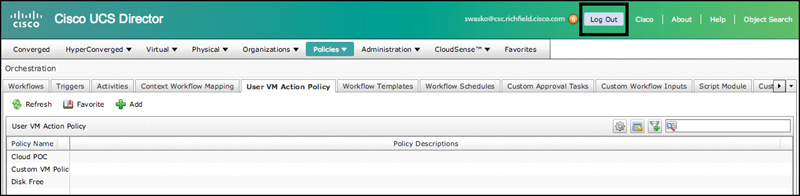
The final steps are to log out of UCS Director as an admin, and log in to UCS Director as an end user that has permissions to the vDC we just mapped this custom User VM Action Policy to.
Step 7. In the upper-right corner of UCS Director, next to your username, click Log Out, as shown in Figure 8-40.
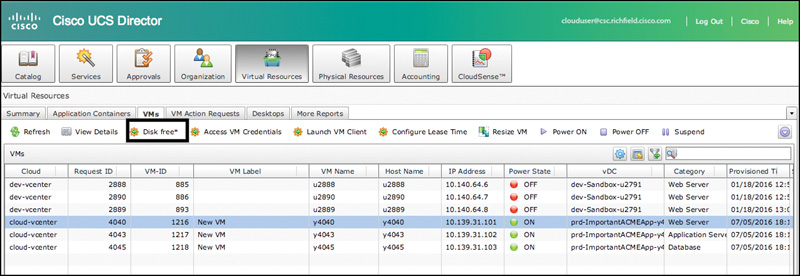
Step 8. Log in to UCS Director as an end user. At the top, you will see the Virtual Resources menu option, as shown in Figure 8-41. Click that icon.
Step 9. Navigate to the VMs tab and select the previous VM you used for testing (for the example, VM Name y4040). Notice that the menu now has a “Disk free*” menu option, as shown in Figure 8-42.
Step 10. Log out of UCS Director as the end user.
Setting VM Options for End-User Selection
When your users are requesting virtual machines from a Standard Catalog or Advanced Catalog, you have the ability to create conditions that can be enforced for the users by creating a Computing Policy. Please note that this is done by applying a Computing Policy to vDCs that you choose.
The Computing Policy drives all sorts of behaviors, such as whether or not an ESX cluster in a pod of infrastructure has enough vCPU or memory available to provision VMs successfully. In addition, you can set default options for permitted values of vCPUs and memory for end users.
As the UCS Director administrator, the Computing Policy allows you to focus on delivering varying tiers of service to virtual computing. As an example, you can choose older ESX clusters with less memory or CPU resources for a development vDC while choosing a new ESX cluster with more CPU/memory for a production vDC.
To create a Computing Policy, follow these steps:
Step 1. Within UCS Director, select Policies > Virtual/Hypervisor Policies > Computing.
Step 2. Navigate to the hypervisor of your choice. In this example, select the VMware Computing Policy tab.
Step 3. Click the Add button to open the Add Computing Policy dialog box, shown in Figure 8-43.
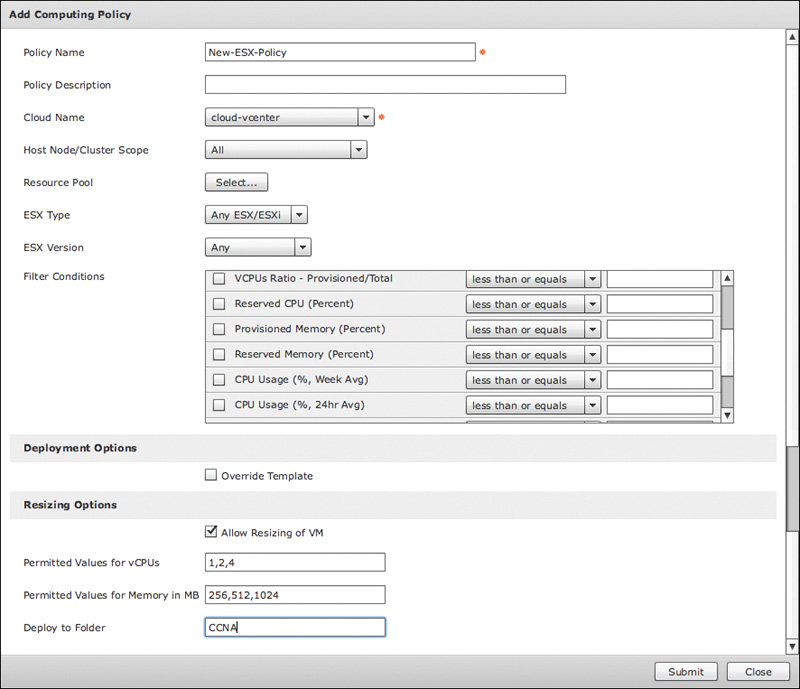
Step 4. Give the Computing Policy a name and, optionally, a description. In this example the policy is named New-ESX-Policy.
Step 5. In the Cloud Name drop-down list box, select the cloud you would like to provision this policy for. In this example, cloud-vcenter is selected.
Step 6. If you want the Computing Policy to operate within the constraints of an ESX resource pool, click Select to the right of Resource Pool and choose a resource pool.
Step 7. Keep ESX Type set to Any ESX/ESXi.
Step 8. Keep ESX Version set to Any.
Step 9. The Filter Conditions scrollable pane gives you a myriad of options. For brevity purposes, they won’t be listed here, but refer to Figure 8-43 to see a partial list of options. You can set parameters such as guests per host, VCPUs Ratio, Provisioned Memory, etc. If any of these conditions aren’t met when an end user requests resources in the vDC where this Computing Policy is applied, the provisioning process may not complete successfully due to a lack of available resources. This gives you the ability to ensure clusters don’t get over-provisioned as part of the end-user service catalog ordering process.
Step 10. Scroll down to the Resizing Options section, check the Allow Resizing of VM check box, and compete the fields as follows:
![]() Permitted Values for vCPUs: Enter a string (separated by commas) of valid vCPU options that will be presented to the end user when they go to provision a virtual machine with this policy applied. For this example, 1, 2, and 4 vCPUs have been allowed.
Permitted Values for vCPUs: Enter a string (separated by commas) of valid vCPU options that will be presented to the end user when they go to provision a virtual machine with this policy applied. For this example, 1, 2, and 4 vCPUs have been allowed.
![]() Permitted Values for Memory in MB: Enter a numeric string (separated by commas) of permitted memory amounts to be allowed when provisioning a virtual machine that has this policy applied to it. For this example, we are only allowing the default options of 256 MB, 512 MB, and 1024 MB.
Permitted Values for Memory in MB: Enter a numeric string (separated by commas) of permitted memory amounts to be allowed when provisioning a virtual machine that has this policy applied to it. For this example, we are only allowing the default options of 256 MB, 512 MB, and 1024 MB.
![]() Deploy to Folder: Enter a name of a folder you’d like to create in Virtual Center where VMs created from this policy will reside. If the specified folder does not already exist, it will be created by UCS Director. This is helpful to keep track of the provisioned VMs and to see them organized logically within VirtualCenter. For this example, we have created a CCNA folder. Note that if the folder already exists, it won’t be re-created.
Deploy to Folder: Enter a name of a folder you’d like to create in Virtual Center where VMs created from this policy will reside. If the specified folder does not already exist, it will be created by UCS Director. This is helpful to keep track of the provisioned VMs and to see them organized logically within VirtualCenter. For this example, we have created a CCNA folder. Note that if the folder already exists, it won’t be re-created.
Step 11. Click Submit to add the Computing Policy.
Understanding Common Administrative Workflows on VMs in UCS Director
UCS Director comes with a default set of administrative workflows that can be leveraged out of the box in your task of automating and orchestrating virtual machine actions within your private cloud infrastructure. This section is certainly not an exhaustive list of workflows but will cover some of the more common ones. You are encouraged to review many more of these within UCS Director in preparation for working with the product in your organization and for the purposes of studying for your CCNA certification.
Step 1. In UCS Director, navigate to Policies > Orchestration.
Step 2. Go to the Default folder and expand the DefaultVMware folder.
Step 3. Select any workflow. For illustration purposes, select the VMware Clone VM As Image workflow.
Step 4. Double-click the selected workflow and you will see the Workflow Designer screen shown in Figure 8-44. Notice that the Workflow Designer screen has two main sections. On the left is a list of available tasks. On the right is a “canvas” similar to that found in many popular diagramming applications that allows you to simply drag and drop workflow tasks from the library on the left onto the canvas.
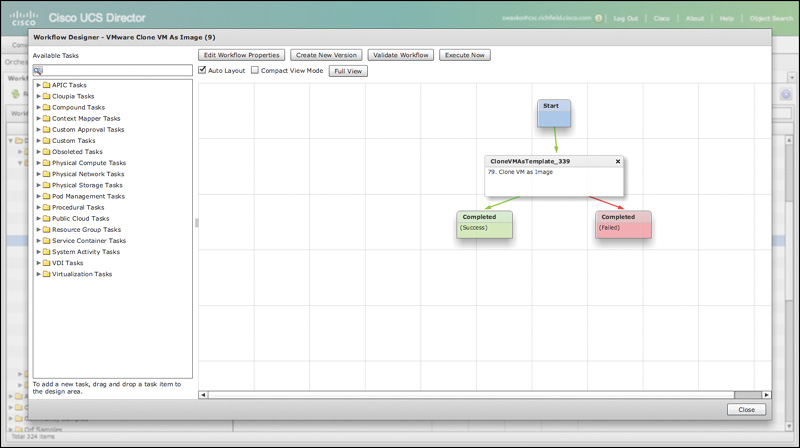
Under Available Tasks on the left of the Workflow Designer, there are two ways to find tasks to use. As you first start to work with UCS Director, it may be helpful to drill down into the various folders and subfolders to find tasks that you are interested in. As you gain more experience with the product and can start to recall task names that are frequently used, you can use the search/query field to quickly and easily search and filter based on items you are interested in.
Step 5. To explore some of the common actions available to virtual hypervisors, expand the Virtualization Tasks folder, expand the HyperV Tasks folder, and then expand the HyperV VM Tasks subfolder, as shown in Figure 8-45.
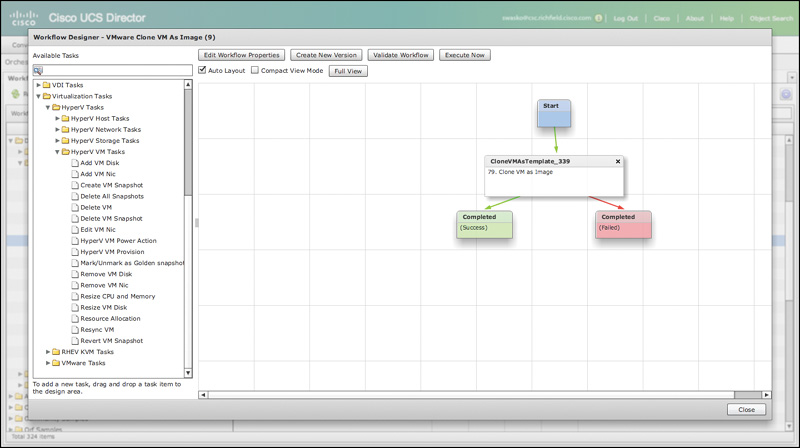
Step 6. Note the common tasks available to you. You could drag and drop these items into the Workflow Designer canvas to link them with other available tasks to create more complex, multistep workflows. But for the purposes of this exercise, we won’t be making any changes to the VMware Clone VM As Image workflow; we are simply observing available workflows.
Step 7. Navigate to the Virtualization Tasks > VMware Tasks > VMware VM Tasks folder. Note some of the many options available that you can perform on a VMware ESX virtual machine.
Step 8. Once you are done reviewing some of these actions, click Close.
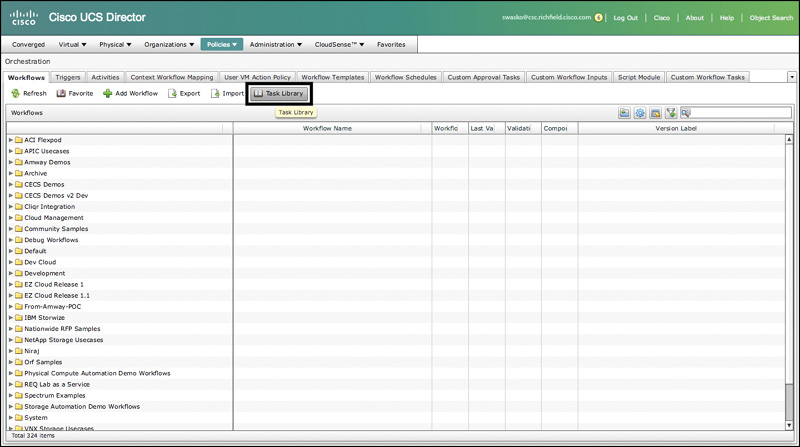
To see a dynamic inventory of all available tasks defined in a particular instance of UCS Director, you can export the entire task library. This is a great reference to save offline out of UCS Director. This will allow you (if you print to PDF as an example) to have a list of all the standard tasks that ship with UCS Director for easy offline reference.
Step 1. In UCS Director, choose Policies > Orchestration.
Step 2. Click the Task Library icon, as highlighted in Figure 8-46. When the dialog box appears, click the Regenerate Document check box and then click Submit.
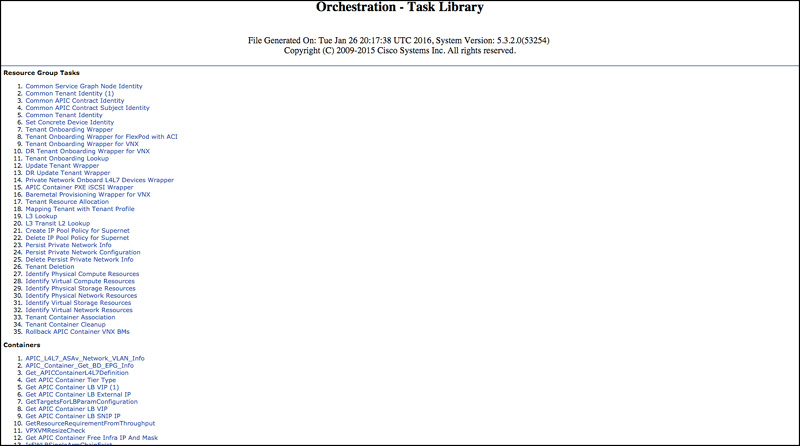
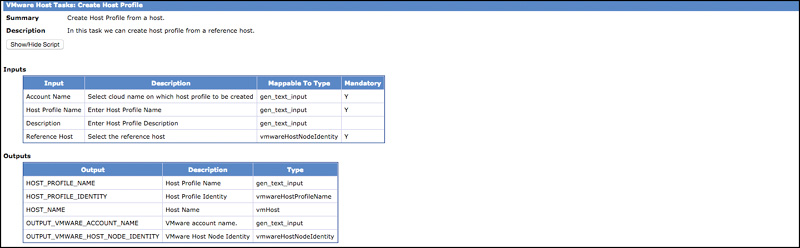
Step 3. The resulting document can then be printed to PDF and used to reference all orchestration tasks within UCS Director (see Figure 8-47). Clicking any task will take you to a detailed summary, description, and table of inputs and outputs. Figure 8-48 shows an example of the output of the task titled VMware Host Tasks: Create Host Profile.
As you can see, UCS Director allows you great flexibility with the thousands of out-of-the-box tasks. Combined with the ability to also import tasks easily into the task library from places like Cisco’s UCS Director community forums or peers of yours, you can see how UCS Director provides you, the cloud administrator, with a great deal of flexibility to handle a wide range of operational tasks within your organization.
Prime Service Catalog VM Integration
The last section of this chapter focuses on how to bring the virtual machine end-user experience into Prime Service Catalog. If we think about the two different audiences each tool in the Cisco ONE Enterprise Cloud Suite serves, it can be broken down along these lines:
![]() UCS Director: A “quick and dirty” service catalog that you and your IT department can use for ordering infrastructure, ordering VMs, and automating common IT tasks (such as an Advanced Catalog entry in UCS Director to “Add a New VLAN” to the data center) quickly and easily. UCS Director provides an IT-focused experience and is tightly coupled with technical IT task automation. However, if the organizational requirements are minimal, UCS Director’s service catalogs can be exposed directly to your end users for them to order infrastructure items quickly and easily. UCS Director lacks the polish, fit, and finish of Prime Service Catalog but may be good enough for your organization to compete with public cloud IaaS and PaaS offerings your internal IT users may be contemplating using or already consuming.
UCS Director: A “quick and dirty” service catalog that you and your IT department can use for ordering infrastructure, ordering VMs, and automating common IT tasks (such as an Advanced Catalog entry in UCS Director to “Add a New VLAN” to the data center) quickly and easily. UCS Director provides an IT-focused experience and is tightly coupled with technical IT task automation. However, if the organizational requirements are minimal, UCS Director’s service catalogs can be exposed directly to your end users for them to order infrastructure items quickly and easily. UCS Director lacks the polish, fit, and finish of Prime Service Catalog but may be good enough for your organization to compete with public cloud IaaS and PaaS offerings your internal IT users may be contemplating using or already consuming.
![]() Prime Service Catalog: Prime Service Catalog offers a much better “fit and finish” and is much more end-user friendly for both ordering catalog items and interacting with provisioned VMs. Whereas UCS Director is an-IT focused experience, Prime Service Catalog focuses more on the end-user experience and centers on business logic more than technical IT task automation.
Prime Service Catalog: Prime Service Catalog offers a much better “fit and finish” and is much more end-user friendly for both ordering catalog items and interacting with provisioned VMs. Whereas UCS Director is an-IT focused experience, Prime Service Catalog focuses more on the end-user experience and centers on business logic more than technical IT task automation.
Linking UCS Director and Prime Service Catalog
The first step is to ensure that UCS Director is communicating properly with Prime Service Catalog. Cisco offers very easy out-of-the-box integration of these two products. The primary setup for this configuration takes place within Prime Service Catalog. Assuming connectivity has already been established, to verify connectivity, take the following steps:
Step 1. Within Prime Service Catalog while logged in as an administrator, click your name in the upper-right corner and then choose Switch To > Administration (see Figure 8-49).
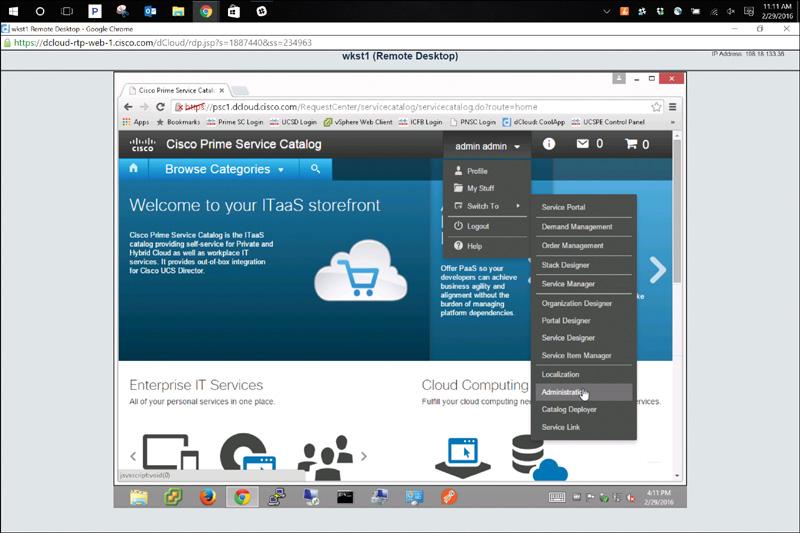
Figure 8-49 Accessing Administration View to Begin Prime Service Catalog and UCS Director Integration
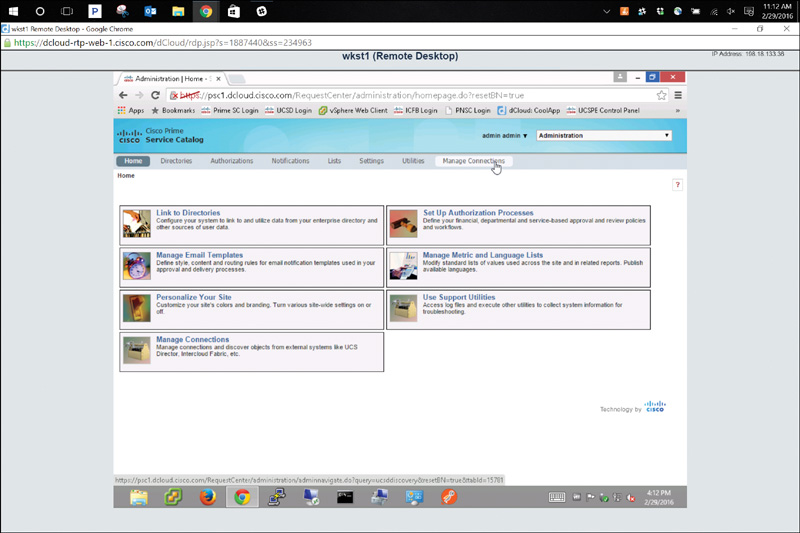
Step 2. Once in the Administration screen, click Manage Connections in the upper menu bar as shown in Figure 8-50.
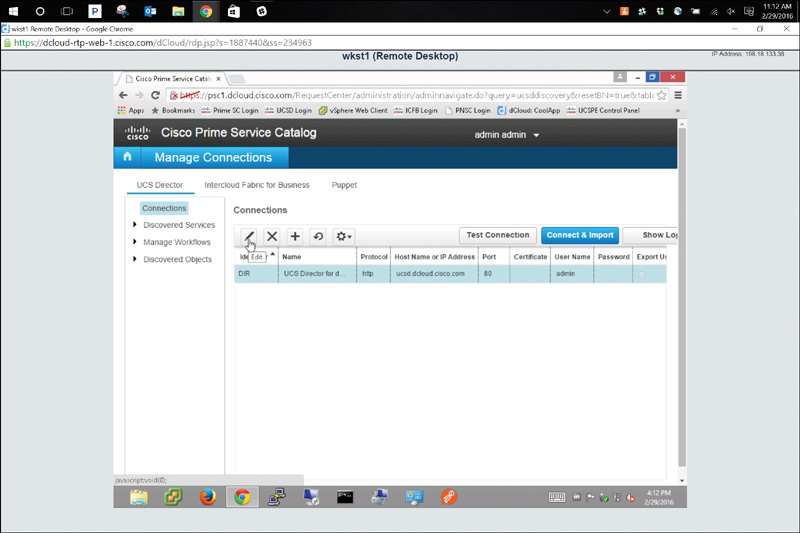
Step 3. On the Manage Connection screen, you’ll see connections for UCS Director, Intercloud Fabric for Business, and Puppet. Click UCS Director, and then click Connections immediately below it. Click the Edit icon, denoted by a pencil (see Figure 8-51).
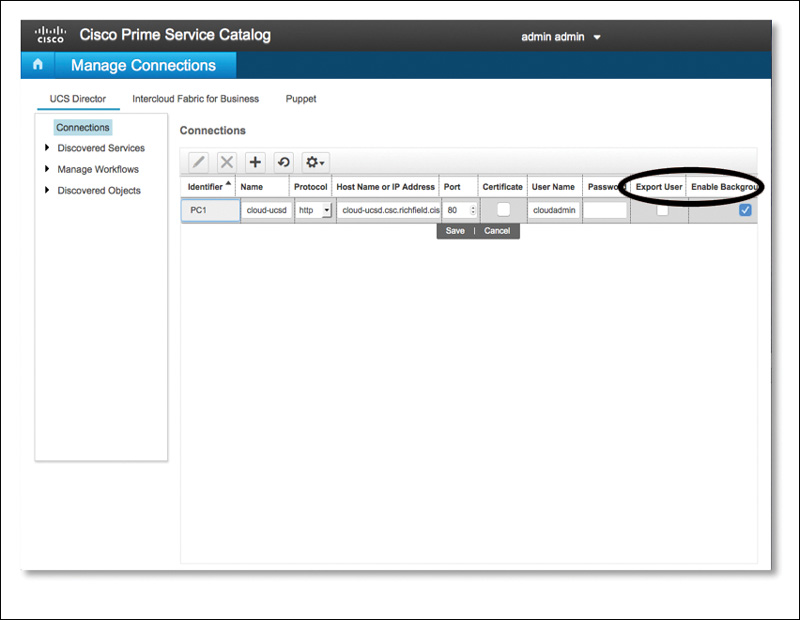
Step 4. Information and options for the connection are displayed across several columns: Identifier, Name, Protocol, Host Name or IP Address, Port, Certificate, User Name, Password, Export User, and Enable Background Sync (see Figure 8-52). Ensure that Export User is not checked and Enable Background is checked. Also ensure this username and password have the appropriate permissions to perform this action. Click Save.
Step 5. Click Connect & Import as shown in Figure 8-53.
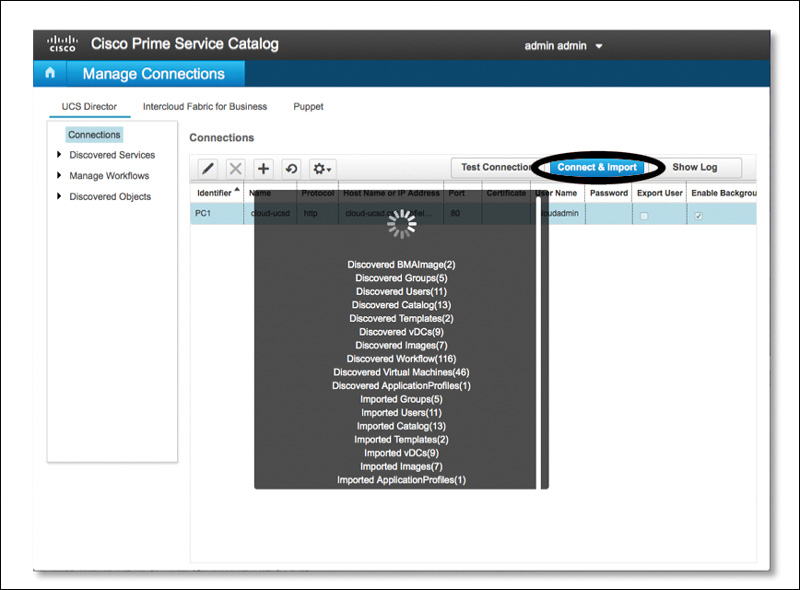
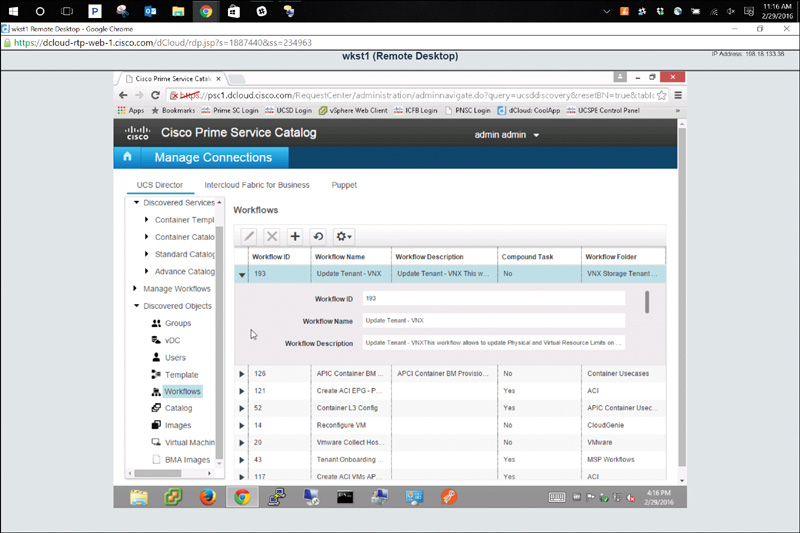
Step 6. Once this completes successfully, expand the Discovered Objects list at the left and click a category, such as Workflows, and note the objects that have been imported from UCS Director (see Figure 8-54).
Exploring “My Stuff”
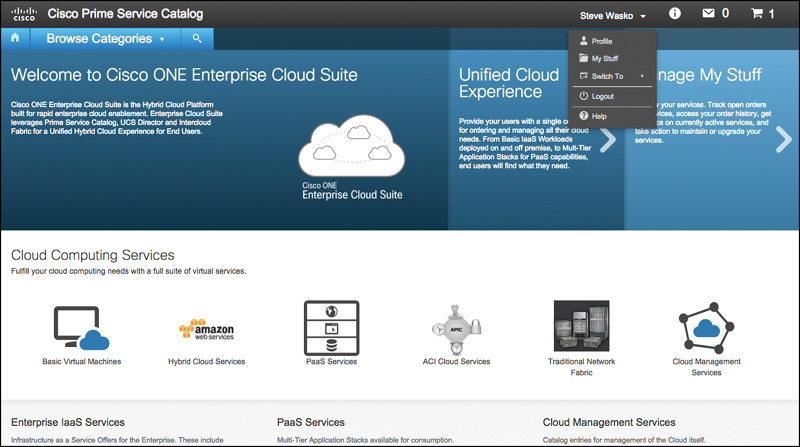
To explore the My Stuff features, first log out as administrator and log in as an end user. Then, from the Prime Service Catalog home/welcome screen, click your username in the upper-right corner (see Figure 8-55) and click the My Stuff menu selection to see all of your Prime Service Catalog items. In addition, the default view of Prime Service Catalog has, as one of the main HTML5 panes, a Manage My Stuff pane, shown on the right in Figure 8-55 (partially obscured by the menu).
Keep in mind that if you are supporting an existing implementation of Prime Service Catalog, you may see additional items in your My Stuff view, such as mobile applications, equipment that you have ordered, etc. Remember, the power and flexibility of Prime Service Catalog extends well beyond IaaS and PaaS scenarios (though those are the focus of discussion in most of this book) and gives you the power and flexibility of placing physical items and services in the service catalog, such as the ability to order business cards, provision desktop IP telephony services, or order custom-developed, in-house applications for your mobile device. These are just some of the many examples of business processes that can be put into Prime Service Catalog’s self-service portal for internal end-user consumption.
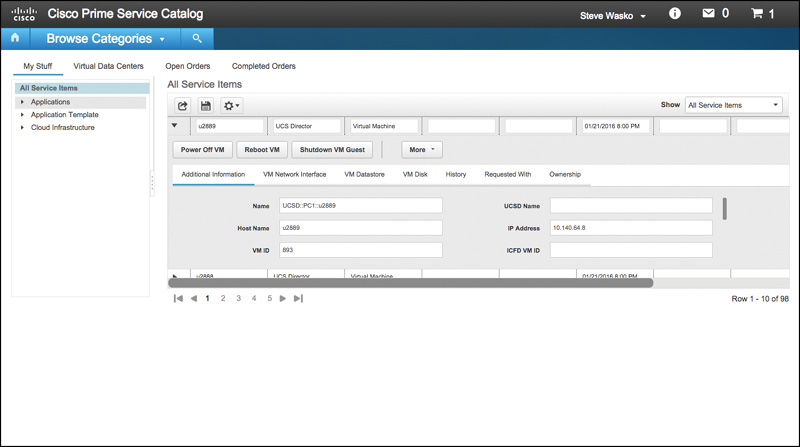
Taking VM Actions in Prime Service Catalog
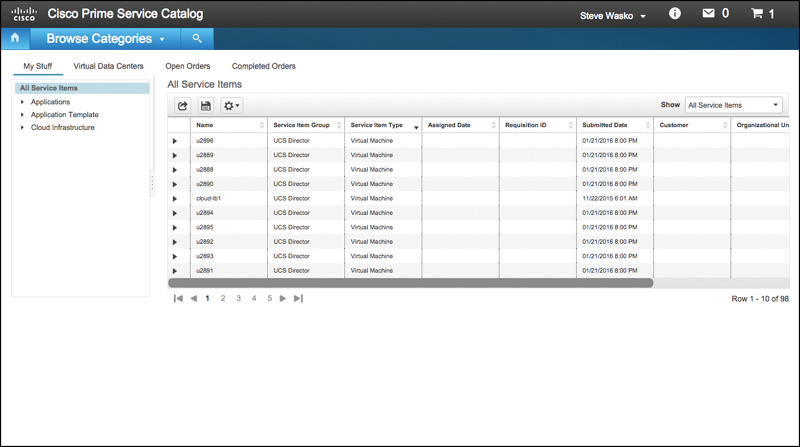
As you navigate into My Stuff within Prime Service Catalog, you will see in the left pane a list of all items belonging to your user account. These items can include virtual machines, applications, vDCs, and many other items. For the purposes of this chapter, the focus will be on virtual machines. Figure 8-56 shows a list of virtual machines belonging to the currently logged-in user.
Clicking a virtual machine pops up a menu that allows you to take actions on that virtual machine. By default, as shown in Figure 8-57, you can perform some basic virtual machine functions such as
![]() Power off VM
Power off VM
![]() Reboot VM
Reboot VM
![]() Shutdown VM Guest
Shutdown VM Guest
Additionally, you can click the More button, as seen in Figure 8-58, to open a menu of additional virtual machine actions that you can perform on the VM.
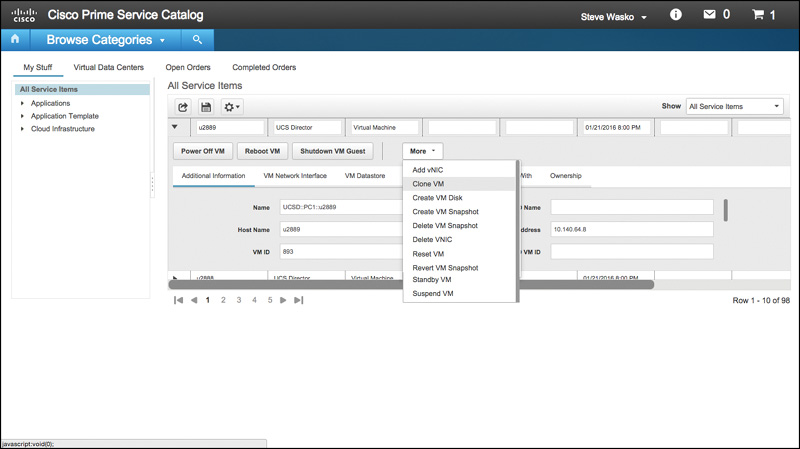
The list of available virtual machine actions under the More button include
![]() Add vNIC
Add vNIC
![]() Clone VM
Clone VM
![]() Create VM Disk
Create VM Disk
![]() Create VM Snapshot
Create VM Snapshot
![]() Delete VM Snapshot
Delete VM Snapshot
![]() Delete VNIC
Delete VNIC
![]() Reset VM
Reset VM
![]() Revert VM Snapshot
Revert VM Snapshot
![]() Standby VM
Standby VM
![]() Suspend VM
Suspend VM
By default, there are quite a few options that can be performed on virtual machines within Prime Service Catalog. Of course, with proper rights and permissions, this list of available actions can be pared down significantly. For instance, it may be good to provide very simple functionality to production virtual machines, such as Reboot VM and Shutdown VM Guest, while allowing development or test virtual machines to have more options available to them.
Exam Preparation Tasks
As mentioned in the section “How to Use This Book” in the Introduction, you have a couple of choices for exam preparation: the exercises here, Chapter 15, “Final Preparation,” and the exam simulation questions on the Pearson IT Certification Practice Test.
Review All Key Topics
Review the most important topics in this chapter, noted with the Key Topics icon in the outer margin of the page. Table 8-2 lists a reference of these key topics and the page number on which each is found.
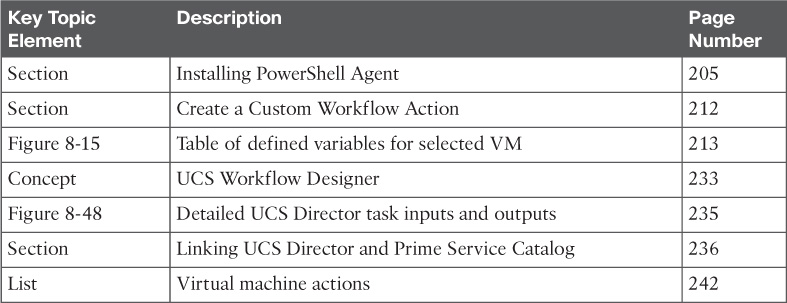
Table 8-2 Key Topics for Chapter 8
Define Key Terms
Define the following key terms from this chapter and check your answers in the glossary:
Prime Service Catalog (PSC)
Microsoft System Center Configuration Manager (SCCM)
change management database (CMDB)