
Chapter 2. Installing Ubuntu
If you are reading this, it is probably safe to assume that you have decided to give Ubuntu a try. You will find that Ubuntu is flexible and powerful not only as an operating system, but also in how you evaluate and install it.
Trying Ubuntu is simple. The Ubuntu desktop DVD is a special “live” DVD. You can use this disk to run Ubuntu from the DVD itself without Ubuntu removing or even interacting with your hard disk. This is ideal if you are already using another operating system such as Windows or Mac OS X; you can try Ubuntu by running it from the DVD, and you don’t have to worry about it overwriting the data on your hard drive or changing any part of your current operating system unless you intentionally choose to do so.
Choosing Your Ubuntu Version
The developers behind Ubuntu have worked to make the software as easy and flexible to install as possible. They understand that people will be installing Ubuntu on computers with varying purposes (desktops, servers, laptops, and so on) and using different types of computers (PCs and Macs, 32-bit and 64-bit computers, and so on). To cater to as many people as possible, two different Ubuntu DVDs can be used. The DVD that accompanies this book is equivalent to the downloadable desktop DVD but with additional packages included for your convenience.
![]() Desktop: The desktop DVD is the one recommended for desktops and laptops. With this DVD, you can boot Ubuntu from the DVD and, if you like it, you have the option to install it to your hard drive. Note that running from the disk without installing directly to the hard drive is the default option to help prevent accidental data loss, and that anything you do during the disk session will not be saved (unless you know what you are doing and how to make that happen). This makes the desktop installation a great way to test Ubuntu on your machine without doing anything permanent.
Desktop: The desktop DVD is the one recommended for desktops and laptops. With this DVD, you can boot Ubuntu from the DVD and, if you like it, you have the option to install it to your hard drive. Note that running from the disk without installing directly to the hard drive is the default option to help prevent accidental data loss, and that anything you do during the disk session will not be saved (unless you know what you are doing and how to make that happen). This makes the desktop installation a great way to test Ubuntu on your machine without doing anything permanent.
![]() Minimal CD: The minimal install CD is recommended for use in any scenario where the desktop version is unusable (e.g., not enough RAM) or for those with more advanced needs (e.g., automated deployments or special partitioning requirements). With this CD, you boot into an installer, which will download the packages as you install the OS, and then run Ubuntu when the installation is complete. Since packages are downloaded, you will need an Internet connection during installation if you use this method.
Minimal CD: The minimal install CD is recommended for use in any scenario where the desktop version is unusable (e.g., not enough RAM) or for those with more advanced needs (e.g., automated deployments or special partitioning requirements). With this CD, you boot into an installer, which will download the packages as you install the OS, and then run Ubuntu when the installation is complete. Since packages are downloaded, you will need an Internet connection during installation if you use this method.
For standard users, it’s valuable to know that Ubuntu 16.04 officially supports two main desktop computer types, or architectures.
![]() i386: This supports all Intel or compatible processors except those that require AMD64; it includes current Apple hardware. If you are not certain which version you need, use this one. It will work on either 32-bit or 64-bit systems, so it is the default choice.
i386: This supports all Intel or compatible processors except those that require AMD64; it includes current Apple hardware. If you are not certain which version you need, use this one. It will work on either 32-bit or 64-bit systems, so it is the default choice.
![]() AMD64: If you know you are using a processor based on the AMD64 or EM64T architecture (e.g., Athlon64, Opteron, EM64T Xeon, or Core2), you should choose this version because it will be a bit more efficient on your hardware.
AMD64: If you know you are using a processor based on the AMD64 or EM64T architecture (e.g., Athlon64, Opteron, EM64T Xeon, or Core2), you should choose this version because it will be a bit more efficient on your hardware.
Other Ubuntu Flavors
In addition to the official Ubuntu release, some flavors and editions are based on Ubuntu but are slightly different. Here are some examples.
![]() Kubuntu: Kubuntu is Ubuntu, but instead of using the default interface, Kubuntu uses the KDE desktop. See http://kubuntu.org or Chapter 9 for more information.
Kubuntu: Kubuntu is Ubuntu, but instead of using the default interface, Kubuntu uses the KDE desktop. See http://kubuntu.org or Chapter 9 for more information.
![]() Ubuntu Server: Ubuntu Server makes Ubuntu easy to install and use on servers. It initially focused on making certain that the highest-quality server applications were available for easy installation and configuration, including MySQL, Apache, and others. The most recent work has improved the cloud computing capabilities of Ubuntu Server via the Ubuntu Enterprise Cloud. See Chapter 8 for more information.
Ubuntu Server: Ubuntu Server makes Ubuntu easy to install and use on servers. It initially focused on making certain that the highest-quality server applications were available for easy installation and configuration, including MySQL, Apache, and others. The most recent work has improved the cloud computing capabilities of Ubuntu Server via the Ubuntu Enterprise Cloud. See Chapter 8 for more information.
![]() Xubuntu: The Xubuntu distribution replaces the default interface with the Xfce 4 environment. Xubuntu is particularly useful for those users who want to run Ubuntu on older hardware, as it has lighter system requirements. See http://xubuntu.org or Chapter 9 for more information.
Xubuntu: The Xubuntu distribution replaces the default interface with the Xfce 4 environment. Xubuntu is particularly useful for those users who want to run Ubuntu on older hardware, as it has lighter system requirements. See http://xubuntu.org or Chapter 9 for more information.
With a range of different flavors and options available, Ubuntu is flexible enough to be used in virtually all situations.
Is It Still Ubuntu?
Some of you may be reading about Kubuntu, Ubuntu Server, and Xubuntu and wondering how different they are from the regular Ubuntu release. These flavors differ mainly in which applications and user interface are included. As such, they may differ quite a bit from the main Ubuntu releases, especially in the user interface look and feel, but the underlying OS and software install system are the same.
Getting Ubuntu
Ubuntu is an entirely free OS. When you have a copy of it, you can give it to as many people as you like. This free characteristic of Ubuntu means that it is simple to get a copy. If you have a high-speed Internet connection, go to www.ubuntu.com/download, and follow the instructions. You can select a desktop DVD or minimal CD image and download it.
If you are willing to wait, you can buy authorized Ubuntu DVDs at http://shop.canonical.com/.
Burning a DVD
When you download an Ubuntu DVD, you download a special .iso file. This file is an “image” of the installation DVD. When you burn the .iso file to a DVD-ROM, you have a complete installation DVD all ready to go.
You need to use a DVD-burning application to burn your .iso file to the DVD correctly. Inside the application should be a menu option called Burn from Disk Image or something similar. The wording and details will vary according to the program you use to burn the image. You should select the .iso file and insert a blank DVD; after a few minutes, out will pop a fresh Ubuntu installation DVD.
To give you a head start, the following subsections present instructions for burning a DVD in some popular tools.
In Windows 7, 8, or 10 To burn your image using Windows 7, 8, or 10, follow these steps.
1. Right-click on the icon for your downloaded .iso image and then select either Burn Disk Image, Open with > Windows Disc Image Burner, or Burn disc image (depending on your version of Windows).
2. Select a writable DVD/DVD drive from the drop-down box.
3. Click Burn.
In Older Versions of Windows with ISO Recorder To burn your .iso file with the freely available ISO Recorder, first go to http://isorecorder.alexfeinman.com, and then download and install ISO Recorder. To burn your image, follow these steps.
1. Insert a blank DVD into your DVD writer.
2. Locate the .iso file you downloaded, right-click it, and select Copy Image to DVD.
3. Click Next, and the recording process begins.
4. When the image has been written, click Finish to exit ISO Recorder.
In Mac OS X To burn your image using Mac OS X, follow these steps.
1. Load the Disk Utility application (found in your Utilities folder).
2. Insert a blank DVD, and then choose Images > Burn and select the .iso file.
In Ubuntu To burn your image using Ubuntu, follow these steps.
1. Insert a blank DVD into your DVD writer.
2. In the File Browser, right-click on the file you just downloaded, and choose Write to Disk. The Write to Disk dialog box opens.
3. In the dialog box, choose your DVD writer and speed, and then click on Write. The Writing Files to Disk Progress dialog box opens, and File Browser begins writing the disk.
Creating a Bootable USB Stick
To create a bootable USB stick, follow these directions for your current operating system.
In Windows To create your bootable USB stick using Windows, follow these steps.
1. Download the Rufus bootable USB drive creator from https://rufus.akeo.ie/. Note that it is a .exe file and does not require additional installation steps to run it.
2. Insert your USB stick into the computer and launch Rufus.
3. Click the optical drive button and select the Ubuntu .iso image you downloaded.
4. Click the Start button and click OK when it warns you that data on the USB stick will be destroyed
In Mac OS X The Ubuntu download page recommends that Mac users install the OS using a DVD because the workarounds required to create a bootable USB stick on OS X are complex.
In Ubuntu To create your bootable USB stick using Ubuntu, follow these steps.
1. Insert your USB stick into the computer.
2. Open the Dash (see Chapter 3 if you don’t yet know what the Dash is) and search for Startup Disk Creator. Click the icon for Startup Disk Creator to run the program.
3. Select your downloaded Ubuntu .iso image. If your downloaded .iso image does not automatically appear in the list in Startup Disk Creator, click Other to select it.
4. Select the USB stick in the bottom box.
5. Click Make Startup Disk.
Booting and Installing
This section begins with instructions for running Ubuntu from the desktop DVD that you burned earlier, from the DVD that came with this book, or from a bootable USB stick. You can explore and test Ubuntu without making any changes to your hard drive. If you don’t like it, reboot your computer and remove the DVD/USB stick to return to what you already have.
Place your DVD into your DVD drive or your bootable USB stick into a USB port and then reboot your computer. If your computer does not boot from the DVD, you should enter your computer’s BIOS and change the boot order to ensure that the boot medium you are using is first in the boot order. Save your BIOS changes, and then restart the computer.
After a few seconds, the Ubuntu logo and boot screen appear. You can then select a language from the menu on the left and decide whether you want to Try Ubuntu, which allows you to try out Ubuntu without making any changes to your computer and install it later if you decide you want to, or whether you want to Install Ubuntu, which causes your computer to jump straight into the installer. Select the first option, and Ubuntu will begin to boot. After a minute or so, the Ubuntu desktop will appear, and you can use the system right away. Under this scenario, the system is running from the DVD and will not touch your hard disk. Do bear in mind that because Ubuntu is running from the DVD, it will run more slowly than if it were installed to your hard disk.
If you decide you want to install the system permanently on your computer’s hard disk, there are two ways you can do so:
1. Double-click the Install icon located on the left side of the desktop.
2. Reboot and select Install Ubuntu from the initial menu.
Using either option, an installer application will walk you through the steps to permanently install your Ubuntu system. The remainder of this chapter describes each part of the process.
Language
The first screen you are presented with when you boot the computer introduces you to the installation program and asks you to select your language, as shown in Figure 2-1, and whether you want to Try Ubuntu (run the operating system from the DVD without changing anything on your hard drive, which we suggest for first-time users before committing to an installation) or whether you want to Install Ubuntu.

Ubuntu supports a huge range of languages. Select your language from the list, and then click Install Ubuntu to continue with the installation.
Preparing to Install Ubuntu
You will be informed of the install requirements, as shown in Figure 2-2. We strongly suggest selecting the option to Download Updates While Installing because this will end your installation with an up-to-the-minute current system that includes any existing security updates or bug fixes. A nice feature is that these updates will be downloaded while the installation is in process, in parallel to other operations, so the updating happens with great efficiency.

You may also choose to install third-party software to enable your computer to play certain media files immediately after installation. This will also save you time later, although some users may not want to install closed source software and will choose not to enable this option. Click Continue after making your selection(s).
Allocate Drive Space
To prepare your hard disk to store the Ubuntu system and your files, hard disks are divided into partitions. Each partition reserves a specific portion of the hard disk for use by a particular operating system. As an example, you may use the entire hard disk for your new Ubuntu system, or you may share the disk so that both Windows and Ubuntu are installed. This shared scenario is known as dual-booting. In a dual-booting situation, your hard disk typically contains Windows partitions as well as Linux partitions, and when it boots it gives you a menu so you can select whether to boot Windows or Linux.
In this part of the installer, you create the partitions for your new system. This can be the trickiest part of the installation as well as the most dangerous. If you have existing partitions (such as a Windows installation) on the disk, it is highly recommended that you back up your important files.
Deciding How You Would Like to Set Up Your Partitions Before You Create Them If you have a clear idea of how your hard disk should be partitioned, it is easier to get everything up and running quickly.
There are two especially common methods of partitioning:
![]() Only Ubuntu on the disk: If you are installing only Ubuntu on the disk and are happy to wipe the entire disk, your life is simple. Ubuntu can do all the work for you.
Only Ubuntu on the disk: If you are installing only Ubuntu on the disk and are happy to wipe the entire disk, your life is simple. Ubuntu can do all the work for you.
![]() Dual-booting: If you are installing to a computer that will have multiple operating system options, you will partition your hard drive and install each operating system to its own partition.
Dual-booting: If you are installing to a computer that will have multiple operating system options, you will partition your hard drive and install each operating system to its own partition.
Regardless of whether you will install only Ubuntu on the disk or you will dual-boot, you need to either confirm that Ubuntu may use the entire disk or enter your desired partitioning scheme, beginning in Figure 2-3.

Ubuntu Only If you are happy to erase your entire hard disk, select Erase disk and install Ubuntu and click Install Now. A dialog may pop up asking you to Write the changes to disks; you can click Continue if you don’t see any problems. If you choose this option, skip ahead to the next section of the book, Installation Begins.
Encryption You also have the option to Encrypt the new Ubuntu installation for security, which will require you to set up a security key (Figure 2-4). This option configures encryption on your entire Ubuntu installation and requires a password or “key” when booting up to unlock your system. Using encryption requires LVM (Linux Volume Manager) to be set up, which the installer will select automatically.

Linux Volume Management (LVM) If you are interested in taking snapshots or resizing your partitions after installation, you can set up LVM from within the installer by selecting the Use LVM with the new Ubuntu installation option.
Manual Partitioning If you will install only Ubuntu or will dual-boot with an existing operating system but want more control over the process, you must set the partitions manually. To do this, select Something else and click Continue. You will see the screen shown in Figure 2-5.

The main part of this screen displays available drives and configured partitions. Clicking on a drive or partition changes the actions available to you below the list. Select the relevant disk to which you want to add partitions. The disks are listed by device name in the order they are connected within your computer.
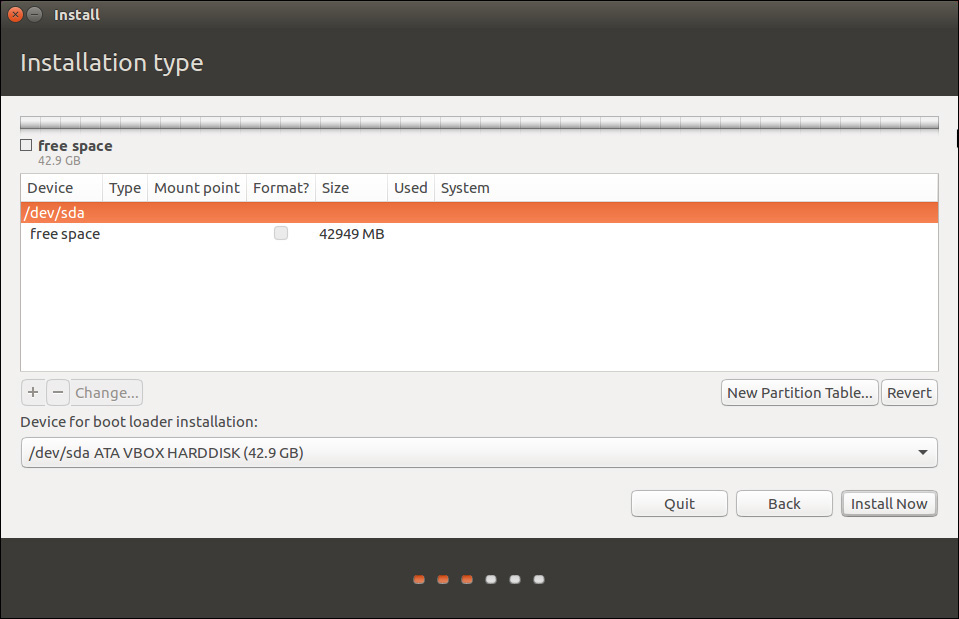
Before you begin, you should prepare the disk for your partitions. If you want to completely wipe a disk, click on the name of the device (/dev/sda in Figure 2-6), and then click New Partition Table. You’ll be asked if you’re sure, so click Continue. The disk is now filled with unallocated data and you can add your Ubuntu partitions.
To add a partition, click a free space entry in the list and then click the Plus (+) button. A new window appears like that shown in Figure 2-7.

Set the values according to your requirements. The Type combo box lets you select which one of the many filesystem types you want the partition to use. The default filesystem included with Ubuntu is ext4, and it is recommended that you use ext4 for any Ubuntu partitions.
Use the Mount Point combo box to select one of the different mount points, which tells Ubuntu where the partition should be used. You need to have a root partition, which has a mount point of /. Click OK to finish configuring this partition. You should also set up a swap partition; the installer will warn you if you do not.
Once you’ve completed configuring all your partitions, click Forward to proceed with the installation. Please note that if you have read all of these comments on partitioning and feel a bit overwhelmed or confused, you don’t need to worry. You may simply use the default settings given by the installer and all will work well.
Installation Begins
At this point, the installation begins. While it progresses, you are asked some questions to customize your installation appropriately. Customizing your OS while installing it concurrently saves time.
Tell the installer where in the world you live (Figure 2-8).

You can select your location in one of several ways. First, you can hover your mouse over the time zone on your part of the world map to select your location. When you are happy with the time zone selection, click it, and select the city nearest to you. Alternatively, use the Selected City drop-down list to find the city nearest to you.
When you are done, click Continue.
Configuring Your Keyboard
The next screen (shown in Figure 2-9) configures your keyboard.

The installer will suggest a keyboard option for you based on your location choice, but you may choose a different one if you desire. You can also use the box at the bottom of the window to test whether your keyboard layout works. Try typing some of the symbols on your keyboard (such as “, /, |) to make sure they work. If you press a symbol key and a different one appears on the screen, you have selected the wrong keyboard layout.
Identification
The next step is to enter some details about you that can be used to create a user account on the computer (Figure 2-10).

In the first box, enter your full name. The information from this box is used in different parts of the system to indicate who the user is behind the account.
Enter a computer name in the last box. Also called a “hostname,” this is a single word that identifies your current machine. It is used on a local network so that you can identify which machine is which.
Hostnames can be great fun. Many people pick themes for their hostnames, such as superheroes, and name each computer on their network after a superhero (Superman, Batman, Spiderman, and so on). Think of a fun hostname theme you can use. For many people, this ends up being the hardest part of the installation process!
In the next box, set a username for yourself (the installer will provide a suggestion based on your full name). Your username should be something easy to remember. Many people either use their first name or add an initial to their first or last name (such as jbacon or jonob). Each username on your computer must be unique—you cannot have two accounts with the same username. Usernames must begin with a lowercase letter—only lowercase letters and numbers are permitted after that.
In the next two boxes, add a password and then confirm it. This password is used when you log in to your computer with the username you just created. When choosing a password, follow these simple guidelines.
![]() Make sure you can remember your password. If you need to write it down, keep it somewhere secure. Don’t make the mistake of putting the password somewhere easily accessible and known to others.
Make sure you can remember your password. If you need to write it down, keep it somewhere secure. Don’t make the mistake of putting the password somewhere easily accessible and known to others.
![]() Avoid using dictionary words (“real words”) such as “chicken” or “beard” when choosing a password, and try to input numbers and punctuation.
Avoid using dictionary words (“real words”) such as “chicken” or “beard” when choosing a password, and try to input numbers and punctuation.
![]() Your password should ideally be longer than six letters and contain a combination of letters, symbols, and numbers. The longer the password and the more it mixes uppercase and lowercase letters, numbers, and symbols, the more secure it is.
Your password should ideally be longer than six letters and contain a combination of letters, symbols, and numbers. The longer the password and the more it mixes uppercase and lowercase letters, numbers, and symbols, the more secure it is.
Here you also have a couple of other options. The first decision is whether you wish to log in automatically or to require a password to log in each time you boot up your computer. By default, it’s recommended that you require a password, so that option is selected. You also have the option to encrypt your home folder. Select this option to make the contents unreadable without a password. This option can make your system more secure, but note that if you lose the password, your data will be unrecoverable.
When you have added all the information, click Continue.
To learn more about the cool things in your new operating system, view the slide show that appears as installation finishes (Figure 2-11).

Finishing Up
From here, as the Ubuntu software continues to be installed on your computer, you are shown a slide show containing useful and interesting information about the operating system. At the end of this process, you are asked to restart your computer. You are now finished and can skip ahead to Chapter 3 to get started with using Ubuntu.
Installing from the Minimal CD
Although the desktop DVD is ideal for installing Ubuntu, you may want to use the traditional installer method to install the system. This .iso file is smaller (typically 40–50MB) and downloads the components required for Ubuntu during installation.
You can find the download link for the latest Minimal CD by visiting help.ubuntu.com/community/Installation/MinimalCD.
This method involves booting the Minimal CD, running through the installer, selecting what you wish to install (i.e., Ubuntu desktop), and then starting the system. This kind of installer is ideal for installation of the Ubuntu OS on older hardware.
To get started, put the CD in the drive and restart your computer.
Select the Install option with the arrow keys, and press Enter. After a few moments, the installation process begins by asking you to choose a language. Select from the different languages by using the up and down arrow keys, and then use the Tab key to jump to the red buttons to continue through the setup.
Choosing Your Spot in the World
Next you need to pick which country you are in, again pressing Enter to accept your choice.
Now you need to select your keyboard layout. Keyboard layouts vary across the world to take into account the many and varied symbols and letters used in different countries. Even if you are using the typical Latin character set (as used in most European countries, the United States, Africa, and Australia), there are variations and additions (e.g., German umlauts). You can let Ubuntu detect your layout for you, or you can choose from a list of options. If you want your layout detected, you will be asked a series of questions until a guess can be made. If the guess is wrong, you can repeat the process. Otherwise, choose your keyboard layout from the options available.
Hardware
Next, the system will attempt to load the rest of the installer and to detect hardware. In most situations, this happens without prompting you for anything, although sometimes you might need to provide input such as choosing a primary network device. Once this is set up, your computer will also configure itself with your local network—if possible. If it cannot configure itself with a local network, it will inform you of this failure and you’ll have the option of configuring the network connection manually or choosing to not configure it at that time. A network connection is required to complete this install, but you can always come back and change the network configuration later once the installation is done.
Setting the Hostname and Time Zone
You are next asked for a hostname for the computer.
Use the text box to add your own hostname, or use the default Ubuntu hostname if required. Feel free to let your imagination go wild, and create a theme for your hostnames (such as superheroes).
After choosing a hostname, you will be asked to select an Ubuntu mirror and define your HTTP proxy information—if you don’t know what that is, you likely don’t have a proxy. Once this step is complete, the install program will download some components required to continue the installation.
Configuring a User
The next part of the installation routine configures a user for the computer. This user role is important because it not only can be used as a normal user, but also has the ability to use sudo to perform system administrator tasks.
You are first asked to enter a full name for the user (such as Elizabeth K. Joseph). Next you are asked for a username, or one will be picked for you from your full name (such as elizabeth). If you want another username, enter it here. Finally, you are asked to enter a password for the user and asked to repeat the password for verification.
The next screen will give you the option to encrypt your home folder. Say “yes” to make the contents of that folder unreadable without a password. Note that if you lose the password, your data will be unrecoverable.
Time Zone
Using the network, the installer will then attempt to detect your time zone. Select Yes if this is correct, or No to manually select a city from your time zone from a list.
Creating Partitions
The system will then read your disks to find out the current partition information. You will be asked to create or select partitions for Ubuntu to install on to. Creating partitions is the most challenging part of the installation routine. Before you partition your disk, think about how your partitions should be organized.
You are given a number of partition options:
![]() Guided—Use Entire Disk
Guided—Use Entire Disk
![]() Guided—Use Entire Disk and Set Up LVM
Guided—Use Entire Disk and Set Up LVM
![]() Guided—Use Entire Disk and Set Up Encrypted LVM
Guided—Use Entire Disk and Set Up Encrypted LVM
![]() Manual
Manual
In most cases, you probably want to use the Guided—Use Entire Disk option. This will erase everything on the hard drive in your computer and set everything up for you. The second option, Guided—Use Entire Disk and Set Up LVM, allows you to use the Logical Volume Manager. The third choice is identical to the second option but also employs disk encryption, which will keep your data safer and more secure in some circumstances. Finally, if you want to set up specific partitions, use the Manual option.
Let’s look at each of these options in turn and how they are used.
Guided—Use Entire Disk When you select this option, your entire disk is partitioned automatically. The installer tells you that a primary and logical partition will be created, and then it asks if you want to go ahead and create the partitions. Click Yes, and you are done.
Guided—Use Entire Disk and Set Up LVM Configuring LVM is covered in Chapter 8.
Guided—Use Entire Disk and Set Up Encrypted LVM Configuring LVM is identical to the previous option except that it also uses a secure encryption layer to provide additional security and protection for your data. If you choose this option, during the process you will be asked to provide a passphrase. Be very careful to choose one that is impossible to guess but that you will also remember. You will need to use this passphrase to access your data every time you boot the computer; if you lose or forget the passphrase, all your data will be permanently inaccessible. There is no way to recover a lost or forgotten encryption passphrase.
Manual Select this option if you want to create your own partitions manually. Here you can create a number of different types of partitions, set their sizes, and configure their properties. Creating these partitions is not done in the same graphical way as the live CD installer, so it is a little more complex. However, doing so is still largely a process of selecting something and pressing Enter.
Depending on your configuration (and the options you selected), you are given a number of options from which to choose:
![]() Configure Software RAID
Configure Software RAID
![]() Configure the Logical Volume Manager
Configure the Logical Volume Manager
![]() Configure Encrypted Volumes
Configure Encrypted Volumes
![]() Configure ISCSI Volumes
Configure ISCSI Volumes
![]() Guided Partitioning
Guided Partitioning
Your disk is listed below these options, and it may display a few existing partitions. If you want to delete the existing partitions, select each one, press Enter, and select Delete the Partition. When you have deleted some partitions, you should see a FREE SPACE line. The FREE SPACE line is used to create new partitions. If the disk was empty already and you don’t see a FREE SPACE line, select the hard disk and press Enter. When asked if you want to create an empty partition table, click Yes. You should now see the FREE SPACE line.
To create a new partition, select the FREE SPACE line and press Enter. In the next screen, click Create a New Partition and press Enter. Now enter the size the partition should be. You can use gigabytes (GB) and megabytes (MB) to indicate size. For example, 4.2GB is 4.2 gigabytes, and 100MB is 100 megabytes. You can also use a percentage or just add max to use the entire disk. Add the size, and then press the Tab key to select Continue. Press Enter. You are next asked whether the partition should be primary or logical. It is likely that you will want a primary partition. Make your choice and continue.
If this is the first partition, you are asked if the partition should appear at the beginning or the end of the disk. It is recommended that when creating the root partition (known as /) on older computers, it should be placed at the beginning of the disk. This gets around some potential BIOS problems on older hardware. On newer computers, this is no longer a problem, and you can put the partition anywhere you like on the disk.
On the next screen, you can configure some settings for the partition. Table 2-1 describes these settings.

When the partition is configured, choose the Done Setting Up the Partition option.
You can now select FREE SPACE again (if there is free space left, of course) to create another partition on the disk. When you have finished partitioning, click the Finish Partitioning and Write Changes to Disk option.
The system will now install the minimal Ubuntu base system to your newly partitioned disk. Because this operation involves downloading software, its speed will depend on the speed of your network, in addition to the speed of your disk drive and computer. Once this process is complete, you will be asked whether you want to have updates installed automatically.
You will now be presented with the Software Selection screen, which will determine what you wish to install. To install the standard Ubuntu operating system, scroll down through the list and select Ubuntu desktop. If you would rather install a server version of Ubuntu, or one of the flavors like Xubuntu instead, you can do it from this screen.
Finishing Up
The installer will now download all of the packages required for your selection and install them. Depending on the speed of your network, computer, and disk drive, this installation could take some time.
Once this process is complete, you will be prompted to install the GRUB bootloader and to decide whether your system clock will be set to UTC. It’s typically fine to accept both of these choices without altering them. The install is complete at this point, and you can follow the instructions to remove the CD and reboot your computer.
Summary
In this chapter, we outlined several methods for installing Ubuntu. Once this task is complete, you are ready to move on to more interesting topics. The next chapter will help you get started.