Using the Built-In Camera
It’s Way Better Than You’d Think
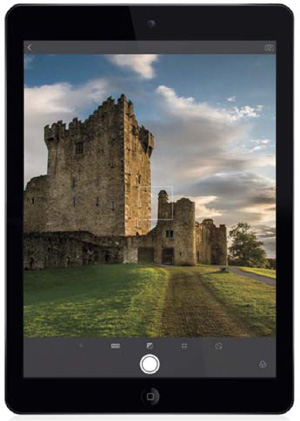
SHUTTER SPEED: 1/320 sec | F-STOP: f/8 | ISO: 200 | FOCAL LENGTH: 28mm | LOCATION: Ross Castle, County Kerry, Ireland
I know you’re probably thinking, “Hey, I want to use Lightroom Mobile to extend the power of Lightroom on my desktop, and I want to use this for my serious DSLR images or my mirrorless camera images.” But, did you know you can also take pictures with the crappy camera built right into your smartphone, and not only that, but Lightroom Mobile has its own built-in camera that makes your phone’s built-in camera slightly less crappy? That’s right, it’s a decrapilator. Okay, to be fair, not every smartphone’s camera is crappy—as long as you’re shooting in nice bright light (which happens around 1/2 the day), the shots come out pretty nice, but as soon as you get in a low-light situation, they turn...well...crappy. And, by crappy, I mean you get the amount of noise you’d expect from an NHRA dragster—it looks like you took the shot in the snow. That level of crappy (side note: I never intended to use the word “crap” as often as I did. It just came flowing out of me. So, I asked my editor [we’ll call her “Kim” because that’s her name] to replace all instances of the word “crap” with either the word “rainbow,” “puppies,” or “unicorn,” but I can’t swear that she actually did that, because the last time I saw her, she was really pooped. She was waiting for the movie Constipated to come out, but it still hadn’t been released). I can do this all day, folks. It’s a gift.
Accessing the Camera

Lightroom Mobile’s built-in camera is surprisingly good. It offers lots of control, built-in live filters, and your images not only go straight into Lightroom on your mobile device, but they also sync back into Lightroom on your desktop. To access Lightroom Mobile’s camera, when you’re in Collections view, or in a collection, just tap on the camera icon at the bottom-right corner of the screen, and you’re ready to go. To manually focus the camera, tap anywhere on the screen and a white box appears onscreen (as seen here) focusing on that area. (Note: Currently, Lightroom’s built-in camera is not available on Android tablets, but it is available on Android phones.)
Using the Camera Features

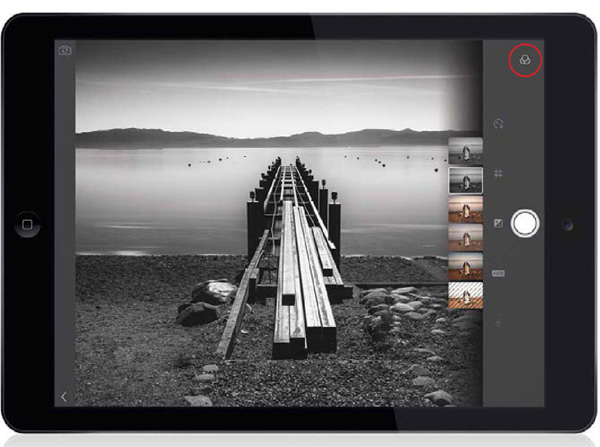
There is a row of icons at the bottom of the preview image area, or on the side, if you’re holding your iPad or phone sideways (as seen here). The first icon on the left/top lets you choose your camera’s flash options—Auto, On, Off, the usual stuff. The second icon from the left/top (the AWB icon) is awesome because it lets you choose your white balance live, which means you can try out different ones even before you take the shot, so you can get the color right from the very start. You can even set a custom white balance (see page 120). If you tap on the third icon directly above/next to the shutter button, it lets you use Exposure Compensation to brighten or darken the image—just tap on the slider that appears (as seen here) and drag to the left/up to brighten the image or to the right/down to darken it. The fourth icon (the one that looks like a pound sign) lets you bring a rule-of-thirds overlay grid up over your preview area, a square preview border, or a horizon finder level feature, so you can make sure your image is level when you take it (when you choose this one, the horizontal line in the center of the image will tilt until you’re holding the camera perfectly straight—then it becomes a straight solid line). The last icon on the right/bottom is a built-in self-timer. Tap on it and you can then set the self-timer to 2, 5, or 10 seconds. To the right of the shutter button (or below) is the Presets icon (it has three overlapping circles). See page 122 for more on these live filters.
Okay, it’s not all Android phones, but there are certain Android models (ones that support the Camera2 API, which was introduced in Android 5.0 Lollipop, like the Samsung Galaxy S7 or the LG G4) that actually can shoot images in the RAW DNG format. If you have one of these phones (it’s a hardware thing—not a software one), you can also edit these RAW images directly in Lightroom Mobile for Android. Just import them into Lightroom from your Gallery and you’re off to the races. By the way, if your Android smartphone shoots in RAW format, you can use Lightroom’s built-in camera to shoot those RAW images directly (as well as shoot in Pro mode, where you can set your shutter speed, ISO, white balance, and focus. You’ll know if you can shoot in RAW if you tap on the onscreen file format badge and it lets you choose Raw, as seen circled here).
Previewing Your Last Capture

Once you take a photo with Lightroom Mobile’s built-in camera, if you want to take a look at the shot you just took, and you’re on an iPhone, just tap-and-hold on the little square thumbnail just to the left of the shutter button and a large preview of the image will appear onscreen (as seen on the right). When you release your finger, it shrinks back down to that small thumbnail size. If you’re using an Android phone, just tap on the little thumbnail to get a larger preview, and then just tap on the preview when you’re done.
Setting a Custom White Balance

To set a custom white balance for your camera (a white balance that is custom-tuned to the current lighting conditions), tap on the AWB (Average White Band... um...I mean, Automatic White Balance) icon (on some Android camera phones, in Pro mode, tap on the WB icon), and then tap on the last icon on the right (it looks like a wrench). This brings up a rectangle asking you to point the camera at something neutral and fill that rectangle with that area (ideally, this would be something light gray, but of course, there’s not always something light gray just hanging around when you need it. So, if there’s not, try to focus on something that’s neutral. Something that’s an even color, like tan). Tap on the shutter button (you’ll see it has a checkmark icon on the button now) to lock that neutral area in as your custom white balance, and you’re ready to shoot.
iPhone Users: Get to Lightroom’s Camera Faster

If you have an iPhone 6s or later, use the 3D Touch feature: just press-and-hold on the Lightroom app icon and a Take Photo button will appear (seen above left). Tap it, and you’re using Lightroom Mobile’s camera. If you don’t have an iPhone 6s or later, then you’ll want to set up your iPhone so you can access Lightroom’s built-in camera directly from the Notifications screen, rather than having to launch Lightroom every time just to get to the camera. Here’s how: Swipe down from the top of the screen to access your Notifications screen, tap on the Today tab at the top, and then scroll to the very bottom and tap the Edit button. Scroll down again until you see Lightroom, then tap on the green + (plus sign) to the left of Lightroom to add it to the “Include” list near the top. Now, in the top section, tap to the far right of Lightroom and drag it up higher in the list, then tap on the Done button. Okay, that’s the setup (it’s a little tedious, right? But it’s done). Now, here’s how to access Lightroom’s camera quickly anytime without having to launch Lightroom: Whenever you want it, just swipe down from the top of the screen to bring up the Notifications screen and, right near the top, you’ll see Lightroom Mobile and directly below it a camera icon that reads “Take Photo” (as seen above right). Tap on that, and you’re using Lightroom’s camera. It’s much more accessible than it sounds (it’s just two taps now: swipe down, tap Take Photo).
Using Live Shooting Presets

When you’re in Lightroom Mobile’s camera, you can apply live filters while you’re shooting (so you’ll see the effects as you shoot, rather than applying them after the fact). To access these live filters, tap on the Presets icon (the one with the three overlapping circles to the right of the shutter button). This brings up six small previews of your image with different shoot-through filters applied, from a contrasty look, a warm shadows look, all the way to a contrasty black-and-white filter, to a really flat-looking black and white (it looks kind of “Instagrammy”). If you want to use one of those, tap on the preview you want, and now you’re shooting live with that filter. To remove all the filters, tap on the first one (the one on the far left or bottom). Extra cool thing: if you do apply a filter preset, you’re basically just applying a Lightroom preset to your image, which means it’s totally undoable anytime, so you’re not locked into that filter you chose when you shot it (see page 72 for more on presets). (Note: For Android phones, these live shooting presets are currently only available for models that support Open GL ES 3.0 or later. You can find the version supported for your Android phone in Lightroom Mobile’s Sidebar.)
Finding the Shots You Just Took

The images you take with Lightroom Mobile’s built-in camera are automatically saved into your Lightroom Photos collection, and you can jump right there by tapping on the left-facing arrow up in the top-left (or bottom-left) corner. These images will also automatically sync back to Lightroom on your desktop after you add them to a collection. They’ll then appear within that collection in your From LR Mobile folder on your desktop.


