
Chapter 4
Authentication, Authorization, Accounting (AAA) and Identity Management
This chapter covers the following topics:
An Introduction to Authentication, Authorization, and Accounting: You will learn AAA concepts, models, and techniques used in different environments.
Authentication: This chapter covers what is authentication and the different types of authentication, such as authentication by knowledge, ownership, biometrics, and others. You will also learn about multifactor authentication solutions, single sign-on (SSO), and many other authentication protocols and schemes.
Authorization: Once authenticated, a subject must be authorized. In this chapter, you will learn about the process of assigning authenticated subjects permission to carry out a specific operation. You will learn about different authorization models that define how access rights and permission are granted. The three primary authorization models are object capability, security labels, and ACLs.
Accounting: You will learn what is the process of auditing and monitoring what a user does once a specific resource is accessed.
Infrastructure Access Control: Infrastructure access controls include physical and logical network design, border devices, communication mechanisms, and host security settings. Because no system is foolproof, access must be continually monitored; if suspicious activity is detected, a response must be initiated.
AAA Protocols: This chapter covers the details about the RADIUS and TACACS+ protocols and how they are used in many different implementations.
Cisco Identity Service Engine (ISE): Cisco ISE is the centralized AAA and policy engine solution from Cisco. In this chapter, you will learn how the Cisco ISE integrates with numerous Cisco products and third-party solutions to allow you to maintain visibility of who and what is accessing your network, and to enforce access control consistently.
Configuring TACACS+ Access: Each of the CCNP concentration exams and the CCIE lab exam focus on configuration and troubleshooting. However, in this chapter, you will learn the concepts of TACACS+ access configurations in infrastructure devices such as routers and switches running Cisco IOS and Cisco IOS-XE software.
Configuring RADIUS Authentication: You can configure RADIUS authentication in multiple scenarios, including Remote Access VPN, Secure Network Access, 802.1X, and more. This chapter includes several examples of how you can configure RADIUS authentication for secure network access.
Cisco ISE Design Tips: In this chapter, you will learn different best practices when designing and deploying Cisco ISE in different environments.
The following SCOR 350-701 exam objectives are covered in this chapter:
Domain 2: Network Security
2.7 Configure AAA for device and network access (authentication and authorization, TACACS+, RADIUS and RADIUS flows, accounting, and dACL)
Domain 5: Endpoint Protection and Detection
5.6 Describe the uses and importance of a multifactor authentication (MFA) strategy
Domain 6: Secure Network Access, Visibility, and Enforcement
6.1 Describe identity management and secure network access concepts such as guest services, profiling, posture assessment, and BYOD
6.2 Configure and verify network access device functionality such as 802.1X, MAB, and WebAuth
6.3 Describe network access with CoA
6.4 Describe the benefits of device compliance and application control
“Do I Know This Already?” Quiz
The “Do I Know This Already?” quiz allows you to assess whether you should read this entire chapter thoroughly or jump to the “Exam Preparation Tasks” section. If you are in doubt about your answers to these questions or your own assessment of your knowledge of the topics, read the entire chapter. Table 4-1 lists the major headings in this chapter and their corresponding “Do I Know This Already?” quiz questions. You can find the answers in Appendix A, “Answers to the ‘Do I Know This Already?’ Quizzes and Q&A Sections.”
Table 4-1 “Do I Know This Already?” Section-to-Question Mapping
Foundation Topics Section |
Questions |
Introduction to Authentication, Authorization, and Accounting |
1 |
Authentication |
2–4 |
Authorization |
5–6 |
Accounting |
7 |
Infrastructure Access Controls |
8 |
AAA Protocols |
9–10 |
Cisco Identity Service Engine (ISE) |
11–12 |
Configuring TACACS+ Access |
13 |
Configuring RADIUS Authentication |
14 |
Additional Cisco ISE Design Tips |
15 |
1. You were hired to configure AAA services in an organization and are asked to make sure that users in the engineering department do not have access to resources that are only meant for the finance department. What authorization principle addresses this scenario?
The principle of least privilege and separation of duties
Accounting and MAC Auth-bypass
Deter, delay, and detect
Policy-based segmentation
2. Which of the following describes the type of authentication where the user provides a secret that is only known by him or her?
Authentication by password
Authentication by knowledge
Personal identification number (PIN) code
Authentication by characteristics
3. Which of the following is a set of characteristics that can be used to prove a subject’s identity one time and one time only?
One-time passcode (OTP)
Out-of-band (OOB)
Biometrics
None of these answers is correct.
4. Which of the following is an open standard for exchanging authentication and authorization data between identity providers, and is used in many single sign-on (SSO) implementations?
SAML
OAuth 2.0
OpenConnectID
DUO Security
5. Which of the following defines how access rights and permission are granted? Examples of that model include object capability, security labels, and ACLs.
A mandatory access control model
An authorization model
An authentication model
An accounting model
6. An authorization policy should always implement which of the following concepts? (Select all that apply.)
Implicit deny
Need to know
Access control debugging logs
Access control filter logs
7. Which of the following is the process of auditing and monitoring what a user does once a specific resource is accessed?
CoA
Authorization
Accounting
TACACS+ auditing
8. Access control lists classify packets by inspecting Layer 2 through Layer 7 headers for a number of parameters, including which of the following?
Layer 2 protocol information such as EtherTypes
Layer 3 header information such as source and destination IP addresses
Layer 4 header information such as source and destination TCP or UDP ports
All of these options are correct.
9. Which of the following statements are true?
RADIUS uses UDP, and TACACS+ uses TCP.
In RADIUS, authentication and authorization are performed with the same exchange. Accounting is done with a separate exchange.
In TACACS+, authentication, authorization, and accounting are performed with separate exchanges.
RADIUS provides limited support for command authorization. TACACS+ provides granular command authorization.
All of these answers are correct.
10. Network access devices (such as network switches and wireless access points) can use an IEEE protocol that when enabled, will allow traffic on the port only after the device has been authenticated and authorized. Which of the following is an IEEE standard that is used to implement port-based access control?
802.11ac
802.1Q
802.1X
pxGrid
11. Which of the following provides a cross-platform integration capability between security monitoring applications, threat detection systems, asset management platforms, network policy systems, and practically any other IT operations platform?
pxGrid
802.1X
TrustSec
SGTs
12. Which of the following are examples of some of the more popular policy attributes supported by Cisco ISE?
Active Directory group membership and Active Directory user-based attributes
Time and date
Location of the user
Access method (MAB, 802.1X, wired, wireless, and so on)
None of these options is correct.
All of these options are correct.
13. Which of the following commands enables AAA services on a Cisco router?
aaa new-model
aaa authentication enable
aaa authentication model
aaa enable console
14. Which of the following is the default behavior of an 802.1X-enabled port?
To authorize only a single MAC address per port
To authorize only a single IP address per port
To perform MAC auth bypass only if the MAC is registered to ISE
To authenticate only a single host that has an identity certificate
15. Which of the following are Cisco ISE distributed node types?
Primary Administration Node (PAN)
Secondary Administration Node (SAN)
Policy Service Node (PSN)
All of these options are correct.
Foundation Topics
Introduction to Authentication, Authorization, and Accounting
In Chapter 1, “Cybersecurity Fundamentals,” you learned about different types of authentication-based attacks and the high-level concepts of the authentication process. In the following sections, you will learn the tenets of authentication, authorization, and accounting (AAA).
An identification scheme, an authentication method, and an authorization model are common attributes of access controls.
An identification scheme is used to identify unique records in a set, such as a username. Identification is the process of the subject supplying an identifier to the object. The authentication method is how identification is proven to be genuine. Authentication is the process of the subject supplying verifiable credentials to the object. The authorization model defines how access rights and permission are granted. Authorization is the process of assigning authenticated subjects the permission to carry out a specific operation.
The Principle of Least Privilege and Separation of Duties
The principle of least privilege states that all users—whether they are individual contributors, managers, directors, or executives—should be granted only the level of privilege they need to do their jobs, and no more. For example, a sales account manager really has no business having administrator privileges over the network, or a call center staff member over critical corporate financial data.
The same concept can be applied to software. For example, programs or processes running on a system should have the capabilities they need to get their job done, but no root access to the system. If a vulnerability is exploited on a system that runs everything as root, the damage could extend to a complete compromise of the system. This is why you should always limit users, applications, and processes to access and run as the least privilege they need.
Somewhat related to the principle of least privilege is the concept of “need to know,” which means that users should get access only to data and systems that they need to do their job, and no other.
Separation of duties is an administrative control that dictates that a single individual should not perform all critical- or privileged-level duties. Additionally, important duties must be separated or divided among several individuals within the organization. The goal is to safeguard against a single individual performing sufficiently critical or privileged actions that could seriously damage a system or the organization as a whole. For instance, security auditors responsible for reviewing security logs should not necessarily have administrative rights over the systems. Another example is that a network administrator should not have the ability to alter logs on the system. This is to prevent such individuals from carrying out unauthorized actions and then deleting evidence of such actions from the logs (in other words, covering their tracks).
Think about two software developers in the same organization ultimately working toward a common goal, but one is tasked with developing a portion of a critical application and the other is tasked with creating an application programming interface (API) for other critical applications. Each developer has the same seniority and working grade level; however, they do not know or have access to each other’s work or systems.
Authentication
Identification is the process of providing the identity of a subject or user. This is the first step in the authentication, authorization, and accounting process. Providing a username, a passport, an IP address, or even pronouncing your name is a form of identification. A secure identity should be unique in the sense that two users should be able to identify themselves unambiguously. This is particularly important in the context of account monitoring. Duplication of identity is possible if the authentication systems are not connected. For example, a user can use the same user ID for his corporate account and for his personal email account. A secure identity should also be nondescriptive so that information about the user’s identity cannot be inferred. For example, using “Administrator” as the user ID is generally not recommended. An identity should also be issued in a secure way. This includes all processes and steps in requesting and approving an identity request. This property is usually referred to as “secure issuance.”
The following list highlights the key concepts of identification:
Identities should be unique. Two users with the same identity should not be allowed.
Identities should be nondescriptive, meaning it should not be possible to infer the role or function of the user from his or her identity. For example, a user called “admin” represents a descriptive identity, whereas a user called “om1337ar” represents a nondescriptive identity.
Identities should be securely issued. A secure process for issuing an identity to a user needs to be established.
Identities can be location-based. A process for authenticating someone based on his or her location needs to be established.
There are three categories of factors: knowledge (something the user knows), possession (something a user has), and inherence or characteristics (something the user is).
Authentication by Knowledge
Authentication by knowledge is where the user provides a secret that is only known by him or her. An example of authentication by knowledge would be a user providing a password, a personal identification number (PIN) code, or answering security questions.
The disadvantage of using this method is that once the information is lost or stolen (for example, if a user’s password is stolen), an attacker would be able to successfully authenticate. Nowadays, a day does not pass without hearing about a new breach in retailers, service providers, cloud services, and social media companies.
Something you know is knowledge-based authentication. It could be a string of characters, referred to as a password or PIN, or it could be an answer to a question. Passwords are the most commonly used single-factor network authentication method. The authentication strength of a password is a function of its length, complexity, and unpredictability. If it is easy to guess or deconstruct, it is vulnerable to attack. Once known, it is no longer useful as a verification tool. The challenge is to get users to create, keep secret, and remember secure passwords. Weak passwords can be discovered within minutes or even seconds using any number of publicly available password crackers or social engineering techniques. Best practices dictate that passwords be a minimum of eight characters in length (preferably longer), include a combination of at least three of the following categories: upper- and/or lowercase letters, punctuation, symbols, and numerals (referred to as complexity), be changed frequently, and be unique. Using the same password to log in to multiple applications and sites significantly increases the risk of exposure.
Generally, when users are granted initial access to an information system, they are given a temporary password. Most systems have a technical control that will force the user to change his or her password at first login. A password should be changed immediately if there is any suspicion that it has been compromised.
As any help desk person will tell you, users forget their passwords with amazing regularity. If a user forgets his password, there needs to be a process for reissuing passwords that includes verification that the requester is indeed who he says he is. Often cognitive passwords are used as secondary verification. A cognitive password is a form of knowledge-based authentication that requires a user to answer a question based on something familiar to them. Common examples are mother’s maiden name and favorite color. The problem, of course, is that this information is very often publicly available. This weakness can be addressed using sophisticated questions that are derived from subscription databases such as credit reports. These questions are commonly referred to as out-of-wallet challenge questions. The term was coined to indicate that the answers are not easily available to someone other than the user, and that the user is not likely to carry such information in his or her wallet. Out-of-wallet question systems usually require that the user correctly answer more than one question and often include a “red herring” question that is designed to trick an imposter but which the legitimate user will recognize as nonsensical.
It might seem very convenient when a website or application offers to remember a user’s logon credentials or provide an automatic logon to a system, but this practice should be strictly prohibited. If a user allows websites or software applications to automate the authentication process, unattended devices can be used by unauthorized people to gain access to information resources.
Authentication by Ownership or Possession
With this type of authentication, the user is asked to provide proof that he owns something specific—for example, a system might require an employee to use a badge to access a facility. Another example of authentication by ownership is the use of a token or smart card. Similar to the previous method, if an attacker is able to steal the object used for authentication, he will be able to successfully access the system.
Examples of authentication by ownership or possession include the following: a one-time passcode, memory card, smartcard, and out-of-band communication.
The most common of the four is the one-time passcode sent to a device in the user’s possession. A one-time passcode (OTP) is a set of characteristics that can be used to prove a subject’s identity one time and one time only. Because the OTP is valid for only one access, if it’s captured, additional access would be automatically denied. OTPs are generally delivered through a hardware or software token device. The token displays the code, which must then be typed in at the authentication screen. Alternatively, the OTP may be delivered via email, text message, or phone call to a predetermined address or phone number.
A memory card is an authentication mechanism that holds user information within a magnetic strip and relies on a reader to process the information. The user inserts the card into the reader and enters a personal identification number (PIN). Generally, the PIN is hashed and stored on the magnetic strip. The reader hashes the inputted PIN and compares it to the value on the card itself. A familiar example of this is a bank ATM card.
A smartcard works in a similar fashion. Instead of a magnetic strip, it has a microprocessor and integrated circuits. The user inserts the card into a reader, which has electrical contacts that interface with the card and power the processor. The user enters a PIN that unlocks the information. The card can hold the user’s private key, generate an OTP, or respond to a challenge-response.
Out-of-band authentication requires communication over a channel that is distinct from the first factor. A cellular network is commonly used for out-of-band authentication. For example, a user enters her name and password at an application logon prompt (factor 1). The user then receives a call on her mobile phone; the user answers and provides a predetermined code (factor 2). For the authentication to be compromised, the attacker would have to have access to both the computer and the phone.
Authentication by Characteristic
A system that uses authentication by characteristic authenticates the user based on some physical or behavioral characteristic, sometimes referred to as a biometric attribute. The most used physical or physiological characteristics are as follows:
Fingerprints
Face recognition
Retina and iris
Palm and hand geometry
Blood and vascular information
Voice recognition
Examples of behavioral characteristics are as follows:
Signature dynamic
Keystroke dynamic/pattern
The drawback of a system based on this type of authentication is that it’s prone to accuracy errors. For example, a signature-dynamic-based system would authenticate a user by requesting that the user write his signature and then comparing the signature pattern to a record in the system. Given that the way a person signs his name differs slightly every time, the system should be designed so that the user can still authenticate, even if the signature and pattern are not exactly what are in the system. However, it should also not be too loose and unintentionally authenticate an unauthorized user attempting to mimic the pattern.
Two types of errors are associated with the accuracy of a biometric system:
A Type I error, also called false rejection, happens when the system rejects a valid user who should have been authenticated.
A Type II error, also called false acceptance, happens when the system accepts a user who should have been rejected (for example, an attacker trying to impersonate a valid user).
The crossover error rate (CER), also called the equal error rate (EER), is the point where the rate of false rejection errors (FRR) and the rate of false acceptance errors (FAR) are equal. This is generally accepted as an indicator of the accuracy (and hence the quality) of a biometric system.
Multifactor Authentication
The process of authentication requires the subject to supply verifiable credentials. The credentials are often referred to as factors.
Single-factor authentication is when only one factor is presented. The most common method of single-factor authentication is the use of passwords.
Multifactor authentication is when two or more factors are presented. Multilayer authentication is when two or more of the same type of factors are presented. Data classification, regulatory requirements, the impact of unauthorized access, and the likelihood of a threat being exercised should all be considered when you’re deciding on the level of authentication required. The more factors, the more robust the authentication process.
Identification and authentication are often performed together; however, it is important to understand that they are two different operations. Identification is about establishing who you are, whereas authentication is about proving you are the entity you claim to be.
In response to password insecurity, many organizations have deployed multifactor authentication options to their users. With multifactor authentication, accounts are protected by something you know (password) and something you have (one-time verification code provided to you). Even gamers have been protecting their accounts using MFA for years.
Duo Security
Duo Security was a company acquired by Cisco that develops a very popular multifactor authentication solution that is used by many small, medium, and large organizations. Duo provides protection of on-premises and cloud-based applications. This is done by both preconfigured solutions and generic configurations via RADIUS, Security Assertion Markup Language (SAML), LDAP, and more.
Duo integrates with many different third-party applications, cloud services, and other solutions. Duo allows administrators to create policy rules around who can access applications and under what conditions. You can customize policies globally or per user group or application. User enrollment strategy will also inform your policy configuration. Duo Beyond subscribers can benefit from additional management within their environment by configuring a Trusted Endpoints policy to check the posture of the device that is trying to connect to the network, application, or cloud resource.
Duo Access Gateway is another component of the Duo solution. The Duo Access Gateway provides multifactor authentication access to cloud applications. You can use your users’ existing directory credentials (such as accounts from Microsoft Active Directory or Google Apps). This is done by using the Security Assertion Markup Language (SAML) 2.0 authentication standard. SAML delegates authentication from a service provider to an identity provider.
Figure 4-1 shows a high-level overview of the Duo Access Gateway solution.
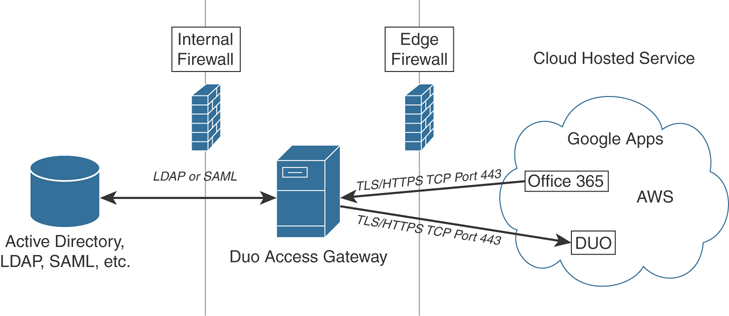
Figure 4-1 Duo Access Gateway
In Figure 4-1, you can see how Duo provides SAML connectors for enterprise cloud applications (Office 365, Google Apps, Amazon Web Services, and so on). The protected cloud applications redirect users to the Duo Access Gateway server that is typically deployed on-premises (that is, on your network). The Duo Access Gateway acts as a SAML identity provider (IdP). It authenticates users by leveraging existing authentication sources for credential verification and then prompting for two-factor authentication before permitting access to the SAML application.
You can also use Duo to protect virtual private network (VPN) users in your organization. For instance, you can configure a Cisco ASA or Cisco Firepower Threat Defense (FTD) device to terminate connections from remote access VPN clients and integrate Duo to provide multifactor authentication.
Figure 4-2 shows an example of multifactor authentication where a user (osantos) connects to a VPN device and is prompted to verify the VPN connection on his iPhone’s Duo mobile app.
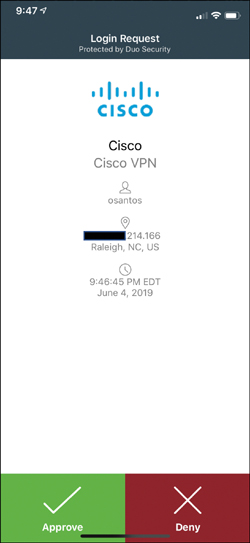
Figure 4-2 Duo Multifactor Authentication in VPN Implementations
Figure 4-3 shows how the Duo app Security Checkup verifies the posture of the mobile device used for multifactor authentication.
You can integrate Duo with many applications. Figure 4-4 shows the Duo administrative dashboard where you can integrate many different applications. In Figure 4-4, three applications are integrated (two Unix-based systems and a macOS system).
To integrate (protect) a new application, you can click the Protect an Application button, and the screen shown in Figure 4-5 is displayed. Then select the application you want to protect. You can access detailed information on how to integrate each application by clicking the Read the documentation link by the name of the respective application.
Zero Trust and BeyondCorp
Zero trust has been a buzzword in the cybersecurity industry for several years. The zero-trust concept assumes that no system or user will be “trusted” when requesting access to the corporate network, systems, and applications hosted on-premises or in the cloud. You must first verify their trustworthiness before granting access. Attackers can bypass different firewalls by employing different evasion techniques. In addition, a lot of attacks start from the inside (from insiders) and can spread out to compromise critical systems and steal sensitive data.
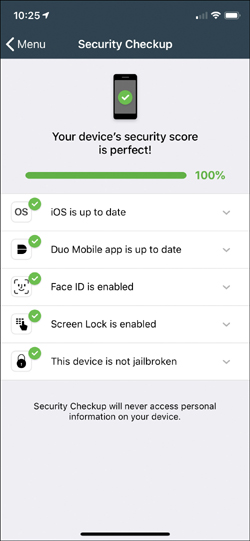
Figure 4-3 Duo App Security Checkup Screen
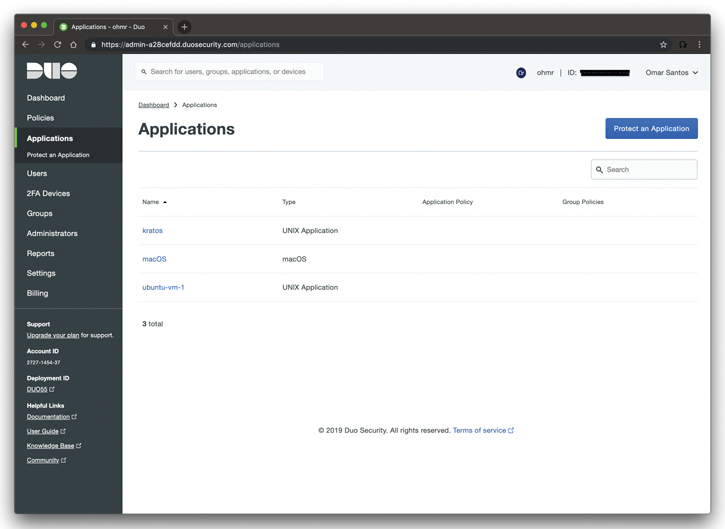
Figure 4-4 Duo Administrative Dashboard Application Integrations
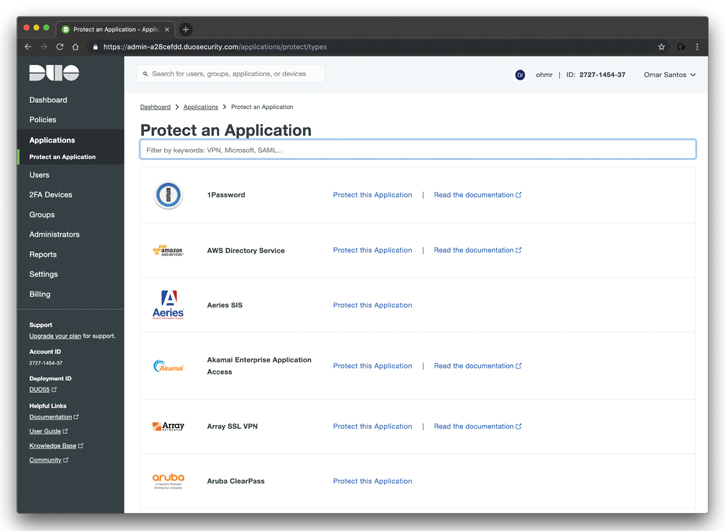
Figure 4-5 Protecting a New Application in the Duo Administrative Dashboard
When an application or system is “protected” with access controls dependent on whether the user is “inside or outside the perimeter,” an attacker can take advantage of these looser sets of controls. Furthermore, a lot of applications do not reside inside the perimeter anymore. They reside in the cloud. Consequently, external cloud-based applications and mobile users can face attacks that are outside of the perimeter protections. Users often make your organization even more vulnerable by using unmanaged and unpatched devices to connect to critical systems and applications. This is why the concept of “zero trust” was introduced in the industry.
Duo sits in the heart of the Cisco Zero Trust security framework. This framework helps you prevent unauthorized access, contain security incidents, and reduce the risk of an adversary pivoting (performing lateral movement) through your network. The Cisco Zero Trust solution allows administrators to consistently enforce policy-based controls and maintain visibility of users and systems across the entire environment. The Cisco Zero Trust solution also provides detailed logs, reports, and alerts that can help security professionals better detect and respond to threats.
Single Sign-On
Suppose you have two separate applications (Application_1 and Application_2). Both applications require user authentication, as demonstrated in Figure 4-6.
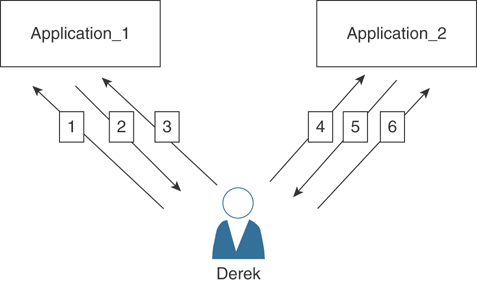
Figure 4-6 Two Applications Without Single Sign-On
The following steps occur in Figure 4-6:
Derek (the user) tries to connect to Application_1.
Application_1 prompts Derek for authentication.
Derek authenticates to Application_1.
Then Derek wants to connect to Application_2.
Application_2 prompts Derek for authentication.
Derek authenticates to Application_2.
As you can see, this is not very “user friendly.” In most environments, you are accessing dozens of applications throughout an enterprise network or even applications hosted in the cloud. This is why single sign-on (SSO) was created.
Figure 4-7 shows an example of a typical SSO implementation.
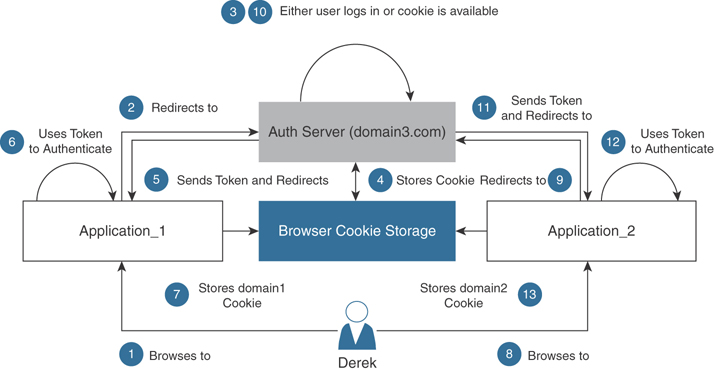
Figure 4-7 Single Sign-On Example
Even though the steps in Figure 4-7 are more elaborate than those in Figure 4-6, the user experience is better. This is because the user (Derek) only needs to authenticate once (to Application_1) and then he can browse (access) any other application that is a participant on the SSO implementation and that Derek is authorized to access.
SAML is used in SSO implementations. However, there are other identity technologies used in SSO implementations such as OpenID Connect, Microsoft Account (formerly known as Passport), and Facebook Connect.
The following are several elements that are part of an SSO and federated identity implementation:
Delegation: SSO implementations use delegation to call external APIs to authenticate and authorize users. Delegation is also used to make sure that applications and services do not store passwords and user information on-site.

Domain: A domain in an SSO environment is the network where all resources and users are linked to a centralized database (this is, where all authentication and authorization occurs).
Factor: You already learned about “multifactor” authentication. A factor in authentication is a vector through which identity can be confirmed.
Federated Identity Management: A collection of shared protocols that allows user identities to be managed across organizations.
Federation provider: An identity provider that offers single sign-on, consistency in authorization practices, user management, and attributes-exchange practices between identity providers (issuers) and relying parties (applications).
Forest: A collection of domains managed by a centralized system.
Identity provider (IdP): An application, website, or service responsible for coordinating identities between users and clients. IdPs can provide a user with identifying information and provide that information to services when the user requests access.
Kerberos: A ticket-based protocol for authentication built on symmetric-key cryptography.
Multitenancy: A term in computing architecture referring to the serving of many users (tenants) from a single instance of an application. Software as a Service (SaaS) offerings are examples of multitenancy. They exist as a single instance but have dedicated shares served to many companies and teams.
OAuth: An open standard for authorization used by many APIs and modern applications. You can access OAuth and OAuth 2.x specifications and documentation at https://oauth.net/2.
OpenID (or OpenID Connect): Another open standard for authentication. OpenID Connect allows third-party services to authenticate users without clients needing to collect, store, and subsequently become liable for a user’s login information. Detailed information about OpenID can be accessed at https://openid.net/connect/.
Passwordless: A type of authentication based on tokens. Passwordless authentication challenges are typically received and sent through SMS, email (magic links), or biometric sensors.
Social identity provider (social IdP): A type of identity provider originating in social services like Google, Facebook, Twitter, and so on.
Web identity: The identifying data is typically obtained from an HTTP request (often these are retrieved from an authenticated email address).
Windows identity: This is how Active Directory in Microsoft Windows environments organizes user information.
WS-Federation: A common infrastructure (federated standard) for identity, used by web services and browsers on Windows Identity Foundation. Windows Identity Foundation is a framework created by Microsoft for building identity-aware applications. You can obtain detailed information about Windows Identity Foundation and WS-Federation at https://docs.microsoft.com/en-us/dotnet/framework/security/.
Now that you have an understanding of the different elements of SSO, multifactor authentication, and user identity, let’s take a look at a couple of examples of how these concepts are used together. In Figure 4-8, the Duo SSO and multifactor authentication (MFA) services provide user authentication for three different cloud services (Cisco WebEx, Cisco Meraki Cloud, and Cisco Umbrella). SSO is done using the SAML protocol.
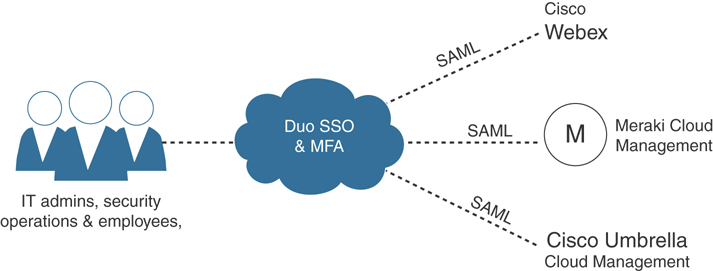
Figure 4-8 Duo Providing SSO and Multifactor Authentication
Figure 4-9 shows another example of how Duo provides user multifactor authentication and SSO to different services, including VPN users, Microsoft Azure applications, remote desktop protocol (RDP) implementations, Secure Shell (SSH), API authentication, and other implementations.

Figure 4-9 Duo Cloud Platform Services
The Duo cloud platform not only provides multifactor authentication and SSO services, but also device visibility, user policy, and device policy checks.
Authorization
Once authenticated, a subject must be authorized. Authorization is the process of assigning authenticated subjects permission to carry out a specific operation. The authorization model defines how access rights and permission are granted. The three primary authorization models are object capability, security labels, and ACLs. Object capability is used programmatically and is based on a combination of an unforgeable reference and an operational message. Security labels are mandatory access controls embedded in object and subject properties. Examples of security labels (based on its classification) are “confidential,” “secret,” and “top secret.” Access control lists (ACLs) are used to determine access based on some combination of specific criteria, such as a user ID, group membership, classification, location, address, and date.
Additionally, when granting access, the authorization process would check the permissions associated with the subject/object pair so that the correct access right is provided. The object owner and management usually decide (or give input on) the permission and authorization policy that governs the authorization process.
The authorization policy and rule should take various attributes into consideration, such as the identity of the subject, the location from where the subject is requesting access, the subject’s role within the organization, and so on. Access control models, which are described in more detail later in this chapter, provide the framework for the authorization policy implementation.
An authorization policy should implement two concepts:
Implicit deny: If no rule is specified for the transaction of the subject/object, the authorization policy should deny the transaction.
Need to know: A subject should be granted access to an object only if the access is needed to carry out the job of the subject. You learned about the least privilege principle and need-to-know concepts earlier in this chapter.
The sections that follow cover the details about the different access control categories.
Mandatory Access Control (MAC)
Mandatory access controls (MACs) are defined by policy and cannot be modified by the information owner. MACs are primarily used in secure military and government systems that require a high degree of confidentiality. In a MAC environment, objects are assigned a security label that indicates the classification and category of the resource. Subjects are assigned a security label that indicates a clearance level and assigned categories (based on the need to know). The operating system compares the object’s security label with the subject’s security label. The subject’s clearance must be equal to or greater than the object’s classification. The category must match. For example, for a user to access a document classified as “Secret” and categorized as “Flight Plans,” the user must have either Secret or Top-Secret clearance and have been tagged to the Flight Plan category.
Discretionary Access Control (DAC)
Discretionary access controls (DACs) are defined by the owner of the object. DACs are used in commercial operating systems. The object owner builds an ACL that allows or denies access to the object based on the user’s unique identity. The ACL can reference a user ID or a group (or groups) that the user is a member of. Permissions can be cumulative. For example, John belongs to the Accounting group. The Accounting group is assigned read permissions to the Income Tax folder and the files in the folder. John’s user account is assigned write permissions to the Income Tax folder and the files in the folder. Because DAC permissions are cumulative, John can access, read, and write to the files in the Income Tax folder.
Role-Based Access Control (RBAC)
Role-based access controls (RBACs, also called “nondiscretionary controls”) are access permissions based on a specific role or function. Administrators grant access rights and permissions to roles. Users are then associated with a single role. There is no provision for assigning rights to a user or group account.
Let’s take a look at the example illustrated in Figure 4-10.
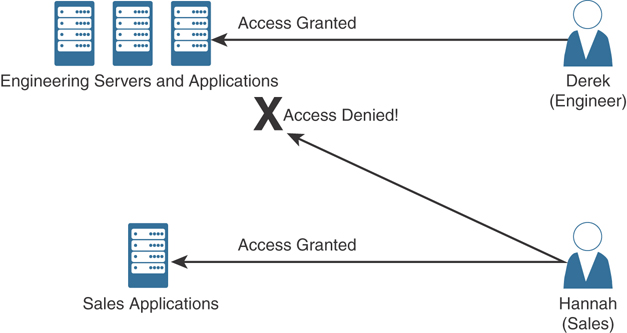
Figure 4-10 An Example of RBAC
The user Derek is associated with the role of “Engineer” and inherits all the permissions assigned to the Engineer role. Derek cannot be assigned any additional permissions. Hannah is associated with the role of “Sales” and inherits all the permissions assigned to the Sales role and cannot access engineering resources. Users can belong to multiple groups. RBAC enables you to control what users can do at both broad and granular levels.
Rule-Based Access Control
In a rule-based access control environment, access is based on criteria that are independent of the user or group account. The rules are determined by the resource owner. Commonly used criteria include source or destination address, geographic location, and time of day. For example, the ACL on an application requires that it be accessed from a specific workstation. Rule-based access controls can be combined with DACs and RBACs.
Attribute-Based Access Control
Attribute-based access control (ABAC) is a logical access control model that controls access to objects by evaluating rules against the attributes of entities (both subject and object), operations, and the environment relevant to a request. The characteristics of ABAC are as follows:
ABAC supports a complex Boolean rule set that can evaluate many different attributes.
The policies that can be implemented in an ABAC model are limited only to the degree imposed by the computational language and the richness of the available attributes.
An example of an access control framework that is consistent with ABAC is the Extensible Access Control Markup Language (XACML).
Accounting
Accounting is the process of auditing and monitoring what a user does once a specific resource is accessed. This process is sometimes overlooked; however, as a security professional, it is important to be aware of accounting and to advocate that it be implemented because of the great help it provides during detection and investigation of cybersecurity breaches.
When accounting is implemented, an audit trail log is created and stored that details when the user has accessed the resource, what the user did with that resource, and when the user stopped using the resource. Given the potential sensitive information included in the auditing logs, special care should be taken in protecting them from unauthorized access.
Infrastructure Access Controls
A network infrastructure is defined as an interconnected group of hosts and devices. The infrastructure can be confined to one location or, as often is the case, widely distributed, including branch locations and home offices. Access to the infrastructure enables the use of its resources. Infrastructure access controls include physical and logical network designs, border devices, communication mechanisms, and host security settings. Because no system is foolproof, access must be continually monitored; if suspicious activity is detected, a response must be initiated.
Access Control Mechanisms
An access control mechanism is, in simple terms, a method for implementing various access control models. A system may implement multiple access control mechanisms. In some modern systems, this notion of an access control mechanism may be considered obsolete because the complexity of the system calls for more advanced mechanisms. Nevertheless, here are some of the most well-known methods:
Access control list (ACL): This is the simplest way to implement a DAC-based system. ACLs can apply to different objects (like files) or they can also be configured statements (policies) in network infrastructure devices (routers, firewalls, etc.). For instance, an ACL, when applied to an object, will include all the subjects that can access the object and their specific permissions. Figure 4-11 shows an example of an ACL applied to a file
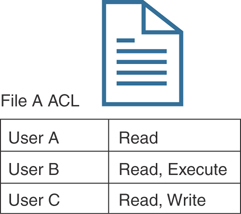
Figure 4-11 An example of an ACL applied to a file
There is also the concept of ACLs in routers and firewalls. In those implementations ACLs provide packet filtering to protect “internal” networks from the “outside” systems and to filter traffic leaving the inside network. ACL criteria could be the source address of the traffic, the destination address of the traffic, destination port, source port, and the upper-layer protocol (otherwise known as the 5-tuple). In Cisco routers and firewalls an ACL is a collection of security rules or policies that allows or denies packets after looking at the packet headers and other attributes. Each permit or deny statement in the ACL is referred to as an access control entry (ACE). These ACEs classify packets by inspecting Layer 2 through Layer 7 headers for a number of parameters, including the following:
Layer 2 protocol information such as EtherTypes
Layer 3 protocol information such as ICMP, TCP, or UDP
Layer 3 header information such as source and destination IP addresses
Layer 4 header information such as source and destination TCP or UDP ports
Layer 7 information such as application and system service calls
In Cisco Next-Generation firewalls you can also configure different access control policies, that go beyond the traditional 5-tuple. You will learn detailed information about ACLs and access control policies in Chapter 7, “Cisco Next-Generation Firewalls and Cisco Next-Generation Intrusion Prevention Systems.”
Capability table: This is a collection of objects that a subject can access, together with the granted permissions. The key characteristic of a capability table is that it’s subject centric instead of being object centric, like in the case of an access control list. Figure 4-12 shows a user (Derek) capability table.
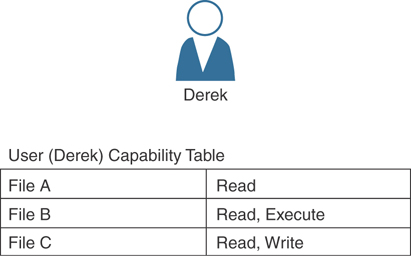
Figure 4-12 User Capability Table
Access control matrix (ACM): This is an access control mechanism that is usually associated with a DAC-based system. An ACM includes three elements: the subject, the object, and the set of permissions. Each row of an ACM is assigned to a subject, while each column represents an object. The cell that identifies a subject/object pair includes the permission that subject has on the object. An ACM could be seen as a collection of access control lists or a collection of capabilities table, depending on how you want to read it. Figure 4-13 shows an example of access controls using an ACM.
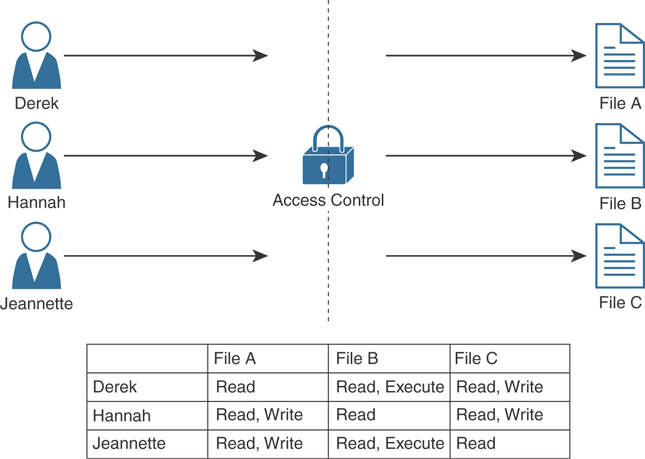
Figure 4-13 Access Controls using an ACM
Content-dependent access control: This type of control uses the information (content) within a resource to make an authorization decision. This type of control is generally used in database access controls. A typical example is a database view.
Context-dependent access control: This type of control uses contextual information to make an access decision, together with other information such as the identity of the subject. For example, a system implementing a context-dependent control may look at events preceding an access request to make an authorization decision. A typical system that uses this type of control is a stateful firewall, such as Cisco ASA, Cisco Firepower Threat Defense (FTD), or Cisco IOS configured with the Zone-Based Firewall feature, where a packet is allowed or denied based on the information related to the session the packet belongs to.
AAA Protocols
Several protocols are used to grant access to networks or systems, provide information about access rights, and provide capabilities used to monitor, audit, and account for user actions once authenticated and authorized. These protocols are called authentication, authorization, and accounting (AAA) protocols.
The most well-known AAA protocols are RADIUS, TACACS+, and Diameter. The sections that follow provide some background information about each.
RADIUS
The Remote Authentication Dial-In User Service (RADIUS) is an AAA protocol mainly used to provide network access services. Due to its flexibility, it has been adopted in other scenarios as well. The authentication and authorization parts are specified in RFC 2865, while the accounting part is specified in RFC 2866.
RADIUS is a client-server protocol. In the context of RADIUS, the client is the access server, which is the entity to which a user sends the access request. The server is usually a machine running RADIUS services and that provides authentication and authorization responses containing all the information used by the access server to provide service to the user.
The RADIUS server can act as proxy for other RADIUS servers or other authentication systems. Also, RADIUS can support several types of authentication mechanisms, such as PPP PAP, CHAP, and EAP. It also allows protocol extension via the attribute field. For example, vendors can use the attribute “vendor-specific” (type 26) to pass vendor-specific information.
Figure 4-14 shows a typical deployment of a RADIUS server, a RADIUS client (wireless router in this example), and a laptop (wireless client or supplicant).

Figure 4-14 RADIUS Server Implementation
RADIUS operates in most cases over UDP protocol port 1812 for authentication and authorization, and port 1813 for accounting, which are the officially assigned ports for this service. In earlier implementations, RADIUS operated over UDP port 1645 for authentication and authorization, and port 1646 for accounting.
The authentication and authorization phase consist of two messages:
The access server sends an ACCESS-REQUEST to the RADIUS server that includes the user identity, the password, and other information about the requestor of the access (for example, the IP address).
The RADIUS server may reply with three different messages:
ACCESS-ACCEPT if the user is authenticated. This message will also include in the Attribute field authorization information and specific vendor information used by the access server to provide services.
ACCESS-REJECT if access for the user is rejected.
ACCESS-CHALLENGE if additional information is needed. RADIUS server needs to send an additional challenge to the access server before authenticating the user. The ACCESS-CHALLENGE will be followed by a new ACCESS-REQUEST message.
Figure 4-15 demonstrates the RADIUS exchange for authentication and authorization.
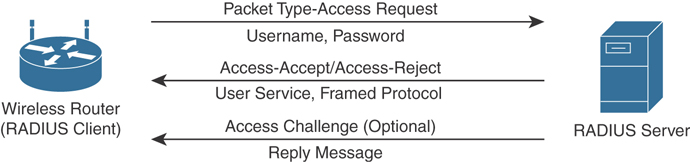
Figure 4-15 RADIUS Exchange for Authentication and Authorization
The accounting exchange consists of two messages: ACCOUNTING-REQUEST and ACCOUNTING-RESPONSE. Accounting can be used, for example, to specify how long a user has been connected to the network (the start and stop of a session).
The RADIUS exchange is authenticated by using a shared secret key between the access server and the RADIUS server. Only the user password information in the ACCESS-REQUEST is encrypted; the rest of the packets are sent in plaintext.
TACACS+
Terminal Access Controller Access Control System Plus (TACACS+) is a proprietary protocol developed by Cisco. It also uses a client-server model, where the TACACS+ client is the access server and the TACACS+ server is the machine providing TACACS+ services (that is, authentication, authorization, and accounting).
Similar to RADIUS, TACACS+ also supports protocol extension by allowing vendor-specific attributes and several types of authentication protocols. TACACS+ uses TCP as the transport protocol, and the TACACS+ server listens on port 49. Using TCP ensures a more reliable connection and fault tolerance.
TACACS+ has the authentication, authorization, and accounting processes as three separate steps. This allows the use of different protocols (for example, RADIUS) for authentication or accounting. Additionally, the authorization and accounting capabilities are more granular than in RADIUS (for example, allowing specific authorization of commands). This makes TACACS+ the preferred protocol for authorization services for remote device administration.
The TACACS+ exchange requires several packets:
START, REPLY, and CONTINUE packets are used during the authentication process.
REQUEST and RESPONSE packets are used during the authorization and accounting process.
The following is an example of an authentication exchange:
The access server sends a START authentication request.
The TACACS+ server sends a REPLY to acknowledge the message and ask the access server to provide a username.
The access server sends a CONTINUE with the username.
The TACACS+ server sends a REPLY to acknowledge the message and ask for the password.
The access server sends a CONTINUE with the password.
The TACACS+ server sends a REPLY with authentication response (pass or fail).
Figure 4-16 demonstrates the TACACS+ authentication, authorization, and accounting exchange.
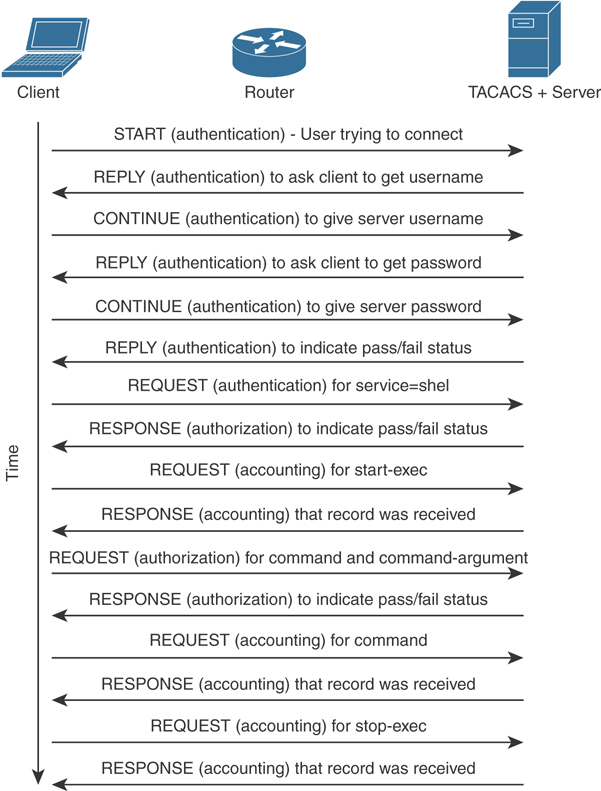
Figure 4-16 TACACS+ Message Exchange for Authentication, Authorization, and Accounting
TACACS+ offers better security protection compared to RADIUS. For example, the full body of the packet can be encrypted.
Table 4-2 summarizes the main differences between RADIUS and TACACS+.
Table 4-2 RADIUS vs TACACS+
|
RADIUS |
TACACS+ |
Transport Protocol |
UDP. |
TCP. |
Security |
Encrypts user password in ACCESS-REQUEST packets. |
Optionally encrypts the full payload. |
AAA Phases |
Authentication and authorization are performed with the same exchange. Accounting is done with a separate exchange. |
Authentication, authorization, and accounting are performed with separate exchanges. |
Command Authorization |
Limited support for command authorization. |
Provides granular command authorization. |
Accounting |
Supports strong accounting capabilities. |
Provides basic accounting capabilities. |
RADIUS authentication and authorization capabilities are defined in RFC 2865, and RADIUS accounting is defined in RFC 2866. TACACS+ is a Cisco proprietary protocol, despite the efforts through the years to have it adopted as an RFC in IETF (for example, https://www.ietf.org/id/draft-ietf-opsawg-tacacs-13.txt).
Diameter
RADIUS and TACACS+ were created with the aim of providing AAA services to network access via dial-up protocols or terminal access. Due to their success and flexibility, they have been used in several other scopes. To respond to newer access requirements and protocols, the IETF has proposed a new protocol called Diameter, which is described in RFC 6733.
Diameter has been built with the following functionality in mind:
Failover: Diameter implements application-level acknowledgment and failover algorithms.
Transmission-level security: Diameter protects the exchange of messages by using TLS or DTLS.
Reliable transport: Diameter uses TCP or SCTP as the transport protocol.
Agent support: Diameter specifies the roles of different agents such as proxy, relay, redirect, and translation agents.
Server-initiated messages: Diameter makes mandatory the implementation of server-initiated messages. This enables capabilities such as on-demand re-authentication and re-authorization.
Transition support: Diameter allows compatibility with systems using RADIUS.
Capability negotiation: Diameter includes capability negotiations such as error handling as well as mandatory and nonmandatory attribute/value pairs (AVP).
Peer discovery: Diameter enables dynamic peer discovery via DNS.
The main reason for the introduction of the Diameter protocol is the capability to work with applications that enable protocol extension. The main Diameter application is called Diameter base and it implements the core of the Diameter protocol. Other applications are Mobile IPv4 Application, Network Access Server Application, Diameter Credit-Control Application, and so on. Each application specifies the content of the information exchange in Diameter packets. For example, to use Diameter as AAA protocol for network access, the Diameter peers will use the Diameter Base Application and the Diameter Network Access Server Application.
The Diameter header field Application ID indicates the ID of the application. Each application, including the Diameter Base application, uses command code to identify specific application actions. Diameter is a peer-to-peer protocol, and entities in a Diameter context are called Diameter nodes. A Diameter node is defined as a host that implements the Diameter protocol.
The protocol is based on two main messages: a REQUEST, which is identified by setting the R bit in the header, and an ANSWER, which is identified by unsetting the R bit. Each message will include a series of attribute/value pairs (AVPs) that include application-specific information.
In its basic protocol flow, after the transport layer connection is created, the Diameter initiator peer sends a Capability-Exchange-Request (CER) to the other peer that will respond with a Capability-Exchange-Answer (CEA). The CER can include several AVPs, depending on the application that is requesting a connection. Once the capabilities are exchanged, the Diameter applications can start sending information.
Diameter also implements a keep-alive mechanism by using a Device-Watchdog-Request (DWR), which needs to be acknowledged with a Device-Watchdog-Answer (DWA). The communication is terminated by using a Disconnect-Peer-Request (DPR) and Disconnect-Peer-Answer (DPA). Both the Device-Watchdog and Disconnect-Peer can be initiated by both parties.
Figure 4-17 shows an example of a Diameter capability exchange and communication termination.
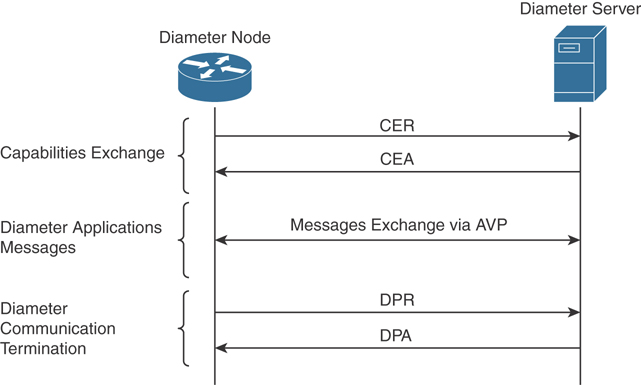
Figure 4-17 Diameter Capability Exchange and Communication Termination
The following is an example of protocol flows where Diameter is used to provide user authentication service for network access (as defined in the Network Access Server Application RFC 7155):
The initiator peer, the access server, sends a CER message with the Auth-Application-Id AVP set to 1, meaning that it supports authentication capabilities.
The Diameter server sends a CEA back to the access server with the Auth-Application-Id AVP set to 1.
The access server sends an AA-Request (AAR) to the Diameter server that includes information about the user authentication, such as username and password.
The access server will reply with an AA-Answer (AAA) message including the authentication results.
Figure 4-18 shows an example of a Diameter exchange for network access services.

Figure 4-18 Diameter Exchange for Network Access Services
Diameter is a much more complex protocol and is used in some mobile service provider environments.
802.1X
802.1X is an IEEE standard that is used to implement port-based access control. In simple terms, an 802.1X access device will allow traffic on the port only after the device has been authenticated and authorized.
In an 802.1X-enabled network, three main roles are defined:
Authentication server: An entity that provides an authentication service to an authenticator. The authentication server determines whether the supplicant is authorized to access the service. This is sometimes referred to as the policy decision point (PdP). The Cisco Identity Services Engine (ISE) is an example of an authentication server. You will learn more about Cisco ISE later in this chapter.
Supplicant: An entity that seeks to be authenticated by an authenticator. For example, this could be a client laptop connected to a switch port. An example of a supplicant software is the Cisco AnyConnect Secure Mobility Client.
Authenticator: An entity that facilitates authentication of other entities attached to the same LAN. This is sometimes referred to as the policy enforcement point (PeP). Cisco switches, wireless routers, and access points are examples of authenticators.
Other components, such as an identity database or a PKI infrastructure, may be required for a correct deployment. Figure 4-19 illustrates an example of an authentication server, supplicant, and authenticator. The supplicant is connected to the authenticator (wireless router) via a Wi-Fi connection.
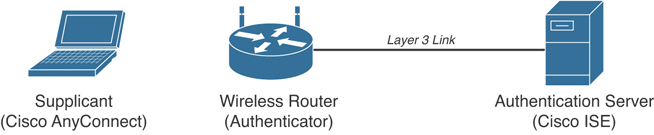
Figure 4-19 802.1X Sample Topology
802.1X uses the following protocols:
EAP over LAN (EAPoL): An encapsulation defined in 802.1X that’s used to encapsulate EAP packets to be transmitted from the supplicant to the authenticator.
Extensible Authentication Protocol (EAP): An authentication protocol used between the supplicant and the authentication server to transmit authentication information.
RADIUS or Diameter: The AAA protocol used for communication between the authenticator and authentication server.
The 802.1X port-based access control includes four phases (in this example, RADIUS is used as the protocol and a Cisco switch as the authenticator):
Session initiation: The session can be initiated either by the authenticator with an EAP-Request-Identity message or by the supplicant with an EAPoL-Start message. Before the supplicant is authenticated and the session authorized, only EAPoL, Cisco Discovery Protocol (CDP), and Spanning Tree Protocol (STP) traffic is allowed on the port from the authenticator.
Session authentication: The authenticator extracts the EAP message from the EAPoL frame and sends a RADIUS Access-Request to the authentication server, adding the EAP information in the AV pair of the RADIUS request. The authenticator and the supplicant will use EAP to agree on the authentication method (for example, EAP-TLS). Depending on the authentication method negotiated, the supplicant may provide a password, a certificate, a token, and so on.
Session authorization: If the authentication server can authenticate the supplicant, it will send a RADIUS Access-Accept to the authenticator that includes additional authorization information such as VLAN, downloadable access control list (dACL), and so on. The authenticator will send an EAP Success message to the supplicant, and the supplicant can start sending traffic.
Session accounting: This represents the exchange of accounting RADIUS packets between the authenticator and the authentication server.
Figure 4-20 illustrates an example of the 802.1X exchange.
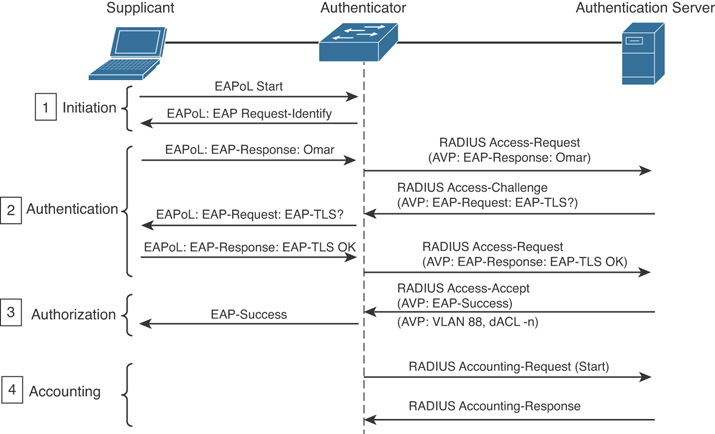
Figure 4-20 802.1X Port Access Control Exchange
In addition to these four phases, it is also very important that the session is correctly terminated. In the standard scenario, where the supplicant terminates the connection, it will send an EAPoL-Logoff message.
Network Access Control List and Firewalling
You learned that one of the most basic implementations of an access control is an ACL. When an ACL is applied to network traffic, it is called a network ACL. Cisco networking devices such as routers, switches, and firewalls include network ACL capabilities to control access to network resources. As for port-based access controls, network ACLs and firewalling are usually seen as special cases of the ABAC model and also sometimes classified as identity-based or rule-based access control because they base the control decision on attributes such as IP or MAC addresses or Layer 4 information. Security group ACLs, on the other hand, are access lists based on the role of the subject trying to access a resource, and they implement role-based access control.
Network ACLs can be implemented at various levels of the OSI model:
A Layer 2 ACL operates at the data link layer and implements filters based on Layer 2 information. An example of this type of access list is a MAC access list, which uses information about the MAC address to create the filter.
A Layer 3 ACL operates at the networking layer. Cisco devices usually allow Layer 3 ACLs for different Layer 3 protocols, including the most used ones nowadays—IPv4 and IPv6. In addition to selecting the Layer 3 protocol, a Layer 3 ACL allows the configuration of filtering for a protocol using raw IP, such as OSPF or ESP.
A Layer 4 ACL operates at the transport layer. An example of a Layer 4 ACL is a TCP- or UDP-based ACL. Typically, a Layer 4 ACL includes the source and destination. This allows filtering of specific upper-layer packets.
VLAN ACLs
VLAN ACLs, also called VLAN maps, are not specifically Layer 2 ACLs; however, they are used to limit the traffic within a specific VLAN. A VLAN map can apply a MAC access list, a Layer 3 ACL, and a Layer 4 ACL to the inbound direction of a VLAN to provide access control.
Security Group–Based ACL
A security group–based ACL (SGACL) is an ACL that implements access control based on the security group assigned to a user (for example, based on his role within the organization) and the destination resources. SGACLs are implemented as part of Cisco TrustSec policy enforcement. Cisco TrustSec is described in a bit more detail in the sections that follow. The enforced ACL may include both Layer 3 and Layer 4 access control entries (ACEs).
Downloadable ACL
A downloadable ACL (dACL), also called a per-user ACL, is an ACL that can be applied dynamically to a port. The term downloadable stems from the fact that these ACLs are pushed from the authenticator server (for example, from a Cisco ISE) during the authorization phase.
When a client authenticates to the port (for example, by using 802.1X), the authentication server can send a dACL that will be applied to the port and that will limit the resources the client can access over the network.
Cisco Identity Services Engine (ISE)
Cisco ISE is the centralized AAA and policy engine solution from Cisco. Cisco ISE integrates with numerous Cisco products and third-party solutions to allow you to maintain visibility of who and what is accessing your network, and to enforce access control consistently.
The following are some of the benefits of Cisco ISE:
Centralizes network access control for wired, wireless, or VPN users.
Helps administrators to comply with security regulations and audits by providing for easy policy creation, visibility, and reporting across the organization. Administrators can easily perform audits for regulatory requirements and mandated guidelines.
Allows administrators to match users, endpoints, and each endpoint’s security posture. It can also process attributes such as location, the time the user logged in or logged off, and the access method.
Provides network visibility and host identification by supporting profiling capabilities. Profiling allows you to obtain real-time and historical visibility of all the devices on the network.
Simplifies the experience of guest users or contractors when accessing the network. Cisco ISE provides self-service registration and fully customizable, branded guest portals that you can configure in minutes.
Provides great support for bring-your-own-device (BYOD) and enterprise mobility also, with self-service device onboarding and management.
Supports internal device certificate management and integration with enterprise mobility management (EMM) partners.
Supports software-defined segmentation policies for users, endpoints, and other devices on your network based on security policies.
Leverages Cisco TrustSec technology to define context-based access control policies using security group tags (SGTs). SGTs make segmentation easier when used in a security group ACL (SGACL).
Uses the Cisco Platform Exchange Grid (pxGrid) technology to integrate with other Cisco products and third-party solutions. pxGrid allows you to maintain threat visibility and fast-tracks the capabilities to detect, investigate, contain, and recover (remediate) security incidents.
Supports TACACS+ and RADIUS AAA services, as well as integration with Duo for multifactor authentication and secure access. Cisco ISE also supports external authentication servers such as LDAP and Active Directory servers.
Cisco ISE can be deployed in a physical appliance or in virtual machines (VMs). You can create physical or virtual ISE clusters for greater scalability, redundancy, and failover.
Cisco Platform Exchange Grid (pxGrid)
Cisco pxGrid provides a cross-platform integration capability among security monitoring applications, threat detection systems, asset management platforms, network policy systems, and practically any other IT operations platform. Cisco ISE supports Cisco pxGrid to provide a unified ecosystem to integrate multivendor tools to exchange information either unidirectionally or bidirectionally.
Legacy Cisco pxGrid implementations supported Extensible Messaging and Presence Protocol (XMPP) for communication. The current Cisco pxGrid implementations use the REST and Websocket protocols.
Cisco pxGrid provides a unified method of publishing or subscribing to relevant contexts with Cisco platforms that utilize pxGrid for third-party integrations. The following links provide detailed information about pxGrid and the supported integration:
Figure 4-21 shows the pxGrid high-level architecture where two pxGrid servers (controllers) communicate with different participating nodes.
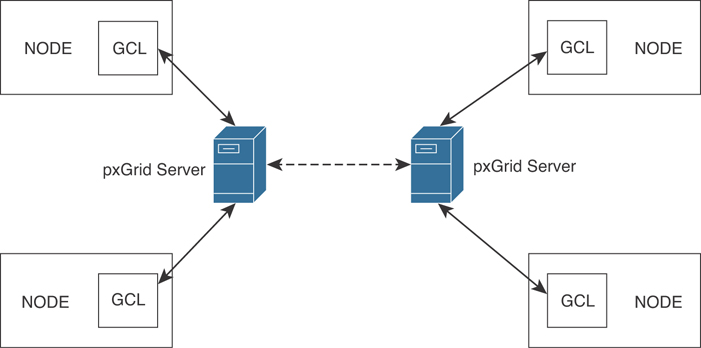
Figure 4-21 pxGrid Architecture
In pxGrid, participant nodes do not communicate directly with pxGrid servers. Participant nodes make programmatic calls to the Grid Client Library (GCL), and then the GCL connects and communicates with pxGrid servers. Some deployments may have only a few nodes, while large deployments may have thousands of nodes.
There are two different types of pxGrid clients: a pxGrid service consumer and a pxGrid service provider. Figure 4-22 illustrates the typical pxGrid client flow.
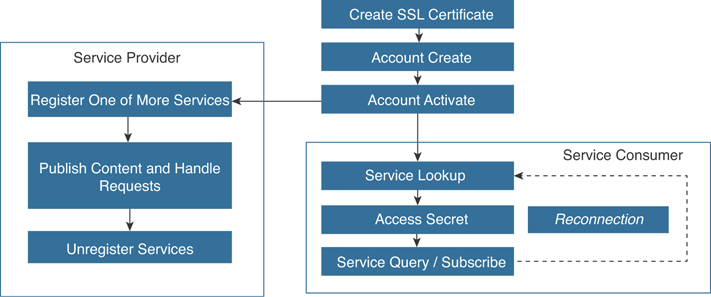
Figure 4-22 pxGrid Client Flow
All pxGrid clients need to authenticate using certificate-based SSL authentication or by using usernames and passwords.
All pxGrid clients must request to activate their accounts on the pxGrid server (via a REST API). pxGrid clients poll on this REST API call until a “ENABLED” message is received from the server. Service providers use the Register/Unregister Service APIs to provide and update the necessary URLs from which their services are accessible for other pxGrid clients.
All pxGrid clients use the Service Lookup API to dynamically discover all available provider services and their locations. pxGrid clients can then perform REST-based queries (via the Service Query/Subscribe API) or build Websocket connections to receive information.
Cisco ISE Context and Identity Services
Cisco ISE provides the ability to maintain contextual awareness of the “who, what, where, when, and how” of network access. It does this by providing identity, visibility, and policy features. Figure 4-23 shows how the Cisco ISE maintains contextual awareness and offers identity services to firewalls, routers, wireless infrastructure devices, and switches.
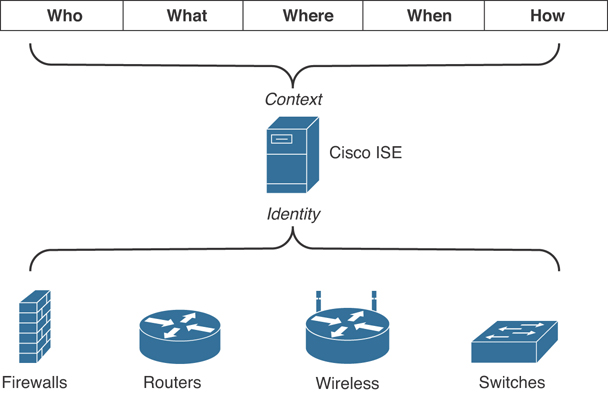
Figure 4-23 Cisco ISE Contextual Awareness and Identity
The two main parts are of the figure are labelled “Context” and “Identity.” Let’s separate the two and start with Context. Figure 4-24 shows some of the major Context elements supported by Cisco ISE.
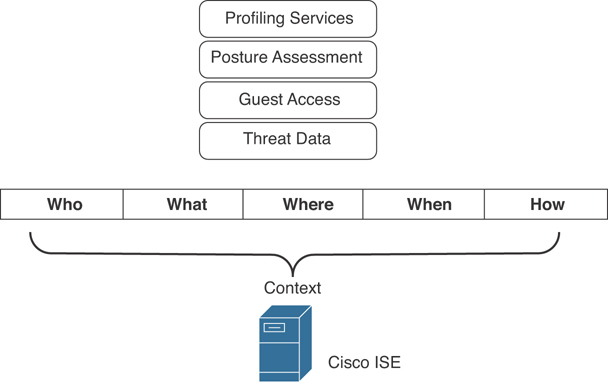
Figure 4-24 Cisco ISE Context Elements
Cisco ISE Profiling Services
Starting with profiling services, this functionality allows you to dynamically detect and classify endpoints connected to the network. Cisco ISE uses MAC addresses as the unique identifier and captures various attributes for each network endpoint that are stored in an internal endpoint database. This classification process ties the captured attributes to preset and/or user-configurable settings. These attributes and settings are then correlated to an extensive library of profiles. For example, these profiles can be of devices like mobile phones (iPhones and Android phones), tablets (iPads and Android tablets), laptops, Chromebooks, and underlying operating systems (such as Windows, macOS, Linux, iOS, Android, and so on). Cisco ISE can also profile other systems such as printers, cameras, IP Phones, Internet of Things (IoT) devices, and so on.
After the endpoints are classified, they can be authorized to the network and granted access based on their profile. Let’s take a look at the example in Figure 4-25. Endpoints that match the IP phone profile can be placed into a voice VLAN (VLAN 10) using MAC Authentication Bypass (MAB) as the authentication method.
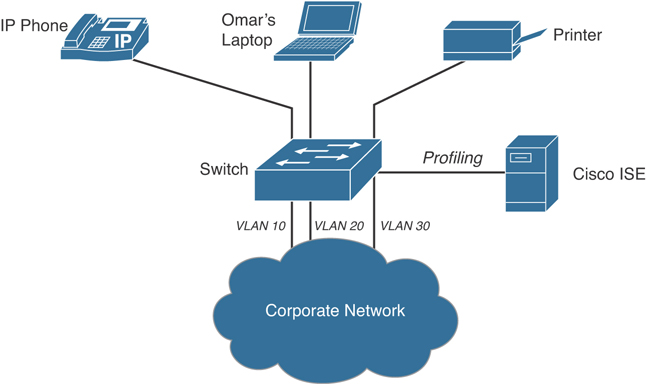
Figure 4-25 Cisco ISE Profiling
Users (based on their authentication and authorization) can also be assigned to different VLANs. In Figure 4-25, Omar’s laptop is profiled and the user is authenticated and subsequently assigned to VLAN 20. A printer is also assigned to a separate VLAN (VLAN 30) using MAB as the authentication method.
Figure 4-26 provides another example. In this example, Cisco ISE can provide differentiated network access to users based on the device used. For instance, a user can get full access to the network resources when accessing the network from their corporate laptop. However, if they connect with their personal device (an iPhone in this example), they are granted limited network access.
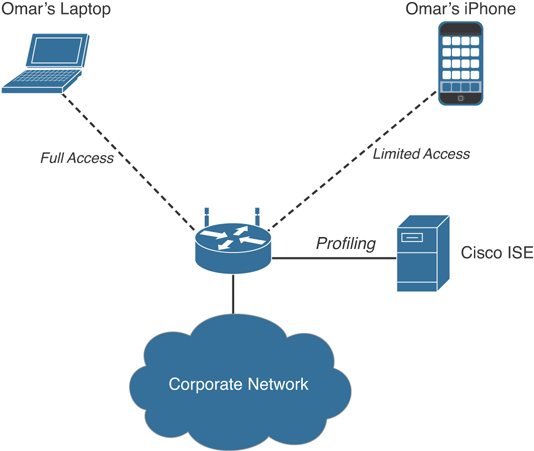
Figure 4-26 Differentiated Network Access to a User Based on the Device Used
Figure 4-27 shows the Cisco ISE Profiling Policies screen where numerous profile policies are listed (including different Apple devices and dozens of other devices from different manufacturers).
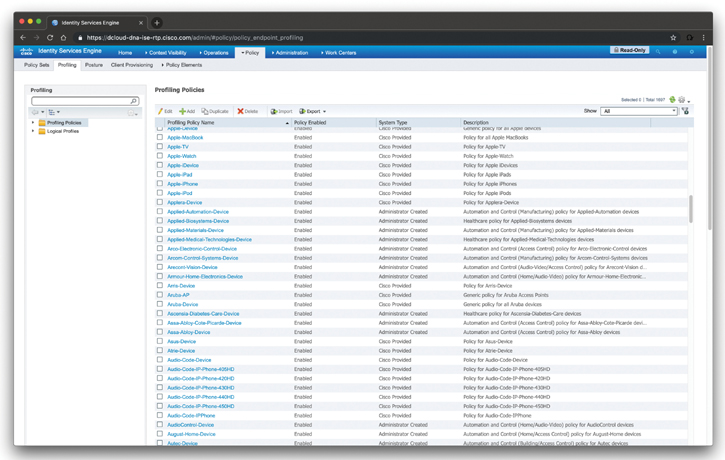
Figure 4-27 Cisco ISE Profiling Policies
Cisco ISE Identity Services
Identity and authentication information can be gathered in several ways:
802.1X: You learned that 802.1X is an industry standard for authentication and identity management. Cisco ISE supports 802.1X authentication in many different types of network access implementations (wired and wireless access).
VPN access with RADIUS authentication: An example is a Cisco Firepower Threat Defense (FTD) device or Cisco ASA sending user credentials from the VPN client via RADIUS to Cisco ISE for VPN authentication.
Cisco ASA identity firewall: Cisco ASA supports identity firewalling (IDFW) and can use Cisco ISE as the authentication server. IDFW is used to authenticate users before passing traffic through the firewall.
Web authentication: Usually done via a URL redirect of the user’s browser. The Cisco ISE has a built-in guest server that provides this web portal service. For instance, let’s suppose the user (Omar) in Figure 4-26 connects to the wireless network infrastructure device and that device is configured in open mode. Then Omar’s browser is then redirected to the login page hosted by the Cisco ISE, and, subsequently, the Cisco ISE server performs the authentication.
MAC Authentication Bypass (MAB): You already learned that MAB relies on a MAC address for authentication. A MAC address is a globally unique identifier that is assigned to all network-attached devices. Consequently it can be used in authentication. However, since you can spoof a MAC address, MAB is not a strong form of authentication. Cisco ISE Profiling functionality combined with MAB provides you with a better alternative to just using MAB.
TrustSec Security Group Tags: Cisco TrustSec is a solution for identity and policy enforcement. ISE can use security group tags (SGTs) for authentication and authorization. SGTs are values that are inserted into the client’s data frames by a network device (for example, a switch, firewall, or wireless AP). This tag is then processed by another network device receiving the data frame and used to apply a security policy. For instance, data frames with a finance_user tag are allowed to communicate only with devices that have a finance_net tag. An IP address can be statically mapped to an SGT. Cisco ISE can gather and distribute all of the IP-to-SGT mapping tables to the network infrastructure devices to enforce policies.
Unauthenticated or authenticated guest access: The Cisco ISE Guest Server functionality provides a guest user a captive portal (splash page) and, optionally, a user agreement page. This captive portal can be configured to ask for information from the user such as their email address, name, company, and other information. Guests that are allowed access to the network without providing identity information are classified as unauthenticated guest access users. Typically, you see this type of access in airports, coffee shops, and other places that offer free Internet access. Even though these guest users are not authenticated by Cisco ISE, all their actions and the information they provide are cataloged. In the case of authenticated guest access, users log in using temporary credentials that expire after a set time period. Guests can receive these credentials through text messages (SMS), a printed document, or other means.
Cisco ISE Authorization Rules
Cisco ISE can enforce policies (also known as authorization) after performing authentication. Cisco ISE supports dozens of policy attributes to each policy rule. These policy rules are maintained in a consolidated policy rule table for authorization. The following are examples of some of the more popular policy attributes supported by Cisco ISE:
Posture assessment results (posture based on attributes collected from the endpoint, such as the version of the operating system, patches installed, applications installed, and more).
Profiler match for device type.
Active Directory group membership and Active Directory user-based attributes (such as company name, department, job title, physical address, and so on).
Time and date.
Location of the user.
Access method (MAB, 802.1X, wired, wireless, and so on).
Mobile Device Management (MDM) registration and enrollment (Cisco ISE supports the integration with third-party MDM solutions, as well).
Information from digital certificates (digital certificates can be used to determine if the device that is trying to connect to the network is a corporate asset or a personal device).
Hundreds of RADIUS attributes and values that can be used for both authentication and authorization.
Figure 4-28 shows an example of the Cisco ISE policy sets.
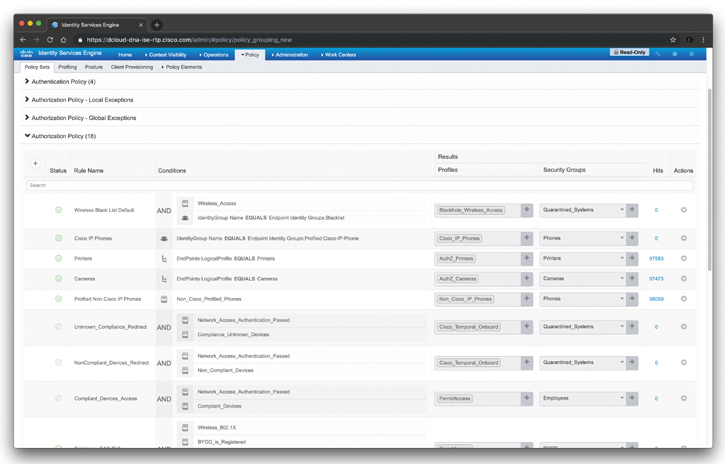
Figure 4-28 Cisco ISE Policy Sets
In the example illustrated in this figure, 18 authorization policies have been configured. The Cisco ISE policies are evaluated on a first-match basis (most common) or multiple-match basis. If there are no matches to any of the configured policies, a default “catch-all rule” is applied and enforced.
Figure 4-29 shows a few examples of other authorization policies configured in Cisco ISE. A policy with the rule name “Employees” is configured to allow network access to users connecting over wired and wireless connections using 802.1X authentication. After the “employees” are authenticated, they are granted access to the network. There are 560,219 hits to this policy.
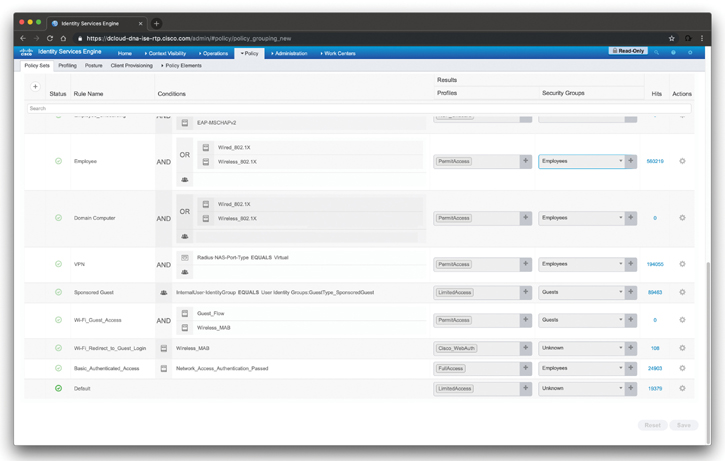
Figure 4-29 Examples of Cisco ISE Authorization Policies
Another example in Figure 4-29 is the VPN rule name, where VPN users are granted access to the network after successful authentication via RADIUS.
Cisco TrustSec
Cisco TrustSec is a solution and architecture that provides the ability to perform network segmentation and enables access controls primarily based on the role of the user (and other attributes) requesting access to the network. Figure 4-30 shows the key components of the Cisco TrustSec architecture.
Figure 4-30 The Key Components of the Cisco TrustSec Architecture
Cisco TrustSec uses the roles of supplicant, authentication server, and authenticator, just like 802.1X. All supplicants must join the TrustSec domain prior to sending packets to the network. Figure 4-31 shows the high-level steps of the Cisco TrustSec authentication process.
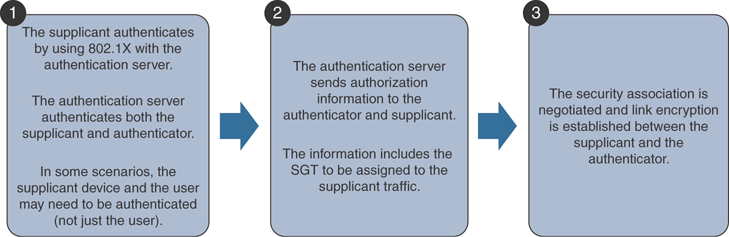
Figure 4-31 Cisco TrustSec Authentication Process
Security group tags (SGTs) are embedded within a Layer 2 frame. Figure 4-32 demonstrates how an SGT is embedded within a Layer 2 frame.
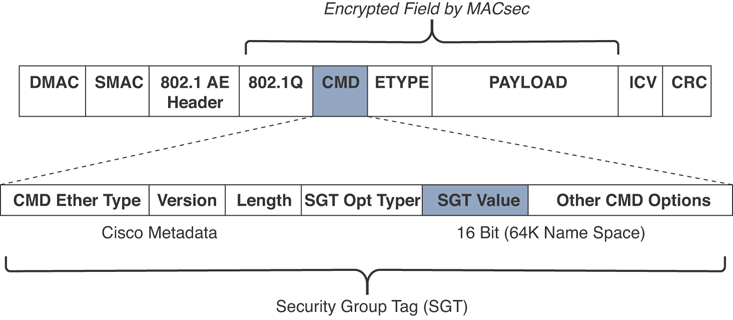
Figure 4-32 SGT Embedded Within a Layer 2 Frame
The access control in Cisco TrustSec is postulated by ingress tagging and egress enforcement. In other words, this means that packets are tagged based on their source once they enter the Cisco TrustSec domain. Then access control occurs at the egress point based on the destination.
Figure 4-33 demonstrates the TrustSec ingress tagging and egress enforcement.
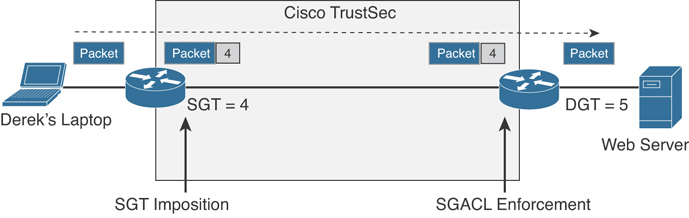
Figure 4-33 TrustSec Ingress Tagging and Egress Enforcement
The following are the steps demonstrated in Figure 4-33.
A user (Derek) sends HTTP packets to a web server.
The ingress switch to the TrustSec domain (TrustSec authenticator) modifies the packet and adds a source SGT. The SGT ID is 4 and corresponds to the “Engineering” group.
The packet is sent through the TrustSec domain and reaches the egress device (or egress point). The egress point checks the SGACL to verify if the Engineering group (4) is authorized to access the web server.
The packet also receives a destination SGT (DGT) with ID 5.
The egress point removes the SGT if the Engineering group (4) is allowed to communicate with the web server and transmits the packet to the destination.
The protocol that allows software-enabled devices to participate in the TrustSec architecture is called the SGT Exchange Protocol (SXP). SXP uses an IP-address-to-SGT process to forward information about the SGT to the first TrustSec-enabled device that is in the path to the final destination. The first TrustSec-enabled device is the device that will insert a “tag” in the packet, which subsequently will reach to the destination (depending on the configured policies).
Posture Assessment
Posture assessment includes a set of rules in a security policy that define a series of checks before an endpoint is granted access to the network. Posture assessment checks include the installation of operating system patches, host-based firewalls, antivirus and anti-malware software, disk encryption, and more. The components illustrated in Figure 4-34 need to be taken into consideration when configuring posture assessment in Cisco ISE deployments.

Figure 4-34 Posture Assessment High-Level Configuration Components
The elements shown in Figure 4-34 ensure that each required section to configuring Cisco ISE for posture assessment is addressed.
You can also configure posture remediations. These posture remediations are the different methods that AnyConnect clients will use to handle non-compliant endpoints. The AnyConnect Posture Module is required to perform posture checks and remediation.
You can deploy three types of agents to be used for posture assessment:
Temporal Agent: No permanent software is installed on the endpoint. This is ideal for guest or contractor endpoints. However, a disadvantage of the temporal agent is that it supports a limited number of posture conditions.
Stealth AnyConnect: Provides a “headless” configuration and supports most of the posture conditions as the full AnyConnect agent. The Stealth AnyConnect agent will run as a background process, and it does not provide any GUI (unless it is included with other AnyConnect modules such as AMP Enabler and VPN).
AnyConnect: Provides support for most posture conditions, automatic remediation, and passive reassessment.
Change of Authorization (CoA)
RADIUS Change of Authorization (CoA) is a feature that allows a RADIUS server to adjust an active client session. For instance, ISE can issue the CoA RADIUS attribute to an access device to force the session to be reauthenticated.
An example is the use of CoA when the Threat-Centric Network Access Control (TC-NAC) detects a vulnerability. The TC-NAC is a feature that enables ISE to collect threat and vulnerability data from many third-party threat and vulnerability scanners and software. The purpose of this feature is to allow ISE to have a threat and risk view into the hosts it is controlling access rights for.
When a vulnerability event is received for an endpoint, Cisco ISE can automatically trigger a Change of Authorization (CoA) for that endpoint, as demonstrated in Figure 4-35.
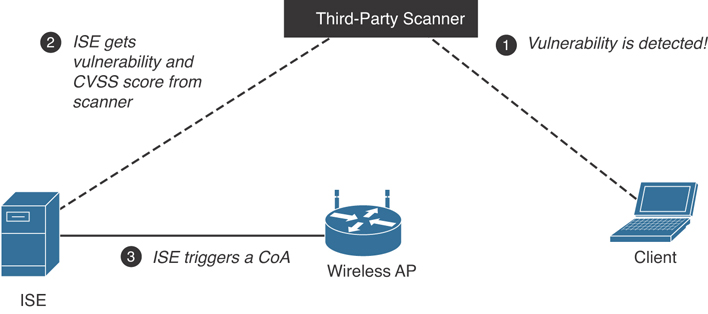
Figure 4-35 TC-NAC Vulnerability Triggered CoA
Cisco ISE supports the following the solutions for TC-NAC:
Cisco Advanced Malware Protection (AMP) for Endpoints
Cisco Cognitive Threat Analytics (CTA)
Qualys
Rapid7 Nexpose
Tenable Security Center
CoA is defined in RFC 5176. There are a few RADIUS-related terms you need to be familiar with before we look at the details of the CoA messages:
The device providing access to the network is the Network Access Server (NAS).
The entity originating the CoA Requests or Disconnect Requests is the Dynamic Authorization Client (DAC). The DAC can be a “co-resident” element within a RADIUS server; however, in some cases that is not the case.
The entity receiving CoA-Request or Disconnect-Request packets is the Dynamic Authorization Server (DAS). The DAS may be a NAS or a RADIUS proxy.
Figure 4-36 shows that the DAC sends a CoA-Request over UDP port 3799 to a NAS (wireless device in this example). The wireless AP (NAS) responds to this with a CoA-ACK if it’s able to successfully change the authorizations for the user session. On the contrary, the NAS replies with a CoA-NAK if the CoA-Request is unsuccessful. In this example, the DAC is a “co-resident” element within the RADIUS server.
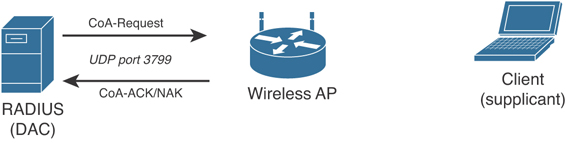
Figure 4-36 CoA-Request from DAC to NAS
Figure 4-37 shows the CoA packet format. A CoA-Request can include the Filter-ID or the NAS-Filter-Rule attributes. The Filter-ID is the name of a data filter list for the session that the identification attributes are mapped to. The NAS-Filter-Rule is the actual filter list to be applied to the session.
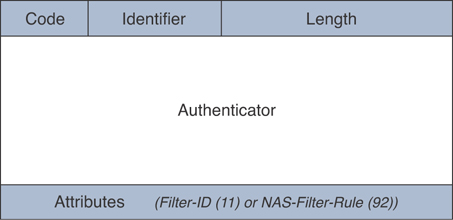
Figure 4-37 The CoA-Request Packet Format
A DAC can also send a Disconnect-Request packet in order to terminate a user session on a NAS and discard all associated session context. Disconnect-Request packets are also sent over UDP port 3799.
If all of the session’s context is discarded and the user sessions are no longer connected, the NAS replies with a Disconnect-ACK, as shown in Figure 4-38.
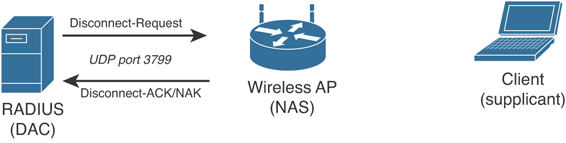
Figure 4-38 Disconnect-Request Sent from a DAC to a NAS
If the NAS is not able to disconnect one or more sessions or discard the associated session context, it will reply with a Disconnect-NAK packet.
Let’s take a look at another example of a CoA implementation. In the example illustrated in Figure 4-39, a Cisco Next-Generation Firewall is configured for remote access VPN termination. CoA is also configured in this deployment. CoA allows the RADIUS server (Cisco ISE) to verify the posture of VPN users without the need for an Inline Posture Node (IPN). This posture assessment is natively performed with the Cisco AnyConnect Secure Mobility Client with the Compliance Module enabled.
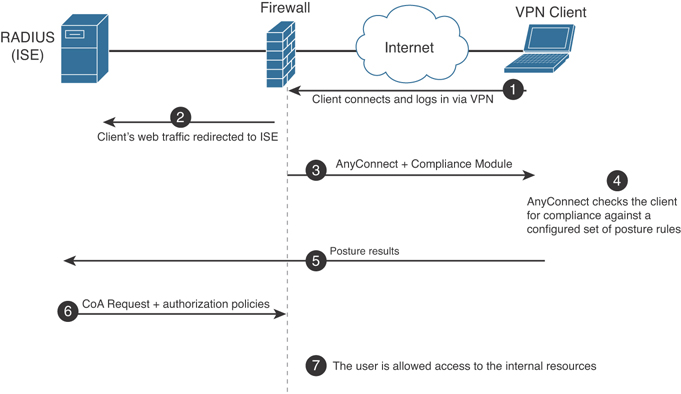
Figure 4-39 CoA in VPN implementations
The following steps are illustrated in Figure 4-39:
The VPN client connects to the firewall and logs in.
The firewall redirects web traffic to Cisco ISE.
The user is provisioned with AnyConnect and its Compliance Module.
AnyConnect checks the client for compliance against a configured set of posture rules (for example, operating system patches, antivirus and anti-malware software installed, services, application, registry entries, and so on).
After the posture validation is completed, the results are sent to the Cisco ISE.
If the client system is complaint, Cisco ISE sends a RADIUS CoA to the ASA with the new set of authorization policies.
After successful posture validation and CoA, the user is allowed access to the internal resources.
Configuring TACACS+ Access
Each of the concentration exams will focus on configuration and troubleshooting; however, in this section you will learn the concepts of TACACS+ access configurations in infrastructure devices such as routers and switches running Cisco IOS and Cisco IOS-XE software.
Let’s suppose you are hired by a fictitious company called SecretCorp (secretcorp.org) to configure administrative access of infrastructure devices using TACACS+ authentication. You are being tasked to configure the routers (R1, R2, and R3) shown in Figure 4-40.
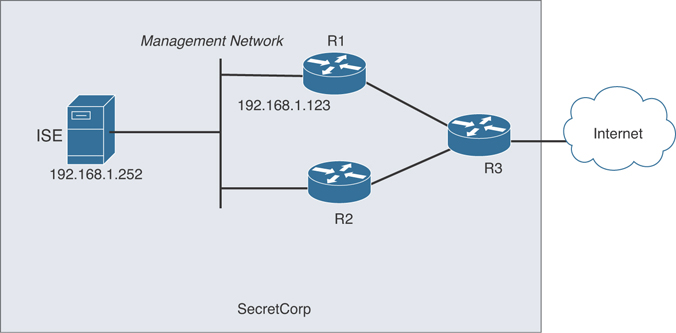
Figure 4-40 SecretCorp’s TACACS+ Authentication
The goal is to configure TACACS+ authentication for Secure Shell (SSH) sessions. Let’s start with Router 1 (R1); the rest will have basically the same configuration. The router will be configured to communicate with Cisco ISE configured as a TACACS+ server. Authenticated users need to be authorized to have access to a command-line interface (EXEC) session, including the privilege level they should be placed into. The authorization check should be done by the router referring to the TACACS+ server. Example 4-1 shows the configuration of R1. The details about the commands entered are included in comments, which are preceded by exclamation marks (!).
Example 4-1 AAA Router Configuration for TACACS+ Authentication
! This command enables the configuration of the rest of the AAA
! If it is in the configuration, it doesn't need to be put in again.
! On most IOS systems, the default has aaa new-model disabled.

R1(config)# aaa new-model

! This authentication method list, when applied to a line such as the VTY
! lines will tell the router to prompt the user who is accessing that line
! for a username and password in order for that user to login.
! When the user supplies the username and password at the login prompt
! the router will send the credentials to a configured TACACS+ server
! and then the server can reply with a pass or fail message.
! This command indicates "group tacacs+" as the first method
! as there could be more than one server configured. If the AAA server does
! not respond after a short timeout the router will then try the
! second method in the method list which is "local" which means the
! router will then check the running configuration to see if there
! is a username and a matching password.

R1(config)# aaa authentication login AUTHEN_via_TACACS group tacacs+ local

! This next authorization method list, when applied to a line, will cause
! the router to check with the AAA server to verify that the user
! is authorized to gain access to the CLI. The CLI represents an
! Exec Shell. Not only can the ISE indicate to the router whether
! or not the user is authorized, but it can also indicate what privilege
! level the user is placed into.
! Both the username and password will need to be created on the ISE server
! for the previous authentication method, and the authorization
! for a CLI will also need to be configured on that same ISE server.
! This authorization list will use one or more configured ISE servers
! via TACACS+, and if there are no servers that respond, then the router
! will check locally regarding whether the command is authorized for this
! user based on privilege level of the user, and privilege level of the
! command being attempted.

R1(config)# aaa authorization exec Author-Exec_via_TACACS group tacacs+ local

! It is important to note that before we apply either of these method lists
! to the VTY lines, we should create at least one local user as a backup
! in the event the ISE server is unreachable, or not yet configured.
! In the example below it will create a user on the local database of the
! router including a username, password as well as a privilege level
! for that user. It is highly recommended that you use strong passwords
! when configuring any user or device credentials.

R1(config)# username admin privilege 15 secret supersecretpassword

! Next we need to create a least one ISE server that the router should try
! to use via TACACS+. This is the equivalent of creating a server group
! of one.
! The password is used as part of the encryption of the packets, and
! whatever password we configure here, we also need to configure on
! the ISE server.

R1(config)# tacacs-server host 192.168.1.252 key thisisapassword

! Verifying that the IP addresses reachable is a test that can be done
! even before the full ISE configuration is complete on the AAA server

R1(config)# do ping 192.168.1.252

Type escape sequence to abort.
Sending 5, 100-byte ICMP Echos to 192.168.1.252, timeout is 2 seconds:
!!!!!
Success rate is 100 percent (5/5), round-trip min/avg/max = 8/13/28 ms
! Next, for the authentication method list and authorization method list
! to be used we would need to apply them. In the example below
! we are applying both method lists to the first five VTY lines.

R1(config)# line vty 0 4
R1(config-line)# authorization exec Author-Exec_via_TACACS
R1(config-line)# login authentication AUTHEN_via_TACACS
! users connecting to these vty lines will now be subject to both
! authentication and authorization, based on the lists that are
! applied to these lines
With the authentication and authorization method lists created and applied, you could attempt to log in through one of the five vty lines, and here is what you would expect: You should be prompted for a username and password, the router should not be able to successfully contact the ISE server (because you have not configured the ISE part of it yet on that server), and then, after a short timeout, the router would use the second method in each of its lists, which indicates to use the local database for the authentication and the authorization. Because you do have a local user with a password and a privilege level assigned to that user, it should work.
By enabling a debug, and attempting to log in, you can see exactly what is happening, as shown in Example 4-2. If you are not connected to the device via the serial console, use the terminal monitor command to be able to see the debug messages in your screen.
Example 4-2 Debugging TACACS+ in the Router
R1# debug tacacs
TACACS access control debugging is on
TPLUS: Queuing AAA Authentication request 102 for processing
TPLUS: processing authentication start request id 102
TPLUS: Authentication start packet created for 102()
TPLUS: Using server 192.168.1.252
TPLUS(00000066)/0/NB_WAIT/6812DC64: Started 5 sec timeout

User Access Verification

! Timing out on TACACS+ regarding authentication because no server is responding
TPLUS(00000066)/0/NB_WAIT/6812DC64: timed out
TPLUS(00000066)/0/NB_WAIT/6812DC64: timed out, clean up
TPLUS(00000066)/0/6812DC64: Processing the reply packet

! Now moving to the local database on the router
Username: admin
Password: supersecretpassword

! Timing out on TACACS+ regarding authorization due to no server responding.
TPLUS: Queuing AAA Authorization request 102 for processing
TPLUS: processing authorization request id 102
TPLUS: Protocol set to None .....Skipping
TPLUS: Sending AV service=shell
TPLUS: Sending AV cmd*
TPLUS: Authorization request created for 102(admin)
TPLUS: Using server 192.168.1.252
TPLUS(00000066)/0/NB_WAIT/6812DC64: Started 5 sec timeout
TPLUS(00000066)/0/NB_WAIT/6812DC64: timed out
TPLUS(00000066)/0/NB_WAIT/6812DC64: timed out, clean up
TPLUS(00000066)/0/6812DC64: Processing the reply packet
! After timing out, the router again uses its local database for
! authorization and appropriate privilege level for the user.

! If we exit, and change the debugs slightly, and do it again, it will give
! us yet another perspective.

R1# debug aaa authentication
AAA Authentication debugging is on
R1# debug aaa authorization
AAA Authorization debugging is on
AAA/BIND(00000067): Bind i/f
! Notice it shows using the authentication list we assigned to the vty
! lines
AAA/AUTHEN/LOGIN (00000067): Pick method list 'AUTHEN_via_TACACS'

! Not shown here, but indeed the ISE server is timing out, due to not yet
! being configured, which causes the second entry in the list "local" to
! be used.

User Access Verification
Username: admin
Password: supersecretpassword

! Now the authorization begins, using the method list we configured for
! the vty lines
AAA/AUTHOR (0x67): Pick method list 'Author-Exec_via_TACACS'
AAA/AUTHOR/EXEC(00000067): processing AV cmd=
AAA/AUTHOR/EXEC(00000067): processing AV priv-lvl=15
AAA/AUTHOR/EXEC(00000067): Authorization successful
R1#
To configure TACACS+ in Cisco ISE, navigate to Work Centers > Device Administration > Network Resources and add a network device. You will see the screen in Figure 4-41.
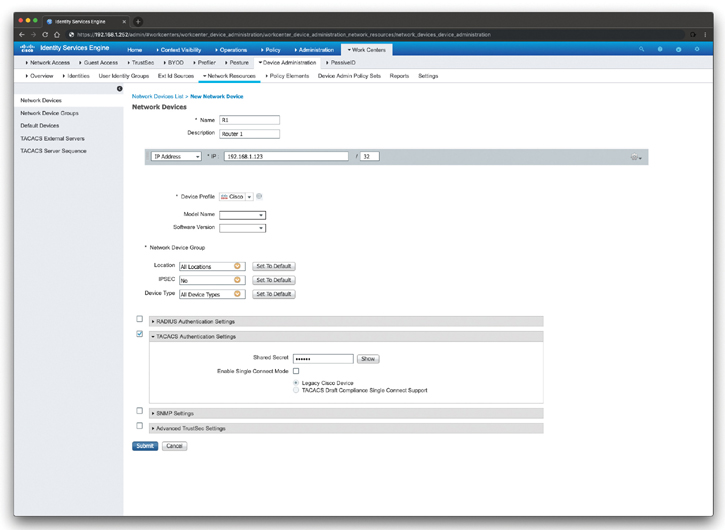
Figure 4-41 Adding a Network Device for TACACS+ Authentication in ISE
In Figure 4-41, the Router (R1) details are entered. The TACACS Authentication Settings checkbox is selected, and a shared secret used to authenticate the TACACS+ session between the router and ISE is entered.
You can create different policies to support different groups of people who require access to the organization’s infrastructure devices, as shown in Figure 4-42 (network administrators, network operators, security administrators, help desk support, and so on).
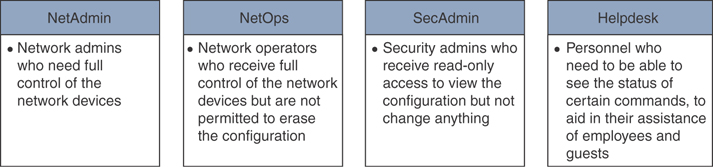
Figure 4-42 Different Groups of People Who Require Access to Infrastructure Devices
To configure these groups and policies, navigate to Work Centers > Device Administration > Policy Elements > Results > TACACS Profiles. The screen in Figure 4-43 shows the TACACS+ profile of a NetAdmin.
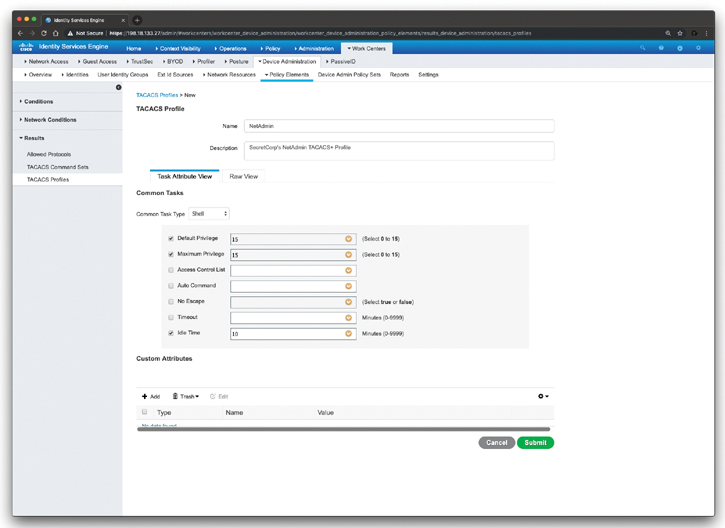
Figure 4-43 NetAdmin Profile
Configuring RADIUS Authentication
You can configure RADIUS authentication in multiple scenarios, including Remote Access VPN, Secure Network Access, 802.1X, and more. Chapter 8, “Virtual Private Networks (VPNs),” provides examples of remote access VPN configurations using RADIUS authentication. In the following section, you will learn how RADIUS can be configured in network switches and Cisco ISE for secure access with 802.1X authentication.
Cisco IOS 15.2.x and Cisco IOS-XE 3.6.x switches follow the Cisco Common Classification Policy Language (C3PL) style of configuration. C3PL is a structured replacement for the configuration commands of various features in Cisco IOS and Cisco IOS-XE. C3PL allows administrators to configure traffic policies based on events, conditions, and actions. This provides some intriguing and advanced authentication features, as well as a very different configuration style that has powerful options, but it can be confusing when learning how to use it. However, many administrators who start to use this configuration style end up loving it and rarely want to go back to the classic methods of configuration.
There are multiple methods of authentication on a switch port:
802.1X (dot1x)
MAB
WebAuth
With 802.1X authentication, the switch sends an identity request (EAP-Identity-Request) periodically after the link state has changed to up. Additionally, the endpoint supplicant should send a periodic EAP over LAN Start (EAPoL-Start) message into the switch port to speed up authentication. If a device is not able to authenticate, it merely waits until the dot1x timeout occurs, and then MAB occurs. Assuming the device MAC address is in the correct database, it is then authorized to access the network.
The default behavior of an 802.1X-enabled port is to authorize only a single MAC address per port. There are other options, most notably Multi-Domain Authentication (MDA) and Multiple Authentication (Multi-Auth) modes. During the initial phases of any Cisco TrustSec deployment, it is best practice to use Multi-Auth mode to ensure that there is no denial of service while deploying 802.1X.
Multi-Auth mode allows virtually unlimited MAC addresses per switch port, and requires an authenticated session for every MAC address. When the deployment moves into the late stages of the authenticated phase, or into the enforcement phase, it is then recommended that you use MDA mode, which allows a single MAC address in the Data domain and a single MAC address in the Voice domain per port.
802.1X is designed to clearly differentiate a successful authentication from an unsuccessful authentication. Successful authentication means the user is authorized to access the network. Unsuccessful authentication means the user has no access to the network. This is problematic in a lot of environments. Most modern environments need to do workstation imaging with Preboot Execution Environments (PXEs), or they don’t have any way to run a supplicant because they may have some thin clients that do not support it. When early adopters of 802.1X deployed authentication companywide, there were repercussions. Many issues arose. For instance, supplicants were misconfigured; there were unknown devices that could not authenticate because of a lack of supplicant, and other reasons.
Several devices that support the Cisco Common Classification Policy Language (C3PL) style of configuration still accept the old style of commands. The legacy style of commands is the default in most of those platforms, and you must enable the C3PL style of commands with the global configuration command authentication display new-style. Even if the name of the command includes the word “display,” the command changes much more than just the display of the commands. It also changes the way the network administrator interacts with the switch and configures the device. You can change back to the classic model using the authentication display legacy command.
The C3PL syntax offers many benefits, most of which are transparent to the end user. For instance, C3PL allows the network device configuration to exist in memory once and be invoked multiple times. This is a resource efficient enhancement.
There are several additional benefits from the C3PL model. For example, 802.1X and MAB can run simultaneously without having to sequence the two distinctive authentication processes, whereas 802.1X authentication has to be failed for MAB to start when not using the C3PL model. You can also use service templates to control preconfigured access control lists on given interfaces in the event of RADIUS not being available.
In legacy devices, the sequencing of 802.1X and MAB can result in certain MAB endpoints not being able to obtain IP addresses via DHCP in a timely manner. Newer devices can process 802.1X and MAB simultaneously, allowing endpoints to obtain a DHCP-assigned IP address in a timely manner. Additionally, legacy devices require a static ACL often applied to interfaces in order to restrict network access for devices that have not yet authenticated. Consequently the ACL remains applied to devices attempting to connect while the RADIUS server is unavailable. This condition results in a denial of service until the RADIUS server is reachable. This may seem desirable in theory, but it is not recommended. This behavior actually makes life more difficult for the policy server administrator.
The ability to create service templates is a good enhancement of C3PL. A separate ACL that would permit network access can be applied to the interface using service templates. These rules can be configured to perform an action under a certain condition, such as when the RADIUS server is not reachable. This feature is known as the “Critical ACL functionality.”
In addition, C3PL provides differentiated authentication. The differentiated authentication feature enables you to authenticate different methods with different servers. For instance, you can send MAB to one server and 802.1X authentications to another. Another interesting feature in C3PL is Critical MAB. Critical MAB allows the switch to use a locally defined list of MAC addresses when the centralized RADIUS server is unavailable.
Configuring 802.1X Authentication
Let’s take a look at the topology shown in Figure 4-44. You are being hired to configure 802.1X in SecretCorp. The goal is to deploy 802.1X authentication in all of SecretCorp’s switches and use ISE. SecretCorp’s switch 1 (sc-sw1) is used in this example.
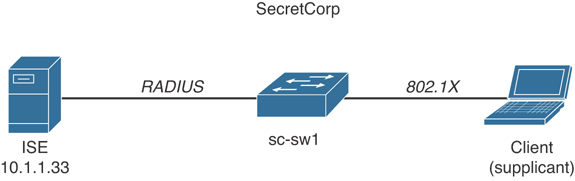
Figure 4-44 SecretCorp 802.1X Deployment
First, you need to configure certificates for URL redirection. To configure certificates for URL redirection, perform the following steps from global configuration mode on the switch (sc-sw1):
Step 1. Configure the DNS domain name on the switch. The domain name is secretcorp.org.
sc-sw1(config)# ip domain-name secretcorp.org
Step 2. Generate self-signed keys to be used for HTTPS. The following command generates a general-usage 2048-bit RSA key pair:
sc-sw1(config)# crypto key generate rsa general-keys mod
2048
Step 3. Enable the HTTP server and configure HTTP Secure server in global configuration mode. Always use HTTPS instead of HTTP.
sc-sw1(config)# ip http server
sc-sw1(config)# ip http secure-server
Step 4. Enable the C3PL configuration style within privileged EXEC mode:
sc-sw1# authentication display new-style
Step 5. After you have changed and enabled the C3PL configuration style, enable the AAA subsystem:
sc-sw1(config)# aaa new-model
Step 6. Make sure you use a common session-id for the AAA network security services:
sc-sw1(config)# aaa session-id common
Step 7. An authentication method is required to make sure the switch uses a particular group of RADIUS servers for 802.1X authentication requests. Create an authentication method for 802.1X:
sc-sw1(config)# aaa authentication dot1x default group
radius
Step 8. Previously in this chapter you learned that authorization is what defines that the user or device is actually allowed to access the network, and what level of access is actually permitted. Create an authorization method for 802.1X:
sc-sw1(config)# aaa authorization network default group
radius
Step 9. Earlier in this chapter you also learned about RADIUS accounting. Accounting packets ensure that the RADIUS server knows the exact state of the switch port and endpoint. Accounting provides information on when a session has been terminated, as well as local decisions made by the switch, such as authentication failure (AuthFail) VLAN assignments. Create an accounting method for 802.1X:
sc-sw1(config)# aaa accounting dot1x default start-stop
group radius
Step 10. You can configure periodic RADIUS accounting packets to allow the RADIUS server (Cisco ISE) to track which sessions are still active on the network. In the following example, periodic updates are configured to be sent whenever there is new information, as well as a periodic update once every 24 hours (1440 minutes):
sc-sw1(config)# aaa accounting update newinfo periodic 1440
Step 11. You can configure a proactive method to check the availability of the RADIUS server. When configured this way, the switch sends periodic test authentication messages to Cisco ISE (the RADIUS server in this case) and waits for a RADIUS response from the server. Within global configuration mode, you can add a username and password for the RADIUS keepalive. These credentials will also need to be added to the local user database in the RADIUS server (that is, Cisco ISE).
sc-sw1(config)# username radius-test password
this_is_a_password
Step 12. Add the Cisco ISE as a RADIUS server. First, you create an object for the RADIUS server and then apply configuration to that object:
sc-sw1(config)# radius server 10.1.1.33
sc-sw1(config-radius-server)# address ipv4 address
auth-port 1812
acct-port 1813
sc-sw1(config-radius-server)# key this_is_a_key
sc-sw1(config-radius-server)# automate-tester username
radius-test probe-on
Step 13. Now that you have configured the switch to proactively interrogate the Cisco ISE server for RADIUS responses, configure the counters on the switch to determine if the server is alive or dead. In the following example, the switch will wait 5 seconds for a response from the RADIUS server and then attempt the test three times before marking the server dead:
sc-sw1(config)# radius-server dead-criteria time 5
tries 3
sc-sw1(config)# radius-server deadtime 15
Step 14. Earlier in this chapter you learned the details about Change of Authorization (CoA). Also in previous steps you defined the IP address of a RADIUS server that the switch will send RADIUS messages to. On the other hand, you need to also define the servers that are allowed to perform Change of Authorization (RFC 3576) operations within global configuration mode, as shown here:
sc-sw1(config)# aaa server radius dynamic-author
sc-sw1(config-locsvr-da-radius)# client 10.1.1.33
server-key this_is_a_shared_secret
Step 15. You can configure the switch to send any defined vendor-specific attributes (VSA) to Cisco ISE during authentication requests and accounting updates:
sc-sw1(config)# radius-server vsa send authentication
sc-sw1(config)# radius-server vsa send accounting
Step 16. Enable the VSAs:
sc-sw1(config)# radius-server attribute 6
on-for-login-auth
sc-sw1(config)# radius-server attribute 8
include-in-access-req
sc-sw1(config)# radius-server attribute 25 access-request
include
sc-sw1(config)# radius-server attribute 31 mac format
ietf upper-case
sc-sw1(config)# radius-server attribute 31 send nas-
port-detail mac-only
Step 17. Make sure that you configure the switch to always send traffic from the correct interface. Switches may often have multiple IP addresses associated to them. You should always force any management communications to occur through a specific interface. It is important also to know that the IP address of this interface must match the IP address defined in the Cisco ISE Network Device object. In the following example, the source interface is GigabitEthernet1/8:
sc-sw1 (config)# ip radius source-interface
GigabitEthernet1/8
sc-sw1 (config)# snmp-server trap-source
GigabitEthernet1/8
sc-sw1 (config)# snmp-server source-interface informs
GigabitEthernet1/8
Step 18. When you configure 802.1X, you configure the ports that will be accepting connections from any device trying to connect to the network in “monitor mode.” Add the following ACL to be used on switch ports in monitor mode:
sc-sw1(config)# ip access-list extended MONITOR_MODE
sc-sw1(config-ext-nacl)# permit ip any any
Step 19. You typically need to allow DHCP, DNS, and PXE/TFTP communication in many different environments. These are classified as “low-impact.” Add the following ACL to be used on switch ports in Low-Impact Mode:
sc-sw1(config)# ip access-list extended LOW_IMPACT
sc-sw1(config-ext-nacl)# remark DHCP
sc-sw1(config-ext-nacl)# permit udp any eq bootpc any eq
bootps
sc-sw1(config-ext-nacl)# remark DNS
sc-sw1(config-ext-nacl)# permit udp any any eq domain
sc-sw1(config-ext-nacl)# remark PXE / TFTP
sc-sw1(config-ext-nacl)# permit udp any any eq tftp
Step 20. The following ACL can be used for URL redirection with web authentication:
sc-sw1(config)# ip access-list extended WEBAUTH-REDIRECT
sc-sw1(config-ext-nacl)# deny udp any any eq 53
sc-sw1(config-ext-nacl)# permit tcp any any eq 80
sc-sw1(config-ext-nacl)# permit tcp any any eq 443
Step 21. The Posture Agent used in the Cisco TrustSec solution is the Cisco AnyConnect Mobility Client. Add the following ACL to be used for URL redirection with the Posture Agent. This ACL only allows HTTP and HTTPS packets to be redirected.
sc-sw1(config)# ip access-list extended AGENT-REDIRECT
sc-sw1(config-ext-nacl)# permit tcp any any eq 80
sc-sw1(config-ext-nacl)# permit tcp any any eq 443
Step 22. Cisco ISE supports authorization profiles for devices joining the network. Cisco switches support something similar to an ISE authorization profile, but they are configured locally on the switch. Service templates are basically a list of VLANs, Timer, Named ACL, and URL Redirect strings that can be applied based on different criteria. These are also similar to downloadable ACLs (dACLs).
Similar to per-user ACLs, service templates can be centrally located on ISE and downloaded during authorization. On the other hand, you can configure a service template local to the switch to apply when none of the configured RADIUS servers (ISE PSNs) are reachable to process 802.1X or MAB requests (known as the critical-auth state). You can add the following service template, named CRITICAL_AUTH, to be used when no RADIUS servers are available, also known as the critical-auth state:
sc-sw1(config)# service-template CRITICAL_AUTH
sc-sw1(config-service-template)# access-group ACL-ALLOW
Step 23. Now let’s configure 802.1X from global configuration mode:
sc-sw1(config)# dot1x system-auth-control
Please note that when you enable 802.1X globally, the switch does not actually enable authentication on any of the switch ports. You will enable that on each port at a later time.
Step 24. Next, enable the dACLs. You need to enable IP device tracking globally in order for dACLs to function properly:
sc-sw1(config)# ip device tracking
Step 25. Configure a control class. A control class defines the conditions under which the actions of a control policy are executed when none of the RADIUS servers are available (otherwise known as the critical-auth state).
sc-sw1(config)# class-map type control subscriber match-
any RADIUS-SERVER-DOWN
sc-sw1(config-filter-control-classmap)# match result-type
aaa-timeout
Step 26. The following command can be used to configure a control class for when 802.1X authentication fails for the session:
sc-sw1(config)# class-map type control subscriber match-

all DOT1X-FAILED
sc-sw1(config-filter-control-classmap)# match method
dot1x
sc-sw1(config-filter-control-classmap)# match result-type
method dot1x authoritative
Step 27. Control policies can be implemented to specify which actions should be taken in response to the specified events. Control policies include one or more rules that associate a control class with one or more actions. Configure a control policy that will be applied to all interfaces that are configured for 802.1X or MAB.
sc-sw1(config)# policy-map type control subscriber
DOT1X-DEFAULT
Step 28. Configure actions for policy violations:
sc-sw1(config-action-control-policymap)# event violation
match-all
sc-sw1(config-class-control-policymap)# 10 class always
do-all
sc-sw1(config-action-control-policymap)# 10 restrict
Step 29. Configure the switch to authenticate the endpoint trying to join the network using 802.1X. When 802.1X is enabled, authentication will be performed when a supplicant is detected on the endpoint:
sc-sw1(config-action-control-policymap)# event agent-
found match-all
sc-sw1(config-class-control-policymap)# 10 class always
do-all
sc-sw1(config-action-control-policymap)# 10 authenticate
using dot1x
Step 30. You can also configure the action the switch will take when 802.1X authentication fails, or when the RADIUS server is down:
sc-sw1(config-action-control-policymap)# event
authentication-failure match-all
sc-sw1(config-class-control-policymap)# 10 class RADIUS-
SERVER-DOWN do-all
sc-sw1(config-action-control-policymap)# 10 authorize
sc-sw1(config-action-control-policymap)# 20 activate
service-template CRITICAL_AUTH
sc-sw1(config-action-control-policymap)# 30 terminate dot1x
sc-sw1(config-action-control-policymap)# 40 terminate mab
sc-sw1(config-action-control-policymap)# 20 class DOT1X-
FAILED do-all
sc-sw1(config-action-control-policymap)# 10 authenticate
using mab
Step 31. Now you can apply the control policy to the access-layer interfaces with the service-policy command. Please note that not all aspects of the 802.1X configuration are completed in C3PL. Consequently, this is why some configuration items will occur at the interfaces separately, as shown here:
sc-sw1(config)# interface range GigabitEthernet 1/0/1 – 10
sc-sw1(config-if-range)# description 802.x1 Enabled Ports
sc-sw1(config-if-range)# switchport host
sc-sw1(config-if-range)# service-policy type control
subscriber DOT1X-DEFAULT
The preceding configuration is applied to a range of ports (from GigabitEthernet 1/0/1 through GigabitEthernet 1/0/10).
Step 32. Finally, you can complete the interface configuration parameters:
sc-sw1(config-if-range)# authentication periodic
sc-sw1(config-if-range)# authentication timer
reauthenticate server
sc-sw1(config-if-range)# mab
sc-sw1(config-if-range)# ip access-group DEFAULT-ACL in
sc-sw1(config-if-range)# access-session host-mode
multi-auth
sc-sw1(config-if-range)# no access-session closed
sc-sw1(config-if-range)# dot1x timeout tx-period 10
sc-sw1(config-if-range)# access-session port-control auto
sc-sw1(config-if-range)# no shutdown
Once again, the SCOR exam does not focus on the detailed configuration and implementation. The CCNP concentration exams and the CCIE Security lab require you to have hands-on experience with these configurations.
Additional Cisco ISE Design Tips
Many organizations deploy Cisco ISE in a distributed fashion. Deployment models can be distributed, standalone, or high availability in standalone mode.
Figure 4-45 illustrates a Cisco ISE deployed in standalone mode.
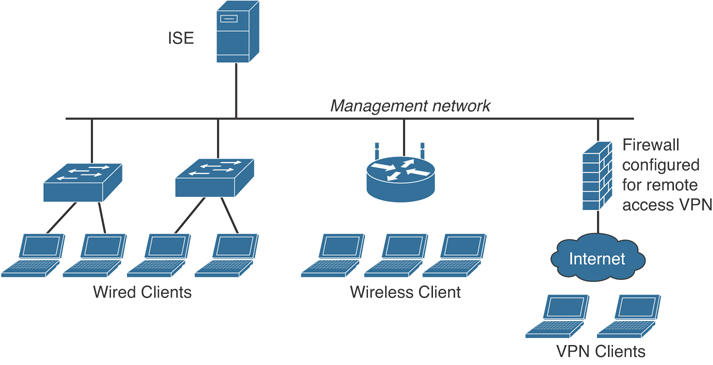
Figure 4-45 Cisco ISE Standalone Deployment
Figure 4-46 shows a topology where two Cisco ISE nodes are deployed in high-availability standalone mode. High-availability standalone mode is basically two Cisco ISE nodes configured in an active-standby backup mode.
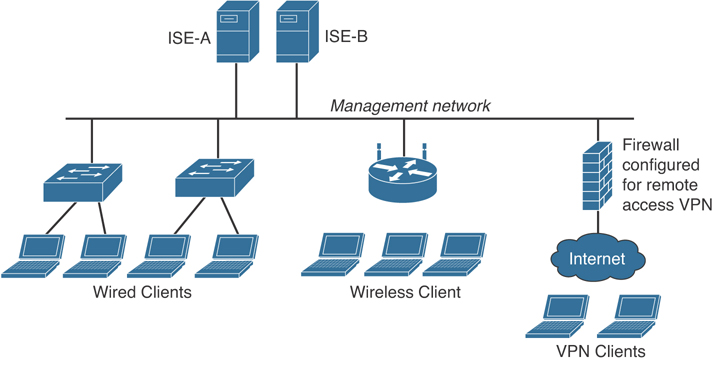
Figure 4-46 Cisco ISE High-Availability Standalone Deployment
When a Cisco ISE secondary node is registered, a data replication channel is created from the primary to the secondary node and the replication process starts automatically. Replication helps provide consistency among the configurations in all Cisco ISE nodes by sharing configuration data from the primary to the secondary nodes.
You can also deploy Cisco ISE in a scalable and distributed mode. Figure 4-47 explains the different types of Cisco ISE nodes that can be present in a distributed configuration model.
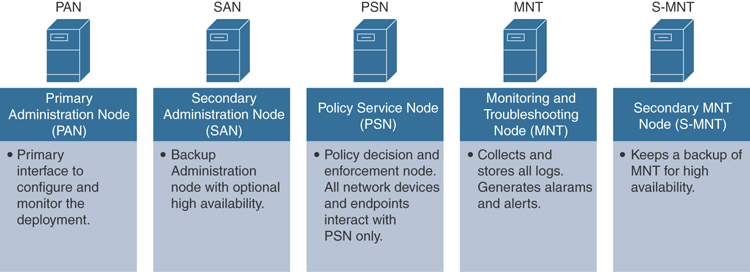
Figure 4-47 Cisco ISE Distributed Mode Node Types
Figure 4-48 demonstrates that a Primary Administration Node (PAN) and a Secondary Administration Node (SAN) are deployed to control several Policy Service Nodes (PSNs) across two different PSN Node Groups (PSN Node Group 1 and PSN Node Group 2). These groups can be deployed in different geographical locations within an organization. Monitoring and Troubleshooting (MNT) and Secondary MNT (S-MNT) nodes are also deployed to collect and store logs, as well as generating any alarms and alerts.
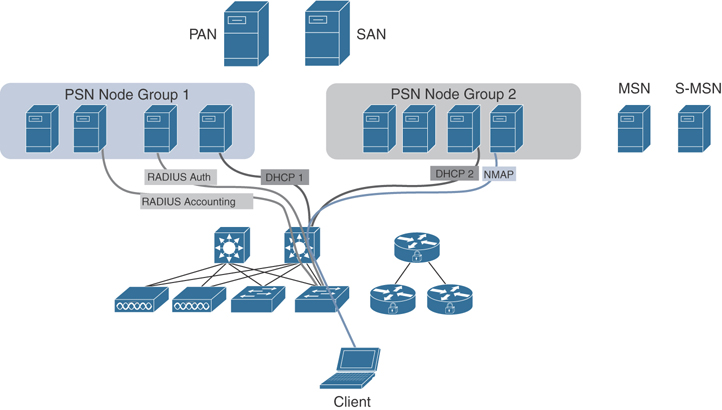
Figure 4-48 Cisco ISE Distributed Mode Example Topology
When you first register a Cisco ISE node as a secondary node, full replication starts automatically. Then incremental replication is performed on a periodic basis to ensure that any new changes, such as additions, modifications, or deletions to the configuration data in the PAN are synchronized to the secondary nodes.
Advice on Sizing a Cisco ISE Distributed Deployment
Deployment sizing traditionally has been performed using the “maximum concurrent sessions” in Cisco ISE as the baseline. In addition, when you deploy Cisco ISE in a distributed way, you should consider the authentication attempts per second (auth/sec).
You can also configure a load balancer in front of the Cisco ISE PSNs to scale your deployment, as shown in Figure 4-49.
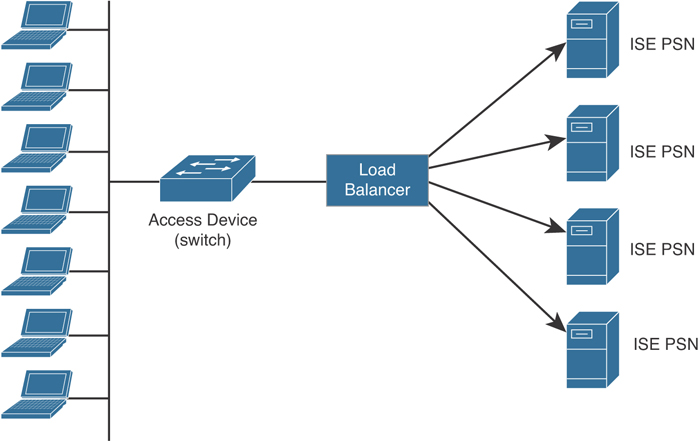
Figure 4-49 Cisco ISE PSNs Behind a Load Balancer
Another question that you may ask is, what happens during peak times or when a network device is rebooted? There is a feature called Anomalous Suppression Detection that can be enabled to suppress misbehaving clients as well as repeated successful authentications.
Exam Preparation Tasks
As mentioned in the section “How to Use This Book” in the Introduction, you have a couple of choices for exam preparation: the exercises here, Chapter 12, “Final Preparation,” and the exam simulation questions in the Pearson Test Prep Software Online.
Review All Key Topics
Review the most important topics in this chapter, noted with the Key Topic icon in the outer margin of the page. Table 4-3 lists these key topics and the page numbers on which each is found.
Table 4-3 Key Topics for Chapter 4
Key Topic Element |
Description |
Page Number |
Section |
The Principle of Least Privilege and Separation of Duties |
|
Section |
Authentication |
|
Section |
Authentication by Knowledge |
|
Section |
Authentication by Ownership or Possession |
|
Section |
Authentication by Characteristic |
|
Section |
Multifactor Authentication |
|
Section |
Duo Security |
|
Section |
Zero Trust and BeyondCorp |
|
Section |
Single Sign-On |
|
List |
Recognize SSO and federated identity elements |
|
Section |
Authorization |
|
List |
Understand the importance of implicit deny and need-to-know authorization concepts |
|
Section |
Mandatory Access Control (MAC) |
|
Section |
Discretionary Access Control (DAC) |
|
Section |
Role-Based Access Control (RBAC) |
|
Section |
Rule-Based Access Control |
|
Section |
Attribute-Based Access Control |
|
Section |
Accounting |
|
Section |
Access Control Mechanisms |
|
Section |
RADIUS |
|
Section |
TACACS+ |
|
The differences between the RADIUS and TACACS+ protocols |
||
Section |
802.1X |
|
List |
Explore the protocols used in 802.1X implementations |
|
Section |
Downloadable ACL |
|
Section |
Cisco Identity Services Engine (ISE) |
|
Section |
Cisco ISE Context and Identity Services |
|
Section |
Cisco ISE Profiling Services |
|
Section |
Cisco ISE Identity Services |
|
Section |
Cisco ISE Authorization Rules |
|
Section |
Cisco TrustSec |
|
Section |
Change of Authorization (CoA) |
|
Paragraph |
Explore the Cisco Common Classification Policy Language (C3PL) style of configuration |
|
Section |
Additional Cisco ISE Design Tips |
Define Key Terms
Define the following key terms from this chapter and check your answers in the glossary:
Security Assertion Markup Language (SAML)
social identity provider (Social IdP)
mandatory access control (MAC)
discretionary access control (DAC)
role-based access control (RBAC)
attribute-based access control (ABAC)
Extensible Authentication Protocol (EAP)
security group–based ACL (SGACL)
MAC Authentication Bypass (MAB)
Review Questions
1. Which of the following is a security model created by Google that is similar to the zero-trust concept?
BeyondCorp
TrustSec
pxGrid
Duo
2. Which of the following are technologies used in SSO implementations?
SAML
OpenID Connect
Microsoft Account
All of these options are correct.
3. Which of the following is true about delegation in SSO implementations? (Select all that apply.)
SSO implementations use delegation to call external APIs to authenticate and authorize users.
Delegation is used to make sure that applications and services do not store passwords and user information on-premises.
Delegation uses multifactor authentication to provide identity services to other servers in the environment.
pxGrid can be used for delegation between a PSN and PAN.
4. Which of the following statements are true about discretionary access controls (DACs)?
Discretionary access controls (DACs) are defined by the owner of the object.
DACs are used in commercial operating systems.
The object owner builds an ACL that allows or denies access to the object based on the user’s unique identity.
All of these options are correct.
5. RADIUS accounting runs over what protocol and port?
UDP port 1812
UDP port 1813
UDP port 1645
None of these options is correct.
6. Which of the following is one primary difference between a malicious hacker and an ethical hacker?
Malicious hackers use different tools and techniques than ethical hackers use.
Malicious hackers are more advanced than ethical hackers because they can use any technique to attack a system or network.
Ethical hackers obtain permission before bringing down servers or stealing credit card databases.
Ethical hackers use the same methods but strive to do no harm.
7. You were hired to configure RADIUS authentication in a VPN implementation. You start RADIUS debugs in the VPN device and notice ACCESS-CHALLENGE messages. What do those messages mean?
ACCESS-CHALLENGE messages are sent if additional information is needed. The RADIUS server needs to send an additional challenge to the access server before authenticating the user. The ACCESS-CHALLENGE will be followed by a new ACCESS-REQUEST message.
ACCESS-CHALLENGE messages are sent if additional information is needed. The RADIUS server needs to send an additional challenge to the access server before authenticating the user. The ACCESS-CHALLENGE will be followed by a new ACCESS-REJECT message.
ACCESS-CHALLENGE messages are sent if the client is using multifactor authentication with a mobile device. The ACCESS-CHALLENGE will be followed by a new ACCESS-REQUEST message.
None of these options is correct.
8. Which of the following are TACACS+ exchange packets used during the authentication process?
START
REPLY
CONTINUE
All of these options are correct.
None of these options is correct.
9. Which of the following is an entity that seeks to be authenticated by an authenticator (switch, wireless access point, and so on)? This entity could use software such as the Cisco AnyConnect Secure Mobility Client.
PAN
PSN
Supplicant
None of these options is correct.
10. 802.1X uses which of the following protocols?
EAPoL
EAP
RADIUS
All of these options are correct.
11. Which of the following statements is true about CoA?
RADIUS CoA is a feature that allows a RADIUS server to adjust the authentication and authorization state of an active client session.
RADIUS CoA is a feature that allows a RADIUS server to detect a change of configuration from other RADIUS servers and, subsequently, deny access to a client trying to connect to the network.
RADIUS CoA is a feature that allows a RADIUS server to perform profiling and posture assessment simultaneously.
None of these options is correct.
12. The _________________ is a structured replacement for feature-specific configuration commands. This concept allows you to create traffic policies based on events, conditions, and actions.
Cisco Common Classification Policy Language (C3PL)
Cisco Policy Mapping
Cisco TrustSec
None of these options is correct.