the art and craft of telling a story: narrative and characterization
by Marcia Kuperberg
by Marcia Kuperberg
The art and craft of telling a story: narrative and characterization
INTRODUCTION
Animation as you know, can be as simple as a word flashing on and off to entice you to visit a website. It can be interactive, requiring your participation to lead you to an end goal. It can be a flying logo at the end of a 20-second TV commercial to remind you of a product name or an ‘architectural walkthrough’ of, say, the 3D room you constructed after reading Chapter 3. These are common uses for animation, but at some stage you may take up the challenge of telling a story through your art.
Narrative and characterization are inextricably linked. Characterization relating to animation within a narrative is explained in this chapter with practical tips to help you create and animate interesting characters to help bring your narrative to life.
After reading this chapter you should be able to:
• Identify some common structures that underlie most forms of narrative.
• Understand the different purposes of the pre-production stages of idea/synopsis/script/treatment/storyboard/animatic or Leica reel.
• Understand movie-making terminology: camera angles and camera movement – and and how this can help you better to convey the story to your audience.
• Take an initial idea, turn it into a narrative, write a synopsis and translate that into both script and treatment.
• Create a storyboard from your script and treatment.
• Gain an insight into characterization: character design and construction, facial expression and lip synchronization.
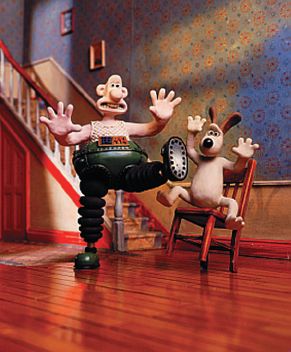
Fig. 7.1 Wallace and Gromit.
© Aardman/W&G Ltd 1989.
THE IMPORTANCE OF UNDERSTANDING FILMIC TECHNIQUES WHEN CREATING SCREEN NARRATIVE
If you come from an illustration/graphics background and have minimal experience of video production you’ll find that developing an understanding of filmic pace and drama can be extremely useful to you in your efforts to convey a storyline. This involves knowing, for example, when to use long shot/close-up/mid-shot etc. – when to use transitions – how long shots should remain on screen – when to use camera movement in a scene and what type – the purpose of storyboards and how to create them.
These areas are illuminated here: they apply to both 2D and 3D animation. In 2D animation you simulate camera movement by the framing of your screen shot whereas in 3D you directly replicate live action filming techniques by using virtual cameras.
Nick Park, of Aardman Animation, is one of the UK’s best known animators. He won both Oscar and BAFTA awards with his very first two short films: Creature Comforts (Oscar) and A Grand Day Out (BAFTA). He has no doubts of the importance for animators of understanding filmic language and techniques. With Wallace and Gromit (figs 7.1 and 7.2), he created two unforgettable characters and set them loose in a series of comic, quirky screen stories. His medium is stop-frame model animation rather than 2D or 3D computer animation but all have much in common.
After leaving high school, Nick went to Sheffield Art School to study film where he specialized in animation, followed in 1980 by postgraduate studies in animation at the National Film School in London (the first Wallace and Gromit film, A Grand Day Out, was his graduation project while there).
Nick believes that much animation suffers from not being very good filmmaking. His first year at the Film School was spent developing general filmmaking skills: writing, directing, lighting and editing, before specializing in animation. In Nick’s opinion a lot of animation is ‘either too indulgent or doesn’t stick to the point of the scene. I think what I love about 3D animation is that, in many ways – the movement of the camera, the lighting, etc. – it’s very akin to live action’.
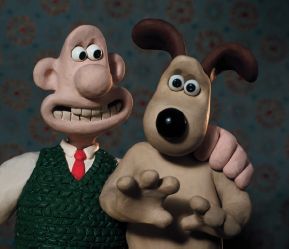
Fig. 7.2 Wallace and Gromit.
© Aardman/W&G Ltd 1989.
This in no way negates the fact that animation excels at creating the impossible, and certainly in 2D, is the art of exaggeration – where you can push movement and expression to the extreme.
Structures that underlie narrative: structuralist theory
Linguists and film theorists have struggled for years to define and explain the concept of narrative. Vladimir Propp, for example, in his Morphology of the Folktale, first published in Russian in 1928, described and analysed a compositional pattern that he maintained underlay the narrative structure of this genre. Others have followed with various attempts to formalize a common structure to narrative. For example, Tzvetan Todorov suggested that narrative in its basic form is a causal ‘transformation’ of a situation through the following five stages (Todorov, Tzvetan. ‘The Two Principles of Narrative’. Diacritics, Vol. 1, No. 1, Fall, 1971, p. 39).
1. A state of equilibrium at the outset
2. A disruption of the equilibrium by some action
3. A recognition that there has been a disruption
4. An attempt to repair the disruption
5. A reinstatement of the initial equilibrium

Fig. 7.3 Kenny Frankland’s sci-fi web narrative, A Bot’s Bad Day, features a world populated by robots (www.tinspider.com). Naddi is pulled into an adventure by accident but provides the important function in the narrative of helping the hero with his quest as well as adding romantic interest in the form of ‘complicating actions’.
© 2001 Kenny Frankland.
Edward Branigan, in his book Narrative Comprehension and Film (Routledge, 1992), examined the whole concept of narrative.
He suggested that it could be looked at, not just as an ‘end product’ (the ‘narrative’) but as a way of experiencing a group of sentences, images, gestures or movements, that together, attribute
• a beginning
• a middle
• and an end to something.
With this in mind, he suggested the following format as a basic structure behind any narrative:
1. Introduction of setting and characters
2. Explanation of a state of affairs/initiating event
3. Emotional response (or statement of a goal by the protagonist)
5. Outcome
6. Reactions to the outcome (Branigan, 1992:4).
If you are interested in creating an animation from your own story idea, the main point of the above is to remind yourself that every story has an underlying structure. The particular structure that underlies your narrative will undoubtedly be affected by the genre of the screenplay, i.e. whether the narrative is a ‘love story’ (romantic comedy or drama-romance), a ‘western’, or a ‘thriller’ for example. Here is a typical structure for a love story put forward by Philip Parker in his book, The Art and Science of Screenwriting:
1. A Character is seen to be emotionally lacking/missing something/someone.
2. Something/someone is seen by the Character as a potential solution to this problem – the object of desire.
3. Barriers exist to stop the Character achieving a resolution with the object of desire.
4. The Character struggles to overcome these barriers.
5. The Character succeeds in overcoming some, if not all, of the barriers.
6. The story is complete when the Character is seen to have resolved their emotional problem and is united with the object of their desire.
Writers ‘write’ stories but filmmakers ‘make’ stories. It’s easy for a novelist to explain in words an entire ‘back story’, i.e. the history of a place or what has happened in characters’ lives prior to the beginning of the narrative that is about to unfold. Novelists can write the thoughts of characters just as dialogue. Not so with a movie, whether animation or live action.
Everything that you want your audience to understand must be laid before it, sometimes through spoken dialogue and/or voice-over but always through action on screen that the audience can interpret to help them follow what is happening.
You may think you’re at a bit of a disadvantage in not being able to explain the plot in written form as a writer can. Fortunately, if you’re going to make an animated narrative, you have an ally, and that is that self-same audience.
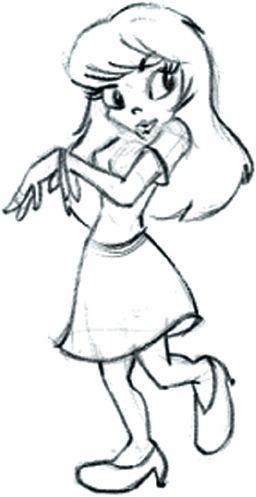
Fig. 7.4 Perhaps you’re creating an animation with a romantic theme. This is Patricia designed by Larry Lauria, Professor of Animation at Savannah College of Art and Design, Georgia.
If you want to make the heroine look alluring, he suggests using the classic device of making her look in one direction, whilst facing her in another.
© 2001 Larry Lauria.
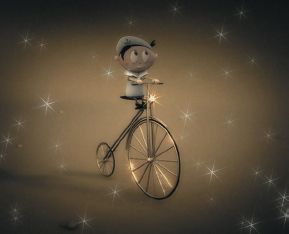
Fig. 7.5 When the audience sees the close-up of the character below

(fig. 7.6) a little later in the narrative, the audience’s learned perception is that this is the same character, merely seen closer or from a different angle.
© 2001 Aardman Animations, by Nick Mackie.
Your audience has been well educated in the art of understanding what you will put before it. Your smart audience, through a constant diet of so much television, cinema and video, has come to understand the conventions of filmmaking and will comply with you in creating illusion, given half a chance.
For example, your audience will happily accept that shots from various camera angles, that you cut together to form sequences that in turn form scenes, together make up a narrative. Another example is the learned cinematic perception that a close-up of an object which has been seen in an earlier shot at a wider angle is that same object, merely given more emphasis. This understanding is, in effect, a perceptual ‘code’ that is a part of our culture. It informs our ability to understand the conception of screen-based narrative.
In the first chapter perception was discussed in terms of how we perceive moving images: the physical fact of the human eye’s ability to turn a series of static images into what appears to be a single moving image. As you can see, perception, in terms of moving imagery, goes far beyond this. The process, not just of individual frames, but of shots, sequences and scenes, all affect our ability to understand film and video as a whole.
In looking at an image, we make our own inferences, therefore performing both voluntary and involuntary perceptual activities. Similarly, in following a narrative, we make assumptions, drawing on what we know already to arrive at our own conclusions about the story. ‘What a person sees in a film is determined to a certain extent by what he or she brings to the film …’ (Asa, Arthur & Berger, I (eds) Film in Society, Transaction Books, New Brunswick,1980:11). No wonder we don’t all like the same movies!
Narrative theory gone mad: let the computer take over! If perceivers (i.e. members of the audience) play such an important part in constructing the narrative by bringing their perceptions of their own worlds to bear upon the story, and the narrative can be deconstructed into a formula (such as those by Propp, Todorov, Brannigan, Parker and others), you might well ask: why bother with a screenwriter at all? After all, in these circumstances, a computer could generate countless stories and the audience could relate to them or otherwise, according to their own experiences. This has indeed been proposed! (Calvino, Italo. ‘Notes toward the Definition of the Narrative Form as a Combinative Process’, Twentieth Century Studies 3, 1970. Pp 93–102).
But then, it has also been proposed that eventually, we could do away with real life actors and actresses and replace them with 3D generated characters that can be controlled more easily and never have ‘off’ days! This possibility can’t be too far away when you consider the characterization in films such as Shrek (2001). Right now, we can produce exciting full length feature films in 2D or 3D (or combinations of both) that thrill audiences as much as live action movies. At the same time we’re all aware of the incredible CGI special FX that make the impossible appear to happen in live action movies: read Andrew Daffy’s account of making the award-winning Chrysler commercial in Chapter 6 where the Golden Gate Bridge in San Francisco was pulled by tugs into a series of ‘S’ bends as cars sped across it. Effects such as realistic looking hair and fur, previously only available on very expensive high-end systems are now within the reach of many (figs 7.7, 7.8 and 7.36) and animators delight in using every device available to push their art to the extremes (fig. 7.8).
This chapter does not attempt to duplicate film-studies-style textural analysis. Here we have touched upon some basic narrative theory but animators interested in scripting and wanting to know more about narrative in general may wish to explore more of the great body of academic material that exists in this area.
Back to Nick Park’s contention on the importance of animators understanding filmic techniques: this boils down to the fact that you, as a filmmaker, must provide the visual clues to help your audience understand the story.
NARRATIVE THEORY IN PRACTICE
From idea to synopsis to treatment, to script, to storyboard, to animatic or Leica reel, to screen.
You may have an idea for a story but how do you translate that idea into an end product that will appear on screen and be enjoyed by your audience? The following takes an example of a short (four-minute) combined live action/animation film. Each of the narrative stages is shown, together with how one stage leads to another.
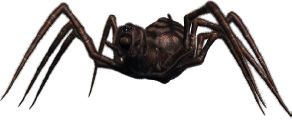
Fig. 7.7 This giant hairy 3D spider was created by Kenny Frankland. Visit www.tinspider.com
© 2001 Kenny Frankland.
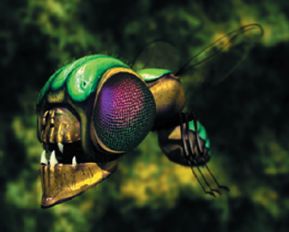
Fig. 7.8 The fly to end all flies.
© 2001 Aardman Animations, by Bobby Proctor.
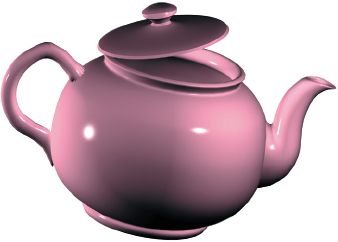
Fig. 7.9 Swings in the balance of power. This happens when a simple 3D teapot designed by Steve on his computer ends up swapping places with him. See an extract of the animation on www.guide2computeranimation.com.
The idea for The Creator began because I wanted to make an experimental film that combined live action with computer animation. Could the two be seamlessly integrated using low-cost desktop technology? By today’s standards, this was very low-tech indeed as the computer used at the time (1993) was a 386 IBM compatible with only 16 Mb RAM! The heavy processing was done using a Spaceward Supernova framestore. Software was the original DOS release 1 of Autodesk 3D Studio.
Audience perception plays a large part in a video of this sort. It was important for the audience to be entertained for the illusion to work – the illusion being that of a digital teapot which turns into a real teapot with attitude!
Teapots are a bit of an ‘in joke’ with 3D computer animators as they have acquired a special significance as modeling icons since seminal test work was first carried out by Martin Newell in 1975 using a teapot to demonstrate modeling techniques (3DS Max shares this joke with animators by providing a teapot amongst its ready-made 3D primitives). It was in this context that I decided to make a teapot one of the lead ‘characters’ in my film. Before writing the story, I sketched out personality profiles of each character: Steve, his boss and the teapot. The storyline for The Creator then began to take shape.
The synopsis
A teapot designer has his latest teapot design rejected by his boss as being ‘too ordinary’. He is told to return to his desk and design a ‘teapot with a difference’. Frustrated, back at his computer, he stares at his rejected design still on screen, and threatens out loud to destroy all his teapot model files. At this, the teapot jumps out of the screen in fright and attempts to escape. He chases it and tries to recapture it but without success. The ‘ordinary’ teapot finally proves it is far from ordinary by turning the tables on its creator and trapping him inside its own world – behind the monitor’s colour bars.
The synopsis is the basic plot – i.e. the storyline with no frills. By reading it, you know what is meant to happen. It gives an indication of the characters involved together with the genre (e.g. mystery/thriller/romance) but there is relatively little indication at all of how it will be treated visually. For this, you need the next stage, the treatment.
This four-minute video gives the general appearance of a live action film shot in a design office location, but the antics of the teapot are computer generated – to give seamless visual integration with the live action.
The scene is that of a product designer’s office. We see Steve, the teapot product designer, sitting slumped at his desk, facing his computer. On the monitor screen there are television-style colour bars. Also visible are a number of novelty teapots. In one hand, Steve is clutching a colour printout of a teapot. His posture indicates despair.
In flashback, we see him entering his boss’s office and presenting her with his latest teapot design. We can see immediately from her expression that she does not like it. Recalling her words – ‘Honestly, Steve, this design is so ordinary! Can’t you, just for once, come up with a teapot that’s a little bit different?’ – Steve scrunches up the printout and angrily throws it at his wastepaper basket. He attacks his keyboard, and stares bitterly at the monitor screen. The colour bars wipe off to show an image of a 3D pink teapot, the same image as shown previously on the printout.
We hear him mutter that he will destroy this teapot along with all the other teapot model files on the network. At these words, the teapot on screen jumps halfway out of the monitor. Steve’s mouth drops open in shock.
Steve tries to block the teapot’s exit as it dives past him but it eludes him, slipping out under his outstretched hand. He swivels and twists in his chair, trying to catch it but to no avail. Suddenly he spies it: it has re-entered the monitor and is deep within its dark recesses. It has changed into a kind of female teapot shape and is beckoning him – calling with a taunting melody. He puts his face very close to the monitor and peers inside. The colour bars reappear from the sides of the screen and slide across with a clearly audible click forcing Steve backwards into his chair. He then tries to scrape open the colour bars to retrieve the teapot whose melody can still be heard faintly. He finally forces the bars open and we see the teapot’s startled reaction to the large face peering at it.
In an instant he is sucked right in, headfirst. We see his feet disappear into the monitor and in the last few seconds, the teapot squeezes out between his shoes. Just as it escapes, the colour bars slam shut with a loud clanging sound leaving Steve trapped inside.
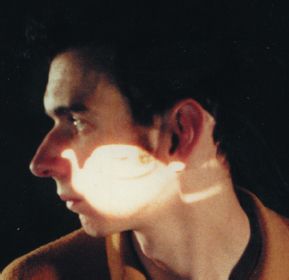
Fig. 7.10 The teapot has escaped from inside the monitor. A sinister note is struck when we see its reflection settle on Steve’s face as he looks around for it. This 4-minute film blurs reality by mixing such FX with live action and CGI animation.
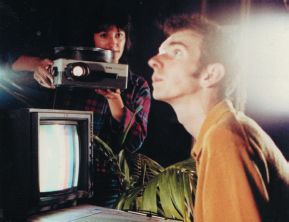
Fig. 7.11 Projecting the reflection of the teapot onto Steve’s face for the effect shown above. The flying teapot will be added in post-production.
Images on this double page spread
© Marcia Kuperberg 1994.
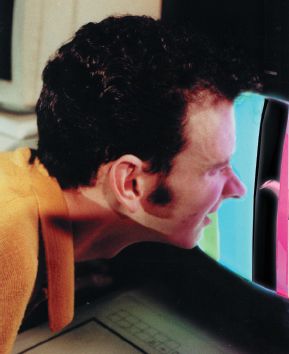
Fig. 7.12 Steve peers into the monitor, the colour bars slide shut.
The teapot dances triumphantly around Steve’s desk, its signature tune quite strident. It flies out of shot. We are left with the scene of Steve’s empty chair, desk and monitor. The monitor shows static colour bars. The scene fades out.
The treatment develops the story and helps us visualize the synopsis. It should be written to show clearly only what would be shown on screen or heard as part of the soundtrack – hence the style of language, e.g. ‘we see/we hear’. Don’t be tempted to write as a novelist, e.g. ‘Steve thinks’ or ‘Steve is fascinated’. Instead, translate that into on-screen action so your audience understands what is in Steve’s or the teapot’s mind. The clearer the visual description of the action, the easier it will be to translate the treatment into a shooting script and to storyboard it. Each stage brings us closer to what the audience finally sees on screen. From the treatment, we can visualize the action and write the shooting script.
The shooting script
INT. DESIGN OFFICE fade in
1. i/s Steve sits, slumped at his desk. On the desk, the large monitor displays television style colour bars. He is holding a computer printout in one hand. He looks up and glances around at the teapots that surround him on all sides.
2. m/s (Steve’s POV) camera pans round teapots on shelves above his desk.
3. m/s Steve turns his eyes away from the teapots to look down (miserable expression) at the computer printout in his hand. It depicts a pink shiny teapot.
4. c/u Colour printout of pink teapot – hand holding.
5. Slow dissolve to INT. BOSS’S OFFICE m/s of Steve handing over the printout to a woman sitting behind a desk. Camera follows movement to show
6. m/s woman takes printout. She looks at it and then looks back to Steve, saying scornfully:
Hillary (boss):
‘Honestly, Steve, this design is so ordinary. Can’t you, just for once, come up with a teapot that’s a little bit different?’ Dissolve back to
7. c/u Steve’s hand holding the printout. He scrunches it up, knuckles white, fist clenched and throws it out of shot.
8. m/s (cut on action) scrunched up paper lands near waste-paper bin next to desk. Camera tilt up to Steve who turns angrily to keyboard and begins typing. He looks up at his monitor screen. The colour bars wipe off to show the image of the 3D pink teapot that was on the printout.
9. c/u Steve’s face:
Steve:
‘I’d like to smash up every last teapot on this planet.’
He turns savagely toward the screen and leans forward:
‘and as for you, I’ll wipe you and every other teapot model file off this hard disk and I’ll destroy the backups!’
10. m/s (over the shoulder) Steve, desktop and monitor. Teapot jerks up and leaps halfway out of screen. Its lid pops off and its spout begins to wave agitatedly from side to side.
11. c/u Steve’s astonished face (POV teapot).
12. m/s (over the shoulder – back view of Steve) teapot is now out of monitor and is ducking from left to right, trying to get past Steve who is also moving left and right to block it.
13. c/u teapot moving up, around, left and right – camera following – fast motion – Steve frantically trying to catch the teapot.
14. m/s Steve swivelling around in his chair arms in all directions as he tries to capture the teapot.
15. c/u Steve’s face and hands as he moves, eyes darting (camera following movement). Suddenly Steve stops moving. His eyes narrow. His head moves forward slowly (POV of monitor).
16. c/u opposite POV (over the shoulder shot of Steve) peering at monitor. Camera slowly dollies forward, past Steve’s shoulder into
17. b/cu of monitor screen dimly showing glimmer of pink teapot.
Camera continues to dolly very slowly toward teapot which morphs into female teapot shape, swinging its ‘hips’ and beckoning from within the monitor’s dark recesses.
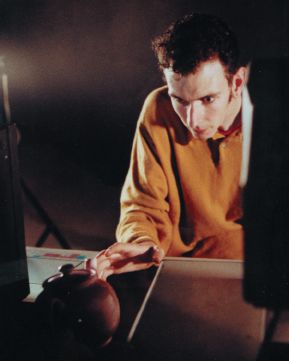
Fig. 7.13 Steve tries to catch the escaping teapot.
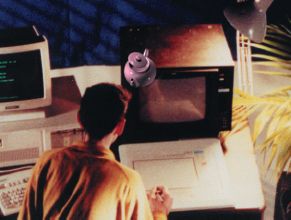
Fig. 7.14 Combining live action with CGI. The teapot animation has been produced separately to the live action and the two come together in post-production (compositing: part of the editing process). For this reason, the storyboards must show accurate positioning of the imaginary teapot so that Steve looks in the right direction as he makes a grab for it.
© 1993 Marcia Kuperberg.
18. b/cu Steve’s face. Face moves closer to camera. Cut on movement to
19. m/s of back of Steve’s head moving toward screen where teapot gleams and beckons. Just as his head nears the surface of the screen, colour bars slide in from each side, meeting at the centre with a click. Steve’s head jerks backwards.
20. c/u Steve’s hands try to scrape colour bars open. Finally, his fingers seem to enter the screen and the colour bars open with a creaking sound. His head enters frame as he moves forward.
21. c/u inside of the monitor: the teapot swings around upon hearing the creaking sound of the bars opening.
22. bc/u Steve’s face – eyes wide – peering (POV from within monitor). There are colour bars at each side of Steve’s head.
23. m/s of Steve from behind. His head is partially inside monitor. Suddenly, he is sucked headfirst into the darkness of the monitor screen. As his feet go in, the teapot squeezes out between his shoes and flies into bc/u filling the screen before flying out of shot.
24. bc/u Monitor – The undersides of Steve’s shoes now fill the screen area. The colour bars slam shut at the centre of the screen with a loud clanging sound.
25. mi/s the teapot flies round and round the desk and monitor (its signature tune is loud and strident) before disappearing off screen.
26. c/u Monitor on the desk. Colour bars on screen. Slow zoom out to l/s. Scene is now the same as the opening shot – minus Steve. Fade out.
An experienced director will be able to read a treatment and immediately begin to ‘see’ the action in his or her mind’s eye. In doing this, the director is beginning the process of creating the shooting script – the shot by shot visualization of the treatment. If this doesn’t come naturally to you, the following description of the commonly used camera angles will help you formulate your own inner vision of your narrative.
USING CAMERA ANGLES AND FRAMING TO TELL A STORY
(Also see Chapter 3: using virtual camera lenses.)
Different camera angles help you tell your story. In the following explanation, examples are given in brackets.
A long-shot (shows whole body) establishes a scene and gives the viewer an understanding of where they are and an overview of what is happening.
Two-shots and mid-shots (cut characters at around waist level) are often used when two characters are talking to each other (fig. 7.15). It allows the audience to concentrate on the limited area shown on screen – without distraction.
A close-up (shows head and neck (fig. 7.16)) centres the viewer’s attention on particular aspects of the action or character. In the case of a close-up of a face, its purpose is usually to indicate facial expression or reaction.Sophisticated computer techniques can simulate real camera telephoto lenses by having the close-up foreground in sharp focus while the background is blurred, giving an out of focus effect as shown here.
A big close-up (in the case of a face, it shows part of the face, often cutting top of head and bottom of chin) – an exaggerated form of a close-up, its purpose is to add drama.
Cut-aways (usually close-ups of associated actions) are good for linking other shots that otherwise would not cut well together in the editing process. They’re also important in that they can serve to emphasize the significance of a previous action by showing another character’s reaction (fig. 7.16). They are also often used to show ‘parallel action’ – something that is happening elsewhere, at the same time.
Robots © 2001 Kenny Frankland.
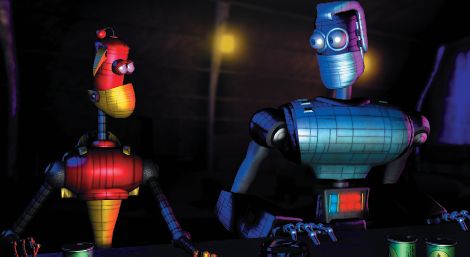
Fig. 7.15 Two-shot from ‘A Bot’s Bad Day’ by Kenny Frankland.
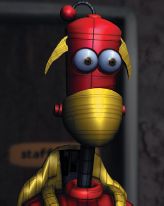
Fig. 7.16 Close-up of Canny Tevoni (to find out a little more about this robot, see fig. 7.21 and visit www.tinspider.com).
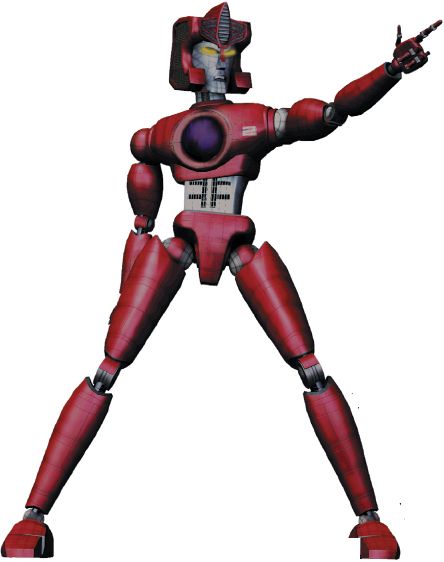
Fig. 7.17 Tilting up on Kenny’s robot Mkii makes him appear taller and more powerful.
© 2001 Kenny Frankland.
A shot with a wide-angle or ‘fish-eye’ lens exaggerates perspectives and keeps both foreground and background in focus whereas a telephoto shot flattens the whole perspective and puts the background out of focus. A common usage is a camera tilt up a city skyscraper to show towering buildings narrowing in perspective.
Tilt up on a character. A camera placed near ground level and tilting upwards toward a character makes that character seem taller and more powerful (fig 7.17).
Tilt down on a character. Similarly, a tilt downwards diminishes a character’s persona. Use zooms sparingly and for good reason, e.g. where the action requires the scene in long-or mid-shot, and you want to move the viewer’s eye toward some point that requires more attention.
Camera movement
Just as in live action, you do not always need to have your camera ‘locked off’. A static camera is commonly used in animation due to its traditional hand-drawn 2D roots, when to move around the characters and the scene meant impossible work loads for the artists who would need to draw perspective changes for thousands of frames.
There is nothing wrong with moving your camera to follow the action as long as it is imperceptible and used for good framing or dramatic purpose, e.g. if a character rises from a chair, the camera can tilt up to follow so that the head remains in frame. This is easy to accomplish with your software’s virtual camera, as the camera can be invisibly linked to whatever object it should follow. BUT don’t move your camera unnecessarily during the shot just because it is easy to do so. Such movement will distract from the action and irritate your audience.
Don’t cross the line! You’ll confuse the audience.
You’ve probably heard of this cinematic rule but you may not be aware of its exact meaning. It is as easy to make this mistake with your virtual movie camera as with a real one.
Here’s the scenario: you have two robots on opposite sides of the table to each other. This is possibly your first establishing shot: a mid-shot of robot A shot over the shoulder of robot B (establishing with your audience that both robots A and B are together in the scene, talking to each other).
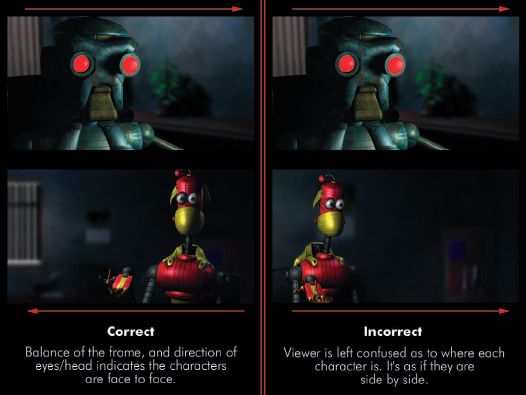
Fig. 7.18 Effects of ‘crossing the line’.
© 2001 Kenny Frankland.
Robot A is speaking animatedly. You now want to show the reaction or response of robot B. Imagine an invisible line connecting the two characters across the table. The camera can move anywhere on one side of this line to look at the faces of either character. As long as the camera does not cross this imaginary line, visual continuity will be maintained (fig. 7.18) and the audience will be able to follow the action.
Dolly in and out. Think of the camera’s view as being the audience’s eyes. If the audience needs to move forward in order to see something better, that is equivalent to the camera dollying in toward the subject. You can think of the camera itself as the audience’s body, and the camera’s target as the point where the audience’s eyes are focused. What the ‘eyes’ actually see is obviously affected by the particular lens used by the camera (see Chapter 3 for more on the visual effects of using different lenses). A zoom will give a different effect to a dolly; in a zoom (in or out) the camera remains stationary, while the focal length of the lens changes. This affects the amount of background shown in the viewfinder/viewport.
Panning is a commonly used camera movement. You pan across a scene to see other parts of it or to follow the action. Plan your camera target’s keyframes to direct the audience’s eyes naturally: try not to force them to look in a particular direction during the pan by inserting additional keyframes. This is likely to create jerky movement.
You can make your camera follow a given path as explained in Chapter 3. An alternative type of pan is the ‘zip’ pan which deliberately ‘zips’ across the scene very fast to show a sudden change of scene/subject. In 2D animation, this is likely to be accompanied by ‘speed lines’ and/or image blur so that the eye can link big changes to individual frames; in 3D an image motion blur will enhance the effect.
Only move the camera when the scene demands it. Although you can create all kinds of camera movement you’ll mostly keep the camera still and let the action unfold before it.
Scene transitions. There are all sorts of effects available to you in non-linear editing programs that can be used to change from one scene to another. These should be used to indicate transitions in time or place, e.g. in the script of The Creator, a dissolve has been used to signify to the audience that the scene of Steve presenting his design to his boss is a ‘flashback’. A general rule is to stick to one type only and use only if the narrative or scene demands it.
You are the ‘narrator’, the storyteller, the filmmaker. It is up to you to decide how best to convey the narrative. Your camera and other subtle visual devices will help you do so.
Typically the soundtrack is created prior to the creation of the animation, particularly if there is on-screen dialogue. The lip and mouth movements of the characters must be synched to the pre-recorded spoken words.
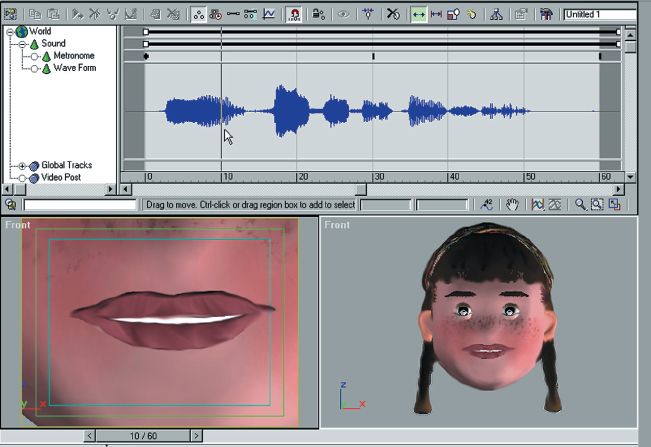
Fig. 7.19 Screen grab from 3DS Max. Scrubbing through the wave form, you can fine-tune your animation to sync sound and action. If you zoom up on a given piece of dialogue, it is sometimes possible to ‘read’ the wave form word by word. Here, the words are: ‘Hi, my name is Marcia.’
© 2001 Marcia Kuperberg.
In a digital soundtrack, each part is recorded on separate tracks, e.g. background music (in sections)/dialogue/spot sound effects (known as ‘foley FX’). You can then import tracks into your animation software to sync sound to image (fig. 7.19). Listening to well acted dialogue and evocative music may be of great help in visualizing both character and action.
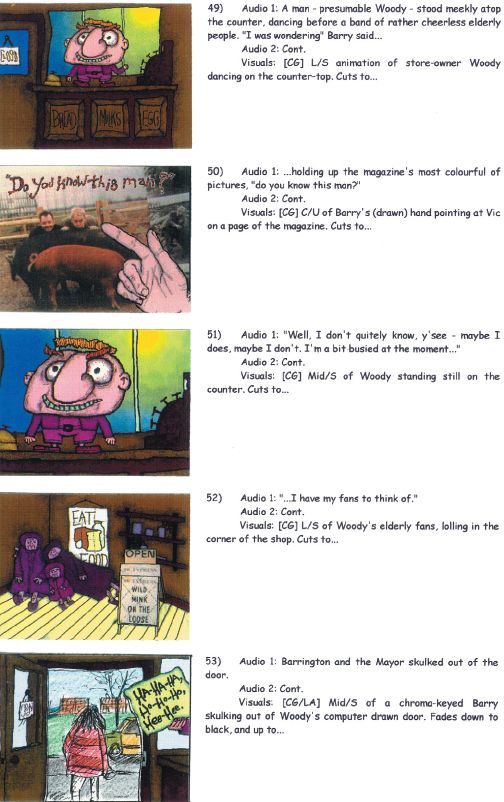
No matter how well a sequence is scripted in words, there is always room for misinterpretation. The storyboard, a shot by shot visualization of the shooting script, can be used in a number of ways.
Concept storyboard (pre-production). The director will create an initial rough storyboard to show the intended action of the characters, the camera angles and camera movement of each shot, with an indication of sound/voice-over.
The production storyboard is a detailed working document and may be given to most members of the crew and creative team. It contains descriptions of scene (interior/exterior) character action, camera movements and angles, shot links and scene transitions, plus an indication of the soundtrack.
The presentation storyboard’s purpose is usually to help ‘pitch’ the narrative idea to a sponsor or client who will be financing part/all of the production. Each scene is depicted with a high level of detail and finish (fig. 7.20).
The Leica reel
Sometimes known as a ‘story reel’, this is a video of the storyboard frames filmed to the basic soundtrack.
Its purpose is to help the director to gain a better idea of pace and timing. At this stage there are often minor changes that are added to the storyboard, e.g. additional shots inserted, timings changed, or changes to camera angles.
The animatic
This is similar to the Leica reel in that it is a rough cut version of the storyboard – filmed to the important parts of the soundtrack. It will contain low resolution graphics (to give a general idea of movement only) filmed with the camera angles and movements indicated by the storyboard. For example, if the character is meant to skip from point A to point B in the final animation, the animatic may show a ‘blocked in’ character merely covering the distance in small jumps. Model and movement detail will be added later.
The previz
This is a refinement of the animatic and is used, for example, by FrameStore CFC (see Chapter 6) as a blueprint for the final animation with accurate camera angles, a clear idea of the style of animation and accurate timings.
Fig. 7.20 (right) Storyboard © 1998 West Herts College, by Barry Hodge, second year BA Media Production Management student.
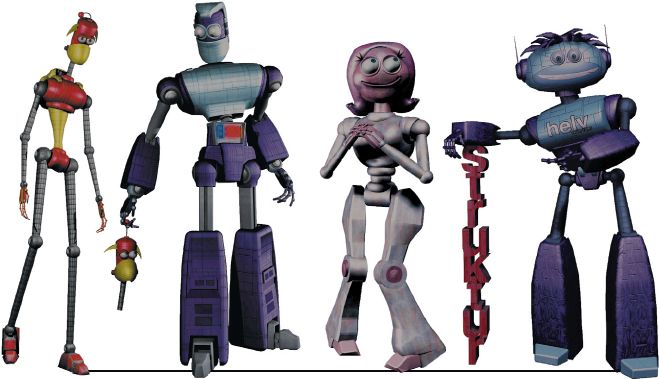
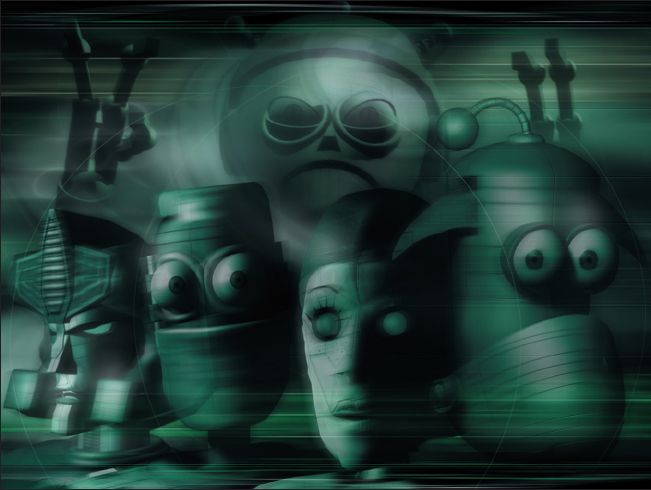
GOODIES Fig. 7.21
Canny Tenovi
Age: 280 cycles
Special Ability:. ..er….moaning.
Notes: Canny Tenovi is a paranoid, boring and useless bot, who spends most of his time complaining about the troubles that the days bring and is never happy with anything in life.
He spends most of his career in dull office jobs or maybe the odd factory putting tails on toy Dwebblesnips.
He hears voices in his head telling him he is special and has some purpose in life…but he’s not sure what though.
In short he’s a weirdo.
Lynk
Age: 220 cycles
Special Ability: chatterbot & designer.
Notes: Lynk is Helv’s lifelong partner.
She spends most of the time in the Giant Apple with Helv designing for various systems while at the same time she keeps her jaw joints lubricated by chattering on and on and on……
…..she doesn’t stop. Blah blah blah blah. …all day…usually about nothing interesting.
…she’ll talk yer socks off this one.
Helv
Age: 260 cycles
Special Ability: good with words.
Notes: Helv is Lynk’s lifelong partner…..
He is obsessed with words and spends all day in his giant apple making huge sculptures like ‘hamster’ and ‘groodies’.
He lives in the Araxion Barrier, but hopes to set up his business in the city. Blessed with a smile, he can be quite a dull character…especially when he starts his rants on the origin of the letter ‘o’.
Nice enough bot, nevertheless.
Bot images © 2001 Kenny Frankland.
By now you may have translated a basic idea into an entertaining story. What about the characters who will bring the story to life and without whom it can’t happen?
Knowing your characters and their ‘back story’
Having a feel and understanding of your characters’ worlds and personalities before you write about a particular episode in their lives will help make their actions more believable on screen. This is known as ‘the back story’ (figs 7.21 and 7.22).
One way of looking at characterization and narrative is that the narrative is the character in action.
In his robot inhabited worlds, Kenny has created characters with interesting, contrasting personalities. They will drive the plot providing, that is, that he makes their motivation very clear to his audience. Your characters’ motivation is the invisible force that controls their actions, pushing them to achieve their particular goal. Their motivations must also be driven by their inherent natures. You can then sit back and your characters will take over, writing the narrative themselves.
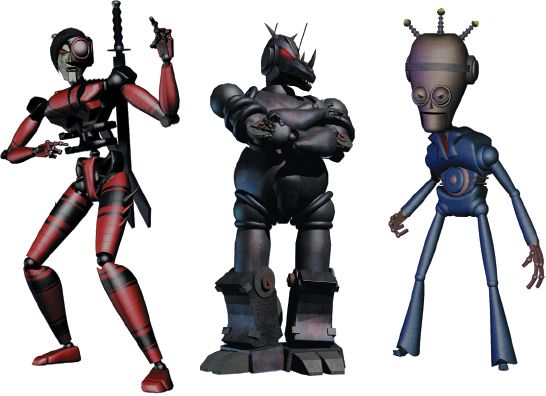
Ripiet Nol
Age: 410 cycles
Special Ability: magician, ninja and hot lover.
Notes: Wow! this guy is tough. He used to be the top assassin, bounty hunter and general bruiser for hire in Botchester…but he made enough money to retire and do what he likes most…wooing the chicks.
His French origins make him the perfect gentlebot. All the chicks love his accent. His top client was ASHiii, who calls him again to help with his problems.
Ahnk
Age: 420 cycles
Special Ability: very strong.
Notes: Ahnk is the leader of the powerful Rhinobots. He is extremely strong, and is virtually indestructible due to his thick metal skin. The Rhinobots are tough military bots who are known as Mega Knights who are trained to kill or be killed. They will happily sacrifice themselves in order to complete a mission.
Ahnk has a very personal bone to pick with our friend Canny, and since talking about it doesn’t seem to work, and a good butt kicking does, things look grim for our red and yellow robot friend. Stay clear.
BADDIES Fig. 7.22
ASHiii
Age: 830 cycles
Special Ability: psychotic.
Notes: When we first meet ASHiii he seems alright, until things don’t go as planned. Then he decides to destroy the planet. A tad touchy, I know, but he is very old, very insane and very lonely…all of which create the perfect recipe for a great psychopath. He is extremely weak, and most of his work is done by his servants or droogs, Thug and Scally. The thing that makes this bot particularly dangerous is his wealth and contacts with other dodgy bots. He has a list of all the best killers, robbers and porn outlets in the city. He has a twitch…

Fig. 7.23 Highly stylized, The Minota and Little Nerkin.
© 2001 Aardman Animations, by Nick Mackie.
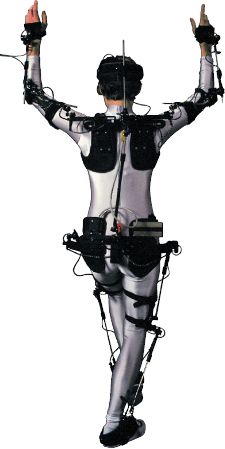
Fig. 7.24 This is Gypsy 3W, a wireless real time motion capture system. Image courtesy of Analogus Corporation and Meta Motion.
The protagonist and the antagonist
The protagonist in your narrative or sequence will be the central character about whom that part of the plot revolves (this can vary from sequence to sequence in the overall narrative and there can be more than one protagonist). The protagonist doesn’t have to be a heroic Hollywood style character who always triumphs; it could just as easily be a wimpish character like Steve in The Creator who meets a sticky end. The antagonist is the character that causes conflict and tension within the plot, in this case, the teapot. You need both to create a drama that engages your audience.
STYLIZATION AND REALISM
In much 2D animation, and some 3D, the characters are highly stylized. They are cartoons, i.e. exaggerated caricatures. This type of stylized character is appropriate for comedy and will be reflected not just in the characters’ appearance (see the bright colours and stylization of Little Nerkin (fig. 7.23)), but in the way they are animated: their actions and reactions to events in the narrative. An important point to bear in mind is that if the appearance of the characters is highly stylized, their actions should be animated with equal exaggeration.
Conversely, realistically modeled 3D characters are much more like virtual actors. As with their appearance, their animated actions also usually aim for realism and for that reason, may sometimes be taken from motion capture.
Motion capture (‘performance animation’)
This entails fitting electronic gadgetry to humans or animals (fig. 7.24) who perform the action required. The movement data of all the limbs is then fed into computers, where the animation software translates it into the movement of the given CG characters. This obviously creates extremely convincing movement. Often, it is too realistic, however – even for a virtual look-alike human or animal, and can be boring. The animator may need to simplify and/or exaggerate some of the movement to suit the requirements of the scene.
Full animation and limited animation
Full character animation – e.g. Disney style – will include all the important elements outlined in Chapter 1. Characters may well speak, but their personalities, motivations and actions are probably extremely well conveyed by the animation itself. In a way, the spoken voice is the icing on the cake.
Hanna and Barbera introduced a style of limited animation through the economic necessity of producing large volume TV series animation. Animation series nowadays include modern, so-called ‘adult’ animation, e.g. The Simpsons, King of the Hill, South Park. These animations are very much plot and dialogue driven. In limited animation, the characters will deliver their lines with the bare minimum of basic lip movements – and body actions.
![]()
Fig. 7.25 Larry’s timing for a normal eye blink. Note that the eyes are in closed position for six frames and the last frame is held for eight frames.

Fig. 7.26 Here, Larry shows the timing for a typical double blink, i.e. there are two closed sets of eyes, each held for only two frames.

Fig. 7.27 This is a snap blink, meant to be very quick with no inbetweens – just open, closed and open again. Note how Larry draws the closed position of the eyes at an angle. This is because of the muscle tension of a quick close movement.
© 2001 Larry Lauria.
Keeping a character alive
Larry Lauria, animation tutor and ex head of The Disney Institute, early in his career met Bill Littlejohn, a master animator. Over breakfast one day, Larry asked him what jewel of animation wisdom Bill could pass along to him. Bill told Larry: ‘if you ever get in trouble (with a scene) … make the character blink.’ Here are some of Larry’s tips on eye blinks.
CGI COMBINED WITH LIVE ACTION
Character interaction. At the production stage of animation, when one is struggling with the technical problems of making the CGI item ‘act’, it is easy to lose sight of the fact that not only must it act, but also react to the live action meant to be taking place in the scene at the time.
The live action will probably be shot against a blue or green screen which will be ‘keyed’ out to be replaced by other elements such as the CGI (computer graphics imagery) at the post-production stage. Turn to the case study (Chapter 6) to see examples of this (figs 6.39, 6.40 and 6.41). The whole only comes together at the post-production stage, when it is usually too late to make either animation or acting changes. On stage, or on a film set, this interaction happens naturally when actors appear together in a scene. A clear storyboard given to actors and crew goes a long way to help them visualize the scene and it also aids the director in explaining the final outcome on screen.
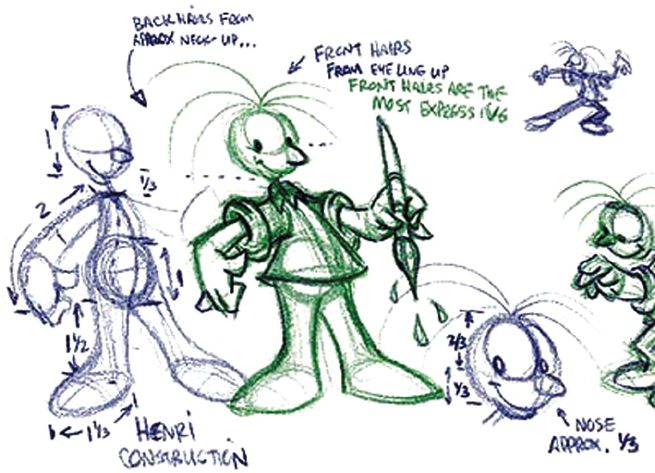
Fig. 7.28 Henri. © 2001 Larry Lauria.
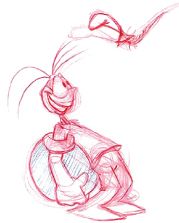
CHARACTER CREATIONS
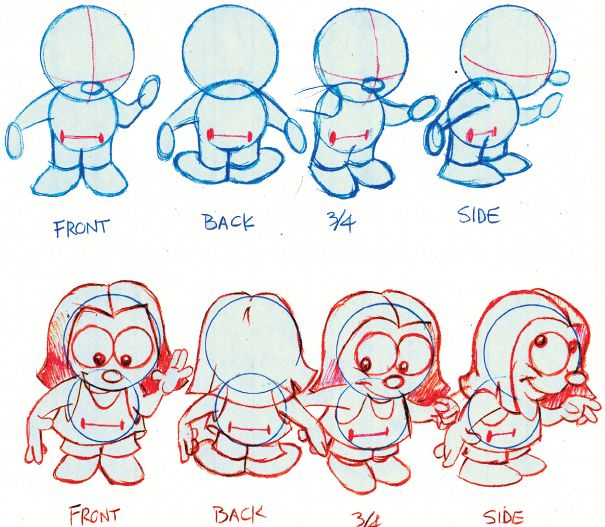
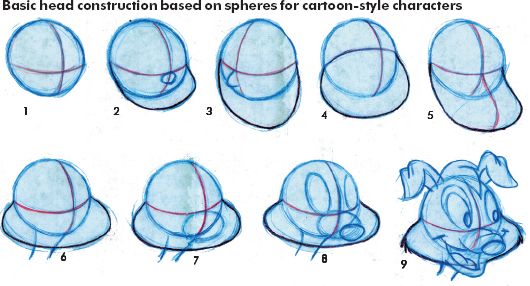
Designing your characters. Begin with character sketches on paper. Refine the design so that you know what your character looks like from many angles with a wide variety of poses and expressions (figs 7.28 and 7.35). Eventually the design will be produced on character sheets to show the character and its relative proportions from all sides (character turnarounds: fig. 7.30) together with typical poses, facial expressions, clothing and colouring/material guide. These will be used as reference for other animators who may be working on the project. Sometimes the character will be required in both 2D and 3D formats. Study the following illustrations by Larry Lauria to see how characters and heads can be based on simple spheres and triangle/pyramid shapes. Also read Chapter 5 for more on creating characters for use in computer games.
Fig. 7.30 Character construction using underlying circles.
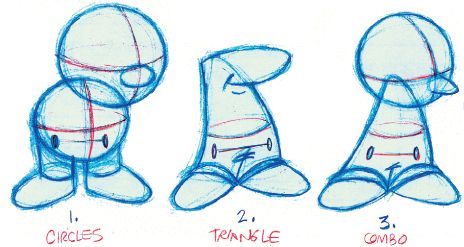
Fig. 7.31 Character construction using underlying circles, triangles and combinations.
Here are some typical character construction techniques, courtesy of Larry Lauria. Notice how the head overlaps the body on a squat character.
© 2001 Larry Lauria.
Fig. 7.32 Head construction of dog.
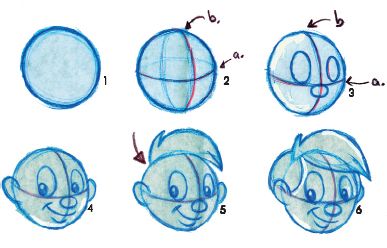
Fig. 7.33 Head construction of boy.
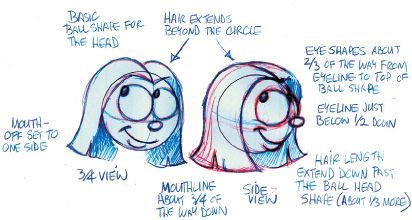
Fig. 7.34 Full head and face of girl.
Here in figs 7.32, 7.33 and 7.34 you can see the basic stages to creating heads and faces based on circles or spheres for 2D or 3D cartoon-style characters.
© 2001 larry Lauria.
We all know that to make a character speak, we need to match the lip positions of speech to the spoken word. These positions are called ‘phonemes’. In phonetic speech, combining phonemes, rather than the actual letters of the word, creates words. For example, in the word ‘foot’ the ‘oo’ sound would be represented by the phoneme UH. The phonetic spelling of the word foot would then be F-UH-T and the mouth shape would be the central UH. There has been a great deal of work done to classify and code these phonemes. The important thing to remember is that phonemes should be assigned to the actual sounds you hear, not the text on the page. Applying phonemes is the key to success in lip sync.
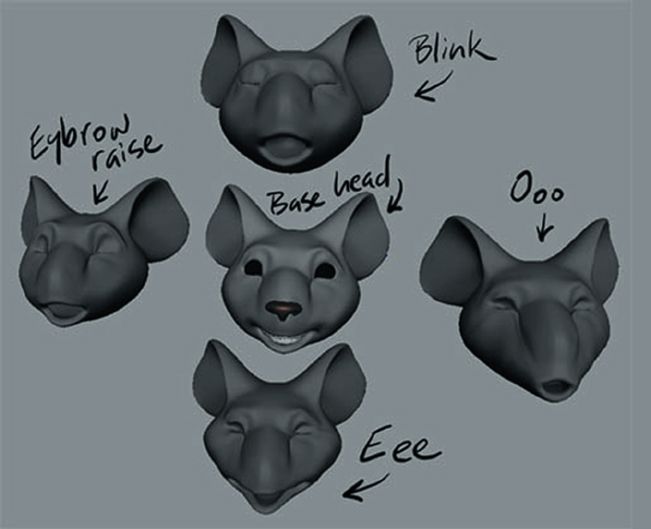
Fig. 7.35 Created by Dan Lane of Aardman Animation, this part of the character sheet explores some typical expressions and phonemes for the mouse on the following pages.
© 2001 Aardman Animations, by Dan Lane.
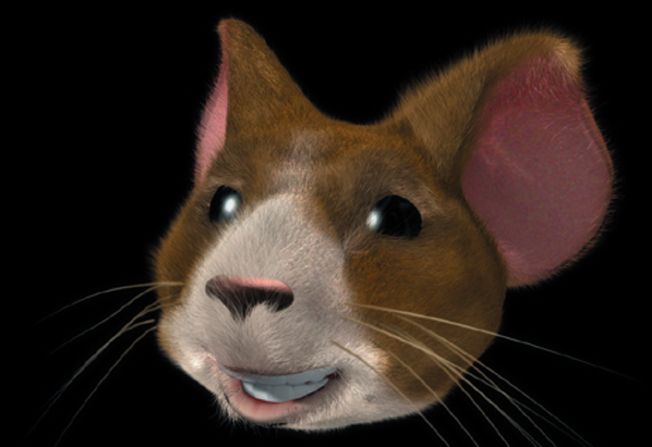
Fig. 7.36 ‘The aim here was to produce a character mouse as a test but create naturalistic fur that behaved in a realistic way. Maya Fur was instrumental in this and the project also brought into play various mapping techniques for colour, baldness and density of the fur and also the use of Maya Paint Effects for the mouse’s whiskers. The head was modeled out of one object so that the fur reacted to everything, even when the mouse blinked.’
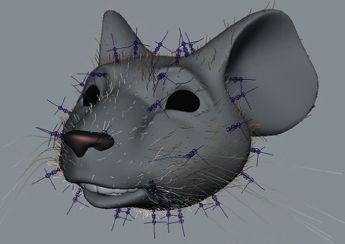
Fig. 7.37 This shows the use of Maya Fur’s Dynamic Chain Attractors used to set up the realistic mouse fur.
All mouse images © 2001 Aardman Animations, by Dan Lane.
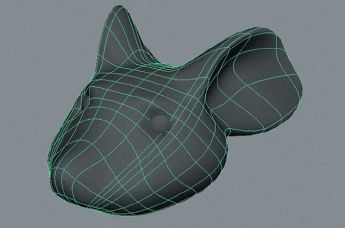
Fig. 7.38 First stage of construction: moulding a single object for the head.
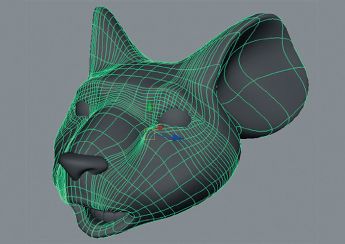
Fig. 7.39 More detail has been added at this stage to allow for expression.
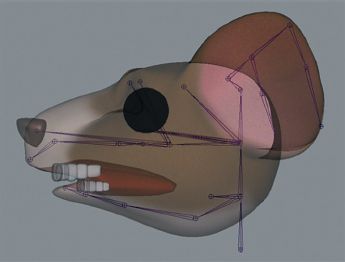
Fig. 7.40 The virtual armature (bones) inside the mesh. When the mesh is bound to the bones, and the bones are animated, the mesh body deforms like real skin.
Creating facial expression in CGI (3D)
Typically, a library of facial expressions will be developed for a character. These expressions can be given to heads that are simply replaced during animation: the technique used in stop-frame model animation. Alternatively, sections of the face, e.g. eyes and eyebrows, can be blended from one shape to another to create additional variations of expression.
Blended facial expressions is standard on the latest versions of 3D software packages such as 3DS Max, Lightwave and Maya. It enables you to divide the face into First stage of construction: moulding a single object for the head. separate, independent sections, e.g. eyebrows and forehead/eyes/ nose and cheeks/mouth and chin.
Each expression or section of an expression can then be animated, usually by means of a % slider, from neutral to full extreme of pose, e.g. smiling upturned mouth to the negative downturned shape. The permutations and combinations of blending different shapes give endless expressive possibilities.
Dan Lane:
‘To animate the mouse, we used a combination of traditional stop motion techniques as well as tools like Maya’s Blend Shapes. A virtual armature was created for the mouse and some simple facial expressions were sculpted as replacement heads, the same way stop motion animation uses them. The two combined along with using Blend Shapes enabled us to bring life to the mouse and animate him, with lip sync, to a short soundtrack. To animate the fur, we used Maya Fur’s Dynamic Chain Attractors. This gave us reactionary movement in the fur whenever the mouse moved his head.’
OBSERVATION AND INSPIRATION
When deciding on the overall ‘look’ of a character, you are the casting director while at the same time, you are already beginning to put yourself into that character’s skin. When you begin to animate, you become that character.
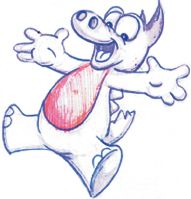
Fig. 7.41 There is no mistaking the emotion expressed by this wide awake character. He exudes happiness and energy through his pose. See more on posing and other animation techniques in Chapter 1.
© Larry Lauria.
The first rule for any actor is to observe the behaviour of those around him/her. Become aware of other people’s mannerisms – the tug of the ear, the scratch of the head – so wherever you are, stop and look (but don’t stare too much or you may be arrested!). An excellent habit to get into is to analyse films and videos: study the movement of the head and eyes for example – when and why does the head move, when does it tilt, when do the eyes move – when do they blink? Animation is the art of exaggeration, but first you must know what it is you’re trying to exaggerate. Notice behaviour in the real world and you’ll be better able to animate in a fantasy world.
Very often, the best person to observe is yourself. You know the expression you are trying to convey through your characters, so always have a mirror in front of you when animating and use it!
CONCLUSION
Ensure the narrative, no matter how short, has a structure with a beginning, a middle, a climax and an end.
Create clear identities for your characters, but remember that you can’t assume your audience knows anything about them other than what is shown on screen (but it helps if you know their ‘back stories’ as this will help you develop your narrative writing and characterization skills).
Before embarking on any form of narrative animation, it’s important to do all the necessary pre-production planning. This includes preparing a synopsis of the narrative, the back story, treatment, script and storyboard for your animation.
When scripting and storyboarding, visualize the script in terms of camera angles and any necessary camera movement to maximize the impact of your story and clarify the action for your audience. Check for expressive posing for the important keyframes of each shot.
It’s also a good idea to create an animatic (to include draft soundtrack) from the storyboard to gain a better idea of pace and timing before beginning the actual animation production.

