Chapter 10:
Cutting DV for a Film Release
For the creative artist, DV is a great democratizer. It enables filmmakers to shoot projects that they might not otherwise afford. Documentary filmmakers can interview hundreds of subjects. Narrative directors can shoot a take as many times as they want. The cost of DV tape is minimal. It almost seems too good to be true. No synching of dailies, no pulldown issues, and no telecine transfers.
Another advantage is the cost of equipment. DV cameras are very inexpensive. Most of the best prosumer cameras are in a price range between $2,500-$4,500. They offer 3-CCD recording, 16-bit sound, and excellent video imagery. Some cameras have interchangeable lenses, matte boxes and an array of filters. One hundred hours of dailies could cost $800 plus personnel and lights. In the event of a deferred pay production, the savings are phenomenal.
But before you recommend shooting DV to a director, consider some of the limitations of a DV-to-film project.
Resolution
One of the first things mentioned when comparing DV to film is resolution. Is DV the equivalent of 35mm film? Some have suggested that by the time a film is shot, duplicated and run through the projection gate at a theater, it has little more resolution than DV. But usually there is a vested interest in those who say these things. Actually the resolution of DV is nowhere close to that of film. And besides, we’re comparing two different processes.
Film is a photochemical process, where light passes through a lens and is projected onto a plane of celluloid which contains a high concentration of tiny silver halide crystals. The crystals are microscopic, ranging in size from .003 to .0003 mil. The size of the crystals is a characteristic of the film, which is defined by the film’s speed. These crystals are not uniform in shape, and they are not ordered in a matrix. They are a bunch of crystals painted onto the plane of the film.
Video, on the other hand, depends on a matrix and is uniform in shape, size and order. The image is captured into a prism that separates it into three primary colors. The light sensitive device is photoelectric (as opposed to photochemical) and each one of the photoelectric devices, called CCDs or charged coupling devices, emits a matrix of pixels, which is electronically processed to reproduce that image when joined with the other two corresponding CCDs. Some DV cameras have only one CCD that is sensitive to the entire color spectrum. These are considered inferior to 3-CCD cameras.
A high-quality NTSC DV image consists of about 360,000 viewable pixels. If one were to shoot the same images with a PAL camera, there would be about 420,000 viewable pixels. But shooting with a PAL camera in the United States has some problems. Acquisition of PAL monitors, decks and editing equipment can be difficult and very expensive. As a result, most DV films shot in the United States use NTSC, in spite of the superior picture quality of PAL. (Another great advantage of shooting with PAL is the closeness of frame rate with film, which will be important when transferring to film).
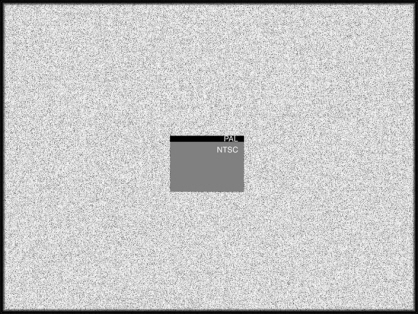
Figure 10.1 The resolution of an NTSC and PAL frame is practically lost when placed in the middle of a 35mm film frame.
How does film compare to that 360,000 pixel image? It’s a bit difficult to say, because the silver halide crystals are not counted, nor are they arranged in a mathematically quantifiable matrix. But we get an idea of film’s resolution from film recorders, high density electronic film scanners used for implementing computer graphic imaging with film, or CGI.
A scanned 35mm frame of film normally consists of 4096 x 3072 pixels. It has the capability of producing an image a little over 12.5 million pixels, a far cry from the 360,000 pixels in a video frame. Thus 35mm film is over 35 times the size (in pixels) of a standard NTSC video frame. To equate this to the big screen, every pixel of video on the screen would equal 35 pixels of 35mm film. To compound the matter, DV is compressed. Although the image is recorded digitally, the information within a DV image is compressed at a 5:1 ratio, adding further resolution issues.
In order to further evaluate the differences between film and video, there is also the need to look at contrast and color space.
Contrast
The contrast ratio of any video image is, at best, 150:1. Some would argue that figure to as low as 30:1. Film has a much wider contrast ratio, at about 1,000:1. As a result, a great deal of contrast is lost when using video. The transfer of video to film seems to exaggerate this even more, perhaps because audiences are used to seeing a wider variety of contrasts and tones when viewing films on the big screen. The lack of contrast can result in a decrease of tones and textures within the frame.
Color Space
In order to properly analyze the differences in color space between film and video, there is a need to examine the process that creates color in video and the spectrum of available colors on film stock.
There is a color gamut of approximately 800 million variations available on film. Different stocks of film are sensitive to different colors. Some pan across the entire spectrum. Others are sensitive to variations in grayscale or luminance. Still others may be sensitive to specific colors. The American Cinematographer’s Manual describes the sensitivity of different film stocks to the color spectrum.
Video consists of an RGB signal which must be converted to YUV and then adjusted so that the signal adheres to a standard, such as NTSC or PAL. The process of conversion and the limitation of available color within a video standard severely limits the amount of colors that can be displayed. In order to keep the data size manageable for each image, the color detail is also downsampled.
Let’s start with RGB. There are 16.7 million colors in RGB color space. Anyone who has used a paint box or photo application might know that individual colors— red, green, and blue —can be adjusted within a range of 256 levels. (Most photo editing software displays numbers from 0 to 255.) There are 256 levels of each color, which can be used together to create other colors from each channel of color. Thus
256 x 256 x 256=16,777,216
However, the color space becomes limited when considering headroom and footroom available for NTSC and PAL pictures. The video black equivalent of an RGB signal is +16. The white point, or 100 percent luminance, is +235. Anything above or below those luminance levels would be considered a nonstandard video signal. The reduction in levels lowers the available colors to 220. In order to compute the available colors, multiply it much like the previous equation, like so
220 x 220 x 220= 10,648,000
After reducing the headroom and footroom, there are 10.6 million colors available in RGB color space. When headroom and footroom limitations are applied to the color space, a rectangle is created like the one contained in Figure 10.2. But the signal also needs to be converted to YUV color space before it can be used. YUV color space is less dense. In his abstract, Merging computing with studio video: Converting between R’G’B’ and 4:2:2, Charles Poynton mathematically computed the result of the conversion to be 2.75 million usable colors. Others have calculated it to be between 2.6 and 2.75 million. As a result, it can be said that available colors in a video picture are limited to 2.75 million!
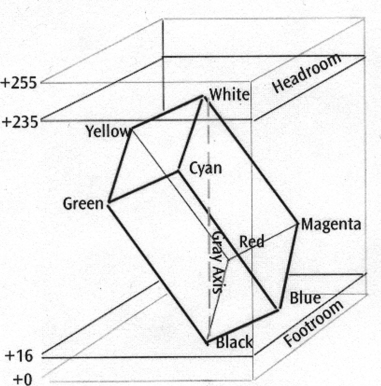
Figure 10.2 Video Signal Color Limitations within the RGB Color Space
The color signal represented by RGB is sampled at 4:4:4. That is, it contains a sampling of luminance information of 4 bits and two samplings of color detail, each with 4 bits of information. In order to make the size of the data more manageable but not too visually different to the human eye, the two color detail components are lowered or downsampled. The human eye has fairly poor color acuity, but can discern luminance variations easily. As a result, the color detail was chosen to make the amount of data more manageable. This compression lowers the color detail from 4:4:4 to the common video standard of 4:2:2 The rate of 4:2:2 color compression is 1.5:1. DV and DVCPro use more compression with lower color detail sampling. DV uses a 4:1:1 sampling while DVCPro uses 4:2:0. The result is a compression in color detail of 2:1. Reduction in color detail sampling can produce artifacts in the picture, including aliasing or “stair-stepping” of elements in the video.
A final limitation of color is this: there are some colors which simply are not available on video, because they do not exist within the color space of 4:4:4 video. Some good examples would be kelly green and a variety of shades of yellow. If a wide variation of color is required for a film, DV is not the answer.
Filmmaker or Videomaker?
Some filmmakers —particularly new ones— are so enthused with the prospect of making a film that they forget to make a plan. Where will it go? How will they market the film? What is the final destination or medium of the work?
Chapter 2 explored several different post production workflows for films. In addition to a workflow, a director needs a marketing plan for the film, particularly a DV film.
Of particular interest to the editor is how and where a film will be displayed. It will either finish on video for direct to tape distribution and video screening at film festivals, or it will finish on film, through some of the processes described later in this chapter.
Why mention marketing plan in a book about editing? Because if the final medium for the film can be determined, the editor can make it look better. The ambiguous intentions of the director can make cutting the film difficult.
Many directors will tell you that they first want to make the video, and if successful, transfer it to film. A lot of independent films are done this way. In fact, it makes sense to do a film this way because all of the inexpensive production costs —shooting on DV and finishing on tape— allow presentation of the work before a relatively expensive transfer to film occurs. Some directors hope that a distributor will pick up the costs of transfer to film.
Most film festivals now allow video projection as well as film. So the expense of showing the work at film festivals is limited to the entry fee. But if an editor can determine the director’s ideal intentions, he or she can better prepare the film for screening venues based upon the final product— either videotape or film.
Finishing on Tape
There are a variety of tools that can be used to enhance video to make it look more film-like. The paradox is that none of these tools should be used if the intention is to transfer from DV to film. Before using these devices, the director must make a decision of whether or not the project will finish on film. Once used, these tools can actually degrade the quality of video, making it nearly impossible to obtain a quality video-to-film transfer.
These enhancement tools come in two categories: production tools and post production tools. The production tools are used on the set, while the production is being shot. They consist of special camera filters that can add film-like characteristics to the video. Unfortunately, in order for a filter to work, it must filter something out. The process is always subtractive. So, while it may seem that the look of the video is superior to a non-filtered look, it is always subtracting from the original quality of the video, not adding. Think of it this way: can a filter add resolution to video? Can it add contrast to an image? The answer to both of these is no, but filters can cause the image to appear higher resolution or higher contrast. This is all great and good for video display, but when the DV comes to a video-to-film transfer facility, the artifacts of filtering cause more issues than if the video were shot without any filtering whatsoever.
While directing a documentary in England, I had to make the determination that the final product would be video, not film. As a result, I was able to have my DP use some very good filtering on the images, which look very film-like. But I also realized that this would limit the venue for the documentary to film festivals that accepted DV, and television.
The post production tools for video are plentiful. A very popular filmlook plug-in is made by Digi-Effects. The CineLook plug in uses film stock types and matches the video to presets based upon those stock types. It also is capable of manually being overridden for limited painting of the image. For example, if you want your video image to look like Kodak Vision 200 stock, you can select the preset from an array of stocks and apply it directly to the image in an NLE.
But like camera filtering, plug-in filters are generally subtractive. So while they may appear to be more film-like, it’s again better to use the original unfiltered video for a video-to-film transfer.
In addition to filtering, there are some proprietary processes available. These processes necessitate that the video is sent out, much like one would send negative to a lab for printing. One of them, FilmLook, has been around for a long time. FilmLook was introduced as a solution to make video attain some of the characteristics of film. It’s been very popular over the years and I have occasionally edited television with this process included on the video masters. The difference appears to be night and day.
Another consideration is matting. If the director wants the DV to have a 1.85:1 matte as most American made films do, it can be added in the NLE, with black bars at top and bottom. Avid’s Film Composer and Final Cut Pro have matte effects that are precise and according to Academy standards. A matte can be applied in any NLE. However, if a video-to-film transfer is intended, a much cleaner matte can be inserted later.
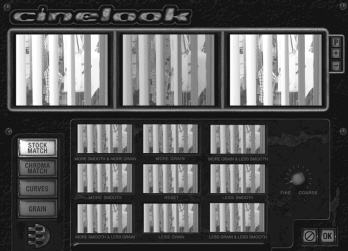
Figure 10.3 Digi-Effects’ Cinelook offers several different coloring parameters as well as presets by the manufacturer to emulate different film stocks.
Transferring from DV to Film
So, the filters for video produce spectacular results. And video-to-film facilities prefer non-filtered video. If you’re not sure where the film is going, what do you do? If time allows, create two sequences of the same cut. Add colorization, filters and mattes to one and call it the video master. The second sequence should be left bare. Call this one the film master. Output both masters to tape. The director can use one for marketing and the other for show. This way, they take advantage of the best of both mediums.
If by chance you are able to discuss the project with the director before principal photography begins, you should make some recommendations that will help the project before it is transferred to film.
- If the filmmaker truly intends to do a video-to-film transfer, he or she should avoid using any lens filters. Lens filtering of any kind tends to distort the image and lowers the resolution characteristics of the video. As previously examined, there isn’t a lot of resolution to begin with, so it isn’t a good idea to take any more away.
- Although a lot of DV cameras have a 16:9 option, it is recommended that this option not be used. Many cameras accommodate 16:9 by squeezing or distorting pixels. If the DV project is going to be matted, it’s better to do it during the film transfer than during shooting. Like filtering, shooting in 16:9 distorts the original resolution.
- Shoot in progressive frame mode, if available. This allows for better picture clarity and motion characteristics more similar to film.
- Shoot in ideal lighting conditions for video, not film. Scenes can be color timed in the final film print, but all of the contrast that video will allow is necessary. Despite its ability to pick up low light images, the flattened contrast ratio of video will negatively affect a video in low light when transferred to film. Blacks do not contrast well in the picture element of dimly lit video like they do in film.
- Do not use the camera anti-shake or stabilizer feature. This slightly enlarges the video image and causes less resolution. Every pixel is needed.
- Shoot farther away from subjects to lower the depth of field. This will give the audience the impression that prime lenses were used instead of video zoom lenses. Depth of field is a dead giveaway that the film was shot in video. Cut down the depth to create a more film-like image.
- As mentioned before, do not use any electronic filtering or proprietary video enhancing processes. Doing so is subtractive from the original resolution and not recommended. Also be sure to not use mattes. Mattes can be inserted onto the film later.
- Cut and output the project using as little compression as possible. Edit the video on an uncompressed video capable NLE if available. Output to digital beta is the most recommended format. Digital beta is more stable than DV tape and is used frequently by video-to-film transfer facilities.
Video-to-Film Transfer Methods
To a DV filmmaker, the process of transferring or conforming DV to film is an expensive one. There are many issues surrounding this process that first must be explored. Choosing a method of transfer, usually based upon cost and precision, is the most important. And there are other technical issues to explore as well, such as what will happen to the six frames removed from the video for every second of film that is transferred. There are methods of dealing with this as well.
Once the final cut of a DV film is achieved on an NLE, the video must be transferred to film. There are many ways to do this, including, but not limited to:
Film Recorder
The film recorder scans each frame of film. Payment is based on a per frame basis. It is quite accurate, but very expensive. It usually creates a “2K” picture, meaning a 2000 x 2000 pixel image.
Film Scanner
Film scanners produce extremely high quality scans of electronic images onto film. The most popular image sizes have 2,000 and 4,000 vertical lines of information. These files are known as 2k and 4k respectively. There are two types of film scanner: a laser scanning system that use red, blue and green lasers that scan the image onto the plane of the film and a specialized film camera that scans high resolution monochrome monitors through red, green and blue filters. Laser scanners are costly but produce a superior image. Popular laser systems include Cineon by Kodak, Pthalo Systems Verite, and the Lux system by Digital Cinema.
When film scanners are used, the video is digitized onto a computer and the film recorder sends the images to a film, one frame at a time. Kodak has developed film specifically for this form of transfer.
Kinescopic-like Processes
Similar to the kinescopes of old, these processes create frames from monitor displays of full framed video. Kinescopic processes use high resolution monitors and a specially designed camera to convert the fields to full frames at 24fps. There is no flicker between fields in the process like there have been in previous kinescopes from old television programs. Kinescopes are much less expensive but not the best quality when it comes to transfer.
While similar to CRT film scanners, kinescopic processes use the videotape timebase as a method for creating the film. Whereas film is projected at 24 fps, the resulting kinescope of the video will play back at 23.976. Not as accurate, but much less expensive and usually less time consuming than film recorders.
Electron Beam Recorder (EBR)
Electron beam recorders send an electron beam directly to three different pieces of film for red, green and blue elements of the frame. EBR processes have multiple stages and are less common. They are also less time consuming than film scanning.
A typical EBR process begins with transfer of the video to film with red, blue and green elements separated and then scanned onto three separate pieces of film using an electron beam. The film itself is monochrome, but the separation process sends only those elements relating to each primary color to their respective plane of film. Then the three films are optically printed together using red, green, and blue filtering.
Sony’s High Definition Center, one of the facilities on the forefront of video-to-film transfer, begins its EBR process with an upconvert of the video from a standard (SDTV) signal to a high definition (HDTV) format. If the video is not to HD aspect, black bars are inserted on either side. The HD video is then doubled in resolution through a proprietary process before the EBR process is begun. All of the process from up-converting to colorization is HD compliant. Sony Digital and 4MC Inc. are the two primary places for EBR in Los Angeles.
Proprietary Processes
Many video-to-film transfers are done with computers and equipment developed specifically by or for a single company. These systems usually integrate one or more of the previously mentioned processes in order to achieve a final output. Many of the developers of these processes are secretive about how their process works.
Which is right? It’s probably best to ask each vendor if a second or two of the video can be transferred as a test. This could cost hundreds of dollars, but a video-to-film print will cost thousands. Better safe than sorry. Once it’s determined which process looks best (try projecting the samples at a local theater), determine the total cost of transfer. Some vendors will bargain. As new processes are being developed, they are anxious to get a few credits under their belt. On the other hand, if a well-known vendor is used, bargaining abilities will be limited.
Keep in mind that even though a rough cut can be projected with a video projector, one never knows exactly how good the film will look until the video-to-film transfer is made. If a re-edit is necessary after screening the film print, it’s going to cost some serious cash. Video-to-film transfers can cost anywhere from $7,000 to $40,000. Replacing a single edit can lead to even more expense.
Dropped Frames
Another important thing to consider when making a film from DV is the projection speed of 24fps. Video plays 30 frames per second. This means that one out of every five frames must be eliminated in the transfer to film. This could cause some serious problems with movement, but even more so with flash edits. Whenever possible, test, test, test! Try sending samples to vendors to see how they deal with the frame drops. Many processes will blend or interpolate the frames so as not to lose any information. In an interpolated frame, two or more frames are blended together before being transferred to film. Other less expensive processes will drop every fifth frame, which can lead to stuttered pans and tilts as well as important missing frames or single frame cuts (flash cuts) in a montage.
Once the video is transferred to film, it can do everything that you would expect of a film. The neg can be color timed, adjusting scene-by-scene or shot-by-shot, and you can duplicate and distribute it like any other film on the market. And the best advantage is that you can store it for long periods of time. You can even take the film and do a recut on a flatbed.
Video retains a reasonably long shelf life, but the magnetic oxide often flakes off, causing dropout. Dropout occurs when the scanning head of a videotape recorder hits a blank area of the mylar where no oxide exists. A dropout cannot physically be repaired on the videotape, although there are some solutions with paintbox systems for correcting it. Videotape is also subject to sticktion, a name derived from sticky friction. Sticktion occurs when the tape is stored in a hot and humid environment. Although videotape is fairly temperature resilient, it has a tendency to stick together when exposed to hot and humid environments for extended periods of time. Sticktion can ruin a videotape master. Heat and humidity can cause the videotape stock to chemically bond together, making playback impossible.
Perhaps the biggest artifact of videotape is technology. Videotape is limited by the devices which record it. Older television programs show their age by the limitations of the cameras of their day. Streaking lights, low contrast and muted colors are all commonplace in videos of the past. Perhaps this is why over 70% of prime time television is originally recorded on 35mm film.
Film is also affected by time. As the celluloid ages, it can become more brittle. But the most common artifact of film is color fading. The color of a film tends to fade toward magenta after an extended period of time. Magenta film can be restored and properly color timed.
No method of recording; digital, video or film, is timeless. But history has proven that film, with higher definition, more resilient properties, and an absence of the technological limitations of the day, has more longevity than videotape.