Figure 11.1 © Andrew Francis (www.xlargeworks.com).
Chapter 11
Fixing Editorial Problems
“One of these things just doesn't belong here.”
—Esthero
The editing phase of postproduction can be a logistical nightmare. There are hours of footage, multiple shots per scene, and multiple takes per shot. If a single frame of a single take is dropped from a production, the consequences can be disastrous. All of this is compounded greatly by the fact that there will inevitably be multiple “final” cuts per production (it's not uncommon to be faced with an edit titled “NEW final final cut 2” ).
The first part of fixing editorial problems therefore involves developing thorough organizational principles. Some people use notepaper to do this, others use spreadsheets and sophisticated software. However you choose to keep track of things, the most important thing is to be able to develop an intricate knowledge for locating information about any elements of the production (refer to Appendix 1 for some organizational tips).
How to Maintain Continuity
Continuity is one of the basic tenets of editing, but sometimes things can go awry.
1. Load the entire scene into an editing system.
2. Check for shots where the line of action is reversed, for example, a character facing left in one shot is facing right in the next. These can usually be resolved by flopping the shot.
a. If there are visible logos or other elements that are obviously wrong when reversed, use the technique in Chapter 9 to replace them with those that have the original orientation.
b. If there are visible logos or other elements that are obviously wrong when reversed, use the technique in Chapter 9 Certain camera angles require flips (along the horizontal axis) rather than flops. Use whichever method seems appropriate.
3. Check for shots where the color is inconsistent, such as two shots of the same subject where one of them is darker than the other. Correct these using the color tools at your disposal.
4. Similarly, check for differences in picture quality. Sometimes they may not be noticeable, other times a very grainy shot might stand out like a glowstick in a dark boardroom. Resolving differences in picture quality is not a simple task. Often you'll be able to improve the visible quality by a marginal amount by following some of the strategies throughout this book, but ultimately you'll have to decide between replacing the low-quality shot and, as a last resort, degrading the quality of the surrounding shots so that the difference is less noticeable.
5. Check for shots where there is duplicate action. For example, in one shot a door may close, and then in the next shot the same door closes again. Depending on the severity of the problem (and how it impacts the main action), these can be resolved by trimming one of the shots. For more extreme continuity errors, it may be necessary to use an alternate take; otherwise, you'll just have to live with it.
6. Check for shots where there is missing action. For example, did someone sit down at a table without first sliding the chair out? Sometimes these types of issues can be resolved by extending a shot or inserting new footage, but sometimes they can prove problematic, especially if the footage does not exist. In the latter case, you can imply that the action happened off-screen. In the example of the character sitting at a table, you could cut to a shot of something else between the character standing and then sitting down, which becomes more convincing if you insert the sound of a chair being slid out during the inserted shot.
7. Save the completed sequence.

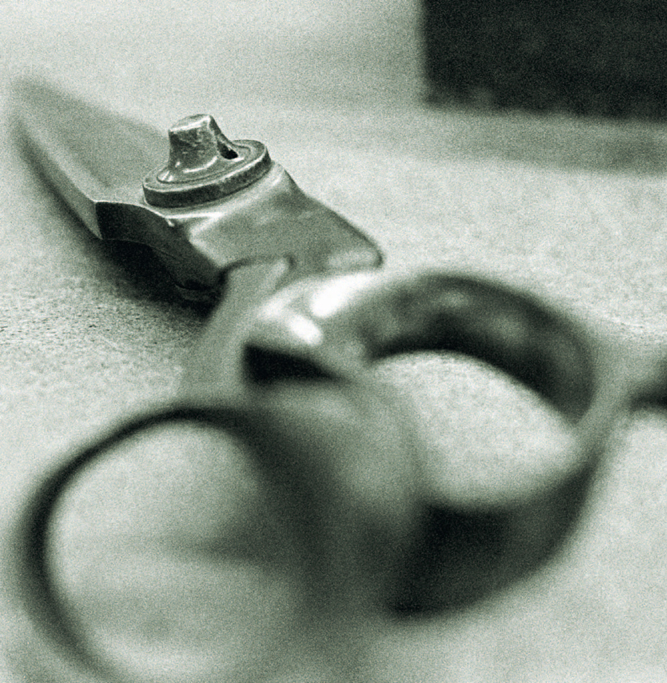
Figure 11.2
Needless to say, any changes to the edit, especially those that involve modifying cut points, should be approved by the picture editor. There are other factors to consider when changing the length of a shot, such as how it will affect audio sync, reel lengths, and the overall production duration. For this reason it is usually preferable to slip edits to minimize the impact of the changes: when extending a shot, trim the adjacent shot, and vice versa.
TIP
Careful use of audio can cover a range of continuity errors. If something looks strange (such as the same door closing twice in a row) but doesn't sound strange (we hear the door closing only once), we tend not to notice it. By the same token, ensuring audio continuity is just as essential as ensuring picture continuity, especially in terms of foley, background sound, and dialogue tonality. Refer to Chapter 7 for more on audio continuity.
How to Correct Flash Frames
The easier flash frames are to spot, the harder they can be to remove.
Single frames that stand out from the rest of the frames of a shot in some way are referred to as flash frames due to the fact that when you watch the footage at speed, it will appear to flash on the problem frame. Spotting them is part of the problem; deciding on the best way to remove them is the other part.
1. Load the sequence and identify the problem frame.
a. Some flash frames are easier to spot if you run the footage slightly slower than real time.
2. Many flash frames are caused by render or editorial errors, particularly if the footage has undergone any previous processing. If that's the case, return to the original footage and re-render it.
2. Some flash frames occur on the last (or first) frame of a shot, and are caused by insufficient footage for the edit. In this case, it may be possible to simply trim the rogue frame, or else slip the entire shot by a frame.
4. Some flash frames can be remedied by color-correcting them to make them match the adjacent frames.
5. In all other cases, cut out the flash frame and follow the procedure in Chapter 10 for regenerating missing frames.
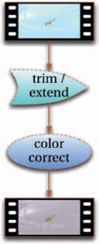
Figure 11.3

Figure 11.4 A flash frame just before a cut or one after the cut is usually an indication of a color correction that is out of sync with the edit. This can usually be resolved by re-outputting the footage from the color correction system, although it may be symptomatic of a sync problem elsewhere.
How to Remove Invisible Edits
Though invisible edits are not necessarily problems, removing them is a good practice to follow.
An invisible edit is a point where there is a cut embedded into what appears to be a single shot. For example, after conforming a sequence of three shots from an EDL, you may discover that there appear to be four separate shots (although the sequence itself is correct).
Invisible edits are a symptom of working in the digital realm. It's entirely feasible for an editor to edit two shots together and render them as a single file, which then gets loaded into a different system. Unfortunately, the new system has no knowledge that the new shot is actually composed of two separate shots. This may not cause any issues from a pragmatic point of view but should be corrected nonetheless, as it will help from an organizational perspective.
1. Load the footage into an editing system.
2. Cue to the point where the shot changes.
3. Cut the shot at that point.
4. Render out each new element separately.
a. You'll probably need to recut these two separate shots back into the main sequence, replacing the one with the invisible edit.
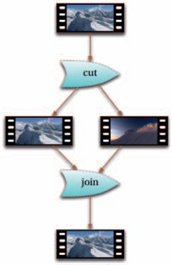
Figure 11.5
Soft Cuts
Soft cuts are like invisible edits, except they dissolve into each other, usually over the course of one or two frames. They are typically caused by bad video dubs between different video formats where frames get averaged together. It's not possible to fix these, save for cutting out the frames in question, so unless you have a copy of the original footage, you're stuck with them.

Figure 11.6 Earth © BBC Worldwide Ltd 2007 A soft cut across a couple of frames in a sequence.
How to Troubleshoot Dissolves
Fades can be the source of all sorts of problems.
Perhaps the most important thing to note is that you cannot reverse dissolves (or fades, for that matter) once they have been baked into the footage. Dissolves are a destructive process and thus are usually left until the end of postproduction.
The following process deals with problems related to dissolves created within an editing system just prior to rendering.
1. Load the sequence into your editing system and play through the dissolve in question.
2. If the dissolve appears to pop at the beginning or end of the fade, that's a sign that the footage used to build the dissolve is incomplete. For example, a pop at the start of a dissolve indicates that the start of the incoming shot is missing. Separate the two parts of the dissolve and step through each frame to determine where the problem lies. You may discover that there were not enough frames provided to complete the dissolve and will therefore have to recapture the shot with additional handles.
3. Sometimes there are no additional handle frames available to create the dissolve fully. You have a few choices in this case:
a. Shorten the duration of the dissolve to include just the available frames.
b. Trim one of the shots.
c. Repeat frames to generate additional source frame.
d. Perform a timewarp on the footage to slow it down just at the point where it's missing footage to generate additional source frames.
4. Sometimes the dissolve just inexplicably looks wrong, and it has nothing to do with the timing. In that case, it's likely that the type of fade being used won't work with the material you're using. Most editing systems offer at least a couple of different fade algorithms to use, so try using a different one. For example, try using an additive dissolve rather than a linear one.
5. Save the changes.
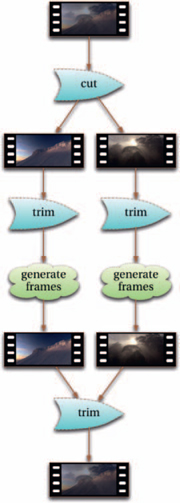
Figure 11.7
How to Create a Custom Transition
Digital systems allow you to create any sort of transition you can imagine.
TIP
It's never a good idea to attempt to color-correct material after a fade has been applied. The reason is that you end up applying the same correction to both the outgoing footage and the incoming footage, which means that you can end up with flash frames at the end of the fade, or (particularly if you're using shapes or keys as part of the correction) ruin the other shot's color. If you absolutely must color-correct a fade, use keyframes to effectively fade the effect of the correction in sync with the editorial fade.
1. Load the two shots and layer them together so that they overlap as you want the transition to appear.
2. Keyframe the outgoing shot with the process you would like to use, starting from the first frame of the overlap and ending on the last frame of the overlap. Reverse this process for the incoming shot.
a. To perform a dissolve, simply keyframe the opacity of the top layer. Use different blending modes to produce different effects.
b. To blur one shot into the other, keyframe the first shot to go from no blur to maximum blur, and the second shot to go from maximum blur to no blur.
c. To create a white-out transition, color-correct the first shot to go from normal brightness to maximum brightness, and the second shot to go from maximum brightness to normal brightness.
d. To create a custom wipe, keyframe the size and/or strength of a key or mask so that the first shot starts with no mask and ends up completely masked (the second shot should be on a lower layer and remain untouched, thus being revealed by the animated mask).
e. You can also create push-wipe type transitions (where one shot appears to push the other) by keyframing the size and position of each layer over the course of the transition.
f. Experiment with combining different processes.
3. Render the result.
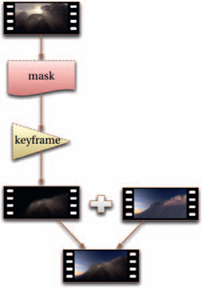
Figure 11.8
Pull-downs
It is difficult to convert between different formats while maintaining the integrity of each frame due to the differences in the frame rates of the various formats. If you want to output film footage, which runs at 24 frames per second, to NTSC video, which runs at 29.97 frames per second, you can simply retime it, which (if you use an interpolative retiming method) can produce smooth playback, but each frame is now different from the original it was created from (and thus the original frames cannot be recreated from the new version).
Situations where you need to preserve original frames but still have playback occur at the correct speed require a pull-down. A pull-down changes the speed of the footage by duplicating fields in a pattern (known as its cadence) so that the sequence as a whole runs longer. This makes it possible to recreate the original footage by performing an inverse telecine (IVTC), which reverses the pattern to restore the original sequence of frames at the original frame rate.
Different pull-down methods may be used for the same conversion, each with varying degrees of smooth playback (see Table 11.1 ).
Table 11.1 Different Pull-down Methods
| Original Frame Rate | New Frame Rate | Pull-down | Cadence |
| 24 | 30 | 2:3 | [AA][BB][BC][CD][DD] |
| 24 | 30 | 3:2 | [BB][BC][CD][DD][A'A']* |
| 24 | 30 | 2:3:3:2 | [AA][BB][BC][CC][DD] |
| 24 | 30 | 3:2:2:3 | [AA][AB][BC][CD][DD] |
* Note: A 3:2 pull-down is essentially identical to a 2:3 pull-down, but uses the B-frame as a reference point.
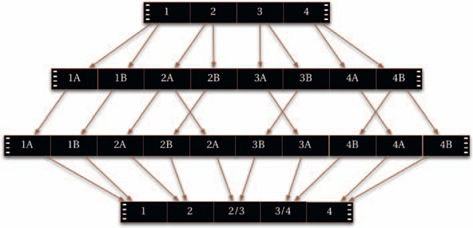
Figure 11.9 A 3:2 pull-down used to create 30 FPS footage from 24 FPS source material.
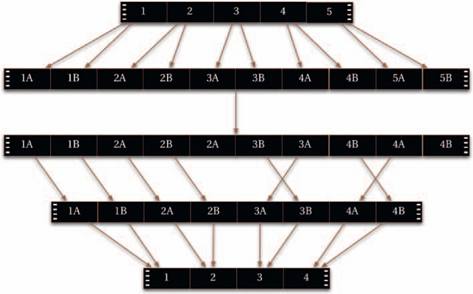
Figure 11.10 An inverse telecine used to restore a 24 FPS sequence from a 3:2 pull-down.
There are some loose ends still left to deal with:
• NTSC runs at 29.97 frames per second, so a reverse telecine from 29.97 will result in footage that runs at 23.976 frames per second rather than 24.
• There is no pull-down method to go from film at 24 frames per second to film at 25 frames per second. The common solution is to run the film footage frame for frame and speed up the audio by 4% to compensate for sync problems. Alternately, it is possible to duplicate a field every 12 frames.
• There is no pull-down method to go from NTSC to PAL. The solution is to perform an NTSC-to-film pull-down and run the resulting footage frame for frame and speed up the audio by 4%.
How to Reverse a Pull-down
Telecine judder, when playback is not smooth, is a telltale sign of video that has a pull-down that can be removed.
The addition and removal of pull-downs are usually handled automatically by editing systems, but all too often pull-downs can be burned-in to the footage, requiring a manual inverse telecine to be performed. There are several key pieces of information you'll need to get started:
• The frame rate of the source footage
• The frame rate of the current footage
• The cadence
• The corresponding A-frame
If you don't know the cadence of the footage, you can usually figure it out by analysis:
• Are there two frames or three frames making a single frame?
• Where does the timecode change (this will tell you where the frame boundary is)?
Jot down the pattern across several frames and you should be able to find a matching cadence and pull-down method.
1. Load the footage.
2. If there are invisible edits, remove them using the process above and treat each new clip separately.
3. Separate each field into a new frame (your system may be able to do this automatically):
a. Retime the footage to 50% of its original speed (without using interpolation).
b. Perform a cut on every single frame.
c. If the footage has an upper-first field order, go to the first frame and mask out every odd-numbered line in the image, and do this for every alternate frame. Then go back and mask out every even-numbered line of every other image (do the opposite for footage with a lower-first field order).
4. Ripple-delete any duplicates. For example, if you determine that your footage is using a 2:3 pattern, ripple-delete one of the B-fields (for instance, the third frame counting from the first A-field) and one of the C-fields in the first grouping, and likewise for every other grouping.
5. Swap frames that are now in the wrong order. For example, if the footage has an upper-first field order and there are two upper-first fields next to each other, swap the second one with the field following it.
6. Layer each pair of fields together.
7. Render out the sequence.
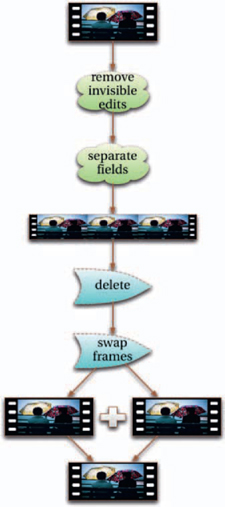
Figure 11.11
If you're going to spend any amount of time using this technique, you should learn how to automate the process as much as possible (for example, using tools like AppleScript or Adobe Photoshop's actions). Although the process is conceptually very simple, it is also incredibly laborintensive, and as much as possible should be done to reduce the time you need to spend on it.
Multiple Pull-downs
It's perfectly common to discover that a sequence contains a combination of shots that contain pull-downs along with those that don't. This can occur for a variety of reasons, such as footage originating from different sources or editing systems incorrectly (or incompletely) applying pull-downs and inverse telecines as part of some other process.
With that in mind, it can be worth returning to the original source material to see if it exhibits the problem, rather than spending much more time trying to undo it.
How to Convert 24 FPS Footage
It's uncommon to work at 24 frames per second, even for film-based projects.
This conversion technique assumes you want to retain the quality of each individual source frame so that it can be reversed later on if need be. In all other cases, simply use a speed change (discussed in Chapter 10) to generate new frames at the desired frame rate.
1. Load the 24 FPS footage into an editing system.
2. Convert it into your working frame rate.
a. For 23.976 FPS (such as 1080p23.98 HD video), change the frame rate metadata to 23.976 (it may be labeled as 23.98).
i. If there is an audio component to the clip, it will need to be slowed down by 1% to stay in sync.
b. For 25 FPS (such as PAL), change the frame rate metadata of the source file to 25. Provided your system does this without forcing the footage to be retimed, you will end up with a clip that has a shorter duration, but every frame will have been preserved.
i. If there is an audio component to the clip, it will need to be sped up by 4% in order to stay in sync.
ii. If you absolutely must ensure the same running time, you can apply a pull-down duplicate one frame every second (or better, one field twice every second).
c. For 30 FPS (such as 1080i60 HD video), apply a 2:3 or a 2:3:3:2 pull-down.
i. A 2:3:3:2 pull-down will produce smoother playback, but some editing systems may not detect it correctly if it needs to be reversed.
d. For 29.97 FPS (such as NTSC), first convert to 23.976, as described above, and then apply a 2:3 or 2:3:3:2 pull-down.
3. Render out the result if necessary.
Changing Frame Rate Metadata
Depending upon the specific file format, the base frame rate of a clip is usually stored as a metadata value inside the file. Changing this may be as simple as opening the file and selecting an option to view the file's properties, or by opening the file and resaving it with the new settings. For example, DV files can be opened in QuickTime Pro and the frame rate adjusted by saving the file as a different format. This process should not require re-rendering and therefore can happen quite quickly.
If all else fails, convert the clip to an image sequence using the process in Appendix 1, which can be re-interpreted by loading into a project using the desired frame rate.
How to Troubleshoot Timecodes
Timecodes are often a source of problems, but fixing them early on can prevent bigger problems from occurring later.
One of the most common (and infuriating) problems encountered in video postproduction involves timecodes, from being unable to capture footage from tape due to timecode breaks to not being able to sync shots correctly.
These problems are typically caused by faults on the source tape damaging the timecode track in some way. What makes many of these problems so frustrating is that the audio and pictorial can be completely fine, and yet the editing system will refuse to work with them without producing errors. The good news is that with the right tools, many of the issues can be fisxed.
1. If you're unable to even digitize the footage (try using a variety of software and settings to attempt to get the footage digitized), you will need to dub the tape first, and then capture from the dubbed tape.
a. Jot down the timecode of a frame known to be accurate (for example, a punch-hole or leader frame usually has a specific timecode) at as many points in the tape as possible.
b. You may need to dub the tape using internal timecode generation (this function is normally labeled as INT on the tape deck) to ensure that a consistent timecode is created on the newly dubbed tape. This will create new timecode that probably has no resemblance to the original, but we'll fix that later.
2. Load the digitized footage into an editing system. Set the start time of the timeline to coincide with the start timecode of the captured tape, and cut the footage in accordingly. For example, if the first frame of bars is known to be at timecode 09:59:30:00, set the start of the timeline to have this timecode, and then cut the footage so the first frame of bars is at the start of the timeline.
3. Do spot checks of specific frames to make sure the timecode of the timeline matches the original frame. Compare any differences between the original tape in a tape deck, as well as any copies the picture editor has been working with. Trim the footage in the timeline to fix any problems (you will typically need to insert one or more frames of black in problem areas, and very rarely, trim out rogue frames).
a. If the timecode drifts significantly, it is possible that the footage may need to use a different timebase. Calculate the differences in duration between the timeline and the reference video to see if a simple adjustment to the frame rate can be made.
b. In the worst case, it may be impossible to correctly re-create the correct timecodes (for example, due to timecode faults during the picture or audio editing stages). In this case you will need to ignore the timecodes completely and rely on eye-matching the shots to get the correct cut points.
4. Render out the timeline.
a. It is essential that the render settings use exactly the same settings as the original video format, or you will introduce compression or other artifacts.
b. Make sure the render writes the timeline timecode into the track of the new file. Some file formats do not support embedding timecode tracks during rendering, in which case you may need to use a different format.
Conforming Timecodes
One of the parts of postproduction where ensuring timecode accuracy is critical is when conforming the final picture EDL from source footage. Conforming is normally an automated process that works for the most part by matching reel numbers and timecodes. If they do not match exactly, the wrong frame, or even the wrong shot, will be conformed into the final sequence.
The fact that these mismatches occur fairly often is one of the reasons why it's not merely enough to rely on an EDL from the picture editor. Your eyes become your most useful tools here, and it is far more common to match footage based on an offline reference video than a list of timecodes.
How to Patch Frames
The process of patching frames is simple but is best left until the end of post-production.
T oward the end of postproduction, you're likely to encounter issues for which a quick fix is all that's practical (and if you're being pragmatic, necessary) considering the time available. For instance, if you discover that a dissolve performed at an earlier stage in the process has a flash frame, good practice would dictate that you return to the system where the dissolve was initially constructed, fix the problem at the source, re-render it, and push the new shot through the chain. All of which may not be possible if it has to be fixed in the cut within 5 minutes.
So sometimes you have to fix the problem in place. In the case of the flash frame, that means color-correcting the frame so that the flash is imperceptible, and then cutting the new frame back into the finished sequence. This process is known as patching, and it usually applies to individual frames rather than clips. It's commonly used to correct flash frames, or film damage noticed at the last minute. Overusing this approach will lead to a finished sequence that cannot be easily adjusted, which is why it is best left until the end of postproduction.
1. Open the finished sequence in an editor.
2. Mark in and out points around the frames to be replaced, and render the region.
a. If you will be using cloning or similar techniques, remember to include sufficient frames on either side of the problem area as a cloning source or for reference.
3. Load the newly rendered images and correct the problem.
4. Render out the fixed set of frames.
5. Cut the new frames back into the sequence, overwriting the problem ones
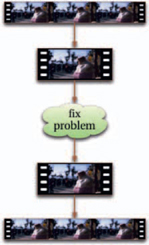
Figure 11.12
EDL Mathematics
Sometimes when working with EDLs, it becomes necessary to perform calculations on the numbers in them in order to make changes outside of an editing system. For example, it is common to take an EDL created for a 25 FPS project and use it to determine timecodes for the equivalent cut points at 24 FPS. The best way to do this is to use a spreadsheet and manually edit the changes there, or you can use software such as Synaesthesia by Surreal Road (synaesthesia.surrealroad.com) to do it for you.
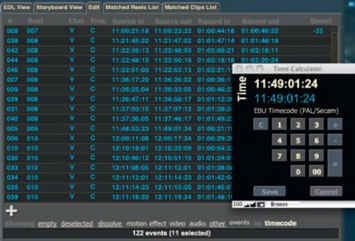
Figure 11.13 Synaesthesia by Surreal Road.