

Figure 4.1 © Escobar Studios (www.escobarstudios.com).
Chapter 4
Fixing Video Problems
“I'm just a cross-hair, I'm just a shot away from you.”
—Franz Ferdinand
Probably the most ubiquitous shooting format on the planet, video is loved by many, and loathed by a few. It's cheap, disposable, and easily obtainable. In the last decade, broadcast-quality video impregnated the consumer market, and today, even at the high end, high-definition video standards can be used with ease on even a modest desktop editing system.
The level of quality of video varies dramatically, from the (almost obsolete) standard definition formats such as PAL and NTSC, through high definition, to emerging formats such as RED, which offer an approximately twenty-fold increase in picture size of the acceptable broadcast specification.
Video Semantics
Technically speaking, “video” refers to a clearly defined set of specifications (standard and high-definition formats). Most digital video we are exposed to (such as those videos on YouTube or cell phones) does not fall into these categories, and are instead some proprietary digital format. However, the vast majority of what would be considered broadcast video cameras are digital in some way or another, and with formats such as Sony's XDCAM or Panasonic's P2 (which store footage in a completely digital format on computer-compatible media), this line is being blurred even further.
To avoid getting overwhelmed in technicalities, “video” in the context of this book will generally mean anything that is not originated on film, and “broadcast video” will be used to specifically refer to video formats used by broadcast television, such as NTSC, PAL, and 1080p.
Frames, Fields, and GOPs
Figure 4.2 © Mikael Altemark (www.flickr.com/people/altemark).
Video gives the illusion of motion by showing a sequence of images in rapid succession. Each image, or frame, is shown for a fraction of a second, typically such a short time that you don't consciously perceive it (the exact number of frames shown in a second is referred to as the frame rate). Most of the time, you can look at an individual frame from a sequence and it will appear indistinguishable from any other digital image (although it may differ in terms of quality). This is one of the reasons why it is often convenient in postproduction to split footage into its constituent frames before doing any processing.
Video isn't just made from frames, though. A single frame can be subdivided into fields, and a sequence of frames can be combined into a group of pictures (GOPs). Each of these can be further subdivided into various components as well (at which point that knowledge stops having any real practical application and serves only to make it all seem unnecessarily complicated).
GOPs define frames into a predictable pattern and are mainly used in digital compression technologies (a notable example being the MPEG standard for digital video compression), and therefore aren't really relevant most of the time, unless you run into compression artifacts (which is covered in Chapter 6).
Fields, on the other hand, are a much more common source of problems. A field is half a frame, and exists to solve a problem of bandwidth. During recording, many video cameras cannot process a complete frame fast enough to capture it in its entirety. Many video cameras process frames line by line from top to bottom, but by the time they get to the end, the image has changed slightly, leading to streaks in footage of fast-moving subjects. To compensate for this, the frame is divided into two fields, which are processed separately. For the first field, the camera records only every other line from top to bottom, and for the second field, records the other set of lines. The two fields are then stored as a single frame (the overlapping field lines are said to be interlaced).
You may already be able to see some of the problems this can cause. First of all, there is the delay between each field being photographed, which means that fast-moving subjects look distorted when seen as a still frame. (They may look fine during playback, however; this is usually because the display itself is showing one field at a time rather than a frame, or it may be that the frame rate is high enough that individual frames are imperceptible.)
Another potential sticking point is the order of the fields. The specification for each video format defines the order differently. The result is that some video formats record the first, third, fifth (and so on) lines first (this is known as “odd” or “upper first”), and others record the second, fourth, sixth (and so on) lines first (known as “even” or “lower first”). This can lead to a whole heap of mess, mostly because there is nothing in the video itself to determine which system is being used — you just have to be aware of it based on the type of video you're working with. If you process video thinking it has even field order when it actually has odd field order (or if it's not interlaced at all), you might not notice until you start to spot problems down the line.
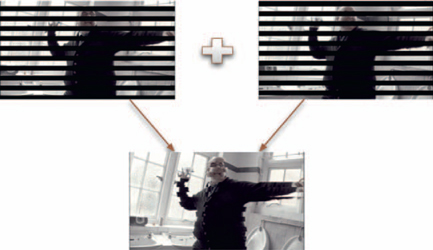
Figure 4.3 Frames are made up from two interlaced fields.

Figure 4.4 Each field is recorded at a different point in time.
TIP
Videos that are recorded with frames in their entirety (without using interlacing) are known as progressive scan. Both progressive and interlaced video can be stored as either type, though: it's not unusual to find progressive video on a tape that traditionally carries interlaced video.

Figure 4.5 Progressive scan records each frame in its entirety.
How to De-interlace Footage
If you plan on mixing interlaced footage with other types of media, you will need to de-interlace it to get the best results.
There are lots of reasons for de-interlacing video, but they ultimately boil down to either trying to squeeze as much image quality out of the footage as possible or reducing artifacts (such as those experienced when resizing or reframing interlaced footage).
1. Resize the footage to 50% of its original height, without using any interpolation (for example, use the nearest neighbor method). Then resize it again back to its original size, this time with interpolation (for example, using one of the techniques in Chapter 9).
a. At this point, you can stop here and you'll be left with a quick and dirty de-interlaced version.
b. Otherwise, save this version as the de-interlaced upper field.
2. Return to the original footage and crop out the top line. Then repeat step 1, which will leave you with the de-interlaced lower field.
3. Layer one of the two newly created versions on top of the other and set them to blend at 50%. This will produce your de-interlaced blended version.
4. Return to the original footage and go to the first frame. Create a mask by subtracting the current frame from the next frame.
5. Repeat this process until you have a mask for all the frames in the sequence (to generate a mask for the final frame, subtract it from the previous frame). This mask sequence roughly represents the areas of motion between frames.
6. Layer the de-interlaced blended version on top of the original footage, using the mask you just generated to confine it to regions of motion.
7. Render out the final sequence.
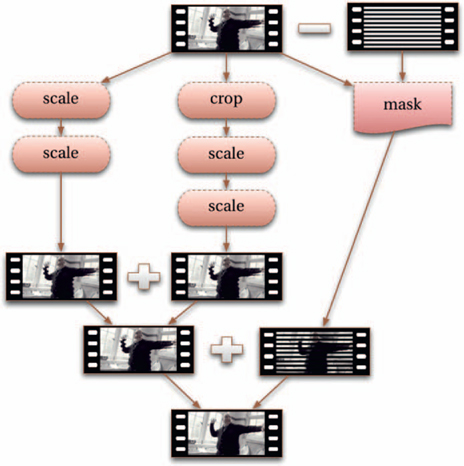
Figure 4.6

Figure 4.7 Close-up, the teeth of interlacing can be seen.

Figure 4.8 After de-interlacing.
TIP
Most video editing applications include a method for de-interlacing video automatically, and this is one of the few instances where I'd advocate using them, if for no other reason than it makes the process much faster. Some software, such as the de-interlace plug-ins by Nattress (www.nattress.com), can achieve results that just aren't possible even with hours of labor.
How to Interlace Footage
Though not a particularly common process, interlacing progressive footage is simple to do (see Figure 4.9).
The most likely reason for wanting to deliberately interlace footage is that you plan to mix it with other interlaced footage, and/or you are outputting to a device that expects to see an interlaced source.
1. Load the footage into an editing system.
2. Retime it to 50% of its original speed (so that it runs twice as fast), using an interpolative method (if your system can't do this, refer to the techniques in Chapter 10). This will generate intermediate frames, but they will be sandwiched between the originals.
3. Remove the first frame from the new sequence, and then retime it to 200% of its current speed (so that the duration matches the original), but this time, make sure it doesn't interpolate the frames. This should leave you with just the interpolated frames (if not, try again, this time without removing the first frame).
4. Create a mask that includes every alternate row of pixels in the frame, starting with the first line.
5. Layer the original footage with the interpolated version in the following way:
a. If you want to create upper-first interlacing, put the original on top of the interpolated version.
b. If you want to create lower-first interlacing, put the interpolated version on top of the original. Refer to Appendix 2 for a list of the field orders of the most popular video formats.
6. Apply your mask to the top layer.
7. Render the sequence.
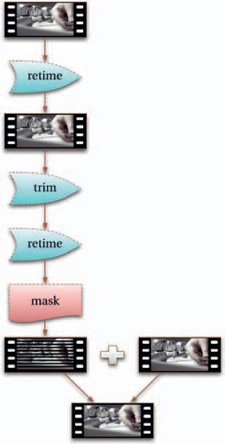
Figure 4.9
Note that this approach may cause the very last frame of the new sequence to not be interlaced, so it is advisable to use footage that is overlong (has handle frames) where possible.
TIP
Even if you're only going to be working with interlaced footage, you should still strive to de-interlace it before doing any postproduction work. In fact, this is crucial if you plan to resize or reposition interlaced images, or do any sort of painting or layering (for example, adding text). Furthermore, you will greatly reduce artifacts that may be caused by operations such as keying or tracking if you first de-interlace. Even though it leads to a slight loss in the original picture quality, de-interlacing, then processing, then re-interlacing it provides substantial benefits overall.
How to Correct Field Dominance
The field order of a sequence can break for several reasons, making playback appear distorted.
Sometimes interlaced footage looks wrong during playback. The “mice teeth” telltale signs of interlacing may become very prominent, or motion in the footage may appear to vibrate. If you can rule out any faults in the display device, then the mostly likely explanation is that the field dominance in the footage — the order in which each field appears — is wrong. The first stage to fixing this problem is to do a little detective work to find out how exactly the dominance is wrong.
1. Load the footage, and make sure that your system isn't set to de-interlace the display automatically.
2. You will first need to determine what the field order should be from the format type (refer to Appendix 2 for a list of the field orders of the most popular video formats), and then compare it to what it currently is by inspecting the first few frames of the footage itself. To do this, look for motion that goes from left to right across a few frames. Examine one of the frames where the motion is quite pronounced, and you should see the “mice teeth” over the areas of motion.
a. If you don't see any interlace patterns, then this indicates that the frame is actually progressive, and the problem can be fixed by using the interlace technique described above.
b. Lines where the teeth extend to the right side were recorded as the second field. Teeth extending to the left are the first field. From the very top of the frame, count the number of lines until you can identify one of the lines as field one or field two. If you find that field one occurs on an odd-numbered line (or that field two occurs on an even-numbered frame) then your footage is currently set to upper-first. Otherwise, it is set to lower-first.
3. Compare the current field order to what the definition of the format is (in other words, what it should be).
a. If the field orders don't match, then the fields need to be reversed.
b. If the field orders are the same, then either the cadence (the order in which the fields appear within the frame sequence) is wrong, or it is being interpreted incorrectly. To determine whether the cadence is to blame, check the motion between adjacent frames. If the motion looks unnatural or appears to vibrate, then the cadence is wrong, and the fields are appearing on the wrong frame.
c. If you find that the footage is being interpreted incorrectly, you will need to check the metadata of the footage file and correct it as needed. Typically, there will be a setting somewhere within the file itself to denote the field order, and the chances are that this has been set incorrectly.
4. In the case of needing to fix the cadence or reversing the fields, the next thing to do is separate the fields. To do so, create a mask that includes every alternate row of pixels in the frame, starting with the first line. This will be your upper field.
5. Layer the upper field version on top of the original (this will cause the lower layer to become the lower field). Yo u must now offset the relative position in time of one of the layers to the other by one frame. If your footage should be upper field first, then you will probably need to ripple-delete the first frame of the top layer (and delete the last frame of the lower layer) or vice versa. Resolving cadence issues might take a little more trial and error, but usually trimming one or two frames from the start of one of the layers will do the trick (in really problematic cases, it may be necessary to re-edit the frame sequence of one layer to get the desired result, but bear in mind that cadence-related problems always have a pattern to them).
6. Render out the sequence.
Figure 4.10

Figure 4.11 Footage with reversed dominance, where the frames are in the correct order, but the fields are in the wrong order.

Figure 4.12 Footage with incorrect cadence, where the fields are out of sync with the frames.

Figure 4.13 Footage with incorrect cadence, where the fields are out of sync with the frames.
TIP
Incorrect cadence might be an indication that the footage has undergone a pull-down process, in which case additional work may be required to restore the footage correctly. See Chapter 11 for more on this topic.
How to Remove Stretched Fields
Removing fields is one thing, but when the fields themselves have been modified, it can be a bit trickier (see Figure 4.14).
With a little experience, de-interlacing footage can become a routine process, especially if you use plug-ins to do most of the work for you. On occasion, though, you may be faced with video that has the hallmarks of being interlaced, but traditional de-interlacing approaches seem to make the situation worse. On closer inspection, you find that the field lines are more than 1 pixel in height — larger than all de-interlacing processes expect them to be.
This is usually the result of interlaced footage being resized without first being de-interlaced, or it could be the result of an interlacing process gone awry.
1. Load the footage and zoom in so that you can see individual pixels. The first thing to note is how many pixels in height each of the “mice teeth” are. If you're lucky, the mice teeth will have hard edges, indicating that they are an exact number of pixels high. If the teeth appear to blur slightly across the rows of pixels, you will need to work out the height by counting a number of rows and calculating the average height.
2. The next thing to note is whether each field line contains any vertical detail, but the teeth sections are hard-edged (not blurry).
a. If it does, then this is a sure sign of an interlacing process gone wrong. Yo u can fix it by following the procedure for correcting field dominance above, but create the mask to match the height of each field line rather than setting it to 1 pixel. The chances are that this will result in a de-interlaced sequence.
3. Resize the footage so that each field line is 1 pixel in height. For example, if you found that each field line was exactly 3 pixels in height, resize it to 33.3% of its original height; if it was 2.5 pixels, then resize to 40%. Make sure not to use any interpolation (for example, use the nearest neighbor filter). If the teeth are still vertically blurred, you can try using a vertical sharpening filter.
4. You can now de-interlace using the procedure above. If you couldn't successfully produce a version at the right size with hard-edged teeth, you will also need to apply a slight vertical blur to the upper and lower fields you create as part of the process to prevent artifacts.
5. Finally, resize the footage to its original height, if necessary, and render.
Figure 4.14

Figure 4.15 Here, each field is 2 pixels in height.

Figure 4.16 After resizing, the field lines are now each a single pixel high.
How to Remove Drop-out
Drop-out is fairly common, but very quick and easy to remove (see Figure 4.17).
“Drop-out” is the term given to a type of damage that video can suffer. It can be recognized as blocks in the image (these could be blocks of color or even other parts of the image) in one or more places on individual frames. In the days of videotape, drop-out was caused by tiny pieces of the tape's surface breaking off or getting damaged in some way. In the digital world, data corruption can lead to a similar effect.
1. Load the footage.
2. On frames that exhibit signs of drop-out, clone areas from adjacent frames, or from elsewhere in the current frame until all the damage has been removed completely from the image.
3. Render out the sequence.
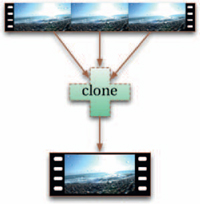
Figure 4.17

Figure 4.18 A frame exhibiting drop-out. © Jack James.

Figure 4.19 The corrected frame.
TIP
Although digital corruption can exhibit similar effects to drop-out, it can be a little more complicated to fix because damaged digitally compressed videos can have additional problems. Refer to the techniques in Chapter 6 for more information.
How to Reduce Ringing
Oversharpening is destructive to the image, and should be avoided at all costs. If it's too late for that though, all is not lost…
Ringing (also referred to as haloing, or occasionally (and incorrectly) as ghosting) is caused by excessive digital sharpening. Since there are many ways that footage can undergo digital sharpening (such as in the camera itself or as part of some digital postprocessing operation), it is not unusual for multiple sharpening processes to stack together, resulting in footage that actually becomes damaged as a result.
The effect of ringing is normally seen on edges in an image: the edge appears sharp, but there appear to be outlines on either side of the edge. It's one of the most destructive things that could happen to an image. The following technique can help reduce the apparent effects of ringing, but cannot recover detail that has been lost (see Figure 4.20).
1. Load the footage.
2. Apply an edge detection filter across all frames. This will isolate the edges in the original. Now we need to isolate the regions next to the edges, where the oversharpening effects are.
3. Apply a second edge detection to the result. This will outline the previously found edges.
4. Blur the result a little. This will form the mask for the next step.
a. You may need to color-correct the mask to focus on the appropriate region.
5. Blur the original footage, constraining the blur to the mask you just created.
6. Render out the result.
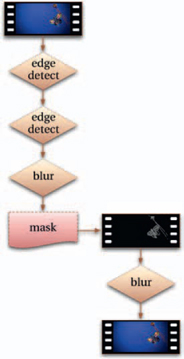
Figure 4.20

Figure 4.21 Close-up of footage with ringing. © Andrew Francis (www.xlargeworks.com).

Figure 4.22 The footage with reduced ringing.
TIP
This technique can be tweaked to produce better results by separating the image into shadows, mid-tones, and highlights. Our eyes are more sensitive to the effects of ringing in the highlight regions, less so in the shadow regions, and hardly at all in the mid-tones, so you can adjust the effects of the technique in each of those regions separately to avoid reducing the image quality too much. You can also experiment with separating the luminosity from the color, and constraining the effects to just the luminosity.
Ghosting and Cross-talk
Ghosting and cross-talk are problems created by transmission or circuitry errors in analogue video. What happens is that the signal gets duplicated in some way, adding to the original and interfering with it. In the case of ghosting, this is seen as a visual echo throughout the video. The complexity of the resulting footage means that it can't be fixed using digital means; instead, the only option is to produce a new copy from the original video source.
How to Convert Video Formats
Converting video between different formats requires a combination of several techniques.
Because there are so many different video formats in popular use, it becomes somewhat inevitable that at some point you're going to need to convert from one format to another. There are many applications that promise the ability to convert between the formats effortlessly, but in practice even these require a great deal of trial and error to get perfect results and are therefore more suited to situations where you need to automate the process of converting one specific format to another several times.
1. First, get the specifications for the format you're converting from, and the format you're converting to, in terms of the frame size, aspect ratio, frame rate, compression, bit depth, and field order (refer to Appendix 2 for the specifications of the most popular video formats). For the source video file, you can take advantage of tools such as the freely available MediaInfo (mediainfo.sourceforge.net) or VideoInspector (www.kcsoftwares.com) to retrieve most of what you need from the file itself.
2. If the source is interlaced, use the process outlined on page 58 to de-interlace it (you should do this regardless of whether or not the target format is interlaced, as it will improve the results from all other steps in this technique).
3. If the source resolution (or aspect ratio, or pixel aspect ratio) is different from the target resolution, then it will need to be resized, using the techniques in Chapter 9.
4. If the frame rate in the source and target formats is different, use one of the techniques in Chapter 10 to retime it.
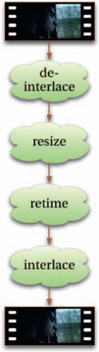
Figure 4.23
5. If the target format is interlaced, use the procedure on page 60 to interlace it.
6. Render out the sequence. Be sure to render to a file format that supports the compression type and bit depth of the target format (alternatively, render to an uncompressed format and then transcode it into the desired format later).
Scaling Video
The nature of digital video means that the need to resize it in some way is very common. The most obvious cause for resizing video is when converting formats, such as when you want to get an HD video source onto a regular DVD (which expect standard definition picture size), or when scaling lower-quality video sources for output to high definition, but there are many other situations where scaling plays an important role.
The problem is actually two-fold; first you must recompose it to match the aspect ratio (the shape of the frame) of the desired format, and then you must resize it. Resizing any digital image is not as simple as it might seem. Different methods give results of varying quality, and some approaches take much more time than others. The topic of resizing and repositioning digital footage is discussed in greater detail in Chapter 9.
How to Make Video Look Like Film
Trying to emulate the “film look” is something that is often attempted; here is one way of doing it.
First of all, a disclaimer: it's not really possible to make something shot on video look like it was shot on film. Film has many properties that give it a unique look that can be difficult, even impossible, to emulate with pixels. Trying to mimic different film stocks requires radically different approaches.
Now that that's out of the way, the “film look” is an incredibly desirable technique to master. Although it's rarely necessary (trying to mix video footage with film footage not withstanding), it's something I'm asked about on a regular basis. The following approach isn't necessarily going to produce the most realistic results, but it provides a structured approach that's well suited to different types of footage.
1. Load the video (ideally, you'd also have at least a reference image of the scene shot with a disposable film-based camera, but this is unlikely).
2. De-interlace the footage if necessary, using the technique on page 58 (interlacing is only exhibited by video footage).
3. Inspect the footage for any signs of oversharpening and use the technique on page 67 to eliminate it if necessary (digital sharpening is a telltale sign of video-sourced images).
4. Reduce any noise in the footage, using the techniques in Chapter 6.
5. Stabilize the footage using the method in Chapter 3 (the complexity of shooting film encourages steadier footage than video, and steady footage is thus synonymous with the format).
6. Resize the footage so that the pixel dimensions match those of the chosen film format (refer to Appendix 2 for the specifications of the most popular film formats), using the techniques in Chapter 9. Make sure you match the aspect ratio as well.
7. Use the technique in Chapter 10 to add motion blur (film tends to be shot with the shutter open longer than in video, and so exhibits more motion blur).
8. Use the technique in Chapter 5 to add grain to the footage.
9. If you want to emulate film damage, you'll need some scanned film that doesn't have any picture content. Then create a mask based upon the dust and scratches and use that in a new layer.
10. Color-correct the image to make the shadow regions a bit deeper, increase contrast in the mid-tones, and reduce the saturation of the reds and blues a little.
a. Different film stocks have slightly different color responses. For example, 8 mm footage tends to have stronger yellows, so saturating the yellow regions will help to emulate 8 mm film.
b. You may find that adding a small amount of glow to the footage gives it a more film-like quality.
11. Render the sequence out, if necessary resizing it back to the original resolution.

Figure 4.24

Figure 4.25 A frame of footage shot on video. © The Cheerleading Company (www.cheerleadingcompany.co.uk).
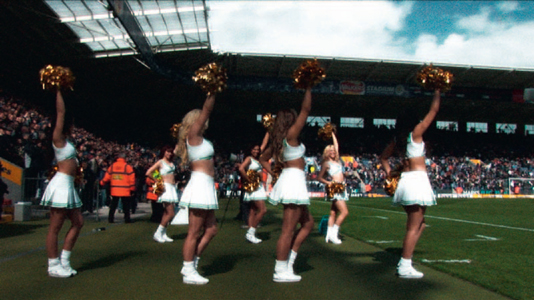
Figure 4.26 The resulting film-look frame.