Figure 6.1 © Maria Lorenzo (www.flickr.com/photos/eme06).
Chapter 6
Fixing Digital Problems
“Come with me, you will see, it's easy.”
—Chungking
During the course of about a decade, the digital image went from being a medium for scientists and specialists to the most popular method for creating and sharing pictures on the planet. The pace of technological advance in this field has been astounding; the hardware required to process and store film-quality images is readily available on the average home computer, and it is almost effortless to work with digital images, given the abundance of free, intuitive software packages, and the same is becoming true of file-based video formats.
On the aural side of things, most people are at least accustomed to the idea of file formats such as MP3 as a means for storing music, and many professional audio institutions have completely done away with analogue recording methods, relying completely on storing uncompressed sound as files on hard disks.
It is natural to assume, therefore, that all the issues related to digital media would have been completely ironed out by now, or at least well documented. The reality of working with any sort of digital material is that it is not quite as painless as we might like to think.
The single greatest benefit of any digital format is the ability to make a perfect copy. The second benefit is the ability to process the data in a variety of ways. However, each of these situations can be a source of potential problems. In the first instance, copying data can fail due to any number of reasons, resulting in incomplete or in some way corrupted data. And by the very nature of digital processing, media can be altered incorrectly in a variety of ways. In both cases, a problem may not be spotted until it is not possible to return to the original and try again.
Digital Corruption
For all their different flavors and glamour, digital files are just strings of numbers. What may be a digital image in one instance is a text file full of gibberish, or an audio clip of screaming static, in the next. The difference between the two may be as small as just a few digits. Once you factor larger structures into the mix (for example, a digital video file that consists of multiple digital image frames, or a digital audio file that consists of multiple audio channels), you may start to realize how fragile the foundations of all these conventions really are.

Figure 6.2 © Louise Docker (www.flickr.com/photos/aussiegall,texture www.flickr.com/people/nesster).
It might take only a single bit of askew data for a digital file to become corrupted. Examples of digital corruption can be found in everyday life, from the iPod that mysteriously skips a beat to the digital television picture that freezes from time to time. (And as a rule, the more complex the data, the more likely it is to suffer —when was the last time you received a partially scrambled email message?)
The thing about corruption is that it manages to find its way into data, in spite of (or perhaps even because of) your best efforts to prevent it, in much the same way that anything organic will eventually decay (this is not a perfect analogy; in most cases, simply leaving files untouched is the best way to protect them).
Assuming you can't just go back to an uncorrupted source file, there are ways to fix most of the common side effects of corruption. In fact, it is sometimes more convenient to perform a quick fix than to search through backups for a pristine copy.
TIP
Corrupted digital audio will usually manifest in the form of pops and clicks (assuming that the file hasn't been rendered completely useless). For techniques to fix these sorts of problems, refer to Chapter 7.
How to Fix Pixel Corruption
Pixel corruption can be so quick and simple to fix that it might be faster to fix this form of corruption than to replace the file.
Pixel corruption can manifest in different ways. It might be that a single pixel on a single frame is the wrong color. Or a group of pixels might be corrupted, perhaps over several frames.
1. Load the footage.
2. Scrub through the footage to identify the extent of the damage.
a. If the corruption occurs on only a single frame (or sporadically across a few frames), clone from adjacent frames to remove it.
b. If the corruption persists across several frames, follow the procedure for removing tramlines covered in Chapter 4.
c. If the corruption covers a significant part of a single frame, follow the procedure in Chapter 10 to remove the frame from the sequence and then regenerate the missing frame.
3. Render out the sequence.
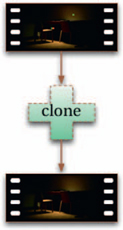
Figure 6.3
Digital Artifacts
Many digital problems arise because of the inherent limitations of digital systems. These limitations can be mathematical (for example, color values exist as discrete steps in digital systems, rather than as continuous spectra as in nature) or geometric (for example, pixels are always rectangular), and can be the cause of a wide variety of different defects, or artifacts.
Some of these defects can be very subtle, and some very much in your face. Because most people don't bother to fix these faults when they arise, and because digital images are so prolific, you see them everywhere. This, in turn, has the effect of making the problems more subliminal.
There are two main reasons for removing artifacts from digital media: to improve the quality and to make it look less digital.
TIP
In my experience, the process of undeleting files is one of the best ways to end up with a lot of corrupt files. Deleted files recovered by a utility may appear to be intact at first glance —the file sizes may check out, and the files may even appear to open normally —but when the time comes to process them, an abundance of problems may reveal themselves. Attempting to undelete files is therefore best used only if there are no alternatives, rather than as a shortcut to restoring from a backup.
How to Anti-Alias Pixels
Aliasing is the most noticeable of the digital artifacts, and the easiest to cure.
Aliasing (also known informally as the “jaggies”) occurs because the square shape of pixels can't reproduce curved or diagonal edges very well. When coupled with the digital sharpening techniques present in most imaging devices, moving footage with aliasing can be very distracting to watch.
1. Load the aliased footage.
2. Scale it to around 170% of its original size, using the techniques in Chapter 10 (err on the side of smoother rather than sharper edges in this case).
3. Render out the resulting sequence.
4. Load the new footage, and scale it back down to its original size (around 59% of the new render), again using smooth interpolative techniques.

Figure 6.4
How to Reduce Noise
Noise is rampant in most digital media, and too much of it can make the footage painful to watch.
1. Load the footage.
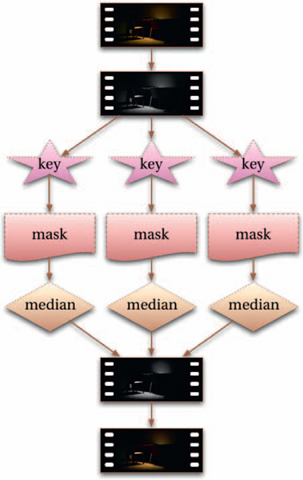
2. Separate the channels, so you can work on just the luminance channel.
3. Key the luminance to obtain masks for shadows, mid-tones, and highlights.
4. Apply a median filter three times to the luminance channel, using each of the masks in turn. You will likely want to use stronger filter settings for the shadows, with the highlights receiving the least of all.
5. Render out the sequence.
The median filter has an effect similar to using a blur filter, but rather than blending pixels together evenly, it analyzes each group of pixels and eliminates the least popular one. The net result is that any pixels that are seemingly random (in other words, noise) are replaced with a more likely result.
TIP
One of the most common cases of aliasing that causes problems is with credit rollers. As they typically consist of white text on a black background, they have lots of high contrast curves and the aliasing can be very prominent. However, the benefit of this situation is that the credit rollers are usually computer-generated, so the text elements (and hence the edges) are resolution-independent. Therefore, the trick to getting high-quality, unaliased credit rollers is to first render them out at a higher-than-necessary resolution, then scale them down to the desired resolution. If you aim for twice the desired resolution before reducing, you usually won't see any aliasing in the final output.
The problem with this approach is that it can also remove actual detail to some degree. There are specific noise-reducing plug-ins available that analyze frames on either side of each group of pixels as well to better calculate which pixels are likely to be noise in each case, making it less likely that you remove details. If you have such plug-ins at your disposal, make use of them.
How to Reduce Banding
Banding is seen in digital media as steps in color graduations.
While aliasing is a side effect of the relative size of each pixel, banding is a side effect of the relative color of each pixel. The problem is fairly common; however, it's usually not very noticeable. Where you see it is in regions of graduated colors, such as a sky that smoothly blends from a deep blue at the top to a lighter blue at the bottom. When banding occurs, you can actually see the steps where one color becomes another.
The following technique takes advantage of the fact that we're more sensitive to details in luminance than in color, which allows the banding to be reduced without seeming to lose any quality.
1. Load the footage.
2. Separate the channels so you can work on just the color channels leaving the luminance channel untouched.
3. If the problem is confined to a specific range of color, mask the affected areas by creating a key to cover that range.
4. Apply a blur filter to the isolated color channels.
5. Add some noise to the sequence and preview the result.
6. If there are still signs of banding at this point, this is an indication that the banding resides primarily within the luminance channel. In this case, add some noise to the luminance channel as well.
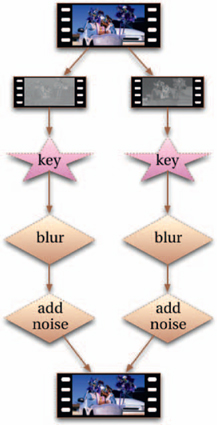
Figure 6.6
Compression
It's probably worth restating this point here: digital media are made up of a bunch of digits. The more detail you have in your footage, the more numbers you need in your files, and that means more disk space. An hour of film-resolution footage, for instance, can require one or more terabytes of storage space. This is not as much of a problem as it used to be, but keep in mind that not only do you need to store your data, but you'll also want to manipulate and move it around quite a lot, which in turn means that not only do you need extra storage space for higher detail, you also need extra time, perhaps the most valuable commodity in post.
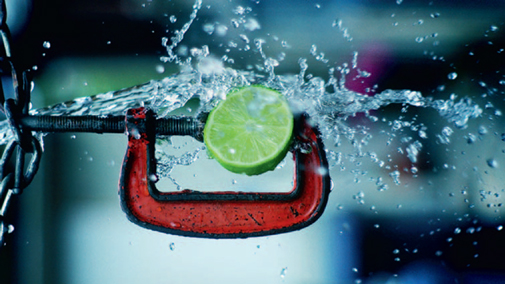
Figure 6.7 © Steven Fernandez (www.flickr.com/photos/stevenfernandez).
One of the solutions to this problem is to change the way the data are represented to use a more efficient structure. Without delving into a technical dissertation on the subject, consider that in the world of instant messaging, the phrase “be right back ” can be reduced to “brb” without losing its meaning. Similarly, digital files can be compressed to save space.
Lossless compression is a form of compression in which the file size is reduced by storing the data more efficiently, but which doesn't compromise the quality of the data at all. Lossless compression can typically reduce file size by up to 50%, but it is not used very often because it can be argued that the net gain of the reduction in size is offset by the additional processing required to decompress it (there is also the argument that data errors in lossless-compressed media are harder to correct than in uncompressed media).
On the other hand, lossy compression reduces file size by reducing quality. The reduction in file size can be so great that it becomes beneficial to do so. Many lossy compression methods reduce quality in an intelligent manner. For example, JPEG compression, which can reduce file size by a factor of 90%, is designed to discard details that are imperceptible to the human eye. But there's the rub: in postproduction, just because we can't see the extra detail doesn't necessarily mean it is useless. For example, consider a shot of a tree in bright sunlight. As it is, we cannot see the blades of grass in the deep shadow, or the clouds in the bright sky, so JPEG compression would discard these hidden details, which is fine, because we wouldn't be able to see them anyway. But if we wanted to take the JPEG version and brighten the shadows or darken the sky, the lack of detail in those areas would become immediately apparent. On the other hand, if we tried the same procedure on a non-compressed version, those hidden details would become visible.
Lossless Conversion
Knowing which formats use compression (as well as the properties of the compression they use) is very important when rendering or converting footage. It can be very tempting to save disk usage by rendering to a lossy-compressed format, but every time you do this, your footage loses quality.
The ideal situation is to use formats that use lossless compression (or even better, not to use any form of compression at all), although as a rule of thumb, if you stick to rendering everything to the format your source media is in (or even to your output format), you shouldn't end up with any serious problems down the line.
In digital video, there are also other types of compression. In intraframe compression, each frame is compressed independently from the others. Interframe compression, on the other hand, uses differences between frames in order to compress the video (this is the method used by MPEG compression, for example). This results in much smaller file sizes, but is less desirable prior to final output, as it becomes difficult to alter aspects such as color (as well as potentially introducing various artifacts into the footage), let alone the devastating loss in quality (meaning, it's advisable to avoid this type of compression wherever possible).
TIP
Certain compression methods use bitrates to determine the degree of compression. The point of these is to limit the throughput (bandwidth) of data during transmission. While this may be of importance during distribution and exhibition (and for certain output formats that have a maximum allowable bitrate), it is not usually a concern during postproduction, and so the bitrate should be kept as high as is feasible.
Color Sampling
Certain video formats use a form of compression known as a sampling ratio. These discard information from each color component at the specified ratio. For example, YUV 4:2:2 compression discards half of the color values from the U and V components compared to the luminance (Y), whereas YUV 4:2:1 discards half of the U component and three-quarters of the V component.
Most of the time this happens at the recording stage, so if you have footage that was shot on a format that uses color sampling, there is no way for you to retrieve the missing detail (on the plus side, it does mean you can keep the file sizes down throughout the majority of the postproduction process). However, you should aim to use formats that maximize the sampling ratio as often as possible, particularly if you plan to do any color correction.
Essence and Metadata
Digital media tends to consist of two components. The data related to the actual content, such as the image or audio data, are known as the essence. The data related to the subsidiary properties of the essence are known as the metadata (literally, data about data). Depending upon the specific media format, the metadata might contain, for example, the frame rate (for video), print size (for images), and the volume level (for audio).
The distinction can be important, as these types of data can be modified independently of each other. Modifying the metadata alone will almost never result in a loss of quality of the essence, and can usually be done very quickly in comparison to modifying the essence.
Compression Damage
Because compression methods are so destructive, they often produce artifacts that cannot be easily removed. The most common of these are block-level artifacts, where the individual blocks of pixels used as part of the compression algorithm become clearly visible to the viewer. There are other types of errors, many of which become pronounced during further processing (for example, through color correction).
Unfortunately, there is no simple way to reverse the majority of damage caused by compression errors. For some simple problems, it may be possible to treat them as if they were other, more common problems, using techniques discussed earlier in this chapter. Even generic approaches such as noise reduction and cloning techniques can sometimes heal a lot of the damage. Alternatively, there

Figure 6.8 © Andrew Francis (www.xlargeworks.com).
is software that is specifically designed to combat certain forms of compression damage, which can work well in the right situation. Usually, though, your options will be to return to a precompressed (or at least, a slightly less compressed) version or just live with the damage.
Audio Compression
Although the term compression in the audio world can refer to the process of changing the properties of an audio sample, there are also algorithms that reduce the size of an audio file (most notably MP3). Many of these are lossy, like JPEG and MPEG, and are therefore destructive processes.
Because audio requires comparatively little disk space, however, in the vast majority of situations, you should avoid using any sort of compression altogether.
How to Work with Multiple Formats
One of the great benefits of working in a digital environment is that it enables lots of different media to be combined.
It's typical for any modern production to combine media sourced from different places, and which therefore must combine material in different formats. More than this, it is very likely that multiple output formats will be produced from a single final master.
Depending on the system you're using, you may be able to simply load all the footage and have the system convert the formats as and when it needs to. If it can't (or if it can't do it reliably), you'll need to follow these steps to convert it all into a common format:
1. Assemble all the different media together and make a note of the properties of each. Based on this information, as well as the properties of the formats you'll eventually be outputting to, decide upon a mastering format to use.
a. When deciding upon the mastering format, ideally you'll choose one that preserves the highest quality aspects of each of the source and output formats.
2. Follow the techniques in Chapter 9 for resizing footage to the mastering format.
3. Follow the techniques in Chapter 11 for ensuring continuity between the different source formats.
4. At this stage it may be worth outputting to the highest-quality destination format (if it's practical and economical to do so) to preview how it will look.
Intermediate Formats
The digital intermediate paradigm, where the source footage for a production is converted to a single digital format before output to various other formats, was originally pioneered for film production but is valid for many other production pipelines and can ensure a high degree of quality and flexibility throughout the postproduction process.
See Digital Intermediates for Film & Video (Focal Press) for more about the entire workflow.
Outputting to Different Formats
When planning to output a production to different formats, you should make a list of the differences between the mastering format that you're going to be generating the output from and the target format (also see Appendix 2 for details of the most popular formats). Pay particular attention to
• Differences in resolution
• Differences in aspect ratio
• Differences in frame rate
TIP
In order to save yourself a lot of aggravation later on, you should try to work with footage that has a pixel aspect ratio of 1.0 as much as possible, at least until you render your output format at the end. To do this, calculate the resolution based on a pixel aspect ratio of 1.0 and render a copy of the footage using these new dimensions to work with. When you're finished you can output to the resolution and pixel aspect ratio of your chosen format.

Figure 6.9 © www.flickr.com/wonderferret.
• Differences in pixel aspect ratio
• Differences in color space
• Differences in compression, if applicable (such as different bitrates)
Each one of these issues must be addressed independently for the best possible results. For example, when outputting from HD material to an SD format, there are differences in resolution and aspect ratio, as well as color space and compression. If you follow the techniques found in Chapter 9 to tackle the aspect ratio and scaling differences, you'll be in a good position to get maximum quality results. Similarly, refer to Chapter 10 for information on dealing with changes in frame rates and Chapter 8 for information on different color spaces.
How to Produce Stills for Print
Producing stills for print from digital media is so easily done that it's often overlooked as an essential part of postproduction.
1. Load the footage into an editor.
2. If necessary, de-interlace the footage to make the footage progressive.
3. Mark the individual frames and render them out.
4. Load the rendered frames in an image editor.
5. Convert to CMYK color space.
6. Color-correct the stills as needed.
7. Save the stills.
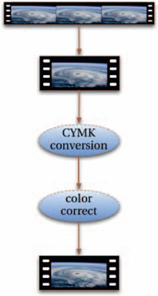
Figure 6.10