
Figure 2.1 © Jack James
Chapter 2
Essential Techniques
“If it looks like it works and it feels like it works, then it works.”
—Snow Patrol
Although there are plenty of sales teams who will tell you otherwise, the best solution for any image or audio problem will depend on finding the right blend of hardware, software, and skills for the specific problem.
There are a lot of great options available for tackling different tasks, some of which are useful for a single specific purpose, and others that are the less glamorous workhorses that no one likes to show off, but that no one can do without.
This chapter will cover the types of different tools that you'll need in order to perform the corrections throughout the rest of the book.
The Software Toolbox
In the digital age, the vast majority of manipulation of picture and audio for postproduction is done with software. It used to be that video engineers would have to familiarize themselves with all manner of signal processor boxes. Likewise, film technicians would have a vast knowledge of chemical processes, but these requirements are gradually getting phased out, relinquished to specific and, perhaps, archaic practices. The rest of us can get almost everything we need done through the use of different software packages in one form or another. With all-digital productions gradually becoming more popular, it's not uncommon to be able to do without devices such as tape decks altogether.
Though this can be liberating (software tends to be easier and cheaper to learn and implement than its former counterparts), it can also become the source of much confusion. There are many different software packages that claim to do the same thing. Some are designed specifically to tackle a single problem, others are postproduction generalists, and yet still others have a large following even though it's not entirely clear what exactly they do.
Figure 2.2 © Jenny Downing (www.flickr.com/photos/jenny-pics/).
Most good books on photography concentrate on technique rather than equipment. Rather than recommending a specific brand or camera, they emphasize specific capabilities, such as manual focus or spot metering. In a similar spirit, I don't want to evangelize a particular product or manufacturer in this book. Instead, I'll focus on the underlying techniques needed to get the job done.
The rest of this section will look at the specific digital tools that you'll need to achieve many of the corrections discussed throughout this book. There are several applications that provide all of these tools, or you may prefer to use different software for different situations. Each of the tools requires practice with real-world examples to get the best results, and I highly encourage you to experiment with any of the tools on this list that you're not familiar with.
TIP
Whatever software you use, you should aim to learn all of its capabilities. You'll soon find that the application you rely on for digital paint also doubles up as a format conversion system with a bit of tweaking. This can save you a great deal of time in the long run. By the same token, be aware of any of the limitations of the software you use. If a specific application is not particularly effective at scaling footage, use something else for that purpose.
Picture Manipulation
The most basic tool to master, picture manipulation refers to changing an image's properties in some way. These changes can be anything from modifying the pixel resolution to repositioning or rotating the picture. Almost every video editing software (including several Web-based ones) will allow you to modify movie files in this way to some extent.

Figure 2.3
Any of the techniques featured in this book that require some form of picture manipulation will include the icon shown in Figure 2.4.
Figure 2.4
Number Crunching
Digital media can be manipulated at a mathematical level: because digital media are essentially just data files, and because data files are essentially just strings of digits, it's possible to perform all sorts of calculations on them. Although at first this may not seem very useful, it forms the basis of almost every other process that can be applied to images and audio. For instance, to brighten an image, you can increase the values of all the pixels, effectively just adding a number to the image.
TIP
Many picture manipulation processes don't require dedicated video software to get the job done. In many cases you can use a digital image editor such as Photoshop to make changes. To do so, refer to the guidelines in Appendix 1 for converting movies to and from image sequences. The catch is that you can process only one frame at a time using this technique, but a lot of image editors allow you to “batch” process many images at the same time.
In the context of this book, number-crunching operations are those that process the source data at its numeric level. This includes processes such as adding, subtracting, dividing, or multiplying data in some way. It also includes processes that separate the source into its basic components, for example, splitting an image into separate red, green, and blue channels.
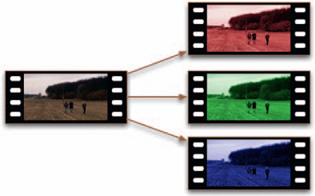
Figure 2.5
Painting
The paint tool, which allows pixels to be added directly to a picture through strokes or dabs, is ubiquitous within image-editing applications and yet strangely absent from the majority of videoediting software. Where it is available, it tends to be an intuitive process, though (as with real painting) it can take time to master. It can be implemented in a variety of ways, allowing either solid colors or pre-defined patterns or, in some cases, strokes that mimic the properties of real-life paintbrushes to be painted
TIP
Some applications may not provide a direct method for performing calculations on the source media. In this case, it may be possible to achieve the same results by using layers with blending modes. See the section “Layering” for more on this process.
onto the picture. Some applications apply paint strokes to single frames only, while others also have the option of applying a single stroke across all frames.

Figure 2.6
Cloning
The clone tool is similar to the paint tool, except that instead of painting solid colors or patterns, it copies pixels from elsewhere in the picture (even from a different frame). This tool is incredibly useful and, with a little skill, can be used to correct almost any type of picture defect, from film scratches to video dropout.
TIP
A workaround to making painted pixels last across multiple frames is to export a reference frame to an image-editing application and create the paint stroke in a new layer. You can then export just that layer, along with its transparency (alpha channel), and layer that on top of the original footage as a freeze frame.

Figure 2.7

Figure 2.8
Any of the techniques featured in this book that require some form of cloning will have the icon shown in Figure 2.8.
Layering
The ability to combine two or more audio tracks or multiple images in some way is crucial to postproduction. A well-placed soundtrack can hide audio defects, while a combination of images may be necessary to add fluffy clouds to a scene with a clear sky.
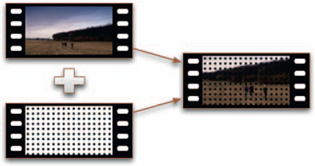
Figure 2.9
Although this is a simple idea, many applications offer some very sophisticated methods for its implementation. Several systems have the ability to blend layered images together in a variety of ways (often called blending or transfer modes). For example, it may be possible to blend two images in such a way that you only see the “differences” between the two. If one of the two images is just a solid color (for example, a shade of gray), you can also do things like add them together (in this case, increasing the brightness of the original image).
Compositing Semantics
The word “composition” unfortunately has many different meanings, even in the context of this book. It can be a generic term for a digital visual effect, typically done by a visual effects artist (or compositor), or it can refer more specifically to a combination of multiple media elements (such as a composite of two different sound effects played at the same time, or one image superimposed over another). It can also refer to a completed work of audio or video (or both), or it can refer to the arrangement of individual visual or aural elements relative to each other.
To make things work, certain tools also use the word composition with abandon to refer to any number of things. In order to ease this situation a little, throughout the book I'll use the word “layering” to refer to a combination of media elements, and reserve the use of the word “composition” for its artistic context.
Masking
Masks are used to define regions in an image. Masks can be used either to limit the effect of a tool or to remove unwanted regions completely. For example, if you want to blur a license plate on a car, you would first mask the license plate, then apply the blur. The blur would then affect only the pixels inside the mask. Alternately, you might want to use a mask to exclude the car from the image completely. Some applications use an “inside/outside” paradigm, allowing you to choose whether to affect areas inside or outside of the mask independently.

Figure 2.10
Masks can be simple shapes like ellipses or rectangles created as resolution-independent vectors, or they can be applied to each pixel of the image individually. They may also vary in strength or transparency, for example, with different parts of the mask affecting the image by a different amount. Many applications provide a way to view the mask as a grayscale image, with the brightness of each pixel corresponding to the strength of the mask at that point. This sounds complicated, but is in fact a
ITP
A garbage mask is a mask created very quickly, with no consideration for precision. This type of mask is typically used in conjunction with other isolation tools, such as a key, to ensure that the key doesn't accidentally affect any pixels outside of the garbage mask area.
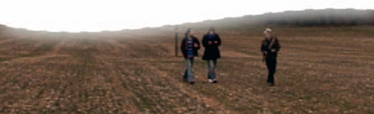
Figure 2.11 A mask can be used to remove unwanted areas…
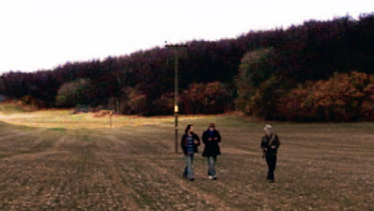
Figure 2.12 … or to single them out for further enhancement.

Figure 2.13 Viewing the grayscale representation of the mask (note the soft edge).
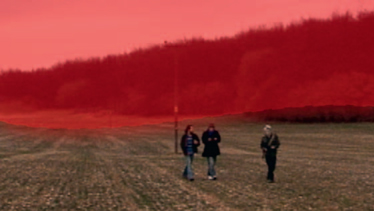
Figure 2.14 The masked area shown as an overlay on the original image.
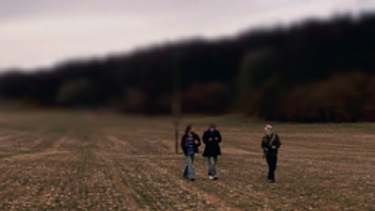
Figure 2.15 The mask used to restrict which parts of the image are blurred.
very convenient way to see how the mask will affect the image. Other systems can display masked areas as an overlay on the original image, for example, desaturating masked areas.
Figure 2.16
Any of the techniques featured in this book that require some form of masking will have the icon shown in Figure 2.16.
Selection Semantics
Many applications make a distinction between masks that are vector-based shapes and masks that are selections (or mattes or even alpha), which are pixel-based and traditionally drawn as “marching ants” to show the boundaries. In practice, the difference is largely due to the way the software works, and ultimately can be meaningless (not to mention confusing) to the artist. In this book, the term “mask” refers to both pixel-based and vector-based variants, as either approach may be appropriate, depending upon the particular footage.
Keying
Keys are also used to define regions in an image, but they work by looking for characteristics based upon chroma or luminance (or some combination of both). The implementation (and resulting accuracy) of keying tends to vary greatly from system to system, but it usually boils down to picking a point in the image with the color you want to isolate, and then tweaking a bunch of settings to get the desired result.
Although keys can be used for individual images, they are particularly useful for their ability to work across an entire sequence. With a little bit of practice, creating a key of a person's lime green sweater over a few seconds, regardless of the person's movement, should be very simple, allowing you to change it to a more tasteful color.
Keys and masks are often considered to be two separate tools. It may be helpful to think of a key as simply a method for generating a mask automatically.
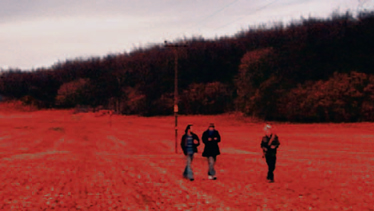
Figure 2.17 A keyed region (shown with overlay).
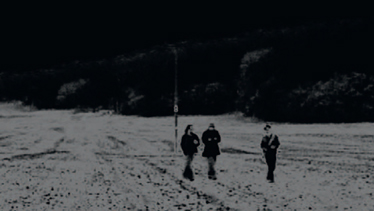
Figure 2.18 The corresponding mask.
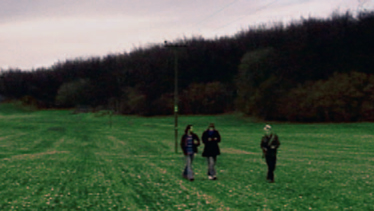
Figure 2.19 The result of a color change on the keyed region.
Any of the techniques featured in this book that require some form of keying will have the icon shown in Figure 2.20.
Figure 2.20
Tracking
Tracking tools are a fairly modern development. They are so useful, though, that it's amazing that anything ever got done without them. The purpose of tracking is to follow the movement of a particular feature in a video sequence. These tools usually work by selecting a region containing the feature to track, and then a region in which to search for the feature on subsequent frames. The position of the feature on each frame is then interpolated to determine its motion within the frame. This data can then be used for a lot of things, such as synchronizing the motion of images on different layers. Most applications that have tracking tools will also allow two or three points of an object to be tracked, which means that additional information, such as changes in size (or the relative distance of the object from the camera) or rotation, can also be inferred. You'll also want something that allows you to manipulate the tracking data in different ways for some techniques.
TIP
Most tracking algorithms use some form of edge detection. In order to get the best results, try to track features that have distinctive shapes and lots of contrast.
The great thing about most tracking software is that it often produces better (not to mention faster) results than if you were to attempt to track the features yourself. Good tracking algorithms also work at the sub-pixel level, measuring changes in position at the level of a fraction of a pixel, which gives smoother results, and which would prove nearly impossible to do manually.
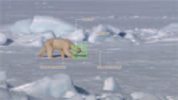
Figure 2.21 Anatomy of a tracker. Earth © BBC Worldwide Ltd 2007.
Any of the techniques featured in this book that require some form of tracking will have the icon shown in Figure 2.22.
Figure 2.22
Color Correcting
Color correction tools come in many different flavors. The most basic allow you to affect the brightness, contrast, and hues of an image, while the more sophisticated will allow colors to be adjusted using curve graphs or even 3D color cubes. There are entire systems exclusively devoted to the color correction of footage (many of which are not at all modestly priced, either), and the creative process itself can take many years to master. However, even basic color correction skills are essential when working to improve footage, no matter how good it might look to begin with.
In conjunction with the tools for modifying colors in an image, many systems also have tools for measuring the colors, which can give more objective feedback than the typical approach of judging the color by how it looks. The most common measurement tool is the histogram, which shows the distribution of brightness values of the pixels. If there are a lot of pure white pixels, this will show as a tall bar at the edge of the histogram. This is indicative of clipped highlights, or areas where certain pixels have reached maximum brightness and have become a single color, something that may be difficult to determine by eye.
TIP
A great way to practice and improve color correction skills is to experiment with using whichever tools you have at your disposal on some digital photos.
Table 2.1
| Operation | Description | |
 |
Brightness | Increasing or decreasing pixel values to raise or lower image brightness respectively |
 |
Contrast | Increasing contrast makes light areas lighter and dark areas darker, decreasing contrast does the opposite |
 |
Hue | Changing the hue of footage changes the color component while keeping brightness and other properties the same |
 |
Saturation | Increasing saturation increases the purity of colors, whilst decreasing (desaturating) makes them grey |
 |
Lift | Increasing or decreasing the lift (or pedestal) raises or lowers the black level respectively |
 |
Gamma | Increasing or decreasing the gamma raises or lowers the midpoint respectively |
(Continued)
| Operation | Description | |
 |
Gain | Increasing or decreasing the gain raises or lowers the white level respectively |
 |
Exposure | Simulates changing exposure as it would happen in-camera |
 |
Replace | Substitutes one color for another |
 |
Color correct | A combination of techniques to change the colors to stylize or match other footage |
Any of the techniques featured in this book that require some form of color correction will have the icon shown in Figure 2.23.
Figure 2.23
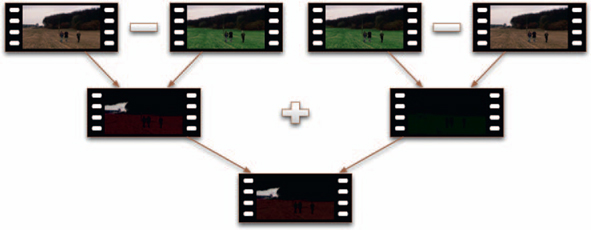
How to Create a Difference Matte
A very useful way to compare images, difference mattes have practical applications, too.
A difference matte is an image that contains information about the differences between two images. Difference mattes are normally used to find differences between images for use in creating masks, but they can also be used to prove that there are no significant differences between two images (for example, when testing different compression methods).
TIP
Some applications allow absolute subtraction, such that pixels can have negative values. If your application supports this feature, it is usually sufficient to subtract one image from the other.
1. Subtract the first image from the second.
2. Subtract the second image from the first.
3. Add the two results together.
4. If necessary, adjust the gamma of the resulting image to increase the visibility of the differences.
Audio Manipulation
Like color correction tools for working with the picture, there are a number of tools for working with the audio, depending upon which application you happen to be using. The most basic of these allows the pitch and volume of an audio track to be adjusted, while more advanced systems might offer 3D equalizers.
Table 2.2
| Operation | Description |
| Expand | Stretches the dynamic range of a sample, making loud noises louder and quiet noises quieter |
| Compress | Squeezes the dynamic range of a sample, making loud noises quieter and quiet noises louder |
| Pitch-shift | Changes the frequencies of a sample, making the wavelengths longer or shorter |
| Resample | Recalculates the sound wave based upon a different sampling frequency |
| Draw | Replaces part of the sound wave with a curve drawn by hand |
| Gain | Adjusts the overall volume by a percentage or a fixed amount |
| Cross-fade | Gradually blends one sample into another |
| Pan | Increases the volume of one channel while decreasing the other |
| Phase-shift | Adjusts the timing of one channel with respect to another |
| Surround pan | Increases the volume of one or more channels while decreasing the others proportionately |
Also like color correction, there are tools for measuring aspects of an audio clip, though audio manipulation can take a long time to master. One of the most common of these is the waveform, which displays the amplitude of the audio over time, which is handy for easily identifying extraneous noises in a recording, as well as audio peaks (where the volume is at or approaching the maximum value).
Sequencing
Whenever you work with more than one audio or video clip, their order and position in time relative to each other become critical. Ensuring the correct placement of these elements requires the use of some form of sequencing system. The majority of these use a timeline paradigm, with the sequence running from left to right to represent the passage of time. These generally provide an intuitive (if slightly unmanageable) interface to understanding the order and timing of each audio or video clip. Many systems also combine the timeline interface with a layering system, such that each layer has its own timeline (this is sometimes referred to as “vertical editing”).
The capabilities of each system vary, but generally speaking it is possible to rearrange, lengthen, shorten, or divide individual clips on the timeline. Most sequencers also provide for transitions, which control how adjacent clips merge together. For instance, the most simple transition, the “cut,” ends one clip and starts another. Dissolves and wipes, on the other hand, progress from one clip to the next by blending and using a pattern, respectively.
Timeline Semantics
Although the term “sequencing” is an appropriate one for positioning audio recordings (as the applications that work with audio in this way are commonly referred to as “sequencers”), in the video industry, the term “editing” is preferred. However, editing is an incredibly vague term in the context of this book (potentially referring to the editing application itself, or the process of changing a parameter within any application, or even the process of modifying something in some way), and so I will use the term “sequencing” throughout this book to refer to both audio and video.
Any of the techniques featured in this book that require some form of audio or video sequencing will have the icon shown in Figure 2.25. Also note that while transitions fall into this category, they can also be created using a combination of layering and dynamics tools.
Figure 2.25
| Operation | Description | |
|
|
Cut | Split a clip into two |
|
|
Trim | Shorten a clip by removing frame from the start or end |
|
|
Extend | Lengthen a clip by adding frames to the start or end |
 |
Replace | Substitute one clip for another, retaining the length and position in a sequence |
|
|
Insert | Adds a clip to a sequence, increasing the sequence's overall duration |
|
|
Overwrite | Adds a clip to a sequence, replacing other footage in order to maintain the sequence's overall duration |
|
|
Delete | Removes a clip from a sequence, leaving a gap |
|
|
Ripple | In combination with other operations, affects the position of clips in the sequence after the current one |
|
|
Slide | Moves a clip along in a sequence |
|
|
Slip | Changes the start and end point of a clip's footage without affecting its position in the sequence |
|
|
Speed up | Makes the clip run faster |
|
|
Slow down | Makes the clip run slower |
Filtering
One of the fundamental benefits of working digitally is that you get to use all manner of signal processors on the material. Audio and video engineers have long been able to process analogue signals in a variety of weird and wonderful
TIP
Many editors have gotten into a mess by making ripple edits when they didn't mean to (and vice versa), which can lead to all sorts of sync problems.
| Filter | Description |
| Equalization (EQ) | A filter that selectively applies gain to audio |
| High pass | A type of EQ that removes low-frequency sound |
| Low Pass | A type of EQ that removes high-frequency sound |
| Shelving | A type of EQ that restricts changes to a range of frequencies, affecting them with a “falloff” |
| Peaking | A type of EQ that restricts changes to specific frequency bands |
| De-click | A filter that reduces audio segments with characteristics similar to clicks and pops |
| Delay | A filter that delays audio segments, typically feeding them back to the original |
| Modulation | A filter that modifies the volume, timing, and frequency of an audio segment, typically combining it with a low frequency oscillation (LFO) |
| Reverberation | A filter that simulates the effect of sound reflecting off of multiple surfaces |
| Comb | A filter that combines an audio segment with a delayed copy of itself |
| Limiter | A filter that limits audio peaks to a specific volume |
Table 2.5
| Filter | Description | |
|
|
Blur | Blurs pixels together |
|
|
Sharpen | Increases the defi nition of details |
|
|
Add noise | Adds random noise to footage |
|
|
Median | Averages pixels together |
|
|
Edge detection | Replaces the footage with detected edges |
ways, such as reducing noise, but these inevitably required dedicated (and often costly) hardware to perform the task. In the digital realm, these processes can be reduced to their mathematical form and applied directly to the picture or audio data to get the same effect.
Any of the techniques featured in this book that require some form of filter-ing will have the icon shown in Figure 2.26. All the filters referred to are ones that are available in most applications as standard.

Figure 2.26
A Filter for Every Occasion
Many systems employ the use of filters through a “plug-in” infrastructure, meaning that other companies can create filters to perform very specific tasks, to the extent that there is probably a filter somewhere that addresses every single technique covered in this book. The problem with using filters for solving specific problems (other than their expense) is that they tend to be designed to be as generic as possible, which means that you have to either dig into the guts of the interface and do a lot of tweaking, or combine them with other filters in order to get a suitable result. Although I've found several filters that work really well for certain specific tasks, I think in many cases it's much easier to build the same effect manually.
Dynamic Adjustment
Most of the tools mentioned so far modify the entire audio or video clip, which is great if you want to resize all your footage in one go, but not so good for trying to increase the volume of a sound at a particular point in a sequence without affecting the entire audio track. Dynamic adjustments allow tools to use different settings at different points in the timeline (the term “dynamic” in this context comes from color correction, but can be applied to any process). For example, you could create a fadeout on a sequence by increasingly darkening the image on each frame, eventually going to black by the end of the sequence. The possibilities are endless.
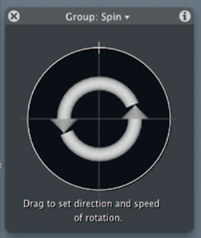
Figure 2.27 Apple's Motion software provides the capability to apply dynamic adjustment gesturally, by telling the system what you want to happen.
Most systems allow the use of dynamics through a key-framing paradigm, where you set two or more values at different points in time, and the system smoothly interpolates between
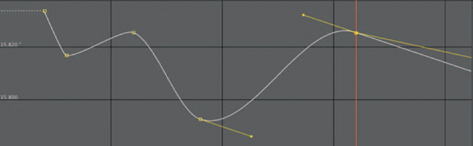
Figure 2.28 Key-framed adjustments are the most common form of dynamic adjustment and are often viewed graphically.

Figure 2.29 Adobe's After Effects software caters to advanced dynamic adjustment through a script-based interface.
Nondynamic Applications
Almost all of the video-based techniques featured in this book that don't require dynamic adjustment (or tracking) can typically be carried out using digital image applications (such as Photoshop), which have all the other requisite tools and some method for batch processing. To do so, convert the sequence to images using the procedure outlined in Appendix 1, and then apply the technique as a batch process to all images. In Photoshop, you can even save the process as an action for later use.
Rotoscoping
Rotoscoping is a technique inherited from animation, in which the animator would trace over each frame of a film sequence, producing very realistic motion. A similar technique is employed on a large scale in the visual effects industry, in which the roto artist will adjust a mask on a frame-by-frame basis to conform to the object in question. It can be a tediously slow process, but it produces incredibly accurate results.
For the purposes of this book, rotoscoping is treated as a dynamic effect, albeit one that is made on every frame in a clip.
the two. More advanced interfaces allow for some form of scripted behaviors, for example, allowing a brightness parameter to react to a zoom parameter. Still others allow for dynamics to be recorded live. For example, you might play an audio track and adjust the pitch while it's playing.
Any of the techniques featured in this book that require some form of dynamic adjustment will have the icon shown in Figure 2.30. Note that painting and cloning techniques are always assumed to be applied to individual frames (unless stated otherwise), but are not considered to be dynamic.

Figure 2.30
Transcoding
One of the weaknesses (or strengths, depending upon your perspective) of working digitally is the vast number of competing formats. For audio there are formats such as MP3 and FLAC, for images, JPEG and TIFF, and for video it gets even more complicated, with formats such as Windows Media and QuickTime, each of which have multiple different “codecs” (compression and decompression algorithms).
TIP
For a list of popular digital formats and comparisons between them, refer to Appendix 2.
Some of these formats are functionally identical to each other and yet are completely incompatible (such as the AIFF and Wave audio file formats), while others are completely different (such as MPEG and RealMovie video formats). Some of them are proprietary and can be used only in conjunction with specific hardware, or are designed only as an intermediate format. Some are more suited to broadcast transmission, some are designed for Internet streaming, and others are designed for archival purposes, which means that on any digital production, there will likely be a good deal of transcoding, converting from one digital format to another.
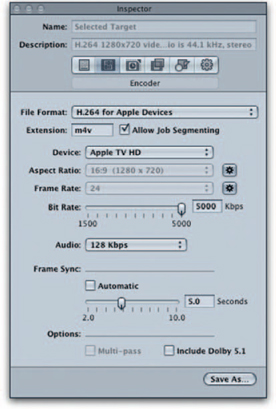
Figure 2.31 Apple's Compressor, a typical transcoding application, with a huge number of parameters to change.
Transcoding can be accomplished in a number of different ways and can introduce quality loss to the source as part of the process, so it's important to be careful about which formats you use and how you perform the transcoding process. This situation is made worse because most transcoding applications are notoriously unintuitive. The good ones seem to be overly technical, while the simpler ones simply don't provide the means to get the best quality results. Chapter 6 contains more information on finding your way around this minefield.
The Hardware Toolbox
Although we don't rely on specific hardware to work with digital media very much anymore, we do still rely on the hardware that runs the software that we do use. Using different hardware won't directly produce different end results, but better equipment will allow you to work more efficiently, which means you get more time to experiment inside the software.
Input Devices
Input devices, such as mice and keyboards, are the main way in which you interact with computer systems. You can see that even a minute improvement in comfort, precision, or speed will add up greatly over the course of a day when you consider just how much time you actually spend pressing keys or dragging and dropping.
Hotkeys are available in almost every major application, and learning them for the applications you use regularly will result in a dramatic improvement in speed. After all, it is much quicker to press a couple of keys than it is to move a mouse to a specific menu item, especially if you do it repeatedly. The more visually minded can take advantage of a keyboard such as Artlebedev's Optimus Maximus, which actually changes the display of each key depending upon the application you're using, meaning that you don't need to commit the hotkeys to memory.
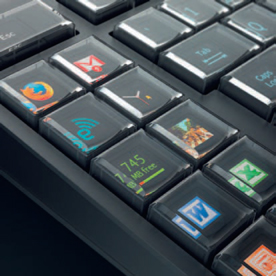
Figure 2.32 The Optimus Maximus keyboard (www.artlebedev.com).
Graphics tablets are an alternative approach to mice. These devices, in which the location of the stylus on the tablet's surface corresponds to the location of the mouse pointer on the screen, are popular among digital artists as they have a much more natural feel than using a mouse. They can take a while to get used to if you've been using a mouse for a long time, but it's well worth it. I find it both more comfortable and faster to use a tablet, even for mundane tasks like dragging and dropping files. The only drawback is that some applications can be a little awkward to work with; for example, certain sliders can be difficult to control with any sort of precision. Tablets such as the Cintiq present an altogether different paradigm, by integrating a monitor into the display, allowing you to feel as though you're reaching into the screen.

Figure 2.33 The Cintiq 12WX graphics tablet (www.wacom.com).
Output Devices
From the ubiquitous LCD monitor to the digital cinema projector, there are several choices available for viewing output. These will vary in terms of resolution and color response, and it's sensible to use a device that is at least close to your target output, which means having a monitor with a resolution of at least 1920 × 1080 pixels if you work with a lot of high-definition footage.
Whichever type of device you use, it is always worthwhile to have a secondary display, so that the application's interface along with other windows can be confined to a single screen, allowing the second to be entirely devoted to the image. It's also important to note that if you're doing color work, the monitor needs to be calibrated on a regular basis, and the ambient lighting needs to be very strictly controlled.
On the audio side, a good set of powered speakers (or at the very least, broadcast-quality headphones) are essential. It goes without saying that if you're working with surround sound, you should have a speaker system to match.
TIP
It's worth noting that printers are largely useless for output in this context. Not only are they intended for still images, but the huge differences in color space between the display and the printed page mean that what you see printed out is not necessarily a good representation of what you see on the screen.
Storage
The cost of data storage has dropped dramatically over the past few years. Where it was once a struggle to store a few megabytes of files, it is now almost not an issue to plug in a disk drive with space for several terabytes of files. There are many different types of storage on offer, from disk-based to optical media.
On the disk-based side, there are both internal and external varieties. Internal disks tend to boast better performance and lower cost, while the external ones can be conveniently relocated to another system. It's also possible to combine multiple disks to appear as a single large disk (this can also result in an increase in performance). There are also systems such as network attached storage (NAS) and storage area network (SAN), which allow you to separate the data into their own independent system.
Optical media (such as CD, DVD, Blu-ray, and even holographic storage methods) and tape-based media are more useful for distribution or long-term storage of data. Although some variants of these are rewritable, in general the idea is that you record a “snapshot” of your data at a particular moment in time onto them, and they are not useful for storing files that are in constant use.
There are also Internet-based storage systems, such as Amazon S3, which provide unlimited capacity with a high level of reliability and are paid for on a subscription basis, making them ideal for long-term archiving. However, the relatively slow speed of Internet-based data transfer makes them less useful for storing a large volume of data in the short term.
There are many pitfalls regarding data storage. The most common issue is the lack of compatibility of file structures between different systems. For example, disks formatted in Windows won't necessarily be readable by Linux or Mac-based systems. (I have found that using the FAT32 disk format seems to provide the best cross-platform compatibility, although individual files must be less than 2GB each.) Alternatively, you could use software such as Google's Fuse to try to access foreign disks.
TIP
Appendix 1 contains several strategies for organizing and protecting data.
Performance
The amount and type of RAM, the speed and number of CPU cores, and various other factors all add up to the overall performance of the system. However, in the real world it can be difficult to determine exactly what the benefit of installing more RAM is while you're working. There seem to be two main areas of postproduction where greater performance has a direct impact on your efficiency: rendering and responsiveness.
Rendering processes are the most hardware-intensive processes you can run on a computer. If you do a lot of rendering, then it can add up to a great saving of time if you increase the speed of the renders. However, many people don't hit the render button all that often, or when they do, it's usually set to run overnight anyway.
The responsiveness of an application is slightly more esoteric; there are so many variables involved that you can sometimes drastically improve it just by tweaking the settings of the operating system. However, there's no doubt that the less time you spend waiting for projects to load and save, or blur previews to update, the quicker you'll be able to get things done. In particular, the performance of the disk system can have a direct impact on how you work. With fast-enough disks, it's possible to get real-time playback of uncompressed footage, whereas with lower performance systems it may be necessary to transcode media in order to get real-time playback.
Operating Systems
In the postproduction industry, it is more common for the need to use a specific application to determine the operating system to use rather than the other way around. Having said that, the difference between each is staggering in the way it affects how efficiently you can work. If you're comfortable messing around with source code, you may find that Linux can coax the ultimate performance out of your system, while Windows advocates prefer the huge user base and wealth of software options it provides. On the other hand, because of its selective hardware base, using Apple's Mac OS X means you'll probably spend less time troubleshooting computer problems, while the built-in AppleScript caters for a decent amount of automation.
The Visual Toolbox
Probably the most important skill to learn to get good results is the ability to evaluate the media you're presented with, in addition to the fixes you apply to them. It may seem obvious, but identifying the problems is the first step toward fixing them. Certain problems are only seen under certain conditions. For example, certain compression errors can only be seen during playback, while others can only be detected on single frames. The same thing is true when you apply fixes. For instance, a fix using the clone tool looks great on the frame it's applied to, but pops out when played back if you're not careful.
There are a lot of tools that can be used throughout the process, such as waveform monitors and vectorscopes, which can be incredibly useful if you know how to use them properly.
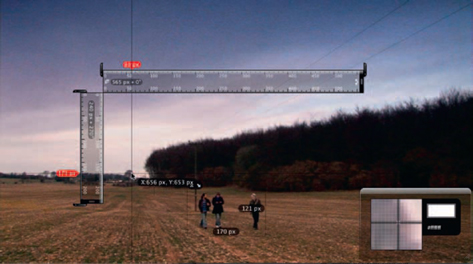
Figure 2.34 The Icon Factory's xScope software provides several tools to analyze image content on screen (www.iconfactory.com).
Gamma Slamming
One handy technique for checking for problems is to use software such as the free DarkAdapted (available for Mac and Windows from www.aquiladigital.us/darkadapted) that can change the display gamma interactively. Doing so can reveal problems in shadow or highlight areas that were previously undetectable, but that might otherwise be seen on an uncalibrated monitor (the type of monitor absolutely everyone else in the world uses).
Above all else, it's important to be pragmatic. You can end up agonizing over getting one particular fix absolutely perfect, when in fact you could have stopped working on it an hour before and no one would have noticed the difference. It can help to ask someone to look over something you're working on. If they can't even tell what the problem is supposed to be, then you've done your job.
TIP
Understanding the cause of a problem can be the most important step to fixing it.