
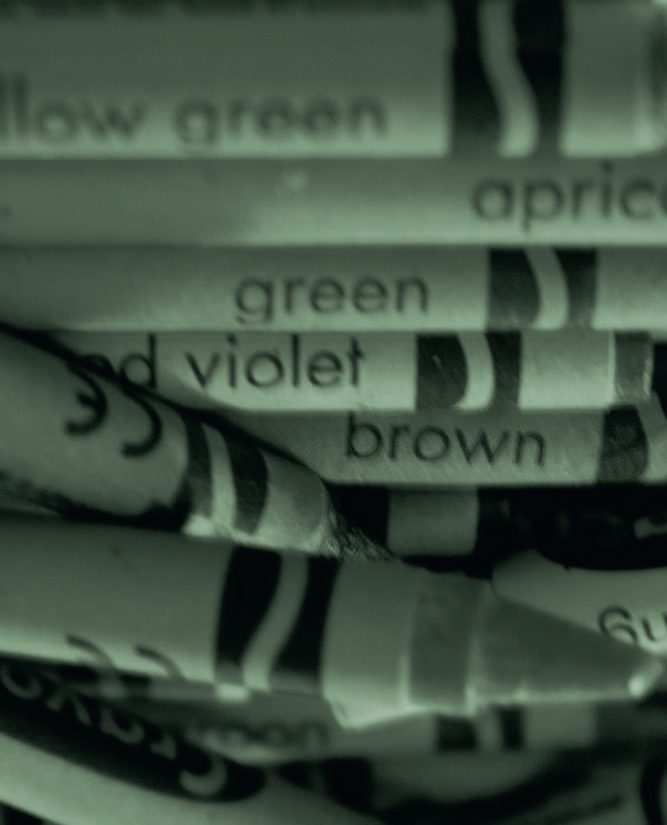
Figure 8.1 © Jack James.
Chapter 8
Fixing Color Problems
“Too close to the light, just for the thrill of it.”
—Moloko
After editing and sound, color is probably the single most important element that can be adjusted during postproduction. Color adds mood and emotion to scenes, and plays a big part in ensuring continuity between shots. But more than that, exceptional color grading gives a sense of artistry to productions. You need only look at recent music videos to witness incredible variety among otherwise similar subjects given by simply changing the color palette.
In digital postproduction, changing the color of footage is easily achievable, and the tools for doing so are highly evolved. However, this doesn't mean that doing it well is easy. In fact, most colorists I've worked with, people whose entire job it is to adjust colors during postproduction, insist that it's something that can never be perfected. I don't doubt that sentiment at all, but the techniques in this chapter will get you at least part of the way there.
Clipping and Crushing
As with audio, every imaging system, whether a film camera, an LCD monitor, or even a human eyeball, has a property known as dynamic range. In technical terms, this is the ratio of the brightest color to the darkest color that the system can reproduce. In slightly less technical terms, it's the point where something becomes pure black or pure white. Our eyes have incredible dynamic range. You can gaze wistfully out of a window on a sunny day into a vista of bright clouds, blue sky, and lush green trees. A camera, on the other hand, might render the view as white mush framed by the edge of a window.
The problem is that once the image has been recorded that way, there is very little you can do to recover the missing detail. Any regions that were recorded as pure white are said to be clipped, and
any regions recorded as pure black are said to be crushed. As far as the imaging system is concerned, any clipped regions are pools of solid white, and crushed regions are pools of solid black. It's a little like pushing a snowball against a hot plate: the more you push the snowball, the more of its shape is destroyed. Even if you were to stop this cruel punishment part way through, the snowball could not regain its former shape.
When faced with clipped or crushed footage, the only way to fix it is to go back to a version of the footage before the clipping or crushing was introduced. For example, with digital footage that originated from film, it may be possible to rescan the footage in question using different color settings to better capture the missing details. Or perhaps the material had already undergone a digital color correction that was a little heavy-handed, and so detail can be recovered by adjusting the process and rerendering it.
All too often, this is not an option; but even then there is sometimes a way to recover some of the detail. Certain video formats and digital file formats have provisional headroom: even though regions are displayed as pure white or black, some extra detail is retained beyond these limits (also known as super-white and super-black, respectively).
There will almost always be footage that is crushed or clipped that you just have to deal with. The important things to do are ensure that crushed regions remain pure black (as opposed to a dark shade of gray), clipped regions remain white, and you don't unnecessarily introduce any clipping or crushing yourself.
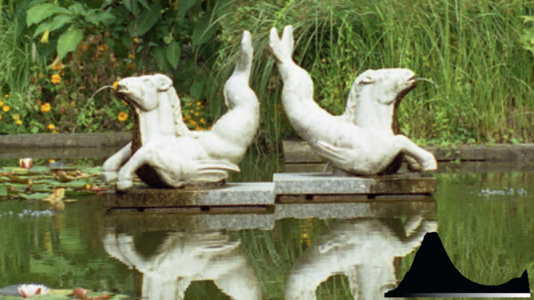
Figure 8.3 A frame without significant clipping or crushing. © Jack James.
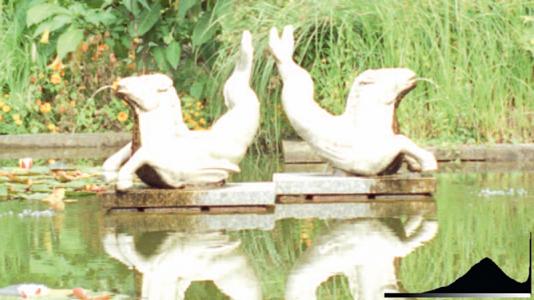
Figure 8.4 After increasing the brightness of the frame, highlight details are lost. Note the histogram has skewed to the right.
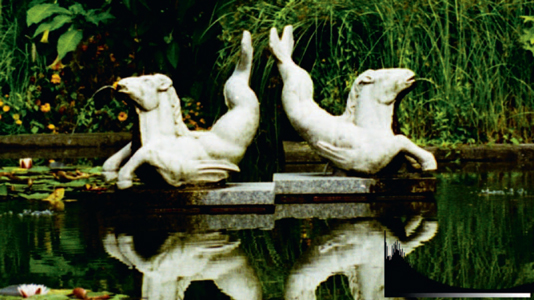
Figure 8.5 After decreasing the brightness of the frame, shadow details are lost. Note the histogram has skewed to the left.
Featured Tools: Video Scopes
Color correction is a very involved and subjective process. It is important, therefore, to take advantage of tools that can help make the decision-making process more objective. The best way to do this is to understand and make use of video scopes, which measure various aspects of a video signal and display them graphically.
There are a variety of scopes available, both as external pieces of equipment and as software-based widgets, and each is used for a different aspect of footage.
Waveform monitors (Figure 8.6) measure luminance in a signal. Use them to check for crushed or clipped signals (the signal will plateau in these cases), as well as regions of headroom in some cases.
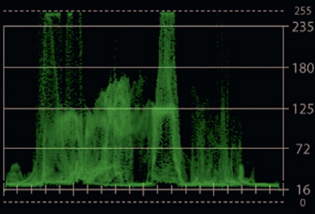
Figure 8.6
Histograms (Figure 8.7) measure the distribution of luminance in a signal. You can use them to check for banding (which will show as little spikes in the graph), overall contrast, and, to a lesser extent, clipping and crushing.
Vectorscopes (Figure 8.8) measure the distribution of chromacity in a signal. You can use these to examine saturation, check for color casts (the signal will appear to be skewed away from the center), and generally check color balance.
Software such as Adobe's OnLocation (www.adobe.com) can replicate the functionality of scopes during a digital shoot, providing valuable feedback when you need it most.
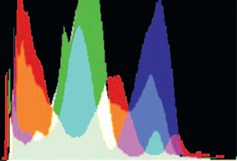 Figure 8.7 |
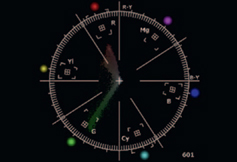 Figure 8.8 |
How to Correct Exposure Issues
Altering under- or overexposed images is not quite as simple as just adjusting the brightness.
Exposure problems are common, and sometimes deliberate. In an effort to capture more sky detail, a cinematographer may deliberately underexpose a shot; likewise, he or she might overexpose a scene in order to get more shadow detail, making the overall image look too dark or too bright, respectively.
Fixing this problem is not as simple as just increasing or decreasing the brightness of the image, as this will inevitably lead to clipping or crushing, or, at the very least, to losing the detail that the cinematographer was trying to capture in the first place (see Figure 8.9).
1. Load the footage and duplicate it.
2. Use curve grading methods on the copy to massage the tonal range into something more desirable.
3. Layer the two copies together.
a. Use a screen blending mode between the two if the original is underexposed; use a multiply if the original is overexposed.
b. You can also experiment with using different blending modes between the two copies, depending upon the image content.
c. If there are clipped regions in the area, they will have to remain as pure white. Likewise, if there are crushed regions, they will have to remain pure black. Take care not to introduce any clipping or crushing yourself during this process, being sure to check all frames in the finished sequence.
d. You can also experiment with separating the red, green, and blue channels and working on each one separately, as exposure can affect each channel separately, especially in the case of images from a digital video source.
4. Render out the sequence.
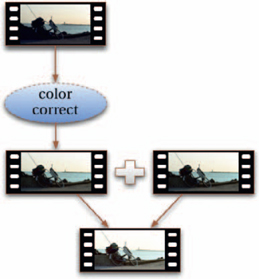
Figure 8.9

Figure 8.10 In the case of overexposed footage, use a curve like this as a starting point.
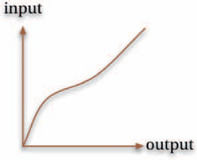
Figure 8.11 In the case of underexposed footage, use a curve like this.
Color Calibration
In the same way that you need clear, good-quality audio monitoring equipment when working with sound, when doing any sort of picture work, especially color work, it is essential to use calibrated equipment. Much of the color correction process is highly subjective; you're using your eyes to determine what looks right. Because of this, you need to ensure that the feedback you're receiving is accurate. Otherwise, you might brighten images that look dark when in fact it's just the monitor that's dark (and you've thus made the images too bright).
Color calibration is difficult to get right. I'm not going to delve too far into this deeply complex and depressingly confusing topic here, as there are many things to consider in order to get it absolutely right. Suffice to say that if you perform even basic calibration of your monitors, you'll see the benefits immediately.
Both Mac and Windows computers offer basic color calibration tools that will guide you through the process of creating a profile for your monitor. Bear in mind that these tools will partly depend upon external factors such as ambient lighting, so it's important to try and keep these factors consistent (which is also why so much of postproduction tends to be done in the dark).
On OS X, go to System Preferences … → Displays → Calibrate. On Windows XP, you'll need to install and run the Color Control Panel Applet PowerToy (available for free from http://www.microsoft.com/prophoto/downloads/colorcontrol.aspx).
On Windows Vista, the applet will already be installed, so just go to Control Panel → Color Settings → Devices → Add.
If you want to get more serious about color calibration, you will need to invest in hardware such as calibration probes and picture line-up generators (PLUGEs).
Color Space
Imaging systems, whether a camera, television screen, or the human eye, can accommodate only a finite number of different colors. For instance, the human eye can see pretty much everything in the spectrum from red to violet, but a video camera is not sensitive to deep reds and greens. The characteristics of the color range and sensitivity of an imaging system are known as its color space (or gamut).
Most of the time, different color spaces overlap with each other, so a specific shade of green will appear the same whether photographed with a digital camera or a film camera, for instance. However, even slight differences in the color spaces between two different imaging systems can result in pictures that look very different, especially when there is a broad range of color in the scene. Colors that don't match up in this way are said to be out of gamut.
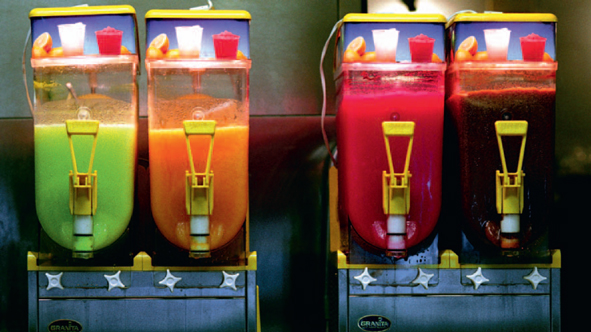
Figure 8.12 © Andrew Francis (www.xlargeworks.com).
One of the most important tasks in postproduction is ensuring continuity between different output formats. This is especially true of productions destined for theatrical release, which may need outputs for 35 mm film, digital cinema, HD video, and broadcast SD video, each of which have different color spaces.
There are two schools of thought on how to tackle differences in color space. The most common practice is to do all color correction in the color space with the widest range of colors, which will result in an ideal color grade for the production, and then correct for out-of-gamut colors in the color space of each target output format.
An alternative approach is to do the color correction in the narrowest color space intended for output, and then correct for the other outputs. The benefit of this approach is that it maintains better continuity across the outputs (in other words, the results will tend to look the same, irrespective of the output format), but at the cost of flexibility during the color correction process.
TIP
For the most part, humans perceive specific colors in relation to others, rather than on their own merit. A shade of green will appear more saturated if it is surrounded by desaturated colors. For this reason, instead of trying to isolate and correct specific out-of-gamut colors, it is often better to adjust the entire color of the image to give the impression of the desired color.
How to Legalize Colors
If you plan for your work to be broadcast, it is essential that the colors are legalized.
Certain colors don't reproduce well with different broadcast standards (this is particularly true of the NTSC standard, which is often referred to as the Never The Same Color twice standard). Not only can these colors look different than intended, but the problem can also affect other parts of the image. For example, strong red colors can bleed into the surrounding areas during television broadcast, which can quickly ruin picture quality. For these reasons, footage must be legalized before it can be broadcast.
There are many factors to consider when making footage broadcast-safe, but fortunately you'll rarely have to worry about the specifics. Almost all video processing systems (and even a few digital imaging applications) have filters to process and correct the footage for you.
1. Load the footage.
2. Apply a legalization filter appropriate to your target broadcast output.
a. Some filters allow you to choose from different methods of legalization. Generally, choosing any of them will result in legal colors. However, they may produce perceptually different results. It's worth previewing each setting and comparing for them differences in tone, contrast, and artifacts such as noise and clipping and crushing, and then picking the one that produces the best-looking result.
3. Render out the sequence.
Legalization should be done at the last stage of postproduction, as it degrades the footage somewhat, and it's always worth retaining a copy of the production just prior to legalization, which can be used to make deliverables for other types of output (such as for the Web).
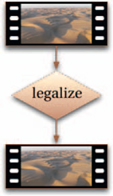
Figure 8.13
TIP
For your production to be suitable for broadcast, you'll also need to pay careful attention to title and action safe regions, and make sure there are no strobing patterns, as these can induce seizures in susceptible television audience members.
Changing Color Space
Working with different formats may entail changing the working color space. This is best done as early as possible in the process, provided the new color space is going to be the primary one, as if it is done later on, it may lead to artifacts. Most systems allow you to change color space transparently, requiring little effort on your part. There are two considerations, though. First, you may need to legalize colors (using the technique given above) to ensure that the converted colors can be reproduced correctly within the new gamut.
The second, and much trickier, part of the problem is that your target color space may vastly differ from that of your primary display device. For example, many film productions that undergo a digital intermediate process use a film color space, which cannot be faithfully emulated using standard digital display devices. These types of production require specially calibrated monitoring equipment, in conjunction with sophisticated color lookup tables (CLUTs), to ensure that the colors seen on the display match those that will ultimately be projected from the outputted film prints.
TIP
There's no substitute for viewing sample output on a typical display device. For example, if you plan to output on film, you should shoot a minute or so of your most problematic shots to see how they hold up when viewed on actual film, in a theater.
How to Enhance Tone and Contrast
Tone and contrast are the most prominent features of color in footage, especially in terms of defining characteristic “looks”.
1. Load the footage.
2. First, identify the darkest and lightest points in the footage. Scrub through all frames looking for the darkest region, and adjust the color until that point becomes black.
3. Adjust the color until the brightest region becomes white (don't use a brightness operation here, as that will also lift the black level; instead, use curves or levels operations).
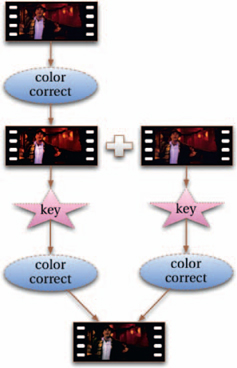
Figure 8.14
4. Duplicate the result and add it as a new layer.
5. Adjust the mid-tones and overall result using curves or levels operations.
a. Experiment with using different blending modes between the two versions and continue making adjustments until you are happy with the result.
b. Use keys to isolate specific regions (such as the highlights or shadows on the luminance channel) for greater control.
6. Render the sequence.
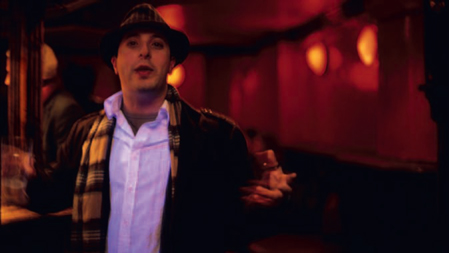
Figure 8.15 A single frame without correction. © Andrew Francis (www.xlargeworks.com).
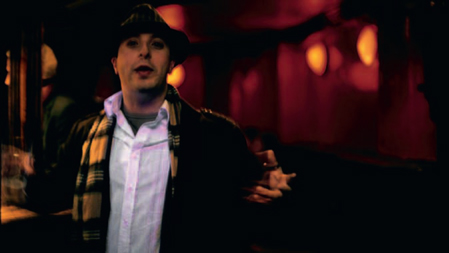
Figure 8.16 After tone and contrast enhancement. © Andrew Francis (www.xlargeworks.com).
How to Enhance Highlights and Shadows
This technique can be used in combination with almost every other color correction process to give images extra depth.
1. Load the footage.
2. Create keys on the luminance channel for the shadow, mid-tone, and highlight areas.
3. Blur the shadow and highlight keys.
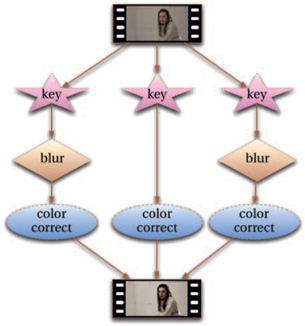
Figure 8.17
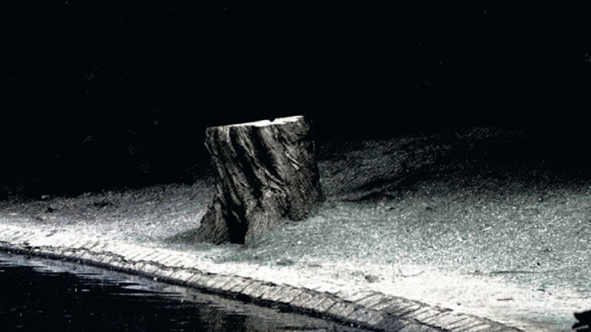
Figure 8.18 A single frame without correction. © Entitled Productions.
Figure 8.19 The frame with enhanced highlights and shadows.
4. Use the keys to selectively adjust the color of each region.
5. Render the sequence.
Color Temperature
Light is rarely pure white. If you film a white sheet during sunset it will probably look slightly pink when you watch it later. The color the light gets recorded as has to do with the color temperature of the light. Higher temperatures tend to be slightly blue, whereas lower temperatures tend to be more red (this is the reverse of how we usually describe colors, that is, we refer to red as being warm and blue as cool).
Different lights (and in the case of sunlight, different times of the day as well) each have a color temperature. When something is photographed, the color temperature of the light source will affect the color of the recorded scene. Most of the time the cinematographer will keep the color under control (for example, by using filters on the camera or selecting a particular type of color-balanced stock), but sometimes there is a resulting color cast on the final footage. For example, if you were to photograph an office interior using daylight-balanced film, you might find that the scene had a green color cast (or tint) to it, due to the color temperature of the fluorescent lights.
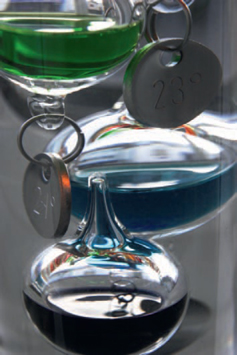
Figure 8.20 © Steve Johnson (www.xhiking.com).
How to Remove Color Casts
Removing color casts is easy on paper, but can require a great deal of experience.
Although many color casts are caused by lighting or filters, some are actually perceptual. For example, if you take a scene that is predominantly red, it may appear to have a slightly yellow cast over more neutral (gray) areas.
Another point to consider is that color casts may not necessarily be a bad thing. The fact that candle light can cause a yellow cast might add to the mood of the scene.
1. Load the footage.
2. Scrub through it and identify an area that should be neutral.
a. If possible, take a reading of the RGB values of the neutral area. This will assist you in the correction process, because to make it neutral, the red, green, and blue values should all match (although this will be less helpful in trying to fix perceptual color casts).
3. Adjust the color balance (using whichever tools you have available) until the area in question is neutralized, making sure that the luminance across the image is unchanged.
4. Preview the footage to ensure the results are consistent, making tweaks as necessary.
a. If the color cast comes and goes during the sequence, you'll need to adjust the correction dynamically to avoid removing one color cast but adding another.
5. Render the sequence.
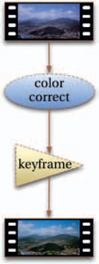
Figure 8.21
Although the process of removing color casts is not particularly strenuous, it does take a lot of practice to get consistently good results. Some colorists prefer to correct for skin tones rather than neutrals, as this will eliminate most perceptual color casts as well. The process of neutralizing colors must ultimately go hand in hand with the overall process of using color to enhance the mood and style of the production.
Black and White
Working with black-and-white digital footage is not really any different from working with color digital footage. Although you don't have to worry about things like color casts, aspects such as tone and contrast are just as important (if not more so).
TIP
Because balancing colors can be a subjective process, in addition to having a correctly calibrated monitor, it can also help to remove any extraneous colors from your point of view. One of the best ways to do this is to set the colors on your computer screen to grey, with a neutral (albeit not very aesthetic) desktop background where necessary.
Figure 8.22 © K. Fogle Photography (fogle.kim11gmail.com).
Although it seems reasonable to assume that it's better to shoot black and white if you plan to finish in black and white, that's not necessarily the case. If you shoot in color, not only do you keep the option of finishing in color later, but you also increase your ability to finesse the black-and-white picture.
The reason for this is that you can use the different colors to isolate and tune color regions during the transition to black and white. For example, if you were to photograph a blue shirt using black-and-white film, it would probably be recorded (depending upon the type of stock used) as white, in the same way that a shirt that is actually white would be. This would make it difficult to differentiate the blue shirts from the white ones later on. If you had shot the scene in full color, though, you'd be able to key the blue prior to conversion to black and white, and save the key for later use.
How to Turn Color into Black and White
Get more control over black-and-white conversions with this technique.
Although it's tempting to use a desaturate filter to remove color from footage, you can get a great deal more flexibility by using the extra information locked away in each of the color channels.
1. Load the footage.
2. Separate the red, green, and blue channels to produce three grayscale sequences.
3. Layer the sequences together, and blend between them until you get a result that you like.
a. You can try duplicating some of the layers and using blending modes between them to emphasize different regions.
4. Render the sequence.
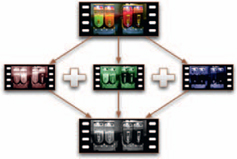
Figure 8.23
How to Bleach Bypass
This popular process gives footage a very stylized look.
The bleach bypass is a very stylized look. Originally a chemical process used on productions such as Saving Private Ryan, it can be emulated digitally on any footage. The result has more contrast, stronger highlights, and less saturation overall than conventional processing. Essentially, a monochrome copy of the image is super -imposed over itself.
TIP
For the best quality, and greater flexibility, try to keep footage in color for as long as possible during postproduction, converting to black and white only when the other processes (such as noise reduction) have been completed.
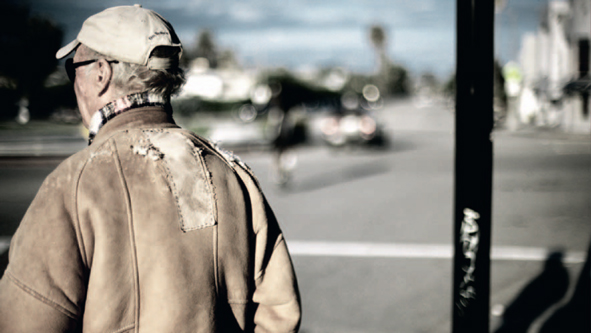
Figure 8.24 The bleach bypass look. © Andrew Francis (www.xlargeworks.com).
1. Load the footage and duplicate it.
2. Follow the procedure on page 138 for converting the copy to black and white.
3. Take the black-and-white copy and layer it over the original.
4. Use blending modes (such as screen or multiply) between the two layers until you achieve the desired look.
a. You can also key the luminance channel for the highlights and blur and brighten it to increase the effect.
5. Render out the result.
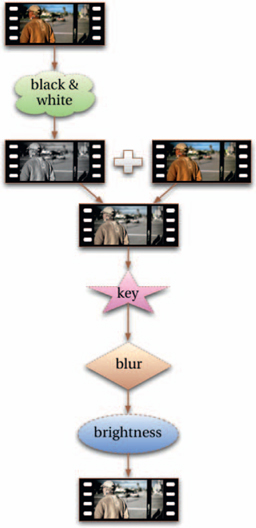
Figure 8.25
Changing Colors
Whenever someone demonstrates a color correction system, they will almost always show off its ability to completely change a color (for example, turning a red rose yellow). In practice, such extreme effects are rarely necessary, but easily performed: simply key the original color to isolate it, and then use the regular slew of color correction tools to alter the isolated region. You may need to combine the key with a garbage matte, especially if the isolated color is present in other parts of the scene.
How to Cross Process
This is another technique adapted from chemical processing that can be used to stylize footage.
Cross processing is another chemical process, caused by putting negative film through the development process for positive (slide) film, or vice versa. The result is a very distinctive, surreal-looking image.
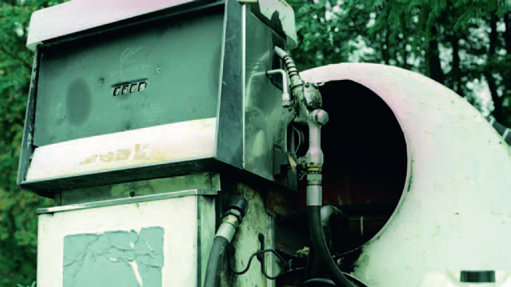
Figure 8.26 The cross process look. © Andrew Francis (www.xlargeworks.com).
1. Load the footage.
2. Create keys on the luminance channel for the shadow and highlight regions.
3. Using the shadow key to limit the effect, darken the red channel and brighten the blue channel.
4. Using the highlight key to limit the effect, brighten the red channel and darken the blue channel.
a. You may also want to apply a blur to the overall highlights to mimic the chemical process.
5. Increase the contrast of the green channel slightly.
6. Tint the entire image slightly yellow.
7. Render the result.
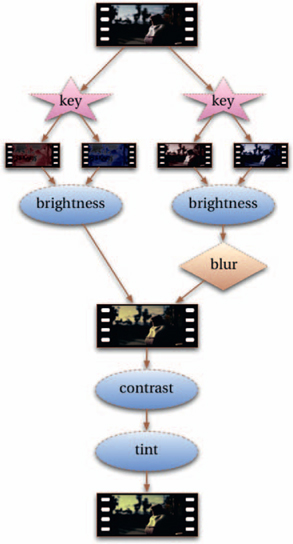
Figure 8.27
How to Blue-Green Transfer
This is the simplest technique to stylize footage, and is surprisingly underused.
A blue-green transfer was a popular technique in the early 1990s, coinciding with the rise of the telecine (film to video) process. It has long since fallen out of use, but it remains a simple yet effective
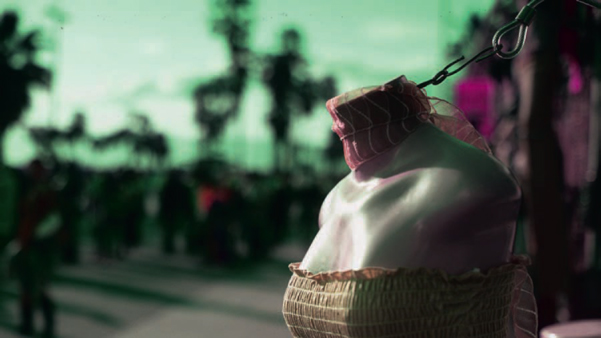
Figure 8.28 The blue-green transfer look. © Andrew Francis (www.xlargeworks.com).
way to stylize footage. It can be combined with other techniques, or used as a starting point for inspiration.
1. Load the footage.
2. Swap the blue channel with the green channel.
3. Render the result.
How to Boost Vibrance
This is a popular technique adapted from digital photography for adjusting saturation in a more controlled way.
Almost every color correction system has a method for adjusting the saturation in an image. This single control gives rise to a great variety of different ways

Figure 8.29
single control gives rise to a great variety of different ways to stylize footage, from the hypersaturated reality of shows such as Pushing Daisies to the more monochromatic imagery of Sin City.
The problem with your garden variety saturation control, though, is that it affects all colors equally. So colors that are already saturated can quickly become oversaturated, or vice versa. This technique provides a way to adjust the saturation of footage based on how saturated it already is, making it ideal for working with skin tones, which are not typically very saturated to begin with.
1. Load the footage and duplicate it.
2. Desaturate the copy.
3. Create a difference matte between the two versions (refer to Chapter 2 for the process of creating a difference matte).
4. Desaturate the resulting footage and then adjust the levels so that the color range is from pure black to pure white.
5. Render out the result.
6. Using this new footage as a mask (you may need to invert it) on the original footage, adjust the saturation as desired.
How to Turn Day into Night
This is where colorists get to show their mettle.
Day-for-night shots can be a producer's dream. You save on the additional expense of a nighttime shoot by shooting during the day, and get a colorist to make the shots look like a nighttime scene through careful manipulation of the colors. However, it takes a very skilled colorist to produce convincing results.
This technique is simple enough to follow, but the secret is in the tweaking; it's a classic example of where tools and technical expertise must give way to pure artistry in order to get the best results.
1. Load the footage. If possible, try to get reference material of similar scenes that were actually photographed at night.
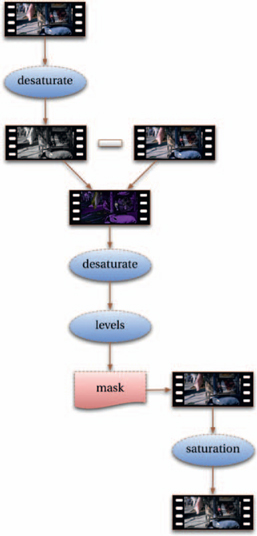
Figure 8.30
Figure 8.31 A single frame without correction. © Andrew Francis (www.xlargeworks.com).

Figure 8.32 After boosting vibrance.
2. Desaturate the shot by around 50–75%. We don't perceive color very well in low light, so it is very unusual to see anything saturated in a nighttime scene.
3. Tint the image slightly blue. This produces a basic day-for-night to use as a starting point. You now need to identify certain key aspects of the scene.
a. What provides the primary light source? Is it the moon, street lights, passing cars, or something else? For light sources like passing cars, you will need to add dynamic color correction to make light appear to move across the scene.
b. What time of night does the scene take place?
4. Remove anything from the scene that shouldn't be visible at night (such as reflections of the sun, birds, and cars without lights).
a. Particularly tricky elements to remove may have to be given to a visual effects artist to deal with, or you might be able to crop or otherwise blot them out.
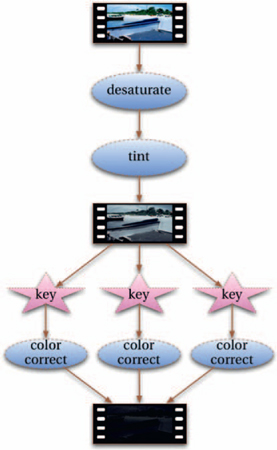
Figure 8.33

Figure 8.34 A single frame without correction. © Andrew Francis (www.xlargeworks.com).
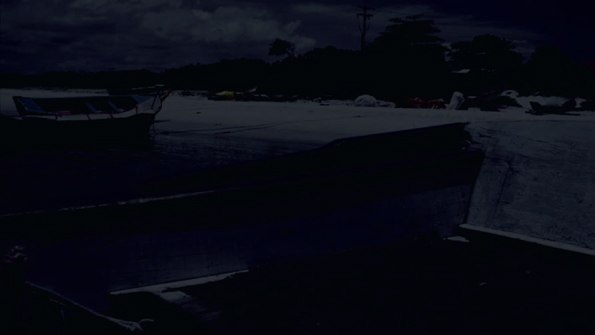
Figure 8.35 Day is turned into night. © Andrew Francis (www.xlargeworks.com).
5. Create keys for the shadow, mid-tone, and highlight regions and adjust the color of each to get the desired result.
a. You'll probably want to exaggerate the darkness of the shadows and mid-tones, adjusting the highlights depending upon the picture content and desired result.
6. Tweak the result until you are happy.
7. Render the sequence.
TIP
For Band of Brothers, colorist Luke Rainey broke with tradition, opting to give everything a brown (rather than blue) hue, resulting in some of the best-looking day-for-night footage ever produced.
For a great example of how lighting changes over the course of a night, refer to the work of colorist Larry Field on the television series 24