

Figure 5.1 © Andrew Francis (www.xlargeworks.com).
Chapter 5
Fixing Film Problems
“ Grant me this final wish, I want to put you in a trance.”
—Soho Dolls
There's something about film. It's a fragile, expensive, complicated, and elitist medium in today's digital world, but it has a certain quality to it. No other medium can evoke a dreamlike state the way that projected film can.
The days of film as a shooting format have been numbered for an extraordinarily long time now, but it is still going strong, with billions of feet of film being shot each year for commercial productions. Despite a tedious amount of technical discussions within the film industry as to its tangible value compared to digital formats, it is very common to end up working with digital footage that originated on film.
The process of digitizing film is best left for another book, but even so, there are some characteristics of film that remain problematic, even in digital postproduction. Thankfully, the vast majority of them are fixable, but have a big tub of elbow grease standing by ….
Film Damage
One of the most recognizable characteristics of film footage is the damage. It's something of a visual cliché that in order to make footage look like actual film (especially old film), there needs to be dust sparkles and scratches all over it. The reality is that film (even modern film) does exhibit these types of damage, albeit (one would hope) in smaller quantities.
TIP
There are lots of techniques that claim to be able to capture the look of film using video footage (even I present a technique for doing this, in Chapter 4). The truth is that no other medium can completely match film visually, which is one of the reasons it remains so popular today.
The damage is caused by the fact that film images exist as physically very small pieces of material that are projected to many times their actual size. Due to
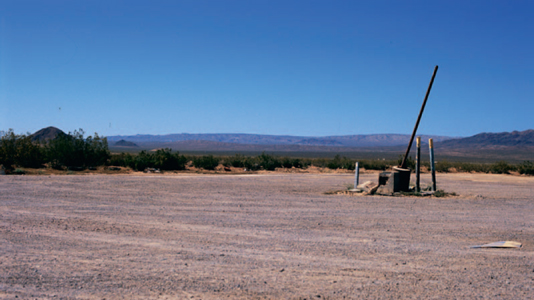
Figure 5.2 © Andrew Francis (www.xlargeworks.com).
the extreme degree of magnification that occurs, even a microscopic strand of hair can become as pronounced as a length of rope.
By the time the film has been scanned and is in a digital form, any of this kind of damage forms part of the image, and as such turns into pixels, leaving behind no trace of the image underneath.
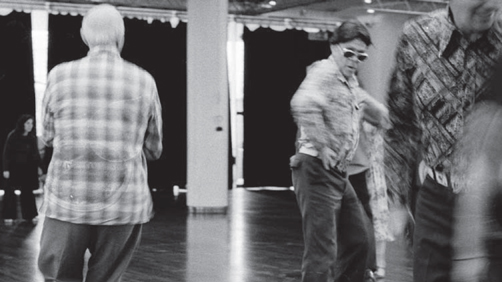
Figure 5.3 A frame of film with dust and scratch damage. © Andrew Francis (www.xlargeworks.com).
Figure 5.4 A frame of film with watermark and mold damage. © Andrew Francis (www.xlargeworks.com).
How to Bust Dust
Dust on scanned film is by far the most common issue to deal with in postproduction.
Dust that happens to be on the surface of each frame of film scanned will become a permanent part of the image. Fortunately, each speck of dust translates to being only a few pixels in size in the digital image, and they are distributed randomly across the frame, so the following technique will work for the vast majority of cases.
TIP
There are a number of options available during the scanning stage that can help reduce the amount of film damage that makes its way into the digital realm. First of all, the film should be cleaned, using either chemical processes (also known as a wet-gate), or ultrasound. Secondly, some modern film scanners have the capability to use infrared to determine the locations of defects on the surface of the film, typically creating mattes that can then be used as part of an automated process to digitally correct them later.
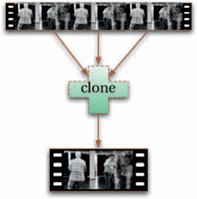
1. Load the dusty footage into a paint system.
2. On a frame with dust, clone from an adjacent frame onto the pixels containing the dust. Use a soft brush, just slightly larger than the dust in question, and use an offset if the area in question moves between the source and target frames.
3. Repeat for any other dust in the frame.
4. Repeat for other frames.
5. Render out the sequence.
On the surface, this is a very simple approach, but the real trick to this technique is speed. There will doubtless be plenty of dusty frames to correct (numbering in the thousands on a typical 90-minute
feature) and so the key is not to agonize over any of them. After all, no hairdresser would cut hair a strand at a time, no matter how good he or she is.
As a rule of thumb, the less noticeable the dust speck is during playback, the less time you should spend trying to fix it.
TIP
One of the trickiest parts of removing film dust is finding the stuff in the first place. The best way I've found to spot dust is to adjust the display so that highlights stand out a lot more in comparison to the rest of the image (dust tends to get scanned as pure white, or close to it). Then play through the footage at a speed slower than real speed, and the dust should be highly visible.
How to Remove Mold and Watermarks
Fixing these larger types of film damage requires a slightly different tact from fixing dust, though the approach is similar.
Mold and watermarks are both types of damage specific to film. They form either as part of the processing and development of the film or during storage. In addition to obscuring the original image, they may also distort part of it in some way. Like dust, they tend to be randomly distributed across the frames, which means that cloning is usually a great way to get rid of them. However, the drawback to cloning in this way is that very slight differences in motion in the image between frames can cause the picture to shift very slightly between frames, and this becomes noticeable only during playback.
Because of the high volume of this type of damage, it must be fixed using a rapid method, which normally means using the same method used for dust. However, the larger size of this type of damage calls for a variation of the simple dust-busting technique above.
1. Load the footage, and identify the frame with the damage.
2. Clone over the damaged area from an adjacent frame.
a. For damage that covers a reasonably large area (in other words, is very noticeable), clone from both the frame before and the frame after the current frame. This will help reduce the perceptual impact of the cloning operation.
b. Some watermarks appear as rings on the image. In some cases it is acceptable to just fix the actual rings, but bear in mind that the areas enclosed by the rings may be subject to some distortion.
3. Repeat for other watermarks or mold in the footage.
4. Render the sequence.
TIP
You'll most likely notice these types of issues while fixing dust, and so it makes sense to perform both operations at the same time, rather than fixing the dust and then going back and fixing mold and watermarks.
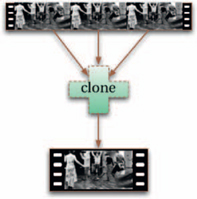
Figure 5.6
How to Remove Tramlines
Tramlines are a staple characteristic of old film. One hundred years later, they're still tough to get rid of.
Tramlines are scratches, so named because they run the length of a piece of film (almost always from top to bottom of every frame). When you watch projected film that has tramlines, the effect is similar to watching the rails from the front of a tram. The common cause of a tramline on a strip of film is a small bit of dirt getting trapped in the path of the film; as the film is pulled across it, it scrapes the surface in much the same way an ice skater makes a distinct path across a frozen lake.
There are two kinds of tramlines: those that move, and those that don't. The ones that move are difficult to repair; those that don't are really difficult.
1. Load the footage.
2. Mask the scratch. If it moves, you will have to adjust the mask dynamically to follow the motion.
3. Use cloning techniques to repair as much of it as possible. This can be very tedious, especially for long sequences, but will result in much better results than using any other method.
a. Clone to a new layer if possible. This will allow you to fix the footage using multiple passes of the clone tool and mix and match results.
b. If the scratch is quite wide and doesn't move, it may be possible to construct a clean plate, particularly if there is a lot of motion in the scene (or if the camera itself pans), which can then be used as a base to repair most of (if not all) the damage.
c. If all else fails, duplicate the footage twice to get two new layers. Shift one layer left and the other right by half the width of the scratch in each case, and then blend them together.
4. Use the mask created earlier to constrain the fix to the scratch itself (you may need to soften the mask to make the fix blend well).
5. Review the fix so far (you may need to render out an intermediate version to see the changes). Then go back and fix anything that screams of digital manipulation.
6. When satisfied, render out the new footage.
TIP
Tramlines are a great candidate for using automated software designed specifically for the purpose. Additionally, if you have access to a high-end compositing system, tools for performing wire removals can work wonders on eliminating most film scratches.
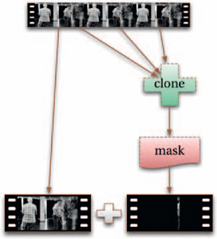
Figure 5.7
How to Correct Frame Registration
When frame registration takes a turn for the worse, fixing the resulting images can become quite a chore.
Even though film consists of individual frames, sometimes the exact positioning along the length of a piece of film (the registration) may not be consistent for various reasons. Just as paychecks are not always evenly spaced throughout a calendar year, sometimes the positioning of each frame along the film may not be exact. This can lead to the picture appearing to oscillate up and down during projection or, in extreme cases, one frame creeping up into the previous one.
This doesn't just affect projection. Bad registration can easily translate to the scanned images, meaning it's possible to end up with scanned frames that vibrate during playback, or even images that contain parts from two adjacent film frames. The ideal method is to fix the problem at the source and rescan the film, although this isn't always possible. The following solution should work for even the most troublesome frame registration issues.
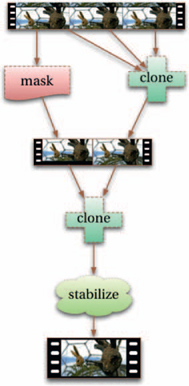
Figure 5.8
1. Load the footage and scrub through it slowly to determine the extent of the damage.
2. If the picture oscillates in some way but each frame is intact, you can treat the footage as if it is suffering from camera shake, and follow the instructions in Chapter 3 to remove it.
3. If the film frames run across two image frames, first rebuild the sequence. To do that, mask the bottom portion of the first frame with the problem, from the top edge of the picture to the bottom of the frame, and paste that into a new file.
a. If the top part of the first frame is incomplete, you can try cloning it from the next frame after you fix it, or just discard it.
4. Mask the top portion of the next frame, and paste that into the bottom of the new frame, taking care to line up the edges.
a. If you're lucky, the join will be seamless. If not, you will need to use cloning techniques to fix the seam later (referring to the technique in Chapter 10 for extending framing might help in this case).
5. Save the new frame, if possible with each section on a separate layer.
6. Repeat the process for the remaining frames.
7. Take the new frames and sequence them together. If possible, retain separate layers for the top and bottom of each image (this will make it easier to tweak the positioning later).
8. Play the sequence through to make sure there is no disparity between the motion of the top and bottom sections.
a. If there is, use stabilization techniques on the top and bottom parts of each frame (if they are not on separate layers, you will need to create new masks and adjust them dynamically to separate the sections).
9. If necessary, use cloning techniques to remove any visible seams from the image.
10. Finally, ensure the finished sequence is steady; if it isn't, use the technique in Chapter 3 for removing camera shake.
11. Render out the sequence.
How to Repair Splice Damage
Splice damage can be devastating, but in the long run, usually only a single frame suffers.
A splice is a method of joining two pieces of film together (the actual process for doing this varies, but there always seems to be some sort of glue involved). Before nonlinear digital editing (before linear video editing, for that matter) splicing film was an integral part of the editing process. Films were quite literally cut and pasted together. Today, splicing film is still necessary in certain situations, even in digital postproduction. For example, if a piece of film snaps, it must be spliced back together in order for it to be scanned.

Figure 5.9
Usually a splice occurs outside of the picture area. Though in theory this means that film splices shouldn't affect the image, in reality they can cause any (or all) of the following side effects:
• Changes to frame registration, such that the footage suddenly (and noticeably) jumps in some way when played back
• Missing frames, if the nature of the splice meant that one or more frames were discarded as part of the process
• Visible glue or other gunk finding its way into the picture area
• In some instances, the splice itself is visible in the picture area.
Each of these issues must be fixed independently of the others, using a combination of techniques.
1. Load the footage into a timeline. First, identify where in the sequence the splice occurs. This should be easy; it will almost always be on the first frame where the damage makes an appearance.
2. Make a cut in the sequence. If there is a shift in frame registration, you can usually fix it by repositioning the part of the sequence after you cut vertically to remove the jump.
a. Sometimes the splice can cause the shift to occur across several frames, as a result of causing the film to bounce slightly during scanning. If that is the case, refer to the technique above for correcting frame registration.
3. If there are missing frames in the sequence, use the technique in Chapter 10 for replacing dropped frames to smooth the sequence.
a. Use this technique if there is extensive damage to any individual frame caused by splice damage; it may be easier to just cut out the bad frame and treat it as if it didn't exist.
4. Use cloning techniques similar to treating mold and watermark damage to clear up any visible stains, glue, or anything else that has found its way into the image.
a. In some cases, this can also be used to recover any part of the picture where the splice is visible.
5. Render out the sequence.
How to Remove Film Gates
No one wants to see film gates creeping into the edge of the picture, especially when removing them is so trivial.
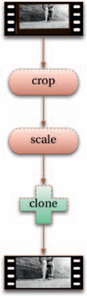
Figure 5.10
Film gates, the film equivalent of a picture frame mount, can sometimes make an unwanted cameo in a shot, either due to misaligned camera elements during a shoot or perhaps due to miscalibration during the film scan.
1. Load the footage and scrub through it to see the extent of the problem (it might help to use whatever visual guides are available in your chosen application).
2. If the gate is steady throughout the sequence, crop the image so that the gate is outside of the safe area for the desired output format, then scale it using the technique in Chapter 9 to get it back to the correct resolution if necessary. When you crop the image, make sure that you retain the same aspect ratio as the original.
3. If the gate gradually creeps into view, it may be possible to use cloning techniques to remove it (this is preferable, as it won't affect the quality of the rest of the image). Otherwise, use the cropping approach, using the frame where the gate is at its most visible as a reference.
4. Render out the sequence.
TIP
If the gate is visible in the frame but outside of the safe area for its intended output format, there's very little point in fixing it, as no one will ever see the difference. The main exception is if you plan on scaling it downward in some way. Most cinematographers will routinely shoot a line-up chart reference to identify the safe regions for the particular aperture they are shooting for; it's wise to refer to a scanned image of the line-up chart to determine whether the gate is indeed inside the intended safe area.
Film Grain
Grains are to film what pixels are to digital images, or what bricks are to the Great Wall of China: not much to look at close-up, but necessary to make the bigger picture.
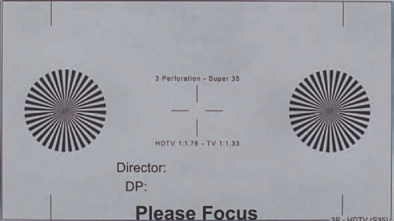
Figure 5.11 An example of a 3-perf line-up chart (courtesy of colorist Jim Mann).
The most unique aspect of film grains (at least, when compared to pixels) is that they are randomly shaped and sized. This is part of the reason why film looks the way it does, but it also means that trying to simulate (or reduce) grain digitally is problematic.
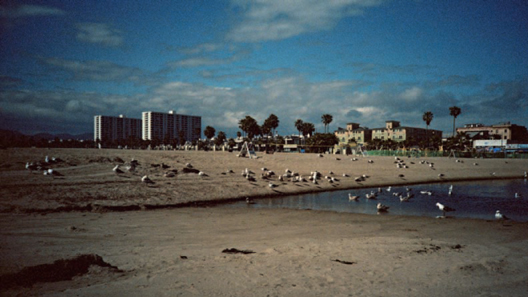
Figure 5.12 Grain is a key characteristic of film and can degrade an image or enhance it aesthetically. © Andrew Francis (www.xlargeworks.com).
The film grain characteristics also vary depending upon the film stock used. For example, fast film (being more sensitive to light) has comparatively large grains, which give it the impression of being “grainy”; in other words, the grains are highly visible during playback. This is not the whole story, though, because 8 mm slow stock film footage (having comparatively small grains) tends to appear more grainy than 35 mm fast stock film footage. The reason for this is that the 8 mm frame is enlarged much more than the 35 mm frame, so the actual size of the grains in the image on screen might end up being much bigger in comparison.
How to Reduce Film Grain
Grain is a big part of what gives film its look, but sometimes it gets in the way of other processes.
The primary reason for wanting to reduce the visibility of film grains from a shot is to make it sit comfortably in a sequence with video footage on either side of it. The second reason is to perform some other operation that would suffer if you left the film grain in (much like you'd want to de-interlace video before scaling it).
The absolute worst reason for trying to reduce grain from a shot is to improve the image quality. Every grain reduction method will compromise the image quality in some way. The only way this could ever be justified is if the grain is so prominent that it is painful to watch the sequence play—to the extent that you'd be willing to blur it a little to remove the distraction and take the pressure off your eyeballs.
1. Load the footage, and zoom into it. Find the average width of a grain (in pixels) on any frame.
2. Apply a median filter, setting the size to slightly higher than the width you just measured, and increase the strength of the filter until the grain is reduced to a satisfactory amount.
3. For a more advanced variation of this technique, you can key the shadows, mid-tones, and highlights separately and apply the median filter to each in turn. The shadow areas will exhibit stronger grain patterns than the mid-tones, with the highlights needing the least correction of all.
4. Render out the sequence.
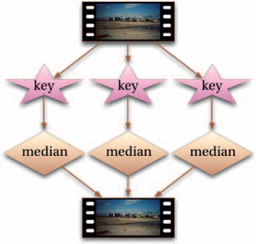
Figure 5.13
How to Add Grain
For the occasions when it's necessary to reduce film grain, adding it back afterward can make doctored footage look more natural.
1. Load some film footage that has no picture content (for example, scanned film leader).
2. If necessary, use the techniques outlined earlier in this chapter to remove signs of film damage.
3. Duplicate the resulting footage and use the grain reduction technique described above on one of the copies to completely remove the grain structure.
TIP
The process of adding and reducing grain is another one of those situations where it's worth investing in software dedicated to the process if you plan on doing it a lot. Grain is next to impossible to create or remove by hand, but there are some very clever algorithms that can add or reduce it by boiling grain patterns down to a mathematical entity, even matching particular stocks very faithfully.
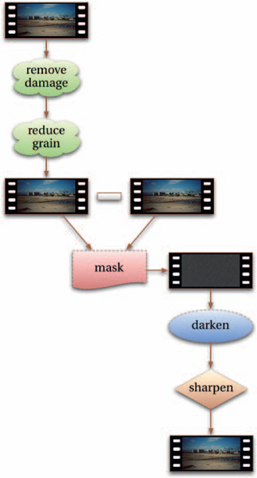
Figure 5.14
4. Generate a difference matte from the two versions, using the technique in Chapter 2.
5. Load the footage to apply the grain to.
6. Color-correct the footage to darken it. Use the difference matte as a mask to limit the extent of the correction.
a. You can further limit the effect by keying the shadows, mid-tones, and highlight regions and applying different color corrections to each. The shadow areas should receive the lion's share of darkening, with the highlights receiving almost no changes at all.
7. You can also try applying a sharpen filter to the footage, using the difference matte to limit the effect. Depending upon the type of footage, this can work well (alternately, invert the mask and use a blur filter on the footage).
8. Render out the finished sequence.
Emulating Video
Even though there have been thousands of articles written on the topic of making video look like film, there are very few that discuss making film look like video, which is strange considering that it's a much more common postproduction technique.
Traditionally, film offers superior quality images over its video counterparts, so it makes sense to shoot film if you're unsure whether you want the end result to look like film or video (the flipside is that film is more expensive to shoot, so it can be in the best interests of the producer to shoot video if there's some uncertainty). The desire to turn film footage into something

Figure 5.15 © Paul No ël Brakmann (www.flickr.com/photos/stallkerl).
TIP
Although these techniques are from the perspective of film-sourced material, with a little bit of modification, they can also be used to make video footage (for example, HD video) look like a lower quality video source (such as a security camera video).
that resembles video can be motivated by the storyline, by artistic license, or by continuity (needing to mix film footage into a sequence of video), and is easily done, given the right tools. Although people tend to think of the “film look,” with video there are actually several different looks, some of which will be covered below.
How to Make Film Look Like HD Video
35 mm film, and even good-quality 16 mm film, has better color rendition and even higher definition than HD video, so it's a good candidate for video emulation.

Figure 5.16
1. Load the film footage.
2. Remove any film damage, using the techniques discussed earlier in this chapter.
3. Use the technique given above for reducing grain.
4. Follow the process in Chapter 3 for adding camera shake (film footage tends to be steadier than video, purely because of the infrastructure required during a shoot).
5. Scale the footage down to match the resolution of your chosen HD format (refer to Appendix 2 for a list of resolutions for common HD formats).
6. Use a sharpening filter on the footage until signs of ringing (oversharpening) just start to appear (refer to Chapter 4 for a discussion of oversharpening).
7. Add noise to the footage (all HD video will exhibit some amount of noise).
a. For a more convincing application of noise, separate the highlight and shadow areas, and be sure to add more noise to the shadow regions than the highlights.
8. Color-correct the footage (if possible, use similar footage shot on an HD camera for reference).
a. Increase the brightness of the highlight regions so they clip (max out at white), paying particular attention to skies in the footage (video cameras are notoriously bad at reproducing sky detail).
b. Darken and slightly desaturate reds, and desaturate greens in the footage (film is much better at reproducing deep reds and greens than video).
c. Lower the contrast of the overall image, especially in the mid-tone regions (video has a linear response to light, and so it looks slightly muddier than film).
9. Retime the footage to match the frame rate of the chosen HD format, using the techniques in Chapter 10.
10. If the target HD format is interlaced, use the method in Chapter 4 to interlace the footage.
11. Render out the sequence.
a. If your chosen video format uses some form of compression, make sure you render using the same compression type, as this will subtly affect the overall look of the finished footage.
TIP
If you're trying to emulate damaged video (for example, video with signs of ghosting or compression damage), your best bet is to use software designed specifically for that purpose, as it can be very complicated to reproduce by hand.

Figure 5.17 An image shot on film. © Andrew Francis (www.xlargeworks.com).

Figure 5.18 The image made to look like video.
How to Emulate Cell Phone Video
Shooting on a cell phone may be cheap, but that doesn't mean it's desirable, even if you want to capture the look.

Figure 5.19
The proliferation of video camera-enabled cell phones means that it is increasingly necessary to mimic the footage produced by these kinds of devices. At the same time, the cameras themselves do not lend themselves particularly well for shooting in the first place, and so shooting normally and postprocessing the footage later to look like the chosen format becomes a much more flexible option.
1. Load the film footage.
2. Remove any film damage, using the techniques outlined earlier in this chapter.
a. It's probably not worth removing small dust sparkles, as these will likely be removed as part of the process anyway.
3. Follow the process in Chapter 3 for adding camera shake. You can add quite a lot of camera shake here, because cell phone video is rarely steady, and the reduction of the picture size will diminish the overall effect.
4. Blur the image until the fine details are barely distinguishable (this will mimic the inferior quality lenses that cell phone cameras tend to have).
5. Scale the footage down to match the resolution of your chosen format (refer to Appendix 2 for a list of resolutions for common mobile formats).
6. Use a sharpening filter on the footage until signs of ringing (over-sharpening) just start to appear (refer to Chapter 4 for a discussion of oversharpening).
7. Add noise to the footage.
a. For a more convincing application of noise, separate the highlight and shadow areas, and be sure to add more noise to the shadow regions than the highlights.
8. Color-correct the footage to match the look of your chosen format (using reference video if possible).
a. Completely clip the highlights so that anything resembling white becomes pure white.
b. Completely crush the shadows so that anything resembling black becomes pure black.
c. Lower the contrast of the overall image.
d. Desaturate the footage (you want colors to be distinguishable, just not very pronounced).
e. For enhanced realism, apply dynamic color correction so that whenever the camera points toward a light source, the brightness of the image increases, depending upon how close to the center of the image the light source is (this will mimic the automatic exposure that many cell phone cameras use).
9. Use the technique in Chapter 10 for adding motion blur (cell phone cameras shoot at a much slower frame rate, and so exhibit much more motion blur).
10. Retime the footage as per the instructions in Chapter 10 to match the frame rate of your chosen format.
11. Render out the sequence.
a. If your chosen video format uses some form of compression, make sure you render using the same compression type, as this will subtly affect the overall look of the finished footage.
b. If you are aiming to use this in a sequence with a higher resolution, you should still render it out at the format's native resolution, and then use the techniques in Chapter 9 to scale it up to the desired resolution later.

Figure 5.20 Film frame given the cell phone treatment.
How to Emulate Security Camera Video
Security cameras use a very low frame rate, making them more like time-lapse cameras than video cameras.
Security cameras typically have different properties than other types of video cameras. Because they are constantly recording, the number of frames captured is reduced dramatically in order to save storage space. Consequently, the frame rate tends to be very low, and there is usually a great deal of motion blur. Furthermore, they are usually monochrome (especially if they are used at night), or at least have greatly reduced color saturation.

Figure 5.21
1. Load the film footage.
2. Remove any film damage, using the techniques from earlier in this chapter.
a. Don't remove all dust or watermarks, as these can appear as things like bugs on the lens, which will actually increase the realism of the effect (unless the camera is supposed to be in a bug-free area).
3. Follow the process in Chapter 3 for removing any camera shake. The resulting footage needs to be completely still to match the fact that security cameras have fixed positions.
4. Scale the footage to the target resolution (use an SD format resolution if in doubt).
5. Add noise to the footage.
a. For a more convincing application of noise, separate the highlight and shadow areas, and be sure to add more noise to the shadow regions than the highlights.
6. Color-correct the footage to match the look of your chosen format (using reference video if possible).
a. Completely clip the highlights so that anything resembling white becomes pure white.
b. Completely crush the shadows so that anything resembling black becomes pure black.
c. Increase the contrast of the overall image.
d. Desaturate the footage (if you want to mimic a black-and-white video camera, desaturate the footage completely).
7. Use the technique in Chapter 10 for adding motion blur (security cameras shoot at a much slower frame rate, and so exhibit much more motion blur).
8. Retime the footage as per the instructions in Chapter 10 to around 1 frame per second.
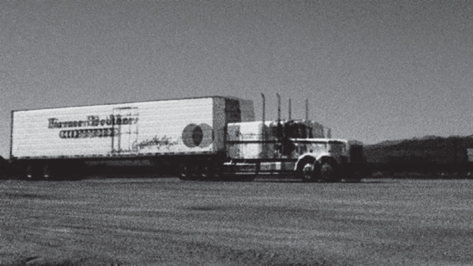
Figure 5.22 Image made to look like it's from a security camera.
9. Retime the result without using any temporal interpolation (in other words, so that the newly created frames are just repeats of the existing frames) to match the frame rate of the final sequence.
10. Render out the sequence at the desired resolution.