
Figure 10.1 Earth © BBC Worldwide Ltd 2007.
Chapter 10
Fixing Timing Problems
“ From this time, we're all looking at a different picture through this new frame of mind. ”
—Portishead
Almost every production will have at least one shot that has timing issues. Most of the time these are deliberate, such as the case of footage intended to be sped up or slowed down. Sometimes, though, there will be shots that have other problems (such as data corruption), which then become the cause of timing issues such as dropped or duplicated frames. And of course, there are problems that occur during the shoot, such as flicker, which were either overlooked or impractical to control at the time.
This chapter will address many of these types of problems, as well as provide some tips to improve intentional timing changes.
Retiming Footage
Almost every production will have at least one retimed (sped up, slowed down, reversed) shot. This is done for a variety of reasons, such as for continuity, for emphasis, to imply a sense of scale, or for special effect. Traditionally, speed changes were always done in-camera by changing the rate at which the film ran, but these days the responsibility tends to be delegated to postproduction for flexibility.
TIP
The following techniques assume you are retiming footage independently from any audio. For information on retiming audio as well, separate the audio tracks from the footage, and refer to Chapter 7.
The digital realm also offers other possibilities. For instance, it's possible to vary the speed of the shot as it plays. A shot could start sped up, then switch to normal speed, and then slow down toward the end, a process known as time-warping or ramping.
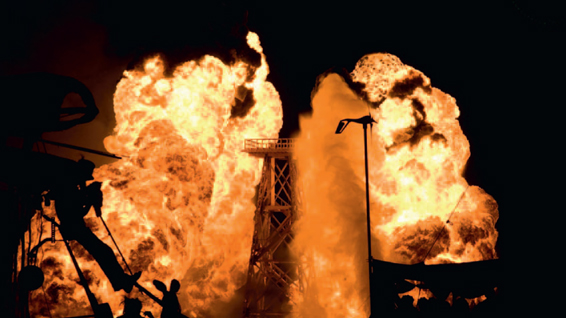
Figure 10.2 Shots of explosions and fire tend to be slowed down to give them more screen time. © Daniel Garcia (dgarcia3focalintent.com).
How to Speed Up a Shot
Almost every editing system can speed up a shot.
1. Load the shot into a new timeline.
2. Set the new speed as a percentage of the original speed. For instance, to double the speed of the original shot, set the speed to 200%.
3. Render the result.
If you know the new duration of the retimed shot rather than the percentage (and if your editing system doesn't let you change the speed by specifying a new duration), you can work out the percentage:
[Number of frames (original shot)/Number of frames (new shot)] × 100
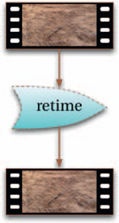
Figure 10.3
If your editing system doesn't let you apply speed changes directly from within its interface, you can do it yourself by manually cutting out frames (using extract or ripple-delete operations) at regular intervals. For example, to double the speed of a shot, cut out every other frame.
TIP
Most systems will allow you to reverse a shot by setting the speed to –100%.
Figure 10.4 A sequence at its original speed. Earth © BBC Worldwide Ltd 2007.
Figure 10.5 Here the sequence runs twice as fast, skipping every other frame. Earth © BBC Worldwide Ltd 2007.
Most systems will speed up footage by simply discarding frames at a regular interval. In most cases, this provides good results, with the added benefit that it processes very quickly.
Some software (notably third-party retiming plug-ins) will default to using motion-based interpolation. For speeding up shots, this is unnecessary at best, and at worst will soften the images by simulating motion blur and thus should be avoided (unless this is the effect you're after).
How to Slow Down a Shot
Slowing down a shot convincingly requires considerably more work than speeding it up.
Certain things are best done in-camera, rather than left to be fixed in post. One of the best examples of this is slowing down footage. No matter how well you can do the job of creating slow-mo digitally, it will never look as good as if you'd set the camera to film at a higher frame rate.
The main issue with slowing down a shot is that you must generate frames that don't exist. On top of that, you will sometimes need to reduce the camera motion blur so that the images appear sharper. Many editing systems that give you the option to slow down footage will do so by duplicating frames at a regular interval. In most cases, this method is not sufficient. If your system has a frame-blending method (or better, a motion-estimation option) you should use it and then check for problems. If not, you can get the same results with a liberal application of elbow grease:
1. Determine the points where new frames need to be generated. For example, if you need the shot to run at half-speed (making it twice as long), then you need to insert a new frame every frame.
a. If the new speed must be less than 50% of the original, then you will need to do the entire process several times, first making it look right at 50% speed and then making further reductions to get to the desired speed.
2. For each new frame to be created, load the frame before and the frame after into an image editor.
3. Combine the two images together using a straightforward blend operation. Depending on the picture content, you may find that different blending modes produce more convincing results.
4. Fix any obvious problem areas, such as double edges, by masking and moving, cloning from the other frames, or warping the affected regions to the correct position.
5. Ensure that the new frame is the same as the other two in terms of overall sharpness, brightness, and contrast, and adjust accordingly.
6. Save the new frame.
7. Insert-edit (or splice-in, or ripple-edit) the new frame into the sequence.
8. Repeat for the other frames to be generated.
9. Play through the new sequence in real time to check for other problems.
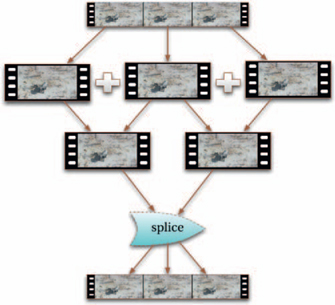
Figure 10.6
Slowed-down shots will almost always look softer than other shots because there is an implied motion blur (unless the shutter was deliberately increased during the shoot). For the sake of continuity, it may be necessary to take steps to try to reduce this blur.
TIP
If you apply a speed change to a cut sequence (using interpolation or motion-estimation-based algorithms), you'll end up with undesirable soft cuts at each cut point. To prevent this from happening, you must apply the speed change to individual shots rather than to the entire sequence.
How to Time-Warp Footage
The complex nature of ramping the speed of a shot requires dedicated software.
Time-warped shots tend to be very striking and energetic because they are unnatural; they distort our sense of rhythm, and therefore are usually relegated to trailers, commercials, pop promos, or stylized films. However, more subtle applications of time-warping can be used to tweak regular speed changes and make them appear less jarring.
Unfortunately, there is no practical way to time-warp shots manually (unless you want to spend a day with a sheet of graph paper and a calculator). Provided you have access to software with time-warp functionality, the process is very simple:
1. Most systems use a graph-based interface, with the output time running horizontally and the input time (or input speed) running vertically. There should be no sharp angles on this graph as you make changes to it, as these tend to produce visible changes in speed (which may be great for trailers, but not so great for narrative pieces). Gentle curves will produce more subtle results (assuming that's what you're after).
2. Determine the points at which the main speed changes occur. In most cases, these will be the start and end of the shot, and in some cases, the middle, too. Set these points to a good average of what you want to achieve, and preview the output.
3. Make sure the first and last frames of the output are what they should be, and not handle frames. Most systems allow you to change the overall duration of the new shot independently of the first and last source frames, so don't worry too much about the duration at this point (unless it has to be a predetermined length).
4. With an overall speed set, layer slight changes into the sequence that look pleasing to the eye. Be sure to review changes in the context of the previous and next shots in the sequence so that it appears smooth.
5. Render the result.
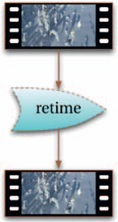
Figure 10.7
TIP
It's absolutely crucial to use a system that can process changes quickly and interactively during the initial phase of time-warping footage. Much of the success of the process lies in a creative process of trial and error, making little adjustments and tweaks, so it's essential that you don't spend time waiting for your shot to be reprocessed. Many time-warping systems include a preview or draft mode to aid performance, and these should be used as needed.
The most important thing about this process is that the result looks right. Don't worry too much about sticking to exact speeds; as long as the first and last frames are set correctly, anything goes!
You may find that this method produces noticeably softer results than the speed-change methods mentioned earlier, or introduces motion artifacts. In this case, you may need to combine this approach with the original speed-change
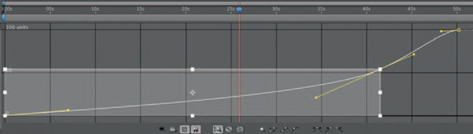
Figure 10.8 Systems such as Adobe's After Effects allow you to use an interactive graph to adjust time parameters.
techniques, using blending or masking of problem areas. For example, to increase the sharpness of a sped-up shot, create a new version of the shot using the method on page 172, and then blend the two shots together (for example, layering some of the luminosity of the straightforward speed-up onto the time-warped one), adjusting as necessary.
Removing Duplicate Frames
Duplicated (or “ doubled-up ” ) frames are a nasty little problem, mostly because they can be easy to miss until it's too late to fix them at the source.
In the digital world, frames can be duplicated due to several situations:
• One or more frames of an image sequence has been copied twice
• The footage has been retimed
• A de-interlace has not been set up correctly
• A digital filter has caused a render error
• A motion-compressed file has been corrupted
Whatever the cause, we'll assume the damage has been done and you're stuck with it. The problem now falls into two categories:
1. There is a duplicate frame at a regular interval (for example, every three frames).
2. There is no pattern as to where the duplicates pop up (or it only happens once).
Figure 10.9 Here the frames are duplicated in a repeatable pattern. Earth © BBC Worldwide Ltd 2007.
Figure 10.10 In this case there is no particular pattern to the repeated frames. Earth © BBC Worldwide Ltd 2007.
In the second case, you need to tackle each duplicate frame individually, which can be fairly tedious if there are a lot of them. In the first case, you should be able to fix all the problem frames in one go.
TIP
Duplicate frames can also be created accidentally during an edit. See Chapter 11 for more on that.
The next question you need to ask is, if you were to remove just the duplicate frames, would the footage run smoothly? In other words, have the duplicates overwritten other frames?
Figure 10.11 In this case, the duplicate frame has overwritten the original frame. Earth © BBC Worldwide Ltd 2007.
Figure 10.12 In this case, all the original frames still exist in the sequence. Earth © BBC Worldwide Ltd 2007.
This can be tricky to determine, particularly if the duplicate frame is on a cut. If the sequence includes audio, then you can check the audio sync. If it's out of sync, then it's likely that all the original picture frames are intact. Another option is to check the shot or sequence length (in frames) against any records you may have (such as an offline EDL). Sometimes, though, you will have to work under the assumption that everything is there and deal with any problems that crop up later on.
In order to remove duplicates, all that needs to be done is to delete the rogue frames and then save the modified sequence. If you know that the duplicates have overwritten other frames, then you instead need to regenerate the missing frames, and then use them to overwrite the duplicate frames.
How to Remove a Single Frame
Removing individual frames is a very straightforward process.
1. Load the sequence into an editing system.
2. If there are any audio tracks, lock them to prevent changing the audio.
3. Cue to the frame to be removed.
4. Mark an in and out point on that frame.
5. Perform an extract (or ripple-delete) edit. This removes the frame and closes the resulting gap in the sequence.
6. Render the sequence.
7. Depending upon the cause of the additional frame, the audio may now be out of sync, so check the rendered output and correct the audio if necessary.

Figure 10.13
TIP
You should record any changes you make to footage in case you need to refer back to it later. Usually, saving a copy of the timeline or an EDL just prior to rendering will suffice.
How to Remove Repeating Frames
Provided your editing software supports this feature, you can remove repeating frames automatically.
If there is a pattern to where duplicate frames occur, you can use a speed-up operation to remove them all in one go.
1. Load the footage into an editor.
2. Calculate the speed required to remove the duplicate frames:
[(Number of sequential frames without a duplicate + 1)/Number of sequential frames without a duplicate] × 100
For example, if there is a duplicate frame after every three frames, then your speed will be (4/3) ×100 = 125%.
3. Apply a speed-change with the calculated value. It's critical that the speed-change uses a drop-frame method (rather than a blend or motion-estimation method); if this is not an option, you'll have to resort to removing the frames manually, one at a time.
4. Render the final sequence.
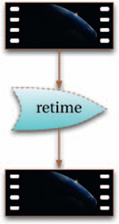
Figure 10.14
TIP
This method only works where there is only one duplicate frame at a time. If the duplicate frames are repeated more than once, you'll need to run this process several times.
How to Regenerate Missing Frames
The slow-mo process can be used to replace missing frames.
There are several cases where you may need to recreate frames:
• The original frame has been damaged
• The shot was accidentally sped up
• An editorial or data error has accidentally removed the frame
To regenerate a single missing frame (Figure 10.15):
1. Load the sequence.
2. Save the frame on either side of the missing frame.
3. Follow the technique on page 173 for slowing down a s generate the intermediate frame.
4. Cut the new frame back into the shot.
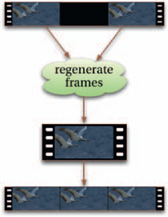
Figure 10.15
To regenerate concurrent missing frames (Figure 10.16):
1. Load the sequence.
2. Follow the steps above to generate the middle missing frame. For example, if there are three frames missing from a shot, this process will give you the second missing frame.
3. Using the newly generated frame, repeat the process as needed to rebuild more frames. For example, you can use the second missing frames along with the two originals to generate the first and third frames from a group of three.
4. Repeat as needed and then cut the new frames back into the sequence.
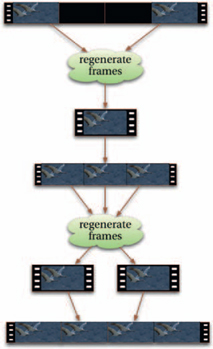
Figure 10.16
TIP
If the original frame exists but is damaged, it is generally better to try to salvage as much of it as possible, perhaps combining a cloning process with this technique, rather than trying to regenerate the entire frame.
If the problem frame is at the beginning or end of a shot (and without any handle frames available), you're pretty much out of luck, although you can try using a motion-estimated speed change. Alternatively, you can extend the previous or next shot by one frame if possible, or, as a last resort, just duplicate the adjacent frame.
Flicker
Synonymous with old motion pictures, flicker can occur for a number of reasons:
• One of the light sources was flickering during the shot
• The frequency of the light source was lower than (or out of phase with) the camera photographing the scene (this is particularly typical when photographing television screens)
• A digital filter or compression method went awry

Figure 10.17 Shooting a scene lit by candlelight can result in flickering images. © Doug Bowman.
In some cases the flicker may enhance the mood of a scene, but in other cases it is undesirable and distracting.
How to Reduce Flicker
Flickering can be diminished using some simple color correction.
Although there is software dedicated to reducing flicker, doing so manually is actually a very simple process. Images flicker because the overall luminance changes very irregularly over a short period of time. Most light sources do not behave this way naturally (with the noticeable exception of fire), and so it is distracting to watch. The process can be reversed to some extent:
1. Load the footage and duplicate it.
2. Apply a desaturation operator to the footage to make it grayscale.
3. Color-correct the footage to equalize it (so that the minimum and maximum values are the same across each frame).
4. Apply a Gaussian blur filter across the footage until there is no discernable detail at all (you may need to apply the filter multiple times to get the desired result).
5. Add another color correction operator, and adjust the midpoint on each frame so that all the frames have the same grayscale value.
6. Copy the adjustments you made back to the original footage. a. Some systems allow you to nondestructively layer operations on top of each other. When using such a system, there is no need to copy the changes back; simply deactivate all the operations except for the final color-correction.
7. At this point you may discover that the color component of the footage is still flickering, in which case you should repeat the process without desaturating the footage and adjust the hue on every frame.
TIP
Be aware that you may introduce additional artifacts, such as clipped highlights and crushed blacks, if there is insufficient headroom in the original footage.
8. Finally, tweak the color as needed to maintain continuity between the frames.
9. Render the result.
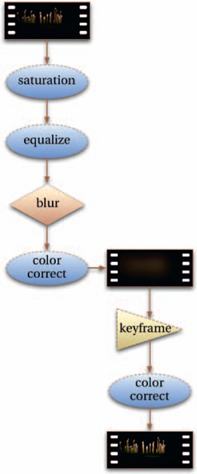
Figure 10.18
Motion Blur
Motion blur is caused by something moving from one point to another during the time the camera was photographing a single frame. In the image, the movement gets exposed in its entirety, causing a blur. During a shoot, the amount of motion blur can be controlled by changing the shutter: a shutter that is open longer will record more motion (and thus more motion blur), while the reverse is true for a shutter that is open for a shorter time.
Too much motion blur can cause a shot to look soft, while too little can make the motion look stochastic. This is typically exploited for stylistic effect, but on some occasions it becomes apparent that a shot has more or less motion blur than is desired, and must be fixed.

Figure 10.19 Too much motion blur can stylize a shot or ruin it. © Andrew Francis (www.xlargeworks.com).
How to Add Motion Blur
Simulating additional motion blur can be simple.
1. Load the shot (with handles if possible).
2. Duplicate the shot twice so that there are three copies of the shot layered on top of each other.
3. Slip the second layer backward by one frame.
4. Slip the top layer forward by one frame.
5. Set the blending modes of the layers to screen (you can experiment with other blending modes as well) and reduce the opacity of the top two layers to suit.
6. Render the new version.
7. To increase the effect, run the process again, using the previously rendered output.
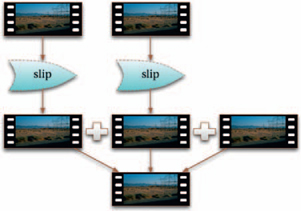
Figure 10.20
How to Reduce Motion Blur
Unfortunately, there isn't a foolproof way to remove motion blur, but you can use this technique to at least reduce its impact.
1. Load the footage.
2. Duplicate it so that there are two copies layered on top of each other.
3. Apply an emboss filter to the top layer. Adjust the settings so that the desired details (such as the edges of foreground objects) stand out.
4. Set the blending mode of the top layer to vivid light (assuming your application supports this mode; otherwise, you'll have to experiment with other types), and adjust the opacity so that the details stand out.
5. Unfortunately, doing this will increase the noise of the image significantly, so you now need to use one of the noise reduction techniques from Chapter 6.
6. For best results, combine the new footage with the original using masking and cloning techniques.
7. Render out the sequence.
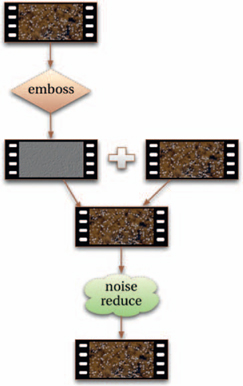
Figure 10.21

Figure 10.22 Earth © BBC Worldwide Ltd 2007.
How to Get Great Time-Lapsed Shots
Getting great-looking time-lapse shots requires combining several techniques.
Time-lapse shots are often simulated using visual effects rather than shot on location, partially because doing so provides greater control over the end result. Time-lapse material created in-camera can suffer from lots of flaws and thus can be visually distracting if not treated properly.
When done right, though, camera time-lapse footage can look stunning, vastly superior to its artificial counterpart. If you have a time-lapse sequence, follow these steps to get the best out of it.
1. Load the footage and play through it, noting all of the issues that are apparent. Generally, it's best to tackle the most obvious problems first.
2. For the motion to be smooth, the first consideration is that all the frames are available (at least to begin with). Time-lapse sequences are created by exposing single frames at a regular interval. If there are frames that were skipped from the sequence, you will need to regenerate them using the technique on page 179.
3. If there are any frames that exist in the sequence but are completely unusable (for example, if someone walked into the shot), remove them and regenerate the frames using the technique on page 179.
4. If there appears to be any camera shake when playing through the sequence at this point, address this next, using the techniques in Chapter 3.
5. If there are any frames that are partly unusable (for example, if a fly landed on the lens), use cloning techniques to fix them.
6. If the sequence appears to flicker, follow the instructions on page 181 to reduce the flicker.
7. If the sequence now appears stochastic, add some motion blur as described on page 182.
8. Color-correct any remaining discrepancies.
9. Retime the sequence as required.
10. Render the result.

Figure 10.23