Chapter 4. Audio/Video & Multimedia
Integrating Sound and Motion into Your Presentation

SUPPORTED AUDIO FILE FORMATS 88

SUPPORTED VIDEO FILE FORMATS 90


EXTRACT AUDIO WITH WINDOWS MEDIA PLAYER 96

EXTRACT AUDIO WITH APPLE ITUNES 98


PUTTING FLASH IN A PRESENTATION 104


Understanding File Formats
Using Audio and Video

Controlling File Playback

Integrating Web Pages and Multimedia
Supported Audio File Formats
There are a lot of competing audio formats out there. Microsoft PowerPoint 2007 recognizes the following options without any additional work on your part. The easiest solution is to stick with one of these formats whenever possible.
AIFF—Audio Interchange File Format (.aiff or .aif)
This is the sound file format originally used on Apple and Silicon Graphics (SGI) computers. The audio files are stored in an 8-bit monaural (mono or one channel) format, which is not compressed. AIFF files can contain two channels (16-bit) and carry stereo sound. This format leads to large file sizes, and can usually be avoided in favor of more efficient files like an MP3, which balances audio quality with file size.

AU Audio—UNIX Audio (.au)
This file format is a common format used for UNIX computers. While the format is supported by PowerPoint, there are no advantages to using it.

MIDI file—Musical Instrument Digital Interface (.mid or .midi)
This file format is very old, and was originally designed for the interchange of musical information between musical instruments, synthesizers, and computers. Unless you have robust musical instruments hooked up to your computer, you might as well forget this one. MIDI files will generally sound like bad cell phone ringtones when played on a personal computer.

MP3—MPEG-1 Audio Layer 3 (.mp3)
This is a popular and common sound file format that you will likely encounter on the Internet. This efficient file is cross-platform compatible, has a clean sound and small size. It is a very common file format and has been a standard since 1991. This is a good file format to use because of its compatibility and quality.

Windows Audio file—Wave Form (.wav)
This audio file format is a holdover from the early days of digital audio on Windows computers. The file format is generally cross-platform, and stores sounds as waveforms. There are several different compression options, which allow for the audio to be stored at different quality settings. Because of its large file sizes, which can bloat your presentation, this format is not very popular.

Need to Embed. If you want the audio file to embed into the presentation, use a WAV file. All other formats can only be linked.
WMA file—Windows Media Audio (.wma)
This is an audio file that has been compressed using one of the Microsoft Windows Media Audio codecs. If users extract audio from a CD using Windows Media Player or Windows Media Encoder, they are likely to store the audio file this way. The WMA codecs have several versions, so it’s important to test your files on all playback machines. If possible, be sure to upgrade the Windows Media Player to the latest version. ![]()

Supported Video File Formats
When it comes to video, things get a bit tricky. The world of video formats is rapidly changing as companies keep trying to make smaller file sizes with better image quality. Additionally, the introduction of Digital Rights Management (DRM) has further complicated compatibility. Here’s a list of file formats that will work natively with PowerPoint 2007. Again, the easiest solution is to stick with these formats whenever possible.
Windows Media file—Advanced Streaming Format (.asf)
This file format is designed to store synchronized multimedia data. It is used most commonly to stream audio and video content, images, and script commands over a network. In practical use, ASF is identical to WMV (described below), but starting with the Windows Media 9 Series, Microsoft uses only the WMV extension.

Windows Video file—Audio Video Interleave (.avi)
This is a common multimedia file format for storing sound and video. It is an older format that is also one of the most common. There are many different versions of AVI files because of several different audio and video codecs. These codecs are needed to decompress the video for playback on your machine. Do not assume compatibility; always test your AVI files before using them. If needed, the necessary codec can usually be found for free on the Internet.

MPEG Movie file—Moving Picture Experts Group (.mpg or .mpeg)
The MPEG format is an evolving set of standards for video and audio compression. It was developed by the Moving Picture Experts Group and was originally intended as a format for embedding video onto CD-ROMs and Video CDs. PowerPoint 2007 recognizes MPEG-1 files natively, but the newer MPEG-2 formats used by DVD and MPEG-4, formats which are commonly used on the Internet, are not compatible.

WMV file—Windows Media Video (.wmv)
These highly compressed files use a version of the Windows Media Video codec. The files are an efficiently compressed format that requires a minimal amount of storage space. Many Windows applications can create WMV files, and you can always download the free Windows Media Encoder from Microsoft’s Web site (www.microsoft.com/downloads).

Why Won’t a File Work?
While your sound or movie file may have the same file extension as one listed above, it still may not work. You need to make sure you have the correct version of the codec installed. Additionally, users of older operating systems can encounter compatibility issues with newer file formats. Try to keep your Windows Media Player up to date with the latest supported version for your Operating System.![]()
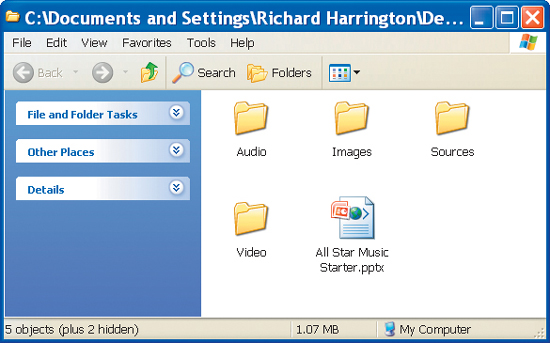
Broken Links Ahead. It is a very good idea to organize your media files. Create a folder for each presentation, then within that folder, add the following:
• the actual presentation file
• an audio folder
• a video folder
• an images folder
• a sources folder
Managing Your Media
While understanding how PowerPoint manages its relationships to media files is not a fun topic, it is an important one. You have two major options: to link to a file on your hard drive or to embed the file into your presentation. Knowing how both methods work will impact your workflow.
Embedding a Sound
Only .wav (waveform audio data) sound files can be embedded into a presentation. This means that the actual audio file is inserted into the file of the presentation and that the source audio is not needed.
By default, .wav sound files that are larger than 100 kilobytes (KB) are automatically linked to your presentation. If you want to embed them, you’ll need to modify your Office options. Click the Office Button then choose PowerPoint Options. Select the Advanced category and adjust the Save options. You can choose to Link sounds with a file size greater than 50,000 KB. Raising this limit will increase the file size of a presentation, but can eliminate linking errors.

Linking a Sound or Video
When you insert a linked sound or video file, PowerPoint creates a link to the file’s current location. If the file is moved, then the link breaks. It is a good idea to copy the sounds and videos into the same folder as your presentation before you insert them.
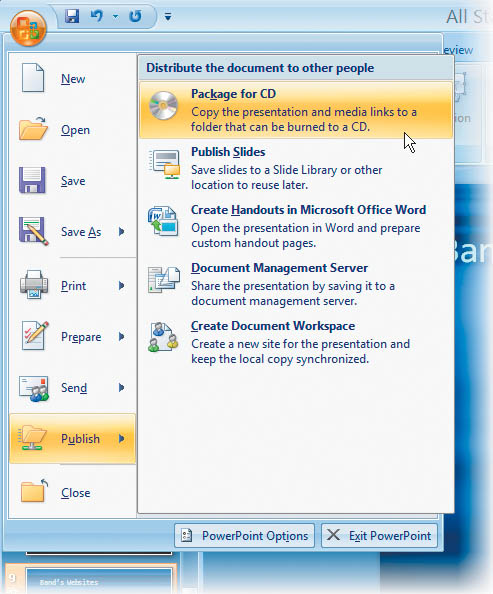
Package for CD
If planning in advance is not an option, then PowerPoint has a different strategy to help you. The Package for CD feature will copy all the files to one location (a CD or folder). Additionally, your presentation will automatically update the links for the new location of the media files.
To access this command in PowerPoint 2007 click the Office button then choose Publish > Package for CD. This is an important step if you plan to give the presentation using another computer or send it to another user. ![]()
Inserting Audio on a Slide
Add Multiple Audio Files to a Slide and Establish Triggers to Play
1. Prepare Your Files
In order to complete this exercise (and others in this chapter) you’ll need to copy the files to your computer. From the project CD-ROM, open the HTW Project Files folder and copy the Chapter 4 folder to your local hard drive. This folder contains all of the files needed for this chapter. Open the file Ch4_All_Star_Music_Starter.pptx and switch to slide 4.
2. Add Sound Files
When you want to add sound to a slide, first you need to select the slide. Click the Slides tab and select slide 4 A. In the Ribbon, click the Insert tab. From the Media Clips group, click the arrow under Sound. Choose the option Sound from File B.
Navigate to the Chapter 4 folder that you copied to your computer. Open the Audio folder and select the file 1_My_Times.mp3. Double-click to insert the file.
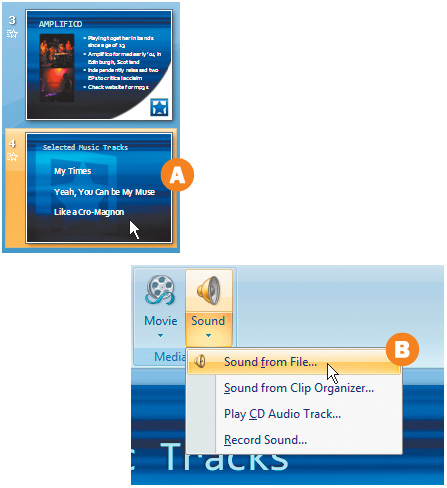
Inserting Audio. PowerPoint gives you four options when working with sound files:
• Sound from File—Use this to access a file on your hard drive.
• Sound from Clip Organizer—Employ to access files that you’ve added to the Clip Organizer for convenience.
• Play CD Audio Track—Play a track right from disc. The CD must be in your computer when you give the presentation.
• Record Sound—Use an attached microphone to record a sound directly into your presentation.
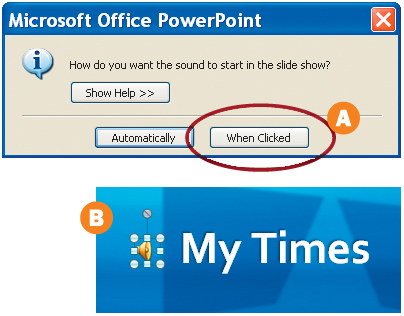
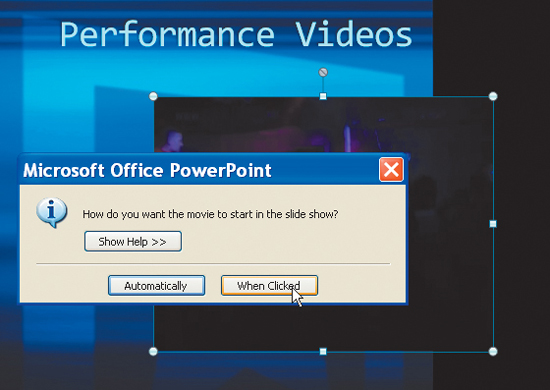
You must now specify how the file should play back. In the Microsoft Office PowerPoint dialog box you have two choices: a file can play back automatically when you get to the slide or play when it is clicked A.
Choose “When Clicked” to manually trigger the sound when you click its icon. A speaker icon appears on your slide and will act as a trigger. It is called a trigger because you must click the icon to activate the effect.
Drag the speaker icon and reposition it on the page. Place the speaker icon next to the type “My Times” B.
Repeat for the other two audio files.
Multiple Audio Files. If you add multiple audio files to the same slide, their icons will stack on top of each other. If you want each sound to start when you click it, drag their icons off of each other after you insert them.
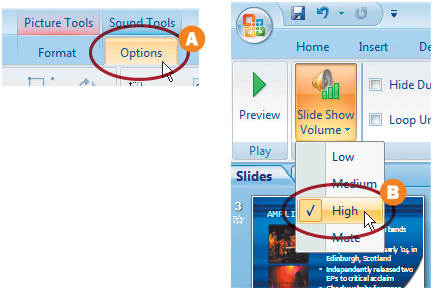
4. Specify Playback Volume
By default, sound files will come in at Medium volume. You can modify this so the audio plays at a louder volume. This is important, as low volume level is a frequent complaint about presentations.
Click the first speaker icon, and then select the Options tab in the Ribbon A. Click the Slide Show Volume button and set the volume to High B. Repeat for the other two sound files.
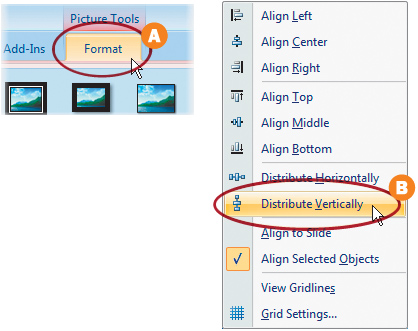
Our final step may seem minor, but it’s the details that truly polish a presentation. When you positioned the speaker icons, you did so visually. While this works, it is not the cleanest way to position items. PowerPoint offers an alignment command.
Select all three speaker icons by holding down the shift key and clicking on all three icons. Select the Format tab A from the Ribbon and click the Align button. Choose Align Objects Left to precisely align the speaker icons. Then choose Align > Distribute Vertically B.
The icons are now professionally aligned on the page. ![]()
Achieving Optimal Playback. Media files can put some strain on the playback of your slide show. Here are a few tips to streamline performance:
• Use smaller file sizes (shorter clips or heavier compression).
• Increase RAM and ensure you have high-quality video and sound cards installed.
• Close down any unnecessary programs in the background.
• Launch the presentation before you need it. Click through your slides so they are stored in your system cache.
Extract Audio with Windows Media Player
Audio Can Be Extracted From a CD to a File for PowerPoint
1. Launch Windows Media Player
From the Start menu, launch Windows Media Player. This application should be installed by default on your computer. If not, you can download it from Microsoft’s Web site for free.
2. Insert an Audio CD and Select Songs
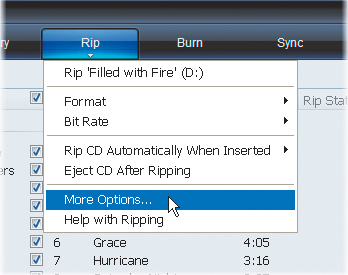
Insert an audio CD into your computer’s disc drive. If you are on the Internet, Windows Media Player will attempt to download information about the CD. Click the Rip tab to extract the files. By default, all tracks are selected to be copied (as long as you have not previously copied them from the CD). Clear the check box next to the track name if you do not want to import a track.
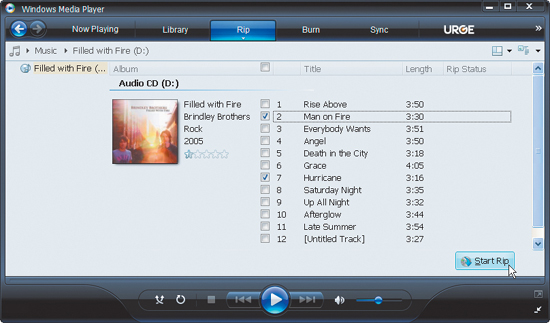
If you’ve never copied audio before, Windows Media Player will prompt you to choose settings on first import. If you’ve previously copied files, then click on the Rip tab and chose More Options to specify a format. The Windows Media Audio format works well, but be certain to uncheck the option to Copy Protect Music (otherwise you can run into issues when playing the audio on another computer).
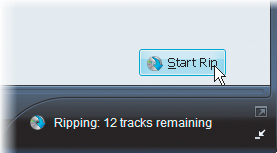
4. Copy Selected Tracks
Click the Start Rip. By default, the selected tracks are copied to your My Music folder. ![]()
Copy to Presentation Folder. You can select the needed audio files in your My Music folder and press Ctrl+C to copy them to your clipboard. Then navigate to your presentation folder and choose Ctrl+V to paste the files.
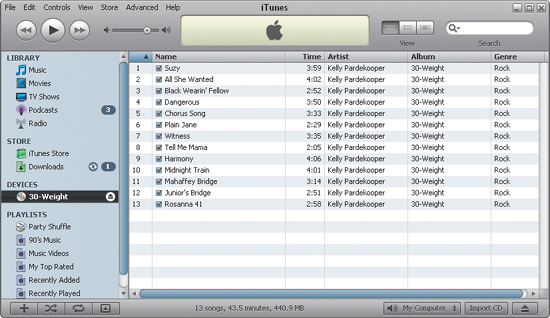
Extract Audio with Apple iTunes
Are You an iPod User? iTunes Works for PowerPoint

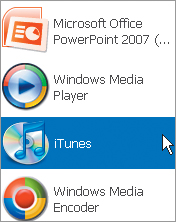
1. Launch iTunes
From the Start menu, launch Apple’s iTunes. If you use an iPod, this is likely already installed on your system. If you don’t have it, you can download from Apple’s Web site for free (www.apple.com).
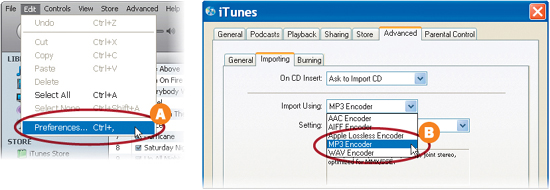
2. Set Your Import Preferences
You need to set your import settings to make them compatible with PowerPoint. From iTunes choose Edit > Preferences A. From the new window, click the Advanced tab then choose Importing. You can then choose to import with the MP3 or WAV encoder B for maximum compatibility with PowerPoint. Click OK to save the Importing preferences.
3. Insert an Audio CD and Select Songs
Insert an audio CD into your computer’s disc drive. If you are on the Internet, iTunes will attempt to download information about the CD. By default, all tracks are selected to be copied. Deselect any songs you don’t want to import by clearing the check box next to the track name.
WWW.KELLYP.NET
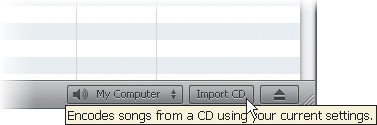
4. Import the Selected Tracks
Click the Import CD button. By default, the selected tracks are copied to My Music > iTunes > iTunes Music folder. ![]()
Find an Audio File Quickly. You can select a track in your iTunes library and press Ctrl+R to reveal the file on your hard drive.
Insert Video on a Slide
Adding Video to a Slide Allows You to Create an Engaging Experience

1. Select the Slide to Add Video
This exercise uses the same presentation file as the last exercise. If it’s not already open, copy the Chapter 4 folder from the book’s CD-ROM and open the Ch4_All_Star_Music_Starter.pptx and switch to slide 5.

Using Movies on Slides. In PowerPoint 2007, you can use desktop video files with formats such as WMV, AVI, or MPEG. Additionally, you can insert an animated GIF file to display a graphic with animation. While GIFs are treated as movie clips, not all movie options are available for animated GIF files.
Unlike pictures, movie files are always linked. This means that your PowerPoint file will look in the original location for the video file. It is a good idea to copy the video file into the project folder (see Caution: Broken links ahead).
On the Insert tab, in the Media Clips group, click the arrow under Movie. Choose the Movie from File option A. Navigate to Chapter 4 > Video folder and choose the file muse.wmv and click OK B.

Prevent Video Problems. To prevent possible problems with links, it is a good idea to copy the movies into the same folder as your presentation before you add the movies to your presentation.
3. Specify Playback
You must now specify how the video file should play back. In the Microsoft Office PowerPoint dialog box you have two choices: a file can play back automatically when you reach the slide, or manually when the preview icon is clicked.
Choose “When Clicked” to manually trigger the video when you click its thumbnail preview icon. A thumbnail preview is added to the slide and will act as a trigger.

Stop and Go Movies. When you insert a movie into a slide, a pause trigger effect is automatically added. You can now click the thumbnail to start the movie, click again to pause the movie, and click it again to resume playing it.
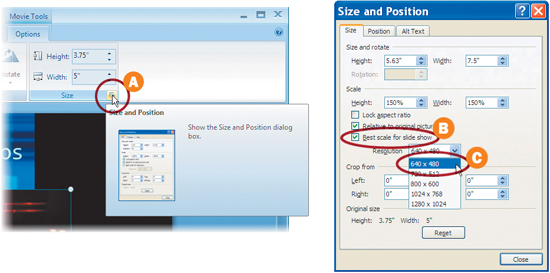
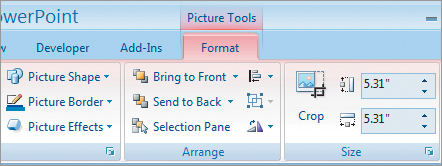
4. Size and Position the Movie
From the Options tab, locate the Size group. Click the small icon next to Size to show the Size and Position dialog box A. To avoid distortion, select the Lock aspect ratio option. In order to scale the movie larger with the best visual appearance, select the Best scale for slide show B and set the Resolution to 640 x 480 C. Click Close when finished with the sizing options. Reposition the movie to center it on the slide.
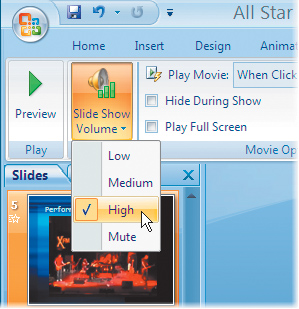
5. Specify Playback Volume
By default, video files will come in at Medium volume. You can modify this so the video plays at a louder volume. Be sure the movie file is selected, then click the Slide Show Volume button and set the volume to High. Double-click the movie’s thumbnail icon to preview the clip.
6. Add the Second Movie
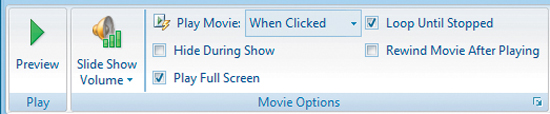
There’s one more clip to add to the slide show. Below, we’ll modify its settings to play back full screen. Switch to slide 6 and choose to Insert a movie file. Use the file yearforme.wmv, from the same folder as the previous clip. Choose to play the clip When Clicked and select OK.
You can set a movie so that it fills up the entire screen when you play it back. Be sure the recently added video clip is still selected and click the Options tab. From the Movie Options area, set the clip to Play Full Screen. This will launch the video full screen when clicked during a presentation.

Giant Pixels. If the resolution of your original movie file is very low, it might appear distorted when it is enlarged. Be sure to preview the movie to see if it appears distorted or blurry. Generally, a small movie that is set to play back full screen will look bad.
8. Test the Movie
Now is a good time to check the slide show for playback. Select the Slide Show tab and click the From Current Slide (Shift + F5) button to preview the slide show. The presentation launches full screen. Click the movie’s thumbnail to launch the movie full screen A.
The clip begins to play full screen B. To stop playback click the clip again. To exit full screen mode, press the Escape key. To exit the slide show press the Escape key once more. ![]()

Putting Flash in a Presentation
Flash Significantly Extends the Animation Abilities of PowerPoint

1. Enable Flash Technology
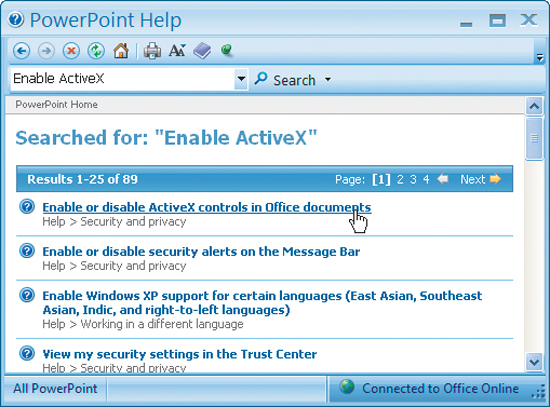
There are several preferences you must modify to enable Flash files. You may need to adjust your security settings to allow Active X to run (this is the portal for Flash). To activate ActiveX, go to the PowerPoint Help file and enter the text “Enable ActiveX.”
Next, make sure that the Shockwave Flash plug-in has been loaded on your system. For maximum compatibility you should download the latest version from www.adobe.com. You should also install the latest version of Flash Player on your system.
Inserting Flash Is an Advanced Task. To unlock this feature, you literally unlock the software. The PFC Media option is also an affordable alternative. Again, this is tricky—so proceed with caution.
2. Enable the Developer’s Tab
The Developer’s tab contains several advanced elements that let you customize a presentation. Most of these are for developers, that is, those individuals who are actually using PowerPoint as a programming environment to create interactive programs.
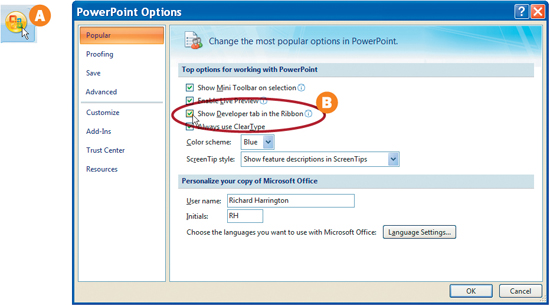
To enable these tools, click the Microsoft Office Button A, and then click the PowerPoint Options button. Next, click Popular, and then under Top options for working with PowerPoint, select the Show Developer tab in the Ribbon check box B. To apply the change, click OK.
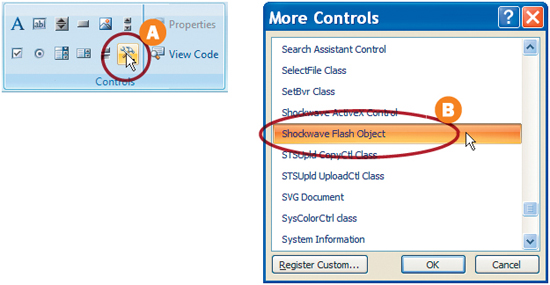
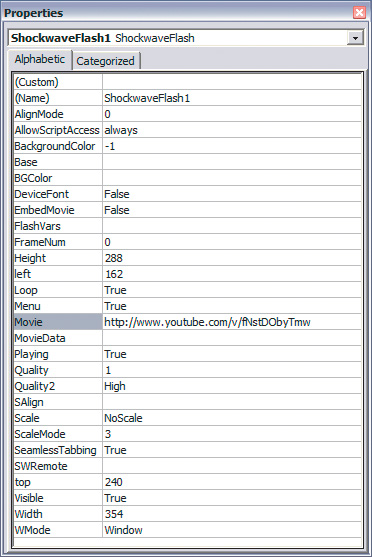
Let’s try adding a SWF animation to a slide. Switch to slide 7 in the All Star Music presentation. On the Developer tab, go to the Controls group, and click More Controls A. In the new dialog box, select Shockwave Flash Object from the list of controls B and click OK. Draw on the slide to insert the control. The animation you are going to insert is full-screen, so drag from the top corner to the bottom corner, covering the entire slide. A white box with an X should now cover the entire slide.
4. Locate the Movie
Unfortunately, the Flash control does not have a browse function to locate the movie. You have to know the actual file path (this is a long string of text such as C:Documents and SettingsRHED PixelDesktopChapter 4SourcesVideoFlash_Title.swf). Be sure to figure out the location of your file. In the Chapter 4 folder you copied at the start of the lesson, open the Video folder; inside is a SWF animation called Flash_Title.swf.
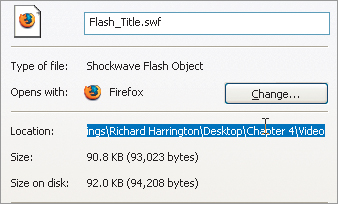
Find the Path. If you right-click on a file, you can choose to view its properties. One of those properties is location; you can highlight it and copy the text to your clipboard. This contains the full path (minus the filename).
5. Modify the Control Container
Now that you know the location of the file, right-click the Shockwave Flash Object on the slide and choose Properties A. On the Alphabetic tab, click the Movie property (this specifies the file). In the value column (the blank cell next to Movie), type or paste the full drive path B, including the file name or URL to the Flash file that you want to play.
You can also set options such as looping by modifying settings in the Properties dialog box.
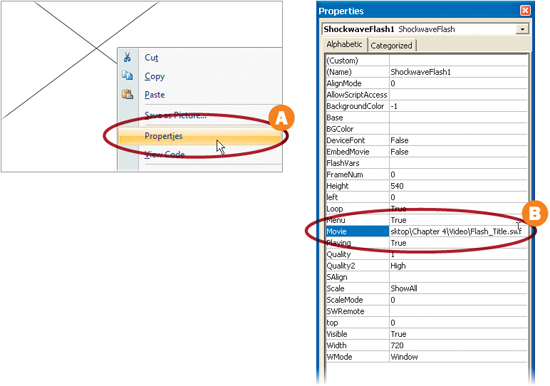
Where’s the Loop? If you want to loop a file, the original SWF file must be set to Loop. Otherwise, modifying the PowerPoint loop setting will have no effect.
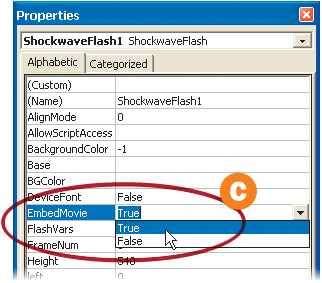
If you want to play the file automatically, set the Playing property to True. Another good idea is to set the file to embed into your presentation (this way you don’t need to worry about links). Set the EmbedMovie property to True in order to automatically include the SWF animation inside the presentation C.
6. Test it Out
Lets see if it works. Press Shift+F5 to Preview the current slide. Did it work? Flash animations are a rapidly evolving feature inside of PowerPoint, so keep an eye on the built-in help menu to see if future updates streamline embedding a Flash file. If the above steps seem too in-depth, then be sure to check out PFCMedia, which shortens this process to a few clicks. ![]()

Rewind a SWF. If you successfully embed a Flash file, you’ll soon discover that it’s very difficult to rewind the Flash file to its beginning. To help with this, at http://skp.mvps.org/flashback.htm you can download a free extension called FlashBack.
Unsupported Formats
There are a lot of competing media formats out there. There’s a myriad of choices beyond Windows Media, and you’ll likely encounter them when you’re building a presentation, and many don’t work with PowerPoint. Here are some types and suggested work-arounds if you need them.
QuickTime
QuickTime files are a common occurrence in both video and animation. Many creative software applications use QuickTime as an authoring format. However, Microsoft has virtually disabled all support for QuickTime files. For easiest integration, it is suggested that you convert your QuickTime files into a PowerPoint-compatible file.
• You can use QuickTime Pro ($29) to convert to an AVI file.
• You can install Flip4Mac to allow Mac users to create Windows Media files directly ($49–$179).
DVD Playback
There are a few approaches to using DVDs in a presentation. Such usage really comes down to what rights you have to the content and whether you’ll have a DVD drive on the system you’ll be presenting from.
• If a DVD drive is available, you can use PFC Media to embed a link to the actual DVD into your presentation (this is Microsoft’s suggested workflow).
• If you have a non-copy-protected DVD, you can use DVD extraction software. A Web search will show you plenty of alternatives out there (our favorite is HandBrake).
Don’t Violate Copyright. Just because you’ve purchased a DVD at the store does not give you the right to extract media from it. Additionally, the concept of “fair use” is often misunderstood and abused. If you are not an educator or a journalist, using a DVD for a commercial purpose (such as a sales presentation) can create legal issues. Needless to say, if it is a video created by your company, you most likely hold the rights. Be sure to visit www.copyright.gov for more information on usage rights.
![]()
Google Video
According to Google, there is no official support for PowerPoint on its system. But if you’re patient, you can work around this block and still use many clips. With a little bit of conversion, you can create a compatible video. First, locate the video you want at http://video.google.com. Click the thumbnail to view the video. If there is a Download button, you can download an MPEG4 file by choosing Video iPod/Sony PSP from the menu and clicking Download.
After you’ve saved the video to your computer you will need to convert it to an AVI or WMV file. See the instructions above for converting QuickTime files and you’ll soon have a video that’s ready.
YouTube
If you’re clever, you can get a YouTube video to work in PowerPoint. It’s not easy, but it’s pretty cool! The trick is to harness the power of Flash (see “Putting Flash in a Presentation”). The only difference is you’ll insert a Web URL for the movie you want. For example if you found a movie like this: www.youtube.com/watch?v=973b_Dr8D5k you would view it on the page. What you need to do is modify the Web link. Instead, use www.youtube.com/v/973b_Dr8D5k to create a direct link to just the media file and none of the Web page navigation. When you launch your presentation, click once to start the clip. If you click the screen again it takes you to the YouTube Web site. Instead, click the space bar to advance the slide. ![]()
PlaysForCertain
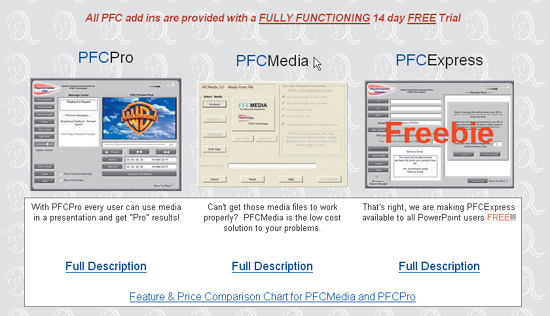
Throughout this chapter we have brought you to a few stopping points you’ll encounter when trying to embed media files into a PowerPoint presentation. There are certain features that Microsoft has chosen to leave out. Fortunately there’s PlaysForCertain, two PowerPoint add-ins, that truly unlock multimedia power. These fill such a unique need that even Microsoft has chosen to suggest them in their help files (a search for inserting a DVD clip tells you to go and purchase these add-ins from PFCMedia).
There are two versions of the add-in PFC Media ($49) and PFCPro ($129). Both offer important features that harness the full abilities of Active X controls and Windows Media Encoder. In fact, Microsoft suggests you download and install the latest of both from its Web site—they’re free). Let’s take a look at the major features and how they can help you.
Media Management
When you insert a media file, PFCMedia automatically creates a copy and resolves linking issues. This is helpful as it saves you some extra work. Additionally, once the presentation is created, the playback machine does not need the specialty software loaded.

Play Commercial DVDs
PFC Media can actually play a DVD clip right inside of PowerPoint. The DVD must stay in your drive as it simply reads the file off the disc (extracting video clips from a DVD is generally seen as a violation of copyright). PFCPro gives you greater control and allows you to select clips from within PowerPoint and even specify exact start and end times. If you need the Closed Caption information from the DVD, then you’ll also need the Pro version.
![]()
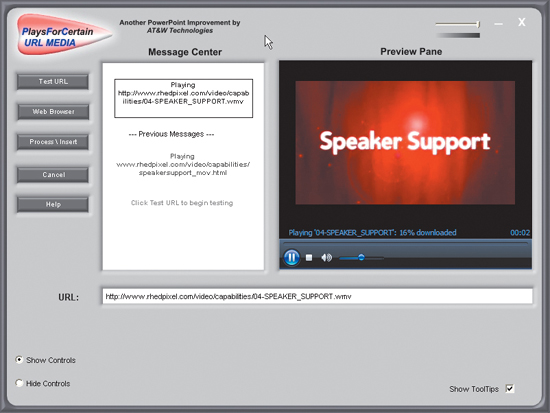
URL Linking for Media
Just enter a URL and the media is linked to and added to the presentation. This is good for items that need to frequently update. Speaking of URL linking, support for Webcams is also provided.
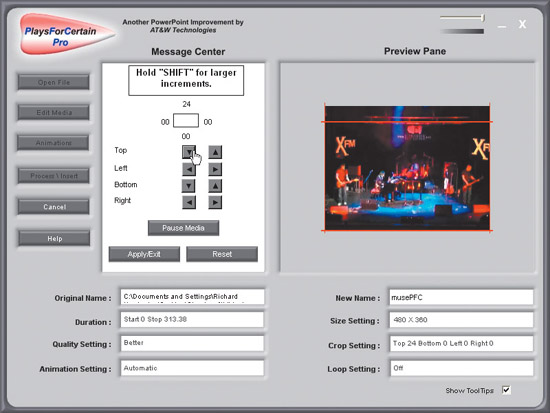
Formatting Options (Pro Only)
Just like with a photo, you can now discard extra pixels by cropping. You can also resize and recompress media to optimize it for disk space or smoother playback. Additionally, you can trim a clip to show only the portion you want.
Worth Trying?
Fortunately, there is a fully functional 14-day trial, so if you have a multi-media heavy presentation coming up, download the software and give it a proper tryout. More details and the software can be found online at www.pfcmedia.com. ![]()
Adding Web Pages
Embedding a Web Page Lets You Bring Online Content Into a Presentation

1. Determine the Approach
Adding Web pages to a slide show is an essential task. There are two approaches to take. The path you choose will depend on whether or not you have an active Internet connection. Our first method is the method to choose if you are unsure about possible Internet connection options during your presentation.
2. Capture the Page
In case your Web connection goes down or is not available, it’s a good idea to insert a static graphic of the Web page. You can do this by using the Print Screen command.
Launch a Web browser of choice such as Firefox or Internet Explorer. Visit the page for the band we’ve been profiling. Take your choice between www.myspace.com/amplifico or www.amplifico.net.
Press the Print Screen key on your keyboard to copy an image of the screen to your clipboard. Switch back to PowerPoint and go to slide 8 in the All Star Music presentation. Press Ctrl+V to paste the image into your slide.

You can clean up the pasted image. With the image selected, click on the Format tab. You’ll find numerous options to crop and clean up the image as well as stylize it with drop shadows or border effects.
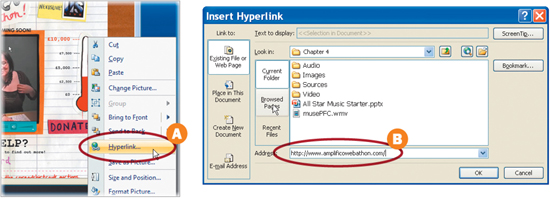
4. Make the Link
With the image selected, right-click and choose Hyperlink A. The Insert Hyperlink dialog box opens. Add the Web page’s address in the appropriately named Address field and click OK B.
5. Test the Link
You can press Shift+F5 to preview the presentation. To view the Web site, click on the screen capture and your Web browser will launch. To switch back to PowerPoint, press Alt+Tab to cycle applications (you may need to press the Tab key multiple times.) To exit the slide show when finished you can press the Escape key.

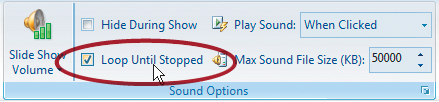
Loop a sound or movie to playback continuously. You can set a sound or movie to play back continuously on a single slide. Just click the sound or video icon to select it on the slide then click on the Options tab. Check the Loop Until Stopped check box. The sound (or movie) will keep playing until you advance to the next slide.
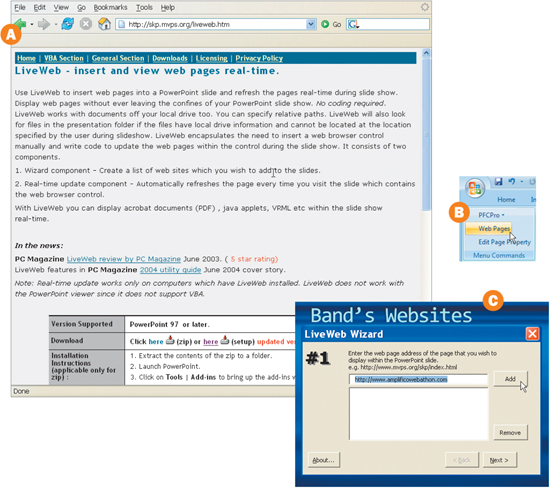
If you are open to a free plug-in, you can download LiveWeb. This very useful add-on can be found at http://skp.mvps.org/liveweb.htm A. It allows you to embed multiple slides into a presentation using its wizard. Additionally, the Web pages are live via ActiveX and you can actually scroll through the page and click on live Web links. We usually chose to use both methods as a backup plan. Go ahead and insert a live Web page on page 9. After installing the free plug-in and relaunching, choose Add-Ins > Web Pages B and follow the LiveWeb wizard C. ![]()
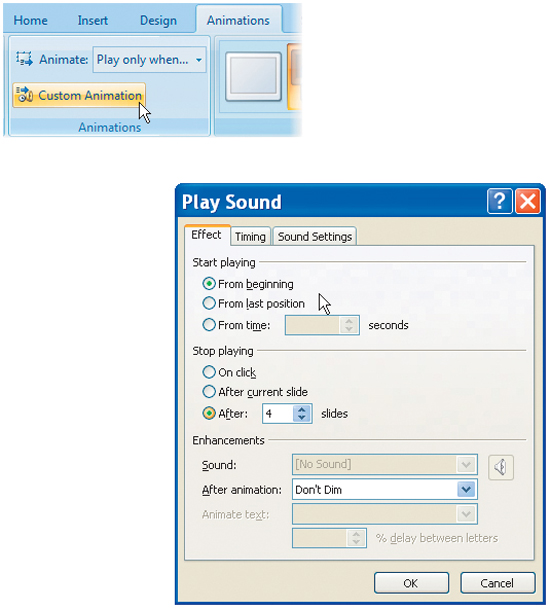
Play a sound or movie across multiple slides. You can set an audio or video file to play all the way through a presentation or a specific number of slides. Click the Sound or Video icon to select the file, then click the Animations tab. From the Animations group, click Custom Animation. In the Custom Animation pane, click the arrow to the right of the selected sound in the Custom Animation list, and then click Effect options. You can now modify the Stop Playing setting. Click “After,” and then select the total number of slides on which the file should play.