
Chapter 8. Imported Graphics
One reason desktop publishing became so popular is how easy it made combining graphics such as photographs and illustrations with type for layouts.
In the years before designers began using personal computers, specialized workers, toiling under the exotic name of strippers, manually trimmed away the blank areas around graphics so that text could be placed around the image. (The name stripper is derived from combining strips of film together.)
Even more complicated was placing text over an illustration. The image and text had to be combined by photography and then stripped into the layout.
Certainly you expect InDesign to import images in the formats that are used by other page-layout programs. But since this is Adobe InDesign, you also get some special benefits when working with other Adobe products.
Here’s where you learn how to add imported artwork to your page layouts. It only takes a few clicks of a mouse to combine type and artwork together. It’s enough to make old-time strippers hang up their tassels!
Placing Artwork
Most artwork that’s used in InDesign comes from other sources such as scanners or digital cameras. Artwork can also be created using programs such as Adobe Photoshop, Adobe Illustrator, Adobe FreeHand, or Adobe Acrobat. You can even place the contents of one InDesign file as a graphic into another. This is extremely helpful for working with ads, coupons, or other inserts.
The easiest way to place artwork is to automatically create the frame that contains it when you import the artwork.
To place artwork without drawing a frame:
- Choose File > Place. This opens the Place dialog box
 .
.
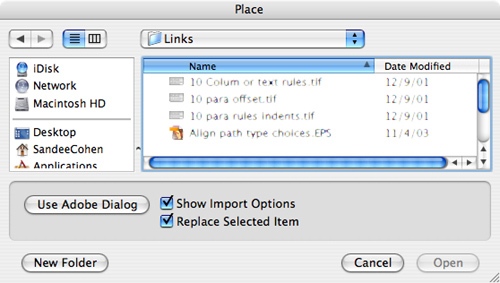 Use the Place dialog box to open a file you wish to place. Check Show Import Options to make refinements to the imported file.
 - Navigate to find the file you want to import.
- Check Show Import Options to open the Import Options dialog box before you place the file.
- Click Open to load the graphic into an image cursor
 .
.
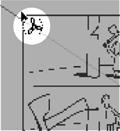
 The loaded image cursor appears when you prepare to place artwork.
 - Click the cursor to place the graphic in a rectangular frame the same size as the artwork.
or
Drag the image cursor to define the size of the rectangular frame.
or
Position the cursor over an empty frame and click. Curves appear around the cursor indicating you are about to place the image within the frame
 .
. The curved loaded image cursor appears when you position the loaded cursor over an existing frame.
You can also place artwork directly into a selected frame. This is handy if you have set up empty frames as placeholders for graphics.
To place artwork into an existing frame:
- Use one of the tools to create a rectangular, elliptical, or polygonal frame.
- Use either the Selection or Direct Selection tool to select the frame.
- Choose File > Place and navigate to find the image you wish to place in the frame.
- Click Open in the Place dialog box. The file automatically is inserted within the frame.
To replace the artwork in an existing frame:
- Use either Selection tool to select the frame that contains the artwork you want to replace.
- Choose File > Place and navigate to find the image you wish to place.
- Click Replace Selected Item in the Place dialog box .
- Click Open in the Place dialog box. The new image automatically replaces the contents of the frame.
To move or copy artwork between frames:
- Use the Direct Selection tool to select the artwork you want to replace.
- Choose Edit > Cut or Edit > Copy. This places the artwork on the clipboard.
- Select the frame that you want to move the artwork into.
- Choose Edit > Paste Into. The contents of the clipboard are pasted into the frame.
You can also select multiple items in the Place dialog box and then add all the items to your document. This way you don’t have to keep going back to the Place dialog box.
To place multiple items at once:
- Choose File > Place to open the Place dialog box.
- Use the Cmd/Ctrl key to select the items you want to place.
or
Use the Shift key to select a range of items.
- Click the Open button. The cursor displays a preview of the placed file. A number next to the preview indicates there are multiple files
 .
.
 The numbered loaded cursor indicates you have more than one placed item.
 - Click or drag to place each item. The number reduces as you place each item.
Using Bridge to Place Artwork
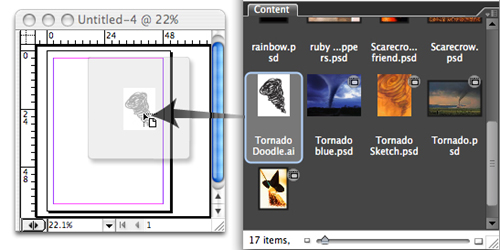
Adobe Bridge not only lets you organize and view artwork, it also lets you drag graphics directly onto InDesign pages.
- Position the Bridge and InDesign windows so that both are visible.
- Select one or more files in the Bridge window.
- Drag the file or files from Bridge onto the InDesign page
 . The preview displays a single image if you have selected one file. The preview displays a multiple image if you have selected more than one item
  .
.
 Drag an image from Adobe Bridge to place it onto an InDesign page.
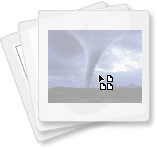 The multiple image preview appears when you drag multiple items from Bridge into InDesign.
 - Release the mouse button to place the item.
- If you have dragged multiple files, click or drag to place the additional images.
Specialty Frames
Frames don’t have to be single items drawn from scratch. You can join frames into one compound shape or you can convert text into frames that can hold images. You can also bring paths from other programs into InDesign to act as frames.
You can make multiple frames act as a single item by converting them to a compound shape. Frames combined into a compound shape display a single image across all the items in the compound.
- Select the frames you want to combine into a compound shape.
- Choose Object > Paths > Make Compound Path. If the frame is a graphic frame, the diagonal lines cross through all the frames in the compound
 and
and  .
.
 Individual frames that act independently display diagonal lines within each object.
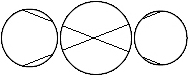 A compound shape displays the diagonal lines across the entire set of frames.
To add an image to a compound shape:
- Use either Selection tool to select the compound shape.
- Use any of the techniques described on the previous pages to place the image in the selected frame. The image tiles across the spaces between the elements of the compound shape
 .
.
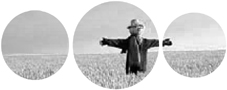 A placed image is seen across all the items in a compound shape.
- Select the compound shape.
- Choose Object > Paths > Release Compound Path. The image is shown only through the first frame; the rest of the compound frames are available to hold other images.
You can also create unique frame shapes by converting text to frames so graphics assume the shapes of letters.
Tip
If you can’t draw for beans, you can convert the characters in dingbat or symbol fonts into graphic shapes such as hearts, arrows, snowflakes, and so on.
- Use the Selection tool to select the frame that contains the text.
or
Highlight the selected text within the frame.
- Choose Type > Create Outlines. Each character of text is converted to paths that can be modified
 .
.
 The Create Outlines command converts text into paths that can then be modified.
Tip
You can also place images into the converted text paths as you can with compound shapes
 .
. Text converted to paths can also hold imported graphics.
Tip
The converted paths are created as compound paths. If you want to place different images or colors in each of the frames, release the compound shape first.
If you work with a vector-drawing program such as Adobe Illustrator or FreeHand, you can also convert the paths in those programs to InDesign frames.
Tip
In addition to Illustrator and FreeHand, this technique can be used with any other program that copies paths using the AICB (Adobe Illustrator Clipboard). Check your vector-drawing program manual for more information.
- Position the windows of the vector-drawing program and InDesign so they are both visible onscreen.
- Select the paths in the vector-drawing program with the appropriate tool in that application.
- Drag the paths from the vector-drawing program onto the window of the InDesign document.
- When a black line appears around the perimeter of the InDesign window, release the mouse button. The paths are converted to InDesign unassigned frames
 .
.
 Artwork can be dragged from a vector program and converted into InDesign frames.
Tip
If you don’t have the screen space to see both windows at once, you can also use the clipboard to copy the paths from the vector program and paste them into InDesign.

Setting the Image Import Options
When you import a graphic, you can use the Image Import Options dialog box to control how that image is placed.

To set the options for TIFF and JPEG images:
- In the Place dialog box, check Import Options.
- Choose a TIFF or JPEG image and click Open. This opens the Image Import Options dialog box for TIFF or JPEG images
 .
.
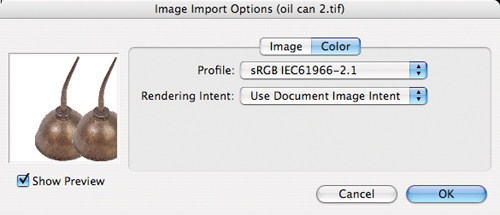 The Image Import Options dialog box for TIFF and JPEG images.
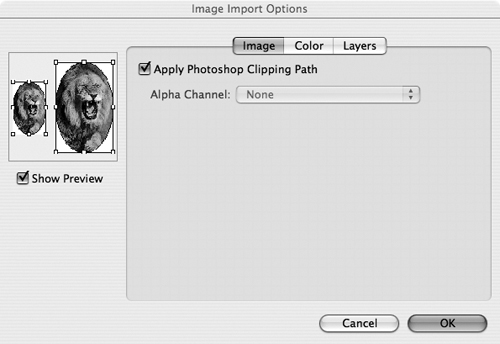
 - Select the Image tab. If the image has a clipping path, you can choose Apply Photoshop Clipping path.
- Select the Color tab. Use the controls to set the Color Management settings.
- Click OK to place the image.
To set the options for PSD images:
- In the Place dialog box, check Show Import Options.
- Choose a Photoshop image and click Open. This opens the Image Import Options dialog box for Photoshop files
 .
.
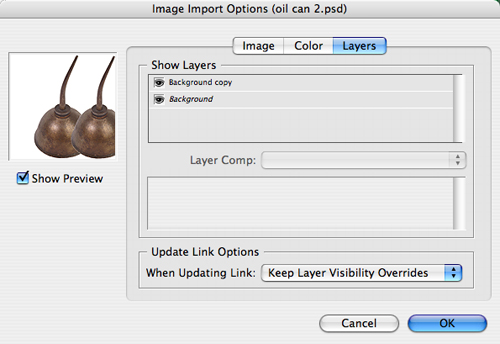 The Image Import Options for Photoshop files.
 - Choose Show Preview to see a preview of the file.
- Select Image Settings. If the image has a clipping path, you can choose Apply Photoshop Clipping path.
- Select the Color tab. Use the controls to set the Color Management settings.
- Select Layers. If the images has layers or layer comps, you can choose which layers are visible in the InDesign layout.
- Click OK to place the image.
To set the import options for EPS images:
- In the Place dialog box, check Show Import Options.
- Choose an EPS file. This opens the EPS Import Options dialog box
 .
.
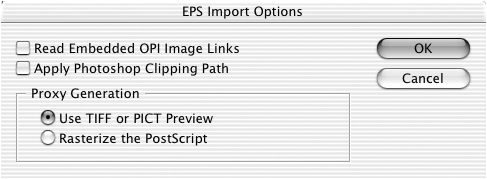 The EPS Import Options dialog box lets you control imported EPS files.
 - Don’t check Read Embedded OPI Image Links unless your service bureau has instructed you to have InDesign perform the image swapping.
- If the image has a clipping path, you can choose Apply Photoshop Clipping Path.
- Set the options in the Proxy Generation to control the preview of the image:
• Use TIFF or PICT Preview uses the preview that was created with the file.
• Rasterize the PostScript displays the actual PostScript data as a preview. This lets you see custom PostScript code such as is found in FreeHand.
- Click OK to place the image.
InDesign also lets you place PDF files as graphics.
To set the options for PDF files:
- In the Place dialog box, check Show Import Options.
- Choose a PDF file. This opens the Place PDF dialog box
 .
.
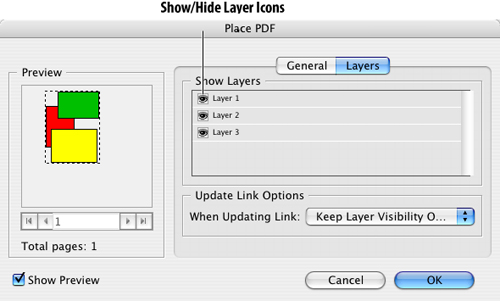
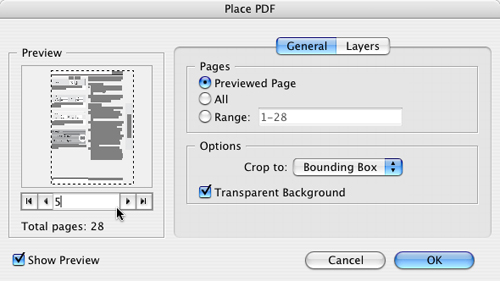 The Place PDF dialog box lets you preview and control the options for PDF files.
 - Choose Show Preview to see a preview of each page of the PDF.
- Use the page selectors to select the page you want to place
 . If you select multiple pages, use the following exercise to place the multiple pages.
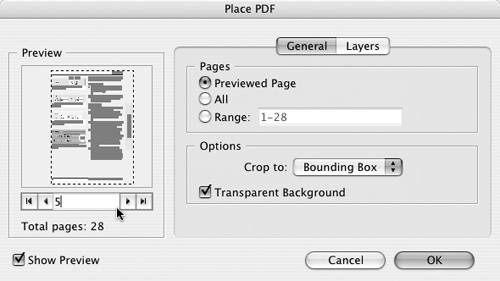 The page selectors let you preview the pages of a multipage PDF.
 - Click the General tab to see those options.
- Use the Crop To list to determine how the PDF should be cropped within the frame
 . Choose the crop options:
• Bounding Box crops to the active page elements, which includes printer marks.
• Art crops to the area defined as placeable art.
• Crop crops to only the printable area, not to the printer marks.
• Trim crops to the area that is the final trim size.
• Bleed crops to the area that is the total size of the image if a bleed area has been specified.
• Media crops to the page size of the original document.
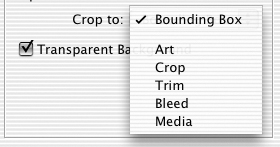 The Crop To Menu in the Place PDF dialog box controls the size of the placed artwork.
 - Choose Transparent Background to show only the elements of the page, without the opaque background
 .
.
 The effect of the Transparent Background on a placed PDF image.
 - Click the Layers tab to set the layers for the PDF.
- Click OK to place the image.
PDF documents can contain more than one page. If you want, you can place those multiple pages all at once, without having to go back to the Place PDF dialog box.
To place multiple pages from a PDF:
- In the Place PDF dialog box, choose one of the following:
• Previewed Page selects whatever page is selected in the Preview area.
• All selects all the pages in the document.
• Range allows you to specify individual pages or a range of pages. Use commas to separate individual pages; use a hyphen to specify a range of pages.
- Click OK to load the cursor.
- Click as many times as necessary to load all the pages. When the plus sign disappears from the cursor, you have reached the last page to be placed.

Working with Images Inside Frames
After you place an image, you may want to move or modify it. Which tool you use and where you click affects what will be selected.
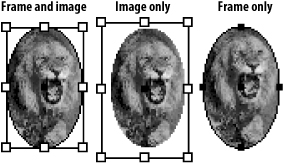
To select and move both the frame and the image:
- Use the Selection tool and click the frame holding the image. A bounding box appears that indicates that the frame and its content are selected
 .
.
 The display of the bounding boxes and points indicates what items are selected.
 - Press and drag the selection to move both the frame and the image.
Tip
If you move quickly, you will see only a bounding box of the moved items
 . If you press and pause for a moment, you will see a preview of the items being moved
  .
. If you move an object quickly, you see only a bounding box as the item is being moved.
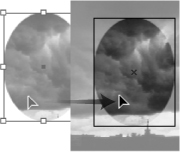 If you press and pause before you move, you see a preview of the image being moved.
To select the image within the frame:
- Use the Direct Selection tool and click inside the frame where the image is visible. A bounding box for the image appears .
- Press and drag the image to move it without disturbing the frame.
To select and move just the frame:
- Use the Direct Selection tool and click the edge of the frame. The points on the frame appear .
- Hold the Opt/Alt key and click the frame again to select all the points.
- Release the Opt/Alt key and drag the frame to move it to reveal a new part of the image.
When you apply transformations to frames that contain placed images, you have a choice as to which objects—the frame, the image, or both—are transformed. Here are some helpful guides.
Tip
If you pause before you drag with any of the transform tools, you will see a preview of the image as you transform it.
To transform both the frame and the placed image:
- Use the Selection tool to select both the frame and the placed image.
- Use any of the Transform panel fields or transform tools
 .
.
 To transform both the frame and its image use the Selection tool to select the items.
- Use the Direct Selection tool to select the frame that contains the image.
- Use any of the Transform panel fields or transform tools to modify only the selected frame
 .
.
 To transform just the frame that contains an image, use the Direct Selection tool to select just the frame and then transform the item.
To modify the placed graphic only:
- Use the Direct Selection tool to select the artwork within the frame.
- Use any of the Transform panel fields or transform tools to modify only the selected image
 .
.
 To transform just the image within a frame, use the Direct Selection tool to select just the image within a frame.
Using the Position Tool
The Position tool works like a combination of the Selection and Direct Selection tools. Originally created for PageMaker users who missed that feature when they switched to InDesign, the Position tool may be the solution for confused designers who don’t know which tool to use for what purpose.
- Click the Position tool in the Tools panel
 .
.
 The Position tool in the Tools panel works as a combination of the Selection and Direct Selection tools.
 - Use the Position tool with a graphic frame as follows:
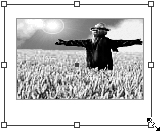
• Move the cursor over the edge of a frame to select the frame. A square next to the cursor indicates that the frame will be selected
 .
. Place the Position tool over the edge of a frame to select the frame.
• Move the cursor over one of the bounding boxes of the frame. The double-headed arrow indicates that both the frame and the graphic can be resized
 .
. Place the Position tool over the bounding box to resize a frame and graphic.
• Move the cursor over the center point of the frame. The curved arrow indicates that you can move the frame and its contents
 .
. Place the Position tool over the center point to move a frame.
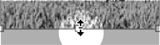
• Move the cursor over the placed graphic within the frame. The Hand cursor indicates that the graphic may be repositioned inside the frame
 .
.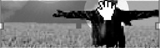 Place the Position tool over the image to move the graphic inside a frame.
• Click the Hand cursor inside the frame. The bounding box for the placed graphic indicates that the graphic may be resized.
• Move the cursor over the bounding box for the graphic. The double-headed arrow indicates that the graphic can be resized
 .
. Place the Position tool over the bounding box for a graphic to resize the graphic.
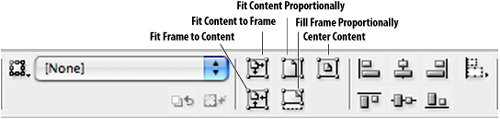
Fitting Graphics in Frames
Placed images don’t always fit perfectly into preexisting frames. InDesign gives you several commands that let you quickly position and resize artwork in frames.
To resize the graphic to the frame size:
- Use either selection tool to select the frame or the graphic inside the frame.
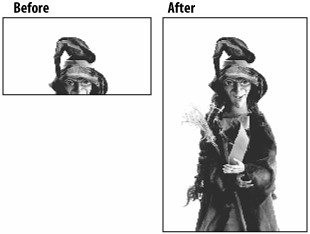
- Choose Object > Fitting > Fit Content to Frame. This changes the size of the graphic to fit completely within the area of the frame
 .
.
 The effect of the Fit Content to Frame command.
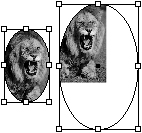
To proportionally resize to the frame size:
- Use either selection tool to select the frame or the graphic inside the frame.
- Choose Object > Fitting > Fit Content Proportionally. This changes the size of the graphic to fit completely, and without distortion, within the frame
 .
.
 The effect of the Fit Content Proportionally command.
The Fit Content Proportionally command usually leaves some empty space between the graphic and the frame. What if you want to resize the image so that it fills the entire frame? That’s where the Fill Frame Proportionally command comes to the rescue.
To resize the graphic to fill the frame:
- Use either selection tool to select the frame or the graphic inside the frame.
- Choose Object > Fitting > Fill Frame Proportionally. This changes the size of the graphic to fit completely, and without distortion, within the frame
 .
.
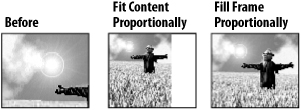 The Fit Content Proportionally command may leave a gap between the frame and the image. The Fill Frame Proportionally command always fills the frame.
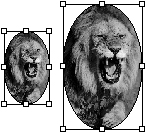
To resize the frame to the graphic size:
- Use either selection tool to select the frame or the graphic inside the frame.
- Choose Object > Fitting > Fit Frame to Content. This changes the size of the frame so that the artwork fits completely within the area of the frame
 .
.
 The effect of the Fit Frame to Content command.
You can also resize a frame to the graphic size by clicking the frame handles.
To resize the frame by clicking the frame handles:
- Use the Selection tool to select the frame.
- Click the frame handles as follows:
• Double-click a corner handle to resize both horizontally and vertically.
• Double-click the left or right handles to resize either horizontally
• Double-click the top or bottom handles to resize vertically.
Sometimes you just want to put a graphic in the center of a frame. This is especially helpful if an image has been transformed so it is no longer visible within the frame.
To center the graphic within the frame:
- Use either selection tool to select the frame or the graphic inside the frame.
- Choose Object > Fitting > Center Content. This centers the graphic within the frame without changing the size of either the graphic or the frame
 .
.
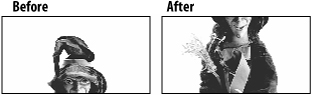 The effect of the Center Content command.
Many designers work with frames already in the layout to which they add images. What they want is their image to automatically be placed at the correct size—filling the frame, or scaled proportionally. InDesign lets you apply that setting to empty frames.
To apply the fitting commands to empty frames:
- Select the frame.
- Choose Object > Fitting > Frame Fitting Options to open the Frame Fitting Options dialog box
 .
.
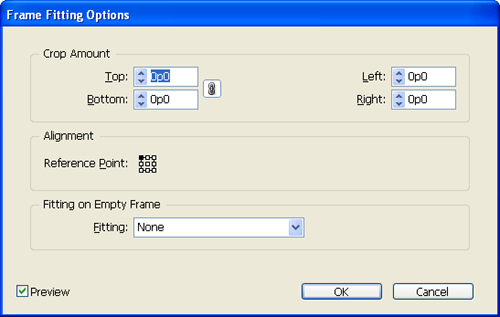 Use the Frame Fitting Options dialog box to set how images appear when placed into a frame.
 - Use the Crop Amount to specify how much area of the image should be outside the frame.
- Set the Alignment Reference Point to choose how the image should be positioned when cropped or scaled.
- Use the Fitting list to set how the image will be scaled when placed into an empty frame
 .
.
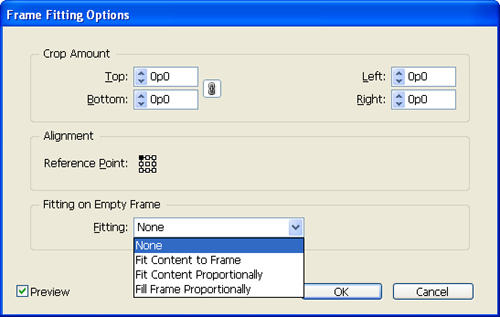 The Fitting controls list lets you choose the Fitting options for how an image is scaled when placed in an empty frame.
or
Choose None to leave the image unscaled when placed.
In addition to the commands that position graphics, you can also position images numerically within frames using the X and Y coordinates in the Transform panel.
To numerically position graphics within frames:
- Check Show Content Offset in the Transform panel menu.
- Use the Direct Selection tool to select the graphic inside the frame.
- Enter the X and Y coordinates in the Transform panel. The image moves to a new position relative to the frame
 . This is called the content offset.
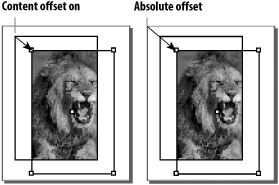 Content offset positions the graphic relative to the frame. Absolute offset positions the graphic relative to the page.

To numerically position graphics on the page:
- Uncheck Show Content Offset from the Transform panel menu.
- Use the Direct Selection tool to select the graphic inside the frame.
- Set the X and Y coordinates in the Transform panel. The image moves to a new position relative to the page rulers. This is called the absolute offset.
Of course you can use any of the transformation commands to scale, rotate, and shear objects within the frame. This allows you to scale images numerically within a frame.
To transform images within a frame:
- Use the Direct Selection tool to select the graphic inside the frame.
- Use any of the Transform tools or the Transform panel.
Nesting Graphic Elements
Once you have an image in a frame, you can then paste it into another frame. This technique is called nesting elements and it allows you much more flexibility in assembling various images than other programs.
Tip
For instance, you can use nested elements to put a placed image inside a circular frame, and then put that circular frame inside a rectangular frame. The top rectangular frame crops the circular frame while the circular frame crops the placed image.
- Use the Selection tool to select the element to be nested inside the frame
 .
.
 Before nesting, the circular frame with the placed image is a separate object.
 - Cut or copy the element to the clipboard.
- Select the frame that is to hold the nested element.
- Choose Edit > Paste Into. This pastes the element inside the frame
 .
.
 After nesting, the circular frame is the content inside the rectangular frame.
Tip
Frames can hold multiple levels of nested frames. So you can have a frame within a frame within a frame, and so on.
Once you have nested elements, you can select those elements using the Select commands. These commands make it very easy to select pasted-in elements and graphics.
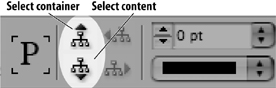
To use the Select commands for nested elements:
- Use the regular Selection tool to select the object. This selects the main container that holds the nested elements
 .
.
 The first click with the Selection tool selects the frame that holds the nested image.
 - Choose Object > Select > Content. This selects the item that was pasted into the main container. In the case of a nested element, this is the frame that holds the placed graphic.
- You can choose Object > Select > Content again to select the placed graphic.
Tip
If you have selected objects within the nested elements, you can choose Object > Select > Container to select upward through the nested elements.
Styling Placed Images
Once you have placed a graphic within a frame, you can employ many techniques to style the frame or the image. For instance, you can change the color of the frame or the color of the image.
To color the frame fill or stroke:
- Use the Selection tool to select the frame.
- Click the Fill icon in the Tools panel or Color or Swatches panel.
or
Click the Stroke icon in the Tools panel or Color or Swatches panel.
- Choose a color in the Swatches panel. If the Fill icon is chosen, you’ll see the fill color wherever the image doesn’t fill the frame
 .
.
 When a frame is selected, choosing a fill color changes the background color of the frame.
If you import a grayscale image, you can add color to it, so you change the black values in the image.
- Use the Direct Selection tool to select the grayscale image.
- Choose the Fill icon in the Color panel or Tools panel.
- Change the tint value to lighten the image.
or
Choose a color in the Color or Swatches panel. The grayscale values change to a tint of the color chosen
 .
. You can change the appearance of a grayscale image by changing the image color or the fill color of the frame.
 - Use the steps in the previous exercise to change the fill color of the frame. This colorizes the white areas of the image.
Linking Graphics
When you place an image, you don’t actually place the image into the document. You place a screen preview of the image that links to the original graphic. In order to print the file, InDesign needs to follow that link to the original graphic.
Tip
It is possible to link text files as well as graphics, but those are primarily used together with InCopy.
To examine the links in a document:
- Choose Window > Links. This opens the Links panel
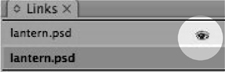
 . The Links panel shows all the linked images in the document with their page numbers. Special icons indicate the status of the image
  .
.
• Missing Link indicates that InDesign can’t find the original graphic.
• Modified Link indicates that the graphic has changed and has a different modification date from when it was originally placed.
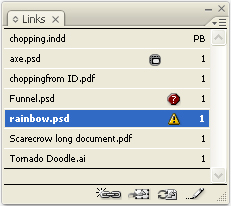 The Links panel displays the names of the placed images in the document.
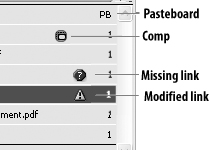 The icons and page numbers next to a listing in the Links panel tell you the status of a placed image.
 - Use the Links panel menu to sort the list of graphics as follows:
• Sort By Name arranges the graphics in alphabetical order.
• Sort By Status arranges the missing or modified graphics together.
• Sort By Page arranges the graphics according to the page they are on.
• Sort By Type arranges similar kinds of graphics together.
The Missing or Modified Links notice appears when you open a file whose link is missing or has been changed ![]() .
.
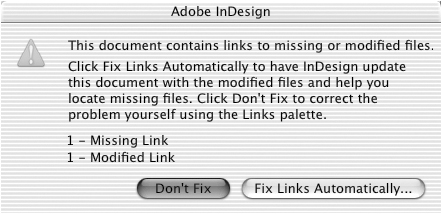
![]() The Missing or Modified Links notice appears when you open a file that has a missing link to a text or graphics file.
The Missing or Modified Links notice appears when you open a file that has a missing link to a text or graphics file.
To relink graphics when you open a document:
- Click the Fix Links Automatically button in the Missing or Modified Links notice. All modified graphics are automatically updated.
- If there are missing links, the operating system navigation dialog box opens. Use it to find each missing graphic.
You can use the Links panel to relink missing graphics to the screen preview.
- Select the missing link in the Links panel.
- Click the Relink button. This opens the navigation dialog box, which you can use to find the missing file.
or
Choose Relink from the Links panel menu.
- Navigate to find the missing file.
- Check the Relink All Instances option to relink all instances of a missing graphic
 .
.
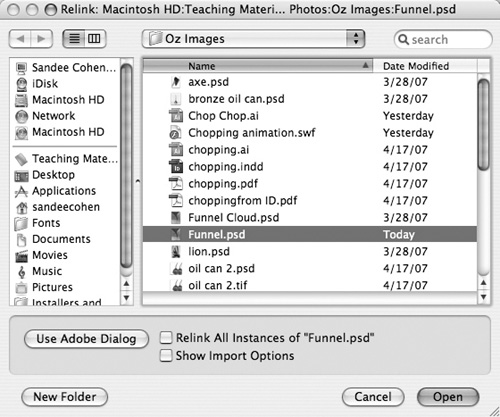 Check the Relink All Instances option to update all instances of a missing image.
 - Check the Show Import Options to open the Import Options dialog box before you relink the graphic.
- Click Open to relink the graphic.
If a graphic has been modified, you can use the controls at the bottom of the Links panel to update the link.
- Select the modified link in the Links panel.
- Click the Update Link button
 .
.
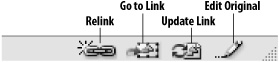 The icon commands in the Links panel allow you to access frequently used commands.
or
Choose Update Link from the Links panel menu.
The Links panel also lets you move quickly to a specific graphic.
To jump to a linked graphic in the document:
- Select the link in the Links panel.
- Click the Go to Link button .
or
Choose Go to Link from the Links panel menu.
The Links panel can also be used to open and edit a graphic.
- Select the graphic you want to edit.
- Choose Edit Original from the Links panel menu.
or
Click the Edit Original icon in the Links panel
. The graphic opens in the program that created it.
You may want to find a placed image in the Macintosh Finder, Windows Explorer, or Bridge window.
- Select the graphic in the Links panel.
- Choose one of the following in the Links panel menu or the context-sensitive menu for the linked image:
• Reveal in Finder (Mac) or Reveal in Explorer (Win) to select the file in the operating system directory.
• Reveal in Bridge to select the file in the Bridge window.
The Link Information dialog box gives you information about an imported graphic.
- Select the graphic in the Links panel.
- Choose Link Information from the Links panel menu. This opens the Link Information dialog box
 .
.
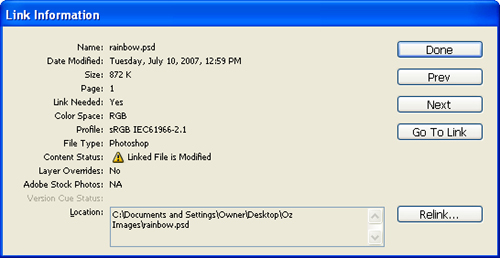 The Link Information dialog box gives you information about a placed graphic.
 - Use the Go To Link button to move to and select the graphic within the InDesign layout.
- If necessary, use the Relink button to find missing graphics.
- Use the Next or Previous buttons to move to other graphics in the Links panel.
- (Mac Only) Click the Spotlight button to see information used by the Macintosh Spotlight find command
 .
.
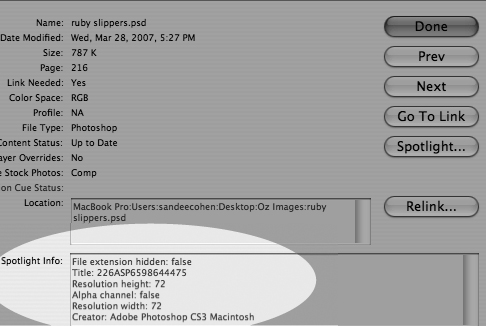 The Macintosh Spotlight Info gives additional information about linked graphics.
 - Click the Done button when finished.
Embedding Graphics
Usually, only the preview of a graphic is contained within an InDesign file. You can, however, embed a graphic within the InDesign file. This means that all the information necessary to print the file is contained within the InDesign document.
To embed placed images or text:
- Select the placed image.
or
Select the frame that contains the imported text.
- Choose Embed File from the Links panel menu. If you have selected a graphic, the Embed icon appears next to the file name in the Links panel
 .
.
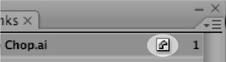 The Embed icon in the Links panel indicates that all the information necessary to print the graphic is stored in the InDesign file.
or
If you have selected text, the file name disappears from the Links panel.
- Select the embedded image.
- Choose Unembed File from the Links panel menu. The Unembed alert box appears
 .
.
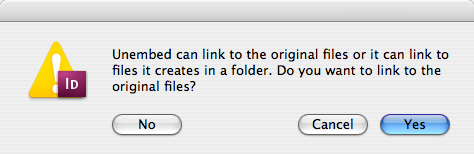 The Unembed alert box lets you choose to link back to the original file or create a new file.
 - Click Yes to link the embedded graphic back to the original file that was placed into InDesign.
or
Click No. A dialog box appears asking you to choose the destination for a new file.
Setting Layer Visibility
When you import Photoshop, Illustrator, InDesign, and PDF files, you have the chance to set the visibility of the layers in those files. This makes it possible to import one file, but then use it with various combinations of the layers turned on or off.
To set the layer options as you import files:
- Choose Show Import Options when you place a layered Photoshop, Illustrator, InDesign, or PDF file.
- Click the Layers option in the Show Import Options dialog box
 .
.
 The Layer controls of the Place PDF dialog box.
 - Click the visibility icon for each layer to show or hide that layer.
- If you have chosen a Photoshop file with layer comps, use the Layer Comp list to choose the layer comp that you want to apply to the image
 .
.
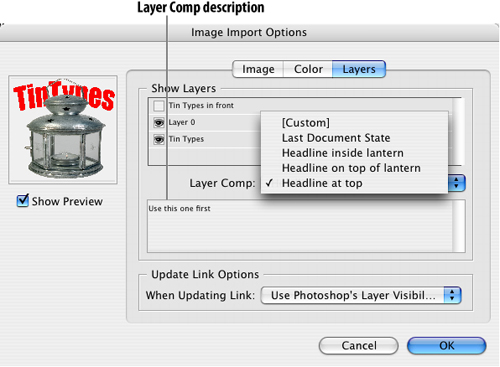 The Layer Comp list of the Image Import Options for a Photoshop file.
 - Select one of the following from the When Updating Link list:
• Use Photoshop’s/PDF’s Layer Visibility resets any overrides you have made in InDesign to the settings of the original.
• Keep Layer Visibility Overrides maintains any layer settings you have made in InDesign.
Once you have imported a layered file, you can change the visibility of the layers.
To edit the layer options of a placed file:
- Select the placed image.
- Choose Object > Object Layer Options.
- Make whatever changes you want.
Using Clipping Paths
Raster images saved as TIFF or EPS files are always rectangular. If you want to see only part of the image you import, you can create a clipping path that surrounds the part of the image that you want to see. The rest of the image becomes transparent. One way to create a clipping path is to use Adobe Photoshop to create paths for the file.
To import a file with a clipping path:
- In Photoshop, use the Path tools to create a path around the image
 .
.
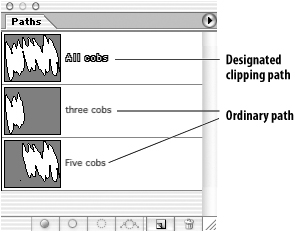 Photoshop’s Paths panel shows the paths saved with the file. Clipping paths are shown in outlined type.
 - Use Photoshop’s Paths panel menu to designate the path as a clipping path.
- Save the file as a TIFF, EPS, or Photoshop file.
- In InDesign, choose File > Place and choose the file you have created.
- In InDesign’s Import Options dialog box, check Apply Photoshop Clipping Path
 . The image is automatically clipped so that only the areas inside the path are visible in the layout
  .
.
 InDesign’s Image Import Options dialog box lets you choose to apply a clipping path to a file.
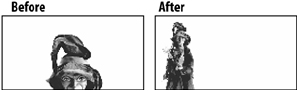
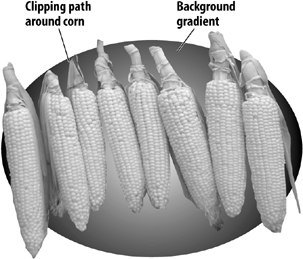 An example of how a clipping path creates a transparent area around an image.
Once you have a clipping path applied to a graphic, you can change the shape of the path to hide or show more of the image.
To modify the shape of a clipping path:
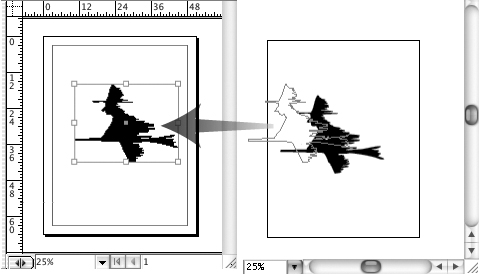
- Use the Direct Selection tool to select the placed image. If the image has a clipping path, the path appears as a series of points and path segments
 .
.
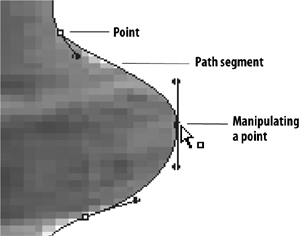 Use the Direct Selection tool to manipulate the shape of a clipping path around an image.
 - Use any of the path techniques to change the shape of the clipping path.
You can also turn a clipping path into a frame. This lets you apply a stroke to the path.
To convert a clipping path into a frame:
- Use either selection tool to select the image with the clipping path.
- Choose Object > Clipping Path > Convert Clipping Path to Frame. The clipping path is converted into an ordinary frame.
You don’t have to designate a clipping path in Photoshop. InDesign lets you select any path saved with the image file as a clipping path.
To choose a path as an InDesign clipping path:
- Select the placed image that includes a path.
- Choose Object > Clipping Path > Options. The Clipping Path dialog box appears
 .
.
 The Clipping Path dialog box lets you create or modify a clipping path for a graphic.
 - Use the Type menu in the Clipping Path dialog box to select the Photoshop Path option
 .
.
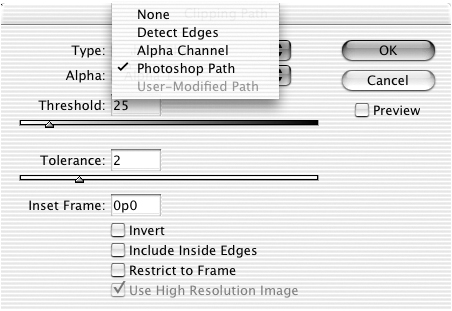 Use the Clipping Path Type list to choose which type of clipping path to apply.
 - Use the Path menu to select which path should be used as a clipping path
 .
.
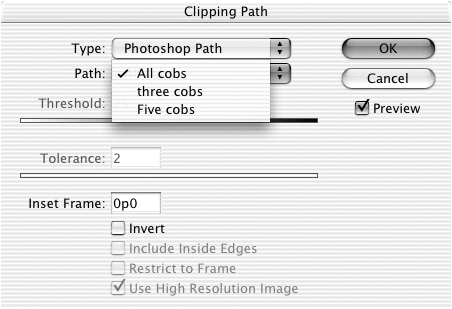 Use the Path list to choose a specific path attached to a graphic.
 - Click the Preview button to see the effects of choosing a path.
- Click OK to apply the path.
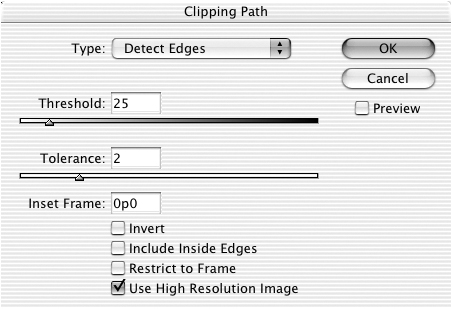
What happens, though, if an image doesn’t contain a clipping path? Fortunately, InDesign can create a clipping path from the edges—or the differences between the dark and light colors—of the image.
To create a clipping path from an image:
- In the Clipping Path dialog box, choose Detect Edges from the Type menu
 .
.
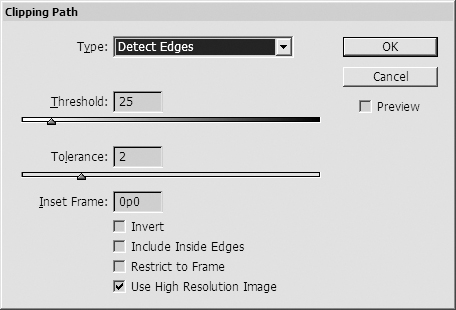 The Clipping Path dialog box gives you controls for creating a clipping path based on the appearance of the image.
 - Adjust the Threshold slider to define the color that is used as the area outside the clipping path; 0 is pure white.
- Adjust the Tolerance slider to allow a slight variation in the Threshold color. A high number for the tolerance often smooths out small bumps in the path.
You can also use an alpha channel saved with the file as a clipping path.
Tip
Alpha channels are grayscale images that are saved along with the color or black channels of an image.
To choose an alpha channel as a clipping path:
- Use the Type menu in the Clipping Path dialog box to select Alpha Channel.
- Use the Alpha menu to select which channel should be used as a clipping path.
- Because alpha channels can contain shades of gray, adjust the Threshold slider to define the color that is used as the area outside the clipping path; 0 is pure white.
- Adjust the Tolerance slider to allow a slight variation in the Threshold color. A high number for the tolerance often smooths out small bumps in the path.
All clipping paths can be further modified by using the controls at the bottom of the Clipping Path dialog box.
To modify the effects of a clipping path:
- Type a positive value in the Inset Frame field to shrink the entire path into the image.
or
Type a negative value to expand the path outside the image.
- If necessary, check Invert to switch, which areas the path makes visible and which areas it leaves invisible.
- Check Include Inside Edges to add areas to the clipping path that are enclosed by the foreground image
 .
.
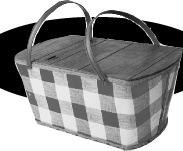 The Include Inside Edges in a clipping path option creates transparent areas within the image such as the area inside the basket handles.
 - Check Use High Resolution Image to create the path from the high-resolution version of the file rather than the preview. This is a slower but more accurate way of calculating the path.
- Check Restrict to Frame to prevent the clipping path frame from displaying any part of the image that is outside the frame that holds the image.
To delete the clipping path around an image:
- Select the placed image.
- Choose Object > Clipping Path > Options. The Clipping Path dialog box appears.
- Choose None from the Type pop-up list.
Importing Transparent Images
InDesign offers you a special advantage when you place native Photoshop (PSD) or Illustrator (AI) files. If there is any transparency in the placed image, InDesign displays the image with the same transparency as in the original file.
To use the transparency in a Photoshop file:
- In Photoshop, use any of the Tools to silhouette or fade the edges of the image. The Photoshop transparency grid indicates which parts of the image are transparent.
- Save the file as a Photoshop (PSD) file.
- Choose File > Place to import the file into the InDesign document.
- Click to place the file. The areas that were transparent in Photoshop will be transparent in InDesign
 .
.
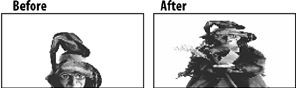
 A transparent Photoshop file lets you see through the glass to the text behind the image.
To use the transparency in an Illustrator file:
- In Illustrator, use any of the commands to apply transparency to the artwork.
- Save the file as an Illustrator (AI) file.
- Make sure that the PDF Compatibility option is checked in the Save dialog box.
- Import the file into the InDesign document. The areas that were transparent in Illustrator will be transparent in InDesign.
In addition to importing Photoshop files with transparent layers, InDesign can also apply an alpha channel saved with flattened files. This allows you to display transparency in file formats that do not support layers or a transparency grid.
To apply an alpha channel to an image:
- Add an alpha channel to the image in Photoshop. The alpha channel should be created as follows:
• Black designates those areas that are not transparent.
• White designates those areas that are completely transparent.
• Shades of gray are used for those areas that are partially transparent.
- Save the file as a TIFF, GIF, JPEG, or BMP file.
- Choose File > Place to import the file into the InDesign document.
- Use the Show Import Options checkbox to open the Image Import Options dialog box.
- Choose the name of the alpha channel from the Alpha Channel menu and click OK to place the file
 .
.
 Use the Alpha Channel menu in the Image Import Options to apply the channel to an image.
 - If necessary, click to place the file on the page. The alpha channel is applied to the image to create opaque, transparent, and semi-transparent areas.
Viewing Images
When you have a large document with a lot of images in it, you might find that the redraw time is delayed as you move around. However, you can set preferences for how your images are displayed by lowering some of the image detail for increased speed as you move through pages. These display settings can be applied to the entire document or to individually selected objects.
To set the default appearance of previews:
- Choose Edit > Preferences > Display Performance (Win).
or
Choose InDesign > Preferences > Display Performance (Mac). This opens the Display Performance Preferences dialog box
 .
.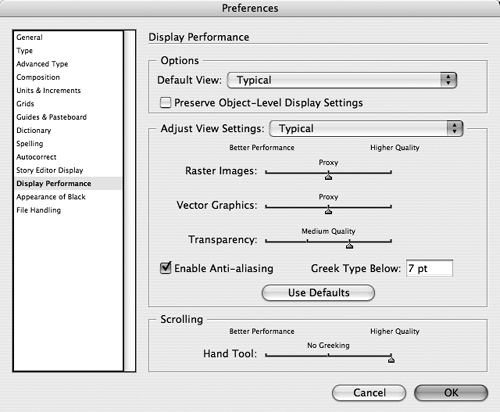 The Display Performance Preferences dialog box controls how images and transparency effects are displayed.
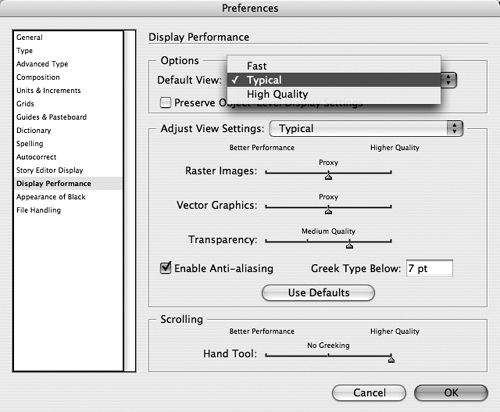
 - Choose one of the three options from the Default View Settings menu
 .
.
• Fast is used when you want fast screen redraw and the best performance.
• Typical is used when you want a better representation of the images.
• High Quality is used when you want to see as much detail as possible onscreen. This option may cause InDesign to work slower than it will with the other choices.
 The Default View Settings list lets you choose which display performance setup is applied to images.
 - Check Preserve Object-level Display Settings to use the display settings that have been applied to individual images
 .
.
 Check Preserve Object-level Display Settings to let each object’s settings override the overall document display setting.
As you work, you can switch between the menu commands without having to open the Display Performance Preferences dialog box.
To switch the default view setting:
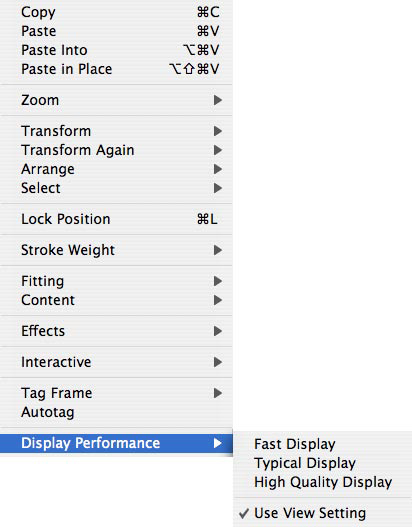
- With no object selected, Right-click (Win) or Control-click (Mac). This opens a context-sensitive menu
 .
.
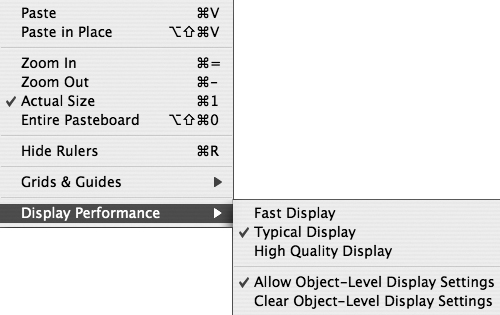 The Display Performance context-sensitive menu lets you switch from one display performance setup to another.
 - Choose one of the view settings from the Display Performance submenu.
- Choose Allow Object-Level Display Settings to override any individual image previews. This does not delete those individual settings, it only overrides them.
- Choose Clear Object-Level Display Settings to delete any individual image previews.
You can also set each individual image to its own display setting. This lets you set one large image to faster screen redraw while showing more detail in other objects.
To set individual image previews:
- Select the image.
- Right-click (Win) or Control-click (Mac). This opens the context-sensitive menu for the display of that object
 .
.
 The Display Performance context-sensitive menu for an object.
 - Choose one of the options from the Display Performance submenu of the context-sensitive menu.
Tip
The Use View Setting command sets the object back to the current View Setting in the Display Performance Preferences.
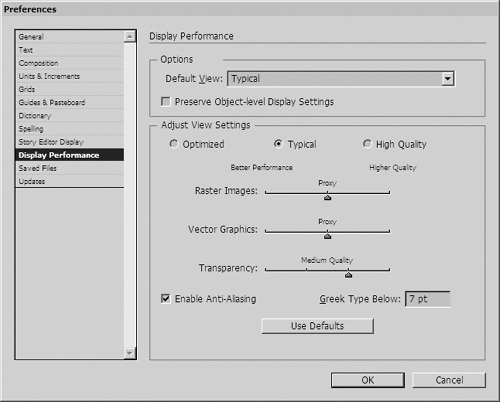
The labels Fast, Typical, and High Quality are merely guides. You can customize the specific displays for raster images, vector art, and transparency effects in the Adjust View Settings area of the Display Performance Preferences.
To set the raster and vector displays:
- Choose Edit > Preferences > Display Performance (Win).
or
Choose InDesign > Preferences > Display Performance (Mac).
- Choose one of the options in the Adjust View Settings menu
 .
.
 The Adjust View Settings menu gives you three display settings to apply to a document or individual images.
 - Drag the slider for the Raster Images or Vector Graphics as follows
 :
:
• Gray Out (far left) displays a gray background instead of the image
 . This is the fastest performance.
• Proxy (middle) displays a 72-ppi screen preview of the image
. This setting provides the best performance that still shows what the image looks like.• High Resolution (far right) displays the maximum resolution for the image
 .
.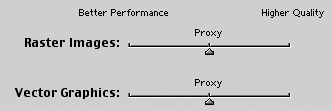 The Raster Images and Vector Graphics sliders let you control how those formats are displayed.
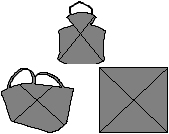 An example of the Gray Out view setting.
 The difference between the Proxy setting and the High Resolution setting.
 - Repeat the process for each of the other menu settings.
You can also adjust the display for the transparency effects as well as the drop shadows and feather effects.
To set the transparency effects displays:
- Choose one of the listings in the Adjust View Settings menu.
- Drag the Transparency slider to each notch setting as follows
 : (The labels appear as you drag the slider.)
• Off (far left) displays no transparency effects. This is the fastest performance.
• Low Quality (second from left) displays basic opacity and blend modes. Drop shadows and feathers are displayed in low resolution only. Some blend modes may change in the final output.
• Medium Quality (second from right) displays drop shadows and feathers in low resolution.
• High Quality (far right) displays high resolution drop shadows and feathers. Blend modes appear in their correct CMYK color display.
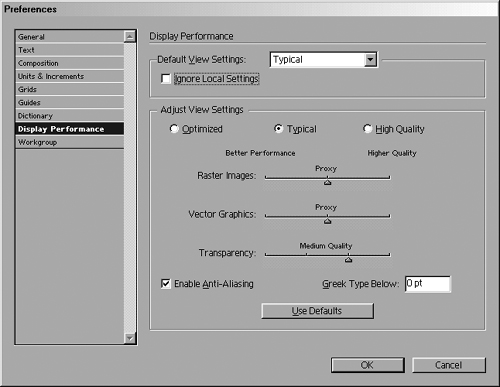 The Transparency slider lets you control the display of drop shadows, feathers, and transparency effects. The setting labels appear as you move the slider.
 - Repeat the process for each of the other Adjust View menu items.