
Chapter 5. Working in Color
When I first started in advertising, only the senior creative teams could work in color. The junior teams were assigned only black-and-white ads. Later on they might be able to work on a two-color job, but the four-color work was handled by senior art directors.
Fortunately, you’re not limited by such constraints. InDesign gives you, right from the first day you use it, all the color controls you could ever wish for. However, with that power comes some responsibility.
When you define colors and use them on your pages, you are wearing two hats. Your first hat is that of a designer who looks at the aesthetics of the page and then applies colors. This is where you have fun with your creativity.
Your second hat is that of production manager. Wearing that hat you need to understand some of the principles of color and printing color documents. You also need to make sure your colors are defined so they print correctly.
The Basics of Color
Here’s a quick primer to help you understand what happens when you define and apply colors in your InDesign layout, as well as other programs.
Using the Color Panel
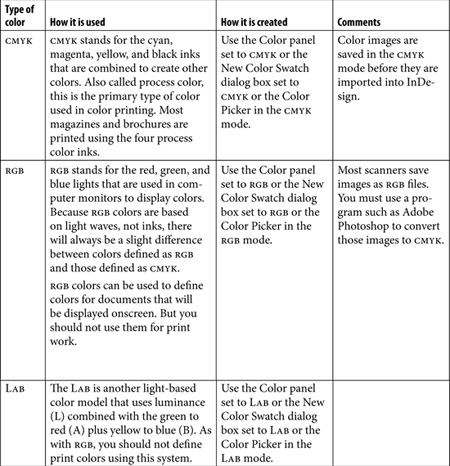
There are three different models for defining colors: CMYK, RGB, and LAB. Each model is used for different purposes. You choose the color mode and mix colors in the Color panel. (See Chapter 6, “Styling Objects,” for how to apply colors to objects and text.)
To choose the options in the Color panel:
- If the Color panel is not visible, choose Window > Color to open the panel
 .
.
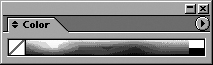 The Color panel with the options turned off shows only the spectrum or ramp for choosing colors.
or
If the Color panel is behind other panels, click the Color panel tab.
- If the color sliders are not visible, click the panel tab or choose Show Options from the Color panel menu
 .
.
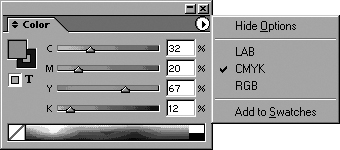 The Color panel menu lets you choose among the three color models.
The CMYK color model is used primarily for print work. CMYK colors are mixed using percentages of the four inks used in process printing: cyan, magenta, yellow, and black.
- Choose CMYK from the Color panel menu. This opens the panel in the CMYK mode
 .
.
 The Color panel with the CMYK (cyan, magenta, yellow, and black) color controls.
 - Choose one of the following methods to define the amount of cyan, magenta, yellow, or black ink in the color:
• Type a value from 0 to 100% in each of the four color fields.
• Drag the sliders for each of the four color fields.
• Click a color in the CMYK spectrum area.
The RGB color model is used primarily for onscreen work such as presentations and Web sites. The RGB colors—red, green, and blue—are mixed using representations of the three colors of light. This is what you see on television screens and computer monitors. RGB colors have a wider range of colors than CMYK colors.
- Choose RGB from the Color panel menu. This opens the panel in the RGB mode
 .
.
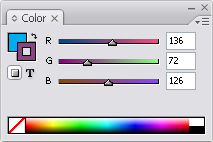 The Color panel set for mixing RGB (red, green, blue) color controls for onscreen display such as Web sites.
 - Choose one of the following methods to define the amount of red, green, or blue in the color:
• Type the value from 0 to 255 in each of the three color fields.
• Drag the sliders for each of the three color fields.
• Click a color in the RGB spectrum area.
The LAB color model defines colors according to a luminance (lightness) component, and two color components, a and b. The a component defines green to red values. The b component defines blue to yellow values. LAB colors are device-independent so that colors don’t change from one source to another.
Tip
The proper name for LAB is L*A*B and is pronounced by spelling out the name (el-ay-bee), not by saying the word “LAB.”
- Choose LAB from the Color panel menu. This opens the panel in the LAB mode
 .
.
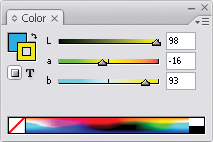 The LAB Color panel mixes colors that look consistent no matter whether you print them or display them onscreen.
 - Choose one of the following methods to define the three components of the color:
• Type the value from 0 to 100 in the L field or type the value from -128 to 127 in the A or B field.
• Drag the sliders for each of the fields.
• Click a color in the LAB spectrum area.
The out-of-gamut symbol appears if you choose an RGB or LAB color that cannot be printed using process inks ![]() .
.

![]() The out-of-gamut symbol for RGB or LAB colors indicates that the color shown on screen will not print as seen using process color inks.
The out-of-gamut symbol for RGB or LAB colors indicates that the color shown on screen will not print as seen using process color inks.
To convert out-of-gamut colors:
• Click the small square next to the out-of-gamut symbol. This converts the color to the closest process-color equivalent.
You can use the Color panel to apply colors to selected objects.
Tip
This technique, while convenient to use, creates unnamed colors or colors that are not listed in the Swatches panel. (See the sidebar “Avoiding Unnamed Colors” for why creating unnamed colors can be a problem.)
To apply colors to a fill or stroke:
• With an object or text selected, use the Color panel to define a fill color. This applies the unnamed color to the fill of the object or text.
or
With an object or text selected, use the Color panel to define a stroke color. This applies the unnamed color to the stroke of the object or text.
Tip
You can choose colors by clicking the ramp section of the Color panel ![]() .
.
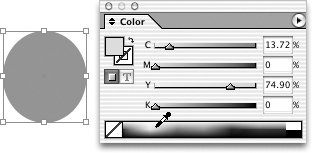
![]() With an object selected, click the color ramp in the Color panel to apply a color to an object.
With an object selected, click the color ramp in the Color panel to apply a color to an object.
Tip
You can also drag a color directly from the Color panel onto objects ![]() . This also creates unnamed colors.
. This also creates unnamed colors.
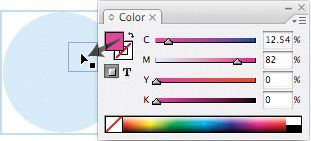
![]() Drag a color from the Color panel to apply a color to an object.
Drag a color from the Color panel to apply a color to an object.
Tip
A square dot appears next to the cursor when you drag a swatch color onto objects. This indicates you are dragging a fill color onto the object.
You can add colors from the Color panel to the Swatches panel so you can easily reuse them.
To transfer colors from the Color panel:
- Define the color in the Color panel.
- Choose Add to Swatches from the Color panel menu. The color appears as a new color swatch in the Swatches panel.
Defining and Storing Swatches
Although it is very quick to create a color using the Color panel, you will find it more efficient to create color swatches. A swatch is a color that has been defined and is stored in the Swatches panel.
Tip
Unnamed colors are not available for all places where you use colors. For instance, only named color swatches can be used as part of text styles.
To work with the Swatches panel:
- If the Swatches panel is not visible, choose Window > Swatches to open the panel
 .
.
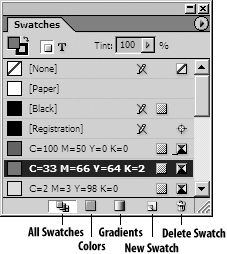 The controls for the Swatches panel.
or
If the Swatches panel is behind other panels, click the Swatches panel tab.
- To see the different types of swatches, click the icons at the bottom of the panel as follows:
• Show All Swatches displays both the color and the gradient swatches.
• Show Color Swatches displays only the color swatches.
• Show Gradient Swatches displays only the gradient swatches.
- To change the display of the swatches in the panel, choose the following from the Swatches panel menu:
• Name displays a list of the swatch names in a large typeface.
• Small Name uses a more compact typeface to display the swatch names.
• Small Swatch displays only the square of the swatch color or gradient.
• Large Swatch displays a larger square of the swatch color or gradient.
Although you can apply colors to objects and text directly from the Color panel, this is not considered a good production workflow. Instead, use the Swatches panel to add the color currently defined in the Color panel.
Tip
If you apply colors from the Color panel, they are called unnamed colors. Unnamed colors can cause production problems later on and should be avoided.
To add a color to the Swatches panel:
- Use the Color panel to define a color.
- Click the New Swatch icon at the bottom of the panel. The new color, named with the color values, is automatically added to the Swatches panel.
InDesign also lets you drag colors from the Color panel into the Swatches panel.
To drag colors into the Swatches panel:
- Create the color in the Color panel.
- Drag the color from the Color panel fill or stroke box to the bottom of or between two colors in the Swatches panel.
- Release the mouse when a black line appears in the Swatches panel
 . The new color is added and automatically takes its name from the color values.
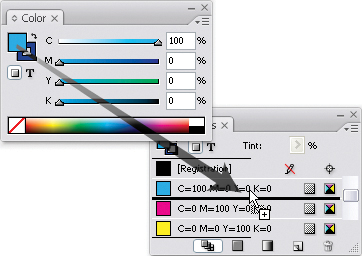 You can drag colors from the Color panel into the Swatches panel.
You can define and add new colors to your document using only the Swatches panel.
- Choose New Color Swatch from the Swatches panel menu. This opens the New Color Swatch dialog box
 .
.
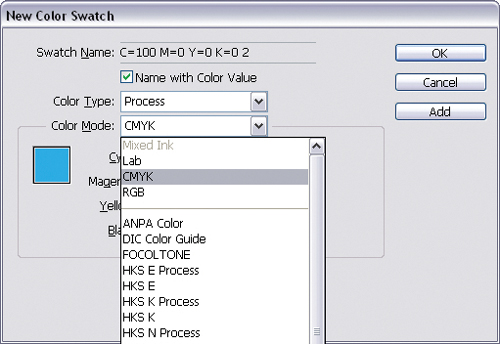
 Use the New Color Swatch dialog box to define colors to be added to the Swatches panel.
or
Opt/Alt-click the New Swatch icon at the bottom of the Swatches panel.
- To name the color swatch yourself, deselect the checkbox for Name with Color Value and then type a name in the Swatch Name field.
or
Leave the setting checked to name the color swatch using the values that define the color. This option is not available for spot colors.
- Choose Process or Spot from the Color Type pop-up list
 .
.
 Use the Color Type menu to choose either process or spot colors.
 - Choose LAB, CMYK, or RGB from the Color Mode menu
 .
.
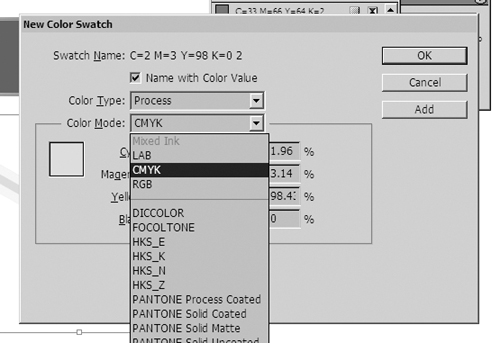 The Color Mode menu in the New Swatch dialog box.
or
Choose one of the Swatch Libraries at the bottom of the Color Mode menu
. - If you have chosen LAB, CMYK, or RGB, use the sliders to change the values from the ones originally defined.
- Click OK. This adds the swatch and closes the dialog box.
or
Click Add to add the swatch without closing the dialog box. This allows you to define additional colors.
The colors that appear in the Swatches panel are displayed with icons that give you information about the type of color, the color mode, and other attributes
 . Of course, once you have defined a color swatch, you can modify its color definition. This changes the appearance of all text and objects that use that color, even if they are not selected.
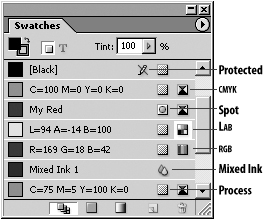 The icons in the Swatches panel identify the different types of colors and color modes.
- Select the swatch and choose Swatch Options from the Swatches panel menu. This opens the Swatch Options dialog box
 . These are the same controls as in the New Color Swatch dialog box.
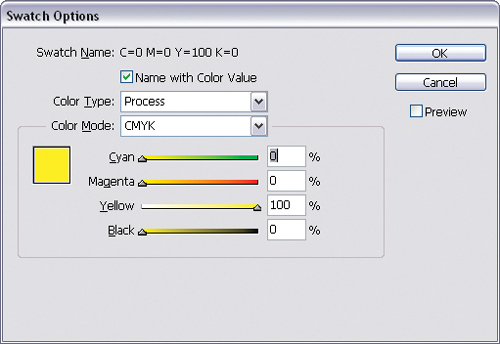 Once you define a swatch, you modify it in the Swatch Options dialog box.
or
Double-click the swatch in the panel.
- Make changes to the color.
- Click OK to apply the changes.
Once you create color swatches, you can apply them via the Fill and Stroke controls in the Tools panel or Color panel.
- Create the object or text that you want to color.
- Select either the Fill or Stroke icons in the Color panel or Tools panel. (See Chapter 6, “Styling Objects,” for more information on the Fill or Stroke icons.)
- In the Swatches panel, click the color you want. This applies the swatch to the object.
- Select the color you want to delete.
Tip
To select a series of adjacent swatches, select the first swatch and then hold the Shift key and select the last swatch in the series. This highlights the first and last swatch and all the swatches in between.
- Click the Delete Swatch icon
 or choose Delete Swatch from the Swatches menu.
 Click the Delete Swatch icon to delete the selected swatches.
 - If the swatch is used within the document, the Delete Swatch dialog box appears, asking how you want to replace the deleted swatch
 :
:
• To swap the color with one from the Swatches panel, choose Defined Swatch and then pick a swatch from the pop-up list.
• To leave the color as an unnamed color applied to the object, choose Unnamed Swatch.
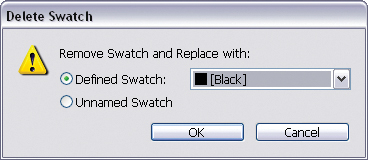 The Delete Swatch dialog box controls what happens to colors when they are deleted from a document.
If you have many colors in your document that you are not using, you may want to delete them to avoid confusion when the file is sent to a print shop.
To delete all unused swatches:
- Choose Select All Unused in the Swatches panel menu
 .
.
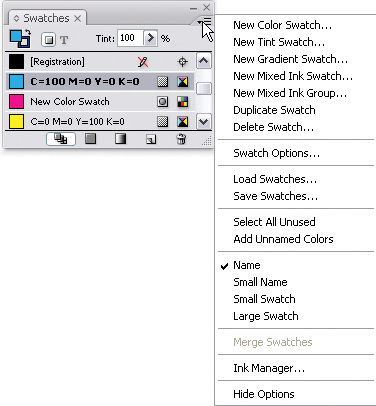 The Swatches panel menu contains the commands for working with color swatches.
 - Click the Delete Swatch icon or use the Delete Swatch command in the Swatches panel menu.
You can also select several swatches and merge them into one color.
Tip
The Merge Swatches command makes it easy to globally replace all instances of one defined color with another.
- Click to select the first color. This is the final color that you want the other colors to change to.
- Hold the Cmd/Ctrl key and click to select another swatch. This is the color that you want to delete.
or
Hold the Shift key and click to select a range of swatches. These are the swatches you want to delete.
- Choose Merge Swatches from the Swatches panel menu . This deletes all the swatches except the swatch that was first selected. That swatch is applied to all text and objects that used the deleted swatches.
The position that swatches occupy in the panel comes from the order in which they were created. You can easily change the order of the swatches.
To move swatches to new positions:
- Select a swatch in the panel.
- Drag the swatch to a new position. A black line indicates where the swatch will be located
 .
.
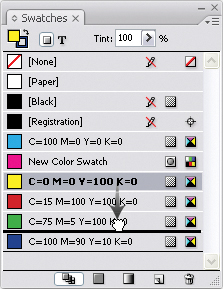 Drag a swatch to move it from one position to another.
 - Release the mouse button.
You may find it easier to duplicate a swatch and modify it than to start from scratch.
To duplicate a swatch:
• Select the swatch and choose Duplicate Swatch from the Swatches panel menu.
or
Select the swatch and click the New Swatch icon.
or
Drag the swatch onto the New Swatch icon.
You can save a selection of swatches for use in other InDesign documents, or in Adobe Illustrator or Adobe Photoshop documents.
- Select the swatches in the Swatches panel that you want to save.
- Choose Save Swatches For Exchange from the Swatches panel menu.
- Use the operating system dialog box to save the swatches as an Adobe Swatch Exchange (.ase) file.
You can import the swatches from one InDesign document into another. You can also import the swatches from an Adobe Swatch Exchange file.
To import swatches from other documents:
- Choose Load Swatches from the Swatches panel menu. The operating system dialog box appears.
- Navigate to find the document or Adobe Swatch Exchange file you want to import swatches from.
- Click Open. The swatches are imported into the current document.
Unnamed colors are colors that are applied to objects directly from the Color panel or the Color Picker instead of through the Swatches panel. It is a good idea not to have unnamed colors floating around your document. Fortunately, you can easily convert unnamed colors into named colors.
To name unnamed colors:
• Choose Add Unnamed Colors from the Swatches panel menu. All unnamed colors are added to the panel named with their percentage values.
You can create colors that are available as the default colors for all new documents.
- Close all documents but leave InDesign running.
- Use any of the methods in this section, “Defining and Storing Swatches,” to define and store a color in the Swatches panel. The color will appear in the Swatches panel of all new InDesign documents.
Using Swatch Libraries
Rather than defining your own color mixtures, you can use the swatch libraries for professional color systems from companies such as Pantone or Trumatch. These color libraries usually have printed samples that you can refer to in order to see how the color will appear when printed.
To add colors from swatch libraries:
- Open the New Swatch dialog box or the Swatch Options dialog box.
- Choose one of the swatch libraries listed in the Color Mode list
 . This displays the colors in the library
  .
.
 The swatch libraries in the Color Mode list.
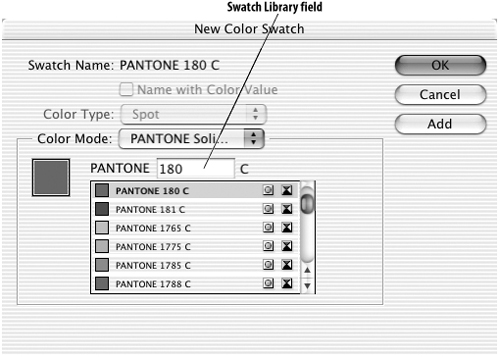 An example of the window that displays a swatch library, such as the Pantone Solid Coated colors.
 - Scroll through the library to select the color you want to add to your document.
or
Instead of scrolling through a long list, type the name or number associated with the color in the Swatch Library field.
You can use the swatch libraries to open color panels from other InDesign documents and Adobe Illustrator documents.
To import swatches from other documents:
- Choose Other Library from the Color Mode list .
- Navigate to select the InDesign or Illustrator document. The colors appear in the window.
Creating Mixed Inks
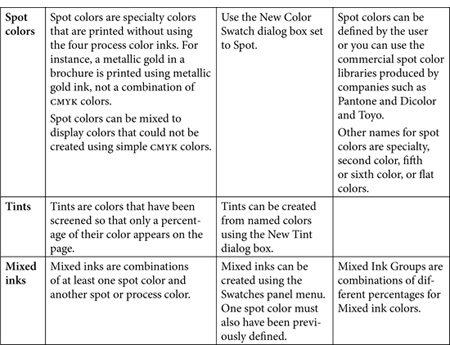
Mixed inks is the term InDesign uses for a color that combines a spot color with other spot colors or process colors. (QuarkXPress calls this type of color a multi-ink.) Mixed inks give you more flexibility in creating colors, especially for two-color jobs.
To create a single Mixed Ink swatch:
- Choose New Mixed Ink Swatch from the Swatches panel menu. This opens the New Mixed Ink Swatch dialog box
 .
.
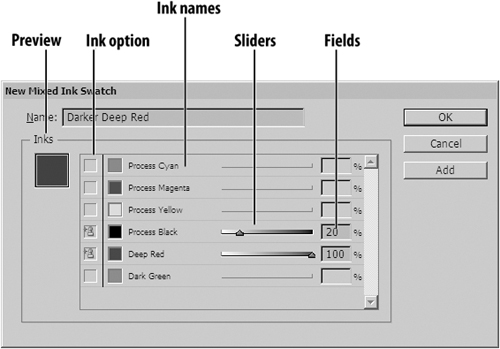 The New Mixed Ink Swatch dialog box allows you to combine a spot color with other colors.
 - Enter a name for the mixed ink swatch.
- Click the ink controls to select the colors in the mixed ink swatch. You must choose two inks, and one of them must be a spot color ink
 .
.
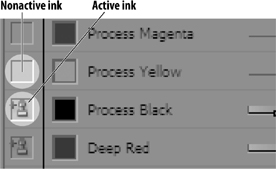 Use the ink controls to define the colors in the mixed ink swatch.
 - Use the sliders or fields to set the amount of each ink in the swatch.
- Click the ok button to create the mixed ink swatch.
or
Click the Add button to create the mixed ink swatch and then use the dialog box to define a new mixed ink swatch.
You might want to create a collection of mixed inks that combine colors in an increasing series of mixtures. InDesign calls this a Mixed Ink Group and makes it easy to automatically create the mixtures of colors.
Tip
A Mixed Ink Group makes it easy to create a variety of mixed inks that can be quickly applied as you work.
- Choose New Mixed Ink Group from the Swatches panel menu. The New Mixed Ink Group dialog box appears
 .
.
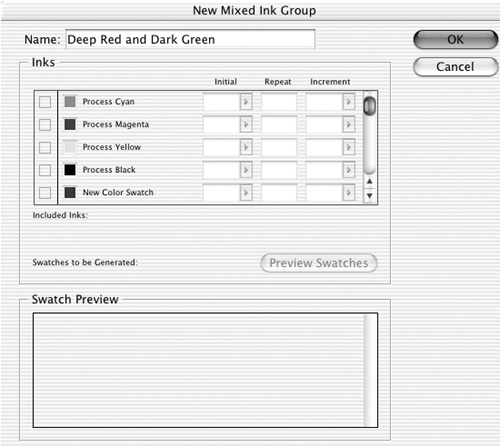 The New Mixed Ink Group dialog box allows you to automatically create a series of mixed inks.
 - Enter a name for the group in the Name field.
- Click the Inks controls to select the colors in the mixed ink swatch. You must choose at least two inks and one of them must be a spot color ink.
- Use the Initial field to define the amount of color that the first instance of an ink has
 .
.
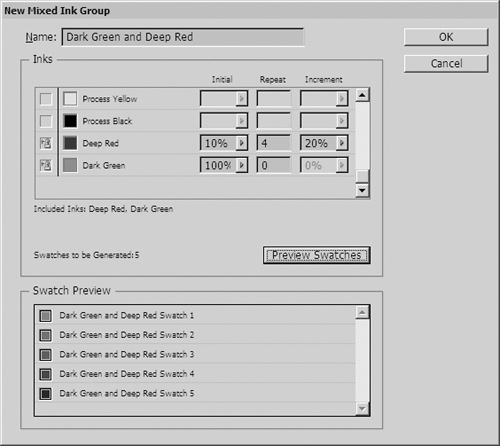 Use the Inks controls to set the mixed ink colors, the initial amounts, the repetitions, and the increments by which they change.
 - Use the Repeat field to set how many new mixed inks will be created with the color.
- Use the Increment field to set the color increases for each new mixed ink.
- Click the Preview Swatches button to see the result of the settings in the Swatches panel .
- Click OK to create the Mixed Ink Group. The group appears in the Swatches panel.
Once you have created a mixed ink group, you can make changes to the entire group or the individual swatches in the group.
To modify all the swatches in a mixed ink group:
- Select the mixed ink group in the Swatches panel and choose Swatch Options from the Swatches panel menu.
or
Double click the name of the mixed ink group in the Swatches panel. The Mixed Ink Group Options dialog box appears
 .
.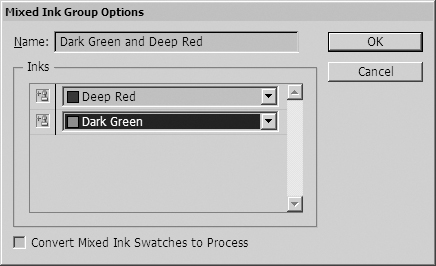 Use the Mixed Ink Group Options dialog box to make changes to the inks used in a mixed ink group.
 - Use the Name field to change the name of the group.
- Use the ink controls to delete inks from the mixed ink group.
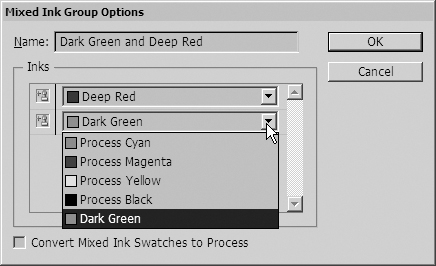
- Use the Inks list to swap one ink for another
 . The list shows both the process and spot colors in the document.
 Use the Inks list to change the colors used in a mixed ink group.
 - If desired, check Convert Mixed Ink Swatches to Process. This changes all the colors in the mixed ink swatches to their process color equivalents.
- Click OK. The changes are applied to the inks used in the mixed ink swatches that you originally created.
Creating Tints
Tints are screened, or lighter, versions of colors. Spot color tints create screens of the base color. Process color tints reduce the amounts of the process inks that define the color.
- Select the base color, that is, the swatch color that you want to tint.
- Use the Tint field in the Swatches panel to create a screen of the swatch color
 .
.
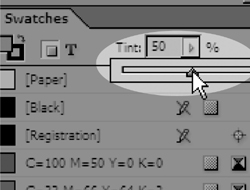 Use the Tint field to create a screened version of a swatch color.
 - Click the New Swatch icon to store the tint percentage as a swatch in the Swatches panel.
Tip
The tint swatch appears in the Swatches panel with the same name as the base color but with the tint percentage listed
 .
.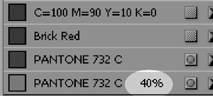 A tint swatch is listed with the same name as the base color and the tint percentage.
As you select a color swatch as a base color, the Color panel displays a slider and a ramp of the color.
To tint a swatch using the Color panel:
- Select the swatch color that you want to tint.
- In the Color panel, use the slider or click in the ramp to create a percentage of the base color
 .
.
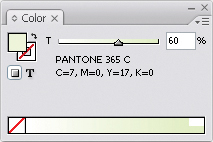 The Color panel displays a slider and tint ramp when a base color is chosen.
 - Click the New Swatch icon to create a tint swatch of the percentage you defined.
You can also create a tint swatch using the Swatches panel menu.
To store a tint swatch of a color:
- In the Swatches panel, select the base color, that is, the color you want to tint.
- Choose New Tint Swatch from the Swatches panel menu. The New Tint Swatch dialog box appears
 .
.
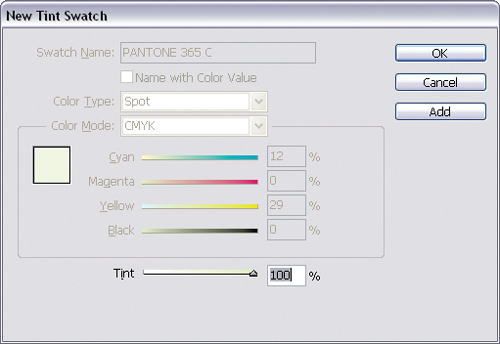 The New Tint Swatch dialog box lets you set the percentage of a tint.
 - Adjust the tint slider to a percentage.
- Click OK. The tint swatch appears in the Swatches panel with the same name as the base color but with the tint percentage listed.
or
Click Add to add the tint to the Swatches panel and then create additional tints.
Once you store a tint swatch, you can modify the tint percentage. This updates all the objects that use that tint swatch.
- Double click the name of the tint swatch in the Swatches panel. This opens the Swatch Options dialog box for tints
 .
.
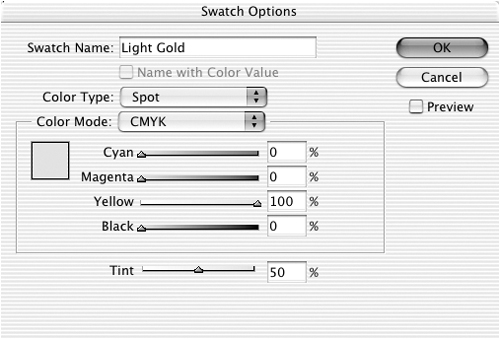 The Swatch Options for a tint swatch let you change the tint percentage or modify the base color of the tint.
 - To change the tint value, adjust the Tint slider at the bottom of the dialog box.
- Click OK to apply the changes.
Using the Color Picker
If you have used Photoshop, you are probably familiar with Photoshop’s Color Picker, which is accessed through the foreground or background color icons in the Tools panel. InDesign also has a Color Picker, which is opened through the Tools panel.
To define a color using the Color Picker:
- Double-click either the Fill icon or the Stroke icon in the Tools panel
 . This opens the Color Picker.
 The Fill and Stroke icons in the Tools panel or Color panel let you open the Color Picker.
 - Use the RGB, LAB, or CMYK fields (
 ,
,  , and
, and  )to define the color.
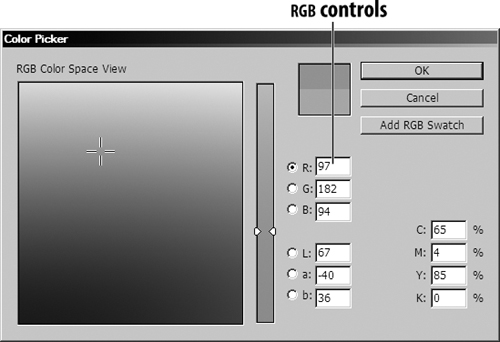 The Color Picker in the RGB mode lets you define and store RGB colors.
 The Color Picker in the LAB mode lets you define and store LAB colors.
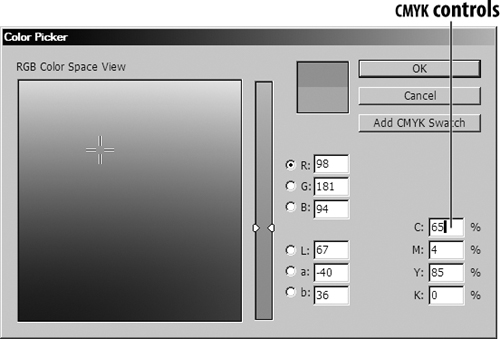 The Color Picker in theCMYK mode lets you define and store CMYK colors.
 - Click OK to apply the color to the current fill or stroke.
To define a color swatch using the Color Picker:
- Double-click either the Fill icon or the Stroke icon in the Tools panel to open the Color Picker.
- Use the RGB, LAB, or CMYK fields to define the color.
- Click the Add [RGB, LAB, or CMYK] Swatch button to add the color to the Swatches panel.
- Click OK to close the Color Picker.
Creating Gradient Swatches
Gradients are blends that change from one color into another. InDesign creates gradients as swatches that can then be applied to objects. (See Chapter 6, “Styling Objects,” for information on applying gradients.)
- Choose New Gradient Swatch from the Swatches panel menu. The New Gradient Swatch dialog box appears
 .
.
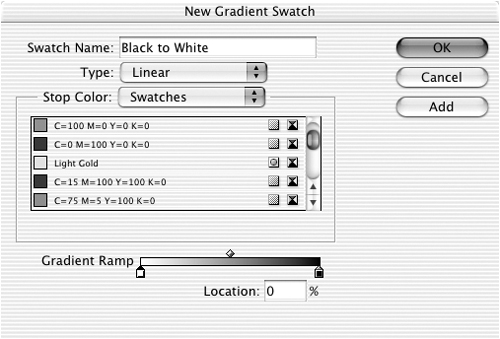 Use the New Gradient Swatch dialog box to define a gradient of blended colors.
 - Enter a name for the gradient in the Swatch Name field.
- Choose Linear or Radial in the Type field
 .
.
 A linear gradient changes colors along a line. A radial gradient changes colors in a circular pattern.
 - Click a color stop on the gradient ramp to define a color in the gradient
 .
.
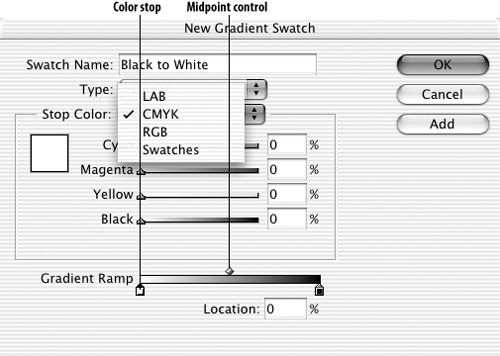 Use the color stops and midpoint controls along the gradient ramp to modify a gradient.
 - Choose the type of color for the selected stop from the Stop Color list
 :
:
• Swatches shows you the list of colors in the Swatches panel.
• LAB, CMYK, or RGB displays the sliders that let you define the color using the LAB, CMYK, or RGB values.
 Use the Stop Color menu to choose the format for the colors used for the color stops.
 - Click the other gradient stop to define a color for it.
- Adjust the midpoint control to change the position where the two colors blend equally.
- Click OK to add the gradient to the Swatches panel
 .
.
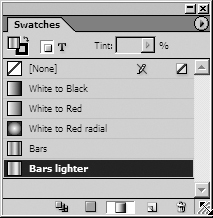 Gradients are stored in the Swatches panel.
or
Click the Add button to add the current gradient to the Swatches panel and continue defining additional gradients.
All gradients must have at least two colors. However, you can easily add more colors to a gradient by using the color stops.
- Open the New Gradient Swatch or the Gradient Options dialog box.
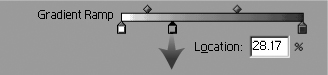
- Click the area below the gradient ramp. This adds a color stop to the ramp area
 .
.
 Click under the gradient ramp to add a color stop to the gradient.
 - Make whatever changes you want to the color stop.
- If necessary, move the color stop to a new position.
- Click OK to apply the changes to the gradient swatch.
To delete a gradient color stop:
• Drag the color stop away from the ramp area and release the mouse ![]() . The gradient reblends according to the colors that remain.
. The gradient reblends according to the colors that remain.
![]() Drag a color stop off the gradient ramp to delete that color from the gradient.
Drag a color stop off the gradient ramp to delete that color from the gradient.
- Select the gradient swatch and choose Swatch Options from the Swatches panel menu. This opens the Gradient Options dialog box.
or
Double-click the gradient in the panel.
- Adjust the midpoint, color stops, or gradient type.
- Click OK to apply the changes.
Just as you can create colors on the fly, you can also create gradients without using the Swatches panel. These gradients are created only within the Gradient panel and are not stored in the Swatches panel.
To work with the Gradient panel:
- Choose Window > Gradient to open the Gradient panel
 .
.
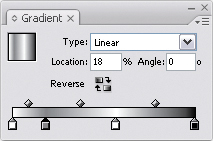 Use the Gradient panel to create on-the-fly gradients.
 - Choose Show Options from the Gradient panel menu to see all the controls.
To create gradients from the Gradient panel:
- Use the Type pop-up list to choose between Linear and Radial.
- Select a color stop and adjust the sliders in the Color panel to define the color at that position.
or
Hold the Opt/Alt key and click the name of a swatch in the Swatches panel.
- Select another color stop and use the sliders in the Color panel to define the color at that position.
- Set the angle of the gradient in the Angle field.
- Click the Reverse icon to reverse the positions of the color stops.
Once you have a defined a gradient in the Gradient panel, you can store it as a swatch.
- Create the gradient in the Gradient panel.
- Click the New Swatch icon in the Swatches panel.
or
Drag the preview of the gradient from the Gradient panel into the Swatches panel.
- Double-click the name of the gradient in the Swatches panel to rename it.
Using the Eyedropper
The Eyedropper tool lets you sample colors from graphics that are placed in your document. (See Chapter 8, “Imported Graphics,” for more information on placing graphics.)
To sample and store colors from placed graphics:
- Click the Eyedropper tool in the Tools panel
 .
.
 The Eyedropper tool lets you sample colors from placed images.
 - Move the Eyedropper cursor over the color of a placed graphic
 .
.
 Click with the Eyedropper tool over an area of an image that you want to sample.
 - Click to sample the color.
- Click the New Swatch icon in the Swatches panel. The sampled color is stored as a color swatch.
Tip
The Eyedropper samples the color in the same color mode as the placed graphic. So RGB images yield RGB colors, and CMYK images yield CMYK colors.
Tip
The Eyedropper can also sample and apply fills, strokes, and transparency attributes of objects and text formatting. (See Chapter 6, “Styling Objects,” and Chapter 14, “Automating Your Work.”)
Overprinting Colors
Overprinting is a technique that allows you to set the color of one object to mix with any colors underneath. For instance, without overprinting, a yellow object placed over a blue background knocks out the blue and prints as yellow. But with overprinting turned on, the yellow object mixes with the blue background to create green.
To set a fill or stroke to overprint:
- Select the object.
- If the Attributes panel is not visible, choose Window > Attributes to open the panel
 .
.
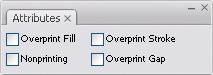 Use the Attributes panel to set the colors of an object to overprint.
or
If the Attributes panel is behind other panels, click the Attributes panel tab.
- Check Overprint Fill to set the object’s fill color to overprint.
- Check Overprint Stroke to set the object’s stroke color to overprint.
- Check Overprint Gap to set the color of the gap applied to stroke effects to overprint.
In some desktop publishing programs, the only way to see the effects of setting an object to overprint is to wait until the object is separated and printed. InDesign lets you see a simulation of overprinting onscreen.
To turn on the overprint preview:
• Choose View > Overprint Preview. InDesign shows the effects of those colors set to overprint ![]() .
.
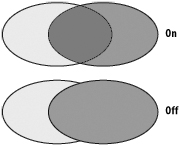
![]() Turn on the Overprint Preview command to see the effects of overprinting onscreen.
Turn on the Overprint Preview command to see the effects of overprinting onscreen.