
Chapter 20. Exporting
Printing your document on paper is not the only way in which your InDesign files can be published. Exporting gives you many options for publishing documents.
For instance, you might want clients to read your document electronically—even if they don’t have the InDesign application. Or you might want to take a design that you created with InDesign and use it as the graphic in another page-layout program. Or you may want to turn your InDesign document into Web pages. You may even want to display your InDesign pages on mobile phones!
When you convert your InDesign files into other formats, you use the export features of the program. Using the export command lets you change InDesign documents into other types of publications such as portable document format (PDF) files or Web hypertext markup language (XHTML) pages.
Setting the Export File Options
InDesign gives you many export options. In each case you choose a file format, name the file, and save it to a location.
- Choose File > Export. The Export dialog box appears
 .
.
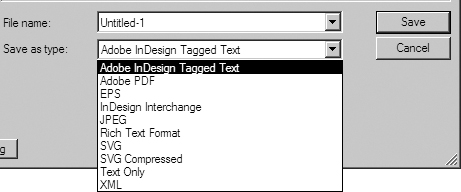 The options for exporting InDesign documents.
 - Give the file a name and set the location.
- Choose one of the following formats from the Save as Type (Win) or Format (Mac) menu:
- Click Save. This opens the options dialog box for each format.
Creating PDF Files
You can convert your InDesign files into PDF documents so that others can read them—even if they do not have the InDesign application.
To set the PDF export options:
- Click each of the categories on the left side of the dialog box
 to display the options.
 The Export PDF categories list.
 - Click the Export button to create the PDF file.
Setting the PDF General Controls
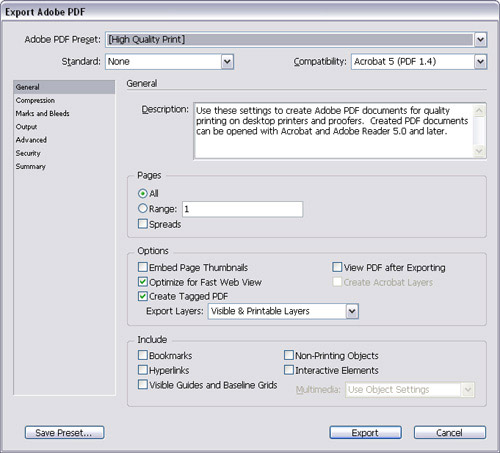
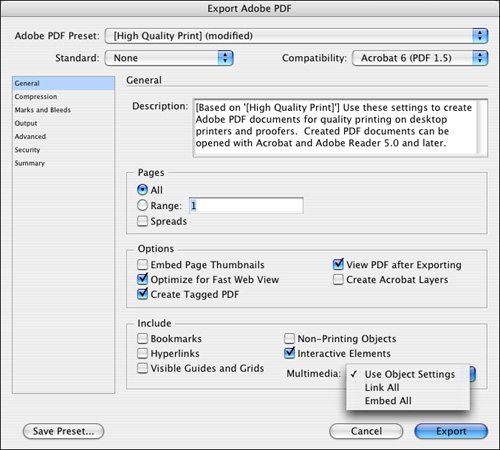
These are the various areas in the General category for exporting as a PDF ![]() .
.
![]() The General category of the Export PDF dialog box.
The General category of the Export PDF dialog box.
To set the PDF version and standard:
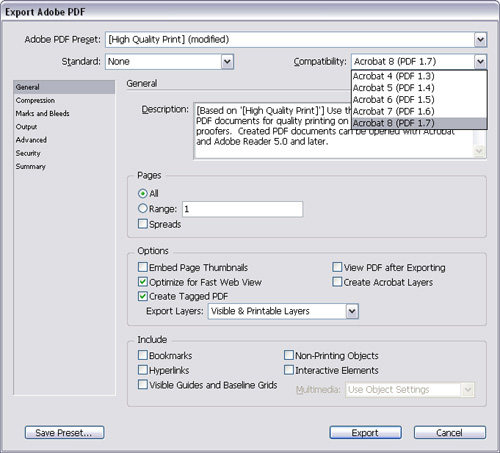
- Use the Compatibility menu to choose which version of PDF files you want to save
 .
.
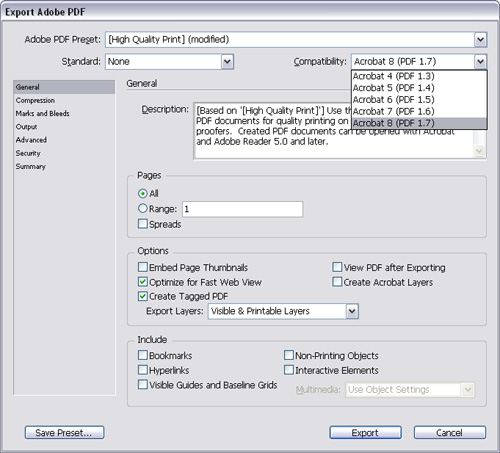 The Compatibility menu lets you choose which PDF version you export.
 - Use the Standard menu to choose one of these five recognized ISO (International Organization for Standardization) standards for PDF/X files
 :
:
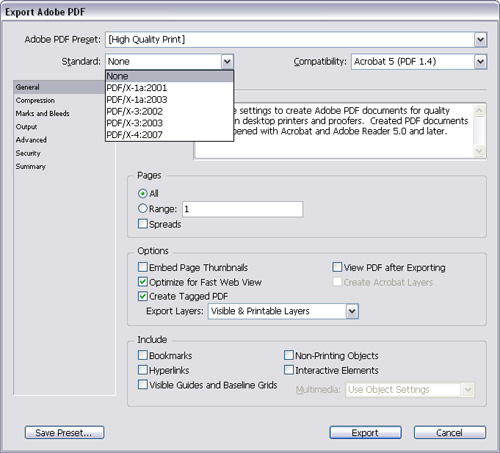 The Standard menu lets you apply an ISO printing standard for PDF documents.
To specify which pages to export:
- In the Pages area, select All to export all the pages in the document
 .
.
 The Pages area in the General category of the Export PDF dialog box.
or
Select Range to enter specific pages.
- Check Spreads to keep pages that are within spreads together in the Acrobat file.
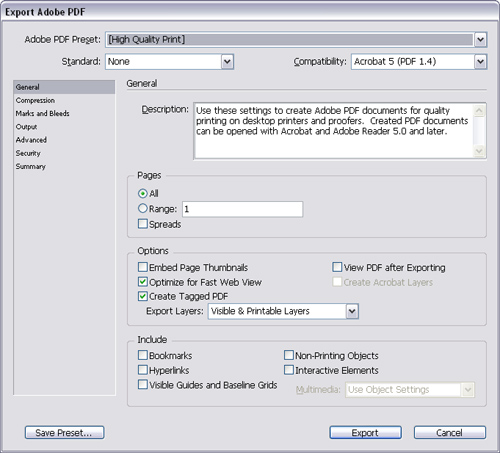
- Choose one of the following from the Options area in the General category
 :
:
• Embed Page Thumbnails adds a thumbnail image for each page. It is not necessary for Acrobat 5 and higher.
• Optimize for Fast Web View prepares for downloading from Web servers.
• Create Tagged PDF adds tags that allow the PDF to be read by screen readers.
• View PDF after Exporting opens the finished Adobe PDF file in Acrobat.
• Create Acrobat Layers is available for PDF 1.5 and higher. It converts the InDesign layers into Acrobat layers.
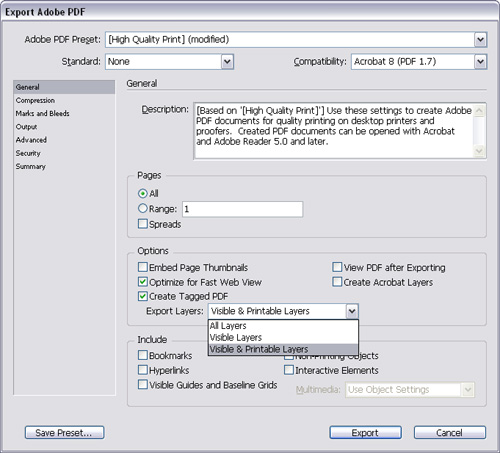 The Options controls in the General category of the Export PDF dialog box.
 - Choose which layers to include from the Export Layers list .
To control what to include in the PDF:
• Choose one of the following from the Include area in the General category ![]() :
:
• Bookmarks creates bookmarks for table of contents entries, preserving the TOC levels.
• Hyperlinks creates Acrobat hyperlinks from InDesign hyperlinks, table of contents entries, and index entries.
• Visible Guides and Grids exports the guides and grids currently visible in the document.
• Non-Printing Objects exports objects that have the nonprinting option applied.
• Interactive Elements exports InDesign’s buttons as interactive PDF elements.
![]() The Include settings in the General category of the Export PDF dialog box.
The Include settings in the General category of the Export PDF dialog box.
If you have movie or sound clips in the document, you can choose whether those files should be linked or embedded in the PDF document.
To set the multimedia embedding options:
- Check the option for Interactive Elements. This activates the Multimedia menu.
- Choose one of the following from the Multimedia menu in the General category
 :
:
• Use Object Settings embeds or links the movie or sound clip according to the settings applied to each media clip.
• Link All overrides any object setting and links all media clips to the PDF. Both the PDF and the media files must be kept together for the media to play properly.
• Embed All overrides any object setting and embeds all media clips in the PDF.
 The Multimedia menu in the General category of the Export PDF dialog box.
Setting the PDF Compression Options
One of the benefits of creating PDF files is that they can be compressed to take up less space. You use the same controls for compressing color and grayscale bitmap images ![]() .
.
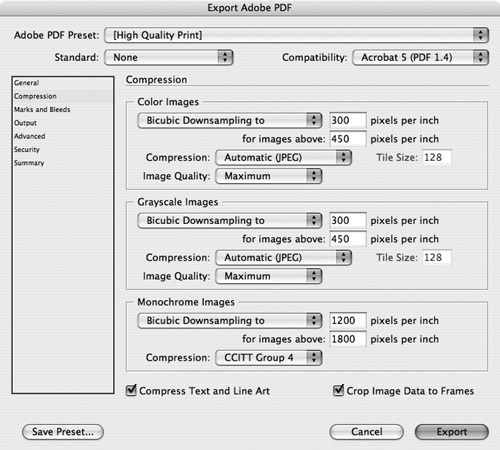
![]() The compression controls in the Export PDF dialog box for color and grayscale bitmap images.
The compression controls in the Export PDF dialog box for color and grayscale bitmap images.
To set the color and grayscale downsampling:
- Choose one of the following from the Sampling menu
 :
:
• Do Not Downsample does not throw away any pixel information. Use this to maintain all information in the image.
• Average Downsampling to averages the pixels in a sample area.
• Subsampling to reduces processing time compared to downsampling, but creates images that are less smooth.
• Bicubic downsampling to is the slowest but most precise method, resulting in the smoothest tonal gradations.
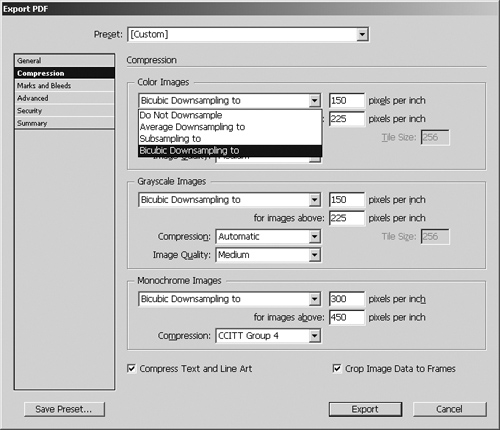 The Sampling menu for color and grayscale bitmap images.
 - When you have set a downsampling method, enter an amount in the resolution field
 .
.
 The Resolution fields for color and grayscale bitmap images.
 - Enter an amount in the field for images above a certain resolution .
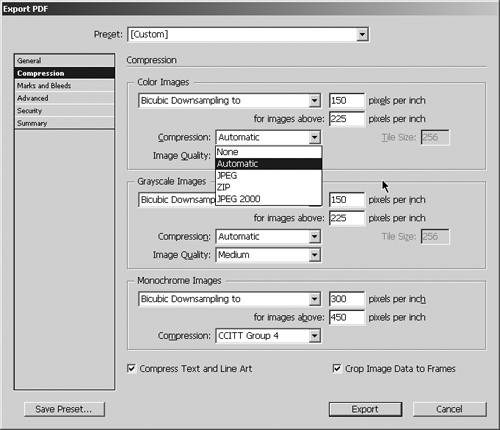
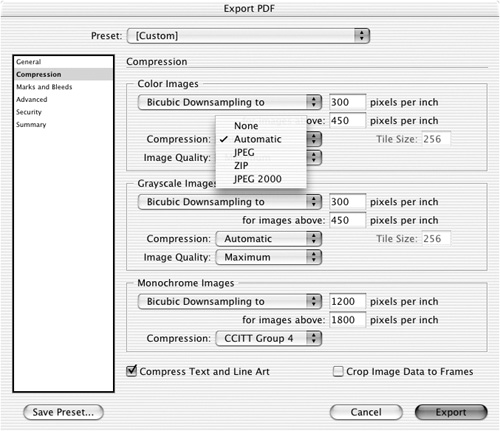
To set the color and grayscale compression:
- Choose one of the following from the Compression menu
 :
:
• None applies no compression.
• Automatic (JPEG) lets InDesign automatically determine the best quality for color and grayscale images.
• Use JPEG for images with tonal changes.
• Use ZIP for images with large areas of flat color.
• Use JPEG 2000 for tonal images for Acrobat 6 or higher.
• Use Automatic (JPEG 2000) for color and grayscale images for Acrobat 6 or higher.
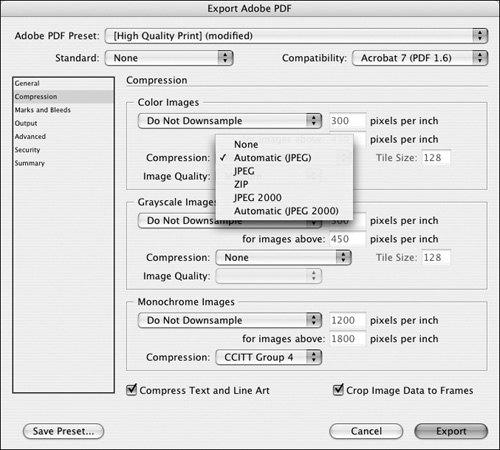 The Compression menu for color and grayscale bitmap images.
 - Choose an Image Quality setting
 :
:
• Maximum sets the least amount of compression.
• Minimum sets the most.
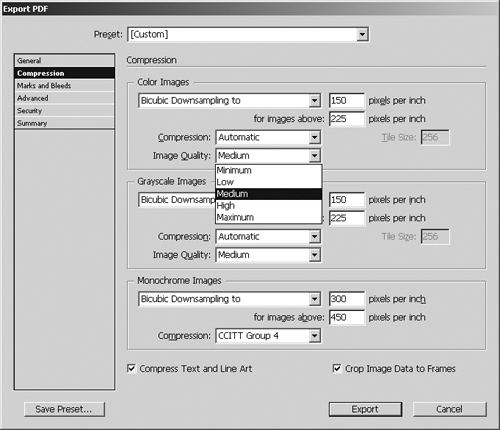 The Image Quality menu for color and grayscale bitmap images.
There are different compression options for monochrome bitmap images (such as 1-bit scanned art) ![]() .
.

![]() The compression controls for monochrome images.
The compression controls for monochrome images.
To set the monochrome bitmap downsampling:
• Choose one of the following from the Sampling menu ![]() :
:
• Do Not Downsample does not throw away any pixel information. Use this setting if you want to maintain all the information in the image.
• Average Downsampling to averages the pixels in a sample area.
• Subsampling to is faster than downsampling, but creates images that are less smooth.
• Bicubic downsampling to is the slowest but most precise method, resulting in the smoothest tonal gradations.

![]() The Sampling menu for monochrome images.
The Sampling menu for monochrome images.
To set the monochrome bitmap resolution:
- When you have set a downsampling method, enter an amount in the resolution field
 .
.
 The resolution fields for monochrome images.
 - Enter an amount in the field for images above a certain resolution .
To set the compression for monochrome images:
- Choose one of the following from the Compression menu
 :
:
• None applies no compression to the image.
• CCITT Group 3 is similar to the compression used for faxes.
• CCITT Group 4 is a general-purpose method that produces good results for most monochromatic images.
• ZIP works well for black-and-white images that contain repeating patterns.
• Run Length produces the best results for images that contain large areas of solid black or white.
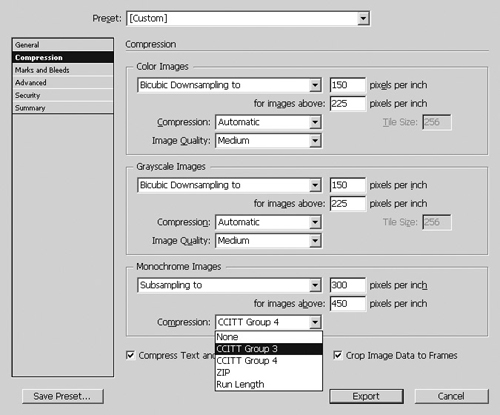 The Compression menu for monochrome images.
 - Check Compress Text and Line Art to further reduce the size of the file.
- Check Crop Image Data to Frames to delete the image outside the frame.
Setting the Output PDF Options
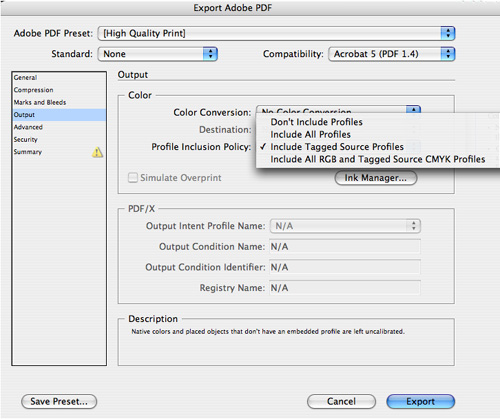
The Output category contains the controls for how color is handled as well as the PDF/X settings.
- Choose one of the following from the Color Conversion menu
 :
:
• No Color Conversion does not convert the colors in the document.
• Convert to Destination converts all colors to the destination profile.
• Convert to Destination (Preserve Numbers) converts colors to the destination profile only if the embedded profiles differ.
 The Color Conversion menu allows you to control how colors in a PDF are handled.
 - Choose a profile for the type of output device from the Destination menu. This is typically the type of printing machine that will handled the file.
- Choose one of the following from the Profile Inclusion Policy menu to control how the color profiles are handled in the document
 .
.
• Don’t Include Profiles removes all color management from the document.
• Include All Profiles creates a color-managed document.
• Include Tagged Source Profiles is used if you only output to specially calibrated output devices.
• Include All RGB and Tagged Source CMYK Profiles is used to calibrate both RGB and CMYK images.
 The Profile Inclusion Policy menu controls how color management profiles are handled.
 - Check Simulate Overprint to show onscreen a representation of how overprinting will look when printed.
- Click the Ink Manager button to control how process and spot colors are handled.
If you have chosen a PDF/X standard, you can control the output profiles for the document.
To set the PDF/X profile controls:
- Use the Output Intent Profile Name menu to select the profile that matches how the document will be printed
 .
.
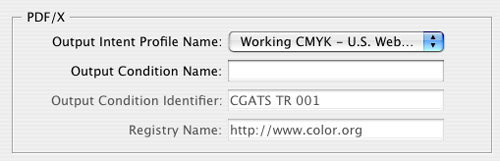 The PDF/X area controls the profiles for PDF/X files.
 - If desired, enter an optional description of how the file will be output in the Output Condition Name field. This information is then stored in the PDF/X file.
- If desired, enter the registration name for the output condition in the Output Condition Identifier field. This field is automatically filled in when you choose one of the standard output profiles.
- If desired, enter the URL in the Registry Name field where the output information is stored. This field is automatically filled in when you choose one of the standard output profiles.
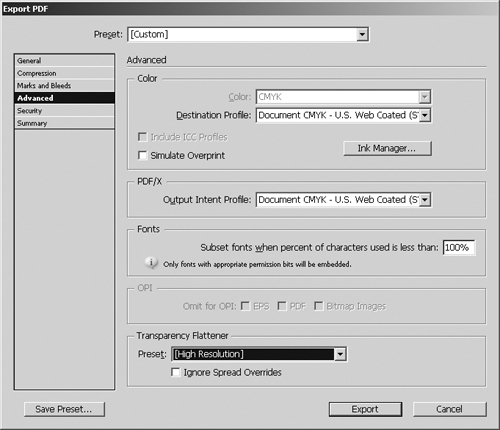
Setting the Advanced PDF Options
The Advanced category contains the controls for handling colors and fonts, and for setting the transparency flattener options.
To control how much of a font is embedded:
• Enter an amount in the Subset Fonts field for the threshold amount ![]() . That threshold determines at what point all the characters of the font will be embedded.
. That threshold determines at what point all the characters of the font will be embedded.
![]() The Subset fonts when percent of characters used is less than field in the Advanced area of the Export PDF dialog box.
The Subset fonts when percent of characters used is less than field in the Advanced area of the Export PDF dialog box.
To add a Job Definition Format to the file:
• Select the option to Create JDF File Using Acrobat ![]() . This adds Job Definition Format (JDF) information to the PDF document.
. This adds Job Definition Format (JDF) information to the PDF document.

![]() The Job Definition Format (JDF) option in the Advanced area of the Export PDF dialog box.
The Job Definition Format (JDF) option in the Advanced area of the Export PDF dialog box.
Tip
You must have Acrobat 7 Professional or higher installed in order to add the JDF information to the file.
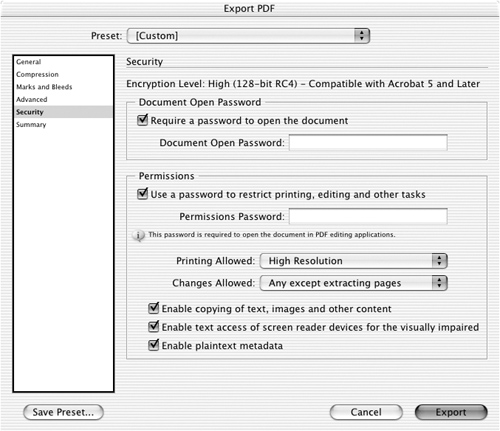
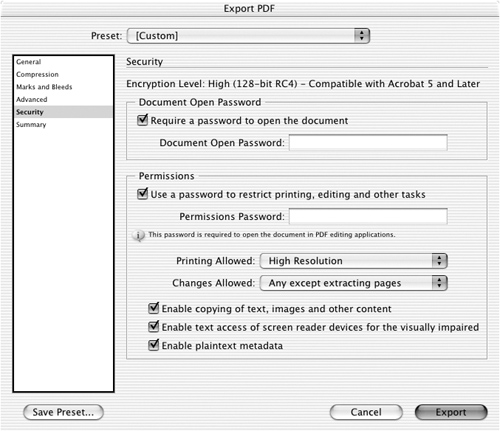
Setting the Security PDF Options
You can also set security options for PDF files to restrict who can open the file or to limit what they can do to it.
The Document Open Password area allows you to set the password that readers must enter in order to open the file.
- Check Require a Password to Open This Document
 .
.
 The Document Open Password area of the Security category of the Export PDF dialog box.
 - Type a password in the Document Open Password field.
The Permissions area sets up what edits and modifications people can make to the PDF once they have opened it. The Permissions password is needed in order to change the settings in the Permissions area.
To set the permissions password:
- Check Use a Password to Restrict Printing, Editing, and Other Tasks
 .
.
 The Permissions area of the Security category of the Export PDF dialog box.
 - Type a password in the Permissions Password field.
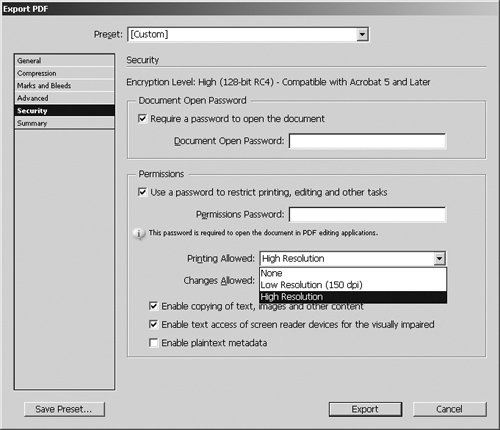
To set the printing permission:
• Choose one of the following from the Printing Allowed menu ![]() :
:
• None turns off all printing from the document.
• Low Resolution (150 dpi) prints only low-resolution versions of the images.
• High Resolution prints the full resolution of the images.
![]() The Printing Allowed menu of the Security category of the Export PDF dialog box.
The Printing Allowed menu of the Security category of the Export PDF dialog box.
To set the changes that are allowed:
- Choose one of the following from the Changes Allowed menu
 :
:
• None allows no changes whatsoever.
• Inserting, deleting and rotating pages allows the user only to add, remove, or change the position of pages in the document. It does not allow changing the content of the pages.
• Filling in form fields and signing allows changes to form fields or applying a security signature to the document.
• Commenting, filling in form fields, and signing allows adding comments, changing form fields, or applying a security signature to the document.
• Any except extracting pages allows all changes except removing pages from the document.
 The Changes Allowed menu of the Security category of the Export PDF dialog box.
 - Check any of the following as desired
 :
:
• Enable copying of text, images and other content.
• Enable text access of screen reader devices for the visually impaired.
• Enable plaintext metadata.
 The other permissions you can set in the Security category of the Export PDF dialog box.
Working with PDF Presets
Just as you can create printer presets for printing documents, you can also create PDF presets that contain settings for generating different types of PDF documents. For example, you may want to post a PDF file on the Web or send the file to a print shop for output.
To save the current PDF settings as a PDF preset:
- Set the options in the Export PDF dialog box.
- Click the Save Preset button
 . This opens the Save Preset dialog box
  .
.
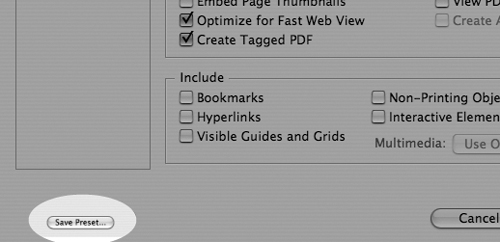 Click the Save Preset button to create a preset based on the current settings in the Export Adobe PDF dialog box.
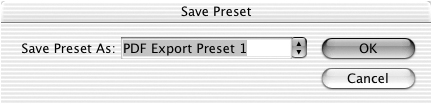 Enter a name for a PDF preset in the Save Preset dialog box.
 - Enter a name for the preset and Click OK. The new preset appears at the top of the Export PDF dialog box.
Once you have saved a preset, you can easily apply it.
To apply a PDF preset:
• Choose a saved preset from the Preset menu at the top of the Export Adobe PDF dialog box ![]() .
.

![]() Choose a preset to apply to a PDF from the Preset menu in the Export PDF dialog box.
Choose a preset to apply to a PDF from the Preset menu in the Export PDF dialog box.
or
Choose File > Adobe PDF Presets > Define and then pick the preset listed in the menu.
You can also define PDF presets without going through the Export PDF dialog box.
- Choose File > Adobe PDF Presets to open the Adobe PDF Presets dialog box
 .
.
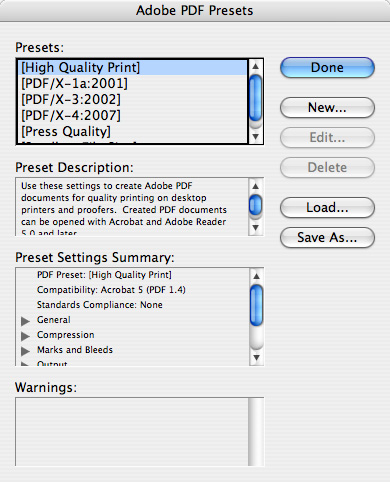 The Adobe PDF Presets dialog box displays the PDF presets that ship with InDesign.
 - Click New. This opens the New PDF Export Preset dialog box.
- Name the preset.
- Choose each of the categories and set them as described earlier in this chapter.
- Select the custom preset you want to edit in the Adobe PDF Presets dialog box
 .
.
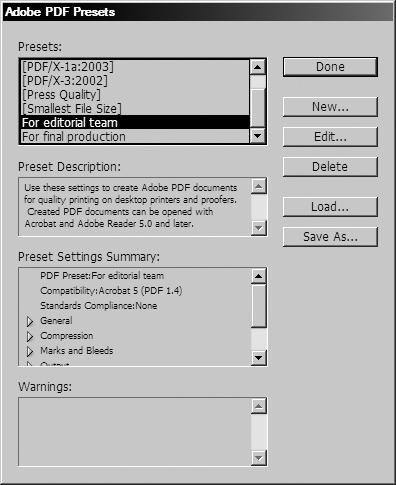 A custom PDF preset, listed without brackets, can be edited, deleted, exported, or imported.
 - Click the Edit button. This opens the Edit PDF Export Preset dialog box.
- Choose each of the categories and make changes as described earlier in this section.
- Select the preset you want to delete in the Adobe PDF Presets dialog box .
- Click the Delete button.
- Click OK to confirm your choice.
- In the Adobe PDF Presets dialog box, select the presets you want to export .
- Click the Save As button. This creates a file that contains the exported presets.
- Click the Load button in the Adobe PDF Presets dialog box .
- Use the dialog box to select the document that contains the presets exported from another machine.
- Click OK. The presets appear in the Adobe PDF Presets dialog box.
Creating EPS Files
You might create a special shape or design in InDesign that you would like to use in another layout program. Export the file as an EPS, or Encapsulated PostScript, file so that you can use it in other applications.
To create an EPS file:
• Click the General tab in the Export EPS dialog box to display the pages, bleed, and general controls ![]() .
.
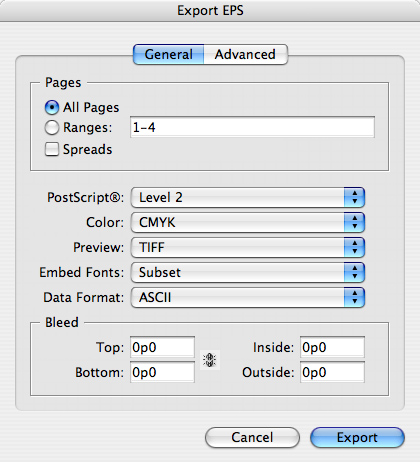
![]() The Export EPS dialog box lets you create an EPS file that can be placed in other programs.
The Export EPS dialog box lets you create an EPS file that can be placed in other programs.
or
Click the Advanced tab to display the production controls ![]() . These are the same as the graphic options for printing
. These are the same as the graphic options for printing
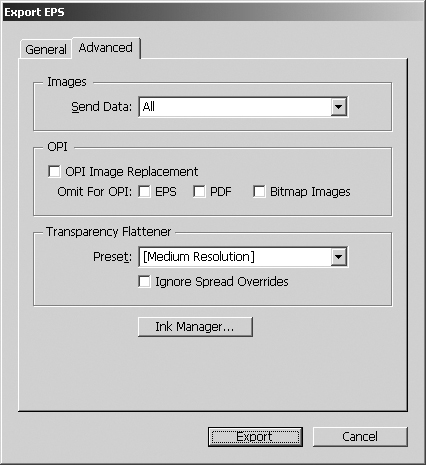
![]() The Advanced section in the Export EPS dialog box contains production controls for creating an EPS file.
The Advanced section in the Export EPS dialog box contains production controls for creating an EPS file.
- In the General area, choose All Pages to export all the pages in the document as EPS files
 .
.
or
Choose Ranges and enter the numbers of the pages you want to export.
- Check Spreads to export spreads as a single EPS file.
The PostScript level sets the complexity of the instructions that are sent to the printer.
To set the EPS PostScript level:
• In the General area, use the PostScript menu to choose the following ![]() :
:
• Level 2 is used with older printers.
• Level 3 is used with newer printers. Use Level 3 only if you know the printer can handle Level 3 PostScript.

![]() Use the PostScript menu in the Export EPS dialog box to set the type of printing instructions.
Use the PostScript menu in the Export EPS dialog box to set the type of printing instructions.
To set the EPS colors:
• In the General area, use the Color menu to choose one of the following options ![]() :
:
• CMYK forces the colors to CMYK. Use this setting for process separations.
• Gray converts the colors to their grayscale values. Use this to limit the colors to a black plate.
• RGB converts the colors to the RGB color space. Use this for onscreen presentation programs.
• PostScript® Color Management lets a PostScript printer use its own in-RIP separations to control the color.

![]() Use the Color menu in the Export EPS dialog box to control the colors in the file.
Use the Color menu in the Export EPS dialog box to control the colors in the file.
To set the EPS preview:
• In the General area, use the Preview menu to choose one of the following ![]() :
:
• None adds no preview to the file.
• TIFF creates a preview that is visible on both the Mac and Windows platforms.
• PICT (Mac only) creates a preview that is visible on the Mac only.
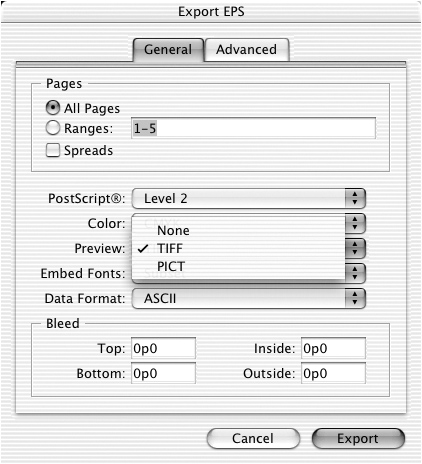
![]() Use the Preview menu in the Export EPS dialog box to give a preview to the image.
Use the Preview menu in the Export EPS dialog box to give a preview to the image.
Just as you can embed fonts in a PDF file, you can also embed fonts in an EPS file.
To embed fonts in the EPS file:
• In the General area, use the Embed Fonts menu to choose one of the following options ![]() :
:
• None does not embed any fonts in the file.
• Complete includes all the characters in the fonts.
• Subset includes only the characters you have used in the file.
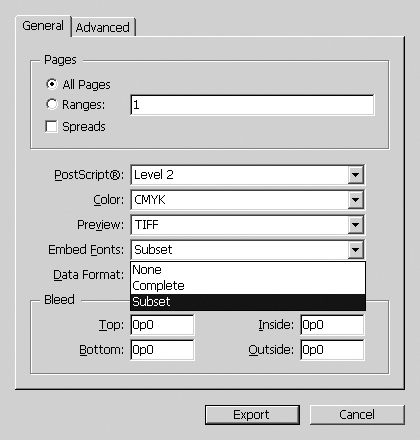
![]() Use the Embed Fonts menu in the Export EPS dialog box to control how many characters in a font are added to the EPS file.
Use the Embed Fonts menu in the Export EPS dialog box to control how many characters in a font are added to the EPS file.
EPS files need to be formatted with a specific type of data.
To set the data format of the EPS file:
• In the General area, use the Data Format menu to choose one of the following options ![]() :
:
• Binary is acceptable for most instances.
• ASCII is used for a PC network that requires ASCII data.
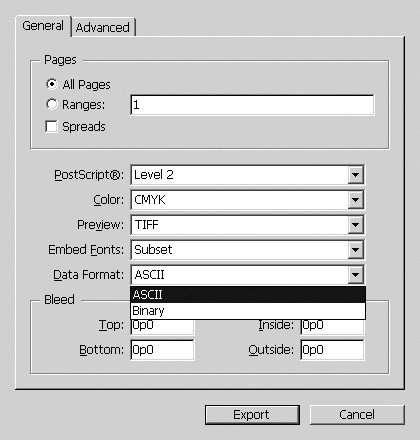
![]() Use the Data Format menu in the Export EPS dialog box to specify the formatting language of the EPS file.
Use the Data Format menu in the Export EPS dialog box to specify the formatting language of the EPS file.
Just as you can add a bleed area when printing a document, you can add a bleed to an EPS file.
To set the size of a bleed:
• In the General area, use the Bleed fields to create a bleed area ![]() .
.

![]() Set the size of the bleed in the Bleed fields in the Export EPS dialog box.
Set the size of the bleed in the Bleed fields in the Export EPS dialog box.
InDesign Interchange Format
The InDesign Interchange Format creates an InDesign Interchange Format file (INX). This INX file can then be opened using InDesign CS2.
To open CS3 files using InDesign CS2:
- Choose File > Export to open the Export dialog box.
- Choose InDesign Interchange from the Format (Mac) or Save as Type (Windows) menu.
- Name the INX file and click Save.
- In InDesign CS2, choose File > Open and navigate to open the INX file. The INX file is converted into an InDesign CS2 file.
Setting the JPEG Options
You might want to convert an InDesign document into a JPEG file that can be posted on the Web. This can be done using the Export JPEG dialog box ![]() .
.
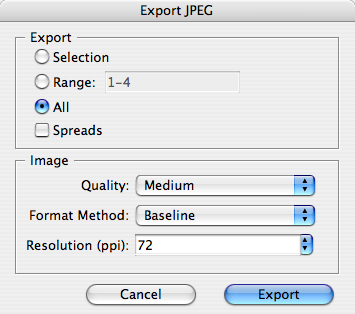
![]() Use the Export JPEG dialog box to convert an InDesign document into a JPEG file.
Use the Export JPEG dialog box to convert an InDesign document into a JPEG file.
To set the area or page to be converted:
- Use the Export area in the Export JPEG dialog box to choose one of the following:
• Selection exports just the selected items as the JPEG. (The selection must be made before you choose File > Export.)
• Range exports a range of pages as individual JPEG files.
• All exports all the pages as individual JPEG files.
- If you are exporting pages, you can select Spreads to export both pages in the spread to a single JPEG file
 .
.
You can also control the quality of the JPEG image and how it is displayed in the browser.
To set the JPEG quality and display:
- Use the Export JPEG dialog box’s Image Quality menu to choose the quality of the JPEG image
 .
.
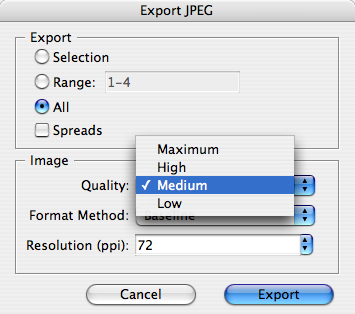 The Image Quality menu controls the size and the quality of JPEG images.
 - Choose a Format Method as follows
 :
:
• Progressive creates an image that appears gradually on the page.
• Baseline creates an image that appears all at once, after the entire image has been downloaded.
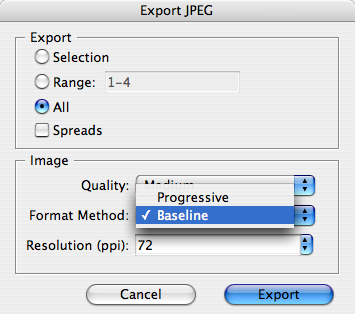 The Format menu controls how JPEG images are revealed.
 - Choose a resolution option.
Exporting SVG Files
InDesign also lets you export documents in SVG (scalable vector graphics) format, which can be viewed on the Web. This format is also being used as the file format for graphics on mobile phones.
- Choose SVG or SVG Compressed from the Save as File Type (Win) or Format (Mac) menu. The SVG Options dialog box appears
 .
.
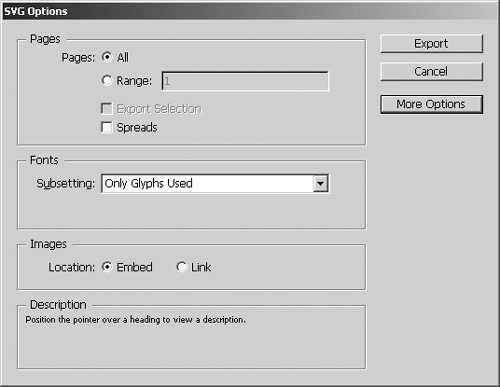 The SVG Options dialog box contains the controls for creating SVG and SVG Compressed files.
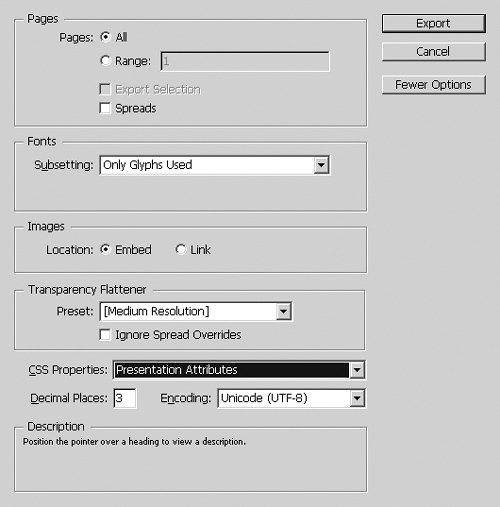
 - Click the More Options button to see the complete set of controls for exporting SVG files

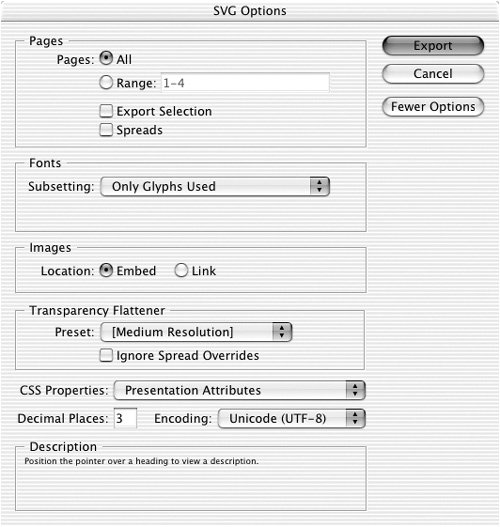 The More Options for the SVG Options dialog box contains additional controls for creating SVG and SVG Compressed files.
You can choose which pages or even which selected objects are exported as an SVG file.
To set the area or pages to be converted:
- In the Pages area, select All to export all the pages in the document
 .
.
 The Pages options in the SVG Options dialog box let you control which pages are exported into SVG files.
or
Select Range to enter specific pages.
- If you have any objects selected, you can check Export Selection to convert just those objects into an SVG file.
- Check Spreads to keep pages that are within spreads together in the SVG file.
SVG files can be changed using database publishing. You may want to embed fonts so that there are characters available for the new text.
To set the fonts for an SVG file:
• In the Fonts area, use the Subsetting menu to choose one of the following ![]() :
:
• None (Use System Fonts) does not embed any characters in the file.
• Only Glyphs Used embeds only the characters in the file. This may limit the ability to edit the text later.
• Common English embeds all the characters in English documents.
• Common English & Glyphs Used adds any non-English characters used in the document as well as the Common English characters.
• Common Roman embeds characters used in Roman language documents.
• Common Roman & Glyphs Used adds characters used to Common Roman.
• All Glyphs uses all characters in a font, such as characters in Japanese fonts.
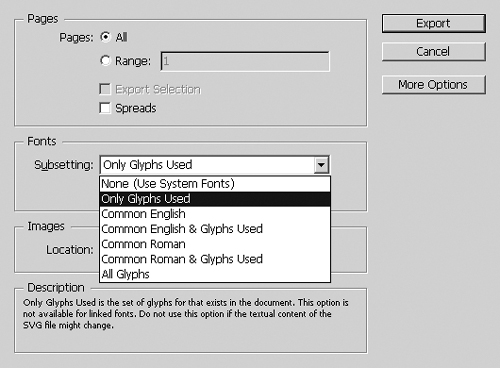
![]() The Fonts Subsetting menu lets you choose how much of a font is embedded in an SVG file.
The Fonts Subsetting menu lets you choose how much of a font is embedded in an SVG file.
You can also control how placed images are embedded within an SVG file.
To set the images for an SVG file:
• In the Images area, choose Embed to add the image into the SVG file ![]() .
.
![]() The Images Location controls let you choose to embed or link images in the SVG file.
The Images Location controls let you choose to embed or link images in the SVG file.
or
Choose Link to have the image exist outside the SVG file.
The More Options button provides additional controls ![]() . The Transparency Flattener section is identical to the controls in the Print dialog box. You can also control the CSS (Cascading Style Sheets) properties.
. The Transparency Flattener section is identical to the controls in the Print dialog box. You can also control the CSS (Cascading Style Sheets) properties.
To set the CSS properties:
• Choose one of the attributes settings from the CSS Properties menu ![]() :
:
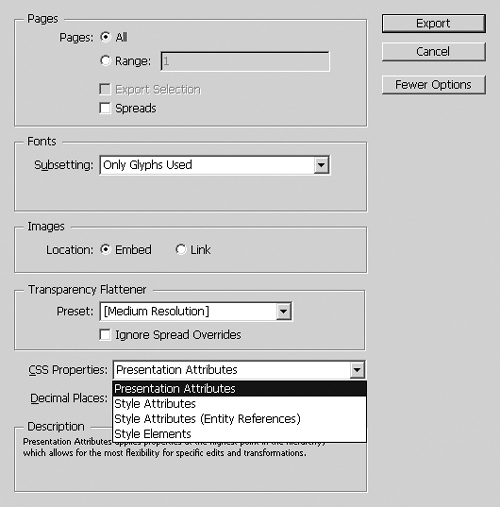
![]() The CSS Properties let you choose properties of cascading style sheets.
The CSS Properties let you choose properties of cascading style sheets.
You can also set how precisely the curves are drawn for vector shapes in the SVG file.
To set the decimal precision:
• Enter a value of 1 to 7 in the Decimal Places field to set how precisely the curves should be drawn.
You can choose the encoding for the character set in the SVG file.
To set the encoding:
• Choose one of the encoding settings from the Encoding menu ![]() .
.
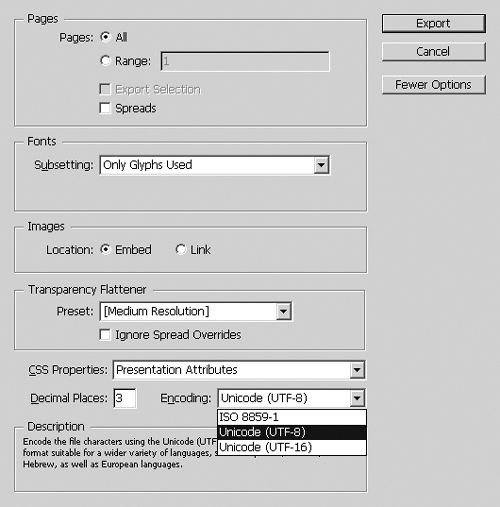
![]() From the Encoding menu choose how the characters should be encoded.
From the Encoding menu choose how the characters should be encoded.
Exporting Text
You may find it necessary to export text from InDesign. For instance, you may want to send the text to someone who works with Microsoft Word. You can send them a text file by exporting the text.
- Place an insertion point inside the frame that contains the text. All the text within that story will be exported.
- Choose File > Export. This opens the Export dialog box.
- Choose a text export format:
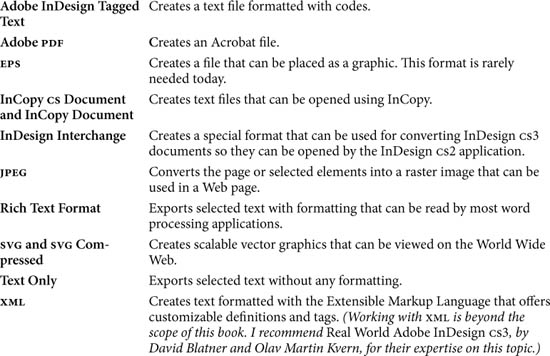
• Rich Text Format keeps all the styles and text formatting. This format can be opened by most word processors, especially Microsoft Word.
• Text Only exports only the characters of the text and discards any styles and text formatting. Use this option only if you want to strip out the text formatting or if the application you are working with does not support the Rich Text Format.
• Adobe InDesign Tagged Text format exports the text with special codes for local character formatting and styles.
- Name the file and choose a destination.
- Click Save to export the file.
Exporting Cross-Media Files
One of the most frustrating areas of desktop publishing is how to convert print layouts, such as InDesign documents, into other formats that can be used on the Web as well as in other InDesign layouts. XML stands for the Extensible Markup Language. When you convert documents into XML files, you can then open them in other programs such as Dreamweaver.
While a complete rundown of the XML and cross-media properties is way beyond this book, here are the basics on how to create XML and XHTML cross-media files.
To export as XML or cross-media files:
• Choose File > Cross-media Export and then choose one of the following:
• XML for use in other InDesign files or Web applications. This opens the Export XML dialog box ![]() .
.
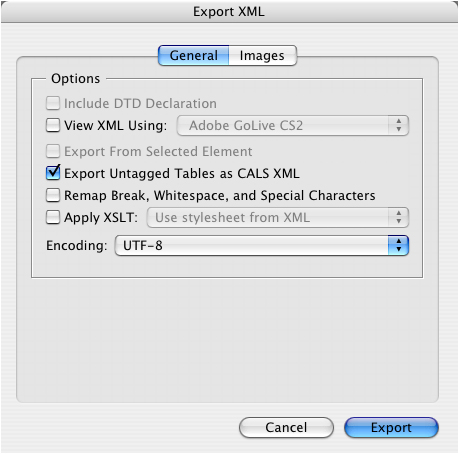
![]() The Export XML dialog box lets you create files for Web applications and other InDesign layouts.
The Export XML dialog box lets you create files for Web applications and other InDesign layouts.
• XHTML/Dreamweaver for use in Dreamweaver Web pages. This opens the XHTML Export Options dialog box ![]() .
.
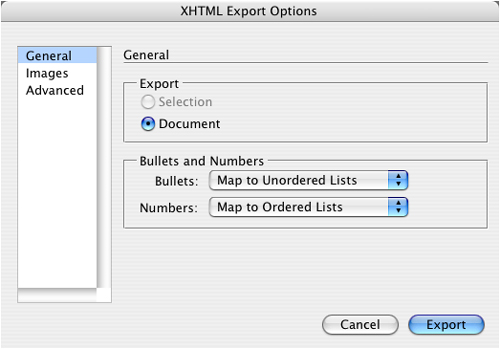
![]() The XHTML Export Options are used for exporting InDesign layouts into Dreamweaver Web pages.
The XHTML Export Options are used for exporting InDesign layouts into Dreamweaver Web pages.
• XHTML/Digital Editions for posting files as Adobe Digital Editions Web pages. This opens the XHTML/Digital Editions dialog box ![]() .
.

![]() The XHTML/Digital Editions Export Options dialog box is used for converting InDesign layouts into Adobe Digital Editions Web pages.
The XHTML/Digital Editions Export Options dialog box is used for converting InDesign layouts into Adobe Digital Editions Web pages.