Chapter 13. Tabs and Tables
Before tabs and tables, there was chaos. Well, perhaps not chaos, but it was difficult to line up columns of text in an orderly fashion.
The word “tab” comes from the tabulator key on a typewriter. (Does anyone still use a typewriter?) The tabulator key moved the carriage a certain number of spaces.
The tabulator key was named because it allowed typists to create tabular data. Tabular data is information arranged in systematic rows and columns—otherwise known as a table.
However, mathematical information isn’t the only thing arranged in tables. Resumes, menus, train schedules, calendars, and even classified ads are all arranged in some form of table.
Anytime you need to keep text or graphics aligned in either columns or rows, consider using the tabs and tables features in InDesign.
Not only can you align text using tabs, but you can create tab leaders that make it easy to read across the lines of text. You can also create tables with repeating headers and footers and add custom strokes and fills to the tables.
Inserting Tab Characters
There are two parts to working with tabs. The first part is to insert the tab characters that force the text to jump to a certain position.
To insert tab characters into text:
- Position the insertion point where you want the tab character to be located.
- Press the Tab key on the keyboard. This creates a tab character in the text
 .
.
 A tab character is displayed as part of the hidden characters in text.
InDesign also has a special type of tab character called a right tab. This tab character automatically sets the text to the rightmost position in the frame
 .
. The right tab character automatically moves the text to the right side of the text frame.
To insert a right tab character:
- Place the insertion point where you want the right tab character.
- Press Shift-Tab.
or
Use the contextual menu to insert a right tab character from the Insert Special Character menu.
Setting Tab Stops
The next—and most important—part to working with tabs is to set the tab stops or the formatting controls that set where the text should stop after it jumps to a new position. This is controlled using the Tabs panel.
To open the Tabs panel:
• Choose Type > Tabs. The Tabs panel appears above the text frame ![]() .
.
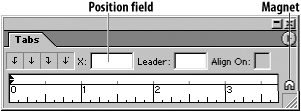
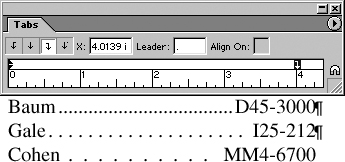
![]() The Tabs panel contains the controls for inserting tab stops and aligning the tabs.
The Tabs panel contains the controls for inserting tab stops and aligning the tabs.
Tip
If the Tabs panel is not positioned above the text, click the Magnet icon in the panel to automatically move the panel to the correct position.
- Select the text.
- Choose the type of tab alignment from the four tab icons in the ruler
 . The four alignments work as follows
  :
:
• Left aligns the left side of the text at the tab stop.
• Center centers the text on either side of the tab stop.
• Right aligns the right side of the text at the tab stop.
• Decimal aligns the text at the decimal point or period within the text.
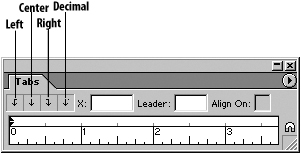 Choose one of the four tab alignment icons to control how the text is aligned.
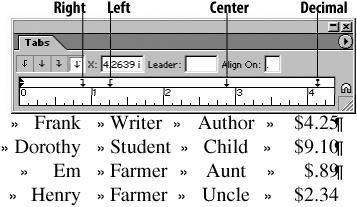 Examples of how the four tab alignments control the text.
 - Click the ruler area where you want the tab stop to be positioned.
or
Type a number in the Position field. A small tab arrow corresponding to the tab type appears that indicates the position of the tab stop.
- Select the text.
- Open the Tabs panel.
- To change the alignment of a tab stop, select the tab arrow and then click a new alignment icon.
or
Hold the Opt/Alt key and click the tab arrow in the ruler.
- To change the position of a tab stop, drag the tab arrow to a new position.
Tip
As you move a tab stop along the ruler, a line extends through the text, even if the Tabs panel is not aligned to the text frame
 . This helps you judge the position of the tab stop.
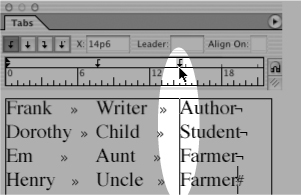 As you move a tab stop, a line extends through the text to help you position the tab stop correctly.
Many times you will want to have tab stops repeated at the same interval. InDesign makes it easy to set repeating tabs.
- Position the first tab stop on the ruler.
- With the tab stop still selected, choose Repeat Tab from the Tabs panel menu
 . This adds new tab stops at the same interval along the ruler
  .
.
 The Tabs panel menu gives you several important commands for working with tabs.
 The Repeat Tab command allows you to easily add tab stops at the same interval along the ruler.
Once you have added tab stops to the Tabs panel ruler, you can remove them easily.
- Select the tab stop on the Tabs panel ruler.
- Drag the tab stop off the ruler. This deletes the tab stop
 .
.
 To remove a tab stop, drag it off the Tabs panel ruler.
or
Choose Delete Tab from the Tab panel menu.
If you have many tab stops on the Tabs panel ruler, it may be easier to delete all the tab stops with a single command.
To clear all the tabs off the ruler:
• Choose Clear All from the Tabs panel ruler ![]() . This restores the invisible default tab stops at every half-inch mark.
. This restores the invisible default tab stops at every half-inch mark.
The Decimal tab aligns numerical data to a decimal point. However, you may need to align text to a different character. For instance, some European currency uses a comma instead of a decimal. InDesign lets you set a custom alignment character.
To set a custom alignment character:
- Choose the Decimal Tab icon.
- Add a tab stop to the ruler.
- Replace the period in the Align On field with a different character. The text aligns around that character
 .
.
 You can enter a custom alignment character for the Align On field. Here the text aligns to the hyphen.
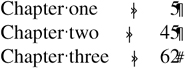
Creating Tab Leaders
A tab leader allows you to automatically fill the space between the tabbed material with a repeating character. Tab leaders are often used in the tables of contents of books (such as the one at the front of this book).
Tip
Tab leaders are added when the reader needs to move horizontally across a wide column from one entry to another. The tab leader helps the reader’s eye stay on the correct line of text.
- Select the tab stop arrow on the Tabs panel ruler.
- Type up to eight characters in the Leader field of the Tabs panel.
 An example of adding spaces to separate the tab leader.
Creating and Using Tables
Tabs are limited to lining up only a single line of text. Tables can line up text so it extends down into several lines. Tables also let you add borders to the cell that contains the text or add fills of color behind the text.
To create a new table in a text frame:
- Place an insertion point inside a text frame.
- Choose Table > Insert Table. The Insert Table dialog box appears
 .
.
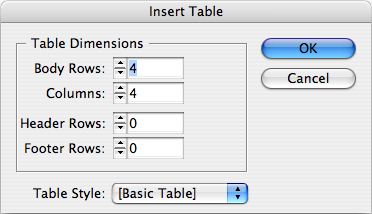 Use the Insert Table dialog box to create an empty table in a text frame.
 - Use the Body Rows control to set the number of rows in the table.
- Use the Columns control to set the number of columns.
- Use the Header Rows control to set the number of rows across the top of the table.
- Use the Footer Rows control to set the number of rows across the bottom of the table.
- If you have defined a table style, use the Table Style list to choose that style for the table.
- Click OK. InDesign creates a table that fills the text frame as follows:
• The width of the table is set to fill the width of the text frame.
• The table columns are distributed evenly across the table.
Many times you will import text that you’d like to be converted into a table. Fortunately, this is rather easy to do.
- Select the text.
- Choose Table > Convert Text to Table. The Convert Text to Table dialog box appears
 .
.
 The Convert Text to Table dialog box lets you choose how text is converted to a table.
 - Use the Column Separator menu to choose which character should be used as the marker for each column in the table.
or
Type the character that you would like as the marker in the Column Separator field.
- Use the Row Separator menu to choose which character should be used as the marker for each row in the table.
or
Type the character that you would like as the marker in the Row Separator field.
- If you have chosen anything except a paragraph symbol for the Row Separator, use the Number of Columns field to choose how many columns there should be in the table.
- If you have defined a table style, use the Table Style list to choose that style for the table.
- Click OK to create the table
 .
.
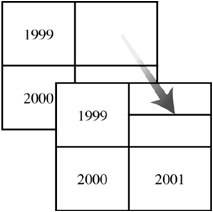
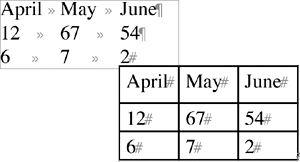 The Convert Text to Table command transforms tabs and paragraphs into rows and columns.
What if you’ve already got a beautiful table, and some tabbed text, but they are separated from each other. InDesign lets you paste tabbed text into existing tables.
- Copy the tabbed text.
- Highlight the cells in the table where you want the text to appear.
- Choose paste. The text will populate the cells of the table and make additional table cells if necessary.
Most people use Microsoft Word and Excel to create text and spreadsheets. InDesign lets you import the tables created by both Word and Excel.
To import a table from Word or Excel:
- Choose File > Place and navigate to the Word or Excel file.
- If necessary, use the Microsoft Excel Import Options
 or the Microsoft Word Import Options
  to control how the file will be imported, as described on the next two pages. Click OK.
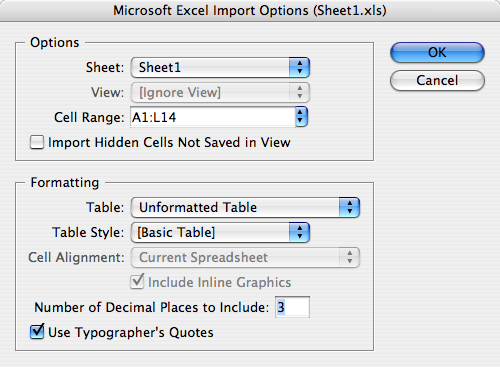 The Microsoft Excel Import Options dialog box lets you choose which worksheet and cells are imported from an Excel document.
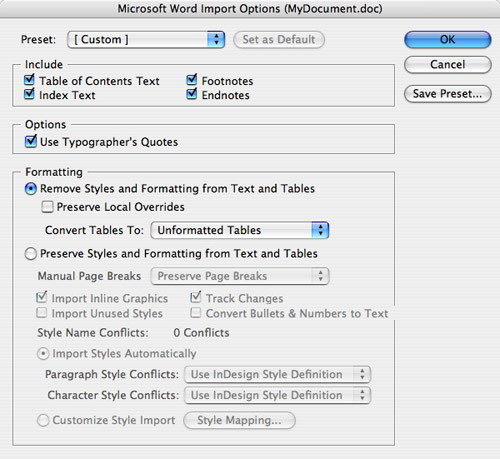 The Microsoft Word Import Options dialog box lets you choose how Word tables are imported into the InDesign document.
 - The imported document is inserted into the selected text frame.
or
Click or drag the loaded text cursor.
You can also customize which Excel data is imported.
To choose the cells that should be imported:
- Use the Sheet menu to select a worksheet.
- Use the View menu to choose a custom view.
- Use the Cell Range field to select cells.
- If desired, check the Import Hidden Cells Not Saved in View box.
To set the formatting for Excel cells:
- Use the Table menu to change the formatting options as follows:
• Formatted Table imports the cells with whatever formatting was applied in Excel.
• Unformatted Table imports the cells with no formatting except a stroke around each InDesign cell.
• Unformatted Tabbed Text converts the cells into text divided by tab characters.
- If you have defined a table style, choose one from the Table Style list.
- Use the Cell Alignment menu to choose:
• Current Spreadsheet imports the text aligned with the alignment that was set in the spreadsheet.
• Left sets the text aligned to the left side.
• Center aligns the text to the center.
• Right sets the text aligned to the right.
- Use Number of Decimal Places to Include to set how many decimal places to include in the imported cells.
- If desired, check Use Typographer’s Quotes to convert straight “quotes” (like these) into open and closed “quotes” (like these).
You can also control how table information in Word documents is imported.
To set the formatting for Word tables:
- Select Remove Text and Table Formatting in the Microsoft Word Import Options dialog box to change the original formatting applied in Word.
- If you have set the option to remove the formatting, choose one of the following from the Convert Tables To menu:
• Unformatted Tables imports the Word table with no formatting except a stroke around each cell.
• Unformatted Tabbed Text converts the cells into text divided by tab characters.
To place a table in a table cell:
- Click with the Text tool to place an insertion point inside a table cell.
- Use the Insert Table command or a Place command to create a table within that cell
 .
.
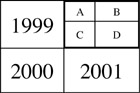 An example of how a table can be inserted inside a cell of another table.
- Place an insertion point in any cell inside the table.
- Choose Table > Convert Table to Text.
- Use the Convert Table to Text dialog box to choose what elements should be used to designate the column and row separators
 :
:
• You can convert columns and rows to tabs, commas, or paragraph returns.
• You can type your own character in the field to customize the conversion.
 The Convert Table to Text command transforms table rows and columns into tabs and paragraph returns.
Navigating Through Tables
As you work with tables, you will want to add content to the cells, move from cell to cell, and select cells, rows, and columns.
To insert text into table cells:
- Place an insertion point inside a table cell.
- Type the text for the cell.
or
Choose File > Place to insert imported text in the cell.
To move from one cell to another:
• Press the Tab key to jump forward from one cell to another ![]() .
.

![]() Press the Tab key to jump forward from one cell to another in a table.
Press the Tab key to jump forward from one cell to another in a table.
or
Press Shift-Tab to move backward from one cell to another ![]() .
.
![]() Press Shift-Tab to jump backward from one cell to another in a table.
Press Shift-Tab to jump backward from one cell to another in a table.
Since you navigate through a table using the Tab character, you need some special techniques to insert actual tab characters into a table.
To insert a tab character into a table:
• Press Opt/Alt-Tab to insert a tab character inside a cell ![]() .
.
![]() Press Opt/Alt-Tab to insert a tab character into a table.
Press Opt/Alt-Tab to insert a tab character into a table.
or
Choose Type > Insert Special Character > Tab Character.
- Choose Table > Go to Row. The Go to Row dialog box appears
 .
.
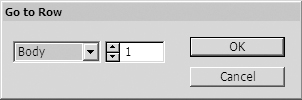 The Go to Row dialog box lets you quickly jump from one row to another.
 - Use the menu to move to the body, header, or footer of the table.
- Enter the number for the row you want to move to.
Selecting Tables
By clicking and dragging your cursor, you can select cells, columns, rows, or the entire table.
Tip
When the entire cell, row, column, or combination of cells are selected, you can copy and paste cells from one part of a table to another.
To select text in a table cell:
- Place an insertion point inside a table cell.
- Drag across the cell until all the text in the cell is highlighted.
or
Choose Edit > Select All to select all the text within that cell.
Tip
There is a difference in the appearance between just the text selected and the entire cell selected
 .
. When the text in a cell is selected, only the text is highlighted. When the entire cell is selected, the entire cell area is highlighted.
To select text in multiple table cells:
- Use the Text tool to drag across to select the cells in specific columns
 .
.
 Drag across and then down to select a specific group of cells in a table.
 - If you want, continue to drag down to select the cells in additional rows.
- Place the Text tool cursor at the top of the table. A down arrow cursor appears.
- Click the down arrow. The entire column is selected
 .
.
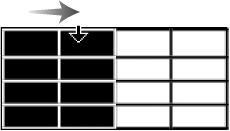 The down arrow cursor indicates you can click to select an entire column in a table.
 - Drag across with the down arrow cursor to select any additional columns.
or
Move the down arrow to another column and Shift-click to select multiple columns.
- Place the Text tool cursor at the left side of the table. A left arrow cursor appears.
- Click the left arrow. The entire row is selected
 .
.
 The left arrow cursor indicates you can click to select an entire row in a table.
 - Drag down with the left arrow cursor to select any additional rows.
or
Move the left arrow to another row and Shift-click to select multiple rows.
- Place the Text tool cursor at the top corner of the table. A slanted arrow cursor appears.
- Click the slanted arrow. The entire table is selected
 .
.
 Position the cursor at the upper-left corner and click to select the entire table.
To use the table selection commands:
- Place the insertion point in a cell in the table.
- Choose one of the following commands:
• Table > Select > Cell selects the cell.
• Table > Select > Row selects the row that contains the cell.
• Table > Select > Column selects the column that contains the cell.
• Table > Select > Table selects the entire table.
Working with Rows and Columns
Once you’ve created a table, you may want to change the number of rows and columns in the table.
Tip
In addition to the Table menu and dialog boxes, many adjustments to tables can be made using the Table panel or Control panel. (See the section “Using the Table or Control Panels” at the end of this chapter for more information on modifying tables with those onscreen elements.)
To change the number of rows and columns:
- Select the entire table or any part of the table.
- Choose Table > Table Options > Table Setup to open the Table Setup dialog box
 .
.
 The Table Setup dialog box contains the basic options for a table’s appearance.
 - Set the Body Rows controls in the Table Dimensions area to increase or decrease the number of rows in the main section of the table
 .
.
 The Table Dimensions area lets you set the number of rows, columns, header rows, and footer rows.
 - Set the Header Rows controls to increase or decrease the number of rows in the header section of the table .
- Set the Columns controls to increase or decrease the number of columns in the table .
- Set the Footer Rows controls to increase or decrease the number of rows in the footer section of the table .
Tip
Use the Preview control at the bottom of the Table Setup dialog box to see the results of changing the controls.
You can also insert columns and rows into a specific location in a table.
To insert columns into a table:
- Place an insertion point where you want to insert the columns.
- Choose Table > Insert > Column. The Insert Columns(s) dialog box appears
 .
.
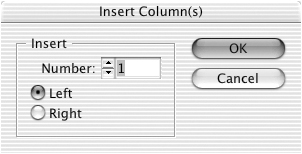 Use the Insert Column(s) dialog box to add columns at a specific location within a table.
or
Choose Insert > Column from the Table panel menu.
- Use the Number field to set the number of columns.
- Choose either Left or Right to specify where the new columns should be inserted
 .
.
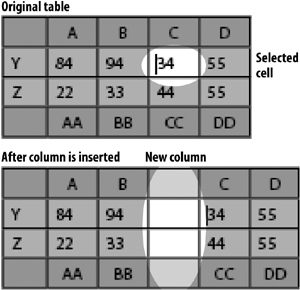 An example of how a column is added to the left of the selected cell.
- Place an insertion point where you want to insert the rows.
- Choose Table > Insert > Row. The Insert Row(s) dialog box appears
 .
.
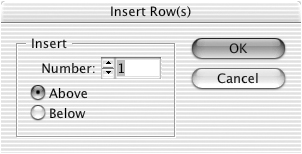 Use the Insert Row(s) dialog box to add rows at a specific location within a table.
or
Choose Insert > Row from the Table panel menu.
- Use the Number field to set the number of rows.
- Choose either Above or Below to specify where the new rows should be inserted.
- Place the insertion point in the final cell of the last row of the table main body, header, or footer.
- Press the Tab key. A new row is automatically inserted.
To add columns as you drag the table edge:
- Drag the last column of the table.
- Press the Opt/Alt key as you drag. This expands the size of the table by adding columns
 .
.
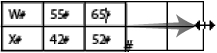 Hold the Opt/Alt key as you drag across to add columns to a table.
To add rows as you drag the table edge:
- Drag the last row of the table.
- Press the Opt/Alt key as you drag. This expands the size of the table by adding rows
 .
.
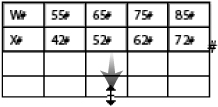 Hold the Opt/Alt key as you drag down to add rows to a table.
- Select the columns you want to delete.
- Choose Table > Delete> Column.
- Select the rows you want to delete.
- Choose Table > Delete> Row.
- Select the table.
- Choose Table > Delete> Table.
You may want to delete the content inside a cell without deleting the cell itself.
To delete the content in table cells:
- Select the cells, columns, or rows.
- Press the Delete/Backspace key or choose Edit > Clear.
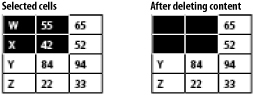
 An example of how you can delete the content of selected cells.
You can’t move cells from one place to another, but you can copy and paste cells and their content to new locations.
To copy and paste the content in table cells:
- Select the cells, columns, or rows that you want to move to a new position.
- Choose Edit > Copy or Edit > Cut. This puts the selected cells on the clipboard.
- Select the new cells, columns, or rows.
- Choose Edit > Paste. The content on the clipboard is pasted into the selected cells
 .
.
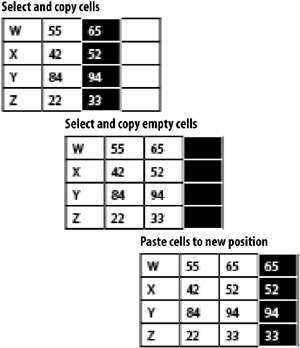 The three-step process to copy and move cells from one position to another.
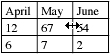
When you create a table, all the columns and rows are evenly spaced. However, you can modify the size of the rows and columns.
Tip
A red dot inside a table cell indicates there is an overflow of text ![]() . You can change the size of the cell to display the overflow text.
. You can change the size of the cell to display the overflow text.
![]() A red dot inside a table cell indicates that there is an overflow of text inside the cell.
A red dot inside a table cell indicates that there is an overflow of text inside the cell.
To change a single row height visually:
- With the Text tool selected, place the cursor along the border of the row you want to adjust. The cursor changes to an up/down arrow
 .
.
 The Up/Down arrow indicates you can adjust the row height.
 - Drag to adjust the height of the row.
To change all the rows visually:
- Place the cursor along the bottom border of the table. The cursor changes to an up/down arrow.
- Hold the Shift key as you drag to adjust the height of all the rows in the table.
To set the row height numerically:
- Select the rows you want to adjust.
- Choose Table > Cell Options > Rows and Columns to open the Cell Options dialog box to the Rows and Columns options
 .
.
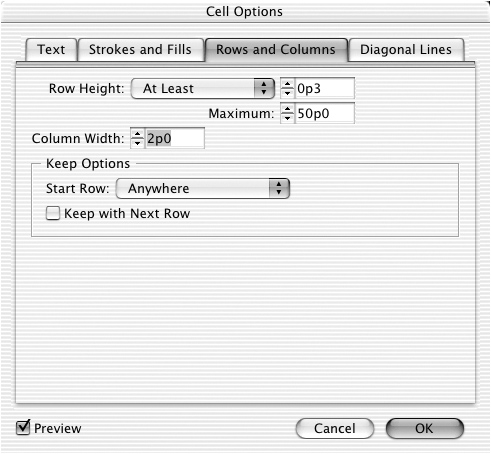 The Rows and Columns category of the Cell Options dialog box.
 - Set the Row Height menu as follows:
• At Least sets a row height that can increase to hold text or an image.
• Exactly sets a row height that does not get larger.
- Enter an amount in the Row Height field.
- Use the Maximum field to prevent the row from becoming too tall.
To change the column width visually:
- With the Text tool selected, place the cursor along the border of the column you want to adjust. The cursor changes to a left/right arrow
 .
.
 The Left/Right arrow indicates you can adjust the column width.
 - Drag to adjust the width of the column.
To set the column width numerically:
- Select the columns you want to adjust.
- Enter an amount in the Column Width field
 .
.
 The Column Width control of the Cell Options dialog box.
You can adjust columns or rows so their spacing is evenly distributed.
To automatically distribute columns:
- Set the rightmost column to the position it should be after the adjustment.
- Select the columns you want to adjust.
- Choose Table > Distribute Columns Evenly. The column widths adjust
 .
.
 The results of using the Distribute Columns Evenly command.
To automatically distribute rows:
- Set the bottommost row to the position it should be after the adjustment.
- Select the rows you want to adjust.
- Choose Table > Distribute Rows Evenly. The row heights adjust so they are the same size
 .
.
 The results of using the Distribute Rows Evenly command.
You can control when and how the rows of a table break across text frames.
To set the keep options for rows:
- Select the rows you want to control.
- Choose Table > Cell Options > Rows and Columns.
- Choose from the Start Row menu as follows
 :
:
• Anywhere lets the row start anywhere in a text frame.
• In Next Text Column forces the row to the next column in the frame or the next text frame.
• In Next Frame forces the row to the next text frame.
• On Next Page forces the row to the next page.
• On Next Odd Page forces the row to the next odd-numbered page.
• On Next Even Page forces the row to the next even-numbered page.
 The Start Row menu lets you choose where that row starts.
 - Check Keep with Next Row to make sure one row doesn’t separate from another
 .
.
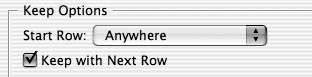 Check Keep with Next Row to force one row to always stay with the next one.
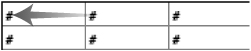
Adjusting Tables Within a Text Frame
Tables are always contained within text frames. You can control how much space there is between the table and the text that precedes or follows it ![]() .
.

![]() Add some space around a table to keep it from colliding with text.
Add some space around a table to keep it from colliding with text.
To set the spacing around a table:
- With the table selected, choose Table > Table Options > Table Setup. The Table Options dialog box appears.
- Use the Table Spacing control for Space Before to set the amount of space between text and the top of the table
 .
.
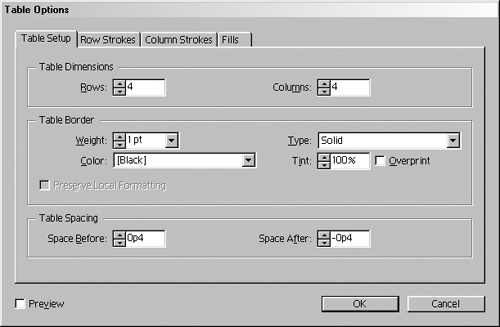 The Table Spacing controls let you set the amount of space before and after a table.
 - Use the Table Spacing control for Space After to set the amount of space between the bottom of the table and the text that follows it.
If a table extends longer than a text frame, you get a text frame overflow. You can easily flow the rest of the table from frame to frame across pages.
To flow tables between frames:
- Use the Selection tool to load the overflow cursor.
- Click the overflow cursor inside the new frame to flow the rest of the table into the frame
 .
.
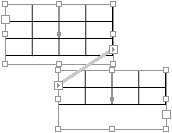 The text threads show how tables can flow from one frame to another.
Working with Headers and Footers
Tables with lots of data often flow from one location to another. For easy navigation, you can repeat the first and last rows of the table each time it appears in a new place. When the first row of a table repeats, it is called a header. When the last row repeats, it is called a footer.
To add a header or footer to a table:
- With the table selected, choose Table > Table Options > Headers and Footers. The Table Options dialog box opens to the Headers and Footers tab
 .
.
 The Headers and Footers area in Table Options lets you control the appearance of headers and footers in the table.
 - Use the Header Rows controls to set the number of repeating rows added to the top of the table
 .
.
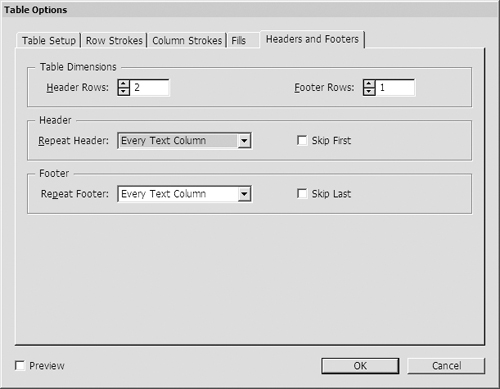 Use the Table Dimensions for Headers and Footers to control the number of header and footer rows.
 - Use the Footer Rows controls to set the number of repeating rows added to the bottom of the table.
To set the repeat options for headers and footers:
- Use the Repeat Header or Repeat Footer menu as follows
 :
:
• Every Text Column repeats the header or footer whenever the table appears.
• Once per Frame repeats the header or footer only once in the same frame. This is useful when a table flows from one column to another.
• Once per Page repeats the header or footer only once in the same page. This is useful when a table flows into multiple frames on the same page.
 Use the Repeat Header menu to set how frequently the header appears.
 - Check Skip First (header) or Skip Last (footer) to display the header or footer only after the first instance of the table.
As you work, you may want to convert body table cells into a header or footer.
To convert cells into a table header:
- Select the rows that you want to convert. These rows must be the first rows of the table.
- Choose Table > Convert Rows > To Header. The rows are converted from the body of the table to the table header
 .
.
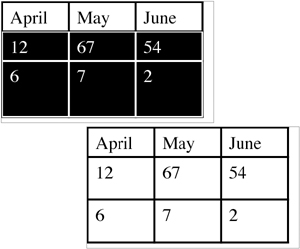
 An example of what happens when a row is converted from body cells to header cells. Notice that the footer takes on the alternating fill.
To convert cells into a table footer:
- Select the rows that you want to convert. These rows must be the last rows of the table.
- Choose Table > Convert Rows > To Footer. The rows are converted from the body of the table to the table footer.
Finally, you may want to convert the rows in a header or footer into the body of the table.
To convert header or footer cells into body cells:
- Select the rows that you want to convert.
- Choose Table > Convert Rows > To Body.
Adding Images to Tables
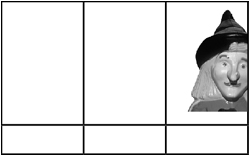
Although table cells are created to hold text, you can easily add images as inline graphics to each cell.
To insert a graphic into a table cell:
- Place an insertion point inside a table cell.
- Choose File > Place to insert an image into the cell
 .
.
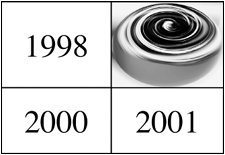 An example of how a placed image can be inserted into a table cell.
or
Paste a graphic copied to the clipboard into the cell.
If the graphic is larger than the size of the cell, some of the graphic may stick out beyond the cell. You use the Clipping setting to control whether placed graphics are seen outside a cell.
To control the display of a graphic inside a cell:
- Place your insertion point inside the cell that contains the placed graphic.
- Choose Table > Cell Options > Text. This opens the Cell Options dialog box
 .
.
 The Clip Contents to Cell option for inline graphics in a cell.
 - Select Clip Contents to Cell to limit the display of the graphic to inside the cell
 .
.
 With the clip options turned on, an inline graphic is confined to the boundaries of the cell.
or
Deselect Clip Contents to Cell to allow the graphic to be displayed outside the cell
 .
. With the clip options turned off, an inline graphic extends outside the boundaries of the cell.
Customizing Cells
In addition to setting the controls for the entire table, you can also make settings for individual cells. You can customize the arrangement of rows and columns by merging or splitting cells. You may want to merge cells to fit more text within a cell. You can also change the space of text within a cell.
- Select the cells you want to merge.
- Choose Table > Merge Cells. The dividers between the cells are deleted
 .
.
 The results of using the Merge Cells command.
- Select the cells you want to unmerge.
- Choose Table > Unmerge Cells.
- Select the cell you want to split.
- Choose Table > Split Cell Horizontally or Table > Split Cell Vertically
 or
or  .
.
 The results of using the Split Cell Horizontally command.
 The results of using the Split Cell Vertically command.
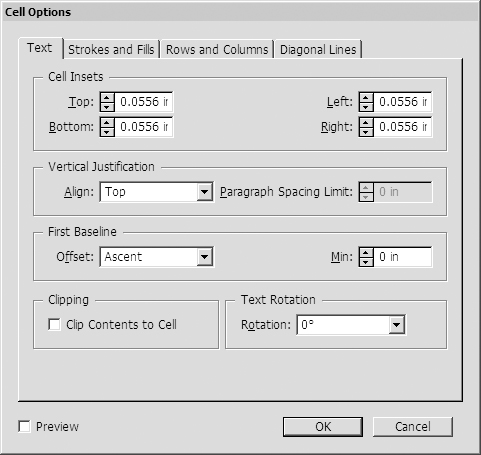
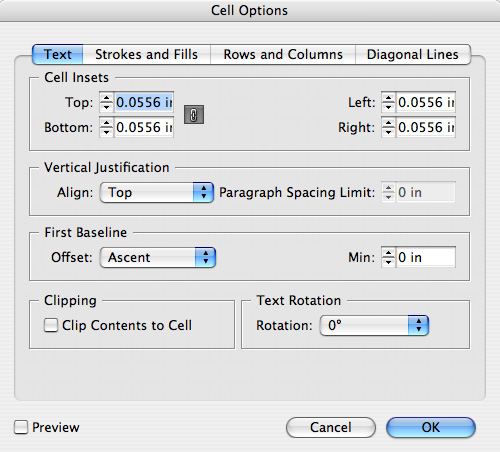
You can also control how text is positioned horizontally and vertically within each cell.
To set the cell options for text:
- Select the cells you want to adjust.
- Choose Table > Cell Options > Text. This opens the Cell Options for text controls
 .
.
 The Text area of the Cell Options controls how text is positioned within each cell.
 - Use the Cell Insets fields to adjust the space between the text and the top, bottom, left, and right sides of the cells
 .
.
 The Cell Insets controls let you specify how far text sits from the edge of a cell.
 - Choose one of the four settings from the Text Rotation menu to rotate the text in 90° increments.
You can also set the vertical alignment for where the text is positioned in the cell.
To set the text vertical alignment:
- Select the cells you want to adjust.
- Choose Table > Cell Options > Text. This opens the Cell Options dialog box for text controls.
- Use the Vertical Justification Align menu to choose one of the four alignment options as follows:
• Top positions the text at the top edge of the cell.
• Center positions the text in the middle of the cell.
• Bottom positions the text at the bottom edge of the cell.
• Justify distributes the lines of the text evenly so that it extends from the top to the bottom of the cell.
If you choose Justify for the vertical alignment, you can then control the space between the lines or paragraphs.
To set the vertical justification spacing:
- Select the cells you want to adjust.
- Choose Table > Cell Options > Text. This opens the text controls for the cells.
- Choose Justify from the Vertical Justification list.
- Set an amount for the Paragraph Spacing Limit
 .
.
 When the Justify option is chosen in the Vertical Justification Align menu, the Paragraph Spacing Limit control is available.
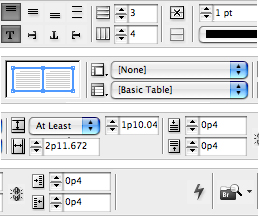
Just as you can control where the first baseline of text appears in a text frame, you can also control the position of the text baseline within a cell.
To control the first baseline in a cell:
- Select the cells you want to control.
- Choose Table > Cell Options > Text. This opens the text controls for the cells.
- In the First Baseline area, use the Offset menu to choose a setting
 .
.
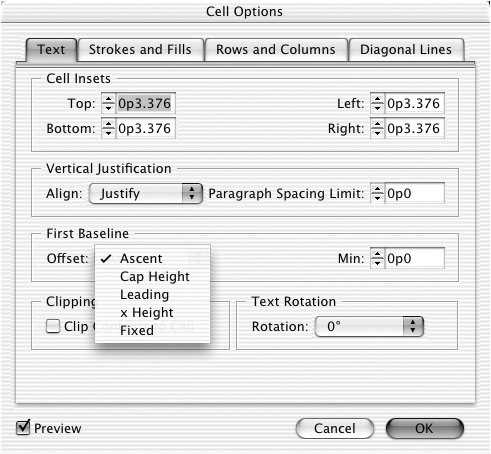 The First Baseline controls let you set the position of the first baseline of text within a cell.
 - In the Min field, set the minimum amount of space for the first baseline.
Setting Borders, Strokes, and Fills
One of the benefits of using tables instead of tabs is how easy it is to add lines and colors to the table. (The line around a table is called the border. Lines around cells are called strokes. Colors inside the cells are called fills ![]() .)
.)
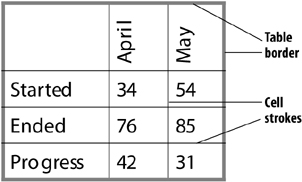
![]() The table border goes around the outside of a table.
The table border goes around the outside of a table.
To add a border around the table:
- Select at least one cell in the table.
- Choose Table > Table Options > Table Setup. The Table Options dialog box opens with the Table Setup options selected
 .
.
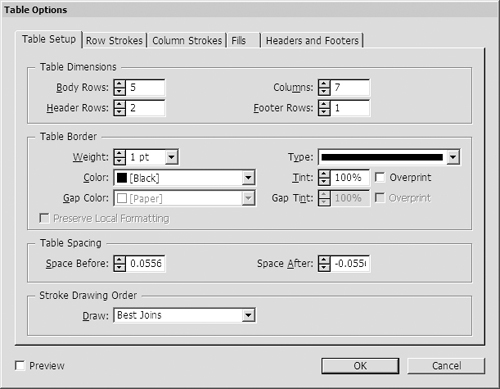 The Table Setup dialog box lets you apply a border around the entire table.
 - In the Table Border category, use the Weight field to set the thickness of the border/line
 .
.
 You can format the line around a table with the Table Border controls.
 - Use the Color menu to set the color of the border/line.
- Use the Tint field to apply a screen to the color.
- If desired, check overprint for the color.
- Use the Type menu to set a stripe pattern for the border.
If you have applied a stroke to a cell that touches the table border, the Preserve Local Formatting checkbox controls how the table border changes the local settings to cells.
To preserve the formatting applied to cells:
- Apple a stroke to the cells.
- In the Table Options dialog box, select Preserve Local Formatting to maintain the appearance of the cell edges that touch the table border
 .
.
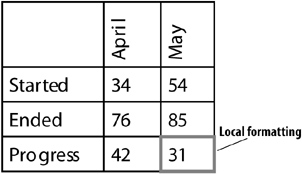 The Preserve Local Formatting option maintains the appearance of cells that touch the table border.
or
Deselect Preserve Local Formatting to allow the table border to override the stroke applied to the cell.
Tables are automatically created with strokes around the cells. You can remove those cell strokes, apply new ones, or customize them as you see fit.
To customize the strokes around individual cells:
- Select the cells you want to modify.
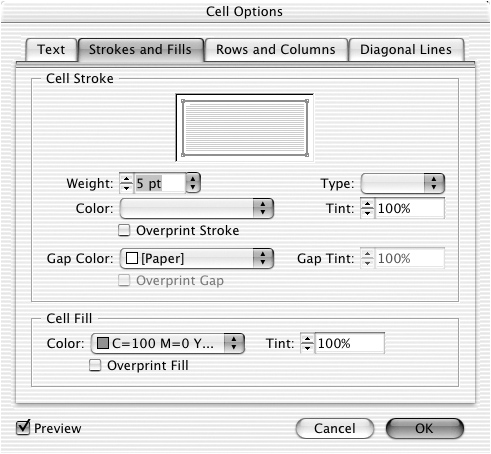
- Choose Table > Cell Options > Strokes and Fills. The Cell Options dialog box appears with the Strokes and Fills options selected
 .
.
 The Strokes and Fills controls under Cell Options let you format cells in a table.
 - Click the proxy lines in the cell preview to select which edges of the selected cells should be formatted
 . The top, bottom, left, and right edges of the preview area correspond to the position of the edges in the selected cells.
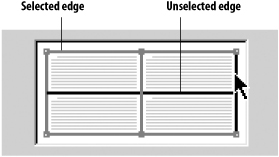 Click the proxy lines for the cell stroke to control which edges of the cell are stroked. The colored lines indicate the edge is selected.
Tip
Important! Select and deselect the proxy lines in the cell preview before you change any of the settings in the dialog box. This avoids applying partial settings to the cells.
Tip
The cell preview area changes depending on the combination of cells, rows, or columns you have selected
 .
.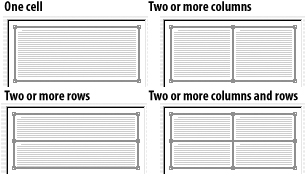 The cell preview area changes depending on how many cells, rows, or columns are selected.
 - Set the controls under Cell Stroke to format the appearance of the selected edges.
- Click OK to apply the settings.
If all your strokes are the same solid color, you don’t have to worry about how the table is drawn. But as soon as you mix strokes or use nonsolid strokes, you need to set preferences for how the strokes appear when they cross each other.
To set the stacking order for the border and strokes:
- Select at least one cell in the table.
- Choose Table > Table Options > Table Setup. The Table Options dialog box appears.
- Choose one of the following from the Draw menu
 :
:
• Best Joins lets InDesign create the best possible appearance for how the strokes intersect.
• Row Strokes in Front moves the strokes for the rows in front of the strokes for the columns.
• Column Strokes in Front moves the strokes for the columns in front of the strokes for the rows.
• InDesign 2.0 Compatibility uses a combination of the Best Joins for the table border and the rows in front of the strokes for the interior cells.
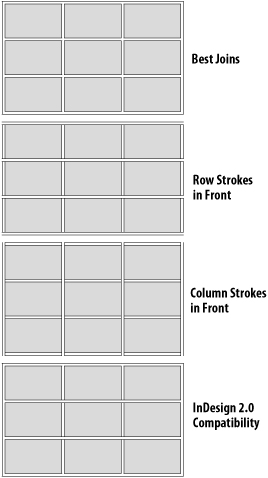 Examples of how the Draw menu settings are applied to tables.
You can also fill the inside of a cell with a color or gradient.
To customize the fill inside individual cells:
- Select the cells you want to modify.
- Choose Table > Cell Options > Strokes and Fills. The Cell Options dialog box opens set to Strokes and Fills.
- Set the controls under Cell Fill to format the color inside the selected cells
 .
.
 The Cell Fill controls let you apply colors to individual cells in a table.
Alternating Strokes and Fills
Many people who work with tables find it helpful to set alternating strokes or fills for entire rows or columns in repeating patterns. This can help readers easily navigate down the column or across the row in lengthy tables.
Tip
Even if you insert or delete rows or columns, the Alternating Pattern feature automatically reapplies the correct sequence of fills to your table.
To alternate repeating strokes for rows:
- Select at least one cell in the table.
- Choose Table > Table Options > Alternating Row Strokes. The Table Options dialog box opens set to the Row Strokes tab
 .
.
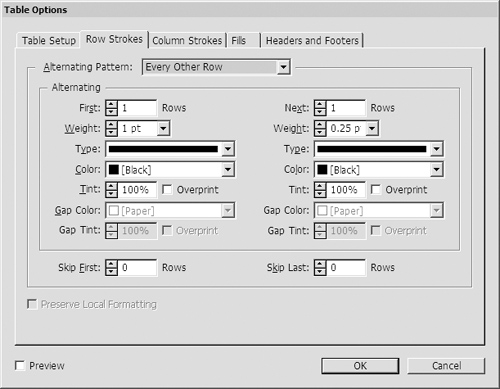 The Table Options for Row Strokes allow you to apply alternating patterns for the strokes applied to rows.
 - Use the Alternating Pattern menu to choose how frequently the row strokes will alternate
 .
.
 The Alternating Pattern menu for setting table rows.
 - Set the controls on the left side of the Alternating area to format the stroke appearance for the first set of rows
 .
.
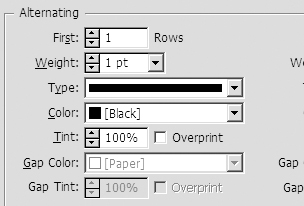 The Alternating controls allow you to choose the appearance for the alternating row strokes.
 - Set the controls on the right side of the Alternating area to format the appearance of the stroke for the next or second set of rows.
- Use the Skip First and Skip Last fields to omit a certain number of rows at the start and end of the table from the alternating count.
To alternate repeating strokes for columns:
- Select at least one cell in the table.
- Choose Table > Table Options > Alternating Column Strokes. The Table Options dialog box opens set to Column Strokes
 .
.
 The Column Strokes controls under Table Options let you apply automatic alternating strokes to table columns.
 - Use the Alternating Pattern menu to choose how many column strokes will alternate
 .
.
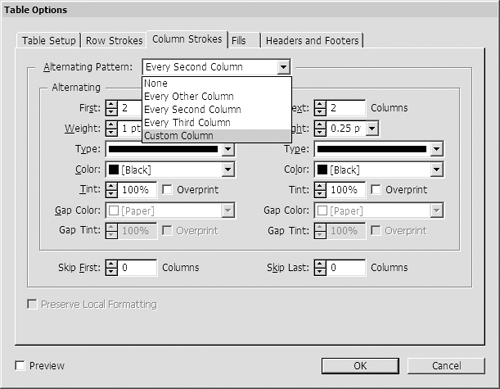 The Alternating Pattern menu for table columns.
 - Set the controls on the left side of the Alternating area to format the appearance of the stroke for the first set of columns
 .
.
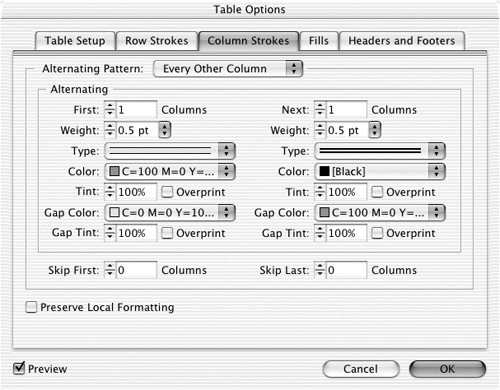 The Alternating controls allow you to choose the appearance for the alternating column strokes.
 - Set the controls on the right side of the Alternating area to format the appearance for the second set of columns.
- Use the Skip First and Skip Last fields to omit certain columns at the start and end of the table from the alternating count.
- Select at least one cell in the table.
- Choose Table > Table Options > Alternating Fills. The Table Options dialog box appears set to Fills
 .
.
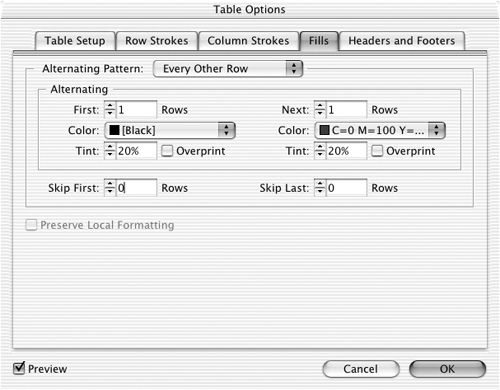 The Fills controls under Table Options let you apply automatic alternating fills to table rows or columns.
or
Choose Table Options > Alternating Fills from the Table panel.
- Use the Alternating Pattern menu to choose how many row or column fills will alternate
 .
.
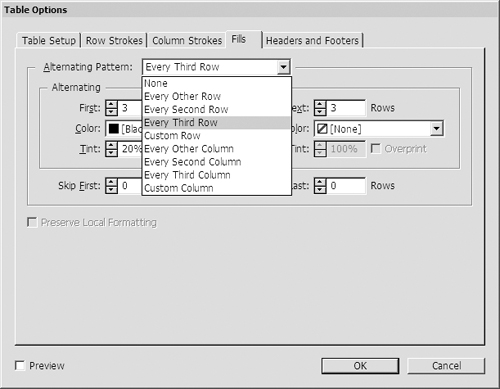 The Alternating Pattern menu for setting table fills.
 - Set the controls on the left side of the Alternating area to format the appearance of the fill for the first set of columns or rows
 .
.
 The Alternating controls allow you to choose the appearance for the alternating fills.
 - Set the controls on the right side of the Alternating area to format the appearance of the second set of columns or rows.
- Use the Skip First and Skip Last fields to omit certain rows or columns at the start and end of the table from the alternating count.
Tip
If you have applied fills to individual cells, the Preserve Local Formatting command controls whether the alternating fills override that local formatting.
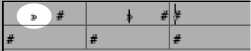
Adding Diagonal Lines in Cells
Many people who design tables use diagonal lines to indicate empty data or corrected information. InDesign lets you apply diagonal lines inside cells.
To add diagonal lines in cells:
- Select the cells you want to modify.
- Choose Table > Cell Options > Diagonal Lines. The Cell Options dialog box opens with the Diagonal Lines options selected
 .
.
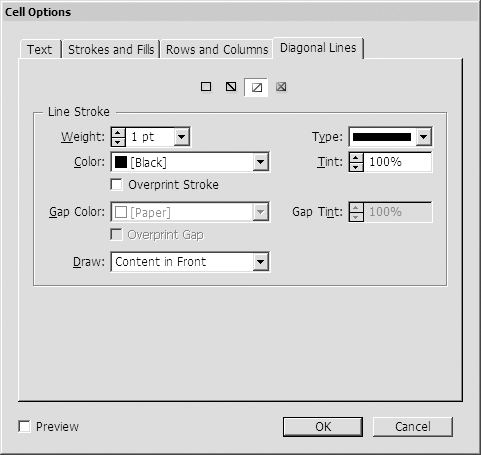 The Diagonal Lines controls under Cell Options let you add diagonal lines to cells.
 - Click one of the direction controls to set the direction of the diagonal lines
 and their styles
  .
.
 The direction controls for the diagonal lines in cells.
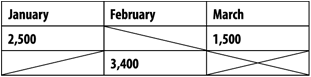 Examples of how the diagonal lines can be used in cells.
 - Set the Line Stroke options to format the appearance of the line
 .
.
 The Line Stroke controls for diagonal lines let you style the appearance of the diagonal lines inside cells.
 - Choose one of the following from the Draw menu:
• Content in Front positions the diagonal line behind any text in the cell.
• Diagonal in Front positions the diagonal line in front of any text in the cell.
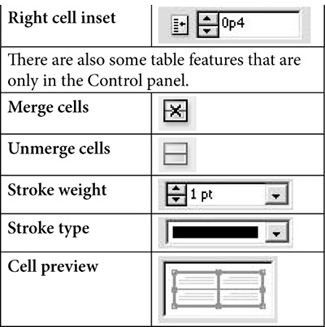
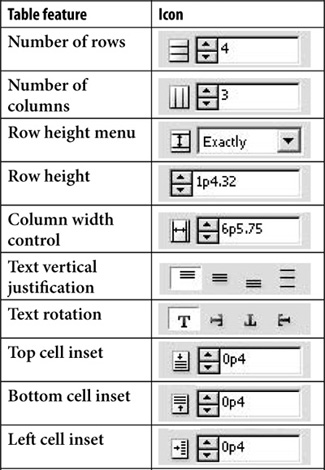
Using the Table or Control Panels
You can also work with the Table panel or the Control panel to modify the number of columns and rows, their width and height, and other settings in tables.
To work with the Table panel or Control panel:
- Select the table or cells in the table.
- Choose Window > Type & Tables > Table. This opens the Table panel
 .
.
 The Table panel provides an onscreen panel to modify many of the table controls.
or
Choose Window > Control. This opens the Control panel
 .
. When a table is selected, the Control panel displays the table controls.
 - Use the controls, fields, and icons as shown in the following chart.