
Chapter 9. Text Effects
Go back and look at the newspaper magazine advertisements created in the 1800s. (Yes, that was way before I worked in advertising.) In those ads, the text marches along in a straight line without swerving toward or moving around the images.
Back then, it was extremely difficult to wrap text around an image. Each line of text had to be cut and pasted around the edges of an image.
The paste-up artists never dreamed of setting text along a path so that it follows the shape of a rollercoaster—that would have been far too much work!
Adding short horizontal rules to divide paragraphs was another tedious task. In fact, if you look closely at some old advertisements, you can see that the rule isn’t perfectly centered in the column.
Fortunately, electronic page-layout programs such as InDesign make it easy to do all these special text effects with incredible precision.
Wrapping Text
One of my favorite effects to apply to text is to arrange it to flow around images and other objects. This is called text wrap in InDesign, a text runaround in some other programs. (InDesign doesn’t give you the runaround.)
- Select the object that you want the text to wrap around. This can be an imported graphic, a text frame, or an unassigned frame.
- Choose Window > Text Wrap. This opens the Text Wrap panel
 .
.
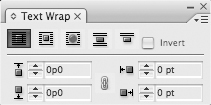 The Text Wrap panel controls the settings for how text flows around an object.
 - Choose one of the following options for how the text should flow around the object
 . (Options shown in the chart on the following page.)
 The five different text wrap buttons let you choose how the text wraps around objects.
• No wrap lets the text flow across the object.
• Bounding Box flows the text around the bounding box for the object.
• Object Shape flows the text around the shape of the frame or the shape of the placed graphic.
• Jump Object flows the text to the next available space under the object.
• Jump to Next Column flows the text to the next column or text frame.
- Check Invert to force the text to flow inside the object
 .
.
 When the Invert command is turned on, the text wrap causes the text to flow inside, not outside, an object.
 - Enter an amount in the offset fields to control the distance between the text and the object
 .
.
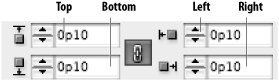 Use the text wrap Offset controls to set the distance between text and a graphic.

Tip
Unless you change the preference setting, lines that wrap below the text wrap object skip to the next available leading increment below the object.
When you choose Object Shape for the text wrap, InDesign lets you set how the text wraps as well as the contour options for that shape.
To set the text wrap contour options:
- Use the Direct Selection tool to select the image.
- Click the Object Shape text wrap button in the Text Wrap panel.
- Choose Show Options from the Text Wrap panel menu to display the Contour Options at the bottom of the Text Wrap panel.
- Use the Contour Options Type menu to choose the type of element that should be used to create the text wrap
 :
:
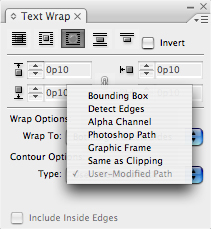 The Contour Options Type menu lets you choose what type of element controls the shape of the text wrap.
• Bounding Box uses the rectangle that contains the image.
• Detect Edges uses the differences between the pixels of the image and its background.
• Alpha Channel lets you choose an embedded alpha channel.
• Photoshop Path lets you choose an embedded path.
• Graphic Frame uses the shape of the frame that contains the image.
• Same As Clipping uses whatever shape has been designated as the clipping path for the image.
- If you choose Alpha Channel or Photoshop Path, use the second pop-up menu to choose a specific channel or path.
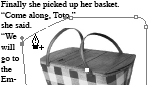
- Check Include Inside Edges to make the text wrap inside any holes in the image, path, or alpha channel
 .
.
 Use the Include Inside Edges option to have text wrap within the edges of the image, such as within the handles of the basket.
Just as you can set the alignment for a paragraph, you can also set how text wraps to the object.
To set the wrap to options for a text wrap:
- Use the Direct Selection tool to select the image.
- Click the Object Shape text wrap button in the Text Wrap panel.
- Choose Show Options from the Text Wrap panel menu to display the Wrap Options in the Text Wrap panel.
- Use the Wrap To menu to choose the orientation for the text wrap
 :
:
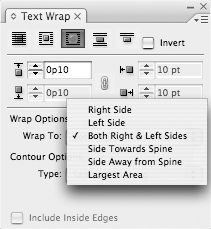 The Wrap To menu lets you choose the orientation for text wraps around objects.
• Right Side wraps only around the right side of the object.
• Left Side wraps only around the left side of the object.
• Both Left & Right Sides wraps to both sides of the object
 .
. The Wrap To option set to wrap the text on both sides of the object.
• Side Towards Spine wraps to either the left or right side of the object depending which side of a facing page document the object is on.
• Side Away From Spine does the opposite of the above.
• Largest Area wraps only on the side that has the most area. This may cause the text to flip from left to right
 .
. The Wrap To option set to wrap the text on whichever side has the largest area.
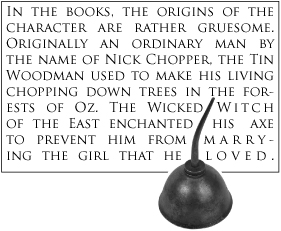
A text wrap doesn’t have to be around visible objects. You can use an object with no fill or stroke as the shape to wrap text around ![]() . This creates a special effect for text around an image.
. This creates a special effect for text around an image.
![]() An example of how an invisible object can be used to create a text wrap.
An example of how an invisible object can be used to create a text wrap.
To wrap text around an invisible object:
- Draw an object with no fill or stroke.
- Set the Text Wrap to Object Shape.
Once you set a text wrap, you can still manipulate it so that the text reads more legibly or fits more attractively into the contour of the object. This is called a custom text wrap.
- Use either selection tool to select the object that has the text wrap applied to it.
- Use the Direct Selection tool to move the points on the text wrap path
 .
.
 Use the Direct Selection tool to change the shape of a text wrap path.
 - Click the Pen tool between points on the text wrap path to add a new point to the path
 .
.
 The plus sign next to the Pen tool indicates that you can add a point to the text wrap path.
 - Click the Pen tool on a point on the text wrap path to delete the point from the path
 .
.
 Position the Pen tool over a point and click to delete points from a text wrap path.
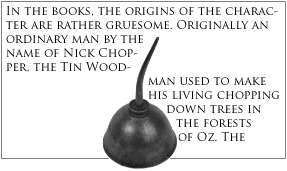
You may find that you don’t want some text to be affected by a text wrap. For instance, you might want to have the body text in one frame run around an image but have the text label in another frame appear over the image ![]() . That’s when you need to direct the text frame to ignore a nearby text wrap.
. That’s when you need to direct the text frame to ignore a nearby text wrap.

![]() An example of how Ignore Text Wrap keeps the map title from being affected by the text wrap applied to the outline of the state.
An example of how Ignore Text Wrap keeps the map title from being affected by the text wrap applied to the outline of the state.
- Select the text frame that contains the text that you don’t want affected by the text wrap command.
- Choose Object > Text Frame Options. This opens the Text Frame Options dialog box
 .
.
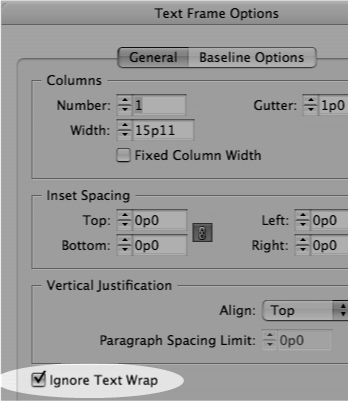 The Ignore Text Wrap checkbox in the Text Frame Options dialog box prevents text from being affected by any text wrap settings.
 - Check Ignore Text Wrap. The text in that frame is unaffected by any objects that have a text wrap applied.
Master pages (covered in Chapter 10, “Pages and Books”) allow you to place an object on many pages at once. You can set the text wrap for an object so that it is only applied on the master page, not any document pages.
To set the text wrap for an object on a master page:
- Place the object on a master page.
- Choose Apply to Master Page Only from the Text Wrap panel menu. (This command is only available for objects on a master page.)
Text on a Path
When you create an object such as a text frame, the outside shape of the frame is considered the object’s path. Not only can InDesign fit text inside a text frame, it also lets you position text so that it runs along the outside of the frame.
To run text on the outside of a path:
- Choose the Path Type tool in the Tools panel
 .
.
 The Path Type tool in the Tools panel is used to add text to a path.
 - Move the tool so that it is near the path. A small plus sign appears next to the tool cursor
 .
.
 The plus sign next to the Path Type cursor indicates you can click to add text to a path.
 - Click with the Path Type tool. A blinking insertion point appears on the path.
- Type the text. Use any of the text controls to select or modify the text.
Once you apply text to a path, you can drag to position the text.
To position text on a path:
• Drag the indicator at the start or end of the text on a path to change the start or end point of the text ![]() .
.
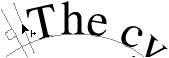
![]() Drag the indicator line to move the text along a path.
Drag the indicator line to move the text along a path.
or
Drag the small indicator within the text to change the center point of the text ![]() .
.
![]() The center point indicator allows you to move text or flip it from one side of the path to another.
The center point indicator allows you to move text or flip it from one side of the path to another.
Tip
You can use the Paragraph panel to change the alignment of the text between the start and end indicators.
To apply effects to text on a path:
- Choose Type > Type on a Path > Options. This opens the Path Type Options dialog box
 .
.
 The Path Type Options dialog box allows you to control how text is applied to a path.
Use the Effect menu
 to control how the text is positioned in relationship to the path
  .
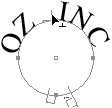
. The Effect menu controls the appearance of the text on the path.
 The five effect settings applied to text on a path.
• Rainbow positions the text in an arc along any curves in the path.
• Skew distorts the text vertically as it is positioned along curves in the path.
• 3D Ribbon distorts the text horizontally as it is positioned along curves in the path.
• Stair Step aligns the individual baselines of each letter so that the text stays vertical as it is positioned along curves in the path.
• Gravity uses the shape of the path to distort the text as it is positioned along curves in the path.
- Click the Flip checkbox to position the text on the other side of the path.
- If the spacing of the text is uneven, use the spacing control to tighten the character spacing around sharp turns and acute angles on the path.
You can also control where the letters are positioned vertically on the path.
To set the vertical alignment of text on a path:
- Use the Align menu
 to control how the text is positioned in relationship to the path
  .
.
 The Align menu controls how the text is positioned in relationship to the path.
 The Align choices applied to text on a path.
• Ascender positions the text so that the tops of the tallest letters touch the path.
• Descender positions the text so that the bottoms of the lowest letters touch the path.
• Center positions the text so that the middle of the text touches the path.
• Baseline positions the text so that the baseline of the text touches the path.
- Use the To Path menu to position the vertical alignment in one of the following positions
 :
:
 The To Path menu positions the vertical alignment of the text on the path.
• Top positions the text relative to the top of the path’s stroke weight
 .
. The effect of the To Path settings on the position of text on a stroked path.
• Center positions the text in the middle of the path’s stroke weight
.• Bottom positions the text relative to the bottom of the stroke weight
.Tip
If you do not see any changes between the To Path settings, try increasing the thickness of the stroke weight.
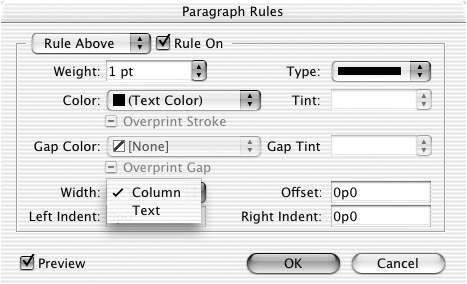
Working with Paragraph Rules
The correct way to create a line above or below a paragraph is with paragraph rules. These are lines that travel with the paragraph and that can be applied as part of style sheets.
- Select the paragraph to which you want to apply the rule and choose Paragraph Rules from the Paragraph panel menu. This opens the Paragraph Rules dialog box
 .
.
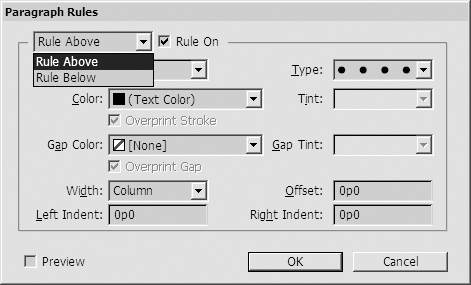
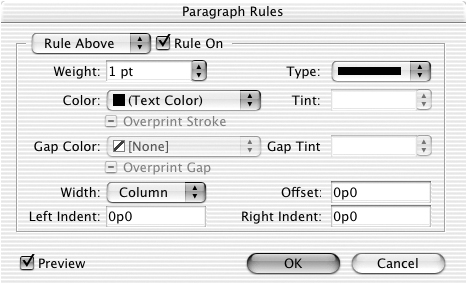
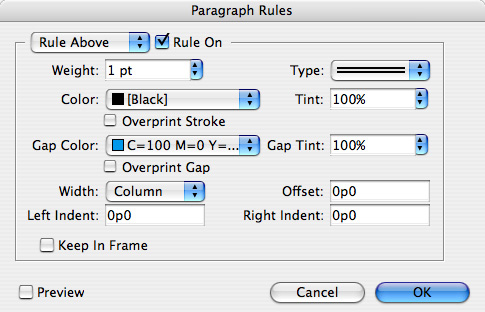 The Paragraph Rules dialog box controls the settings for paragraph lines.
 - Choose Rule Above or Rule Below to specify whether the rule appears before or after the selected paragraph
 .
.
 Choose Rule Above or Rule Below to position the line above or below a paragraph.
 - Check Rule On to activate the rule.
Once you have turned on the rule, you can style its appearance. This is somewhat similar to styling the stroke for an object.
To style the appearance of a rule:
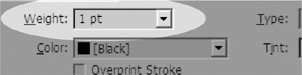
- Set an amount for the weight (or thickness) of the rule
 .
.
 Use the Weight control to define the thickness of the paragraph rule.
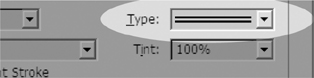
 - Use the Type list to set a stroke style
 .
.
 Use the Type list to choose the stroke style for the paragraph rule.
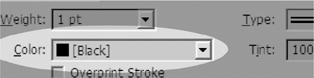
 - Use the Color list to apply one of the predefined swatch colors or gradients
 .
.
 Use the Color list to choose the main color for the paragraph rule.
 - If desired, check Overprint Stroke to set the ink to overprint.
- Use the Tint controls to create a shade of the color
 .
.
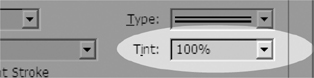 Use the Tint control to set the screen for the color of the paragraph rule.
 - If you have chosen a rule style that has a gap, use the Gap Color list to apply a color or gradient swatch to the gap
 .
.
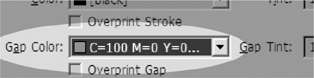 Use the Gap Color list to set the secondary color of the paragraph rule.
 - If you have chosen a gap color, use the Gap Tint controls to create a shade of the gap color
 .
.
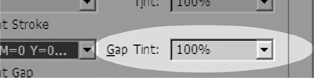 Use the Gap Tint control to set the screen for the gap color of the paragraph rule.
 - If desired, check Overprint Gap Color to set the gap ink to overprint.
If a paragraph rule falls at the top of a paragraph, you may want to control whether the rule is displayed inside or outside the frame.
To control the position of the rule within a frame:
- Select the paragraph with the rule.
- Open the Paragraph Rules dialog box.
- Check Keep in Frame.
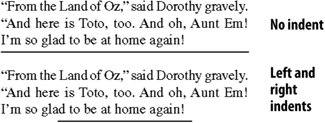
The length of a rule (called its width) can be set to cover the width of the column or the width of the text. The rule can also be set to be indented from the column or text margins.
To control the width of a rule:
- Choose from the Width list in the Paragraph Rules dialog box as follows
 :
:
 The Width list lets you choose the length of paragraph rules.
• Column creates a rule that is the same width as the column that holds the text
 .
. Column width fits the rule to the width of the column. Text width fits the rule to the neighboring text.
• Text creates a rule that is the same width as the closest line of text
. - Set the Left Indent to the amount that the rule should be indented from the left side of the column or text
 .
.
 The Left Indent and Right Indent fields let you modify the length of a rule.
 - Set the Right Indent to the amount that the rule should be indented from the right side of the column or text .
By default the paragraph rule is positioned on the baseline of the text. You can control the position above or below the baseline ![]() . This is called the offset of the rule.
. This is called the offset of the rule.

![]() Change the Offset amount to move a rule up or down relative to the text.
Change the Offset amount to move a rule up or down relative to the text.
To control the offset of a rule:
• In the Paragraph Rules dialog box, enter a value in the Offset field.
• For a Rule Above, positive numbers raise the rule above the baseline.
• For a Rule Below, positive numbers lower the rule below the baseline.
You can create many special effects with paragraph rules. One of the most common is to superimpose text inside paragraph rules to create the effect of reversed text. Most reversed text is white type inside a black background. However, any light color can be used inside any dark background ![]() .
.
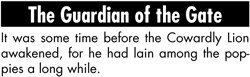
![]() A paragraph rule can create the effect of reversed text.
A paragraph rule can create the effect of reversed text.
Tip
Don’t forget that you can also use the underline or strikethough styles to create reversed text.
- Apply a light color to a line of type.
- Open the Paragraph Rules dialog box.
- Create a Rule Below.
- Set the weight of the rule to a point size large enough to enclose the text. For instance, if the text is 12 points, the rule should be at least 12 points.
- Set a negative number for the offset value.
- Check Preview so you can see the effect of the weight and offset settings you choose.
- Adjust the weight and offset, if necessary.
- Click OK to apply the rule
 .
.
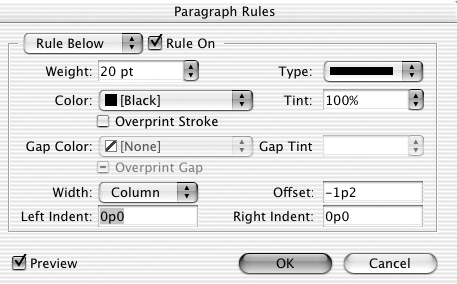 A dialog box showing the sample settings for a paragraph rule that create the effect of reversed text.
Inline and Anchored Objects
Another type of nested element is called an inline object. An inline object is a frame that is pasted as a character into the actual text.
- Select the element that you want positioned.
- Cut or copy the element to the clipboard.
- Click to place an insertion point where you want the inline object to be positioned.
- Choose Edit > Paste. The element is pasted into the text and flows along with any changes to the text
 .
.
 An inline object flows along with the text.
You can also place an image directly into the text as an inline object.
To import an image directly as an inline object:
- Place your insertion point where you would like the graphic to appear.
- Choose File > Place and select the image you want to import. The image appears inside an inline frame.
In addition to inline objects, InDesign also allows you to insert anchored objects into text flow. Anchored objects require a little more preparation but are much more powerful than inline objects.
- Place the insertion point in the text where you want to anchor the object.
- Choose Object > Anchored Object > Insert. The Anchored Object dialog box appears
 .
.
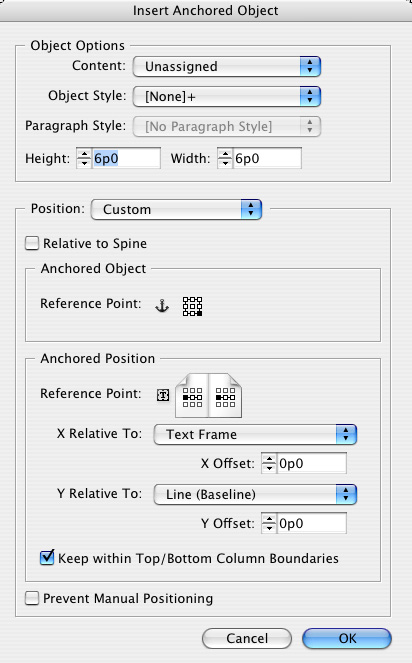 The Insert Anchored Object dialog box lets you control the options for an anchored object.
 - Set each of the options for the Anchored Object as described in the following exercises.
- Click OK to insert the anchored object into the story. An anchored object hidden character symbol appears in the text.
To set the Object Options for an anchored object:
- Use the Content list to choose the type of object to be anchored. These are the same as the Object > Content options
 .
.
 The Content list lets you choose the type of anchored object.
 - Use the Object Style list to choose a graphic style for the object. (See Chapter 15, “Text and Object Styles,” for more information on graphic styles.)
- If you select Text as the content, use the Paragraph Style list to choose the style for the text.
- Use the Height and Width controls to set the size of the anchored object.
I divide anchored objects into two different types based on their position on the page.
To set the Position for the anchored object:
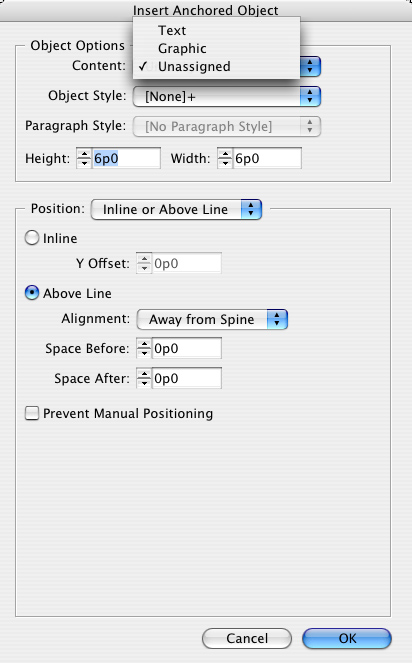
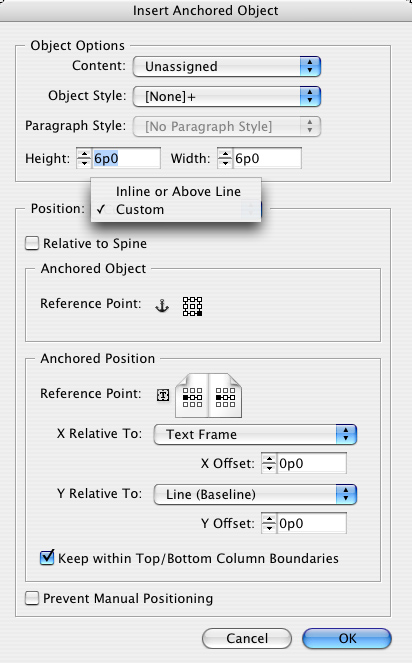
• Use the Position list to choose the type of positioning for the anchored object ![]() :
:
![]() The Position list lets you choose the location for anchored objects.
The Position list lets you choose the location for anchored objects.
• Inline or Above Line positions the anchored object within the text frame.
• Custom allows you to position the anchored object outside the text frame.
Once you have chosen the positioning for the anchored object, you can set the options for the location of the anchored object ![]() .
.

![]() The Position options for Inline or Above Line anchored objects.
The Position options for Inline or Above Line anchored objects.
To set the options for inline objects:
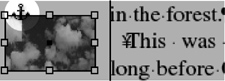
- Click the Inline radio button to specify that option for the object. This removes all the options except the Y Offset.
- Use the Y Offset controls to move the object above or below the baseline of the text.
To set the options for Above Line objects:
- Click the Above Line radio button to position the object above the line that contains the anchor insertion point
 .
.
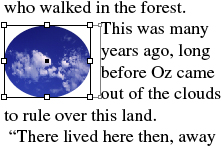
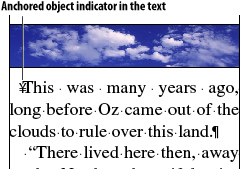 An Above Line anchored object inside a text frame.
 - Use the Alignment list to position the object in the text frame as follows
 :
:
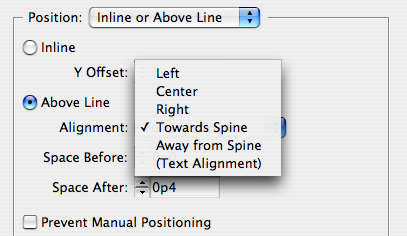 The Alignment list for Above Line anchored objects.
• Right aligns the object on the right.
• Left aligns the object on the left.
• Center aligns the object in the center.
• Text Alignment uses whatever alignment was set for the paragraph that contains the anchored object.
- If you have a facing-page document, you have two additional options. These options flip the anchored object if it is a left- or right-hand page.
• Towards Spine positions the object so that it is closest to the spine.
• Away From Spine positions the object so that it is furthest away from the spine.
- Use the Space Before or Space After control to add space above or below the object.
- Check the Prevent Manual Positioning option to stop the object from being moved with any of the selection tools.
The other type of anchored object is the custom object. This option offers the most choices for positioning the anchored object.
Tip
I find the Custom Anchored Objects dialog box baffling ![]() . The only way I can apply the settings is to first insert the anchored object and then close the dialog box. Next, with the anchored object still selected, I choose Object > Anchored Object > Options. This opens the Options dialog box that has a Preview that lets me see what the settings are doing.
. The only way I can apply the settings is to first insert the anchored object and then close the dialog box. Next, with the anchored object still selected, I choose Object > Anchored Object > Options. This opens the Options dialog box that has a Preview that lets me see what the settings are doing.
![]() The Custom Anchored Objects dialog box.
The Custom Anchored Objects dialog box.
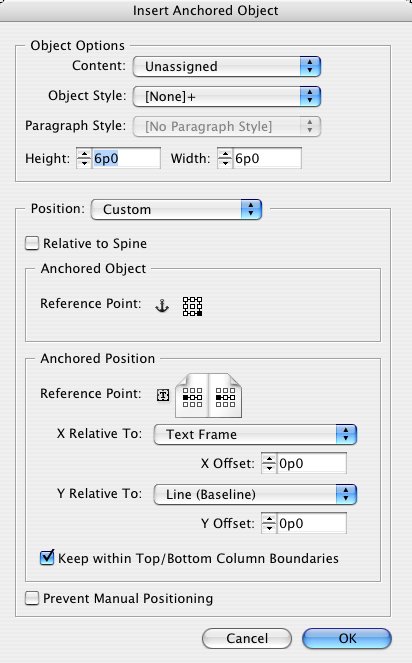
To set the options for custom objects:
- Use the Anchored Object Reference Point proxy box to choose which point on the anchored object should be used as the orientation of the anchored object.
- If the document has facing pages, you can choose Relative to Spine to allow the settings to flip depending on whether they are left- or right-hand pages.
- Click the Anchored Position Reference Point to choose the position on the page where the object should align.
- Use the X Relative To list to set the point from which the horizontal axis should start
 .
.
 The X Relative To list for custom anchored objects.
 - Use the Y Relative To list to set the point from which the vertical axis should start
 .
.
 The Y Relative To list for custom anchored objects.
 - Use the X Offset and Y Offset controls to move the anchored object from the X and Y reference points.
- Select Keep Within Top/Bottom Column Boundaries to insure that the anchored object does not move above or below the frame that contains the text.
- Select Prevent Manual Positioning to prevent the object from being moved.
As I said on the previous page, it’s a lot easier to set the options for a custom anchored object if you edit the settings for an existing anchored object.
To edit the settings for an anchored object:
- Use the Selection tool to select the anchored object.
- Choose Object > Anchored Object > Options. This opens the Anchored Object Options dialog box, which gives you a Preview option in addition to all the settings to control the anchored object.
So what if you want to convert the anchored object into a regular object but position it in the same spot as when it was anchored? I thought I could cut and paste the object to get it out of the text flow. Nope; instead you need to release the anchored object.
To release an anchored object:
- Use the Selection tool to select the anchored object.
- Choose Object > Anchored Object > Release. This converts the anchored object into an ordinary object.