
Chapter 4. Working with Objects
Back in the old days of board mechanicals, advertising agencies and design studios had a production area called the bullpen. It was the people in the bullpen—called bullpen artists—who actually created the mechanical. Most of them were kids just out of design school; the bullpen was usually their first step up the ladder in advertising or design.
The kids in the bullpen were amazing. Although not professional illustrators, they could create all sorts of artwork for the layout.
The same is true with InDesign. While InDesign is not a full-fledged drawing program such as Adobe Illustrator, you can use InDesign’s tools to create a wide variety of effects by distorting, moving, resizing, duplicating, and aligning objects. It’s your electronic bullpen.
Types of Frames
Frames are the containers in which you place graphics or text. Frames can also be used as graphic shapes. There are three types of frames you can create: unassigned, graphic, and text.
Unassigned frames
Unassigned frames are created with the Rectangle, Ellipse, and Polygon tools ![]() . These frames are useful for adding color to your layout or a stroke around an area without inserting a graphic or text.
. These frames are useful for adding color to your layout or a stroke around an area without inserting a graphic or text.

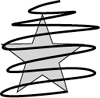
![]() The three different types of frames: unassigned, graphic, and text.
The three different types of frames: unassigned, graphic, and text.
Graphic frames
Graphic frames are created with the Rectangle Frame, Ellipse Frame, and Polygon Frame tools. When you create a graphic frame, diagonal lines inside the frame indicate that you can insert a graphic inside the frame ![]() .
.
Tip
Although most people insert images inside graphic frames, there is nothing to prevent you from flowing text inside a graphic frame.
Text frames
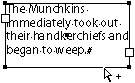
Text frames are created using the Text tool or by converting frames. When you create a text frame, two link boxes appear on the sides of the frame in addition to the bounding box handles. Text frames also display a blinking insertion point when they are selected ![]() .
.
Creating Basic Shapes
You use the rectangle, ellipse, and polygon frame tools to create graphic frames into which you place images.
To create a rectangular graphic frame:
- Click the Rectangle Frame tool in the Tools panel
 .
.
 The Rectangle Frame tool in the Tools panel creates rectangular graphic frames.
 - Drag across the page to create the rectangle.
- Release the mouse button when the rectangle is the correct size.
To create an elliptical graphic frame:
- Click the Ellipse Frame tool in the Tools panel
 .
.
 The Ellipse Frame tool in the Tools panel creates elliptical graphic frames.
 - Drag across the page to create the ellipse.
- Release the mouse button when the ellipse is the correct size.
You can also create rectangles and ellipses by specifying their size numerically.
To create objects numerically:
- Click with either the Rectangle or Ellipse Frame tools. A dialog box appears
 .
.
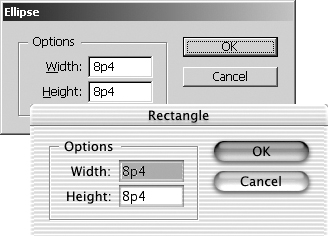 The Ellipse and Rectangle dialog boxes let you create frames with precise width and height.
 - Enter the width and height amounts.
- Click OK. The frame appears where the mouse was clicked.
To create a polygon graphic frame:
- Double-click the Polygon Frame tool in the Tools panel
 . This opens the Polygon Settings dialog box
  .
.
 Use the Polygon Frame tool to create polygon and star graphic frames.
 The Polygon Settings dialog box creates either polygons or stars.
 - Enter a number in the field for the Number of Sides to the polygon.
- To create a star, change the amount in the Star Inset field from 0% to a higher number.
- Drag across the page to create the polygon or star.
- Release the mouse button when the polygon or star is the correct size.
InDesign is definitely the program for anyone who says they can’t even draw a straight line. The Line tool makes it easy.
- Click the Line tool in the Tools panel
 .
.
 The Line tool in the Tools panel creates straight lines.
 - Position the cursor where you want the line to start.
- Drag to create a line.
- Release the mouse where you want the line to end.
Selecting Objects
Once you’ve created objects, you can use different techniques to select them.
- Choose the Selection tool (black arrow) in the Tools panel
 .
.
 The Selection tool in the Tools panel selects entire objects. The Direct Selection tool selects a point on an object or images inside objects.
 - Click the object you want to select.
- Hold the Shift key to select any additional objects.
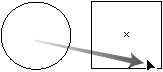
You can also select objects by dragging an area, or selection marquee, around the object.
To select by dragging a marquee:
- Choose the Selection tool.
- Drag along a diagonal angle to create a marquee around the objects you want to select
 .
.
 Drag to create a marquee to select objects.
Tip
You do not need to marquee the entire object to select it. Objects are selected if any portion is within the marquee.
You can also use a menu command to select all the objects on a page.
To select all the objects on a page:
• Choose Edit > Select All.
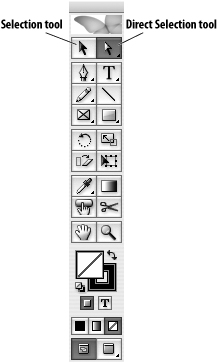
What Are The Differences Between the Selection Tools?
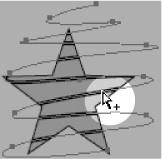
Perhaps the most confusing part of InDesign is the difference between the Selection tool (black arrow) and the Direct Selection tool (white arrow) ![]() .
.
If you are familiar with QuarkXPress, you can think of the Selection tool as Quark’s Object tool. It will always select the object as a whole. Use this tool when you want to manipulate the entire object.
Think of the Direct Selection tool as Quark’s Content tool. It selects the points that make up a frame or the image that is pasted inside a frame. Use this tool when you want to select inside a frame.
If you’ve ever worked with Adobe Illustrator, you’ll instantly recognize the two selection tools as identical to their Illustrator cousins.
Moving Objects
The simplest way to position an object on a page is to drag it to a new position, but you can also move objects by using menu and keyboard commands, or by typing specific numerical locations into a dialog box, as you’ll learn later in this chapter.
To move an object by dragging:
- Choose the Selection tool in the Tools panel.
- Click the object you want to move. A bounding box with eight handles appears around the object. This indicates the object is selected.
- Position the Selection tool on the edges of the bounding box (but not on the handles of the bounding box).
- Drag to move the object. If you drag quickly, you will see only a bounding box preview of the object being moved
 .
.
 Quickly drag to see the bounding box of the object being moved.
or
Press and pause for a moment before you drag the object. The pause gives InDesign enough time to let you see a preview of the object as you move it
 .
. Pause before you drag to see a preview of the object being moved.
You can also move an object more precisely. One way to do this is with the Move command in the Transform menu.
- Select the object or objects.
- Choose Object > Transform > Move. This opens the Move dialog box
 .
.
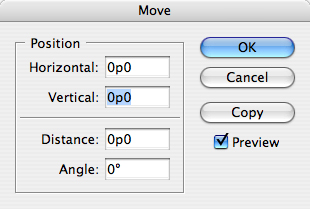 The Move dialog box gives you numerical controls for moving objects.
Tip
This command is also available in a contextual menu or by double-clicking the Selection or Direct Selection tools.
- Use the Horizontal and Vertical fields to move the object along those axes.
- Use the Distance field to move the object an absolute distance.
- Use the Angle field to set the angle along which the object moves.
- Click OK to move the original object.
or
Click Copy to create a duplicate of the object in the new position.
To copy an object as you drag:
- Hold the Opt/Alt key before you start the move.
- Move the object as described on the opposite page. A double-headed arrow indicates that a copy is being created
 .
.
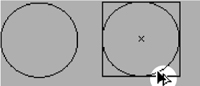 The double-headed arrow indicates that a copy is being created of the moved object.
 - Release the mouse button. The copy appears in the new position.
Replicating Objects
There are several commands you can use to create duplicates of objects. Use the Copy command when you want to put the object on the clipboard so you can paste it somewhere else.
- Select an object to copy.
- Choose Edit > Copy.
Use the Cut command to remove the object from the page so it can be pasted elsewhere.
- Select an object to cut.
- Choose Edit > Cut.
Use the Paste command to see the contents of the clipboard.
To paste objects:
• Choose Edit > Paste. The contents of the clipboard appear in the center of the window area ![]() .
.
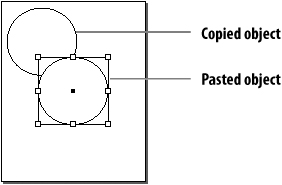
![]() The Paste command places the object in the center of the page.
The Paste command places the object in the center of the page.
or
Choose Edit > Paste in Place. The contents of the clipboard appear in the same location on the page as when they were originally selected.
The Duplicate command makes a copy without changing the contents of the clipboard.
- Choose the object to duplicate.
- Choose Edit > Duplicate. The selected object appears on the page slightly offset from the original
 .
.
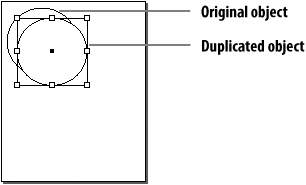 The Duplicate command places the object slightly offset from the original.
You can also duplicate many objects at once.
To duplicate multiple objects:
- Choose an object.
- Choose Edit > Step and Repeat. The Step and Repeat dialog box appears
 .
.
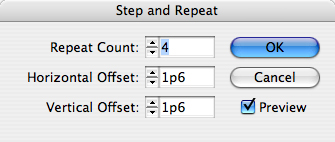 Use the Step and Repeat dialog box to make multiple copies of an object positioned at specific horizontal and vertical intervals.
 - In the Repeat Count field, enter the number of duplicates that you want to create in the top row.
- In the Horizontal Offset field, enter a distance for the horizontal space between duplicates.
- In the Vertical Offset field, enter a distance for the vertical space between duplicates.
- If desired, check the Preview box to see how your settings affect the objects.
- Click OK. The selected object is duplicated in the desired positions
 .
.
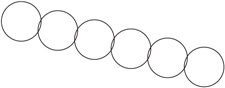 The Step and Repeat command created five copies of the first circle.
Step and Repeat can also create a grid ![]() .
.
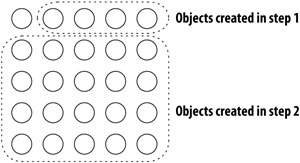
![]() An example of how to use the Step and Repeat command to create a grid of objects.
An example of how to use the Step and Repeat command to create a grid of objects.
- Set the Step and Repeat dialog box as follows:
• In the Repeat Count field, enter the number of duplicates for the top row.
• Enter the distance for the Horizontal Offset with the Vertical Offset as zero.
- Click OK to duplicate the objects.
- Select all the objects in the row, and set the Step and Repeat dialog box a second time:
• In the Repeat Count field, enter the number for the additional rows.
• Enter a distance for the Vertical Offset, with the Horizontal Offset as zero.
Resizing Objects
Very often things need to be made bigger or smaller. InDesign gives you several different ways to scale objects. You can also use the bounding box handles to change the dimensions of the object visually. This is the easiest way to quickly resize an object.
To resize using the bounding box handles:
- Choose the Selection tool.
- Choose which handle to drag based on the following options
 :
:
• Drag the corner handles to change both the width and height.
• Drag the top or bottom handles to change the height only.
• Drag the left or right handles to change the width only.
 Use the bounding box handles to resize an object.
 - Drag the handle. If you drag quickly, you will see only the bounding box of the object
 .
.
 If you drag quickly, you only see a box as you resize an object.
or
Press and hold for a moment and then drag the handle. This shows a preview of the object as you resize the bounding box
 .
. If you press and pause a moment, you see an actual preview as you resize an object.
Tip
Hold down the Shift key as you drag a corner to keep the original proportions of the width and height.
- Release the mouse button when the object is the correct size.
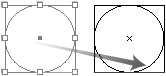
Using the Transform Tools
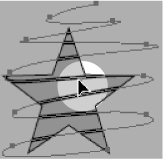
The transform tools resize and distort objects. You can transform the object itself (also called the container) or the object as well as any content. How you select objects changes the effect of the transform tools.
To control the effect of the transform tools:
• Select the object using the Selection tool. This type of selection causes the transform tools to affect both the container and any text or images inside it ![]() .
.
![]() Objects selected with the Selection tool have both the object and its content transformed by the transform tools.
Objects selected with the Selection tool have both the object and its content transformed by the transform tools.
or
Hold the Opt/Alt key as you click the frame with the Direct Selection tool. This causes the transformation to affect only the container, not any text or images contained in the frame ![]() .
.
![]() Objects selected with the Group Selection tool have only the object transformed by the transform tools.
Objects selected with the Group Selection tool have only the object transformed by the transform tools.
Tip
The plus (+) sign next to the Direct Selection tool indicates that the tool is the Group Selection tool.
All the transformations take place in relation to a reference point. Each object has a default reference point, but you can change it if necessary.
To control the reference point:
- Select the object to be transformed.
- Choose one of the transform tools. A reference point appears inside the object.
- Move the cursor near the reference point. A small icon appears next to the cursor that indicates you can move the reference point
 .
.
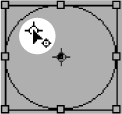 The indicator that the reference point can be moved to a new position.
 - Drag the reference point to a new position.
or
Click to position the reference point in a new position.
The Scale tool lets you increase or decrease the size of objects.
To scale objects visually using the Scale tool:
- Select the object or objects.
- Choose the Scale tool in the Tools panel
 .
.
 The Scale tool in the Tools panel is used to change the size of objects.
 - If necessary, change the position of the reference point.
- Move the cursor away from the reference point, and drag to scale the object
 .
.
 The arrowhead appears while scaling an object.
Tip
To see a preview of the image as you scale, press and hold the mouse button for a moment before you start to drag.
If you prefer, you can resize objects numerically using the Scale command.
To scale objects using the Scale command:
- Select the object or objects.
- Choose Object > Transform > Scale. This opens the Scale dialog box
 .
.
 The Scale dialog box lets you scale objects using numerical values.
 - Enter an amount for the Scale X (horizontal) field.
- Enter an amount for the Scale Y (vertical) field.
- Check the Preview check box to see the effects of entering the amounts.
- Click OK to scale the object.
or
Click Copy to create a scaled copy of the object.
To scale objects numerically using the Scale tool:
- Select the object or objects.
- Choose the Scale tool in the Tools panel.
- Hold the Opt/Alt key and click to designate the position of the reference point. This opens the Scale dialog box .
- Set the dialog box controls as described in the previous exercise.
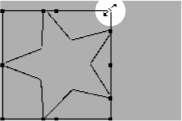
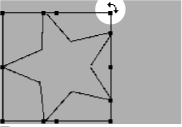
The Rotation tool changes the orientation, or angle, of the object on the page.
To rotate objects visually using the Rotate tool:
- Select the object or objects.
- Click the Rotation tool in the Tools panel
 .
.
 The Rotate tool in the Tools panel is used to change the orientation of objects.
 - If necessary, change the default reference point.
- Move the cursor away from the reference point, and drag to rotate the object
 .
.
 Rotating an object around its reference point.
To rotate objects using the Rotate command:
- Select the object or objects.
- Choose Object > Transform > Rotate. This opens the Rotate dialog box
 .
.
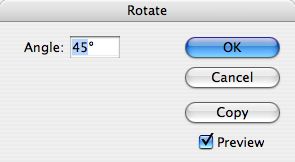 The Rotate dialog box lets you rotate objects using numerical values.
 - Use the Angle field to set how much the object should rotate.
- Check the Preview command to see the effects of entering the angle.
- Click OK to rotate the object.
or
Click Copy to create a copy as you rotate the object.
To rotate objects numerically using the Rotate tool:
- Select the object or objects.
- Choose the Rotate tool in the Tools panel.
- Hold the Opt/Alt key and click to set the position of the reference point. This opens the Rotate dialog box .
- Set the dialog box controls as described in the previous exercise.
The Shear tool distorts the shape of objects.
To shear objects visually using the Shear tool:
- Select the object or objects.
- Click the Shear tool in the Tools panel
 .
.
 Use the Shear tool in the Tools panel to distort objects.
 - If necessary, change the reference point by dragging it to a new position. The cursor indicates the reference point can be moved.
- Move the cursor away from the reference point, and drag to shear the object
 .
.
 Shearing an object around the reference point.
To shear objects using the Shear command:
- Select the object or objects.
- Choose Object > Transform > Shear. This opens the Shear dialog box
 .
.
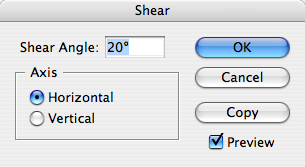 The Shear dialog box lets you distort objects using numerical values.
 - Use the Shear Angle field to set the amount of distortion.
- Check one of the Axis options:
• Horizontal shears along the horizontal axis.
• Vertical shears along the vertical axis.
- Check the Preview command to see the effects of entering the shear angle and choosing the axis.
- Click OK to shear the object.
or
Click Copy to create a sheared copy of the object.
To shear objects numerically using the Shear tool:
- Select the object or objects.
- Choose the Shear tool in the Tools panel.
- Hold the Opt/Alt key and click to set the position of the reference point. This opens the Shear dialog box .
- Set the dialog box controls as described in the previous exercise.
Rather than switching between the Scale and Rotate tools, you can use the Free Transform tool to scale, rotate, or shear an object.
To use the Free Transform tool:
- Select the object or objects.
- Click the Free Transform tool in the Tools panel
 . A bounding box appears around the object.
 Choose the Free Transform tool in the Tools panel to scale, rotate, and shear objects.
 - To scale the object, place the cursor over one of the handles. The cursor changes to a double-headed arrow
 .
.
 The double-headed arrow indicates that the Free Transform tool is in the scale mode.
or
Place the cursor outside one of the handles of the bounding box. The cursor changes to a curved double-headed arrow
 .
. The curved double-headed arrow indicates that the Free Transform tool is in the rotation mode.
or
Drag one of the handles and then hold the Cmd/Ctrl key after you have started the drag. The cursor does not change appearance, but the object will be sheared.
- Release the mouse button to apply the transformation.
Using the Transform Panel
The Transform panel allows you to move, scale, rotate, and shear objects precisely, using numerical values.
Tip
When you have objects selected, the Control panel displays many of the controls that are found in the Transform panel.
To open the Transform panel:
• Choose Window > Object & Layout > Transform to open the panel ![]() .
.
![]() The Transform panel is a command center for positioning and transforming objects.
The Transform panel is a command center for positioning and transforming objects.
or
If the Transform panel is behind other panels, click the Transform panel tab.
As you work with the Transform panel, it is important to know its reference point on the object. This is the same as the reference point used with the transform tools.
To set the Transform panel reference point:
- Select the object or objects that you want to transform.
- Click the reference point control on the Transform panel to choose the point around which the object moves
 .
.
 The reference point controls where in the object the transformation occurs.
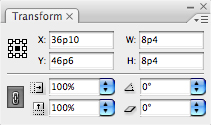
You can use the Transform panel to move objects numerically.
To move an object with the Transform panel:
- Select the object or objects that you want to move.
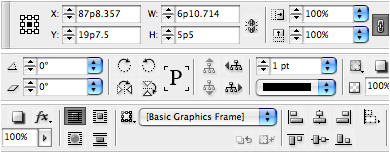
- To move the object horizontally, enter an amount in the X field
 .
.
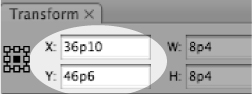 The X and Y fields in the Transform panel control the position of an object.
 - To move the object vertically, enter an amount in the Y field .
- Press Enter or Return to apply the changes.
You can use the Transform panel to resize an object numerically.
To resize with the Transform panel:
- Select the object or objects.
- If necessary, change the reference point as explained on the preceding page.
- To change the width of the object, enter an amount in the W field
 .
.
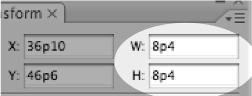 The W and H fields in the Transform panel control the width and height of objects.
 - To change the height of the object, enter an amount in the H field .
- Press Enter or Return to resize the object.
You can resize proportionally even if you know the size for only one side of the object.
- Select the object or objects.
- Enter the new size in the W field or H field .
- Do not change the amount in the other field.
- Hold Cmd/Ctrl as you press Enter or Return. The amount in both the W and H fields changes proportionally.
You can also scale using the Transform panel.
To scale with the Transform panel:
- Select the object or objects.
- If necessary, change the reference point.
- To change the horizontal size, enter a percentage in the Scale X field
 .
.
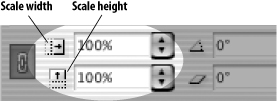 The Scale width and height fields in the Transform panel let you apply percentage amounts to scale objects.
 - To change the height of the object, enter a percentage in the Scale Y field .
- Press Enter or Return to apply the changes.
To scale proportionally with the Transform panel:
- Select an object or objects.
- If the Link icon is in the open state, click to close it
 .
.
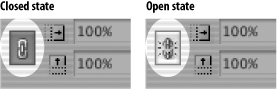 The Link icon in the closed state forces both the Scale X and the Scale Y fields to the same amount. In the open state, you can enter different amounts for the Scale X and Scale Y fields.
 - Enter an amount in either the Scale X or Scale Y fields. You do not have to enter an amount in both fields. The closed Link icon forces both fields to display the same amount.
- Press Enter or Return to apply the changes.
You can also rotate objects using the Transform panel.
To rotate with the Transform panel:
- Select the object or objects.
- If necessary, change the reference point.
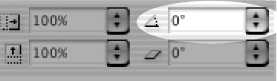
- Enter the amount of rotation in the Rotation field
 .
.
 The Rotate field in the Transform panel lets you change the angle of objects.
 - Press Enter or Return to apply the changes
 .
.
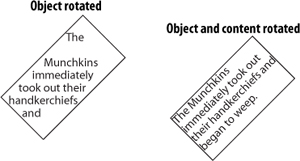 The difference between rotating an object or rotating an object and its content.
You can also shear objects using the Transform panel.
To shear with the Transform panel:
- Select the object or objects.
- If necessary, change the reference point.
- Enter the amount of distortion in the Shear field
 .
.
 The Shear field in the Transform panel lets you distort the shape of objects.
 - Press Enter or Return to apply the changes
 .
.
 The difference between shearing an object or shearing an object and its content.
Using the Transform Commands
In addition to the transform tools and transform fields, there are a whole bunch of transform commands you can use on objects. These commands make it easy to perform commonly used transformations, such as rotating and flipping objects.
To rotate with the Transform commands:
- Select an object or objects.
- Click to open the Transformation panel menu.
or
Choose Object > Transform.
- Choose one of the rotation settings as follows
 :
:
• Rotate 180°.
• Rotate 90° CW (clockwise).
• Rotate 90° CCW (counter-clockwise).
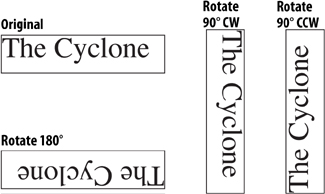 The effects of rotating objects using the Transform submenu.
To flip objects using the Transform commands:
- Select an object or objects.
- Click to open the Transform panel menu.
or
- Choose Object > Transform.
Choose one of the flip settings as follows
 :
:• Flip Horizontal.
• Flip Vertical.
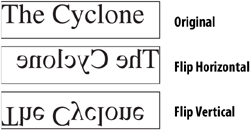 The effects of flipping objects using the Transform submenu.
When you perform a transformation on an object, that transformation is stored in InDesign’s memory. You can then perform the same transformation again on another object—even in another document! This is similar to Illustrator’s Transform Again command.
- Use any of the transform commands on a selection.
- Select a different object or objects.
- Choose one of the following from the Object > Transform Again submenu.
• Transform Again applies the last single transform command to the selection as a whole
 .
.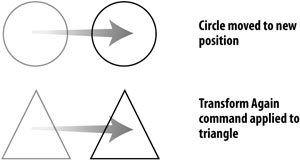 The Transform Again command allows you to duplicate transformation commands applied to objects.
• Transform Again Individually applies the last single transform command to each object in the selection
 .
.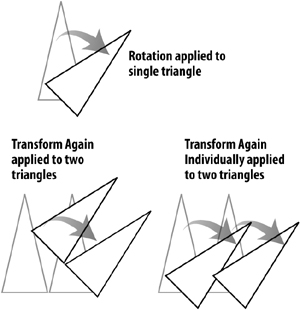 The differences between the Transform Again command and the Transform Again Individually when applied to multiple objects.
• Transform Sequence Again applies the last set of transformation commands to the selection as a whole.
• Transform Sequence Again Individually applies the last set of transformation commands to each object in the selection.
Tip
InDesign remembers all the transformation commands until you select a different object or perform a different task.
Using the Arrange Commands
Objects in InDesign are layered on top of one another in the same order they were created. (This is sometimes called the stacking order.) The first object created is behind the second, the second behind the third, and so on. Though you may not see the layering when objects are side by side, it is apparent when they overlap ![]() .
.

![]() When two objects overlap, it is obvious which object is in front of the other.
When two objects overlap, it is obvious which object is in front of the other.
Tip
The layering of objects is not the same as the layers of a document. (See Chapter 11, “Layers,” for more information on working with layers.)
The Arrange commands allow you to move objects through the stacking order.
To move up or down one level in a stack:
- Select the object you want to move.
- Choose Object > Arrange > Bring Forward to move the object in front of the next object in the stacking order
 .
.
 Effects of the Bring Forward command.
or
Choose Object > Arrange > Send Backward to move the object behind the next object in the stacking order
 .
. Effects of the Send Backward command.
To move up or down the entire stack:
- Select an object you want to move.
- Choose Object > Arrange > Bring to Front to move the object in front of all the others in its layer
 .
.
 Effects of the Bring to Front command.
or
Choose Object > Arrange > Send to Back to move the object behind all the others in its layer
 .
. Effects of the Send to Back command.
Aligning Objects
The Align panel provides commands that align objects or distribute them evenly along a horizontal or vertical axis.
- Choose Window > Object & Layout > Align. This opens the Align panel
 .
.
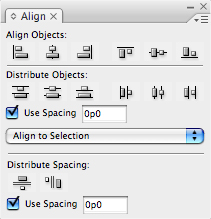 Use the Align panel to arrange objects in an orderly fashion.
 - Choose Show Options from the Align panel menu to see all the commands in the panel.
- Select two or more objects.
- Use the Alignment menu to choose to what items the objects should align
 .
.
• Align to Selection uses the objects themselves for alignment.
• Align to Margins uses the margins for alignment.
• Align to Page uses the page trim for alignment.
• Align to Spread uses the size of the spread for alignment.
 The alignment menu lets you choose how the objects should be aligned.
 - Click an alignment icon as follows:
• Click a vertical alignment icon to move the objects into left, centered, or right alignment
 .
.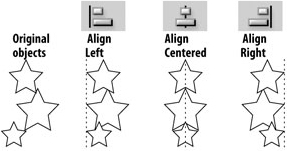 Effects of the vertical alignment icons.
• Click a horizontal alignment icon to move the objects into top, centered, or bottom alignment
 .
.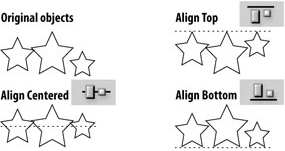 Effects of the horizontal alignment icons.
Tip
The align commands move objects based on the best representation of the controls. For instance, the Align Left command uses the leftmost object; Align Top uses the topmost object, and so on.
You can also move objects so the spaces between certain points of the objects are equal. This is called distributing objects.
- Select three or more objects.
- Click a distribute icon as follows:
• Click a vertical distribute icon to move the objects so that their tops, centers, or bottoms are equally distributed
 .
. Effects of the vertical distribute icons Notice that the middle object changes position to create an even distribution.
• Click a horizontal distribute icon to move the objects so that their left edges, centers, or right edges are equally distributed
 .
.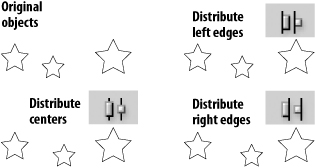 Effects of the horizontal distribute icons Notice that the middle object changes position to create an even distribution.
You can also distribute objects based on their size. This ensures that the space between the objects is equal.
To distribute the space between objects:
- Select three or more objects.
- Click a distribute space icon as follows:
• Click the vertical space icon to move objects so the vertical spaces between them are equal
 .
.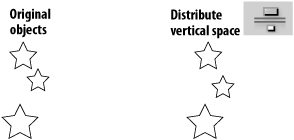 Effect of the vertical distribute space icon.
• Click the horizontal space icon to move objects so the horizontal spaces between them are equal
 .
.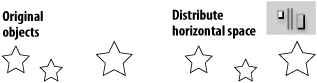 The effect of the horizontal distribute space command.
The Align panel also has controls to space objects numerically. You can apply a numerical distance between the tops, centers, bottoms, or sides of objects.
To use spacing to distribute objects:
- Select two or more objects.
- Check Use Spacing in the Distribute Objects section of the Align panel
 .
.
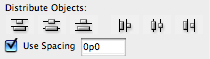 The Use Spacing option for Distribute Objects lets you set a specific distance between the tops, centers, bottoms, or sides of objects.
 - Enter the numerical distance in the Use Spacing field.
- Click one of the Distribute Objects icons. Now the objects are separated by a specific space inserted between the tops, centers, bottoms, or sides of the objects.
You can also set a specific numerical distance between the objects themselves. This is very useful when you want the same amount of space between objects, but the objects themselves have different sizes.
To set the spacing between objects:
- Select two or more objects.
- Check Use Spacing in the Distribute Spacing section of the Align panel
 .
.
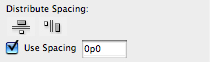 The Use Spacing option for Distribute Spacing lets you set a specific distance between objects.
 - Enter the numerical distance in the Use Spacing field.
- Click one of the Distribute Spacing icons. Now a specific amount of space is added between the objects horizontally or vertically.
Grouping and Pasting Into Objects
You can group objects so you can easily select and modify them as a unit.
- Select the objects you want to group.
- Choose Object > Group. A dotted-line bounding box encloses all the objects
 .
.
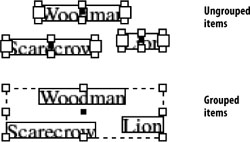 When selected with the Selection tool, grouped items display a bounding box around the entire group.
You can also create groups within groups. This is called nesting.
- Select the grouped objects.
- Hold the Shift key and select another object or group.
- Choose Object > Group.
Once you have grouped objects, you can select individual objects within the group.
To select groups or objects within groups:
• Click once on any item in the group. The group is selected as a whole.
or
Double-click to select a specific item in the group ![]() .
.
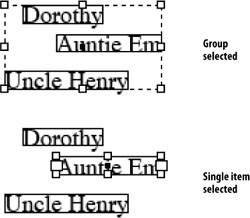
![]() When selected with the Direct Selection tool, a single item in a group is displayed on its own.
When selected with the Direct Selection tool, a single item in a group is displayed on its own.
Tip
The first double-click may act like the Direct Selection tool. If so, double-click again to select the entire item.
To use commands to select objects within groups:
- Use the Selection tool to select the group.
- Choose Object > Select > Content. This selects the topmost object in the group.
- Choose Object > Select > Previous Object. This selects the object that is layered below the selected object.
or
Choose Object > Select > Next Object. This selects the object that is directly above the selected object.
- Select the group.
- Choose Object > Ungroup.
- If you have nested groups, continue to ungroup the objects as necessary.
You can also paste an object into a frame. This is similar to the concept of masks in illustration programs. InDesign refers to the object that is pasted as the content. It refers to the frame that holds the object as the container.
To paste an object into another:
- Select the first object and position it over the second object
 .
.
 An object to be pasted into another should be positioned over the other.
 - Choose Edit > Cut to place the first object on the computer clipboard.
- Select the second object and choose Edit > Paste Into. The content appears within the borders of the container
 .
.
 The Paste Into command displays the content only within the borders of the container.
- Use the Direct Selection tool to select the pasted-in content.
- Choose Edit > Cut.
There are some special techniques for selecting just the container or the content of pasted-in objects.
To select just the container object:
• Click on the frame that holds the content with the Direct Selection tool to select the container ![]() .
.

![]() Click with the Direct Selection tool to select just the container.
Click with the Direct Selection tool to select just the container.
or
Click with the Selection tool and then choose Object > Select > Container.
To select just the content object:
• Click inside the container with the Direct Selection tool to select the content ![]() .
.
![]() Click inside the container with the Direct Selection tool to select the content.
Click inside the container with the Direct Selection tool to select the content.
or
Click with the Selection tool and then choose Object > Select > Content.
You use special techniques to move the content inside the container.
To move only the content object:
- Select the content object.
- Use either the Direct Selection or the Selection tool to drag the content by its center point
 . The content moves within the container.
 Use the center point to move just the selected content.
- Select the container object.
- Use either the Direct Selection or the Selection tool to drag the container by its center point
 . The container moves without disturbing the content.
 Drag the center point of the container to move it without disturbing the content.
Using the Control Panel for Objects
The Control panel is context sensitive. This means it displays different commands depending on the number of objects selected, or if the objects are grouped or pasted-in.
To use the Control panel with a single object:
• Select an object, grouped object, or several objects. The Control panel displays the following options ![]() :
:
• Transform panel commands
• Flip commands
• Select container, content, next object, and previous object
• Stroke options for width and stroke style
• Effects
• Text wrap
• Object styles
• Alignment controls
![]() The Control panel when an object is selected.
The Control panel when an object is selected.
Using the Measure Tool
There are many places where you can find the numerical sizes of items. But what if you want to measure the distance to another item? That’s where the Measure tool is so helpful.
To measure distances using the Measure tool:
- Choose Window > Info to open the Info panel.
- Click the Measure tool in the Tools panel
 .
.
 The Measure tool in the Tools panel.
 - Place the Measure tool on the start point and drag to the end point. A measuring line appears on the page
 . The Info panel displays the following attributes
  :
:
• Horizontal position displays the X coordinate of the first point in the line or whichever point is then moved.
• Vertical position displays the Y coordinate of the first point in the line or whichever point is then moved.
• Distance shows the length of the line.
• Width shows the width of the bounding box that would enclose the line.
• Height shows the height of the bounding box that would enclose the line.
• Angle shows the angle on which the line was drawn.
 Drag the Measure tool to measure the distance between two points.
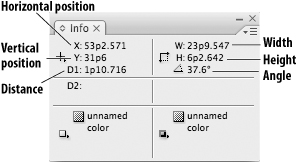 The measurements displayed in the Info panel for the measuring line drawn with the Measure tool.
Once you have drawn a measuring line, you can move it to other areas of the page.
- With the Measure tool still selected, position the cursor over the measuring line.
- Drag the line to a new position
 .
.
 Drag the line segment of the measuring line to move it to a new position.
You can also change the start or end points of the measuring line.
To reposition the points of the measuring line:
- With the Measure tool still selected, position the cursor over either point in the measuring line.
- Drag the point to a new position.
You can also extend a second line out from the origin of the measuring line to create an electronic protractor to measure angles.
- Drag the first line with the Measure tool.
- Hold the Opt/Alt key and move the Measure tool back to the origin of the first line. An angle cursor appears
 .
.
 The angle cursor indicates that you are about to create a second measuring line.
 - Drag to create a second line extending out from the origin point
 . The Info panel displays the distance of the second line, as well as the angle between the measuring lines
  .
.
 Two measuring lines let you measure angles with the Measure tool.
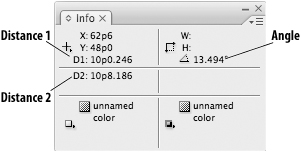 The Info panel display for two measuring lines.
Using the Info Panel with Objects
The Info panel also gives you information about the document, text, and placed images.
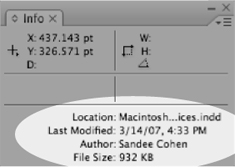
To see the document information:
• Deselect any objects on the page. The Info panel displays the following information ![]() :
:
• Location of the file on the computer.
• Last Modification date and time.
• Author as entered in the File Info (File > File Info) dialog box.
• File size.
![]() With no objects selected, the Info panel displays document information.
With no objects selected, the Info panel displays document information.
To see the text information:
• Place your insertion point inside a text frame.
or
Highlight the text in the frame. The Info panel displays the following ![]() :
:
• Characters in the frame or selection.
• Words in the frame or selection.
• Lines in the frame or selection.
• Paragraphs in the frame or selection.

![]() With text selected, the Info panel displays text information.
With text selected, the Info panel displays text information.
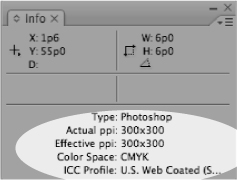
To see the placed object information:
• Select a frame that contains a placed image, or the placed image itself. The Info panel displays the following ![]() :
:
• Type of placed image.
• Actual ppi (points per inch) resolution of the image.
• Effective ppi resolution of the image if you have scaled the image in InDesign.
• Color Space of the image.
• ICC Profile (if applicable) may also be shown.
![]() With a placed image selected, the Info panel displays placed image information.
With a placed image selected, the Info panel displays placed image information.
Locking Objects
You can also lock objects so they cannot be moved or modified. This prevents people from inadvertently destroying your layout.
Tip
Locking objects is not the same as locking the layers of a document. (See Chapter 11, “Layers,” for more information on working with layers.)
To lock the position of an object:
- Select the objects you want to lock.
- Choose Object > Lock Position. A small padlock appears if you try to move or modify the object
 .
.
 The Padlock cursor indicates that the Lock Position command has been applied.
- Select the objects you want to unlock.
- Choose Object > Unlock Position.
Selecting Frames
Use this chart as a guide to let you know what type of object you have selected and which parts of the object can be selected using the Selection tool or the Direct Selection tool.
