“The Next Step” is really a pretty decent name for this chapter, because (a) it’s about what you’d do next in Camera Raw, after you’ve got the essentials down, and (b) it’s also the name of a song by jazz guitarist Kurt Rosenwinkel (from his album of the same name). Now, as far as jazz guitarists go, Kurt certainly is good (hey, I did listen to a 30-second clip of his song in the iTunes Music Store), but my favorite jazz guitarist in iTunes is Barry Greene. Now, I actually know Barry Greene (have known him for years—he’s a great guy and an unbelievable guitar player), and while I’m proud to know him, I’m embarrassed to tell you how I know him—he was once the guitar player in my band. That, in and of itself, isn’t all that embarrassing, but it’s when we played together, and what we played. It wasn’t jazz. That’s right, it was in the early ’80s and we played in a disco band. That’s right—I’m not ashamed of it—I was the keyboard player in a disco band. For years. With Barry. An equally embarrassing admission is...I liked it. Sadly, I dressed the part of the ‘80s disco keyboard player, with long coats, thin ties, I had blonde highlights in my hair, I wore bolos, gloves with the fingers cut out, white boots, you name it. We all did (we thought it was cool. We were wrong). Worse yet, I still have our band photo, and because I want to give you the ultimate mental break before we head into more advanced Camera Raw stuff, I posted it, just for you, on my blog at www.scottkelby.com (when you go there, in the search field on the right, type in “Rumor Hazit,” the name of our disco band back then, and you’ll find a link to the photo). Now, you may notice that besides wearing devastatingly cool stage clothes, I had a slightly different (thinner) appearance, as well. So when you go there, I have but one request: be kind.
As good as digital cameras have become these days, when it comes to exposure, the human eye totally kicks their butt. That’s why we shoot so many photos where our subject is backlit, because with our naked eye we can see the subject just fine (our eye adjusts). But when we open the photo, the subject is basically in silhouette. Or how about sunsets where we have to choose which part of the scene to expose for—the ground or the sky—because our camera can’t expose for both? Well, here’s how to use Camera Raw to overcome this exposure limitation:
Step One:
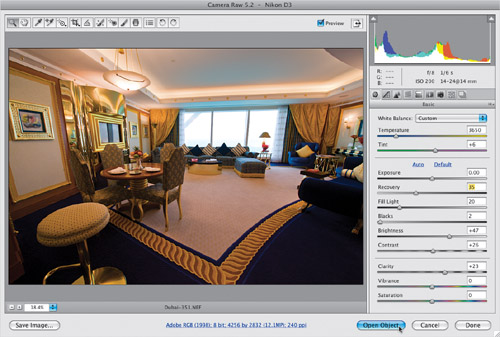
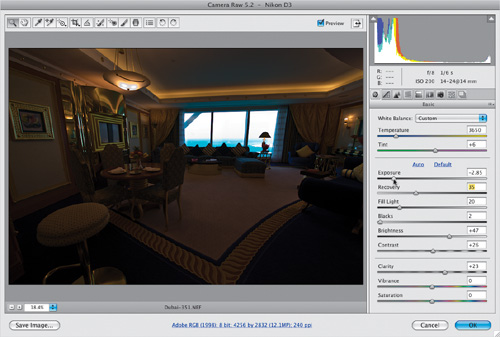
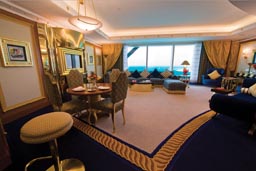
Open the photo you want to double-process. In this example, the camera properly exposed for the room, so the bright light outside the windows is totally blown out. Of course, or goal is to create something our camera can’t—a photo where both the inside and outside are exposed properly. To make things easy, we’re going to open this image as a Smart Object in Photoshop, so press-and-hold the Shift key, and the Open Image button at the bottom changes into the Open Object button. Click that button to open this version of the photo in Photoshop as a Smart Object (you’ll see the advantage of this in just a minute).
SCOTT KELBY
Step Two:
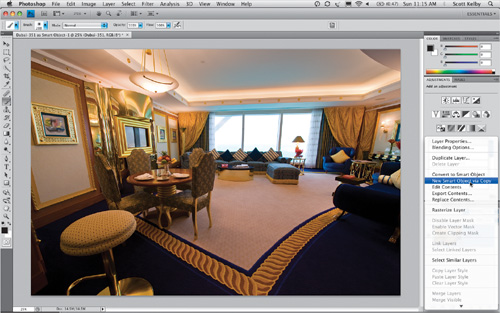
Your image will open in Photoshop as a Smart Object (you’ll see the layer thumbnail has a little page icon in the bottom-right corner). So, now we need a second version of this image—one we can expose for the foreground. If you just duplicate the layer, it won’t work because this duplicate layer will be tied to the original layer, and any changes you make to this duplicate will also be applied to the original layer. So, to get around that, go to the Layers panel, Control-click (PC: Right click) on the layer, and from the contextual menu that appears, choose New Smart Object via Copy. This gives you a duplicate layer, but breaks the link.
Step Three:
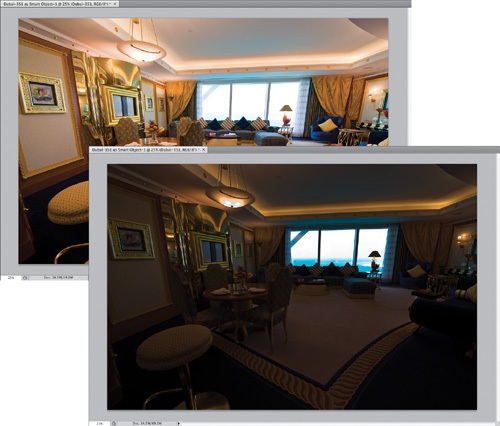
Now double-click directly on this duplicate layer’s thumbnail and it opens this duplicate in Camera Raw, but this time, you’re going to expose for the view outside the windows, without any regard for how the room in the foreground looks (it will turn really dark, but who cares—you’ve already got a version with the room properly exposed on its own separate layer). So, drag the Exposure slider way over to the left, until you can see some detail through the windows. Here you can see the ocean outside the windows.
Step Four:
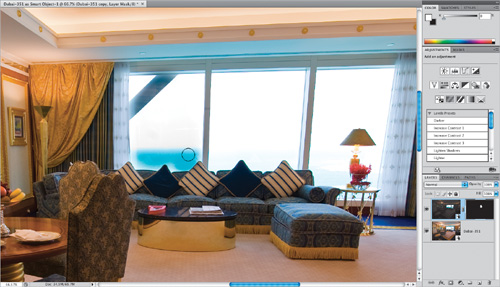
You now have two versions of your photo (as seen here), each on different layers—the brighter one exposed for the interior on the bottom layer, and the darker version on the layer directly on top of it, and they are perfectly aligned one on top of one another.
Step Five:
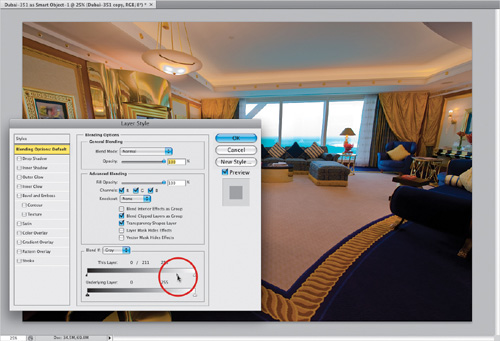
Now, at this point I usually try a little trick first that automatically combines the two images into one, and while it doesn’t work with every photo, when it does, it’s a thing of beauty. Go to the Layers panel and double-click right below the top layer’s name (not on the thumbnail—right below the layer’s name) to bring up the Layer Style dialog’s Blending Options (seen here). At the bottom are two Blend If sliders, and if you drag the top one to the right, it will blend the darker areas from the layer below it. The problem is it’s a very harsh blending (you can actually see harsh jaggy edges), that is unless you press-and-hold the Option (PC: Alt) key before you start dragging. This splits the slider in two, and gives you a smooth blend (look at the half of the slider circled in red here—it splits the slider nub in half).
Step Six:
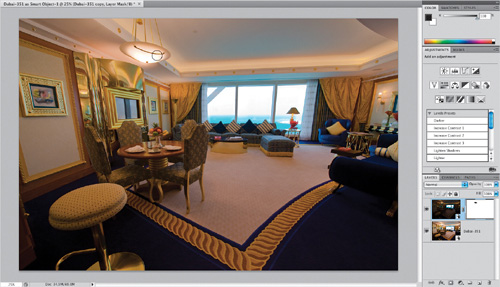
In our example, I dragged the top split slider all the way to the right, and it created a blend of the outside exposure and inside exposure (as seen here), but it also did one thing I didn’t like: Take a look at the light bulbs in the hanging light fixture over the dining table. They look, well...kinda lame. So, luckily, you can bring back any areas from the original background layer by doing this: click on the Add Layer Mask icon (at the bottom of the Layers panel—it’s the third icon from the left), then get the Brush tool (B), choose a soft-edged brush, press D, then X to set your Foreground color to black, and paint right over the area that doesn’t look good (in this case, the hanging lamp), and it returns it to its original condition. Basically, you’re covering up the blending with a black mask. More on masks later in the book.
TIP: Always Opening Your Images as Smart Objects
If you always want your RAW-processed images to open as Smart Objects, click on the workflow options link at the bottom of the Camera Raw dialog (the blue text below the Preview area), and when the dialog appears, turn on the Open in Photoshop as Smart Objects checkbox.
Step Seven:
Unfortunately, most of the time we have to blend these two images manually using layer masks, which just takes longer. Let’s start by deleting our duplicate layer, then go back to Step Two and make a copy of your Smart Object layer, and lower the exposure and all that stuff, but stop before you use the Blend If sliders. Instead, go to the Layers panel, press-and-hold the Option (PC: Alt) key, and click on the Add Layer Mask icon at the bottom of the Layers panel. This puts a black mask over the layer with the photo exposed for the outside, covering it so you only see the lighter image on the background layer (as seen here). Remember: The darker outside version is still there—it’s just hidden behind that black mask. Now, press the letter B to get the Brush tool, then click on the down-facing arrow next to the word Brush in the Options Bar and choose a medium-sized, hard-edged brush from the Brush Picker (this helps to keep you from painting outside the lines). Now, press the letter D to set your Foreground color to white, and start painting over the areas of the photo that you want to be darker (in this case, the windows). As you paint with white directly on that black mask, the white reveals the darker version beneath the mask. Just be careful not to paint on the walls, curtains, etc.

Before
After
One of the biggest advantages of using Camera Raw is that it enables you to apply changes to one photo, and then easily apply those exact same changes to a bunch of other similar photos taken in the same approximate setting. It’s a form of built-in automation, and it can save you an incredible amount of time when editing your shoots (plus, if you use Bridge’s Camera Raw, rather than Photoshop’s, you can have your photos processing in the background, while you’re working on something else in Photoshop. That is some serious productivity!).
Step One:
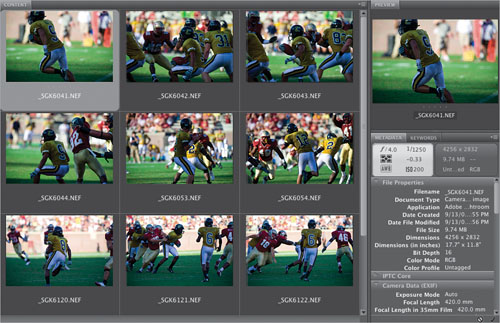
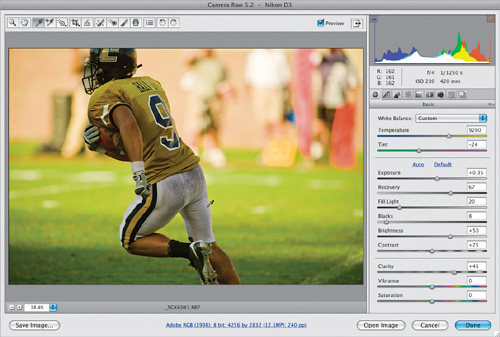
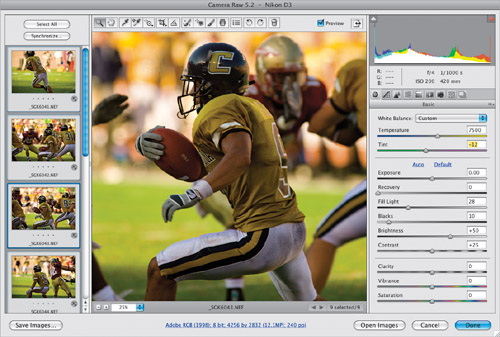
The key to making this work is that the photos you edit all are shot in similar lighting conditions, or all have some similar problem. In this case, our photos are from a college football game. Earlier in the day, the field was in the sun, and the white balance and exposure were fine, but later in the day, part of the field wound up in the shadows, so the white balance was off, making the uniforms have a bluish cast, and putting the players in the shadows.
SCOTT KELBY
Step Two:
So, go to Bridge, click on a photo to edit, and press Command-R (PC: Ctrl-R) to open the photo in Bridge’s Camera Raw (as shown here). Adjust the photo the way you’d like. In our example, I started by taking the White Balance tool (I) and clicking on the back of this player’s leg to remove the blue color cast. Next, I increased the exposure a bit, and raised the Recovery amount to tame the bright light behind him. The player’s in the shadows a bit, so I increased the Fill Light amount to make him more visible. Lastly, I moved the Clarity slider to the right to give the photo more punch. When you’re done, don’t open the image, just click the Done button.
Step Three:
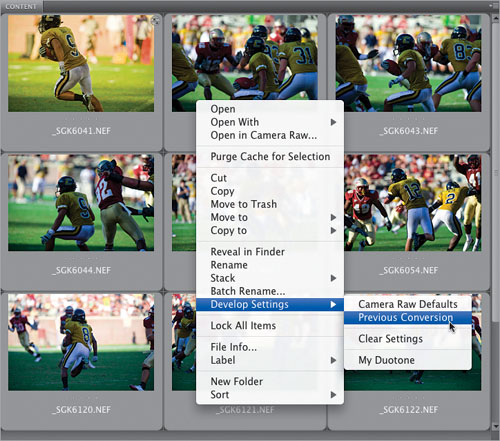
When you click that Done button, you’re returned to Bridge, and the thumbnail for the photo you just edited now reflects the changes you made (you can see here, it’s warmer and brighter). Press-and-hold the Command (PC: Ctrl) key and select all the other photos in Bridge that you want to have those exact same edits (white balance, exposure, recovery, fill light, etc.). Now, Control-click (PC: Right-click) on any one of those selected photos, and a contextual menu will appear. Go under Develop Settings and choose Previous Conversion (as shown here).
Step Four:
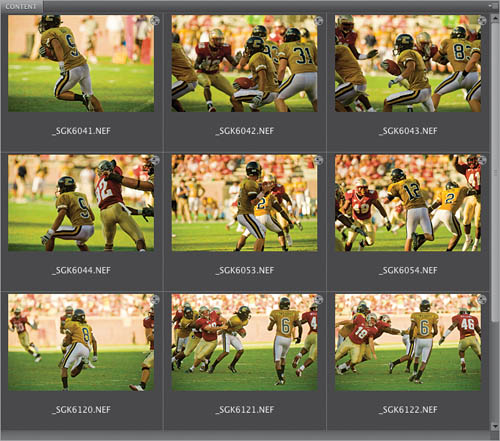
All the changes you made to the previous photo are now applied to all your selected photos in Bridge (as shown here, where you can see the white balance is now better [it’s much less blue], the fill light has been tweaked, etc.). Now, what if you only wanted to apply certain edits you made—like just the white balance setting, and not all the other stuff? Then you’d use another method (on the next page).
TIP: Clearing the Develop Settings
If after applying those edits to your photos, you decide one or more of them doesn’t look good with those edits, then Control-click (PC: Right-click) to bring up that contextual menu again, but this time go under Develop Settings and choose Clear Settings. This removes any changes made in Camera Raw.
Step Five:
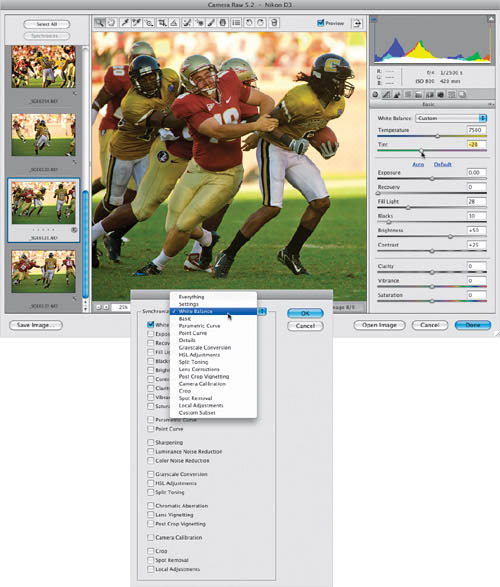
If you’re not in Bridge, you can go to the folder on your computer where your RAW photos are, select them, and double-click on one of them to open them all in Camera Raw (you’ll see them appear in a vertical filmstrip along the left side. To open JPEGs or TIFFs in Camera Raw, you’ll need to select them in Bridge and then press Command-R [PC: Ctrl-R]). Click on one of the photos and make your edits. In this case, we just want to fix the white balance and fill light. I used the Shade White Balance preset, but then their pants looked a little magenta, so I dragged the Tint slider a little bit away from magenta (as shown here). I also increased the fill light, then the blacks, so the Fill Light adjustment didn’t make the photo look washed out. Now click the Select All button at the top left, and then click the Synchronize button (beneath it). This brings up the Synchronize dialog (shown here), where you choose which of the edits you made to the first photo will be applied to the rest of your selected photos. Here, we only want the White Balance, Fill Light, and Blacks settings applied, so choose White Balance from the Synchronize pop-up menu at the top, and it automatically deselects all the other checkboxes, then turn on the checkboxes for Fill Light and Blacks.
Step Six:
When you click OK, only those checked edits will be applied to all your selected photos in Camera Raw, as seen here, where you can see in the filmstrip how the other thumbnails are now updated with the non-bluish look.
TIP: Editing Only Select Photos
If you only want certain photos to be affected, and not all the ones open in Camera Raw, then in the filmstrip, Command-click (PC: Ctrl-click) on only the photos you want affected and click the Synchronize button.
If you shoot in JPEG, your digital camera applies sharpening to your photo right in the camera itself, so no sharpening is automatically applied by Camera Raw. But if you shoot in RAW, you’re telling your camera to ignore that sharpening, and that’s why, when you bring a RAW image into Camera Raw, by default, it applies some sharpening, called “capture sharpening.” In my workflow, I sharpen twice: once here in Camera Raw, and once more right before I output my final image from Photoshop (called “output sharpening”). Here’s how to apply capture sharpening in Camera Raw:
Step One:
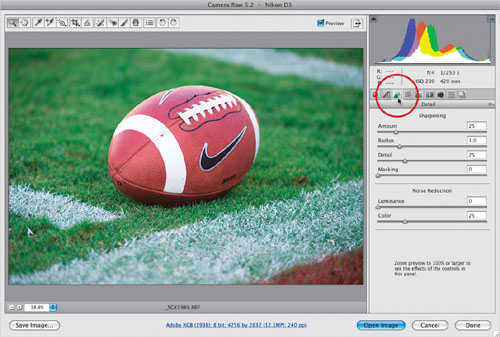
When you open a RAW image in Camera Raw, by default, it applies a small amount of sharpening to your photo (not the JPEGs or TIFFs, only RAW images). You can adjust this amount (or turn if off altogether, if you like) by clicking on the Detail icon, as shown here, or using the keyboard shortcut Command-Option-3 (PC: Ctrl-Alt-3). At the top of this panel is the Sharpening section, where by a quick glance you can see that sharpening has already been applied to your photo. If you don’t want any sharpening applied at this stage (it’s a personal preference), then simply click-and-drag the Amount slider all the way to the left to lower the amount of sharpening to 0 (zero), and the sharpening is removed.
SCOTT KELBY
Step Two:
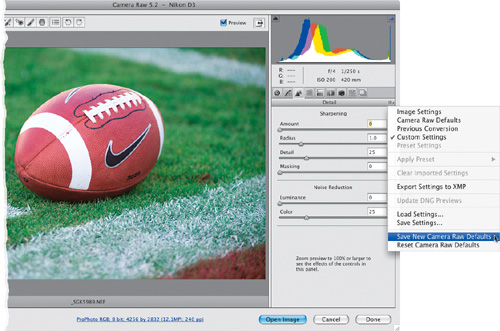
If you want to turn off this automatic, by default sharpening (so image sharpening is only applied if you go and manually add it yourself), first set the Sharpening Amount slider to 0 (zero), then go to the Camera Raw flyout menu and choose Save New Camera Raw Defaults (as shown here). Now, RAW images taken with that camera will not be automatically sharpened.
Step Three:
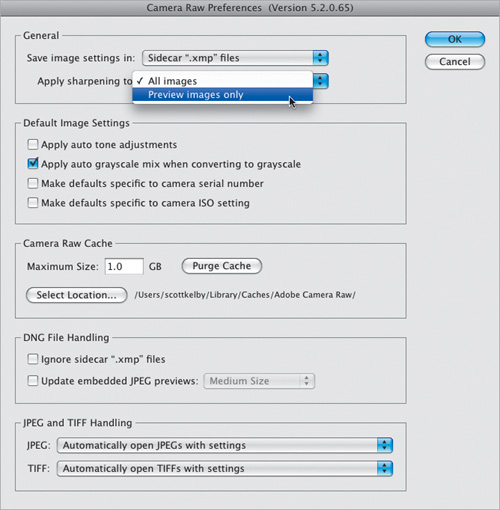
Before we charge into sharpening, there’s one more thing you’ll want to know: if you don’t actually want sharpening applied, but you’d still like to see what the sharpened image would look like, you can sharpen just the preview, and not the actual file. Just press Command-K (PC: Ctrl-K) while Camera Raw is open, and in the Camera Raw Preferences dialog, choose Preview Images Only in the Apply Sharpening To pop-up menu (as shown here), and then click OK to save this as your default. Now the sharpening only affects the preview you see here in Camera Raw, but when you choose to open the file in Photoshop, the sharpening is not applied.
Step Four:
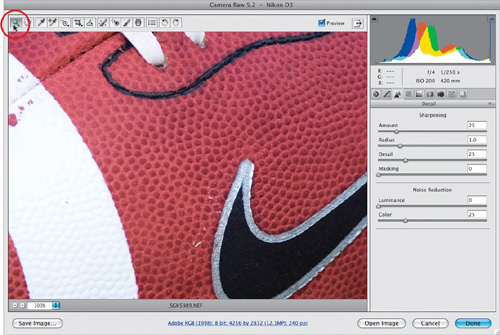
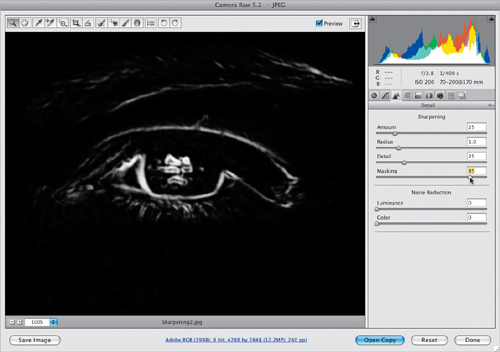
When this Sharpening section was first introduced in CS3, I’d watch friends and students use it, and you’d see them drag the Amount slider all the way over to the right (to 150) and then back to 0 (zero) again and then back to 150 again, and they’d say, “It’s not doing anything!” That’s because, even though it says right within the Detail panel itself, “Zoom preview to 100% or larger to see the effects of the controls in this panel,” virtually no one sees that. So, forgive me if you did read that message in the panel and this seems totally obvious to you, but (here goes) before you do any actual sharpening, set your view to 100% (as shown here), or you really won’t be able to see the sharpening as you apply it (sorry...it had to be said). The quickest way to get to that 100% view is to double-click directly on the Zoom tool (shown circled here). (Note: The message will disappear after you zoom in to 100%.)
Step Five:
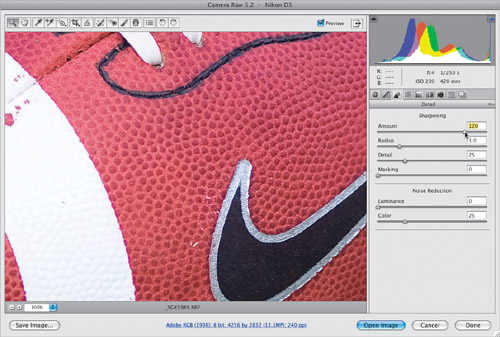
Now that you’re at a 100% view, drag the Amount slider all the way to the right so you can see, in fact, that when you’re at 100%, the sharpening does indeed work. Again, dipping into the realm of the painfully obvious, dragging the Amount slider to the right increases the amount of sharpening. Compare the image shown here, with the one in Step Four (where the Sharpening Amount was set to the default of 25), and you can see how much sharper the image now appears, even though I only dragged it to 120.
TIP: Making Camera Raw Full Screen
To have Camera Raw expand to fill your entire screen, click the Full Screen icon to the right of the Preview checkbox, at the top of the window.
Step Six:
The next slider down is the Radius slider, which determines how far out the sharpening is applied from the edges being sharpened in your photo. This pretty much works like the Radius slider in Photoshop’s Unsharp Mask filter, which is probably why the default is 1 (because that’s probably where we’ll leave it most of the time). I use less than a Radius of 1 if the photo I’m processing is only going to be used on a website, in video editing, or somewhere where it’s going to be at a very small size or resolution. I only use a Radius of more than 1 when the image is visibly blurry and needs some “emergency” sharpening. If you decide to increase the Radius amount above 1 (unlike the Unsharp Mask filter, you can only go as high as 3 here), just be careful, because if you go too much above 1, your photo can start to look fake and oversharpened. You want your photo to look sharp, not sharpened, so be careful out there.

Step Seven:
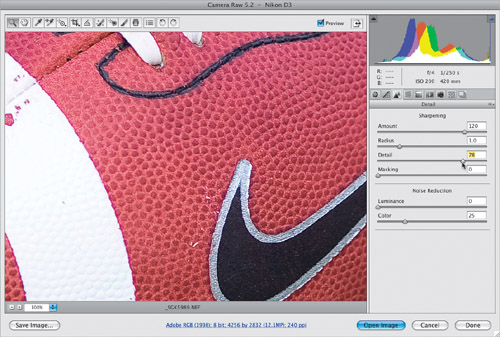
The next slider down is the Detail slider, which determines how much of the edge areas are affected by sharpening. You’ll apply lower amounts of Detail if your photo is slightly blurred, and higher amounts if you really want to bring out texture and detail (which is why this slider is aptly named). So, how much Detail you apply depends on the subject you’re sharpening. With an image like this one, with lots of texture in the leather, it’s an ideal candidate for a high amount of Detail (so are most landscapes, cityscapes, motorcycle shots—stuff with lots of edges), so I dragged the slider to the right (all the way to 78), until the detail really came out in the leather.
Step Eight:
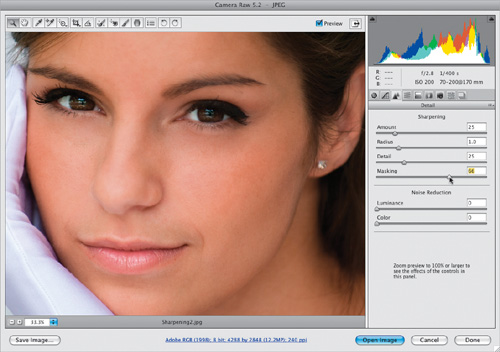
I’m going to change photos to show you the Masking slider. This one’s easier to understand, and for many people, I think it will become invaluable. Here’s why: When you apply sharpening, it gets applied to the entire image evenly. But what if you have an image where there are areas you’d like sharpened, but other softer areas that you’d like left alone (like the photo here, where you want to keep her skin soft, but have her eyes, lips, etc., sharpened)? If we weren’t in Camera Raw, you could apply the Unsharp Mask filter to a duplicate layer, sharpen this layer, add a layer mask, and paint away (cover) those softer areas, right? Well, that’s kind of what the Masking slider here in Camera Raw does—as you drag it to the right, it reduces the amount of sharpening on non-edge areas. The default Masking setting of 0 (zero) applies sharpening to the entire image. As you drag to the right, the non-edge areas are masked (protected) from being sharpened.
SCOTT KELBY
Step Nine:
All four sliders in the Sharpening section of the Detail panel let you have a live preview of what the sharpening is affecting—just press-and-hold the Option (PC: Alt) key as you drag; your screen will turn grayscale, and the areas that the slider you’re dragging will affect appear as edge areas in the preview window. This is particularly helpful in understanding the Masking slider, so press-and-hold the Option key and drag the Masking slider to the left. When Masking is set to 0, the screen turns solid white (because sharpening is being evenly applied to everything). As you drag to the right, the preview (shown here) now shows only the parts of the photo receiving sharpening. If you drag all the way to 100, you’ll see that only the most obvious edges are now receiving full sharpening.
Step 10:
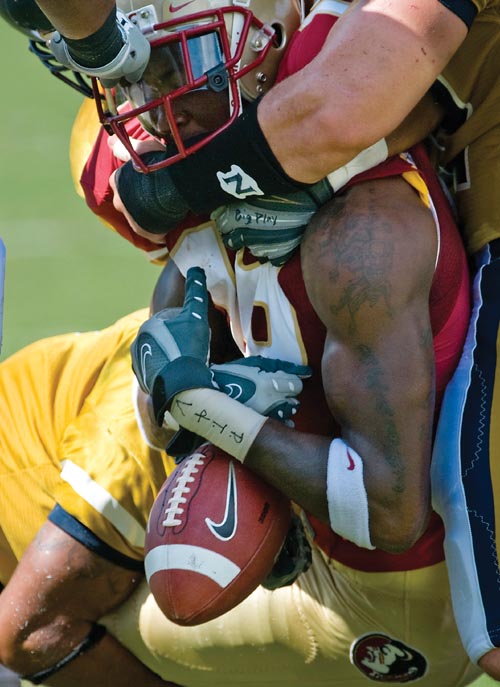
Here’s a before/after of our football shot, first with no sharpening applied (Before), and then a nice crisp amount applied (After) using these settings—Amount: 110, Radius: 1, Detail: 78, Masking: 0. To see your own before/after, press the letter P to toggle the Preview on/off.

Before

After
Chromatic aberration is a fancy name for that thin line of colored fringe that sometimes appears around the edges of objects in photos. Sometimes the fringe is red, sometimes green, sometimes purple, blue, etc., but all the time it’s bad, so we might as well get rid of it. Luckily, Camera Raw has a built-in fix that does a pretty good job.
Step One:
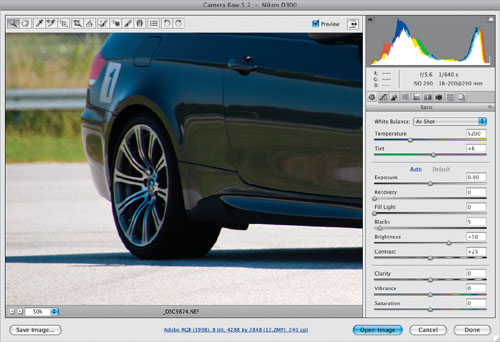
Open the photo that has signs of chromatic aberrations (colored-edge fringe). If chromatic aberrations are going to appear, they’re usually right along an edge in the image that has lots of contrast (like between the black edges of this tire, and the pavement behind it). If the aberrations are bad enough, you’ll be able to see them right off the bat, but if you just suspect they might be there, you’ll have to zoom in for a closer look (by the way, if you’re using a quality camera with quality lenses, you might have to look far and wide before coming across a photo suffering from this problem).
SCOTT KELBY
Step Two:
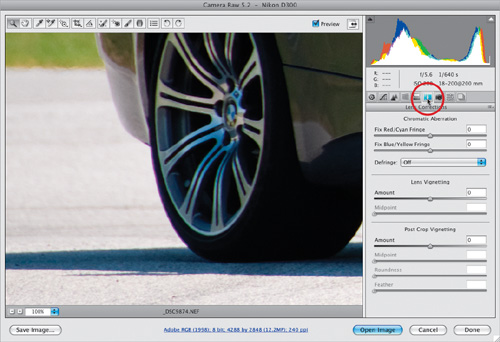
Press Z to get the Zoom tool in the Camera Raw window and zoom in on an area where you think (or see) the fringe might be fairly obvious. In the example shown here, I zoomed directly in on the back tire and sure enough, it has a purplish fringe running along the edge. To remove this fringe, click on the Lens Corrections icon (it’s the sixth icon from the left at the top of the Panel area) to bring up the Chromatic Aberration sliders.
Step Three:
There are only two sliders and you just drag toward the color you want to fix (they’re labeled—the top one fixes red or cyan fringe; the bottom fixes blue or yellow fringe). But before you begin dragging sliders, you may want to click on the Detail icon (the third icon from the left at the top of the Panel area) and lower the Sharpening Amount to 0%, because sharpening can also cause color fringes to appear (and you want to make sure you’re curing the right problem).

Step Four:
Since the fringe in this particular case is purple, we may have to move more than one slider. Start by moving the bottom Chromatic Aberration slider to the left (toward blue), which reduces the blue part of the purple fringe (just make sure you don’t drag so far toward blue that you create a yellow fringe. Hey, I’m just sayin’). There’s still a little color fringe, so try the Red/Cyan slider—moving it a little toward cyan seems to do the trick.

TIP: Editing TIFFs and JPEGs
Although you can edit TIFFs and JPEGs in Camera Raw, there is one “gotcha!” Once you edit one of those in Camera Raw, if you click the Done button (rather than opening the image in Photoshop), you’ll need to always open that photo from within Camera Raw to see the edits you made. That’s because those edits live only inside of Camera Raw; if you bypass Camera Raw and open an edited TIFF or JPEG directly into Photoshop, the Camera Raw edits you made earlier won’t be visible.
If you’re looking at a photo and the corners of the photo appear darker, that’s lens vignetting. Generally, I look at it this way: If it’s just the corners, and they’re just a little bit dark, that’s a problem and I fix it. However, sometimes I want to focus the viewer’s attention on a particular area, so I create a vignette, but I expand it significantly beyond the corners, so it looks like an intentional soft spotlight effect. Here’s how to fix (or create) vignettes:
Step One:
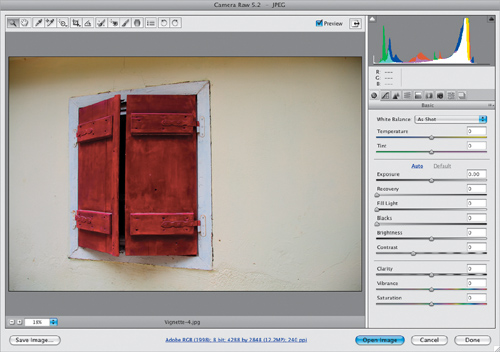
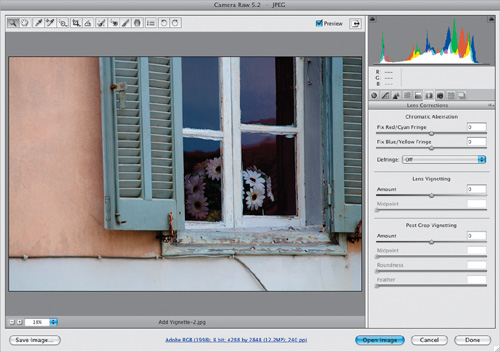
In the photo shown here, you can see the dark areas in the corners (that’s the bad vignetting I was talking about). This vignetting is normally caused by the camera’s lens, so don’t blame yourself (unless you bought a really cheap lens—then feel free to give yourself as much grief as you can bear).
SCOTT KELBY
Step Two:
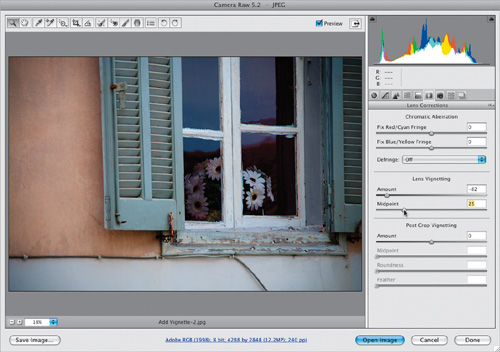
To remove this vignetting from the corners, click on the Lens Corrections icon (it’s the sixth icon from the left) to bring up the Lens Vignetting controls. Click on the Amount slider and drag it to the right until the vignetting in the corners disappears (dragging to the right essentially brightens the corners, which hides the vignetting). Once you begin moving the Amount slider, the Midpoint slider beneath it becomes available. That slider determines how wide the vignetting repair extends into your photo (in other words, how far out from the corners your repair extends), so drag it to the right to expand the lightening farther toward the center of your photo.
Step Three:
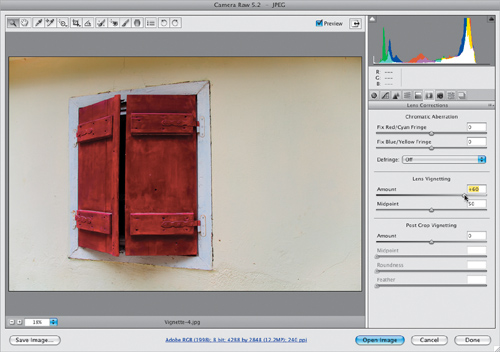
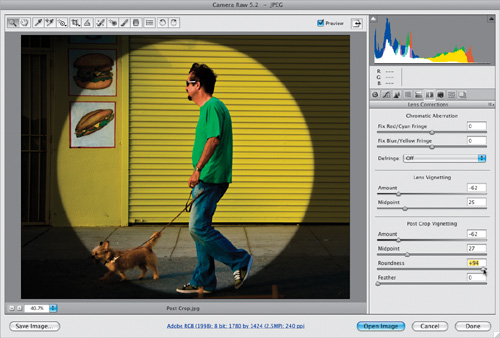
Now for the opposite: adding vignetting to focus attention (by the way, in the “Special Effects for Photographers” chapter, I also show you how to get the same effect outside of Camera Raw). This time, in the Lens Vignetting section you’re going to drag the Amount slider to the left, and as you drag left, you’ll start to see vignetting appear in the corners of your photo (as seen in Step Four). But since it’s just in the corners, it looks like the bad kind of vignetting, not the good kind, so you’ll need to go on to the next step.
SCOTT KELBY
Step Four:
To make the vignetting look more like a soft spotlight falling on your subject, drag the Midpoint slider quite a bit to the left, which increases the size of the vignetting and creates a soft, pleasing effect that is very popular in portraiture, or anywhere you want to draw attention to your subject. That’s it—how to get rid of ’em and how to add ’em. Two for the price of one!
TIP: Seeing a Before/After
If you want to see a before/after of just the changes you’ve made in a current panel, press the letter P to toggle that panel’s Preview checkbox on/off. However, if you want to see a before/after of all the edits you’ve made in Camera Raw, then you’ll need to choose Image Settings from the Camera Raw flyout menu to see the before version, and then from that same menu, choose Custom Settings to see the after version. I agree—it’s clunky.
Step Five:
So far, adding the vignette has been pretty easy—you just drag a couple of sliders, right? But where you’ll run into a problem is when you crop a photo, because you’re also cropping the vignetting effect away, as well (after all, it’s an edge effect, and now the edges are in a different place, and Camera Raw doesn’t automatically redraw your vignette at the newly cropped size). That’s why one of the most requested Camera Raw features is the ability to add a vignette after the fact, and in CS4, not only did they add it, they added more controls to vignetting. It’s called Post Crop Vignetting and it’s found at the bottom of the Lens Corrections panel (seen here).

SCOTT KELBY
Step Six:
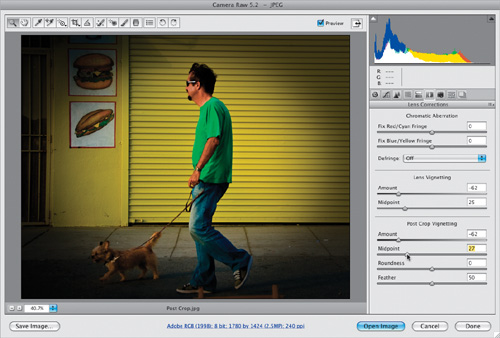
When you crop a photo (like we did here), you can see the problem—the vignette effect (added in Step Five) is pretty much gone. So, to add it back in, go to the Post Crop Vignetting section and drag the Amount slider to the left to darken the edges, then use the Midpoint slider to choose how far into your image this vignetting will extend.
Step Seven:
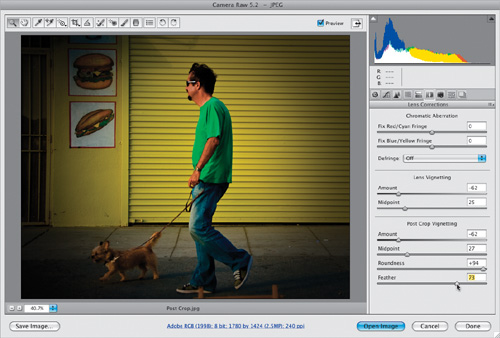
One of the two new sliders they added in CS4 is a control over the roundness of the vignetting. I lowered the Feather amount here to 0 just so you can get a better idea of what the Roundness slider does. The farther to the right you drag, the rounder the shape gets, and when you drag to the left, it actually becomes more like a large, rounded-corner rectangle.
Step Eight:
The Feather slider determines how soft that oval you created with the Roundness slider becomes. I like it really soft, so it looks more like a spotlight, so I usually drag this slider quite a bit over to the right (here I dragged it over to 73, but I wouldn’t hesitate to go higher, depending on how it looks on the photo).
Adobe created DNG (an open archival format for RAW photos) because, at this point in time, each camera manufacturer has its own proprietary RAW file format. If, one day, one or more manufacturers abandon their proprietary format for something new (like Kodak did with their Photo CD format), will we still be able to open our RAW photos? With DNG, it’s not proprietary—Adobe made it an open archival format, ensuring that your negatives can be opened in the future, but besides that, DNG brings another couple of advantages, as well.
Step One:
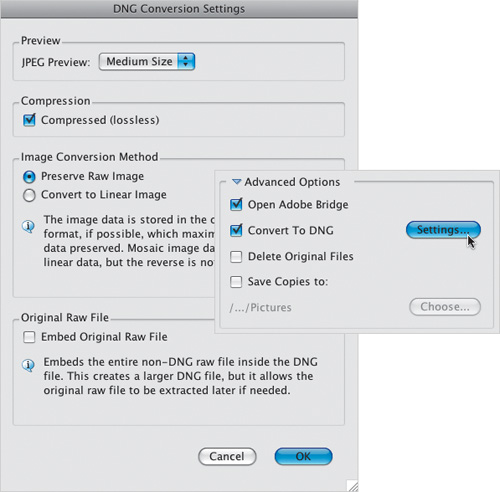
There are three advantages to converting your RAW files to Adobe DNG: (1) DNG files are generally about 20% smaller. (2) DNG files don’t need an XMP sidecar file to store Camera Raw edits, metadata, and keywords—the info’s embedded into the DNG file, so you only have one file to keep track of. And, (3) DNG is an open format, so you’ll be able to open them in the future (as I mentioned in the intro above). Here’s how to convert to DNG: If you’re using Bridge’s built-in Photo Downloader, then you can have your images converted to DNG automatically as they’re imported from your camera’s memory card. In the Advanced Options section of the Photo Downloader, turn on the checkbox for Convert to DNG. If you want to change the settings (I don’t—I use the defaults), click the Settings button (as shown here) to bring up the DNG Conversion Settings dialog. I leave the compression turned on (the term “lossless” lets you know there’s no loss of quality). Next, I only recommend choosing Convert to Linear Image if you plan to open this DNG in a RAW processing application other than Camera Raw or Photoshop Lightroom, because it makes the file size larger. That’s also why I don’t embed the original RAW file, because it totally cancels out Advantage #1.
Step Two:
If you have a RAW image open in Camera Raw, you can save it as an Adobe DNG by clicking the Save Image button (as shown here) to bring up the Save Options dialog (seen in the next step). Note: There’s really no advantage to saving TIFF or JPEG files as DNGs, so I only convert RAW photos.
SCOTT KELBY
Step Three:
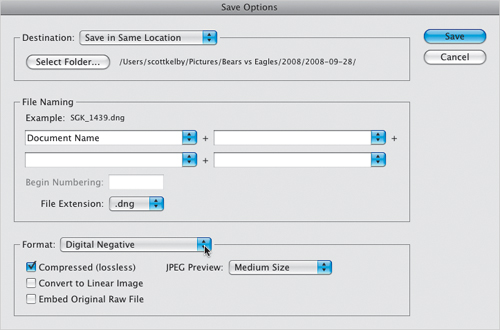
When the Save Options dialog appears, at the bottom of the dialog, from the Format pop-up menu, choose Digital Negative (shown below). Below that are the same three options we talked about in Step One, when converting to DNG while importing your RAW photos from your memory card. Make your choices, click Save, and you’ve got a DNG.
TIP: Setting Your DNG Preferences
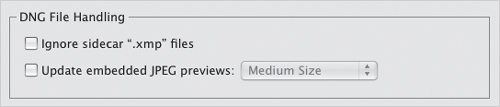
Once you’ve converted to DNG, Camera Raw does give you a few preferences for working with these DNG files. Press Command-K (PC: Ctrl-K) to bring up Photoshop’s Preferences dialog, then click on File Handling in the column on the left side, and click on the Camera Raw Preferences button (or press Command-K when you have Camera Raw open). When the dialog appears, go to the DNG File Handling section (shown below). You’d choose Ignore Sidecar “.xmp” Files only if you use a different RAW processing application (other than Camera Raw or Lightroom), and you want Camera Raw to ignore any XMP files created by that application. If you choose Update Embedded JPEG Previews (and choose your preferred preview size from the pop-up menu), then any changes you make to the DNG will be applied to the preview, as well.
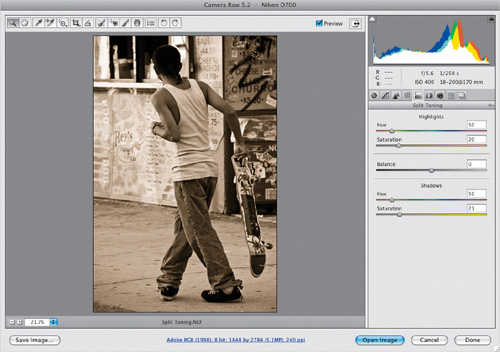
Split toning is a feature borrowed from Photoshop’s younger cousin Photoshop Lightroom (the photography workflow application), where it’s gained lots of fans. What it does is lets you apply one tint to your photo’s highlights, and one tint to your photo’s shadow areas, and you even can control the saturation of each tint and the balance between the two for some interesting effects. If you’re not a fan of the split-toned look, you can still use split toning to easily create a duotone effect from right within Camera Raw.
Step One:
Creating split-toning effects (which used to be a traditional darkroom technique) is now incredibly easy and, although split-toning effects can be applied to both color and B&W photos, you probably see it most often applied to a B&W image. Here’s the original full-color image (if you look at the sliders, you can see where I tweaked the photo to look good in color, but we’re going to convert it to black and white, so those settings probably won’t do much good). Start by converting it to grayscale in the HSL/Grayscale panel (the fourth icon from the left at the top of the Panel area). Just turn on the Convert to Grayscale check box at the top of the panel.

SCOTT KELBY
Step Two:
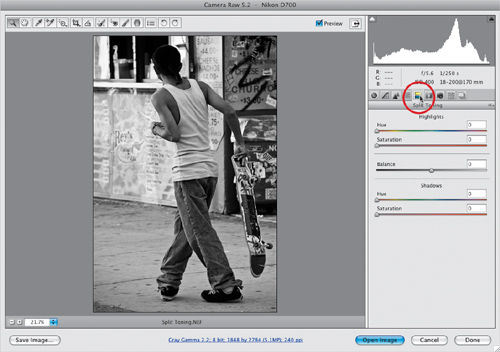
Once the photo was converted to black and white (as shown here), it looked pretty flat to me, so I increased the Fill Light, Contrast, and Blacks amounts quite a bit, so it looked like the image you see here. Now, click on the Split Toning icon at the top of the Panel area (it’s circled in red here). At this point, dragging either the Highlights or Shadows Hue slider does absolutely nothing because, by default, the Saturation sliders are set to 0. Luckily, there is a hidden tip that will let you temporarily see the hues at their full saturation as you drag: just press-and-hold the Option (PC: Alt) key, then click-and-drag.
Step Three:
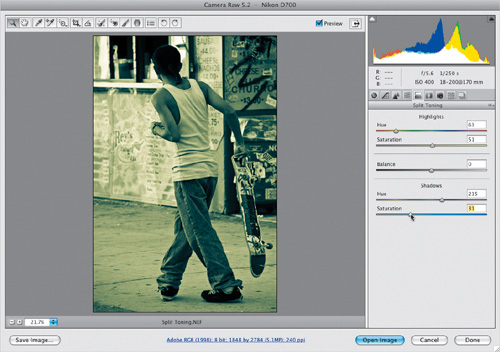
Once you find a highlight hue you like, release the Option (PC: Alt) key and drag the Highlights Saturation slider to the right. The further you drag, the more saturated your highlight tint becomes. Once that’s in place, do the same thing with the Shadows Hue slider (press-and-hold the Option key, drag the Hue slider to pick your hue, then release the Option key, and slowly drag the Shadows Saturation slider to the right). In the example shown here, we have a yellow tint in the highlights and a blue tint in the shadows. I know what you’re thinking, “Scott, I’m not sure I like split toning.” I hear ya—it’s not for everybody, and it’s definitely an acquired taste (and I’m not quite sure I’ve acquired it yet), but some people love ’em. There’s a name for these people. Freaks! (Kidding.)
Step Four:
There is one more control—a Balance slider which lets you control whether your split tone favors your highlight or shadow color. Just drag left, then back right, and you’ll instantly see what this slider does. Although I’m not personally a fan of split-toning effects, I do use the Split Toning panel for something else—creating duotones. All you have to do is use the exact same Hue setting for the Highlights as you do the Shadows, then lower the Saturation of both the Highlights and Shadows until it looks like a duotone. In the example shown here, I set both the Highlights and Shadows Hue sliders to 50, then I lowered the Saturation of both to around 20 or 21, and that gives you the nice duotone effect you see here.
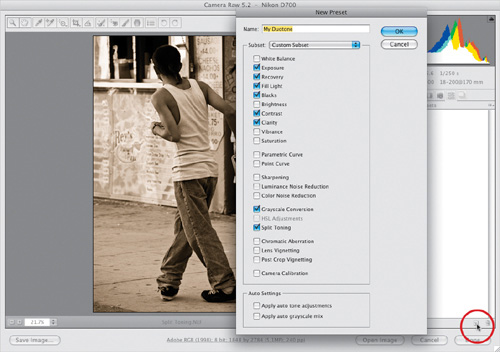
Now that we created a split-tone/duotone effect, this is the perfect time to start making your own one-click presets. That way, the next time you open a photo that you want to have that same effect, you don’t have to go through all those steps (converting it to black and white, tweaking it, then applying the Split Toning settings), you can just click one button and all those settings are applied at once, giving you an instant one-click effect anytime. Of course, these presets aren’t just for duotones—make one anytime you want to reuse any settings.
Step One:
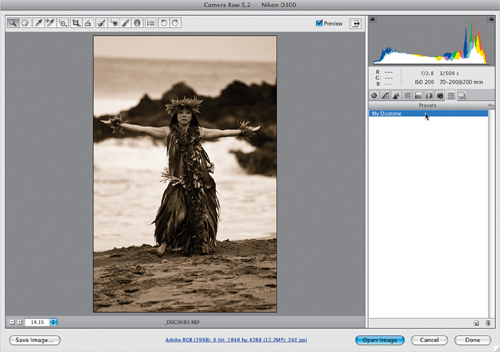
Since we just created that duotone effect (on the previous page), we’ll go ahead and use that to create a one-click preset. Just remember—anytime you come up with a look you like, you can save it as a preset. To create a preset, you click on the Presets icon (it’s the second icon from the right at the top of the Panel area), and then click on the New Preset icon (shown circled here in red) to bring up the New Preset dialog (seen here). Now, just turn on the check boxes for the adjustments you want copied to your preset (as shown here), give your preset a name, and then click the OK button.
Step Two:
Once you’ve saved the preset, it appears in the Presets list (since there’s only one preset here, I’m not sure it qualifies as a list at this point, but you get the idea, right?). To apply it is really a one-click process—just open a different photo, go to the Presets panel, and click on the preset (as shown here), and all those settings are applied. Keep in mind, though, because the exposure is different for every photo, if you save a preset where you had to tweak the exposure a lot, that same exposure will be applied anytime you apply this preset. That’s why you might want to save just the split-tone/duotone settings and not all the exposure stuff, too.
SCOTT KELBY
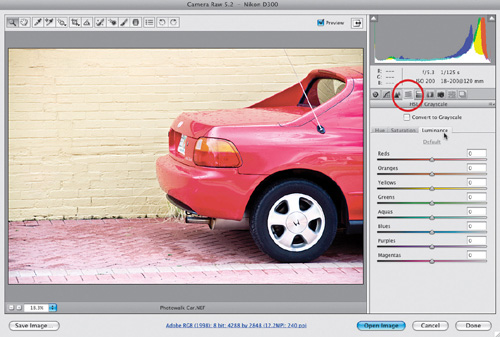
In the next chapter, you’re going to learn how to paint an adjustment over any part of your image, but sometimes you need to affect an entire area (like you need the entire sky bluer, or the sand warmer, or a piece of clothing to be an entirely different color). In those cases, where you’re adjusting large areas, it’s usually quicker to use the HSL adjustments, which not only let you change color, but also let you change the saturation and the lightness of the color. It’s more powerful, and handy, than you might think.
Step One:
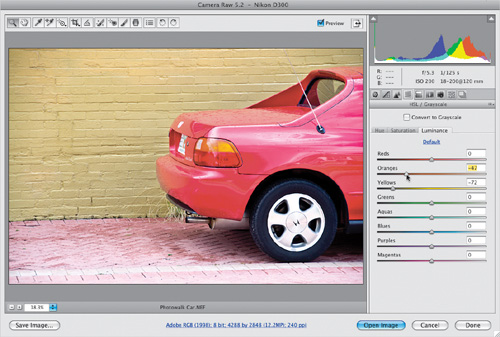
Here’s the original image of a red car on a washed-out yellow wall, and what I’d like to do is tweak the color of that wall so it’s a richer yellow, which would add a nice contrast to the red car. You tweak individual colors, or ranges of color, in the HSL/Grayscale panel, so click on its icon at the top of the Panel area (it’s the fourth one from the left—circled here in red). Now, click on the Luminance tab (as shown here) to bring up the Luminance controls (which control how bright the colors appear).
SCOTT KELBY
Step Two:
The yellow in the wall is washed out, so we need to bring some richness and depth back into the color, so drag the Yellows slider way over to the left toward the darker yellows (those color bars behind each slider give you an idea of what will happen when you drag a slider in a particular direction). Now drag the Oranges sliders to the left quite a bit, too (as shown here). Moving the Oranges slider affected the bright yellow reflection in the red car, as well as the wall. How did I know this was going to do that? I had no idea. I just dragged each slider back and forth real quick to see what it would do. I know—it sounds awfully simple, but it works.
Step Three:
So now the Yellows are bright, but they’re not rich and bold yet, so click on the Saturation tab near the top of the panel, and then drag the Yellows slider all the way over to the right, and the wall just comes alive with color. I also dragged the Oranges slider to the right, too (as shown here), because it had such a great effect on the wall earlier, and as a bonus, it also made the orange in the turn signals really stand out. Now that the photo is really vivid, you can see some unintentional edge vignetting in the corners, so just go to the Lens Corrections panel and, under Lens Vignetting, drag the Amount slider to the right until it goes away (for me, it was about +26, and I didn’t need to touch the Midpoint slider at all. See page 124 for more on fixing vignetting).

Step Four:
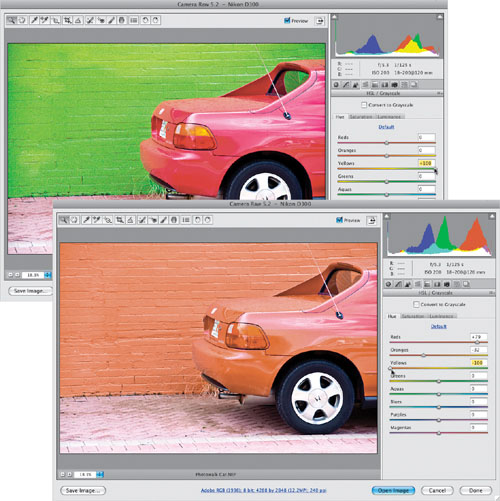
To actually change colors (not just adjust an existing color’s saturation or vibrance), you click on the Hue tab near the top of the panel. The controls are the same, but take a look at the color inside the sliders themselves now—you can see exactly which way to drag to get which color. In this case, to make the yellow wall change to a green wall, you’d drag the Yellows slider to the right toward green. Easy enough. Now, quite honestly, I wouldn’t actually have changed the wall color to green like that, but I wanted to show you how the Hues section works, and this does the trick. While we’re trying some wild stuff, try this: to make everything orange, drag the Reds slider to +79, drag the Oranges slider to –32, and the Yellows slider over to –100. How did I figure this one out? You guessed it—I started dragging sliders around (don’t tell anybody I actually do this).
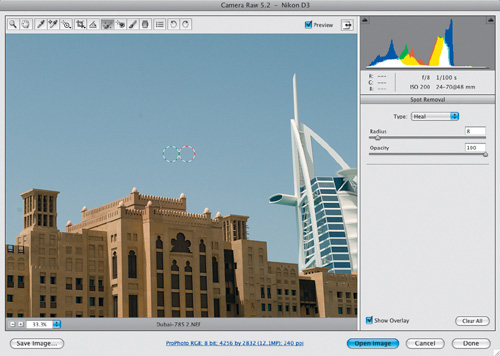
If you need to remove something pretty minor from your photo, like a spot from some dust on your camera’s sensor, or a blemish on your subject’s face, or something relatively simple like that, you can use the Spot Removal tool right within Camera Raw. If it’s more complicated than just a simple spot or two, you’ll have to head over to Photoshop and use its much more powerful and precise retouching tools (like the Healing Brush tool, Patch tool, and Clone Stamp tool).
Step One:
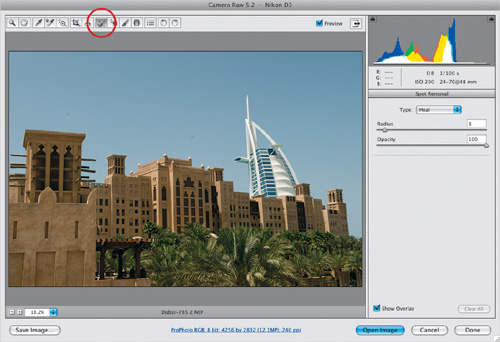
This photo has some simple problems that can be fixed using Camera Raw’s Spot Removal tool. You start by clicking on the Spot Removal tool (the seventh tool from the right in the toolbar) by pressing B to get it, and a set of options appears in the Spot Removal panel on the right (seen here). Using the tool is pretty simple—just move your cursor over the center of a spot that needs to be removed (in this case, it’s those spots in the sky where my camera’s sensor got dirty), then click, hold, and drag outward, and a red-and-white circle will appear, growing larger as you drag outward. Keep dragging until that circle is a little larger than the spot you’re trying to remove (as shown here below). Don’t forget, you can use the Zoom tool (Z) to zoom in and get a better look at your spots before you drag out your circle.
SCOTT KELBY
Step Two:
When you release the mouse button, a second circle (this one is green and white) appears to show you the area where Camera Raw chose to sample your repair texture from (it’s usually very close by), and your spot or blemish is gone (as seen here).
TIP: When to Fix Blemishes in Camera Raw
So, what determines if you can fix a blemish here in Camera Raw? Basically, it’s how close the blemish, spot, or other object you need to remove is to the edge of anything. This tool doesn’t like edges (the edge of a door, a wall, a person’s face, etc.), so as long as the blemish (spot, etc.) is all by itself, you’re usually okay.
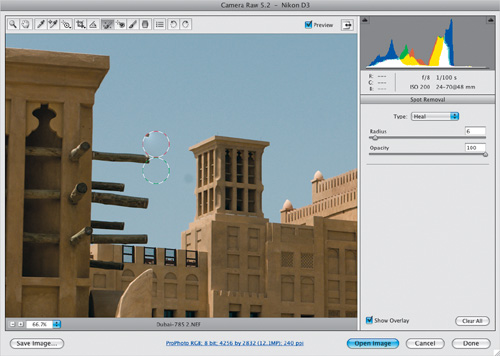
Step Three:
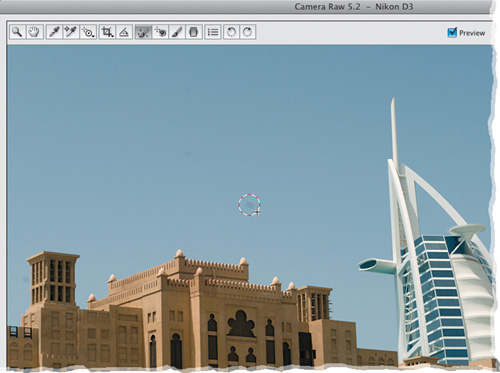
To remove a different spot (like the one to the right of the top wood post here), you use the same method: move over that spot, click, hold, and drag out a circle that’s slightly larger than the spot, then release the mouse button. In this case, Camera Raw did sample a nearby area, but unfortunately it also sampled the bottom corner of the post and it copied it to the sky area where we were retouching, making the retouch look very obvious with that piece of post hanging out there.
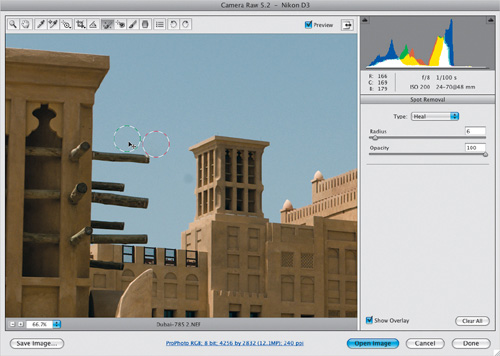
Step Four:
If this happens, here’s what to do: move your cursor inside the green-and-white circle, and drag that circle to a different nearby area (here, I dragged upward and to the left to a clean nearby area), and when you release the mouse button, it resamples texture from that area. Another thing you can try, if the area is at all near an edge, is to go to the top of the Spot Removal panel and choose Clone rather than Heal from the Type pop-up menu (although I use Heal about 99% of the time, because it generally works much better).
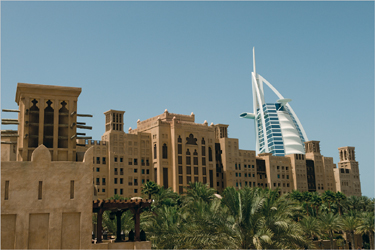
Step Five:
When you’re done retouching, just change tools and your retouches are applied (and the circles go away). Here’s the final retouch after removing all the spots in the sky from my dirty sensor. Use this tool the next time you have a spot on your lens or on your sensor (where the same spot is in the same place in all the photos from your shoot). Then fix the spot on one photo, open multiple photos, and paste the repair onto the other selected RAW photos using Synchronize (see “Editing Multiple Photos at Once,” earlier in this chapter, and just turn on the Spot Removal checkbox in the Synchronize dialog).
Camera Raw has its own built-in Red Eye Removal tool, and there’s a 50/50 chance it might actually work. Of course, my own experience has been a little less than that (more like 40/60), but hey—that’s just me. Anyway, if it were I, I’d probably be more inclined to use the regular Red Eye tool in Photoshop CS4 itself, which actually works fairly well, but if you’re charging by the hour, this might be a fun place to start. Here’s how to use this tool, which periodically works for some people, somewhere. On occasion. Perhaps.
Step One:
Open a photo in Camera Raw that has the dreaded red eye (like the one shown here). To get the Red Eye Removal tool, you can press the letter E or just click on the tool up in Camera Raw’s toolbar (as shown here).
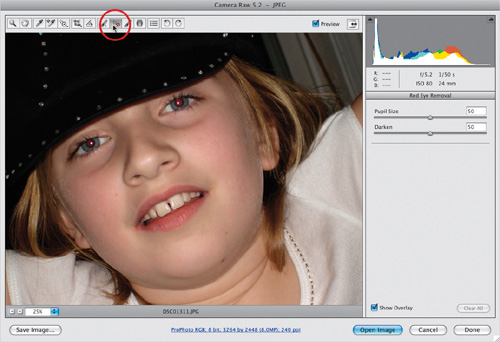
DAVID SINGER
Step Two:
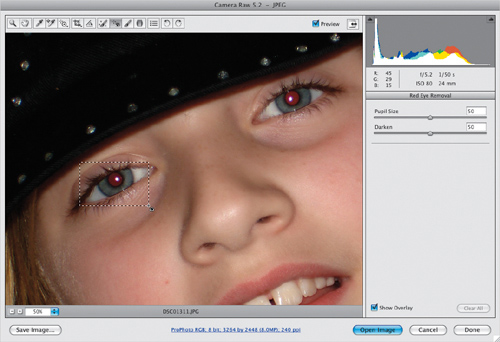
You’ll want to zoom in close enough so you can see the red-eye area pretty easily (as I have here, where I just simply zoomed to 50%, using the zoom level pop-up menu in the bottom-left corner of the Camera Raw window). The way this tool works is pretty simple—you click-and-drag the tool around one eye (as shown here; make sure you include some of the surrounding face), and as you drag, it makes a black-and-white box around the eye. That tells Camera Raw where the red eye is located.
Step Three:
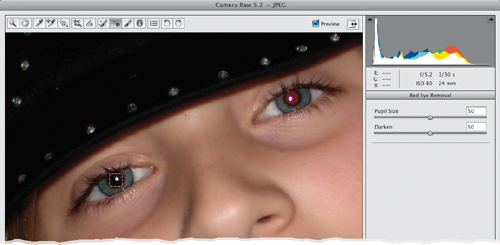
When you release the mouse button, theoretically the box should snap down on the pupil, making a perfect selection around the area affected by red eye. You’ll notice that the key word here is “theoretically.” In our example, it did. If it doesn’t, then press Command-Z (PC: Ctrl-Z) to Undo that attempt, and try again, but before you do that, let’s try to help the tool along by increasing the Pupil Size setting (in the Red Eye Removal panel on the right) to around 100 (as seen in the next image).
Step Four:
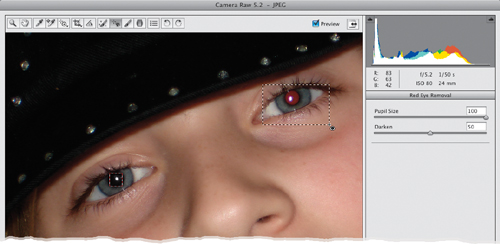
Now, with the Pupil Size setting at 100, the tool should do what we hoped it would—snap right down around the pupil, and remove the red from that area. Once that eye looks good, go over to the other eye, drag out a selection again (as shown here), and it does the same thing (the before and after are shown below). One last thing: if the pupil looks too gray after being fixed, then drag the Darken slider to the right. Give it a try on a photo of your own. It’s possible it might work.
Before

After
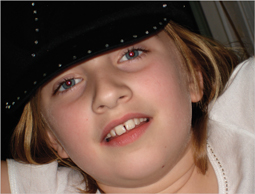
Some cameras seem to have their own “color signature,” and by that I mean that every photo seems to be a little too red, or every photo is a little too green, etc. You just know, when you open a photo from that camera, that you’re going to have to deal with the slight color cast it adds. Well, if that’s the case, you can compensate for that in Camera Raw, and then set that color adjustment as the default for that particular camera. That way, any time you open a photo from that camera, it will automatically compensate for that color.
Step One:
To calibrate Camera Raw so it fixes a persistent color cast added by your camera, open a typical photo taken with that camera in Camera Raw, and then click on the Camera Calibration icon (it looks like a camera and is the third icon from the right at the top of the Panel area). So, let’s say that the shadow areas in every photo from your camera appear slightly too red. In the Camera Calibration panel, drag the Red Primary Saturation slider to the left, lowering the amount of red in the entire photo. If the red simply isn’t the right shade of red (maybe it’s too hot and you just want to tone it down a bit), drag the Red Primary Hue slider until the red color looks better to you (dragging to the right makes the reds more orange).
Step Two:
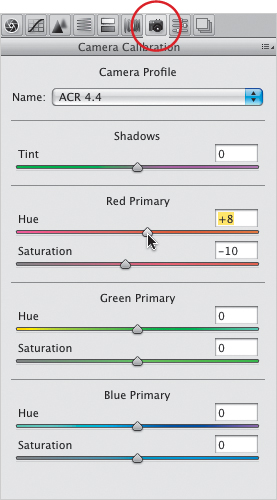
To have Camera Raw automatically apply this calibration each time a photo from that particular camera is opened in Camera Raw, go to Camera Raw’s flyout menu (in the top right of the panel), and choose Save New Camera Raw Defaults (as shown here). Now, when you open a photo from that camera (Camera Raw reads the EXIF data so it knows which camera each shot comes from), it will apply that calibration. Note: You can adjust your blues and greens in the same way.
If you wind up shooting in low light (at night, indoors, at a concert, etc.), then you’re probably used to cranking up your ISO to 800 or more, so you can hand-hold the shots, right? The downside of a high ISO is the same with digital as it was with film—the higher the ISO, the more visible the noise (those annoying red and green spots or splotchy patches of color), especially in shadows, and it gets even worse when you try to lighten them. Here’s what you can do in Camera Raw to lessen the noise. (By the way, the answer is: not much.)
Step One:
Open an image in Camera Raw that has a digital noise issue, press Z to get the Zoom tool, and zoom in to at least 100%–200%, so the noise is easily visible. There are two types of noise you can deal with in Camera Raw: (1) high ISO noise, which often happens when you’re shooting in low-light situations using a high ISO setting (like the photo shown here); and (2) color noise, which can happen even in normal situations (this noise is more prevalent in some cameras than others). When you see this junk, click on the Detail icon in Camera Raw (its icon is two triangles and is third from the left at the top of the Panel area).

SCOTT KELBY
Step Two:
To decrease color noise, drag the Noise Reduction Color slider to the right. It does a fair job of removing at least some of the color noise, though it does tend to desaturate your overall color just a bit. If the problem is mostly in shadow areas, then drag the Luminance slider to the right instead. Be careful, as it tends to make your photo look a bit soft. Now, to be honest with you, Camera Raw’s Noise Reduction feature is...well, it ain’t great (that’s being kind). I use an inexpensive Photoshop plug-in called Noiseware Professional (from Imagenomic) that works absolute miracles. It’s really all I use for noise.

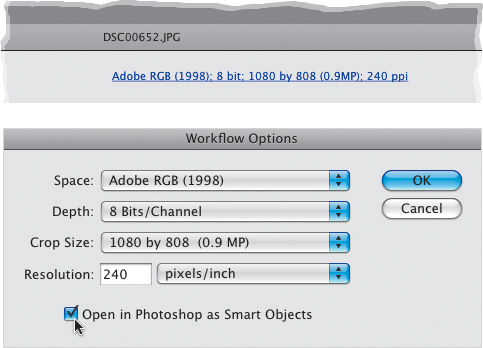
Since you’re processing your own images, it only makes sense that you get to choose what resolution, what size, which color space, and how many bits per channel your photo will be, right? These are workflow decisions, which is why you make them in the Workflow Options dialog. Here are my recommendations on what to choose, and why:
Step One:
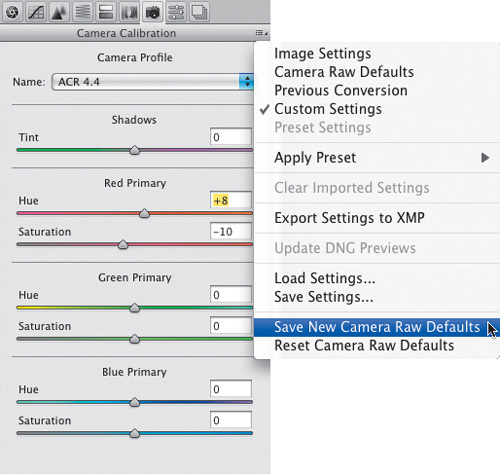
Once you’ve made all your edits, and the photo is generally looking the way you want it to, it’s time to choose your resolution, size, etc. Directly below the Camera Raw Preview area (where you see your photo), you’ll see your current workflow settings—they are underlined in blue like a website link. Click on that link to bring up the Workflow Options dialog (which is seen in the next step).
SCOTT KELBY
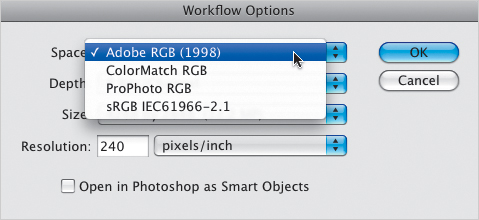
Step Two:
We’ll start at the top by choosing your photo’s color space. By default, it shows the color space specified in your digital camera, but if you’re editing a RAW photo, you can ignore that and choose the color space you want the photo processed with. I recommend choosing the same color space that you have chosen as Photoshop’s color space. For photographers, at this point in time, I still recommend that you choose Adobe RGB (1998) for Photoshop’s color space, and if you’ve done that, then you would choose Adobe RGB (1998) here, from the Space pop-up menu. See my color management and printing chapter (Chapter 13) for more on why you should use Adobe RGB (1998).
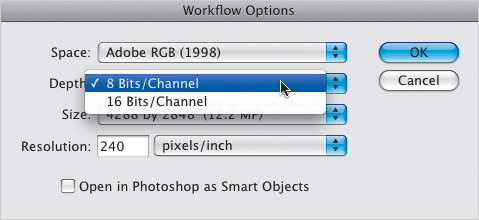
Step Three:
When it comes to choosing your photo’s bit depth, I have a simple rule I go by: I always work in 8 Bits/Channel (Photoshop’s default), unless I have a photo that is so messed up that after Camera Raw, I know I’m still going to have to do some major Curves adjustments in Photoshop just to make it look right. The advantage of 16-bit is those major Curves adjustments wouldn’t damage the photo as much (you’d get less banding or posterization) because of the greater depth of 16-bit. The reasons I don’t use 16-bit more often are: (1) many of Photoshop’s tools and features aren’t available in 16-bit, (2) your file size is approximately double, which makes Photoshop run a lot slower, and (3) 16-bit photos take up twice as much room on your computer. Still, some photographers insist on only working in 16-bit and that doesn’t bother me one bit. (Get it? One bit? Aw, come on, that wasn’t that bad.)
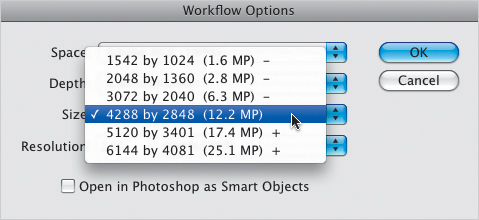
Step Four:
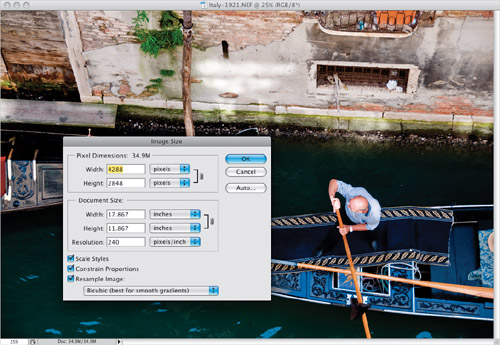
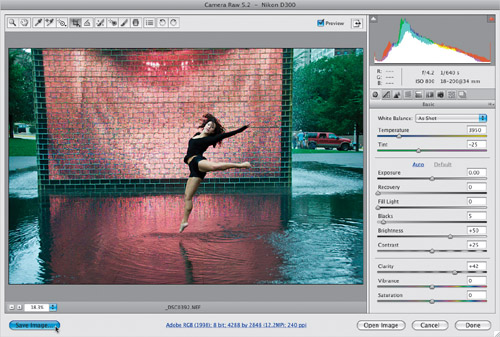
The next option down is Size. By default, the size displayed in the Size pop-up menu is the original size dictated by your digital camera’s megapixel capacity (in this case, it’s 4288 by 2848 pixels—the size generated by a 12.2-megapixel camera). If you click-and-hold on the Size pop-up menu, you’ll see a list of image sizes Camera Raw can generate from your RAW original (the number in parentheses shows the equivalent megapixels that size represents). The sizes with a + (plus sign) by them indicate that you’re scaling the image up in size from the original. The – (minus sign) means you’re shrinking the size from the original, which quality-wise isn’t a problem. Usually, it’s fairly safe to increase the size to the next largest choice, but anything above that and you risk having the photo look soft and/or pixelated.
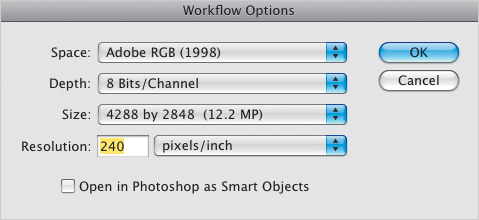
Step Five:
The last Workflow Options choice is what you want the resolution of your processed file to be. The topic of resolution is something entire training DVDs are dedicated to, so we won’t go in-depth about it here, but I’ll give you some quick guidelines. If your photo will wind up on a printing press, use 300 ppi (you don’t really need that much, but many print shops still think you do, so just play it safe at 300 ppi). When printing to an inkjet printer at larger than 8×10″ size, I use 240 ppi (although some argue that the sweet spot for Epson printers is 360 ppi, so you might try printing the same image at both resolutions and compare). For prints smaller than 8×10″ (which are viewed at a very close distance), try 300 ppi. If your photos are only going to be viewed on the Web, you can use 72 ppi. (By the way, the proper resolution is debated daily in Photoshop discussion forums around the world, and everybody has their own reason why their number is right. So, if ever you’re bored one night....)
Step Six:
When you click OK and then click Open Image in the Camera Raw dialog, your photo is processed using those settings and opened in Photoshop (here’s the processed photo in Photoshop with the Image Size dialog open, so you can see the settings). These workflow settings now become your defaults, so you don’t have to mess with them again, unless: (a) you want to choose a different size, (b) you need to work in 16-bit, or (c) you need to change the resolution. Personally, I work at the original size taken by my camera, in 8-bit mode, and at a resolution of 240 ppi, so I don’t have to change these workflow options very often.