
For those of you who bought the CS3 version of this book, you might be looking up at that title “Look Sharp” and thinking, “Hey, that’s the same title he used in the old book,” and while that may be technically true, it’s not the same song. The song I referenced in the CS3 book was from the band Roxette, but the song I’m referring to this time around is from Joe Jackson (the guy who had the ’80s hit “Is She Really Going Out With Him?”). Now, you’re probably wondering, with copyright laws being what they are today, how can two different songs have exactly the same name without creating an avalanche of lawsuits? Well, it’s because of a special exemption within international trademark and copyright laws, which stipulates that the names of books or songs can’t be copyrighted. It’s because of this exemption that I nearly named this book The DaVinci Code, but beyond that, it’s the only reason why Joe Jackson was allowed to not only name his song “Look Sharp” (like Roxette), but he was also allowed to have the same name as the father of the Jackson Five, which not coincidentally is (you guessed it) Joe Jackson. The more I thought about this, the more intrigued I became, and after months of intense research (most of which was conducted with the gracious help of a team at a small university about 30 kilometers outside of Gstaad), we learned that Joe Jackson isn’t even his real name. It’s David Ian Jackson. Worse yet, his original name for the song was actually “Unsharp Mask,” but at the last minute, in the recording studio, he changed the name to “Look Sharp” to avoid creating confusion in the marketplace with the Beatles’ #1 hit from 1968 “Lab Sharpen Man,” from their classic album Levels & Curves.
After you’ve color corrected your photos and right before you save your file, you’ll definitely want to sharpen your photos. I sharpen every digital camera photo, either to help bring back some of the original crispness that gets lost during the correction process, or to help fix a photo that’s slightly out of focus. Either way, I haven’t met a digital camera (or scanned) photo that I didn’t think needed a little sharpening. Here’s a basic technique for sharpening the entire photo:
Step One:
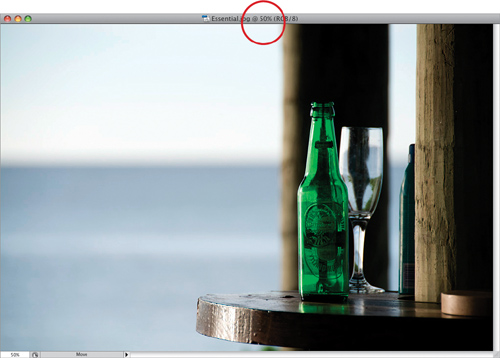
Open the photo you want to sharpen. Because Photoshop displays your photo differently at different magnifications, choosing the right magnification (also called the zoom amount) for sharpening is critical. Because today’s digital cameras produce such large-sized files, it’s now pretty much generally accepted that the proper magnification to view your photos during sharpening is 50%. If you look up in your image window’s title bar, it displays the current percentage of zoom (shown circled here in red). The quickest way to get to a 50% magnification is to press Command-+ (plus sign; PC: Ctrl-+) or Command-– (minus sign; PC: Ctrl-–) to zoom the magnification in or out.
SCOTT KELBY
Step Two:
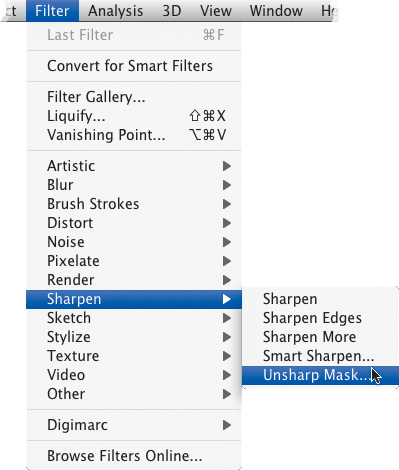
Once you’re viewing your photo at 50% size, go under the Filter menu, under Sharpen, and choose Unsharp Mask. (If you’re familiar with traditional darkroom techniques, you probably recognize the term “unsharp mask” from when you would make a blurred copy of the original photo and an “unsharp” version to use as a mask to create a new photo whose edges appeared sharper.)
Step Three:
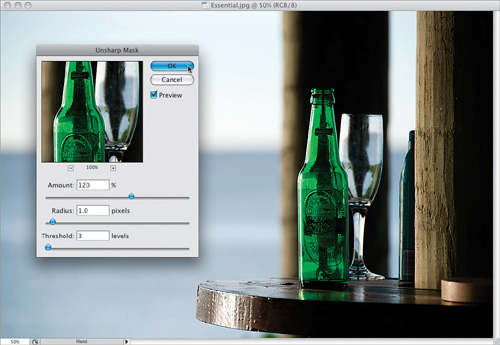
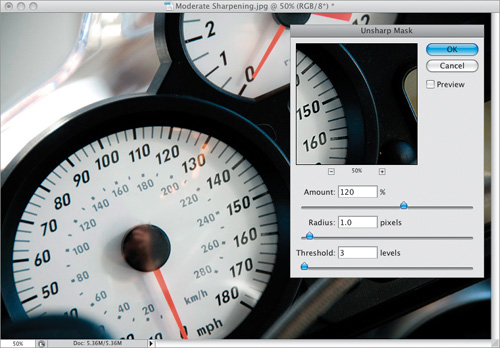
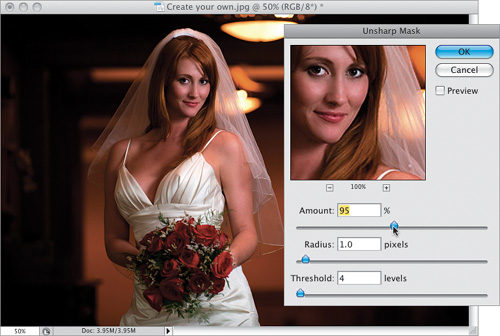
When the Unsharp Mask dialog appears, you’ll see three sliders. The Amount slider determines the amount of sharpening applied to the photo; the Radius slider determines how many pixels out from the edge the sharpening will affect; and Threshold determines how different a pixel must be from the surrounding area before it’s considered an edge pixel and sharpened by the filter (by the way, the Threshold slider works the opposite of what you might think—the lower the number, the more intense the sharpening effect). So what numbers do you enter? I’ll give you some great starting points on the following pages, but for now, we’ll just use these settings—Amount: 120%, Radius: 1, and Threshold: 3. Click OK and the sharpening is applied to the entire photo (see the After photo below).
Before
After
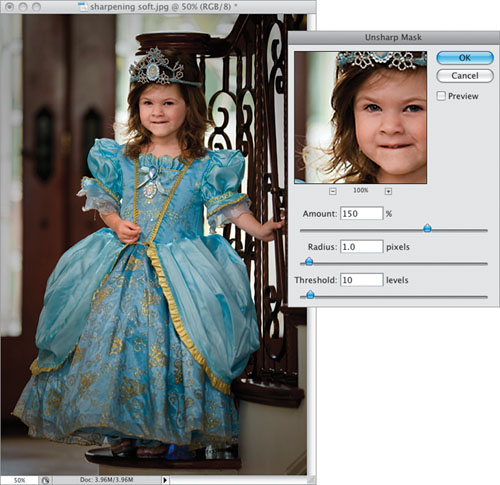
Sharpening soft subjects: Here are Unsharp Mask settings—Amount: 150%, Radius: 1, Threshold: 10—that work well for images where the subject is of a softer nature (e.g., flowers, puppies, people, rainbows, etc.). It’s a subtle application of sharpening that is very well suited to these types of subjects.
SCOTT KELBY
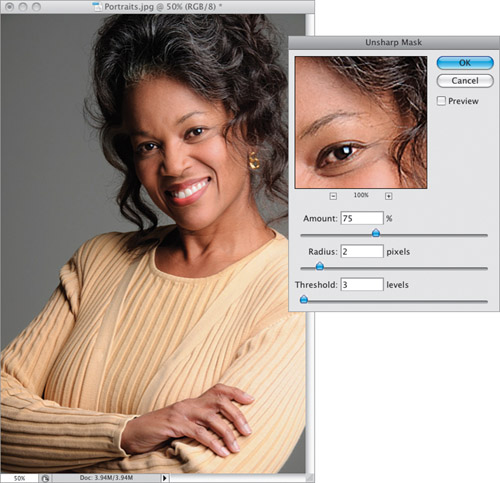
Sharpening portraits: If you’re sharpening close-up portraits, try these settings—Amount: 75%, Radius: 2, Threshold: 3—which apply another form of subtle sharpening, but with enough punch to make eyes sparkle a little bit, and bring out highlights in your subject’s hair.
SCOTT KELBY
Moderate sharpening: This is a moderate amount of sharpening that works nicely on everything from product shots, to photos of home interiors and exteriors, to landscapes (and in this case, a speedometer). These are my favorite settings when you need some nice snappy sharpening. Try applying these settings—Amount: 120%, Radius: 1, Threshold: 3—and see how you like it (my guess is you will). Take a look at how it added snap and detail to the numbers and the dashboard.
SCOTT KELBY
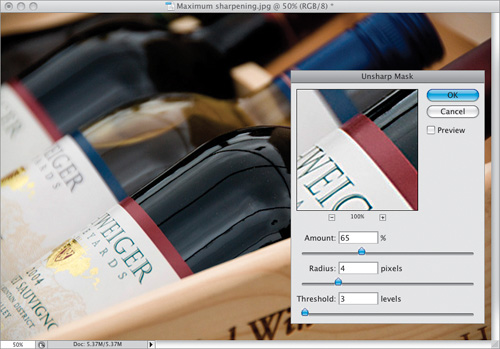
Maximum sharpening: I use these settings—Amount: 65%, Radius: 4, Threshold: 3—in only two situations: (1) The photo is visibly out of focus and it needs a heavy application of sharpening to try to bring it back into focus. (2) The photo contains lots of well-defined edges (e.g., rocks, buildings, coins, cars, machinery, etc.). In this photo, the heavy amount of sharpening really brings out the detail in the labels and reflections on the bottles.
SCOTT KELBY
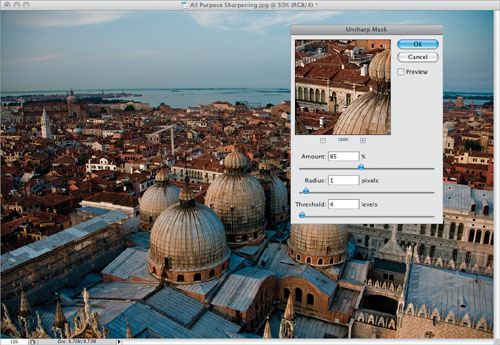
All-purpose sharpening: These are probably my all-around favorite sharpening settings—Amount: 85%, Radius: 1, Threshold: 4—and I use these most of the time. It’s not a “knock-you-over-the-head” type of sharpening—maybe that’s why I like it. It’s subtle enough that you can apply it twice if your photo doesn’t seem sharp enough the first time you run it, but once will usually do the trick.
SCOTT KELBY
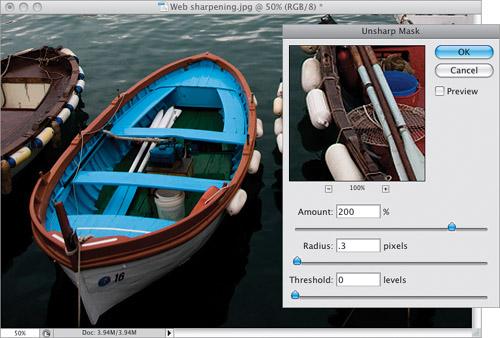
Web sharpening: I use these settings—Amount: 200%, Radius: 0.3, Threshold: 0—for Web graphics that look blurry. (When you drop the resolution from a high-res, 300-ppi photo down to 72 ppi for the Web, the photo often gets a bit blurry and soft.) If the sharpening doesn’t seem sharp enough, try increasing the Amount to 400%. I also use this same setting (Amount: 400%) on out-of-focus photos. It adds some noise, but I’ve seen it rescue photos that I would otherwise have thrown away.
SCOTT KELBY
Coming up with your own settings: If you want to experiment and come up with your own custom blend of sharpening, I’ll give you some typical ranges for each adjustment so you can find your own sharpening “sweet spot.”
SCOTT KELBY
Amount
Typical ranges run anywhere from 50% to 150%. This isn’t a hard-and-fast rule—just a typical range for adjusting the Amount, where going below 50% won’t have enough effect, and going above 150% might get you into sharpening trouble (depending on how you set the Radius and Threshold). You’re fairly safe staying under 150%. (In the example here, I reset my Radius and Threshold to 1 and 4, respectively.)
Radius
Most of the time, you’ll use just 1 pixel, but you can go as high as (get ready) 2 pixels. You saw one setting I gave you earlier for extreme situations, where you can take the Radius as high as 4 pixels. I once heard a tale of a man in Cincinnati who used 5, but I’m not sure I believe it. (Incidentally, Adobe allows you to raise the Radius amount to [get this] 250! If you ask me, anyone caught using 250 as their Radius setting should be incarcerated for a period not to exceed one year and a penalty not to exceed $2,500.)
Threshold
A pretty safe range for the Threshold setting is anywhere from 3 to around 20 (3 being the most intense, 20 being much more subtle. I know, shouldn’t 3 be more subtle and 20 be more intense? Don’t get me started). If you really need to increase the intensity of your sharpening, you can lower the Threshold to 0, but keep a good eye on what you’re doing (watch for noise appearing in your photo).

The Final Image
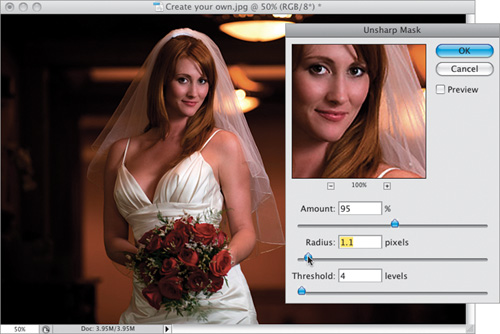
For the final sharpened image you see here, I used the Portraits Sharpening setting I gave earlier, and then I just dragged the Amount slider to the right (increasing the amount of sharpening), until it looked right to me (I wound up at around 85%, so I didn’t have to drag too far). If you’re uncomfortable with creating your own custom Unsharp Mask settings, then start with this: pick a starting point (one of the set of settings I gave on the previous pages), and then just move the Amount slider and nothing else (so, don’t touch the Radius and Threshold sliders). Try that for a while, and it won’t be long before you’ll find a situation where you ask yourself, “I wonder if lowering the Threshold would help?” and by then, you’ll be perfectly comfortable with it.

This sharpening technique is my most often-used technique, and it has replaced the Lab Sharpening technique I’ve used in the past, because it’s quicker and easier, and pretty much accomplishes the same thing, which is helping to avoid the color halos and color artifacts (spots and noise) that appear when you add a lot of sharpening to a photo. Because it helps avoid those halos and other color problems, it allows you to apply more sharpening than you normally could get away with.
Step One:
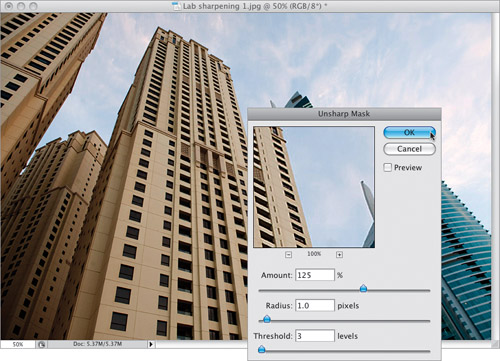
Open the RGB photo you want to sharpen, and apply an Unsharp Mask just like you normally would (for this particular photo, let’s apply these settings—Amount: 125, Radius: 1, Threshold: 3, which is my recipe for nice, punchy sharpening).
SCOTT KELBY
Step Two:
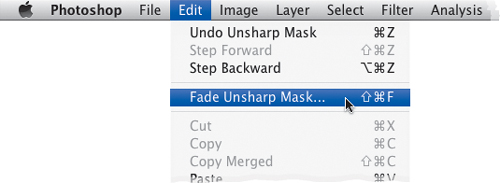
Immediately after you’ve applied the sharpening, go under the Edit menu and choose Fade Unsharp Mask (as shown below).
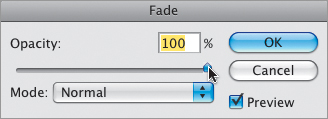
TIP: Undo on a Slider
I think of Fade’s Opacity slider (seen here) as “Undo on a slider,” because if you drag it down to 0, it undoes your sharpening. If you leave it at 100%, it’s the full sharpening. If you lower the Opacity to 50%, you get half the sharpening applied, and so on. So, if I apply sharpening and I think it’s too much, rather than changing all the settings and trying again, I’ll just use the Fade Opacity slider to lower the amount a bit. I’ll also use Fade when I’ve applied some sharpening and it’s not enough. I just apply the Unsharp Mask filter again, then lower the Opacity to 50%. That way, I get 1½ sharpenings.
Step Three:
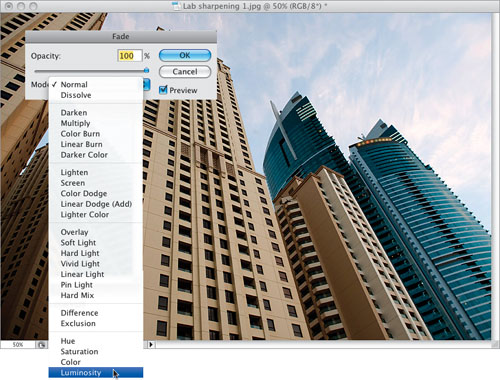
So, at this point, you can ignore the Opacity slider altogether, because the only thing you’re going to do here is change the Fade dialog’s Mode pop-up menu from Normal to Luminosity (as shown here). Now your sharpening is applied to just the luminosity (detail) areas of your photo, and not the color areas, and by doing this it helps avoid color halos and other pitfalls of sharpening a color image.
Step Four:
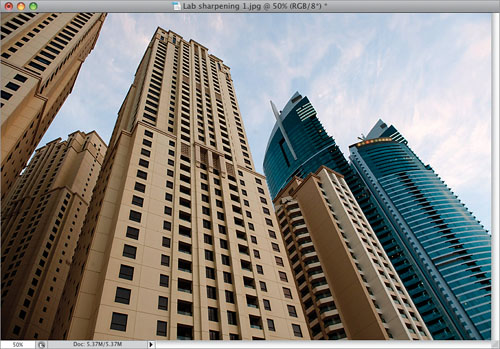
Click the OK button, and now your sharpening is applied to just the luminosity of the image (which is very much like the old Lab mode sharpening we used to do, where you convert your image to Lab color mode, then just sharpen the Lightness channel, and then convert back to RGB color). So, should you apply this brand of sharpening to every digital camera photo you take? I would. In fact, I do, and since I perform this function quite often, I automated the process (as you’ll see in the next step).
Step Five:
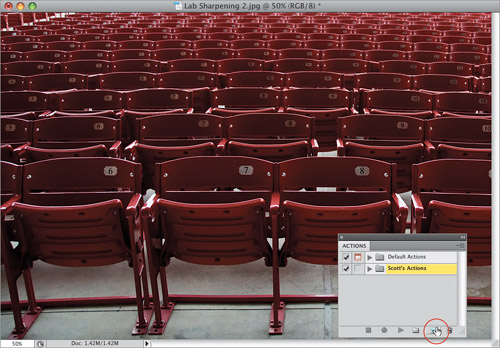
Open a different RGB photo, and let’s do the whole Luminosity sharpening thing again, but this time, before you start the process, go under the Window menu and choose Actions to bring up the Actions panel (seen here). The Actions panel is a “steps recorder” that records any set of repetitive steps and lets you instantly play them back (apply them to another photo) by simply pressing one button (you’ll totally dig this). In the Actions panel, click on the Create New Action icon at the bottom of the panel (it looks just like the Create a New Layer icon from the Layers panel, and it’s shown circled in red here).
SCOTT KELBY
Step Six:
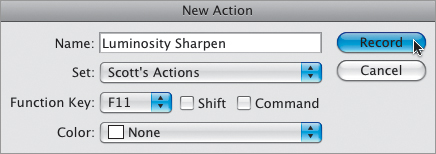
Clicking that icon brings up the New Action dialog (shown here). The Name field is automatically highlighted, so go ahead and give this new action a name. (I named mine “Luminosity Sharpen.” I know—how original!) Then, from the Function Key pop-up menu, choose the number of the Function key (F-key) on your keyboard that you want to assign to the action (this is the key you’ll hit to make the action do its thing). I’ve assigned mine F11, but you can choose any open F-key that suits you (but everybody knows F11 is, in fact, the coolest of all F-keys—just ask anyone. On a Mac, you may need to turn off the OS keyboard shortcut for F11 first). You’ll notice that the New Actions dialog has no OK button. Instead, there’s a Record button, because once you exit this dialog, Photoshop CS4 starts recording your steps. So go ahead and click Record.
Step Seven:
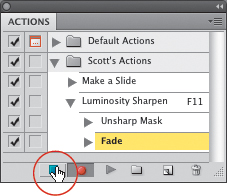
With Photoshop recording every move you make, do the Luminosity sharpening technique you learned on the previous pages (apply your favorite Unsharp Mask setting, then go under the Edit menu, choose Fade Unsharp Mask, and when the dialog appears, change the blend mode to Luminosity and click OK. Also, if you generally like a second helping of sharpening, you can run the filter again, but don’t forget to Fade to Luminosity right after you’re done). Now, in the Actions panel, click on the Stop icon at the bottom of the panel (it’s the square icon, first from the left, shown circled here in red).
Step Eight:
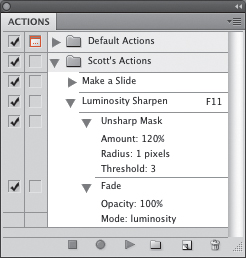
This stops the recording process. If you look in the Actions panel, you’ll see all your steps recorded in the order you did them. Also, if you expand the right-facing triangle beside each step (as shown here), you’ll see more detail, including individual settings, for the steps it recorded. You can see here that I used the Amount: 120%, Radius: 1, and Threshold: 3 Unsharp Mask settings.
Step Nine:
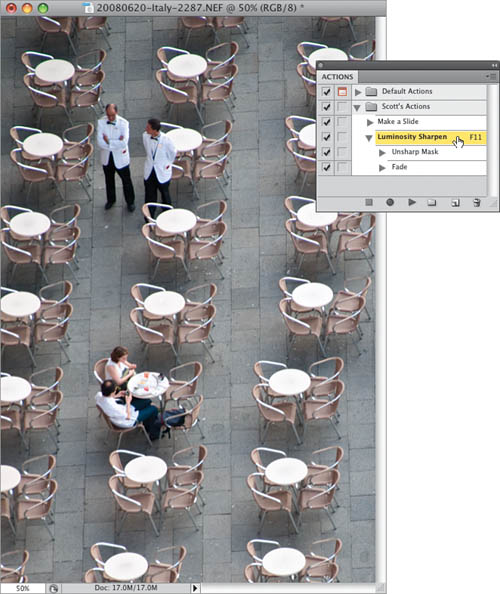
Now, open a different RGB photo and let’s test your action to see that it works (it’s important to test it now before moving on to the next step). Press the F-key you assigned to your action (you chose F11, right? I knew it!). Photoshop immediately applies the sharpening to the Luminosity for you, and does it all faster than you could ever do it manually, because it takes place behind the scenes with no dialogs popping up.
SCOTT KELBY
Step 10:
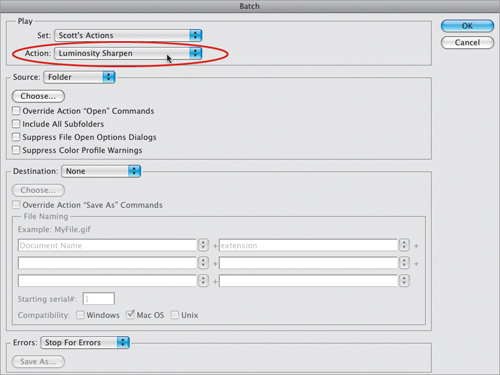
Now that you’ve tested your action, we’re going to put that baby to work. Of course, you could open more photos and then press F11 to have your action Luminosity sharpen them one at a time, but there’s a better way. Once you’ve written an action, you can apply that action to an entire folder full of photos—and Photoshop will totally automate the whole process for you (it will literally open every photo in the folder and apply your Luminosity sharpening, and then save and close every photo—all automatically. How cool is that?). This is called batch processing, and here’s how it works: Go under the File menu, under Automate, and choose Batch to bring up the Batch dialog (or you can choose Batch from the Tools menu’s Photoshop submenu within Adobe Bridge CS4). At the top of the dialog, within the Play section, choose your Luminosity Sharpen action from the Action pop-up menu (if it’s not already selected, as shown here).
Step 11:
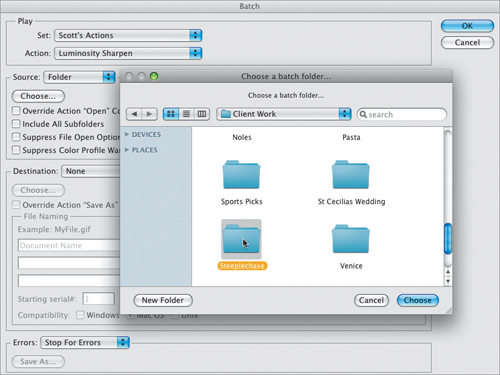
In the Source section of the Batch dialog, you tell Photoshop which folder of photos you want to Luminosity sharpen. So, choose Folder from the Source pop-up menu (you can also choose to run this batch action on selected photos from Bridge, or you can import photos from another source, or choose to run it on images that are already open in Photoshop). Then, click on the Choose button. A standard Open dialog will appear (shown here) so you can navigate to your folder of photos you want to sharpen. Once you find that folder, click on it (as shown), then click the Choose (PC: OK) button.
Step 12:
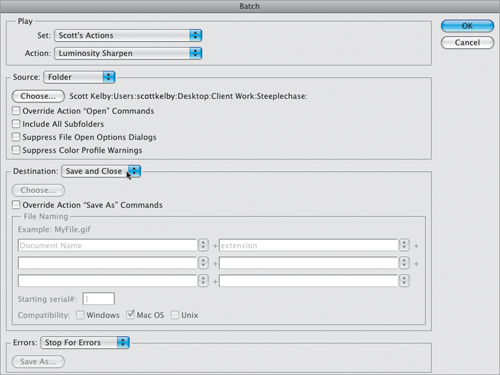
In the Destination section of the Batch dialog, you tell Photoshop where you want to put these photos once the action has done its thing. If you choose Save and Close from the Destination pop-up menu (as shown here), Photoshop will save the images in the same folder they’re in. If you select Folder from the Destination pop-up menu, Photoshop will place your Luminosity-sharpened photos into a totally different folder. To do this, click on the Choose button in the Destination section, navigate to your target folder (or create a new one), and click Choose (PC: OK).
Step 13:
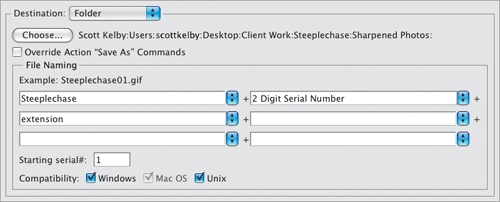
If you do choose to move them to a new folder, you can automatically rename your photos in the process. In short, here’s how the file naming works: In the first field within the File Naming section, you type the basic name you want all the files to have. In the other fields, you can choose (from a pop-up menu) the automatic numbering scheme to use (adding a 1-digit number, 2-digit number, etc., and if you choose this, there’s a field near the bottom where you can choose which number to start with). You can also choose to add the appropriate file extension (JPG, TIFF, etc.) in upper- or lowercase to the end of the new name. At the bottom of the dialog, there’s a row of checkboxes for choosing compatibility with other operating systems. I generally turn all of these on, because ya never know. When you’re finally done in the Batch dialog, click OK and Photo shop will automatically Luminosity sharpen, rename, and save all your photos in a new folder for you. Nice!
This is a technique I learned from Photoshop color genius Dan Margulis (author of the brilliant Photoshop LAB Color book). Dan was gracious enough to let me include his technique in my book, The Photoshop Channels Book, and this pretty much breaks every rule you’ve ever heard about sharpening, but man does it work wonders on the right photo (and, by the way, the right photo is any photo with lots of texture, or very well-defined edges that can handle an awful lot of sharpening. I wouldn’t try this on a photo of a puppy, or a baby chick, etc.).
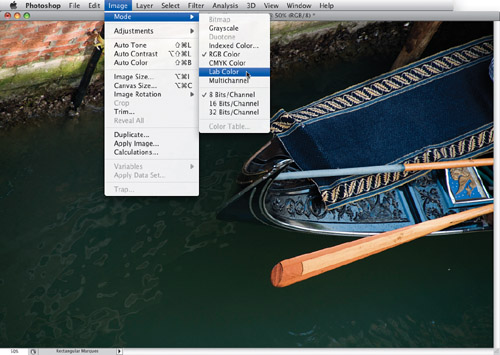
The first step is to switch to Lab color mode, so go under the Image menu, under Mode, and choose Lab Color (as shown here).
SCOTT KELBY
Step Two:
Now you’re going to load the Lightness channel as a selection (remember, we’re in Lab color mode, so there’s a Lightness channel, where all the detail is, and an “a” color channel and a “b” color channel, which hold the color). To load the Lightness channel as a selection, press Command-Option-3 (PC: Ctrl-Alt-3).
Step Three:
Once your selection is in place, you’ll need to inverse it, so go under the Select menu and choose Inverse (or use the keyboard shortcut Command-Shift-I [PC: Ctrl-Shift-I]). Once your selection is inversed, we want to keep that selection in place, but hide it from view (so we can see how our sharpening looks without the distracting selection border), so press Command-H (PC: Ctrl-H).

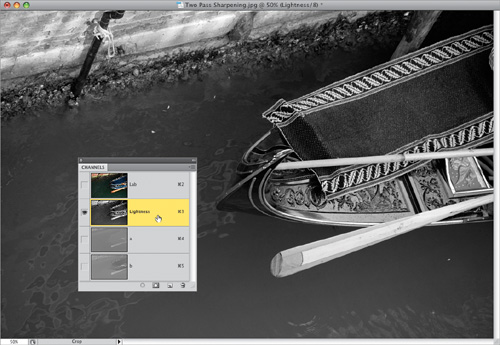
Step Four:
Now that our selection is hidden from view, go to the Channels panel and click on the Lightness channel. We’re going to apply our sharpening to the selected area on just this channel. This lets us avoid applying our sharpening to the color channels, which (as you now know) can cause a host of annoying problems. The big advantage of doing our sharpening this way is that since we’re avoiding many of the problem areas of sharpening, we can actually get away with applying more sharpening without damaging our images.
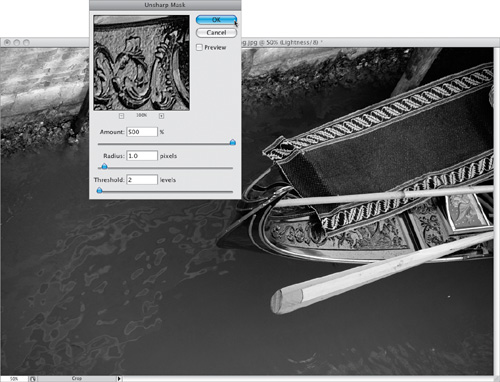
Step Five:
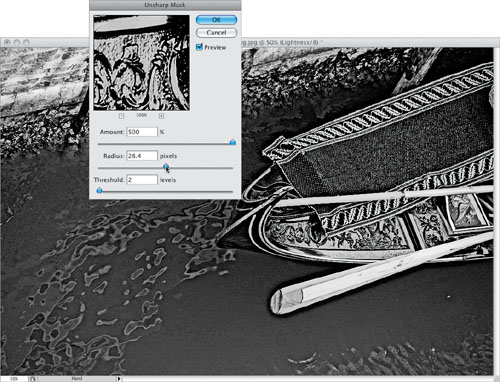
Now you’re going to apply your first round of sharpening using the Unsharp Mask filter (by now you know it’s found under the Filter menu, under Sharpen). When the Unsharp Mask dialog appears, for Amount choose 500%, set the Radius at 1 pixel, set the Threshold to 2 levels, and click OK. This will apply a good, solid sharpening to the selected area of the Lightness channel.
Step Six:
Now you’re going to add a second pass of sharpening, so bring up the Unsharp Mask filter once again. Start by leaving the Amount set to 500%, but then drag the Radius slider all the way to the left. Then slowly raise the radius by dragging the slider to the right, until the shape starts to come back. This two-pass sharpening is designed to be used on high-resolution images, and on a high-resolution image, your Radius setting will probably be somewhere between 25 and 35 pixels. I turned on the Preview checkbox in the example shown here, so you can see what this amount of sharpening does to your photo. Okay, I know it’s not pretty, but you’re going to fix that in the next step.
Step Seven:
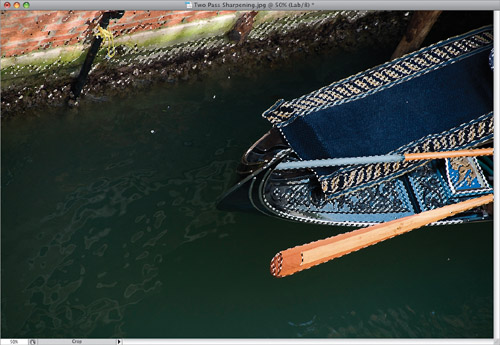
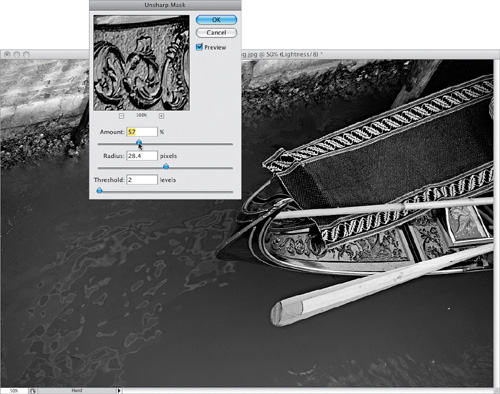
Once you’ve dialed in that Radius amount (again, it will probably be between 25 and 35), lower the Amount to somewhere between 50% and 60% (just choose which looks best to you), and click OK to apply the final sharpening. Then go back under the Image menu, under Mode, and choose RGB Color to return to RGB. That’s it—two different passes of the Unsharp Mask filter that make for some incredibly sharp photos (as seen below in the After photo).
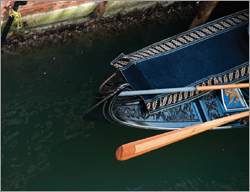
Before

After
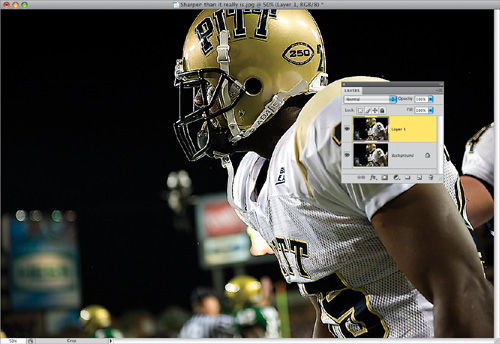
One of the tricks the pros use to get incredibly sharp photos is to apply their sharpening once, and then go back and spot sharpen only those areas in the photo that can hold a lot of sharpening (for example, areas that contain chrome, metal, steel, buttons on clothing, jewelry, or even your subject’s eyes in some cases). This is a really great way to make your photos appear to be much sharper and crisper than they really are.
Step One:
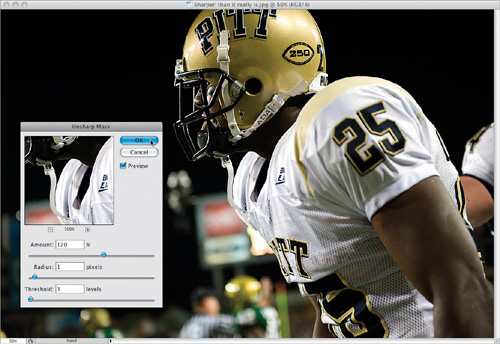
Open a photo you want to appear extra sharp. Go under the Filter menu, under Sharpen, and choose Unsharp Mask. For Amount, enter 120%; for Radius, enter 1; and for Threshold, enter 3 (as shown here). Then click OK to apply a moderate amount of sharpening to your entire photo.
SCOTT KELBY
Step Two:
Press Command-J (PC: Ctrl-J) to duplicate the Background layer. Now, on this duplicate layer, press Command-F (PC: Ctrl-F) to run the Unsharp Mask filter again, using the exact same settings. In fact, see if you can get away with applying it another time (or two). Unless you’re working on a super-high-resolution photo, applying the filter three times in a row will oversharpen your photo enough to where it’s pretty much trashed (as shown here, where the photo is totally oversharpened).
Step Three:
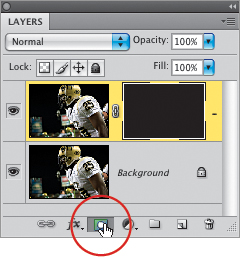
In the Layers panel, press-and-hold the Option (PC: Alt) key and click on the Add Layer Mask icon at the bottom of the Layers panel (as shown here). This adds a black mask to your super-sharp layer, and this mask totally hides that layer (so you’re seeing the original Background layer with just one pass of the Unsharp Mask filter). Now your photo looks regular again.
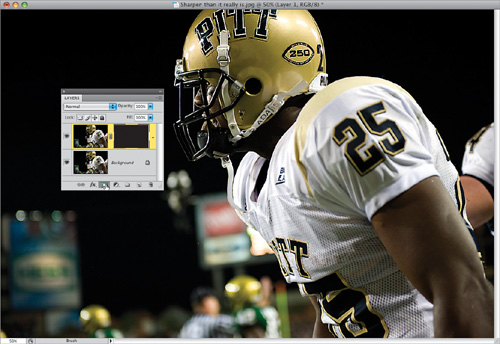
Step Four:
Now press B to get the Brush tool, choose a medium-sized, soft-edged brush, and with your Foreground color set to white, paint over areas with lots of detail to bring out just those areas. In the example shown here, I painted over part of the chin strap on his helmet (as shown here), along with the letters on his helmet. I also painted over the face mask on his helmet, as well as the numbers and letters on his jersey. Revealing just these few sharper areas, which immediately draw the eye, makes the whole photo look much sharper (as seen below).

Before
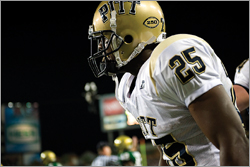
After
Count me as a fan of the Smart Sharpen filter (introduced back in Photoshop CS2), and although at the time I felt I would switch over to it for all my filter-based sharpening, I now pretty much find that I use it primarily when I run into a photo that is out of focus, or just needs some really serious sharpening. There are other advantages to Smart Sharpen, like being able to save your favorite settings in a pop-up menu, and there’s a new sharpening algorithm that lets you avoid color halos, among others things, but here’s how I’m using it today:
Step One:
Go under the Filter menu, under Sharpen, and choose Smart Sharpen. This filter is in Basic mode by default, so there are only two sliders: Amount (which controls the amount of sharpening—sorry, I had to explain that) and Radius (which determines how many pixels the sharpening will affect). The default settings are 100% for Amount (which I think is too high to use for just regular everyday sharpening), and the Radius is set at 1, which usually does the trick. You can see the first thing I like about the Smart Sharpen dialog, and that’s the nice big preview window (shouldn’t every Photoshop filter have a nice big preview like that? Don’t get me started).
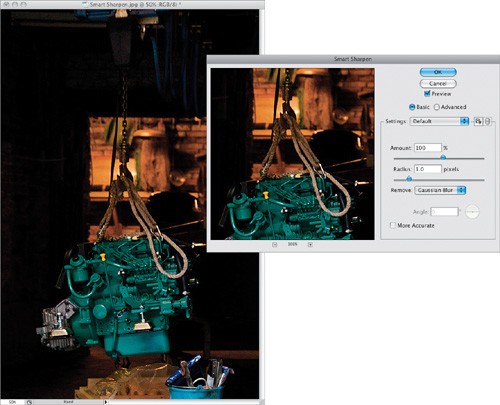
SCOTT KELBY
Step Two:
Below the Radius slider is the Remove pop-up menu (shown here), which lists the three types of blurs you can reduce using Smart Sharpen. Gaussian Blur (the default) applies a brand of sharpening that’s pretty much like what you get using the regular Unsharp Mask filter (it uses a similar algorithm). Another choice is Motion Blur, but unless you can determine the angle of blur that appears in your image, it’s tough to get really good results with this one.
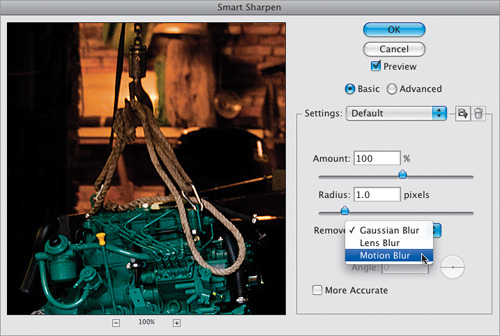
Step Three:
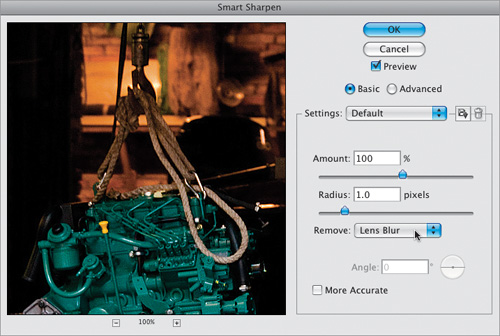
So, which one do I recommend? The third choice—Lens Blur. This is a sharpening algorithm created by Adobe’s engineers that’s better at detecting edges, so it creates fewer color halos than you’d get with the other choices, and overall I think it just gives you better sharpening for most images. The downside? Choosing Lens Blur makes the filter take a little longer to “do its thing.” (That’s why it’s not the default choice, even though it provides better-quality sharpening.)
Step Four:
So, after you choose Lens Blur, go to the bottom of the dialog and you’ll see a checkbox for More Accurate. It gives you (according to Adobe) more accurate sharpening by applying multiple iterations of the sharpening. I leave More Accurate turned on nearly all the time. (After all, who wants “less accurate” sharpening?) Note: If you’re working on a large file, the More Accurate option can cause the filter to process slower, so it’s up to you if it’s worth the wait (I think it is). By the way, the use of the More Accurate checkbox is one of those topics that Photoshop users debate back and forth in online forums. For regular everyday sharpening it might be overkill, but again, the reason I use Smart Sharpen is because the photo is visibly blurry, slightly out of focus, or needs major sharpening to save. So I leave this on all the time. Please don’t let anyone in the forums know I do that. They might slap me with some sort of fine. ;-)

Step Five:
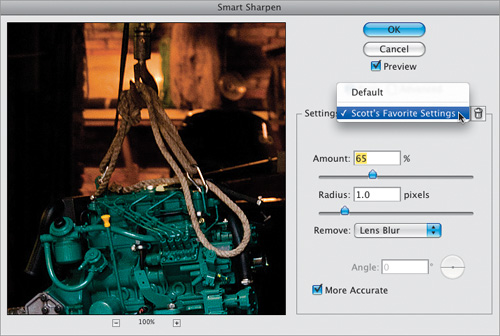
I’ve found with the Smart Sharpen filter that I use a lower Amount setting than with the Unsharp Mask filter to get a similar amount of sharpening, so I usually find myself lowering the Amount to between 60% and 70%. However, if the photo I’m working on is really soft, I would actually go above 100% to...well...whatever it takes. So that’s the extent of what I do with Smart Sharpen—I generally set the Amount to 60%–70%, I leave the Radius set at 1, I choose Lens Blur from the Remove pop-up menu, and I turn on the More Accurate checkbox. Take a look at the before/after on the bottom of the next page to see the results of using the Smart Sharpen filter.

Step Six:
If you find yourself applying a setting such as this over and over again, you can save these settings and add them to the Settings pop-up menu at the top of the dialog by clicking on the floppy disk icon to the right of the pop-up menu. (Why a floppy disk icon? I have no idea.) This brings up a dialog for you to name your saved settings, so name your settings and click OK. Now, the next time you’re in the Smart Sharpen filter dialog and you want to instantly call up your saved settings, just choose it from the Settings pop-up menu (as shown here).
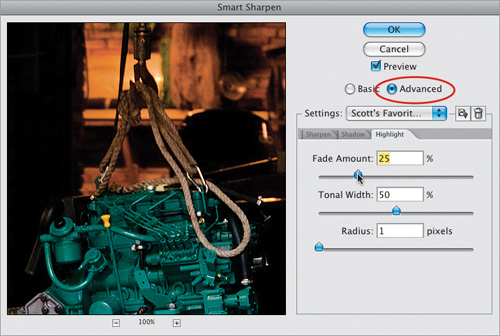
Step Seven:
If you click the Advanced radio button, it reveals two additional tabs with controls for reducing the sharpening in just the shadow or just the highlight areas that are applied to the settings you chose back in the Basic section. That’s why in the Shadow and Highlight tabs, the top slider says “Fade Amount” rather than just “Amount.” As you drag the Fade Amount slider to the right, you’re reducing the amount of sharpening already applied, which can help reduce any halos in the highlights. (Note: Without increasing the amount of fade, you can’t tweak the Tonal Width and Radius amounts. They only kick in when you increase the Fade Amount.) Thankfully, I rarely have had to use these Advanced controls, so 99% of my work in Smart Sharpen is done using the Basic controls.

Before
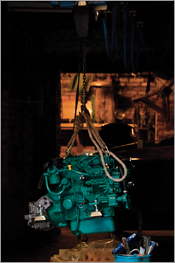
After
This is a sharpening technique that doesn’t use the Unsharp Mask filter, but still leaves you with a lot of control over the sharpening, even after the sharpening is applied. It’s ideal to use when you have an image (with a lot of edges) that can hold a lot of sharpening or one that needs heavy sharpening to really make it snap.
Step One:
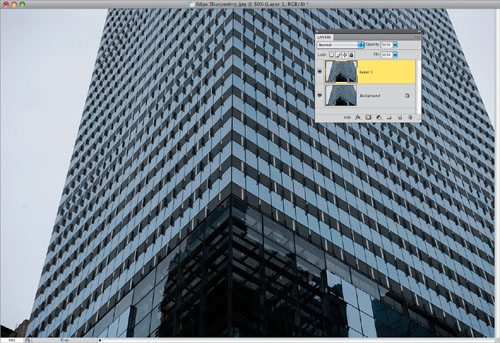
Open a photo that needs edge sharpening. Duplicate the Background layer by pressing Command-J (PC: Ctrl-J), as shown here.
SCOTT KELBY
Step Two:
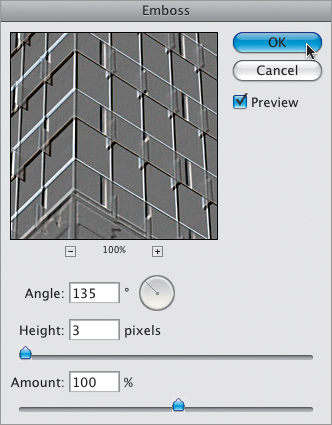
Go under the Filter menu, under Stylize, and choose Emboss. You’re going to use this filter to accentuate the edges in the photo. You can leave the Angle, Height, and Amount settings at their defaults (135°, 3, and 100%), but for low-res images, you’ll want to lower the Height setting to 2 pixels (and for high-res 300-ppi images, try raising it to 4 pixels). Click OK to apply the filter, and your photo will turn gray with neon-colored highlights along the edges. To remove those neon-colored edges, press Command-Shift-U (PC: Ctrl-Shift-U) to Desaturate the color from this layer.
Step Three:
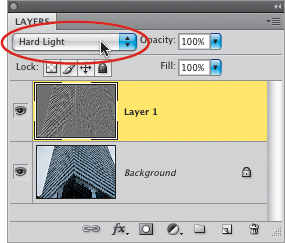
In the Layers panel, change the layer blend mode of this layer from Normal to Hard Light. This removes the gray color from the layer, but leaves the edges accentuated, making the entire photo appear much sharper.
Step Four:
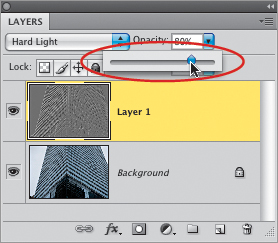
If the sharpening seems too intense, you can control the amount of the effect by simply lowering the Opacity of this layer in the Layers panel (in the After photo shown below, I lowered the layer’s opacity to 80%, as shown here).
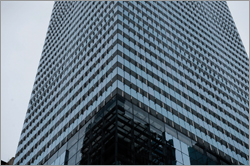
Before
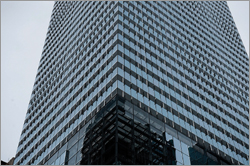
After