

I could only find one song with the title “Resized,” and I think it’s a perfect fit for a chapter on resizing and cropping your photos. The song is by a band called Bungle and this particular song features Laura Pacheco. It’s from their album Down to Earth. I’m telling you this like you’re going to go and buy the CD, but trust me—you’re not. That’s because I’m going to try and talk you out of doing just that. Here’s why: the full-length song is five minutes and 55 seconds. After hearing just the free 30-second preview of it on Apple’s iTunes Store, I imagine there are some people (not you, mind you, but some people) who might become somehow adversely affected by its super-fast-paced hypnotic beat and might do things that they might not normally do while listening to selections from the Eagles or James Taylor.
In fact, I would advise against even listening to the 30-second free preview if any of these conditions are present: (1) it’s late at night and you have all the lights out, (2) the lights are out and you have a strobe light flashing, (3) the lights are out, a strobe is flashing, and you’re holding a large butcher knife, or (4) the lights are out, a strobe is flashing, you’re holding a large butcher knife, and you’ve just been fired from your job. “Resized” would make a great background track for House of the Dead VII, because it’s not one of those gloomy Metallica songs—it actually has a fast pop-like beat, but at the same time, it makes you want to grab a butcher knife (not me, of course, and certainly not you, but you know...people like that one really quiet guy who works in accounting. I’d keep him away from that song. Especially if he ever gets fired).
In each new version of Photoshop, Adobe tweaks the interface a bit to find ways to manage loads of panels and filters and tools in a way that makes working in Photoshop easier and more efficient. In CS4, Adobe made some pretty major changes, and luckily it seems like almost all of them are improvements. There are dozens of little changes, and I’ve interspersed some of them throughout the book where appropriate, but there are a few major things I think we need to tackle up front, especially if coming to CS4 from CS3 or an earlier version.
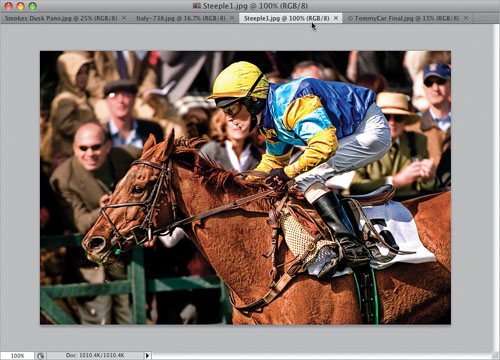
Tabbed Documents:
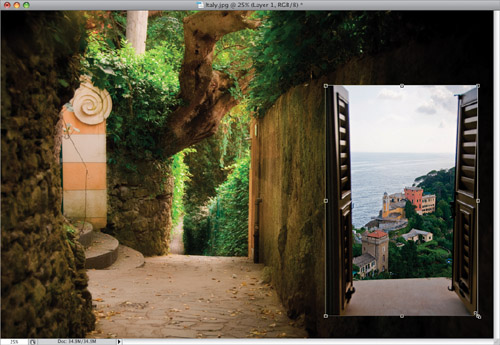
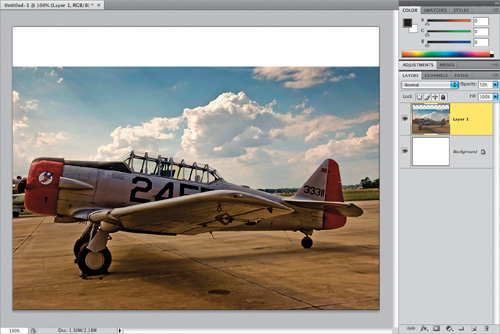
To help you manage your open images, CS4 has tabbed documents, so if you have one image open, and open a second or third image, it appears tabbed within the current window (kind of like tabs in a Web browser). You can see here that I’ve got four images open—all four appear as tabs (displaying the image names) across the top of this window. You can toggle through these tabs to see each image by pressing Control-Tab. To close an image, click on the little X at the right end of its tab. To put the images in their own separate windows, choose Float All in Windows, under Arrange in the Window menu.
SCOTT KELBY
Dragging Between Documents:
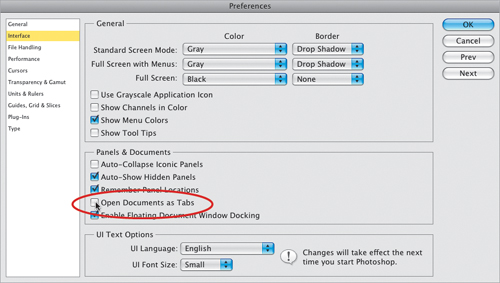
A lot of people like this tabbed environment, but sadly, I’m not one of them, because we can’t drag-and-drop layers between documents as easily. Now we have to drag the layer up to the tab of the window we want to move it to. Then, we pause a moment while that image becomes visible, and then we have to move our cursor out over the image area and release the mouse. To me, that’s just plain clunky, and it’s why I turned tabbing off by going under the Photoshop menu (PC: File menu), under Preferences, and choosing Interface, then turning off the checkbox for Open Documents as Tabs.
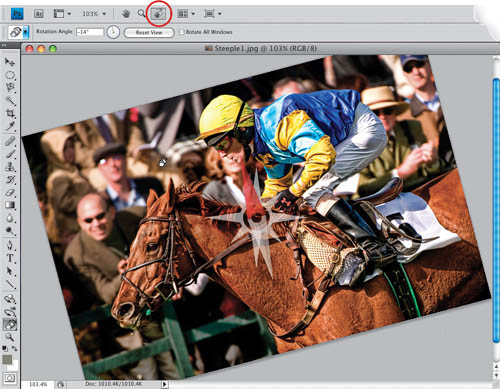
Another new CS4 interface feature is the ability to rotate your viewing area. If you’re working with a Wacom tablet, and you like to keep it in your lap while retouching or painting, you’re probably going to love this feature, because it lets you position the canvas in a very natural position for working with a wireless pen. To rotate your view, just click the Rotate View tool (found up in the Application Bar up top—it’s shown circled here in red—or just press R), and then click-and-hold in your image. A compass overlay will appear in the center of your image, and now you can just drag to rotate your view (by the way, this rotating doesn’t actually rotate the pixels, just your view, so don’t worry—you’re not messing up your image). If you want every new image opened at this same rotated view, turn on the Rotate All Windows checkbox up in the Options Bar. To return to a normal view, click on the tool again and press the Reset View button also in the Options Bar, or simply double-click on the tool itself in the Toolbox, or press the Esc key.
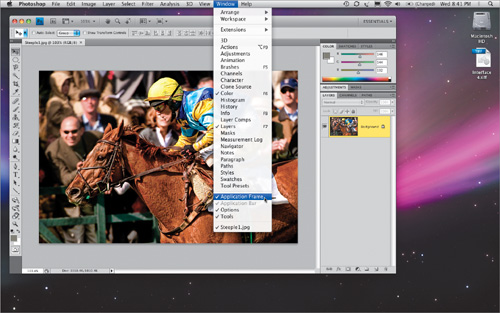
For Mac Users (Application Frame):
This is only for Mac users, because the Windows version of Photoshop has always had this feature. By turning this feature on (you go under the Window menu and choose Application Frame), it puts Photoshop in a floating window just like a Web browser (as seen here), and like a Web browser window, Photoshop is now resizable (just grab the bottom-right corner and drag inward). This also puts a gray background behind your working area, so you won’t accidentally click on the desktop background and leave Photoshop, which is a feature Windows users coming over to the Mac really like.
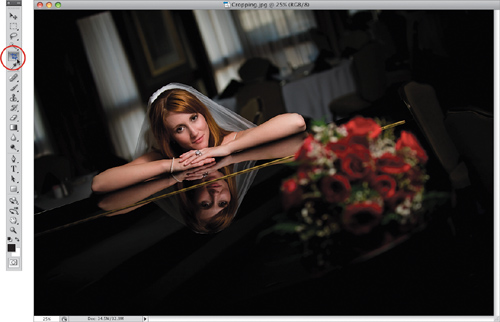
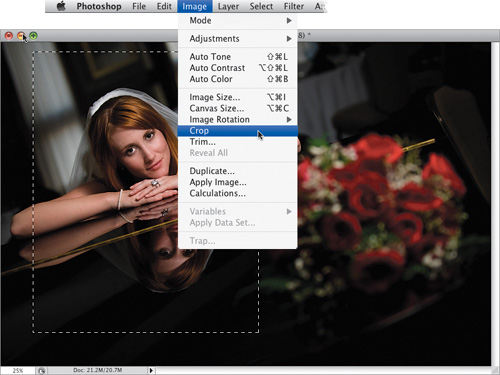
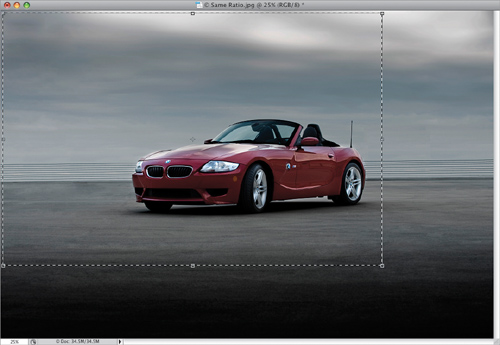
After you’ve sorted your images in Adobe Bridge, one of the first editing tasks you’ll probably undertake is cropping a photo. There are a number of different ways to crop a photo in Photoshop. We’ll start with the basic garden-variety options, and then we’ll look at some ways to make the task faster and easier. At the end of this project, I’ve added a new way to see your cropping that won fame when it was added to Adobe Photoshop Lightroom, but I figured out an easy way to get the exact same cropping trick here in Photoshop CS4.
Step One:
Press the letter C to get the Crop tool (you could always select it directly from the Toolbox, but I only recommend doing so if you’re charging by the hour).
SCOTT KELBY
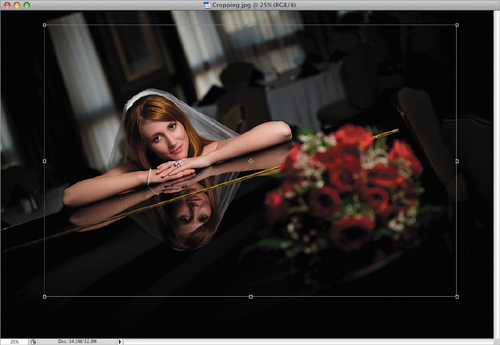
Step Two:
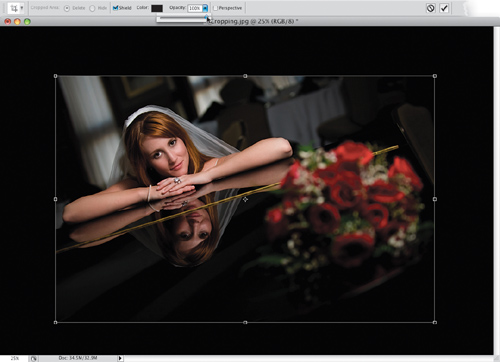
Click within your photo and drag out a cropping border. The area to be cropped away will appear dimmed (shaded). You don’t have to worry about getting your crop border right when you first drag it out, because you can edit the border by clicking-and-dragging the points that appear in each corner and at the center of each side.

Step Three:
If you don’t like seeing your photo with the cropped-away area appearing shaded (as in the previous step), you can toggle this shading feature off/on by pressing the Forward Slash (/) key on your keyboard. When you press the Forward Slash key, the border remains in place, but the shading is turned off (as seen here).
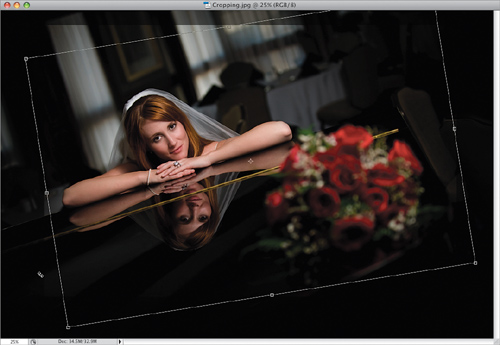
Step Four:
While you have the cropping border in place, if you need to rotate your photo, you can do that as well (so basically, you’re doing two things at the same time: cropping and rotating). You rotate the cropping border by just moving your cursor anywhere outside the border. When you do this, the cursor will change into a double-headed arrow. Just click, hold, and drag up (or down) and the cropping border will rotate in the direction you choose (as shown here).
TIP: For Mac Users Only
Not just Mac users, but specifically Mac users using new MacBooks, because Apple added a new feature called Multi-Touch gestures, which lets you make certain finger movements on your MacBook’s track-pad to control things within your Mac. Adobe leveraged these new gestures in CS4 by assigning some Photoshop features to them. For example, to rotate the canvas, just put your fingers together like you’re trying to pick up a quarter by the edges, then rotate around (like you’re rotating the coin), and Photoshop’s canvas will rotate along with you. You can zoom in by pinching your fingers together; zoom out by spreading your fingers (iPhone users will feel right at home).
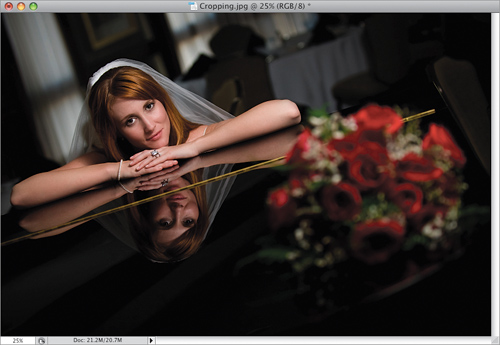
Step Five:
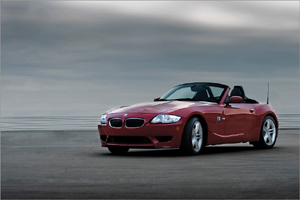
Once you have the cropping border right where you want it, press the Return (PC: Enter) key to crop your image. The final cropped image is shown here, where we cropped off some of the windows above and to the left (the daylight coming through them was drawing your attention over there, which we don’t want), and we also cropped away a distracting chair on the right and a table on the left. You can see the uncropped image on the previous page.
TIP: Deciding Not to Crop
If you drag out a cropping border and then decide you don’t want to crop the image, you can either press the Esc key on your keyboard, click on the “No!” symbol in the Options Bar, or just click on a different tool in the Toolbox, which will bring up a dialog asking if you want to crop the image. Click on the Don’t Crop button to cancel your crop.
Step Six:
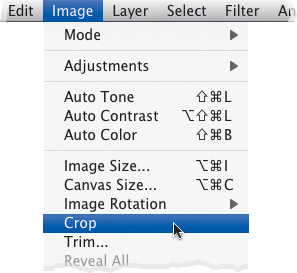
Another popular way to crop is to skip the Crop tool altogether and just use the Rectangular Marquee tool (M) to put a selection around the area of your photo you want to keep. You can reposition the selection by clicking inside the selected area and dragging. When your selection is positioned where you want it, go under the Image menu and choose Crop. The area outside your selection will be cropped away instantly. Press Command-D (PC: Ctrl-D) to Deselect.
Step Seven:
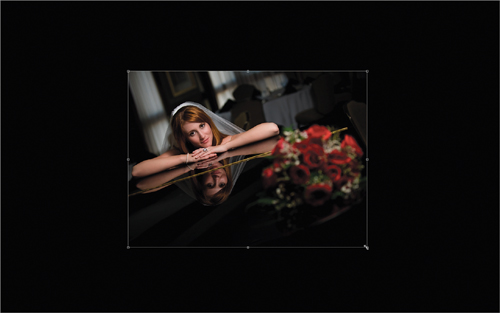
Okay, are you ready for the ultimate cropping experience? (There’s a sentence that’s probably never been written before.) It’s inspired by Lightroom’s popular Lights Out full-screen cropping method. In Lights Out mode, as you crop, it surrounds your photo with solid black, so you see a live preview of what the final cropped photo will look like as you crop. It’s pretty sweet, and once you try it, you won’t want to crop any other way. Luckily, you can do the same thing here in Photoshop CS4. Start by taking the Crop tool and dragging it over part of your photo (it doesn’t matter where or what size). In the Options Bar, there’s an Opacity field, which lets you choose how light the area you’re cropping away is going to display onscreen. Click on the downward-facing triangle and increase the Opacity to 100%, so it’s solid black (as shown here).
Step Eight:
Now press the Esc key to remove your cropping border. Press Tab, then the F key twice to hide all of Photoshop’s panels and menus, plus this centers your photo onscreen surrounded by solid black (as seen here). That’s it—you’re in “Lights Out cropping mode” because you made any cropped-away area solid black, which matches the black full-screen area surrounding your photo. So, try it yourself—get the Crop tool again, drag out a cropping border, then drag any one of the cropping handles inward and you’ll see what I mean. Pretty sweet, eh? When you’re done cropping, press Return (PC: Enter), then press the letter F once more to leave full-screen mode, then press the Tab key to bring your panels, menus, and Toolbox back.
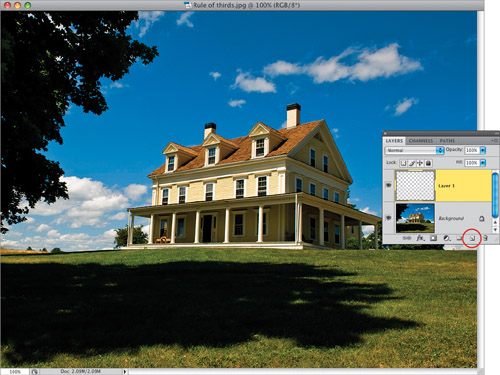
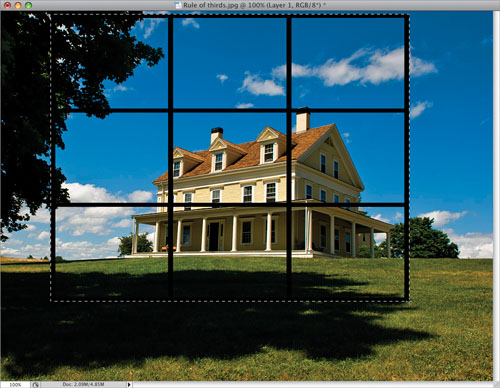
The “rule of thirds” is a trick that photographers sometimes use to create more interesting compositions. Basically, you visually divide the image you see in your camera’s viewfinder into thirds, and then you position your horizon so it goes along either the top imaginary horizontal line or the bottom one. Then, you position the subject (or focal point) at the center intersections of those lines. But if you didn’t use the rule in the viewfinder, no sweat! You can use Photoshop to crop your image using the rule of thirds to create more appealing compositions.
Step One:
Open the photo you want to apply the rule-of-thirds cropping technique to (the shot here is poorly composed, with the subject right in the center—it just screams “snapshot!”). So, start by creating a new blank layer by clicking on the Create a New Layer icon at the bottom of the Layers panel (it’s circled in red here).
SCOTT KELBY
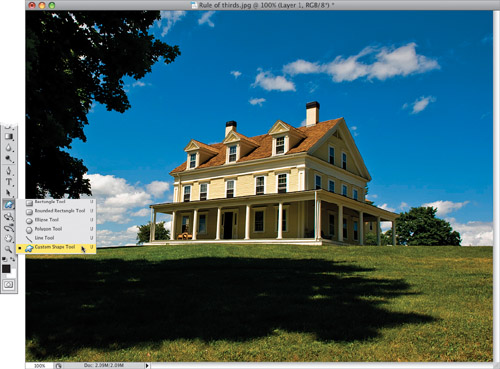
Step Two:
Now, go to the Toolbox and get the Custom Shape tool (as shown here), or press Shift-U until you have it.
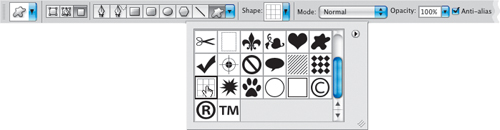
Step Three:
The Custom Shape tool’s options will appear up in the Options Bar. First, click on the third icon from the left (so your shape will draw pixels, instead of a Shape layer or a path). Next, click on the downward-facing triangle to the immediate right of the current shape, and the Shape Picker will pop down (as shown here). In the default set of shapes there is a Grid shape, and that shape is already divided into equal thirds, so click on that shape to choose it.
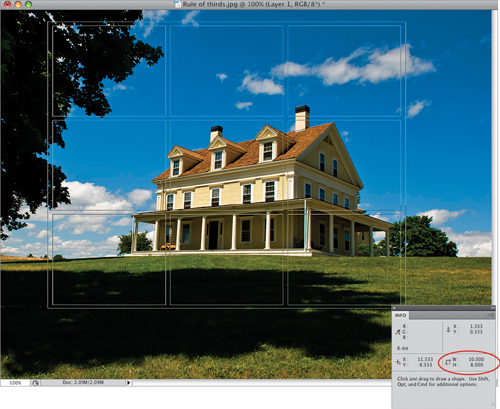
Step Four:
You’re going to need to see the exact size you want to crop down to, so go under the Window menu and choose Info. This brings up the Info panel (shown here), which displays the Width and Height for any shape you draw. So now take the Custom Shape tool and drag out a grid, and as you drag, keep an eye on the Info panel’s Width and Height fields (our goal is to print an 8×10″ print, so we’re going to want our final grid size to be 8″ tall by 10″ wide). Now, start dragging (don’t worry about positioning the grid right yet—just keep your eye on that Info panel, and your wrist steady, so you can drag out exactly an 8×10″ grid. Also, don’t worry about damaging your photo—that’s why we created that new blank layer in Step One, so your grid will appear on this new layer).
Step Five:
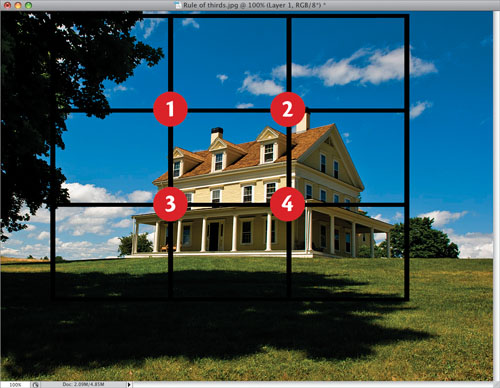
Press the letter V to switch to the Move tool, and click-and-drag your rule-of-thirds grid into the position you’d like it (ideally, your subject, or point of interest, would appear at one of the four places within the grid where the lines intersect. I’ve marked all four here as a visual reminder).
Step Six:
Once the grid is positioned right where you want it, get the Rectangular Marquee tool (M) and click-and-drag out a selection that is the exact same size as the grid (as shown here).
TIP: Jump to Any Tool and Back Automatically
File this under “Did it always work like this?” In CS4, while you’re working with one tool, you can temporarily access another tool, and when you’re done, automatically switch back. Just use the one-key shortcut for the tool you want (like V for the Move tool, or B for the Brush tool), but don’t just press it once, or it makes the switch permanent. Instead, just press the letter and hold it, use the tool, then release the letter, and you’re right back to the tool you started with.
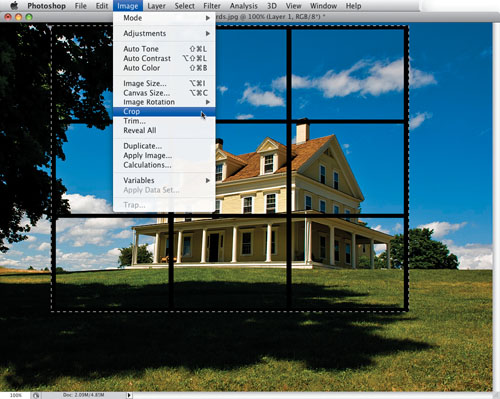
Step Seven:
Now go under the Image menu and choose Crop (as shown here).
TIP: Cropping to Add Canvas
You can also use the Crop tool to make your canvas area bigger. First, open a photo, then press the letter F (to make the gray area outside your photo visible). Take the Crop tool (C), and drag out over a small area inside your photo. Now, you can drag any corner or side point of your cropping border right outside your image area, off into that gray area surrounding your photo (so you can visually position where you want more canvas area). Then, when it’s right where you want it, press the Return (PC: Enter) key and the area outside your image area now becomes white canvas area. Not bad, eh?
Step Eight:
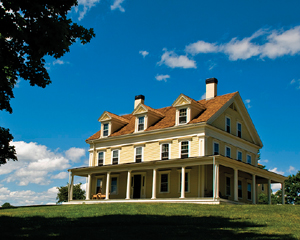
When you choose Crop from that menu, it crops the photo based on your current selection, so basically it crops the photo down to the edges of your grid. Now, press Command-D (PC: Ctrl-D) to Deselect, and then go to the Layers panel and drag Layer 1 (your grid layer) into the Trash (at the bottom of the Layers panel) to delete it. You can now see your final cropped photo—cropping using the rule of thirds.
If you’re outputting photos for clients, chances are they’re going to want them in standard sizes so they can easily find frames to fit their photos. If that’s the case, you’ll find this technique handy, because it lets you crop any image to a predetermined size (like 5×7″, 8×10″, and so on).
Step One:
Let’s say our image measures roughly 16×10″, and we want to crop it to be a perfect horizontal 10×8″. First, press the C key to get the Crop tool, and up in the Options Bar on the left, you’ll see Width and Height fields. Enter the size you want for the width, followed by the unit of measurement you want to use (e.g., “in” for inches, “px” for pixels, “cm” for centimeters, “mm” for millimeters, etc.). Next, press the Tab key to jump over to the Height field and enter your desired height, again followed by the unit of measurement.
SCOTT KELBY
Step Two:
Click within your photo with the Crop tool and drag out a cropping border. You’ll notice that as you drag, the border is constrained to a horizontal shape, and once you release the mouse button, no side points are visible—only corner points. Whatever size you make your border, the area within that border will become a 10×8″ photo.
Step Three:
After your cropping border is onscreen, you can reposition it by moving your cursor inside the border (your cursor will change to an arrow). You can now drag the border into place, or use the Arrow keys on your keyboard for more precise control. When it looks right to you, press Return (PC: Enter) to finalize your crop, and the area inside your cropping border will be 10×8″. (I made the rulers visible by pressing Command-R [PC: Ctrl-R], so you could see that the image measures exactly 10×8″.)
TIP: Clearing the Width and Height
Once you’ve entered a Width and Height in the Options Bar, those dimensions will remain in place until you clear them. To clear the fields (so you can use the Crop tool for freeform cropping to any size), just go up in the Options Bar and click on the Clear button (while you have the Crop tool active, of course).
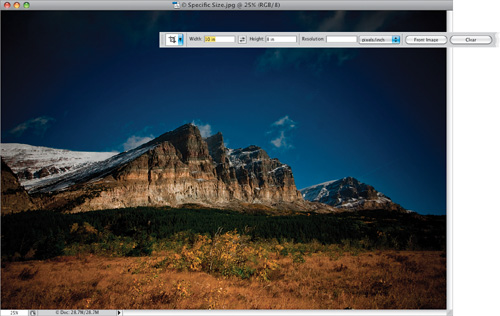
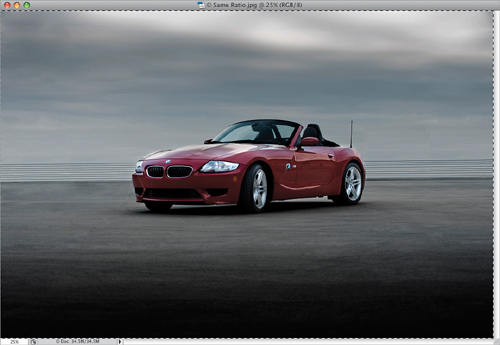
COOLER TIP: Cropping to Another Photo’s Size
If you already have a photo that is the exact size and resolution that you’d like to apply to other images, you can use its settings as the crop dimensions. First, open the photo you’d like to resize, and then open your ideal-size-and-resolution photo. Get the Crop tool, and then in the Options Bar, click on the Front Image button. Photoshop will automatically input that photo’s dimensions into the Crop tool’s Width, Height, and Resolution fields. All you have to do is crop the other image, and it will share the exact same specs as your ideal-size photo.
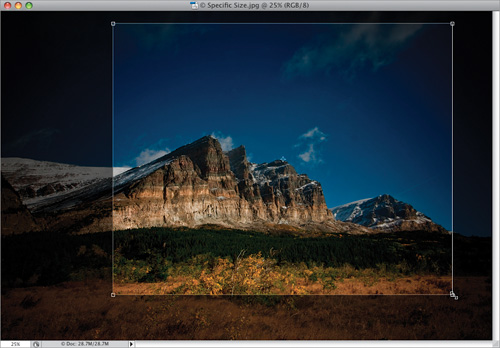
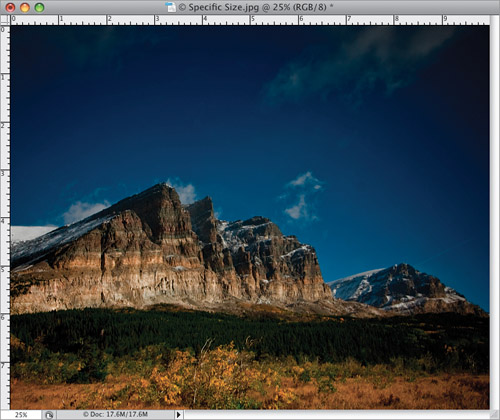
Okay, let’s say you want to crop a photo down in size, but you want to keep the aspect ratio the same as the original photo from your camera (so when you crop, the photo will be smaller in size, but it will have the exact same width-to-height ratio as the original photo). You could pull out a calculator and do the math to figure out what the new smaller size should be, but there’s a faster, easier, and more visual way. (By the way, although the Crop tool within Camera Raw gives you a menu of preset ratios, you can only use those presets on a RAW image, but this technique works on any photo.)
Step One:
Open the photo you want to crop. Press Command-A (PC: Ctrl-A) to put a selection around the entire photo.
SCOTT KELBY
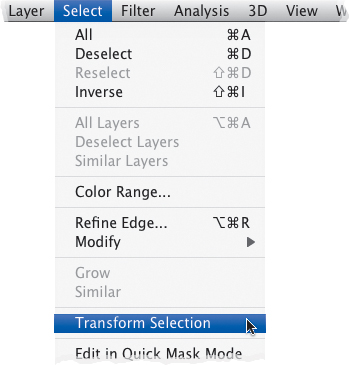
Step Two:
Go under the Select menu and choose Transform Selection. This lets you resize the selection itself, without resizing the photo within the selection (which is what usually happens).
Step Three:
Press-and-hold the Shift key, grab a corner point, and drag inward to resize the selection area. Because you’re holding the Shift key as you scale, the aspect ratio (the same ratio as your original photo) remains exactly the same. Once you get the selection near the size you’re looking for, move your cursor inside the bounding box, and then click-and-drag to position your selection where you want to crop. Then, press Return (PC: Enter) to complete your transformation.
Step Four:
Now that you’ve used your selection to determine the crop area, it’s time to actually crop, so go under the Image menu and choose (no big surprise here) Crop.
Step Five:
Once you choose Crop, the image is then cropped to fit within your selection, so just press Command-D (PC: Ctrl-D) to Deselect. Because you followed the steps shown here, your cropped image maintains the same aspect ratio as your original photo.
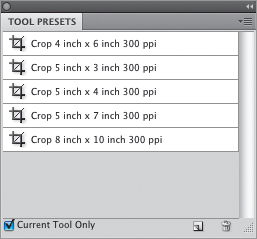
Although it’s more of an advanced technique, creating your own custom tools isn’t complicated. In fact, once you set them up, they will save you time and money. We’re going to create what are called “tool presets.” These tool presets are a series of tools (in this case, Crop tools) with all our option settings already in place. So we’ll create a 5×7″, 6×4″, or whatever size Crop tool we want. Then, when we want to crop to 5×7″, all we have to do is grab the 5×7″ Crop tool preset. Here’s how:
Step One:
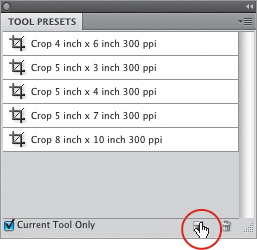
Press the letter C to switch to the Crop tool, and then go under the Window menu and choose Tool Presets to bring up the Tool Presets panel (or click on it in the panel dock on the right side of your screen, where it’s nested by default). You’ll find that five Crop tool presets are already there, all set to 300 ppi. That’s great if you need these sizes at 300 ppi; but if you don’t, you might as well drag these tool presets onto the Trash icon at the bottom of the panel. (Also, make sure that the Current Tool Only option is turned on at the bottom of the panel so you’ll see only the Crop tool’s presets, and not the presets for every tool.)
Step Two:
Go up to the Options Bar and enter the dimensions for the first tool you want to create (in this example, we’ll create a Crop tool that crops to a wallet-size image). In the Width field, enter 2. Then press the Tab key to jump to the Height field and enter 2.5. Note: If you have the Rulers set to Inches under the Units section in Photoshop’s Units & Rulers Preferences (Command-K [PC: Ctrl-K]), when you press the Tab key, Photoshop will automatically insert “in” after your numbers, indicating inches.
Step Three:
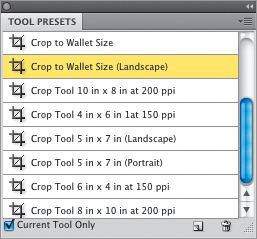
In the Tool Presets panel, click on the Create New Tool Preset icon at the bottom of the panel (to the left of the Trash icon). This brings up the New Tool Preset dialog, in which you can name your new preset. Name it “Crop to Wallet Size,” click OK, and the new tool is added to the Tool Presets panel.

Step Four:
Continue this process of typing in new dimensions in the Crop tool’s Options Bar and clicking on the Create New Tool Preset icon until you’ve created custom Crop tools for the sizes you use most. Make sure the name is descriptive (for example, add “Portrait” or “Landscape”).
TIP: Changing the Names of Presets
If you need to change the name of a preset, just double-click directly on its name in the panel, and then type in a new name.
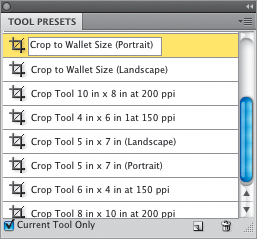
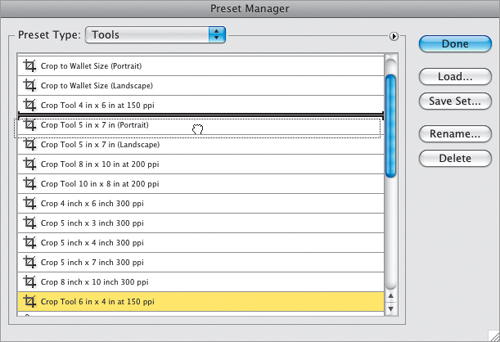
Step Five:
Chances are your custom Crop tool presets won’t be in the order you want them, so go under the Edit menu and choose Preset Manager. In the resulting dialog, choose Tools from the Preset Type pop-up menu, and scroll down until you see the Crop tools you created. Now just click-and-drag them to wherever you want them to appear in the list, and then click Done.
Step Six:
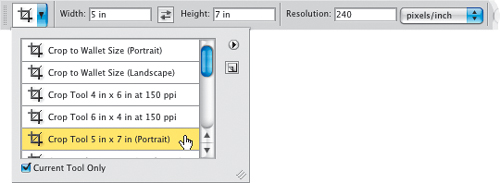
Now you can close the Tool Presets panel because there’s an easier way to access your presets: With the Crop tool selected, just click on the Crop icon on the left in the Options Bar. A pop-up menu of tools will appear. Click on a preset, drag out a cropping border, and it will be fixed to the exact dimensions you chose for that tool. Imagine how much time and effort this is going to save (really, close your eyes and imagine...mmmm...tool presets...yummy...).
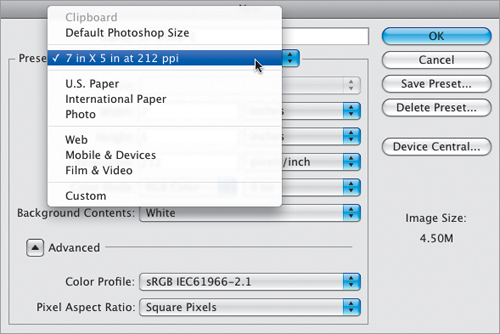
Photoshop’s dialog for creating new documents has a pop-up menu with a list of preset sizes. You’re probably thinking, “Hey, there’s a 4×6″, 5×7″, and 8×10″—I’m set.” The problem is there’s no way to switch the resolution of these presets (so the Portrait, 4×6 will always be a 300 ppi document). That’s why creating your own custom new document sizes is so important. Here’s how:
Step One:
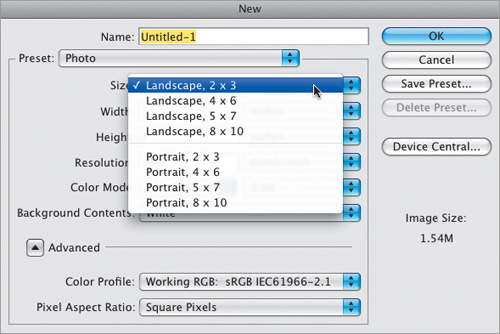
Go under the File menu and choose New. When the New dialog appears, click on the Preset pop-up menu to reveal the list of preset types, and choose Photo. Then click on the Size pop-up menu to see the preset sizes, which include 2×3″, 4×6″, 5×7″, and 8×10″ in both portrait and landscape orientation. The only problem with these is that their resolution is set to 300 ppi by default. So, if you want a different size preset at less than 300 ppi, you’ll need to create and save your own.
Step Two:
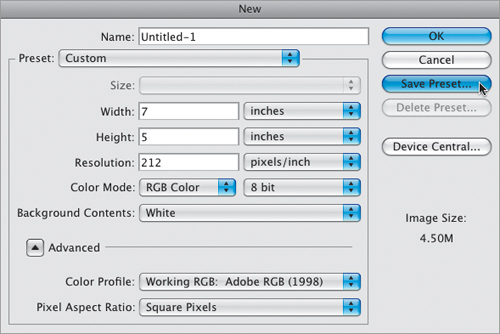
For example, let’s say that you want a 5×7″ set to landscape (that’s 7″ wide by 5″ tall). First choose Photo from the Preset pop-up menu, then choose Landscape, 5×7 from the Size pop-up menu. Choose your desired Color Mode, and then enter a Resolution (I entered 212 ppi, which is enough for me to have my image printed on a high-end printing press). Once your settings are in place, click on the Save Preset button.
Step Three:
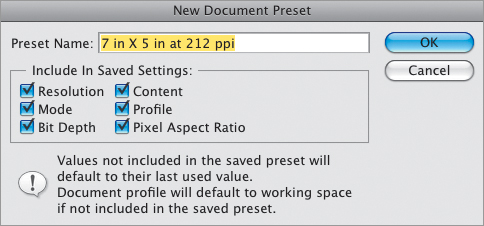
This brings up the New Document Preset dialog. In the Preset Name field, enter your new resolution at the end of the size. You can turn on/off the checkboxes for which parameters you want saved, but I use the default setting to include everything (better safe than sorry, I guess).
Step Four:
Click OK and your new custom preset will appear in the New dialog’s Preset pop-up menu. You only have to go through this once. Photoshop CS4 will remember your custom settings, and they will appear in this Preset pop-up menu from now on.
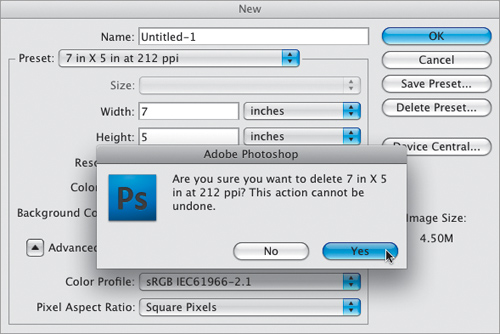
Step Five:
If you decide you want to delete a preset, it’s simple—just open the New dialog, choose the preset you want to delete from the Preset pop-up menu, and then click the Delete Preset button. A warning dialog will appear asking you to confirm the delete. Click Yes, and it’s gone!
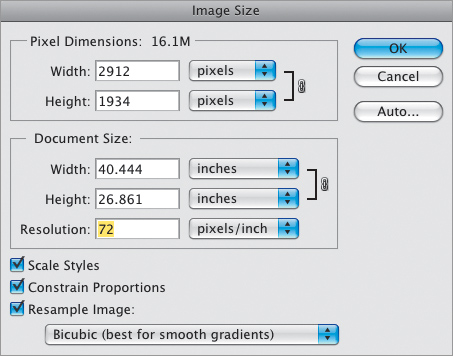
If you’re used to resizing scans, you’ll find that resizing images from digital cameras is a bit different, primarily because scanners create high-res scans (usually 300 ppi or more), but the default settings for many digital cameras produce an image that is large in physical dimensions, but lower in pixels-per-inch (usually 72 ppi). The trick is to decrease the physical size of your digital camera image (and increase its resolution) without losing any of its quality. Here’s the trick:
Step One:
Open the digital camera image that you want to resize. Press Command-R (PC: Ctrl-R) to make Photoshop’s rulers visible. As you can see from the rulers, the photo is about 40″ wide by 27″ high.
SCOTT KELBY
Step Two:
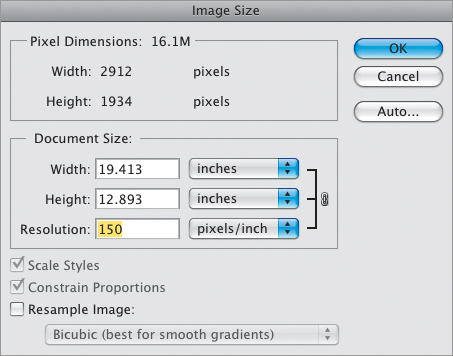
Go under the Image menu and choose Image Size (or press Command-Option-I [PC: Ctrl-Alt-I]) to bring up the Image Size dialog. Under the Document Size section, the Resolution setting is 72 ppi. A resolution of 72 ppi is considered “low resolution” and is ideal for photos that will only be viewed onscreen (such as Web graphics, slide shows, and so on), but it’s too low to get high-quality results from a color inkjet printer, color laser printer, or for use on a printing press.
Step Three:
If we plan to output this photo to any printing device, it’s pretty clear that we’ll need to increase the resolution to get good results. I wish we could just type in the resolution we’d like it to be in the Resolution field (such as 200 or 300 ppi), but unfortunately this “resampling” makes our low-res photo appear soft (blurry) and pixelated. That’s why we need to turn off the Resample Image checkbox (it’s on by default). That way, when we type in a Resolution setting that we need, Photoshop automatically adjusts the Width and Height of the image down in the exact same proportion. As your Width and Height come down (with Resample Image turned off), your Resolution goes up. Best of all, there’s absolutely no loss of quality. Pretty cool!

Step Four:
Here I’ve turned off Resample Image and I entered 150 in the Resolution field for output to a color inkjet printer. (I know, you probably think you need a lot more resolution, but you usually don’t.) This resized my image to almost 13×19″, so with a little bit of cropping I can easily output a 13×19″ print (which happens to be the maximum output size for my Epson Stylus Photo R2880—perfect!).
Step Five:
Here’s the Image Size dialog for our source photo, and this time I’ve increased the Resolution setting to 212 ppi for output to a printing press. (Again, you don’t need nearly as much resolution as you’d think.) As you can see, the Height of my image is no longer 27″—it’s now just over 9″. The Width is no longer 40″—now it’s just over 13″.

Step Six:
When you click OK, you won’t see the image window change at all—it will appear at the exact same size onscreen—but look at the rulers. You can see that it’s now about 9″ high by about 13.75″ wide. Resizing using this technique does three big things: (1) it gets your physical dimensions down to size (the photo now fits easily on an 11×17″ sheet); (2) it increases the resolution enough so you can output this image on a printing press; and (3) you haven’t softened, blurred, or pixelated the image in any way—the quality remains the same—all because you turned off Resample Image. Note: Do not turn off Resample Image for images that you scan on a scanner—they start as high-res images in the first place. Turning Resample Image off is only for low-res photos taken with a digital camera.
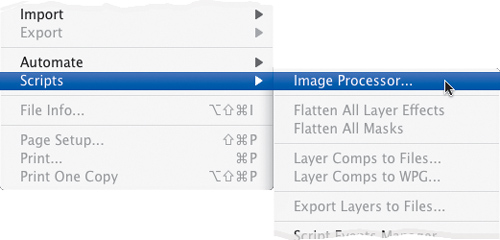
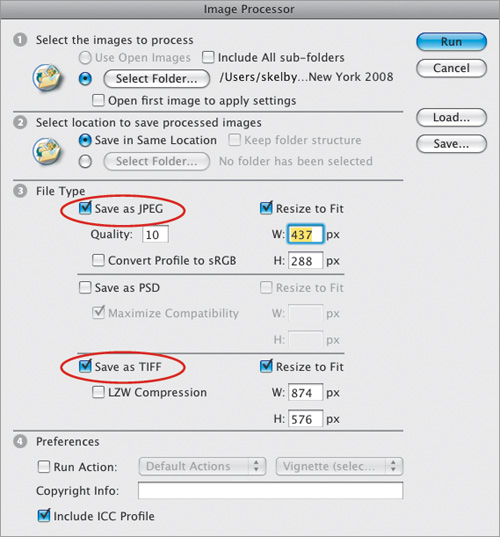
Back when Photoshop CS was fairly new, Russell Preston Brown (Adobe’s in-house evangelist and Photoshop madman) introduced a pretty slick little utility called Dr. Brown’s Image Processor, which would let you take a folder full of images and save them in various formats (for example, it could open a PSD file and automatically make a JPEG and a TIFF from it, and resize each along the way). It became a cult hit, and so in CS2, an updated version of it was included (but sadly, they dropped the “Dr. Brown’s” part, which I always thought gave it its charm).
Step One:
Go under the File menu, under Scripts, and choose Image Processor. By the way, if you’re working in Adobe Bridge (rather than Photoshop), you can Command-click (PC: Ctrl-click) on all the photos you want to apply the Image Processor to, then go under the Tools menu, under Photoshop, and choose Image Processor. That way, when the Image Processor opens, it already has those photos pegged for processing. Sweet!
Step Two:
When the Image Processor dialog opens, the first thing you have to do is choose the folder of photos you want it to “do its thing” to by clicking on the Select Folder button, then navigating to the folder you want and clicking Choose (PC: OK). If you already have some photos open in Photoshop, you can click on the Use Open Images radio button (or if you choose Image Processor from Bridge, the Select Folder button won’t be there at all—instead it will list how many photos you have selected in Bridge). Then, in the second section, decide whether you want the new copies to be saved in the same folder or copied into a different folder. No big whoop (that’s a technical term).
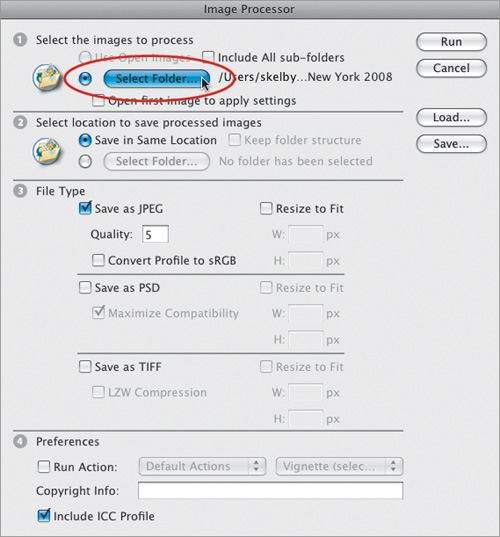
Step Three:
The third section is where the fun begins. This is where you decide how many copies of your original you’re going to wind up with, and in what format. If you turn on the checkboxes for Save as JPEG, Save as PSD, and Save as TIFF, you’re going to create three new copies of each photo. If you turn on the Resize to Fit checkboxes (and enter a size in the Width and Height fields), your copies will be resized too (in the example shown here, I chose a small JPEG of each file, then a larger TIFF, so in my folder I’d find one small JPEG and one larger TIFF for every file in my original folder).
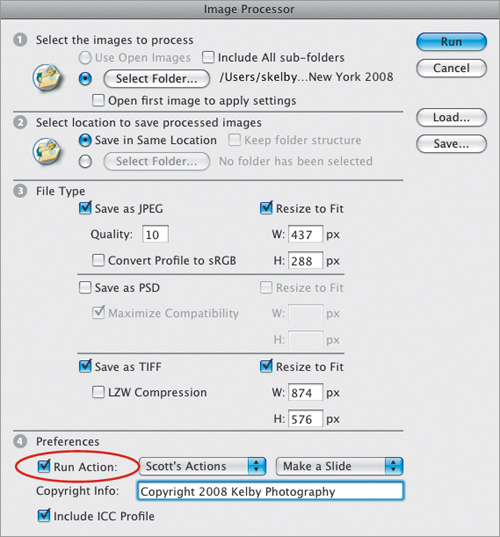
Step Four:
In the fourth section, if you’ve created an action that you want applied to your copies, you can also have that happen automatically. Just turn on the Run Action checkbox, then from the pop-up menus, choose which action you want to run. If you want to automatically embed your copyright info into these copies, type your info in the Copyright Info field. Lastly, there’s a checkbox that lets you decide whether to include an ICC profile in each image or not (of course, I’m going to try to convince you to include the profile, because I included how to set up color management in Photoshop in Chapter 13). Click the Run button, sit back, and let it “do its thing,” and before you know it, you’ll have nice, clean copies aplenty.
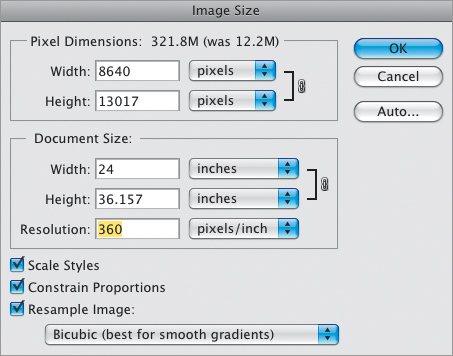
This is a resizing technique I learned from my friend (and world-famous nature photographer) Vincent Versace. His poster-sized prints (24×36″) always looked so sharp and crisp—but we were both shooting with the same 6-megapixel camera—so I asked him his secret. I figured he was using some scaling plug-in, but he said he did the whole thing in Photoshop. My thanks to Vinny for sharing his simple, yet brilliant technique with me, so I could share it with you.
Step One:
Open the photo you want to resize, then go under the Image menu and choose Image Size. By the way, in Photoshop CS2, Adobe finally added a keyboard shortcut to get to the Image Size dialog: Command-Option-I (PC: Ctrl-Alt-I).
SCOTT KELBY
Step Two:
Type in the dimensions you want as your final print size. The original width for my image is 7″, so when I type 24″ for the Width, the Height field will automatically adjust to just over 36″ (the Width and Height are linked proportionally by default—adjust one and the other adjusts in kind; here I’ll have to crop my height down to 36″). Of course, not all images scale perfectly, so depending on how many megapixels your camera is, you may not be able to get exactly 36″ (and in fact, you may not want to go that big. But if you do, you might need to enter more than 24″ to make your height reach 36″, and then you can go back and crop your width down to 24″ [see the “Cropping to a Specific Size” technique earlier in this chapter]).
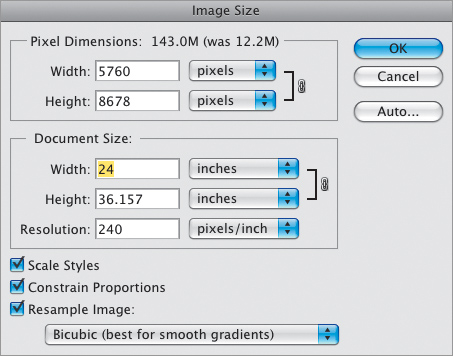
Step Three:
Once your size is in place, you’ll need to adjust your resolution upward, so go to the Resolution field and enter 360. Now, you know and I know that this goes against every tried-and-true rule of resolution, and breaks the never-just-type-in-a-higher-number-with-the-Resample-Image-checkbox-turned-on rule that we all live and die by, but stick with me on this one—you’ve got to try it to believe it. So, type it in, grit your teeth, but don’t click OK yet.
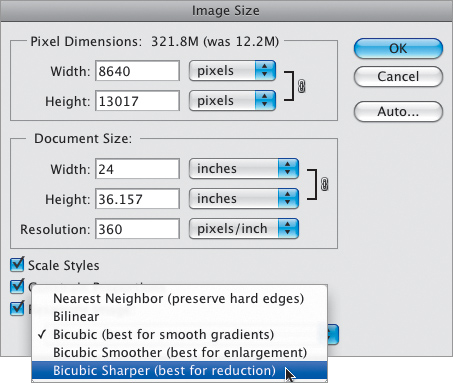
Step Four:
Back in Photoshop CS, Adobe introduced some new sampling algorithms for resizing images. According to Vincent’s research, the key to this resizing technique is to not use the sampling method Adobe recommends (which is Bicubic Smoother), and instead to choose Bicubic Sharper in the Resample Image pop-up menu, which actually provides better results—so much so that Vincent claims that the printed results are not only just as good, but perhaps better than those produced by the expensive, fancy-schmancy upsizing plug-ins.
Step Five:
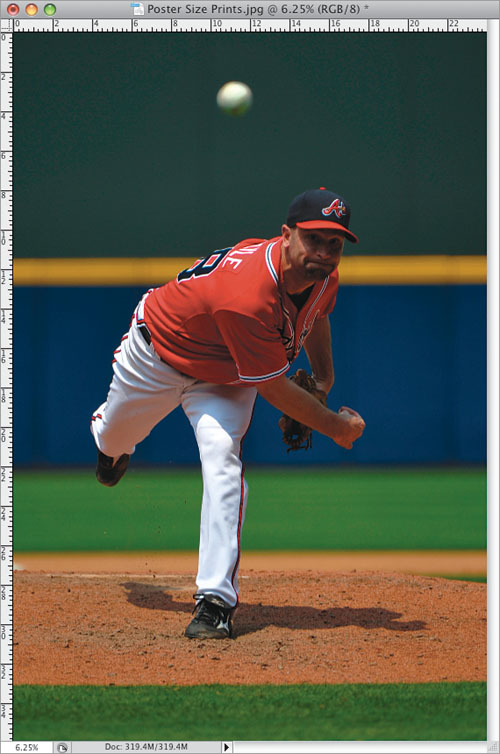
I’ve tried this technique numerous times, and I have to say—the results are pretty stunning. But don’t take my word for it—click OK, print it out, and see for yourself. Here’s the final image resized to 24×36″ (you can see the size in the rulers by pressing Command-R [PC: Ctrl-R]).
There’s a different set of rules we use for maintaining as much quality as possible when making an image smaller, and there are a couple of different ways to do just that (we’ll cover the two main ones here). Luckily, maintaining image quality is much easier when sizing down than when scaling up (in fact, photos often look dramatically better—and sharper—when scaled down, especially if you follow these guidelines).
Downsizing photos where the resolution is already 300 ppi:
Although earlier we discussed how to change image size if your digital camera gives you 72-ppi images with large physical dimensions (like 24×42″ deep), what do you do if your camera gives you 300-ppi images at smaller physical dimensions (like a 10×6″ at 300 ppi)? Basically, you turn on Resample Image (in the Image Size dialog under the Image menu), then simply type in the desired size (in this example, we want a 6×4″ final image size), and click OK (don’t change the Resolution setting, just click OK). The image will be scaled down to size, and the resolution will remain at 300 ppi. IMPORTANT: When you scale down using this method, it’s likely that the image will soften a little bit, so after scaling, you’ll want to apply the Unsharp Mask filter to bring back any sharpness lost in the resizing (go to Chapter 12 to see what settings to use).
Making one photo smaller without shrinking the whole document:
If you’re working with more than one image in the same document, you’ll resize a bit differently. To scale down a photo on a layer, first click on that photo’s layer in the Layers panel, then press Command-T (PC: Ctrl-T) to bring up Free Transform. Press-and-hold the Shift key (to keep the photo proportional), grab a corner point, and drag inward. When it looks good, press Return (PC: Enter). If the image looks softer after resizing it, apply the Unsharp Mask filter.
SCOTT KELBY
TIP: Reaching the Free Transform Handles
If you’re resizing a photo on a layer using Free Transform and you can’t reach the handles (because the edges of your photo extend outside the image area), just press Command-0 (PC: Ctrl-0), and your window will automatically resize so you can reach all the handles—no matter how far outside your image area they once were. Two things: (1) This only works once you have Free Transform active, and (2) it’s Command-0—that’s the number zero, not the letter O.

Resizing problems when dragging between documents:
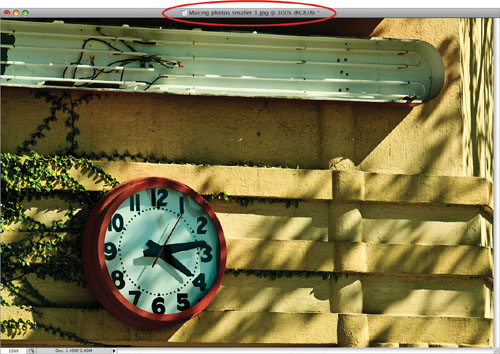
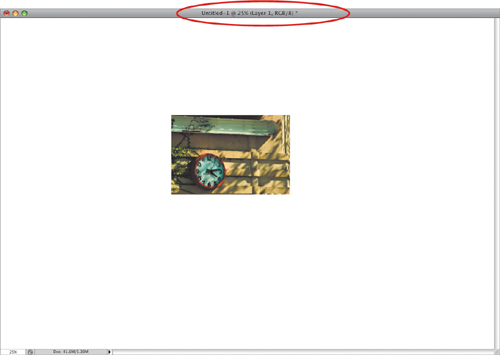
This one gets a lot of people, because at first glance it just doesn’t make sense. You have two documents, approximately the same size, side-by-side onscreen. But when you drag a 72-ppi photo (a clock on a wall) onto a 300-ppi document (Untitled-1), the photo appears really small. Why? Simply put—resolution. Although the documents appear to be the same size, they’re not. The tip-off that you’re not really seeing them at the same size is found in each photo’s title bar. Here, the clock image is displayed at 100%, but the Untitled-1 document below is displayed at only 25%. So, to get more predictable results, make sure both documents are at the same viewing size and resolution (check in the Image Size dialog under the Image menu).
SCOTT KELBY
TIP: Automated Cropping & Straightening
Want to save time the next time you’re scanning prints? Try gang scanning (fitting as many photos on your flatbed scanner as will fit and then scan them as one big single image), and then you can have Photoshop automatically straighten each individual image and place it into its own separate document. You do this by going under the File menu, under Automate, and choosing Crop and Straighten Photos. No dialog will appear. Instead, Photoshop will look for straight edges in your photos, straighten the photos, and copy each into its own separate window (by the way, it seems to work best when the photos you scan as a group have similar tonal qualities. The more varied the colors of the photos are, the harder time it seems to have straightening the images). This automation also works on single, crooked images.
One of the most jaw-dropping new features in Photoshop CS4 is “content-aware scaling,” and why it rocks is you can resize one part of your image, while the important parts stay intact. For example, let’s say you took a portrait of an executive, and you need to be able to add some text beside her for a magazine cover. If you didn’t compose the shot to accommodate the text when you took the shot, you’d have a lot of cloning and background work to do. But with content-aware scaling, you can stretch the background without stretching your exec. Here’s how it works:
Step One:
One of the things I use content-aware scaling for most is making digital camera images fit in traditional photography sizes (like 8×10″, 5×7″, etc.). You always have to crop the image, or leave white space at the top and bottom, when resizing an image to fit in one of these standard sizes, as shown here, where I dragged a digital camera image into an 8×10″ document. When you position it so you see the full image, it leaves a huge gap at the top.
SCOTT KELBY
Step Two:
So, rather than leaving the gap, most folks try to just resize the photo so it fills the full 8×10″ area, but you can see what happens when you do that—you no longer see the full image as you composed it. In our case—worse yet—it clips off the nose and tail of the plane (as seen here).
Step Three:
Since the zoom-to-fill-cropping from Step Two doesn’t work, we’ll go back to what we did in Step One, which at least gives you the full image as you shot it. You could try just stretching the image by going to Free Transform (press Command-T [PC: Ctrl-T]), and when the resizing handles appear, grab the center handle and drag upward, but that distorts everything and now you have a really squatty-looking bloated plane, and so this really isn’t an option for most images.
Step Four:
This is where content-aware scaling comes in handy. Resize the image so it fits fully in the image area (like back in Step One), then go under the Edit menu and choose Content-Aware Scale (or use the keyboard shortcut Command-Option-Shift-C [PC: Ctrl-Alt-Shift-C]). Then, grab the top handle and drag straight upward, and you’ll notice that it stretches the sky upward, but pretty much leaves the airplane intact, without stretching or bloating it. Now, if you keep dragging upward (beyond what we’ve dragged here), it will start dragging the plane, so you can’t just drag forever, but luckily you see a live onscreen preview as you’re dragging, so you’ll know right away how far you can drag. When you’ve dragged far enough, press Return (PC: Enter) to lock in your change. Next, let’s look at another way to use content-aware scaling.
Step Five:
Since Content-Aware Scale is aware of your subject, you can use it in other ways. For example, if you wanted these two NASCAR race cars closer to each other (obviously, what I’m about to show you is not for news reporters—you’d be doing this strictly for personal artistic reasons. Moving cars together after the fact is, well...cheating). But before we start moving cars, I want to point out another option, and that is a button up in the Options Bar that looks like a person (shown circled here in red). You turn this option on when you have people in the photo you’re about to resize. That tells the Content-Aware Scale command to protect anything that has a skin tone, and then it tries to avoid those areas. It doesn’t always work, but it usually helps.

SCOTT KELBY
Step Six:
Now, back to our cars. If you were to try this with regular old Free Transform (just opening Free Transform and dragging the top handle downward), it doesn’t move the cars closer together—it just squashes everything, and makes the photo pretty unusable. So, once you try this, before you hit the Return (PC: Enter) key to lock in your transformation, hit the Esc key on your keyboard to cancel your transformation. Instead, let’s try the same thing using the Content-Aware Scale command.
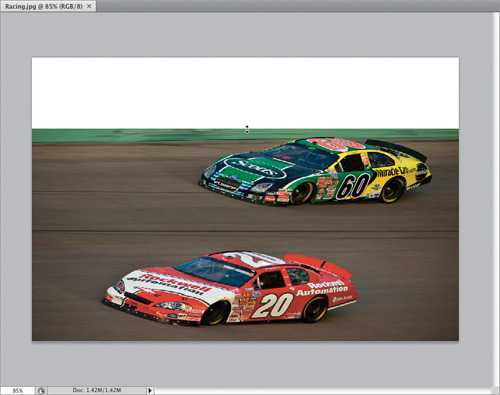
Step Seven:
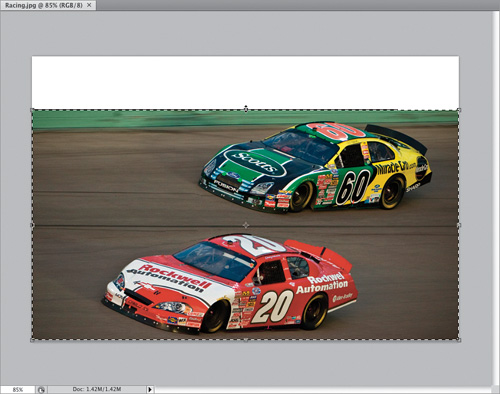
Press Command-A (PC: Ctrl-A) to Select All, then go under the Edit menu and choose Content-Aware Scale. Grab the top-center resize point and drag straight downward, and check out how the cars actually do move closer together (if I dragged any closer, their bumpers would be touching), but the cars themselves aren’t distorted or squashed. I know—amazing! At this point I would crop the photo, cropping off some of the open area in front of the cars, so it goes back to a normal aspect ratio.
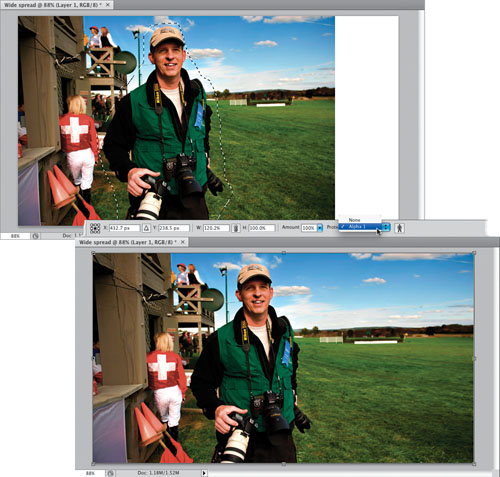
Step Eight:
Here are two more controls you need to know about: First, if you try Content-Aware Scale and it stretches your subject more than you want, go get the Lasso tool (L) and drag a selection around your subject (as shown here, top left), then go under the Select menu and choose Save Selection. When the Save Selection dialog appears, just click OK. Then bring up Content-Aware Scale again, but this time, go up in the Options Bar and choose Alpha 1 from the Protect pop-up menu (as shown here) to tell Photoshop where your subject is. Now you can drag to the right to fill the empty space with the least stretching (as seen here in the photo of my buddy Jeff Revell). There’s also an Amount control up in the Options Bar, which determines how much stretching protection is provided. At its default of 100%, it’s protecting as much as possible. At 50%, it’s a mix of protected resizing and regular Free Transform, and for some photos that works best. The nice thing is the Amount control is live, so as long as your handles are still in place, you can lower the Amount and see live onscreen how it affects your resizing.
SCOTT KELBY
If you hand-held your camera for most of your shots rather than using a tripod, you can be sure that some of your photos are going to come out a bit crooked. Here’s a quick way to straighten them accurately in just a few short steps:
Step One:
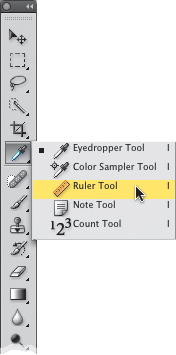
Open the photo that needs straightening. Choose the Ruler tool from Photoshop’s Toolbox (it looks like a little ruler, and it’s hidden behind the Eyedropper tool, so just click-and-hold for a moment on the Eyedropper tool until the Ruler tool appears in the flyout menu).
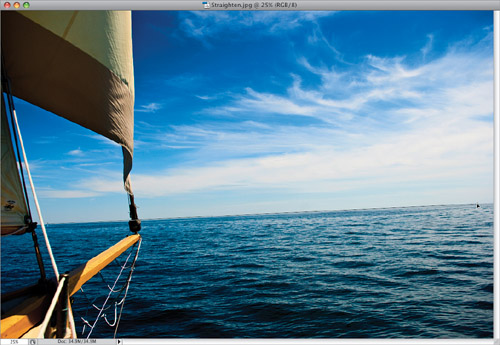
Step Two:
Try to find something in your photo that you think is supposed to be straight or relatively straight (the horizon, in this example). Click-and-drag the Ruler tool horizontally along this straight edge in your photo, starting from the left and extending to the right. As soon as you drag the tool, you can see the angle of the line displayed in the Info palette (found under the Window menu) and up in the Options Bar, but you can ignore them both because Photoshop is already taking note of the angle and placing that info where you’ll need it in the next step.
SCOTT KELBY
Step Three:
Go under the Image menu, under Image Rotation, choose Arbitrary, and the Rotate Canvas dialog will appear. Photoshop has already entered the proper angle of rotation you’ll need to straighten the image (based on your measurement), and it even sets whether the image should be rotated clockwise or counterclockwise.
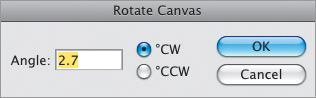
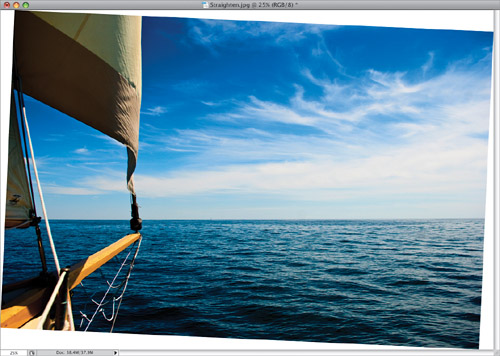
Step Four:
All you have to do now is click OK, and your photo will be perfectly straightened (check out the horizon in the photo shown here—it’s now nice and straight).
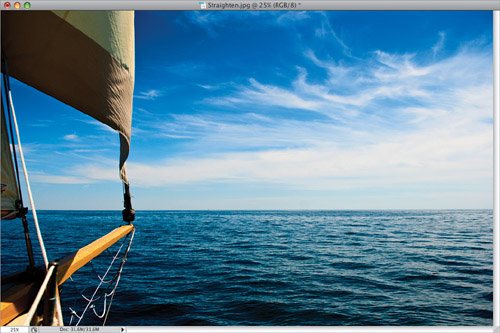
Step Five:
After the image is straightened, you might have to crop it to remove the extra white canvas space showing around the corners of your photo, so press C to switch to the Crop tool, drag out a cropping border, and press the Return (PC: Enter) key.
TIP: Clearing the Ruler Line
When you use the Ruler tool, the line it draws stays on your photo until you rotate the image. If you want to clear the measurement and remove the line it drew on your image, click on the Clear button in the Options Bar.