

This is the first chapter in the book (which is precisely why, against the wishes of my editor, I call it “Chapter 1”). Anyway, this is as good a time as any to let you know that I have always named the chapters in my books after songs, movies, or TV shows, so it’s actually the subtitle that appears under the chapter title that really tells you what the chapter is about. If you looked at the chapter title above, you probably thought, “Oh, how cute. He named this chapter after a nursery rhyme.” If you thought that, you are very old. At least 40. However, if you’re much, much younger than that (like myself), and incurably cool (ditto), then you probably recognize the title not as a nursery rhyme, but as a tender, emotion-filled love song that includes the touching lyric “I’m Fergie Ferg and me love you long time.” Ah ha (you loudly exclaim), that “love you long time” bit is a reference to the movie Full Metal Jacket (which came out in 1987. I was probably a toddler back then and definitely not already 27 years old, if that’s what you’re thinking). So now you’re feeling all “Yeah, I knew that one,” but then there’s a single bead of sweat trickling down your forehead. It’s there because you’re afraid someone (me) is going to ask you who this Fergie is and the only Fergie you know (at your advanced age) is the Duchess of York, but you know darn well that she isn’t likely to be quoting lines from Full Metal Jacket in her R&B songs, but now you’re even more worried that the rest of the book you just bought is like this chapter intro. If you’re worried about that, it can only mean one thing: you didn’t read “Five Quick Things...” that came before this chapter. If I were you, I’d go back and read that now. Don’t worry. I’ll wait long time.
So, you’ve finished your shoot and now you’re back at your computer and ready to look at your photos, see how you did, separate the keepers from the clunkers, etc. Of course, the first step is to get the photos from your camera onto your computer and into Adobe Bridge CS4. Luckily, Adobe included a built-in photo downloader in Bridge, so the process is pretty simple.
Step One:
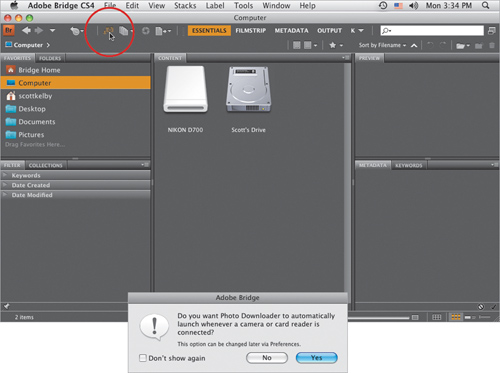
To import photos from your digital camera, first launch Adobe Bridge CS4 (from here on out, I’ll just call it Bridge for short), and then click the Get Photos from Camera icon on the top-left side of Bridge (it’s circled here in red), or if you’re charging by the hour, you can go under the File menu and choose Get Photos from Camera. By the way, if Bridge is open and you connect a digital camera or a memory card to your computer, a little dialog will appear asking you if you want to have the Photo Downloader appear automatically each time a camera or card reader is connected to your computer (it’s shown here). Since the Photo Downloader is just one click away, personally I’d rather not have it popping up automatically, but this one’s totally your call.
Step Two:
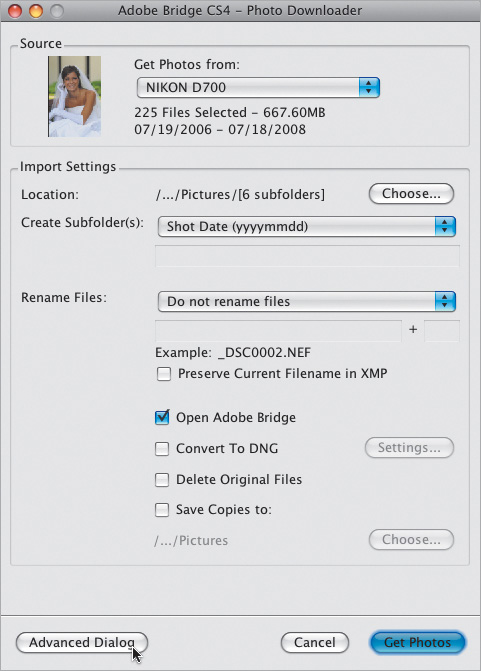
Clicking on that Get Photos from Camera icon brings up Bridge’s Photo Downloader. Before you do anything else, I recommend clicking on the Advanced Dialog button in the bottom-left corner (as shown here). While this does make some advanced options available, more importantly, it shows you previews of the photos you’re about to import.
SCOTT KELBY
Step Three:
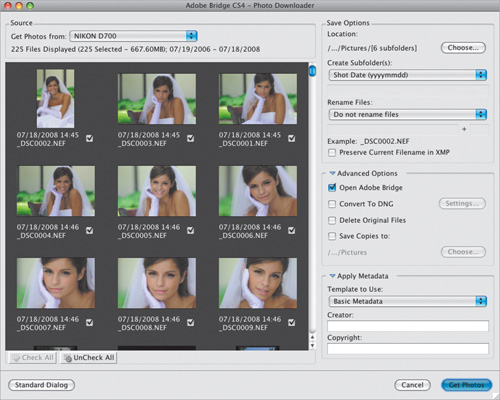
Here’s what the Advanced dialog looks like, with the thumbnail previews on the left, and options on the right. By default, it’s set to import every photo it finds on your memory card. If you see a photo you don’t want imported, just turn off the checkbox under the thumbnail (only checked photos will be imported). If you want just a few photos imported, it’s quicker if you start by clicking the UnCheck All button first (below the left side of the thumbnail preview area) to uncheck all the photos. Then select the photos you do want to import by pressing-and-holding the Command (PC: Ctrl) key and clicking on them (as you do, each thumbnail is highlighted), then turn on the checkbox for any one of these photos, and all your selected photos become checked (and will be imported).
SCOTT KELBY
Step Four:
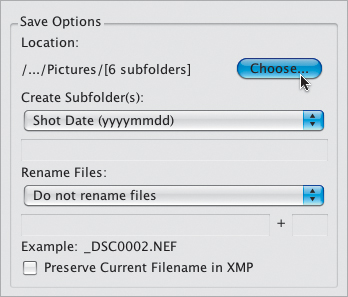
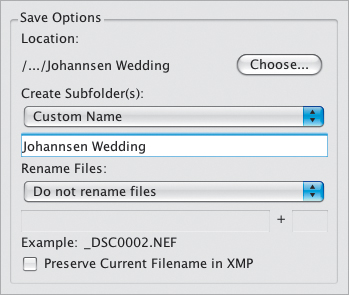
Once you’ve chosen which photos you want imported, you’ll need to choose where these photos will be saved to on your computer. By default, it saves them in your Pictures folder. If you want them saved to a different location, then click the Choose (PC: Browse) button (as shown here, where I’ve zoomed in on the Save Options section of the Photo Downloader). This brings up a dialog where you can choose the location where you’d like your imported photos stored. Pretty standard stuff—you’ve chosen which photos you want to import, and where you want to save them on your computer once they’re copied from your memory card.
Step Five:
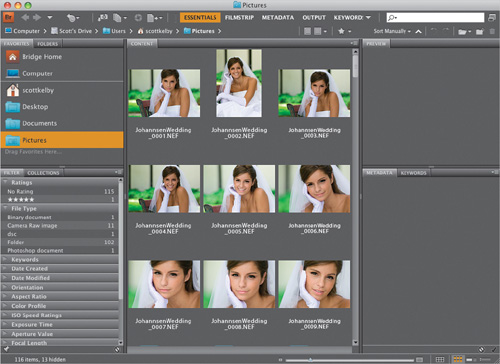
I recommend letting the Photo Downloader create a separate folder for your imported photos, inside your Pictures folder. If not, it’ll just toss them loose into your main folder, which makes staying organized a nightmare. By default, it puts your photos in a folder named with the date you took them. Personally, I think it’s more useful to name the folders by topic or subject (that way, you don’t have to remember the date). For example, these photos are from a wedding, so from the Create Subfolder(s) pop-up menu, I’d choose Custom Name and then type in the name I’d like for the folder just below it, as shown here, where my custom name is “Johannsen Wedding.” When I’m searching on my computer, that name means more to me than just seeing a folder named “20080711.”
Step Six:
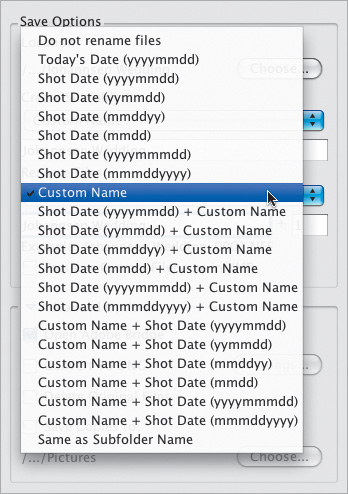
Also by default, your photos will keep the same non-descriptive, just-about-useless names your camera gave them when they were taken. So, I recommend having the Photo Downloader rename your photos as they’re imported with a descriptive name, which will make your life much easier down the road when you need to find these photos again fast. To do this, click on the Rename Files pop-up menu, and a list pops up with a wide range of auto-naming choices (seen here). So, just choose which naming convention you’d like from the options that include a custom name, including the ones followed by the date the photos were taken, from this list.
Step Seven:
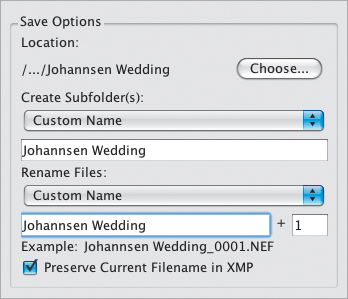
If you’ve chosen any of the naming conventions that have a custom name in it from the Rename Files pop-up menu, the name field is highlighted beneath it. Type in your custom name (in this case, I chose “Johannsen Wedding”) and then in the field to the right of it, choose the number where you’d like the sequential auto-numbering to start (it automatically uses a four-digit number). An example of your renaming appears directly under the name field (as seen here). There’s also a checkbox that lets you embed the original filename into your renamed file, just in case for some reason you need it one day (by the way, so far I’ve never needed to know a photo’s original camera-given name, but hey—ya never know).
Step Eight:
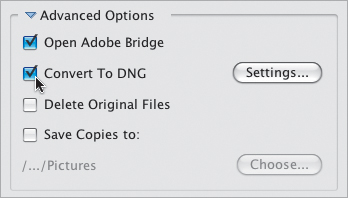
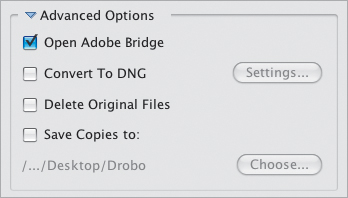
In the Advanced Options section, there’s a checkbox that automatically opens Bridge (if it’s not already open) once your photos are imported. I know what you’re thinking: “That’s an advanced option?” (Don’t get me started.) Anyway, directly under that you have the ability to convert your imported photos into Adobe’s DNG format, which is a universal archival format designed primarily for RAW files. For more on the advantages of DNG, jump over to Chapter 4, but in the meantime, here’s my rule of thumb for converting to DNG: If it’s a RAW file, I turn on the Convert To DNG checkbox. If it’s a JPEG or TIFF file, there’s not really any advantage for converting to DNG, so I don’t. Simple enough. Again, to learn more about DNG and why you might want to convert your RAW photos to DNG, jump over to Chapter 4.
Step Nine:
There are two more options in the Advanced Options section: one I recommend you avoid, and one that is absolutely critical. First, the bad one: there’s a checkbox called Delete Original Files. This one erases the photos on your memory card right after they’re copied to your computer. So, what if the images you just copied to your computer are corrupt or otherwise messed up? (Hey—it happens.) You can’t try to re-import them or rescue them from the memory card because (that’s right) you just had Bridge erase them. My golden rule is: Don’t erase anything unless you have at least two backups first, and you’ve spot checked at least two or three random photos from those to make sure they’re okay. Otherwise, you’re really taking your chances. Okay, so that’s the bad checkbox (leave Delete Original Files turned off). Now, for the good one.
Step 10:
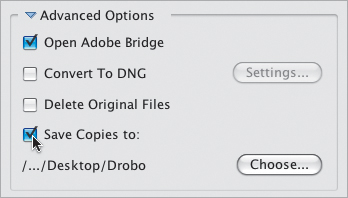
To make certain you have a second backup copy, turn on the Save Copies To checkbox to automatically back up your imported photos to a different hard drive (click the Choose [PC: Browse] button to choose the external hard drive, network, etc., where you want a copy of the photos you’re importing backed up to). This is so incredibly important because at this point, if your computer’s hard drive crashes, all your photos are gone. For good. But by turning this feature on, you’ll have a second backup set on a totally separate hard drive (and yes, it has to be on a totally separate hard drive—backing up to a different folder on your same computer doesn’t help, because if your computer’s hard drive crashes, you lose the originals and the backup at the same time).
Step 11:
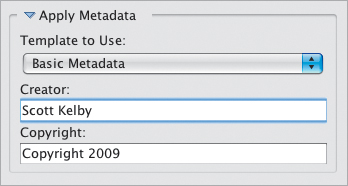
The next section down is the Apply Metadata section. This is where you’re able to embed your name and copyright information into each file automatically, as it’s imported. Simply click in the Creator field and type in your name. Then click in the Copyright field, type in your copyright info (as shown here), and you’re set. Now, you can have more information embedded upon import than this, but first you’d have to create a metadata template (which would appear in the Template to Use pop-up menu at the top of this section). I show you how to create your own in Chapter 2, so for now, just use the Basic Metadata template and enter your name and copyright info.
Step 12:
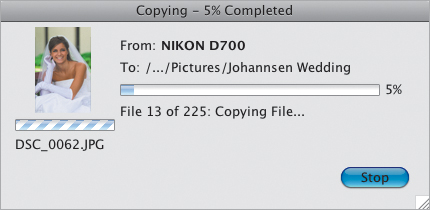
So that’s a look at how I set up the Photo Downloader to import photos. Now all you have to do is click the Get Photos button (in the bottom right-hand corner of the Photo Downloader window), and a download status dialog appears (shown here), showing you which files are being imported, how far along you are, etc.
Step 13:
Once your files are imported, they’re displayed in Bridge as thumbnails (as shown here), and now you can begin sorting, ranking, and doing all the other cool stuff we’re going to learn in the rest of this chapter and in Chapter 2.
Once you import your photos, they appear in Bridge, but they appear in the default layout. This layout does a good job of giving you access to all of Bridge’s different panels and features, but I think it’s a pretty lame setup for actually using Bridge. So, here we’re going to look at how to set up Bridge for a much a better way to view and work with your photos.
Step One:
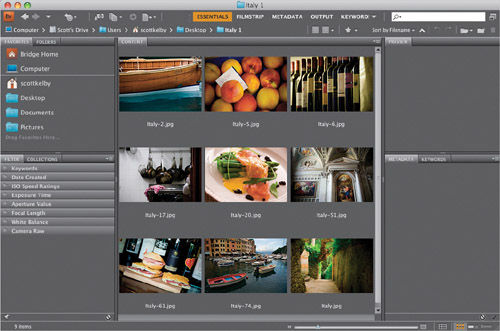
Although we call it “importing,” your photos aren’t actually in Bridge—they’re in a folder on your computer, and you’re looking at what’s inside that folder using Bridge. Your photos show up as thumbnails in the Content panel, which by default appears in the center of Bridge (as shown here). You have control over how quickly your thumbnails appear in Bridge based on how high quality you want your thumbnails to be.
SCOTT KELBY
Step Two:
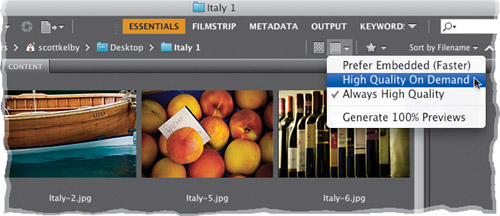
You make your “speed” choice from an Options pop-up menu in the Path Bar at the top of the window (shown here). Prefer Embedded (Faster) lets your thumbnails load the fastest by using the same small preview you see on the back of your digital camera. High Quality on Demand (which is the one I use myself), loads low-res thumbnails first, but once you click on a thumbnail, it then renders a higher-quality thumbnail. I don’t recommend Always High Quality (which has Bridge individually render a high-res preview of each photo) simply because it’s so much slower. Generate 100% Previews is painfully slow because it renders the full-screen preview even if you never use it. Again, my recommendation: High Quality on Demand for initial quick loading, and then higher quality when you click on a thumbnail.
Step Three:
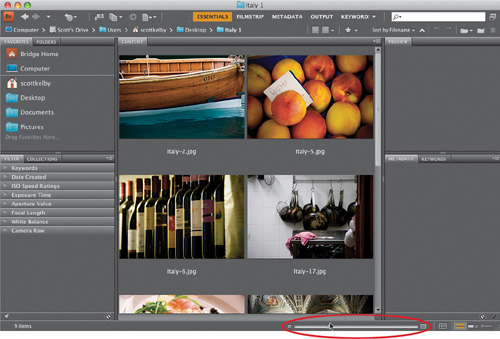
By the way, if you’re going to choose Prefer Embedded (Faster), you don’t have to dig through that pop-up menu—just click the little Browse icon to the immediate left of the Options icon. Now, once your thumbnails appear in the Content panel, you can resize them using the thumbnail slider at the bottom right of Bridge (as shown here). Dragging to the right makes the thumbnails larger, and you can pretty much imagine what happens when you drag to the left.
TIP: One-Click Sizing
If you want to jump to the next larger (or smaller) size thumbnail, just click on the little rectangular icon on the far right (or left) of the thumbnail slider.
Step Four:
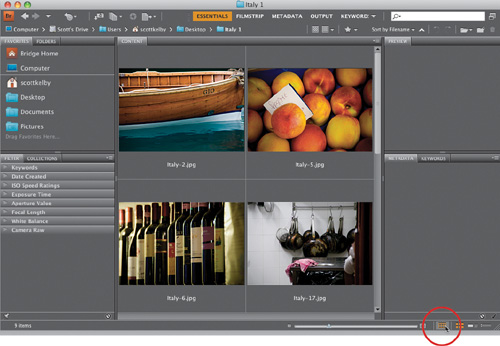
If you look back at the Bridge capture in Step Three, you’ll see a problem—see how the two photos at the very bottom of the center Content panel are cut off? If that drives you as crazy as it does me, you can turn on an option that makes sure that never happens. You see, there’s a new little feature that they added in Bridge CS4 that I personally love (it’s the little things, right?) called Grid Lock, and you turn this option on by clicking on the little Lock Thumbnail Grid icon in the bottom-right corner of Bridge’s window (shown circled here in red). By the way, there are a few other icons there, as well: the next icon over switches you back to regular Thumbnails view; the second icon from the right displays a Details view of your photos, which is a small thumbnail followed by lines of embedded info about your photo; and the icon on the far right gives you a List view, which is a simple list of your images like you might see when viewing a folder of images on your computer.
Step Five:
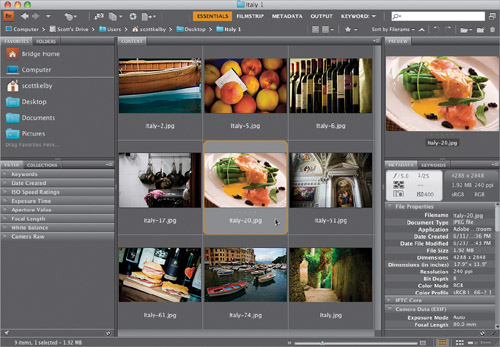
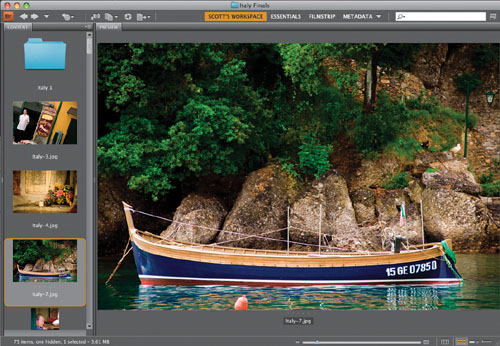
Once my photos appear in Bridge, the first thing I generally want to do is get a closer look at them. When you click on a thumbnail, a preview of that photo appears in the Preview panel at the top of the right side Panels area (as seen here). The problem is the preview isn’t much bigger than the thumbnail (in fact, if you’ve dragged the Thumbnail slider to the right, it’s not even as big!). So, when I’m starting to look at my images, the first thing I do is make my preview larger—that way I can see my photos at a large enough size that I can actually make a reasonable decision about which ones are “keepers” and which ones don’t make the cut. What we need is a much bigger Preview panel, and a much smaller Content panel.
SCOTT KELBY
Step Six:
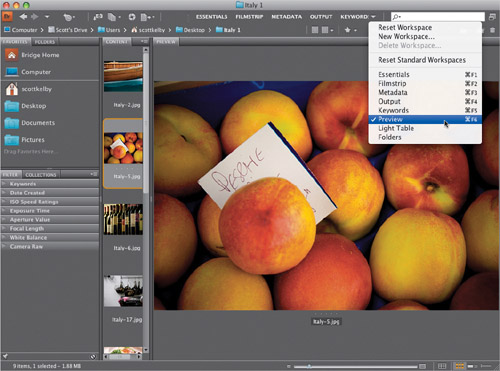
A step in the right direction is to choose one of Adobe’s built-in workspaces. These are just different layouts for Bridge’s panels that focus on different tasks. Some of these built-in workspaces appear right on the Application Bar at the top of the window, so they’re one click away (like Essentials, Filmstrip, etc.). To get to the workspace we need, called Preview, you can either click-and-hold on the little down-facing triangle to the right of the workspaces in the Application Bar and choose Preview from the pop-up menu (as shown here), or just press Command-6 (PC: Ctrl-6). Either way, it changes Bridge’s layout to what you see here, with a really big Preview panel on the right, the Content panel (with your thumbnails) really skinny in the center, and the left side Panels area still there on the left. This is better, but I’m not loving it. There’s still too much clutter for just viewing your images (we need distractions out of the way, so we can focus on the photos).
Step Seven:
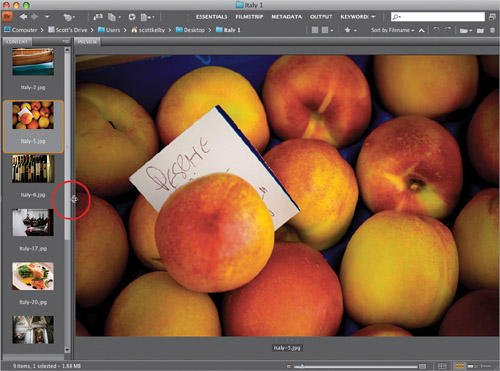
To put the focus on our photos, we need to hide the left side Panels area. Go back and look at the capture in Step Six, and you’ll see a thin divider bar that separates the left side Panels area from the Content panel in the center. Just double-click directly anywhere on that divider bar, and the left side Panels area tucks out of sight, leaving just the Content panel thumbnails on the left, and a really huge Preview panel. Now, I recommend shrinking the size of the Content panel on the left, so you just have one vertical row of thumbnails. You do that by clicking-and-dragging the thin divider bar between the Content and Preview panels to the left to squash the Content panel’s size a bit (as shown here).
Step Eight:
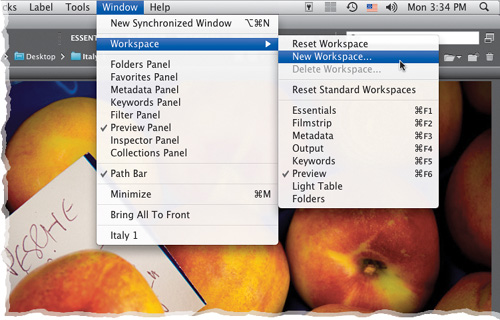
This is the exact Bridge layout I use when looking at my imported photos, and if you like this layout, you can save it as your own (so it’s only one click away). You do that by going under the Window menu, under Workspace, and choosing New Workspace. A dialog will appear asking you to name your workspace and when you click OK, your workspace will now not only appear in the Workspace submenu, it will also appear as the first workspace in the Application Bar’s list of workspaces.
TIP: Panel Tricks
To collapse any panel, just double-click on its tab. To expand it, double-click on its tab again. However, if there’s a panel you find you don’t use, you can hide it from view—just go under the Window menu and choose the name of the panel you want to hide. To make a hidden panel visible again, do the same thing.
Step Nine:
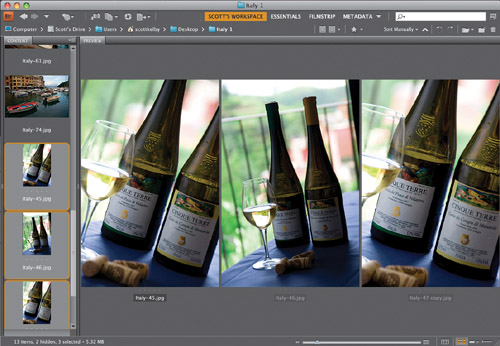
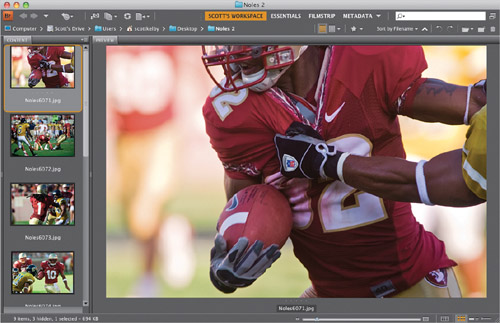
Now that your Preview panel is nice and large, you can really put it to work. If you press-and-hold the Command (PC: Ctrl) key, and click on more than one thumbnail in the Content panel, it displays them in the Preview panel (as shown here). To remove one of the photos from the Preview panel, Command-click on its thumbnail in the Content panel to deselect it (if you look at the capture in Step 10, you’ll see where I’ve deselected the center photo, leaving just two selected, and they automatically zoom up to fill in the space and give you an even better size for making a comparison).
SCOTT KELBY
Step 10:
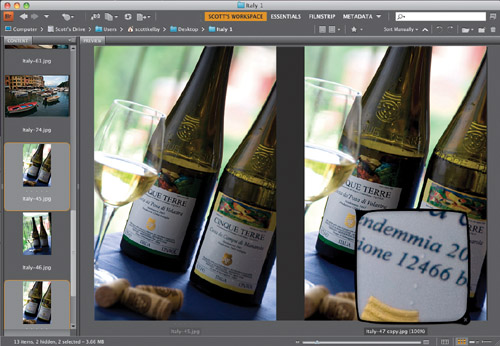
The Preview panel has another nice feature: a built-in Loupe for zooming in tight (perfect for zooming in on an eye in a portrait to check sharpness). Here’s how it works: Move your cursor over a photo, and your cursor changes into a magnifying glass. When you click, a Loupe magnifier (shown here) appears with a 100% view of the area your cursor is over. To reposition the Loupe, click-and-drag it where you want. To zoom in to a tighter 200% view, press the + (plus sign) key on your keyboard (the view magnification amount appears to the right of the photo’s name). Click the + key again to zoom to 400%, and once again for the maximum view of 800%. To zoom back out, press the – (minus sign) key. To remove the Loupe, click the little X in its bottom-right corner.
TIP: Flipping the Loupe
If you get so close to an edge that the Loupe would extend outside the image (or the Preview panel itself), it automatically flips to a different orientation.
Step 11:
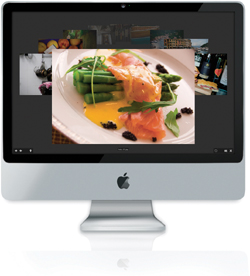
One of my favorite new features in Bridge CS4 is the ability to instantly see a full-screen view of any thumbnail—just click on the thumbnail in the Content panel, then press the Spacebar on your keyboard, and it appears full screen (like you see here). As handy as this is, there is another full-screen view mode you may actually like better—Review mode, which is also new in CS4.
SCOTT KELBY
Step 12:
To see all the images in your current folder in Review mode, press Command-B (PC: Ctrl-B). If you have more than four images in your folder, it puts your images full screen in a cool carousel-like rotation (as seen here). This mode is great for two big reasons: The first being it makes a really nice on screen slide show presentation. You can use the Left and Right Arrow keys on your keyboard to move through the photos or the arrow buttons in the lower-left corner of the screen (as a photo comes to the front, it becomes larger and brighter). If you want to open the image in front in Photoshop, press the letter O. To open the front photo in Adobe Camera Raw, press R. To open all your images in Camera Raw, press Option-R (PC: Alt-R). To leave Review mode, press the Esc key. If you forget any of these shortcuts, just press H.
SCOTT KELBY
TIP: One-Click Collection from Review Mode
When you’re in full-screen Review mode and you’ve whittled things down to just your keepers, you don’t need to leave Review mode and navigate to the Collections panel to create a collection—just click the New Collection button in the bottom-right corner of the screen and whatever’s left in Review mode is automatically added to this new collection.
Step 13:
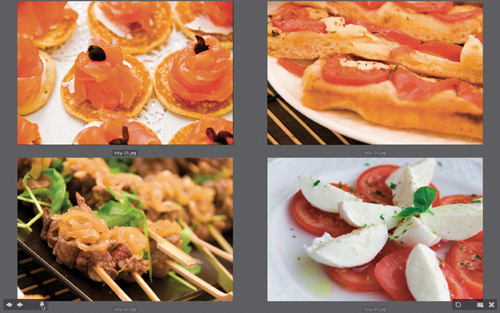
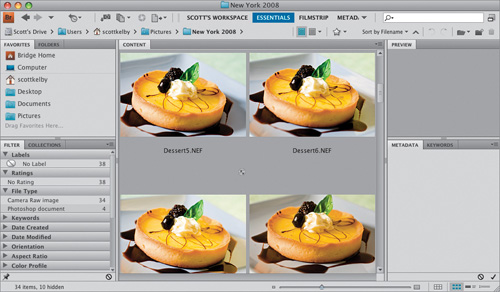
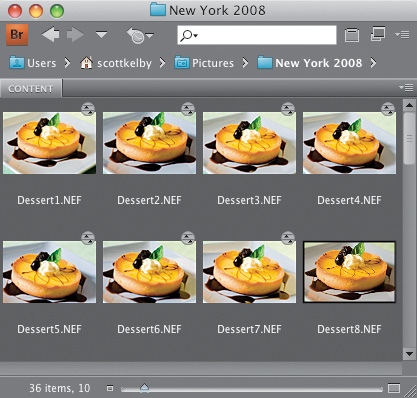
The second reason to use Review mode is to help you narrow things down to just your best photos from a shoot. Here’s how: Let’s say you have five or six similar photos, or photos of a similar subject (in this case, food), and you want to find the single best one out of those. Start by Command-clicking (PC: Ctrl-clicking) on just those photos (in the Content panel) to select them, and then press Command-B (PC: Ctrl-B) to enter Review mode. As you move through the photos (using the Left and Right Arrow keys on your keyboard), and you see one come to front that’s not going to make the cut, just press the Down Arrow key on your keyboard (or click the Down Arrow button onscreen) and that photo is removed from contention. Keep doing this until you’ve narrowed things down to just the final image. Once you fall below five images, you no longer get the carousel view. Instead, it looks more like regular Preview mode—it’s just full screen (as seen here).
SCOTT KELBY
Step 14:
In Review mode, you can still use the Loupe for zooming in—just move your cursor over any photo and click to bring up the Loupe for that photo. You can have multiple Loupes—one for each open image (shown here).
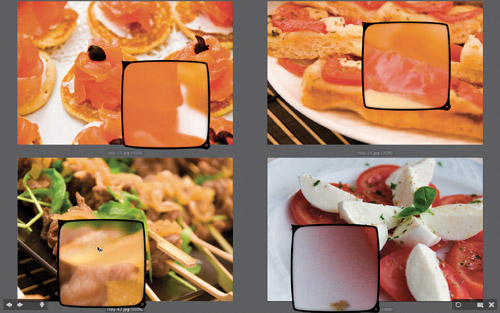
TIP: Moving and Zooming in the Loupe
With some Loupes in place, Command-click (PC: Ctrl-click) and drag within any one of them and they’ll all move together, which is handy for inspecting similar photos. Also, if you press Command–+ (plus sign; PC: Ctrl–+) to zoom in, all the Loupes zoom in together.
Step 15:
Okay, this isn’t really a step, but I’ve got a few cool tips about viewing your photos and working with Bridge’s panels, and I figured this is a perfect place for them.
SCOTT KELBY
TIP: Grouping Panels
You can group panels you want together by clicking on a panel’s tab, and dragging-and-dropping it onto another panel. This creates a “nested” panel, where you can now click on a tab to reveal that panel. That way, if you need a lot of panels visible for the way you work, at least you can nest them together. In the example shown here, I clicked-and-dragged the tabs of the panels normally in the right side Panels area and dropped them on the top of the left side Panels area to nest them there (notice the five tabs across the top of the left side Panels area).
TIP: Quick Navigation Using the Path Bar
The Path Bar shows you visually the folder hierarchy (the file path) of what you’re seeing in Bridge, but beyond that, each level of that path is clickable. So, if you want to jump back two folders, just click on the folder. This can be a huge time saver when navigating from folder to folder.
TIP: Hide the Path Bar
If you really want the ultimate in clean layouts for viewing your photos, you can hide the Path Bar across the top of Bridge’s window—go under the Window menu and choose Path Bar, and it’s hidden (in the image here, the Path Bar is hidden, leaving just that one slim bar across the top).
TIP: Hiding Panels Areas
Pressing the Tab key hides both side Panels areas, so whatever’s in the center panel goes full screen.
Ah, finally we get to the fun part—sorting your photos. We generally have the same goal here: quickly finding out which are the best shots from your shoot (the keepers), marking them as your best shots, and then putting them one click away, so we can view them as slide shows, post them on the Web, send them to a client for proofing, or prepare them for printing. Here we’re going to look at how to do just that, in the most efficient way possible, by taking advantage of some of the new features in Bridge CS4.
Step One:
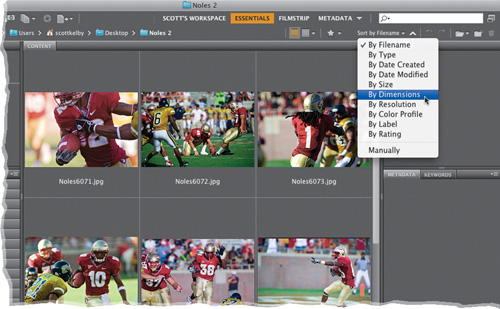
When you view your images in Bridge, by default, they’re sorted manually by filename, so it’s pretty likely that the first photo you shot will appear in the upper-left corner of the Content panel. I say it’s “pretty likely” because there are exceptions (if you did multiple shoots on different cameras, or shot on different memory cards, etc.), but most likely they’ll appear first one shot first. If you want to change how they are sorted, click-and-hold on the words Sort by Filename near the right side of the Path Bar, and a pop-up menu of options will appear (as seen here).
SCOTT KELBY
Step Two:
Let’s start by quickly rating our photos to separate the keepers from the rest of the bunch. First, I switch to a view mode that’s better for decision making, so choose either the workspace we created earlier (seen here) or Full Screen Preview (select any photo and then press the Spacebar. You don’t have to select them all first—just click on any one, hit the Spacebar, then use the Left and Right Arrow keys on your keyboard to move through the full-screen images). If you go with the workspace we created earlier, you still use the same Left and Right Arrow keys on your keyboard to move through your images.
Step Three:
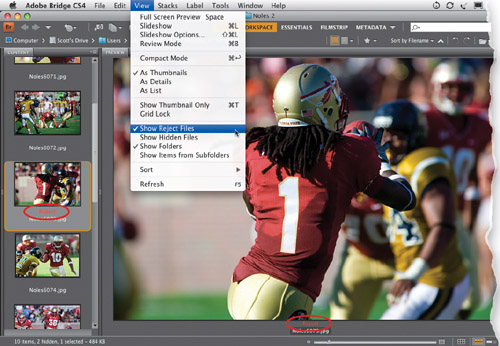
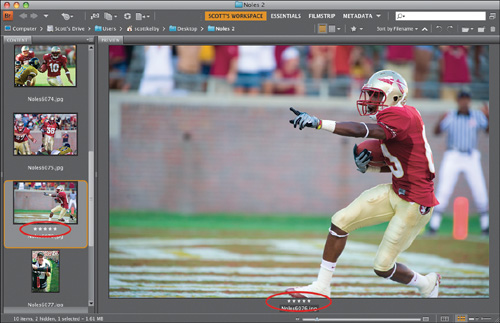
Probably the most popular method for sorting your images is to rate them using Bridge’s 1- to 5-star rating system (with 5 being your best images). That being said, I’m going to try to convince you to try a rating system that is faster and more efficient. When you see a photo that is really bad (way out of focus, the flash didn’t fire, the subject’s eyes are closed, etc.), press Option-Delete (PC: Alt-Delete) to mark that photo as a Reject. When you do this, the word Reject appears in red below the large image in the Preview panel, and below the thumbnail, as well (they’re both circled here in red). It doesn’t delete them; it just marks ‘em as Rejects. Note: You can choose to have Bridge automatically hide any photos you mark as Rejects by going under the View menu and choosing Show Reject Files (as shown here).
Step Four:
When you see a “keeper” (a shot you may want to print, or show to the client, etc.), then you’ll press Command-5 (PC: Ctrl-5) to mark that photo as a 5-star image, and this star rating will appear below the selected photo in the Preview panel and the thumbnail, as well (they’re shown circled here in red). So that’s the drill—move through your photos and when you see a real keeper, press Command-5, and when you see a totally messed up photo, press Option-Delete (PC: Alt-Delete) to mark it as a Reject. For all the rest of the photos, you do absolutely nothing. So, why not use the entire star rating system? Because it takes way, way too long (I’ll explain why on the next page).
SCOTT KELBY
Step Five:
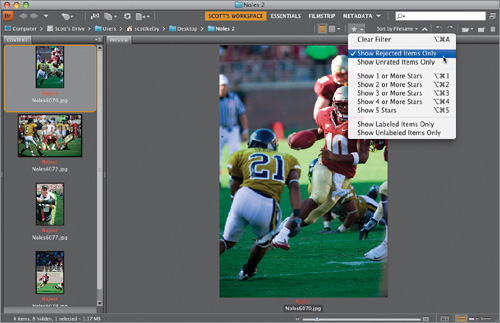
Here’s why I don’t recommend using the entire star rating system: What are you going to do with your 2-star images? They’re not bad enough to delete, so we keep ‘em, right? What about your 3-star ones? The client won’t see these either, but we keep ‘em. What about your 4-star photos (the ones that weren’t quite good enough to be five stars)? We keep them, too. See where I’m going? Why waste your valuable time deciding if a photo is a 2- or a 3- or a 4-star, if all we’re going to do is keep ‘em anyway? The only shots we really care about are the ones we want off our computer (they’re messed up and just wasting disk space), and our best shots from that shoot. So, once you’ve gone through and ranked them, let’s get rid of the dogs. Click-and-hold on the Filter Items by Rating icon on the right side of the Path Bar (it’s the star) and choose Show Rejected Items Only (as shown here) to see just the Rejects.
SCOTT KELBY
Step Six:
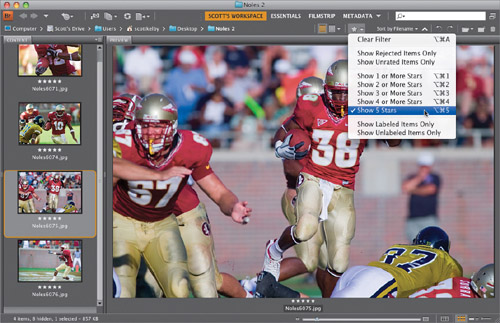
Now press Command-A (PC: Ctrl-A) to select all of them, and then press Command-Delete (PC: Ctrl-Delete) to move these all to your Trash (PC: Recycle Bin). Next, go under the Filter Items by Rating pop-up menu again, but this time choose Show 5 Stars (as shown here) to filter things down so just your keepers—your 5-star images—are visible in Bridge.
Step Seven:
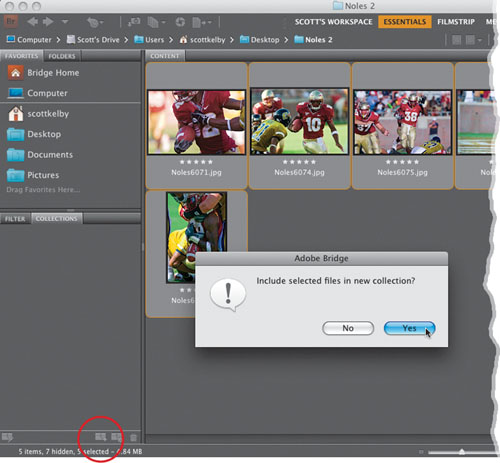
At this point, we want to set things up so that in the future these 5-star photos are just one click away at any time and we do that using collections. Here’s how it works: Our first step is to click on the word Essentials up in the Application Bar, then press Command-A (PC: Ctrl-A) to select all your 5-star photos. Now click on the Collections panel’s tab (in the middle of the left side Panels area) to make the Collections panel visible. Click on the New Collection icon at the bottom of this panel (it’s circled here in red) and a dialog will appear asking if you want to include the selected photos in this new collection (you do, so click the Yes button).
SCOTT KELBY
TIP: Removing Ratings
To remove a photo’s star rating, just click on the photo, then press Command-0 (zero; PC: Ctrl-0).
Step Eight:
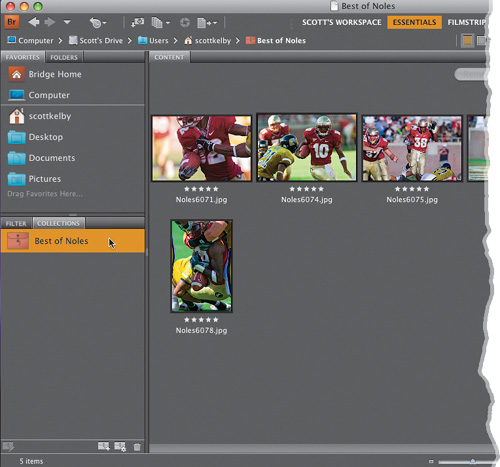
When you click the Yes button, Bridge creates a new collection in the Collections panel. The collection is untitled, but the name field is already highlighted, so all you have to do is type in a name for your collection (as I did here), and press the Return (PC: Enter) key on your keyboard to lock in your new name. Now these “best of that shoot” photos will always be just one click away—go to the Collections panel, click on the collection, and just the shoot’s 5-star photos appear. Also, if you wanted to view this collection larger, you could either make the thumbnails bigger (using the Thumbnail Size slider at the bottom of the window), or just switch to your viewing workspace (the one we created earlier) and you’ll see the images really large in the Preview panel.
Step Nine:
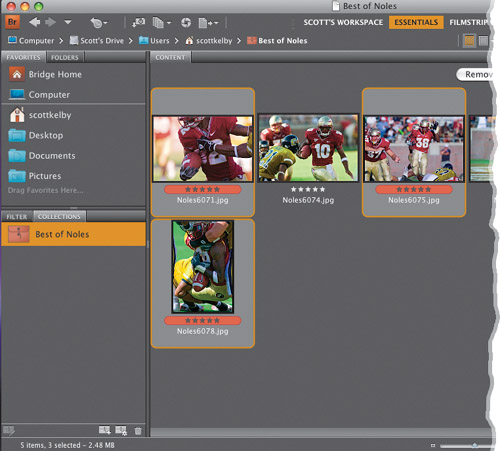
Now, you can take things a step further if you like. For example, if you show these shots to your client, and they choose three of these 5-star photos to have printed, you can then use color labels to mark those as your “Client Selects.” Just Command-click (PC: Ctrl-click) on the photos they chose to select them, then press Command-6 (PC: Ctrl-6) which adds a color banner around the star rating (as seen here, where you can see Red labels on three of the images). If I do this, I generally create another collection called “Client Selects” by clicking on the Filter Items by Rating icon (the star on the right side of the Path Bar) and choosing Show Labeled Items Only from the pop-up menu, which displays just those red-labeled photos. Then I select them all (Command-A [PC: Ctrl-A]), click the New Collection icon at the bottom right of the Collections panel, and I would name this one “Noles Selects.”
Step 10:
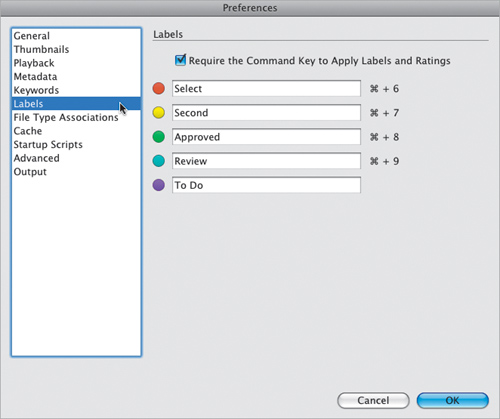
If you like this color label thing, there are four other built-in color labels, and you can assign your own names for what each color label represents. Just press Command-K (PC: Ctrl-K) to bring up Bridge’s Preferences dialog, then click on Labels in the left side column (as seen here). This shows the different colors, their keyboard shortcuts (on the far right), and you can just click in any name field and rename them.
TIP: Assigning Color Labels
There are three ways to add a color label: (1) use the keyboard shortcut, (2) select the photo(s), then Control-click (PC: Right-click) on it, and choose the label you want from the Label submenu, or (3) go under the Label menu and choose the label.
This probably seems like the most obvious thing in the world, because in just about all Adobe products, if you click on something and hit the Delete key on your keyboard, it goes away. But in Bridge, it doesn’t really just go away—a dialog pops up and in a roundabout way, asks you “How much do you really hate this photo?” Here’s how to understand what your choices really are:
Step One:
To delete a photo(s), just click on it to select it, then press the Delete key on your keyboard. This brings up the warning dialog shown here, which assumes you don’t really want to delete this file, you just want to mark it as a Reject (that’s why the Reject button is highlighted as the most likely choice). If you do want to move the selected photo(s) into the Trash (PC: Recycle Bin), then click the Delete button.
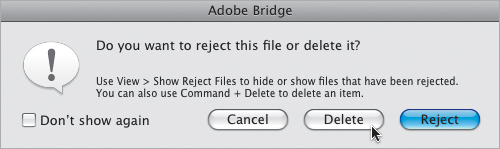
Step Two:
Sadly, clicking the Delete button brings up another warning dialog (seen here) asking if you really want to move this photo into the Trash (PC: Recycle Bin). If you want to avoid both of these dialogs when deleting files, here’s what to do: Don’t just hit the Delete key, instead hit Command-Delete (PC: Ctrl-Delete), which will take you right to the second dialog. When it appears, turn on the Don’t Show Again checkbox and from this point on, the Command-Delete shortcut will send your stuff straight to the Trash without any dialogs.

TIP: Deleting Folders
On a Mac, you can’t delete folders by just pressing the Delete key. You have to click on the folder(s), and then press Command-Delete.
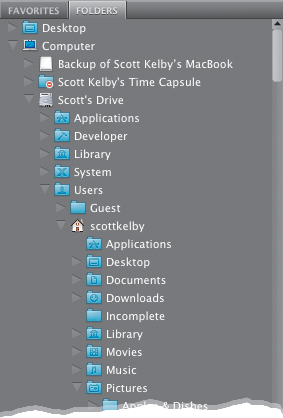
So far we’ve mostly been working with photos that we just imported from our camera’s memory card, but if you want to see photos that are already on your computer, you’ll need to work inside the Folders panel. This panel gives you access to any folder of photos on your computer, on an external hard drive, or over a network. Here’s how it works:
Step One:
First, make sure you’re in the Essentials workspace (click on Essentials in the Application Bar), then click on the Folders panel’s tab to make the Folders panel visible. This Folders panel gives you access to all the files and folders on your computer, so you can simply navigate to a folder of photos and click on it to see them. Of course, if you have an external hard drive connected, or DVD, or CD, etc., you’ll see them listed too, and you can look at them the same way. So, it’s pretty much like the standard file structure of your computer.
Step Two:
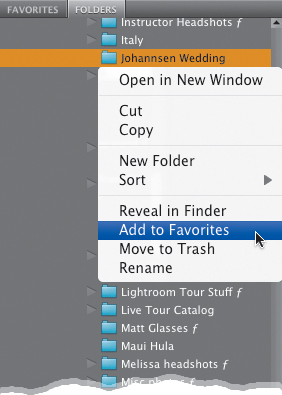
Right beside the Folders panel’s tab is the Favorites panel’s tab, and this panel is kind of like your Bookmarks (PC: Favorites) in your Web browser. So, if you find yourself constantly going to a particular folder of photos, you can save a shortcut to that folder in the Favorites panel. That way, you won’t have to go digging through your hard drive in the Folders panel to find it—it will be just one click away. To add a folder as a favorite, Control-click (PC: Right-click) on the folder and choose Add to Favorites from the contextual menu that appears. (Note: If you use a layout where you can see both the Folders and Favorites panels at the same time, after finding a folder using the Folders panel, you can just drag-and-drop it from the Content panel right into the bottom area of the Favorites panel.)
Step Three:
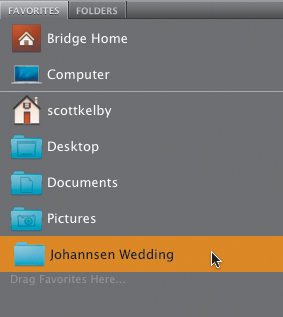
Once you’ve saved that folder as one of your favorites, you’ll see it added to the bottom of the list in the Favorites panel. Now, to jump directly to the photos in that folder, just click on it (as shown here).
TIP: Renaming Photos
It’s hard to imagine why someone wouldn’t like such a descriptive name as DSC_00679.jpg, but if you’re one of those people who finds it useful to apply names that describe what’s actually in the photo (like me), here’s how it’s done: With a thumbnail selected, click directly on the photo’s filename (in the Content panel) and the name will highlight. Type in your new name, press the Return (PC: Enter) key, and the thumbnail updates with your new-and-improved name.
Step Four:
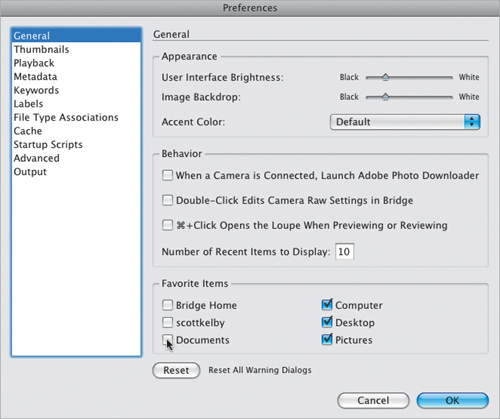
If you look in the list of favorites in the Favorites panel, you can see Adobe has kind of already decided what it thinks might be some of your favorite destinations and added them to your list. If you’d like to remove any of them (so there’s more room for the items you choose as your favorites), go to Bridge’s General Preferences (Command-K [PC: Ctrl-K]) and in the bottom section of the dialog, within the Favorite Items section, turn off the checkboxes for whichever Adobe-chosen items you don’t want to appear in your Favorites panel (as shown here), then click OK. So, that’s basically how to look at folders full of photos, and how to save your favorite folders (or discs, or drives, etc.), so they’re more convenient. Now on to moving photos from folder to folder.
Step Five:
Another nice feature of Bridge’s Folders panel is that you can use it to move photos from one folder to another. You do this by clicking-and-dragging the thumbnail of the photo you want to move, then dropping that photo into any folder that appears in the Folders panel (when you move the dragged photo over a folder, the folder is highlighted letting you know that you’ve targeted that folder). That photo will now be removed from the currently selected folder and placed into the folder you dragged-and-dropped it into.
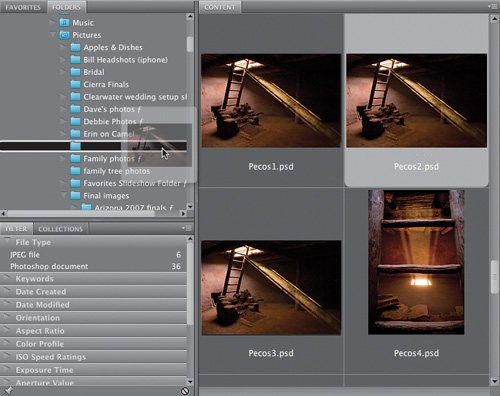
SCOTT KELBY
TIP: Dragging-and-Copying
If you press-and-hold the Option (PC: Alt) key as you click-and-drag, instead of moving your original photo, Bridge will place a duplicate of your photo into that folder.
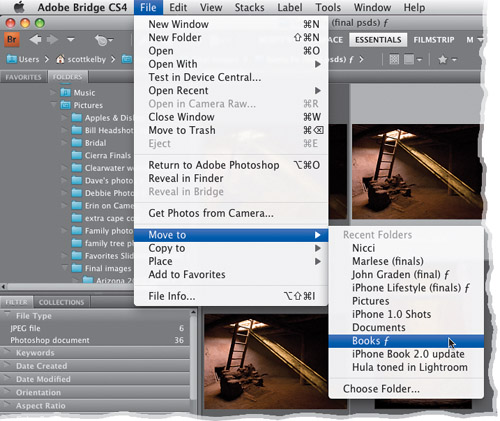
Step Six:
If your list of folders is really long, there’s a more manual way to move photos from folder to folder. First, click on a photo you want to move to a different folder, then go under the File menu, under Move To, and you’ll see a list of your recently viewed folders (as shown here). Now just choose which folder you want that photo to appear in, and you’re set. If you didn’t recently use the folder you want, just select Choose Folder at the bottom of the submenu. If, instead, you wanted to make a copy of your selected photo and place it into another folder, you’d still go under the File menu, but this time you’d choose Copy To and then choose a recent folder or Choose Folder.
SCOTT KELBY
Rotating photos within Bridge is as easy as clicking one button. However, when you rotate photos within Bridge itself, you’re only really rotating the thumbnail. This is handy, because when you’re sorting photos with a portrait orientation (tall rather than wide), you want to be able to see them upright to make a sorting judgment call, but you have a separate decision to make if you want the actual photo rotated—not just the thumbnail. Here’s how to do both:
Rotating thumbnails: Rotating a thumbnail is a total nobrainer—just click on the thumbnail you want to rotate, then click on one of the curved arrow Rotate icons in the top-right corner of Bridge (on the right side of the Path Bar). The left arrow icon rotates counterclockwise; the right arrow icon rotates clockwise. You can also use the shortcut Command-[ (Left Bracket key; PC: Ctrl-[) to rotate counterclockwise, or Command-] (Right Bracket key; PC: Ctrl-]) to rotate clockwise.
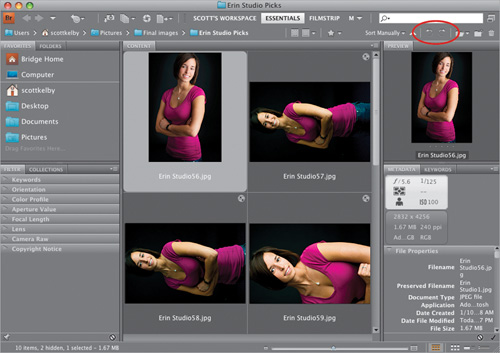
SCOTT KELBY
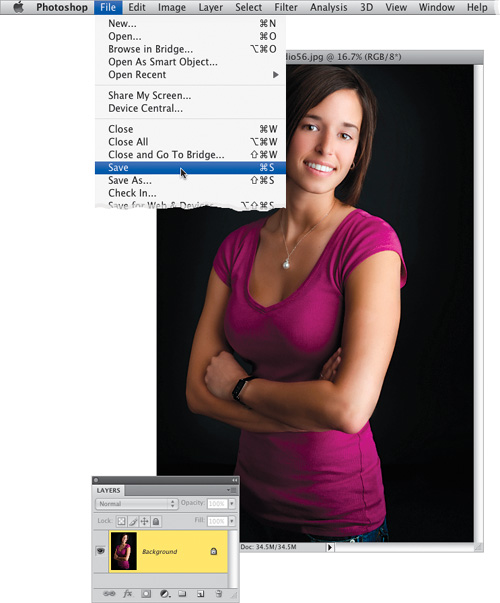
Rotating the actual photo: When you rotate a thumbnail, you’re doing just that—the photo doesn’t get rotated until you actually open it in Photoshop (go look in the image’s folder on your hard drive, and you’ll see from the file’s thumbnail that the actual photo isn’t rotated). So if you really want to rotate the original photo, rotate the thumbnail, then double-click on the thumbnail in Bridge, and the image will open in Photoshop with the rotation applied. Now you can choose Save from the File menu to make the rotation permanent.
The Metadata panel is where you can go to see all the background info on your photos, including all the EXIF metadata added by your digital camera at the moment you took the shot, along with any metadata added in Bridge itself (like your copyright info or custom filenames added when you imported the photos from your camera). Here’s how to leverage that info into making finding a particular photo that much easier, using the Filter panel:
Step One:
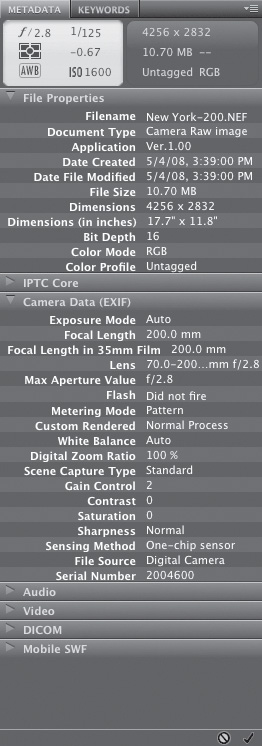
When you take a photo with today’s digital cameras, at the moment you take the shot, the camera automatically embeds loads of information about what just took place—things like the make and model of the camera, the time the photo was taken, the exposure setting, the f-stop, shutter speed, etc. (this info is called EXIF camera data). Click on a photo in Bridge, and you’ll see the basic camera data is displayed at the top of the Metadata panel (found in the right side Panels area) in a layout similar to an LCD screen on a digital camera (as shown here). Once you bring the digital photo into Bridge, more information is embedded into the photo (stuff like the filename, when it was last edited, the file format it was saved in, its physical dimensions, color mode, etc.). All this embedded info comes under the heading of metadata, and that’s why it appears in the Metadata panel. At the top of the panel, under the File Properties section is the info Photoshop embeds into your file. The next section down is IPTC Core metadata, which is where you can embed your own customized info (stuff like copyright, credits, etc.) into the photo (this is covered in detail in the next chapter). The Camera Data (EXIF) section displays data embedded by your camera.
Step Two:
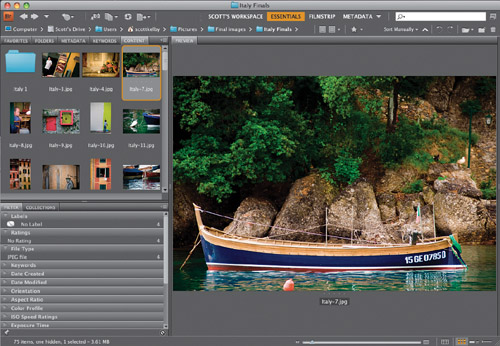
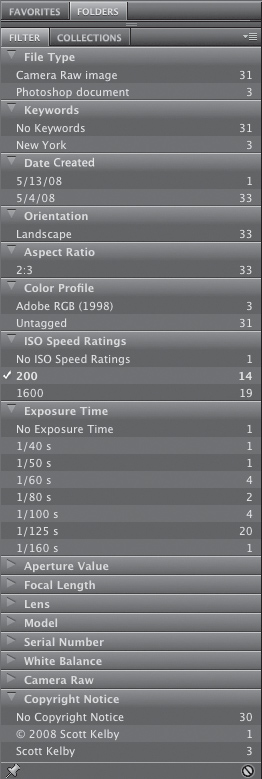
Metadata is more than just interesting to look at—it can be incredibly useful in helping you find a particular photo (or group of photos), because this metadata is also automatically read by the Filter panel, which appears in the left side Panels area. Here’s how it works: click on any folder of photos, and their metadata is automatically added to this Filter panel. For example, click on a folder, and then look in the Filter panel. In the example shown here, it lists the dates the photos in that folder were created, and how many photos in that folder were created on each date. But here’s where it gets cool: Go down a little further to the ISO Speed Ratings section. See where it says 200? To the right of that, it shows that 14 photos in this folder were taken at ISO 200. Click on the 200, and now only those 14 photos are displayed in Bridge (and a checkmark now appears before 200 to show you what’s currently being displayed). I know, pretty cool (and very powerful)!
Step Three:
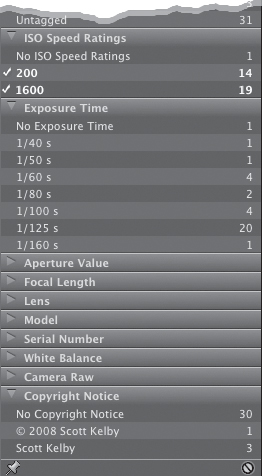
Okay, let’s say you now want to see all the ISO 200 and ISO 1600 photos together. To do that, just click to the immediate left of 1600 to add a checkmark to that filter, and now both ISO 200 and ISO 1600 photos are displayed together. To remove a line of filtering, click on the checkmark again. To clear all the filters, click on the “No!” symbol in the bottom-right corner of the panel. So, to recap: if you have some idea of what you’re looking for (for example, you remembered that these shots were taken indoors during a presentation), metadata filtering can help you quickly narrow the field.
To me, the default colors of Bridge seem...I dunno...kinda uninspiring (that’s really being kind). I guess I feel like it looks less like a photographer’s program, and more like a business program, which is why the first thing I did when I launched Bridge CS4 was to customize the background colors of it with the same background color scheme as Adobe’s Photoshop Lightroom program. I think Lightroom has ideal background colors for working with photography (and for just looking cool in general).
Step One:
Here’s the default look for Bridge CS4, which pretty much makes my case (above) for why I needed to change the background colors, and make it feel more like a photographer’s application than a business one. To customize the look of your Bridge, press Command-K (PC: Ctrl-K) to bring up Bridge’s Preferences dialog (shown in the next step).
SCOTT KELBY
Step Two:
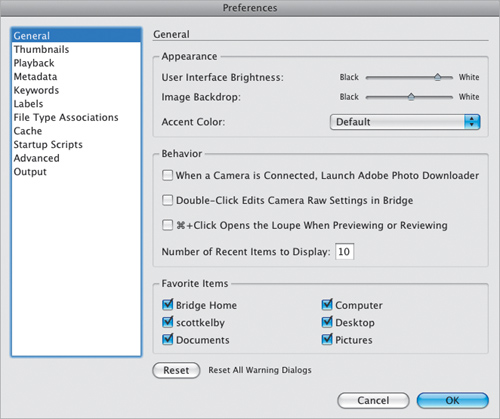
When the Preferences dialog appears, by default it brings up the General preferences (shown here), and at the top is the Appearance section. The User Interface Brightness slider controls the color of all the panels except the Content panel and Preview panel (the two panels where you actually see your photos). Now, when I say it controls the “color of all the panels,” you really only get three choices: (1) solid white, (2) solid black, and (3) some shade of gray in-between. By default, the main panels are very light gray and the image panels are not quite as light (the default slider settings are shown here).
Step Three:
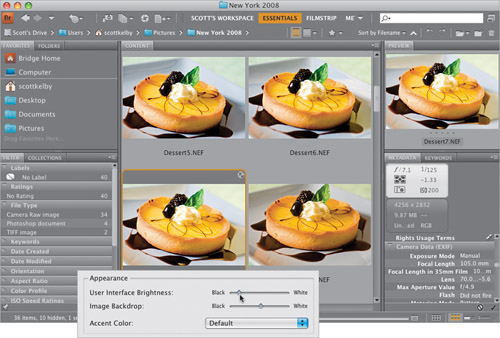
To get a better looking background, try clicking-and-dragging the top slider (the User Interface Brightness slider) quite a bit to the left, as shown here. As you can see, this gives the main panels a nice dark gray interface (a similar shade of gray that Lightroom uses), but the Content and Preview panels still have that medium gray background behind them (which we’ll change in a minute). By the way, if you want something even darker, of course, you can drag that slider all the way over to Black for a real high-tech look.
Step Four:
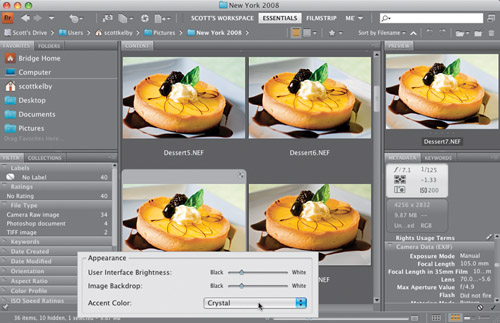
Lightroom has a darker gray behind the panels where the photos are viewed, but here’s the weird thing: if in Bridge’s preferences you click-and-drag the Image Backdrop slider (the bottom slider) to the left so it stops at the same exact spot as the top slider, it makes the background behind the Content and Preview panels darker than the other panels (as shown here). I have no idea why (yet another great mystery of our time). There is one more control here—the Accent Color—which is what you see highlighted when you click on something. By default, it puts a thin yellow line around your photo cell, and it tints the cell a lighter gray. But for this “Lightroom-like” color scheme, I recommend changing the accent color to Crystal (shown here), so when you click on a photo it highlights that photo in a light enough gray that it really stands out, without putting a yellow line around your image.
Step Five:
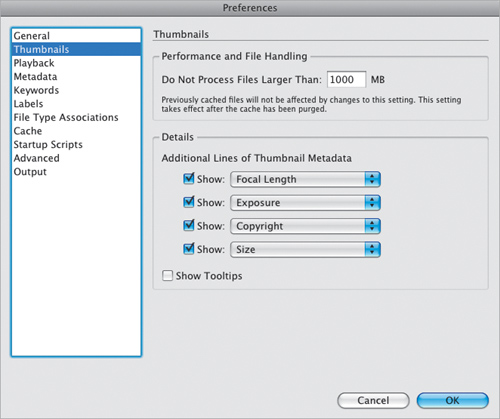
Besides just choosing background colors, you can also decide how much (or little) information the Content panel displays under each thumbnail. For example, by default the name of each file is displayed below its thumbnail, but you can add up to four additional lines of information (which are pulled from the metadata embedded in the file by your camera, or added in Bridge itself). To turn on these extra lines of info, press Command-K (PC: Ctrl-K) to open the Preferences dialog, and in the list on the left side, click on Thumbnails to bring up the Thumbnails preferences. In the Details section, turn on the Show checkbox beside each info line you want to add, and then choose the specific types of info from the pop-up menus to their right (as shown here).
Step Six:
Click OK and you’ll see those extra lines of info now appear under your thumbnails (as shown here, in this close-up of one of the thumbnail cells).

TIP: Hiding Info
If you ever want to see just the thumbnails and temporarily hide all those extra lines of metadata, just press Command-T (PC: Ctrl-T) and only the thumbnails will be displayed. This is a handy shortcut because all those extra lines of info take up space, and when you’re displaying three or four extra lines, plus the file’s name, and perhaps even a rating, fewer thumbnails fit in the same amount of space.
Step Seven:
Now, we’ll move on to changing the size of Bridge. Of course, you can just click-and-drag the bottom-right corner of Bridge and resize the window to whatever suits you, but if your goal is a smaller Bridge, then just click on the Switch to Compact Mode icon located in the top-right corner of Bridge (at the end of the Application Bar). Bridge will literally shrink in size, leaving only small thumbnails visible (much like a small version of Bridge’s Light Table workspace). The hidden advantage of Compact mode is that it floats in front of whichever applications are open (so if you’re working in Photoshop CS4 or another Creative Suite application, Bridge will appear just like a floating panel). By the way, if you like the Compact mode but don’t want this floating feature, turn off Compact Window Always On Top from Bridge’s flyout menu (click on the down-facing arrow in the top-right corner).
SCOTT KELBY
Step Eight:
If you like Compact mode, you’re gonna love Ultra-Compact mode (believe it or not, that’s its real name—I love it!). First, switch to Compact mode and then click on the Switch to Ultra-Compact Mode icon (it’s the third icon from the right in the top-right corner). This hides the thumbnail area, leaving just a few of the Application Bar’s options.