I know, “The Bridge” sounds a little too obvious a name for a chapter on advanced bridge techniques, but it beats the alternative of using the movie title Bridge to Terabithia (see, “The Bridge” doesn’t sound all that bad now, does it?). It took me all of about four seconds in Apple’s iTunes Store to come up with at least 30 song titles that not only included the term “the bridge,” but actually were named exactly that. There were versions in the iTunes Store from everyone from Janis Ian to Eddie from Ohio, whose song “The Bridge” appears on his album I Rode Fido Home. While listening to the free 30-second preview of Eddie’s song, it was at that moment I knew I had to choose this version—the Eddie from Ohio version—as my chapter title. It was because no one (outside of close friends and relatives of Eddie himself) was ever going to do an iTunes search for that song, and if by some cosmic solar accident someone like myself did come across his version of “The Bridge,” the chances of a royalty coming Eddie’s way were very slim indeed. That’s sad in a way, because I think Eddie needs the money. I think Eddie may need the money for music lessons. (I’m kidding of course, Eddie doesn’t need music lessons—he’s got an album on iTunes, and now that his album I Rode Fido Home has gotten a write-up in print, it’s only a matter of time before photographers around the world start going to iTunes and plunking down their 99¢ to download their own personal copy of what is soon to be a cult hit—“The Bridge” by Eddie from Ohio. This is precisely why they call me “The Star Maker.” It’s either that or “The Guy with the Tin Ear.” I can’t remember which.)
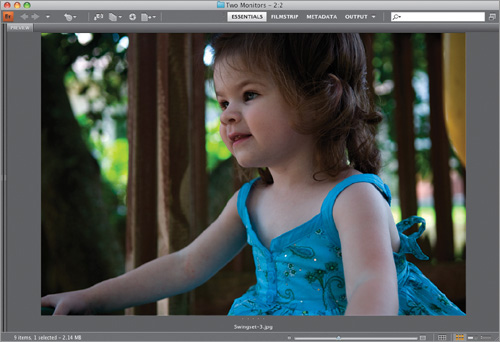
If you’ve got two monitors, have I got a setup for you! You can create a second Bridge window where you can have your thumbnails and other panels appear on one screen, and then on the second screen have a really large version of your selected photo. Here’s how to make this setup work for you:
Step One:
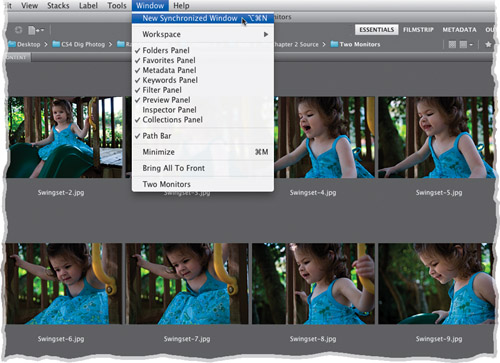
Go under Bridge’s Window menu and choose New Synchronized Window (as shown here).
SCOTT KELBY
Step Two:
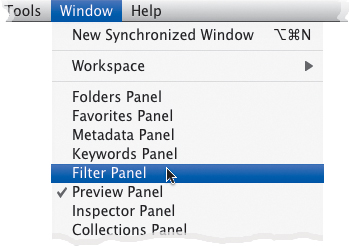
This will create an identical second floating window, but before you just drag it over to that second monitor, there are some things you’ll need to do to set this new synchronized window up so it displays just a large-sized preview of the currently selected thumbnail. Start by going under the Window menu and you’ll see that just about all the panels have a checkmark by them (indicating that they’re visible). Well, you want them all hidden except Preview, so go and choose each one, as shown here (except for Preview, of course), and now all those other panels will be hidden from view.
Step Three:
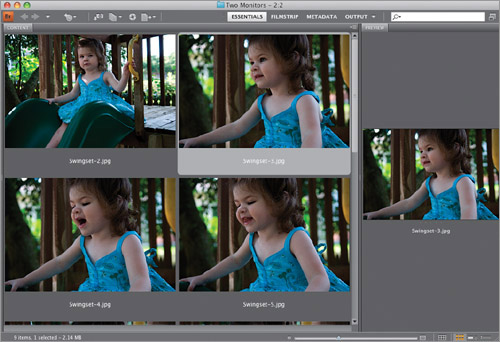
Once you hide these panels, you’ll notice that the Content panel is still visible because it’s the one panel you can’t hide. So, what you need to do is click on the divider bar between the Content panel and the Preview panel, and drag it all the way over to the far-left side. This hides the Content panel from view, leaving just the Preview panel visible (as shown in the image in Step Four).
Step Four:
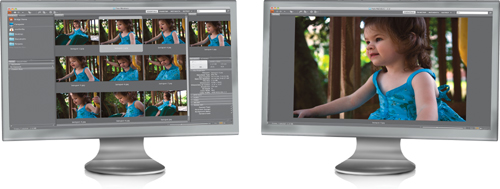
Now you can click-and-drag this window over to your second monitor, and as you click on a thumbnail in the first window, the large preview will appear in the second monitor (as shown below). One last thing: go ahead and save this setup as a custom workspace by going under the Window menu, under Workspace, and choosing New Workspace. Now you’re just one click away from this two-monitor setup. Note: You can also save a custom workspace you’ve created by clicking-and-holding on the down-facing triangle to the left of the search field, and then choosing New Workspace from the pop-up menu.
Let’s say you took 10 or 12 shots of a bird, in pretty much the same position. In Bridge, you’ll see 10 or 12 thumbnails of these very similar shots, right? This is where stacks come in. You can group these very similar photos together under just one thumbnail (called a stack), so those shots only take up one spot, instead of 12. Any time you want to see your bird photos, you just click on that one and the stack expands to reveal them all. Now, in CS4, Bridge can even create stacks for your panos and HDR shots automatically. Pretty slick, eh?
Step One:
To stack similar photos together, press-and-hold the Command (PC: Ctrl) key, and click on the similar photos you want in your stack to select them.
SCOTT KELBY
Step Two:
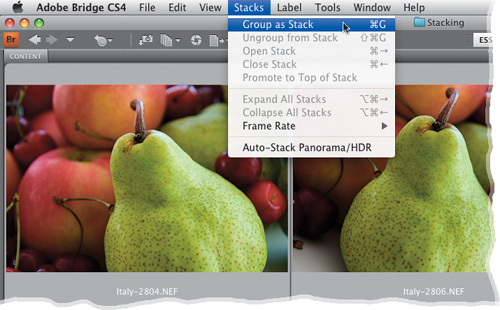
Now, in the Menu bar, go under the Stacks menu and choose Group as Stack, or just press the keyboard shortcut Command-G (PC: Ctrl-G).
Step Three:
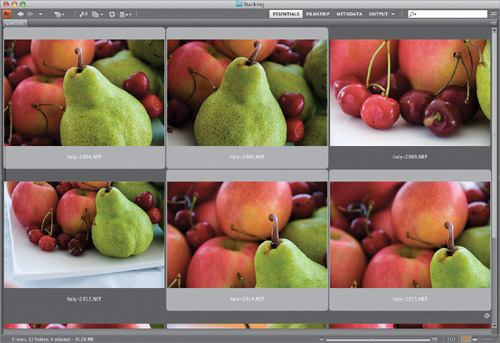
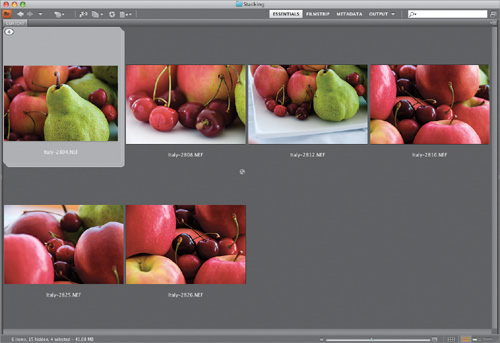
Once you do either of those, when you look in the Content panel, you’ll see two indicators that you have a stack: you’ll see a thin stroke around your thumbnail’s cell that looks like the outline of a traditional slide mount (as seen here), and a number appears in the top-left corner to let you know how many photos are in that stack (in our case here, it’s 4). By stacking these similar photos together, you can now see more photos in your Content panel that otherwise you’d have had to scroll down to see. You can create as many stacks as you’d like—after all they’re just there to help you stay organized. How many (or few) stacks you create is totally up to you.
SCOTT KELBY
Step Four:
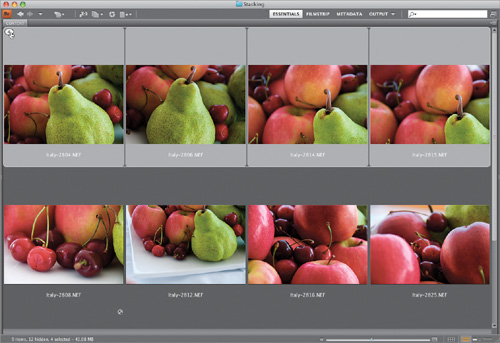
If you want to expand your stack and see what’s inside it, just click directly on the number up in the top-left corner, and the stack expands (as shown here). If you actually want to permanently unstack your stack (and have your photos return to just being individual thumbnails), press Command-Shift-G (PC: Ctrl-Shift-G).
TIP: Open Stacked Photos in Photoshop
If you click on a stack and press the Return (PC: Enter) key, only the top photo (the visible photo) in that stack will open in Photoshop. However, if you look closely, you’ll see that there are two slide mount outlines around each stack. If you click directly on the second slide mount (the one in back), when you press the Return key, it opens all the photos in that stack in Photoshop. By the way, if those photos are in RAW format, they will open in Camera Raw instead.
Step Five:
To add photos to an existing stack, first click on the stack you want to add them to, then Command-click (PC: Ctrl-click) on the other photo(s) you want to add. Now press Command-G (PC: Ctrl-G), and those photo(s) are added to the stack.
TIP: Scrubbing Through a Stack
If you have 10 or more photos in your stack and you place your cursor over its thumbnail, a little horizontal slider will appear across the top of your stack. If you click-and-drag this slider to the right, it will scroll through and show you the thumbnails of the photos in that stack. That’s pretty sweet because you don’t have to expand the stack.
Step Six:
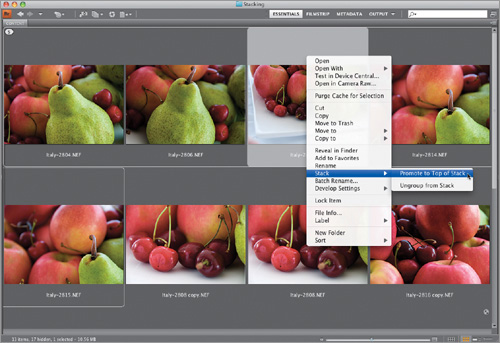
After you’ve created your stack, you can choose any photo as the top photo (and the one visible when the stack is collapsed) by first expanding the stack (click on the number in the thumbnail’s top-left corner), and then Control-clicking (PC: Right-clicking) on the photo you’d like as the top photo. When the contextual menu appears, under Stack, choose Promote to Top of Stack (as shown here) and that photo will now represent the stack. Of course, when the stack is expanded, you can drag-and-drop photos into the order you want.
TIP: Instant Stack Slide Show
To the immediate left of that horizontal slider I mentioned in the previous tip is a tiny Play button. Click it to see a quick mini-slide-show of the photos in that stack, right within that thumbnail window.
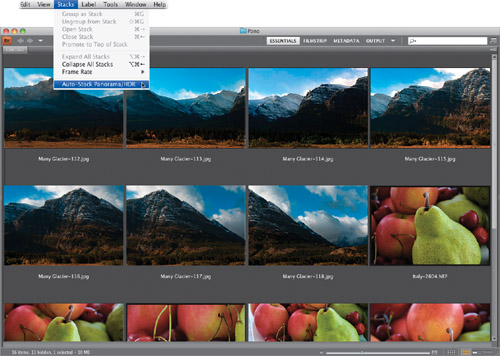
Step Seven:
If you shoot multiple shots to later stitch together as a single panorama, then stacking really makes sense. In CS4, they added an automatic feature that looks at the embedded camera data and tries to determine if the photos are a panorama (it looks at the time between shots). Or, if you took a series of shots at different exposures to compile into a single HDR (High Dynamic Range) photo, it senses that too, and can automatically stack them together. To turn this feature on, go under the Stacks menu and choose Auto-Stack Panorama/HDR (as shown here), and Bridge will search through your current images and see if it can stack any together for you.
SCOTT KELBY
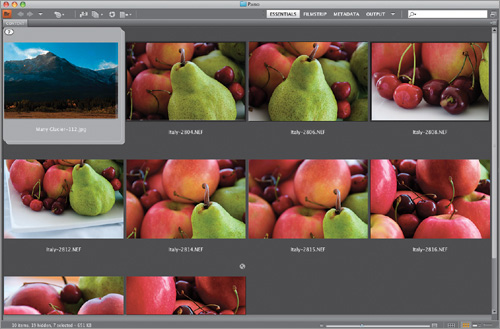
Step Eight:
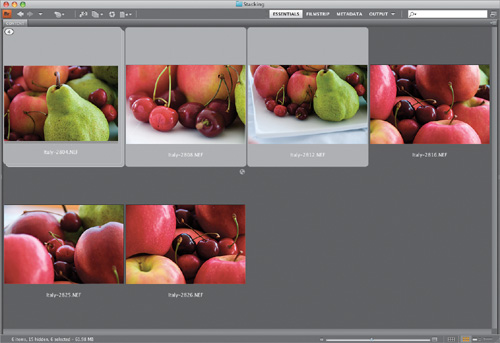
Here you can see the results of an auto-stack of the panorama shown in the previous step.
TIP: Finding Your Panos Easier
If you don’t want to use the auto-stack feature, here’s a tip to help you find your panos easier when they’re loaded into Bridge: Right before you shoot your pano, hold up your index finger in front of the lens and take a shot. Then shoot your pano, and after the last frame, hold up two fingers and take another shot. That way, later, when you bring your photos into Bridge, you’ll not only see a reminder that you shot a pano, you’ll see exactly which photos belong in that pano. Try this once, and you’ll always do it.
In the last chapter, you learned how to do a manual full-screen slide show (you press the Spacebar and your photo goes full screen, then you use the Arrow keys on your keyboard), but for a client presentation, you might want a slicker slide show with smooth transitions and effects. Of course, beyond just showing off your work, while the slide show is running, you can still delete any bad shots, apply ratings, rotate shots, etc. Here’s how to set one up:
Step One:
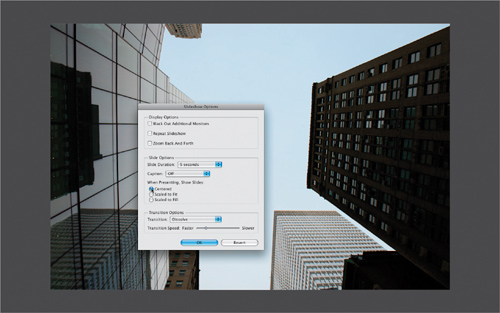
To see a full-screen slide show of the photos currently shown in Bridge, press Command-L (PC: Ctrl-L) and your slide show starts (as shown here). If you just want certain photos to appear in your slide show, select them by Command-clicking (PC: Ctrl-clicking) on them before you start your slide show. The slides advance automatically, but if you’d prefer to switch slides manually, press the Right Arrow key on your keyboard (to return to the previous slide, press the Left Arrow key. I know, that was pretty obvious. Sorry).

SCOTT KELBY
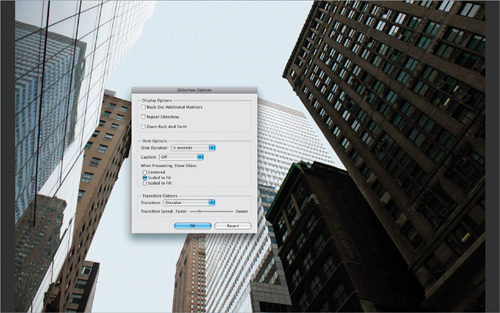
Step Two:
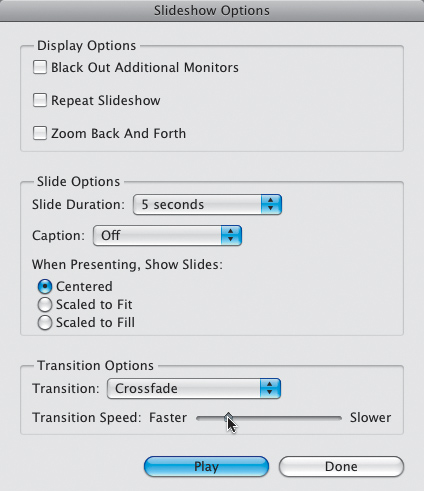
To pause your slide show press the Spacebar. To restart, press it again. To quit your slide show, press the Esc key on your keyboard. Also, there are options for how your slide show displays onscreen, and you bring those up by pressing Command-Shift-L (PC: Ctrl-Shift-L) or just choose Slideshow Options from the View menu. The Slideshow Options dialog is shown here.
SCOTT KELBY
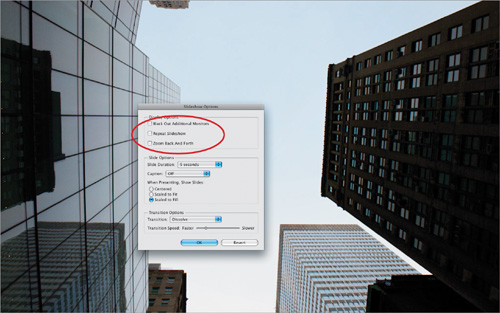
Step Three:
At the top of the dialog are the display options. The first option only applies to people working with two different monitors (turning this on blacks out the second monitor, so it doesn’t distract from your slide show on the first monitor). The Repeat Slideshow checkbox does... come on, do I really have to describe this one? The last checkbox, Zoom Back And Forth, sounds like it would create something really annoying, but actually this is Adobe’s name for the popular Ken Burns effect—where your photos slowly and smoothly move toward the screen (or away from it), giving your slide show some subtle motion. You should definitely at least give this a try to see if you like the effect (it’s very popular).
SCOTT KELBY
Step Four:
The next set of options relates to the slides themselves, including how long each slide appears onscreen and whether any captions you’ve added to the photo’s metadata will appear onscreen, as well. The next option down is important, because it determines how big your photos appear onscreen. I don’t like the default Scaled to Fit setting, because (depending on the size of your photos) it can leave gray bars on both sides of your image (look at the image in Step One to see what I mean). That’s why I prefer either of the two other choices. The Scaled to Fill option scales your photo to fill the entire screen (which looks really good; see Step Three), and I recommend this option if you choose the Zoom Back and Forth effect. If you’re not using Zoom Back and Forth, I like the Centered option, which displays your photos a little smaller, but nicely centered on a gray background (as shown here).
Step Five:
The last set of options is the transition options, where you can choose from a pop-up menu of transitions. Thankfully, the default transition is a nice, smooth dissolve, but you can choose other transitions, as well as how fast (or slow) the transition effect takes before the next slide appears (you set this using the Transition Speed slider, just below the Transition pop-up menu, as shown here).
Step Six:
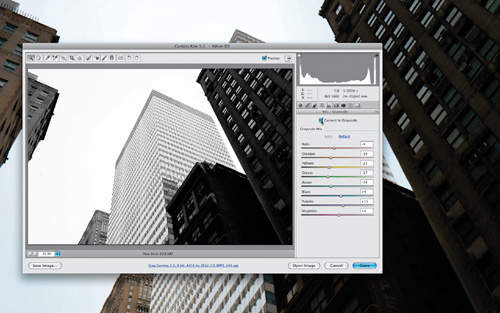
This is really more a tip rather than a step, but it’s so cool that I had to include it separately. If you’re looking at your slide show and you see a RAW photo you’d like to edit, just press the letter R (easy to remember—R for RAW). It pauses your slide show and instantly opens that photo in Bridge’s own Camera Raw, as shown here (remember—Bridge has Camera Raw built right in), so you can edit the photo. Once you’re done editing, click the Done button and you return to the slide show. The changes you made are instantly applied and the slide show continues. This is cooler than it first sounds. Think about it—you’re watching your slide show and you see a photo and think “I wonder what that would look like if it was black and white,” so you press R to bring up Camera Raw, turn on the Convert to Grayscale checkbox, click Done, and bam, you’re back in your slide show, and your photo is black and white. Now come on—that is pretty slick.
SCOTT KELBY
Step Seven:
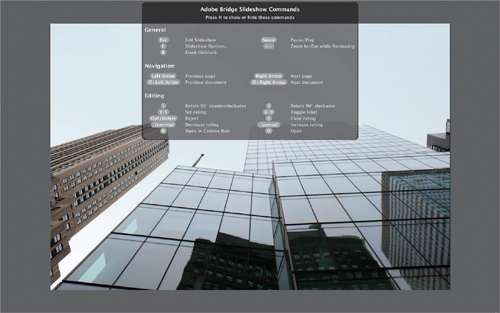
There are other keyboard shortcuts for controlling your slide show (like ones for applying star ratings to your slide show photos, or to rotate them, etc.), but you don’t have to remember all of them if you can remember just one—the letter H. If you press H on your keyboard while the slide show is running, a list of shortcuts appears onscreen (as shown here). To hide the shortcuts, press H again. Okay, now there is one handy shortcut that’s not on this list—if you click your mouse button on a photo in the slide show, the slide show pauses and your photo zooms to 100%. To move around the photo while zoomed in, just click-and-drag. Click on the photo again and then press the Spacebar to restart the slide show.
SCOTT KELBY
Step Eight:
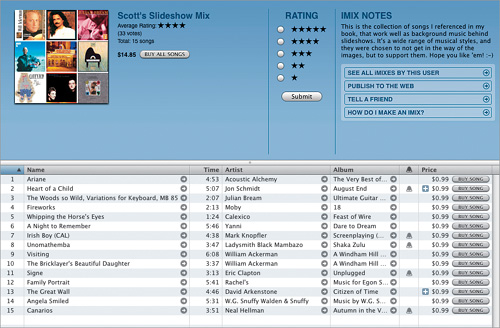
Sadly, Bridge CS4 still doesn’t have a built-in background music feature, but that doesn’t mean you can’t have background music. Here’s what I do: I open Apple’s iTunes (for PC or Mac) and start my background music first. Then I jump over to Bridge and start my slide show. The effect is exactly the same—a full-screen slide show with background music. By the way, if you want some ideas for great slide show background music, in Apple’s iTunes Store I created a 16-song iMix (basically, a playlist) of great slide show background music, called (surprisingly enough) “Scott’s Slideshow Mix.” You can listen to a 30-second preview of each track, and you can buy any of them for 99¢ each. To get to my iMix, launch your Web browser and type in this address: http://phobos.apple.com/WebObjects/MZStore.woa/wa/viewPublishedPlaylist?id=222715 or just go to the iTunes Store and search for my iMix by its name, “Scott’s Slideshow Mix.”
It doesn’t take long to have thousands of photos on your computer or an external drive, and the secret to keeping all of them just one click away is to use keywords (a fancy name for search terms). That way, for example, if you needed to find all your images of a bride holding a bouquet, you’d just type in bouquet, and instantly every shot you tagged with the keyword “bouquet” would appear. All you have to do is take a few seconds now to create and embed those keywords. Here you’ll learn how to embed them, and then how to put them to use.
Step One:
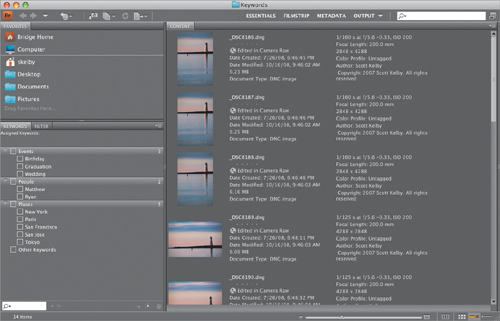
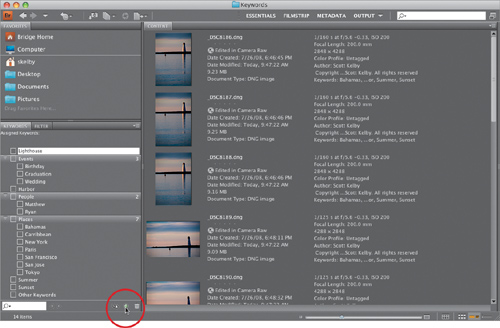
There’s a built-in workspace that’s designed to make tagging your shots with keywords more convenient, so let’s start there by choosing Keyword from the Application Bar’s Workspace pop-up menu (click on the down-facing triangle to the left of the search field), or use the keyboard shortcut Command-F5 (PC: Ctrl-F5). This puts the Keywords panel in the bottom left, and your photos take up the rest of the window in Details view (as shown here).
SCOTT KELBY
Step Two:
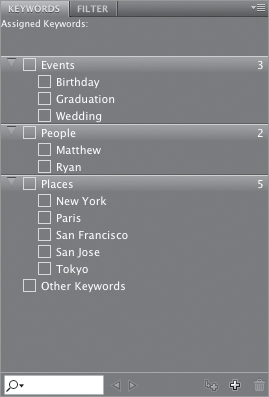
If you look in the Keywords panel, you’ll see that Adobe has already included some keyword categories (Adobe calls them parent keywords), including Events, People, and Places, each with some of the most common keywords associated with these categories as subkeywords (for example, under Events, the default keywords are Birthday, Graduation, and Wedding). These default keywords are just there to basically give you an idea of how keywords and subkeywords work, and to give you a starting place, but the real power comes from you creating and applying your own keywords.
Step Three:
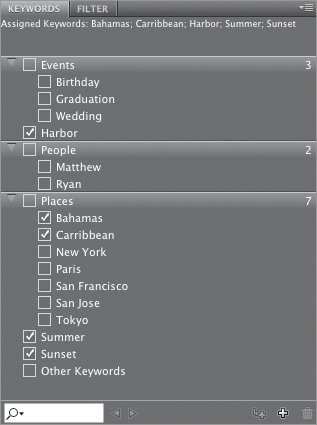
Any keywords that you’ve assigned to a photo will appear in the Keywords panel. For example, when you look in the Keywords panel, you’ll see the generic keywords (Harbor, Summer, Sunset) I added after I imported photos I took down on the island of Nassau in the Bahamas. If I click on one of those photos, two things happen in the Keywords panel: (1) at the top of the panel, it displays all the keywords assigned to that photo, and (2) down in the list of keywords you’ll see a checkmark beside each keyword assigned to your selected photo, as shown here (we actually use the term “tagged,” as in, “That photo is tagged with Harbor and Sunset.” It’s important to use slang like this to build “street cred” with the kids—I mean, your colleagues).
Step Four:
The problem is, generic keywords will only get you so far. Here’s why: Let’s say that you’re working on a client project and you need a photo of a lighthouse you remember shooting on one of your summer trips to the Caribbean. Well, you could look in your Caribbean folder, but there could easily be hundreds, or even thousands of photos in that folder. Instead, to narrow your search, you could go to the Filter panel and click on the keyword Summer, and now all the shots you took in summer would appear. That’s nice, but what if there are 614 shots you took during the summer (as shown here)? You’ll need to narrow your search further, but you really can’t, because you only assigned these generic keywords.

Step Five:
If you want to save yourself from having to spend 30 minutes searching every time you need to find a particular photo, here’s what to do: after you import your photos and get rid of the obviously bad, out-of-focus, totally trashed shots, go right then and tag your photos with specific keywords. At this point in the game, it takes just a few minutes, but it will turn your 30-minute searches into 30-second searches, so it’s definitely worth doing. You start in the Keywords panel by clicking on the New Keyword icon at the bottom-right corner of the panel (as shown here). This adds a new highlighted parent keyword field, so type in the name you want to add as a keyword (I typed in “Lighthouse”). Note: You can also click on a parent keyword, then click on the New Sub Keyword icon to create a subkeyword.
Step Six:
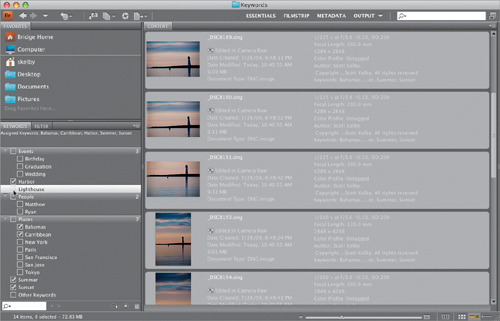
Now scroll through your photos, and when you see one with that lighthouse, Command-click (PC: Ctrl-click) on it to select it. Once they’re all selected, go to the Keywords panel and turn on the checkbox for Lighthouse (as shown here), and all the selected photos are now tagged with that keyword. So, that’s basically the process—create and assign keywords in the Keywords panel. Then to find photos, use the Quick Search field, or the Find command, which we’re going to talk about in just a moment. But first, we need to add more keywords to these photos because a year from now you might not remember that you used the keyword Lighthouse to describe them. So, I would add more keywords, like Nassau, Island, and any other descriptive terms that might help you find these photos in the future.
SCOTT KELBY
Step Seven:
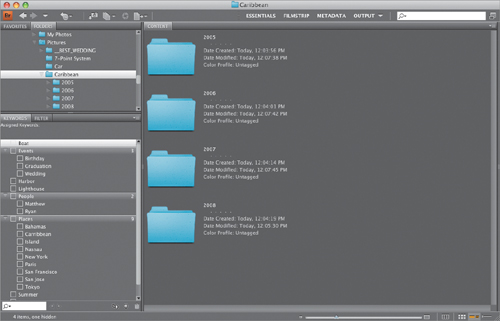
So, now let’s see just how adding these keywords has made your life easier by going back to our client project. Go to the Folders panel, find your Pictures folder, and click on it to show its contents. Find your folder named Caribbean and click on it. Let’s say that inside this folder are all the photos you’ve taken in the Caribbean in the past five or six years (we’ll assume you’ve been there a number of times), so you have several subfolders by date.
TIP: Deleting Parent Keywords
If you want to delete the default parent keywords that Adobe put in the Keywords panel, just go there and click on the parent keyword (like Events or People) and then click on the Trash icon at the bottom of the Keywords panel. You delete subkeywords the same way.
Step Eight:
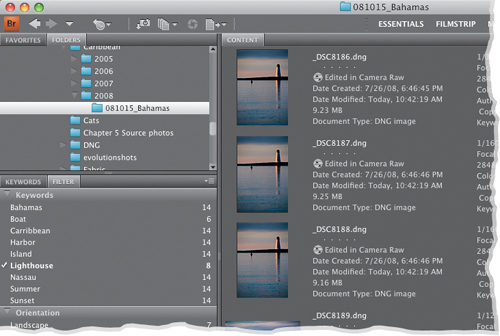
If you know which subfolder in your Caribbean folder you need to look in, you can use the Filter panel to find it. Just click on the subfolder in the Folders panel, then in the Filter panel, click on the keyword you want (I clicked on Lighthouse here). This will show you only the images in that subfolder with Lighthouse as a keyword. If you took lighthouse photos at different times of day (different ISOs), and you know what ISO you are looking for, you can click on both the keyword and the ISO, and Bridge will filter your photos to ones that contain both.
Step Nine:
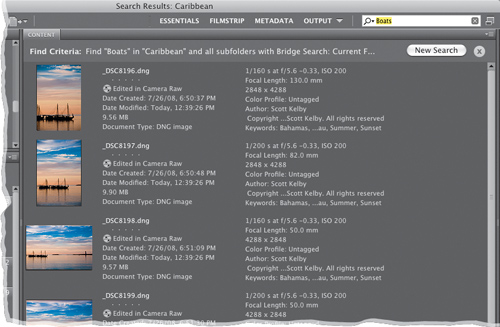
Now, the other way to quickly find photos is by using the Quick Search field up in the top-right corner of Bridge (this is new in CS4, by the way). Quick Search uses Bridge’s search engine by default, and will search in your folder and all subfolders by filename and keyword. Just type in the keyword(s) you want to search for (in this case, “Boats”), and as soon as you start typing, it starts narrowing your search, until just your photos tagged with Boats are showing.
Step 10:
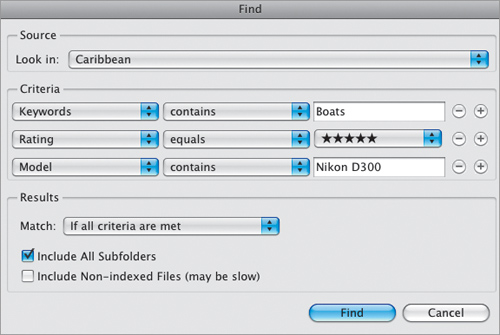
If you want to do an advanced search (a search with more options and power), then skip the Quick Search field up top and, instead, press Command-F (PC: Ctrl-F) to bring up the Find dialog (shown here). (Note: If you decide to narrow your search after using Quick Search, just press the New Search button at the top right of the Content panel to bring up the Find dialog with your current search criteria in place.) You pick your search criteria from pop-up menus, and you can add as many different lines of criteria as you’d like by clicking on the + (plus sign) button on the far right side of each criteria line. Here I searched for the keyword Boats, but added more criteria, so it only searches for my 5-star images take with my Nikon D300. To search your subfolders, make sure the Include All Subfolders checkbox is turned on near the bottom of the dialog.
TIP: Getting Automatic Find Criteria
If you go to the Keywords panel and Control-click (PC: Right-click) on a keyword you want to search, and choose Find from the contextual menu that appears, it automatically chooses all the right criteria for you and inserts the keyword in the text field. A big time saver!
Step 11:
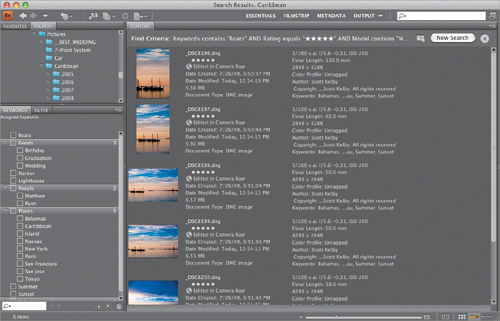
Click the Find button, and within a few seconds just the photos that have been tagged with the keyword Boats, that are 5-star rated, and were taken with that particular make and model of camera will appear in the Content panel (as shown here). To search for something else, click the New Search button in the top right of the Content panel. To clear this advanced search, click the little X button at the top right of the Content panel.
SCOTT KELBY
Step 12:
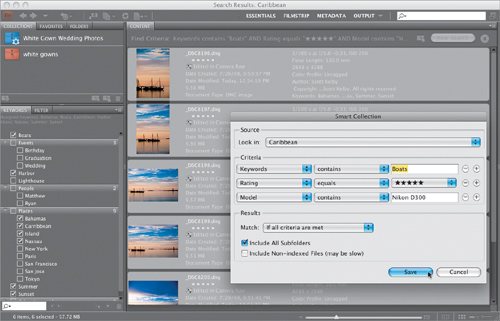
Okay, so all your 5-star boat photos shot with your Nikon D300 appear in the Content panel. Now what? Well, you can sort them, open them in Photoshop, etc., but if you think you’d like to have instant access to this exact same group of photos again (without having to do another Find), you can create a collection of them (remember, we learned that earlier in the sorting our images part of Chapter 1?). To do that, first select the photos you want in that collection (I just do a Select All [Mac: Command-A; PC: Ctrl-A] at this point). Then go under the Window menu and choose Collections Panel, and it appears in the top left of the window. Click the New Collection button at the bottom right of the panel, click the Yes button to include the selected files in your new collection, give your new collection a name, and you’re set. Now these photos are just one click away in the Collections panel. Note: If you make this a smart collection (as shown here), it updates live, meaning whenever you tag a new 5-star photo shot with your Nikon D300 with the Boats keyword, it will automatically be included in this smart collection (and smart collections are really just the results of a search, so it doesn’t add any file size. See “Creating Smart Collections” near the end of this chapter). Pretty handy, eh??
When you take a photo, your digital camera automatically embeds a host of background info right into your photo (called EXIF data), which includes the make and model of your camera, the lens you used, your exposure settings, etc. Bridge not only lets you see this information, but it also lets you embed your own custom info (like your copyright info, contact info, etc.). Bridge also shows the file properties (like the pixel dimensions, resolution, color mode, the file size, etc.). All this embedded info is known as your photo’s metadata.
Step One:
Click on a photo in Bridge and then look at the Metadata panel, on the bottom-left side of Bridge if you switch to the Metadata workspace (I zoomed in on it here so you can see it more clearly), to see all the photo’s embedded background info. On the top left of the panel, there’s a little window that looks like a digital camera’s LCD screen. This “fake LCD screen” displays some key EXIF data (shooting info) for that photo, like the f-stop, shutter speed, ISO setting, metering mode, etc. The section to the right of the screen shows some of the file info data, like the physical dimensions, file size (in this case, it’s 2.90 MB), resolution, etc. Below these two boxes is the File Properties section, which shows the full file info data, instead of just the “quick glance” version. By the way, Bridge pulls this File Properties info from the photo itself, so this information is not editable by you (or me) in this panel. The only way to change this part of the metadata is to actually change the photo itself by opening it in Photoshop and changing the image size, or color mode, or resolution, etc. Then, when you save the file with the changes, the metadata is updated automatically to reflect them.
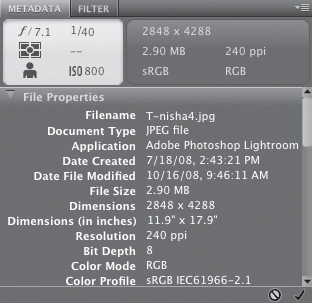
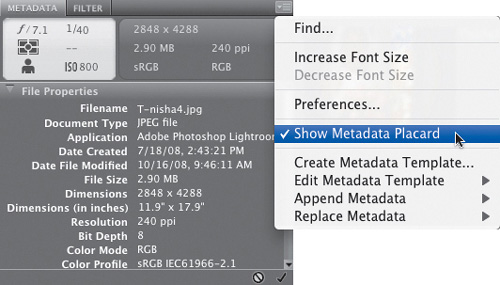
Tip: You can hide the fake LCD screen and the info box to the right of it by clicking on the tiny down-facing triangle in the top-right corner of the panel and choosing Show Metadata Placard from the flyout menu (as shown here). Choosing this hides those sections from view. If you change your mind, just choose Show Metadata Placard again.
Step Two:
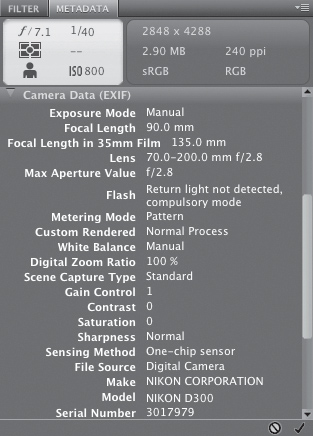
Now scroll down a little further until you come to the Camera Data (EXIF) section, as shown here (you’ll scroll right by the IPTC Core info section, but don’t worry, we’ll look at that next). This section shows the information embedded by your digital camera at the moment you pressed the shutter button. Info in this Camera Data (EXIF) section can’t be edited at all—it was put there by your camera and it stays there, so all you can do is look at it (you’ll use this info later, and then you’ll understand why it’s so useful). So, for now, just take a look at it and comment out loud something along the lines of, “That’s really cool the way it knows everything about my photo.”
Step Three:
Now, there is a long list of Camera Data (EXIF) fields you can’t add info into (many more than the average photographer will ever need). That’s why most folks set up this list to display only the fields they really want to see. To do this, click on the tiny down-facing triangle in the top-right corner of the Metadata panel and choose Preferences from the flyout menu that appears. This brings up Bridge’s Preferences dialog with the Metadata category selected. Scroll down to Camera Data (EXIF) and you’ll see the full list of available camera data fields (scary, ain’t it?). Only the fields with checkmarks by them will be visible, so to hide a field in the list, just click on the checkmark beside that field. Also, ensure the Hide Empty Fields checkbox is turned on at the bottom, so when you click OK, only the checked fields with information will be visible.

Step Four:
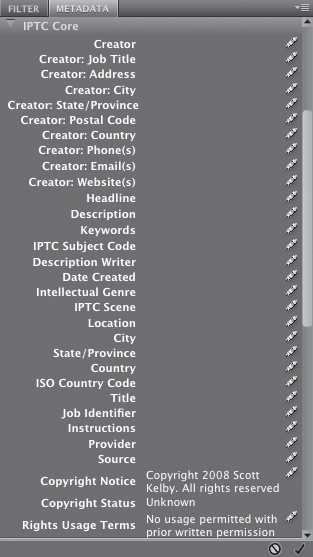
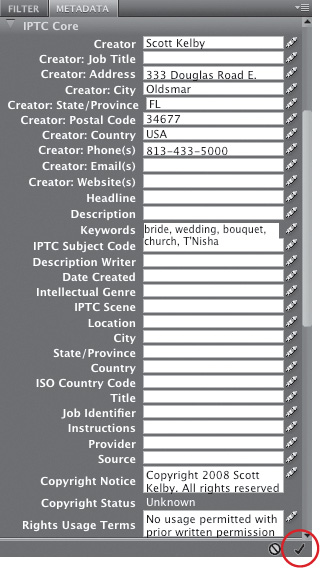
Okay, so although the camera data isn’t editable, there is one section where you can add your own info—it’s the IPTC Core section (named for the International Press and Telecommunications Council). This is where you can add info directly into the file, like your copyright info, your contact info, the rights usage for the photo, your website, etc. So, let’s add some. In the Metadata panel, scroll down to IPTC Core and click on the right-facing triangle to the left of the words IPTC Core to reveal that section (shown here). If you see a little pencil icon on the far-right side of any field, you can write your own custom info into that field. If you added some metadata during the import process (like your copyright info), you’ll see that info has been added to those fields.
Step Five:
To enter your own info, click once in the blank field to the right of the item you want to edit and all the text fields will appear. To see how this works, click to the right of Creator: Address (it’s near the top). When the field appears, just type your street address. To move on to the next field down (in this case, it’s the Creator: City field), just press the Tab key on your keyboard. If you want to jump directly to any field, just click on it. When you’re done adding your own custom data, click on the checkmark icon at the very bottom of the Metadata panel. You can also press Return (PC: Enter) or, if the field accepts multiple lines of text (such as the Creator: Website field), press Command-Option-Return (PC: Alt-Enter).
Step Six:
Applying your own custom info on a photo-by-photo basis can really be slow and tedious, but luckily you can apply your info to as many photos as you’d like, all at once. If you want to apply this info to all the photos in the folder you’re currently working with, press Command-A (PC: Ctrl-A) to select them all, then click to the right of the info field you want to add to activate it. Now just type in your info, and when you’re done, click the checkmark in the bottom-right of the panel, and all those photos will now have that custom metadata applied. But what if you just want to add (or edit) metadata on certain photos? (Maybe you want to add your contact phone number to some photos you’re going to post on the Web.) Then do this instead: Click on the first photo you want to edit, then press-and-hold the Command (PC: Ctrl) key and click on all the other photos you want to affect. Once they’re selected, click to the right of the phone number field, type your phone number in the active field, click the checkmark, and it’s done. Much faster and easier.
SCOTT KELBY
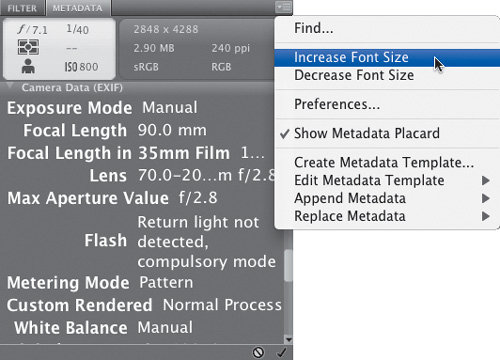
TIP: Increasing the Font Size
Because there’s so much metadata included in each photo, Adobe had to make the panel’s font size really small. Luckily, you can increase it by clicking on the Metadata panel’s flyout menu (in the top-right corner of the panel) and choosing Increase Font Size. If it’s still not big enough, choose it again. Still not big enough? Choose it again and again, until it’s so large your next-door neighbors can read it through your front window. Take a look at the example shown here where I just chose Increase Font Size two times.
I’m pretty sure the last thing you want to do in Bridge is spend a lot of time typing, but you’ll probably at least want to embed your copyright info, your contact info, your website, and on and on. That’s why you’ll want to know how to create a metadata template, which allows you to enter all that info only once, then you can embed it all automatically with just one click of your mouse.
Step One:
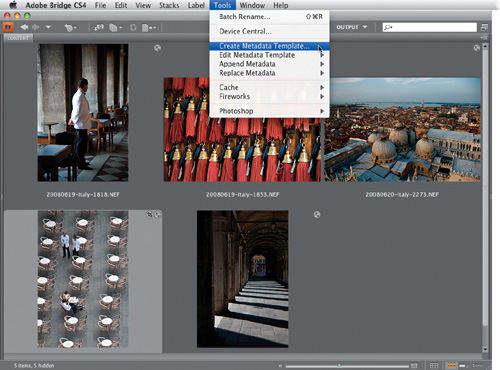
You’ll need to start with a photo on which to base your template. So navigate to a folder of images within Bridge that you’d like to assign some copyright and contact info to and click on one of the thumbnail images in that folder. Then go under the Tools menu and choose Create Metadata Template (as shown here).
SCOTT KELBY
Step Two:
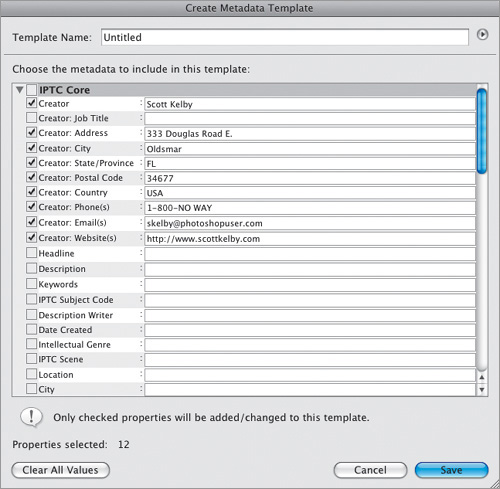
This brings up the Create Metadata Template dialog (shown here). You’ll see a checklist of IPTC Core metadata categories on the left-hand side, but only the ones with checkmarks by them will be visible. So turn on the checkboxes for those you want visible, then in the fields to the right, type in the information that you’d like to turn into a template (in the example shown here, I just added my basic contact info). Don’t forget, if you scroll down, there are many more fields you can add info to (including the all-important copyright fields).
Step Three:
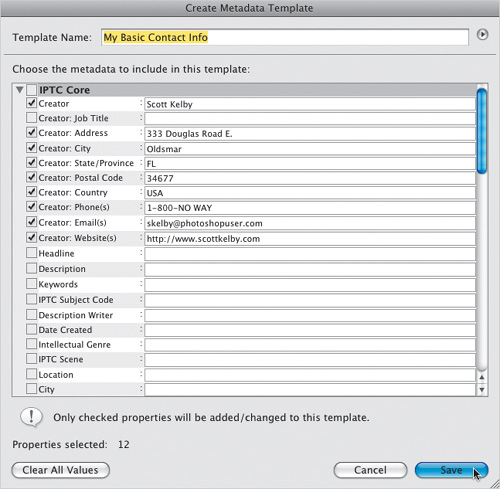
Once you’ve entered all the information you’d like in your template, type in a name for it in the Template Name field at the top of the dialog (this is the name you’ll see listed when you go to apply this template later or during the import process, so be descriptive). Now click the Save button at the bottom of the dialog (as shown here).
Step Four:
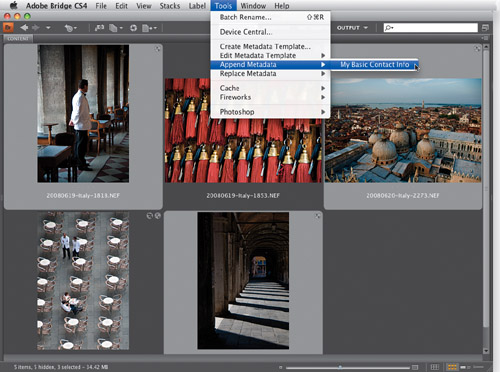
Now that your template has been created, applying it is simple. Just select the photos you want to have that info embedded into (as shown here, where I Command-clicked on our photos—on a PC you would Ctrl-click on them). Then go under the Tools menu, under Append Metadata, and choose your saved template (as shown here, where I’m choosing the template I just created named “My Basic Contact Info”). From now on, this template will appear in this list, so you can apply it anytime. Also, you can create and save as many of these templates as you’d like, with each one having a different set of info (so you could have one with detailed copyright info, or one that just has copyright info and nothing else, or one that you’d use when selling a digital image file to a client, etc.).
Well, technically I’m not sure if this belongs in a chapter about Bridge, except that so much of what we’re talking about is metadata, so I hope you don’t mind if I stick it here. Okay, so why would you want to strip out the very metadata that we clearly hold so dear? Well, it contains personal information about you, your whereabouts on a certain day, your equipment, your lenses, your settings, etc. Stuff your clients don’t need to know (whether you’re giving them the file or selling your work to a stock photo agency). Here’s how to quickly strip it out:
Step One:
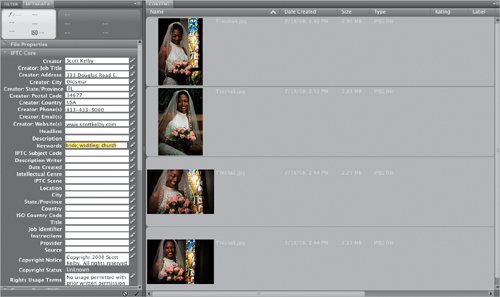
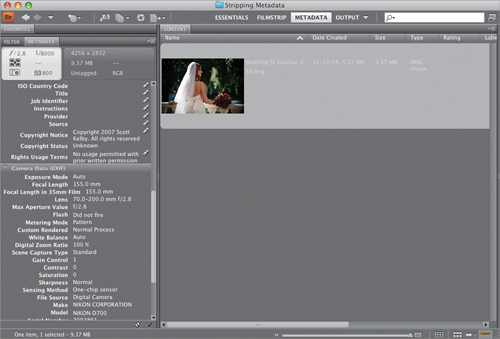
Go under the Window menu, under Workspace, and choose Metadata. This displays your thumbnails with metadata for each photo displayed to the right of it (the metadata will scroll horizontally, while keeping the thumbnails in place). That’s the info we’re going to strip out, along with more that’s not displayed here. To see the rest, double-click on the Favorites panel tab to collapse it and have the Metadata panel expand into that empty space. If you distribute this photo “as is,” all that metadata will be included along with it, and it will be viewable to anyone with a photo editing program. So, double-click on the photo thumbnail to open it in Photoshop CS4.
SCOTT KELBY
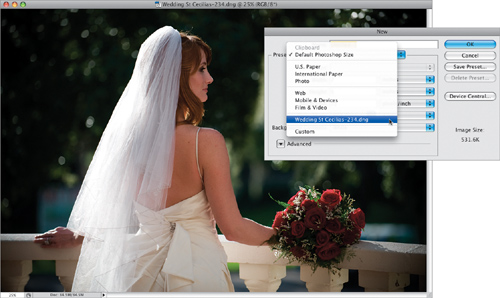
Step Two:
Go under Photoshop’s File menu and choose New. When the dialog appears, click on the Preset pop-up menu at the top and, near the bottom, you’ll see the name of your open photo. Select the photo’s name, and the exact Width, Height, Resolution, and Color Mode settings from your open photo will be copied into the New dialog’s fields. Just click OK and a new document with the same specs as your open photo will appear onscreen.
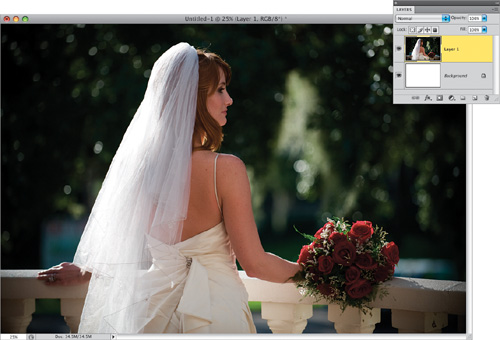
Step Three:
Once your new blank document is open in Photoshop, click back on the photo you opened. Now press V to get the Move tool, press-and-hold the Shift key, and then click-and-drag your photo onto the new blank document. Because you’re pressing-and-holding the Shift key while you’re dragging, the photo will appear in the exact position it did in the original. However, this dragged copy is on its own separate layer, so press Command-E (PC: Ctrl-E) to merge this layer with the Background layer (this flattens the document). Since the document you dragged your photo onto was a new blank document, it has no metadata whatsoever, and your photo, which comes over as a layer, doesn’t carry any of its own metadata with it.
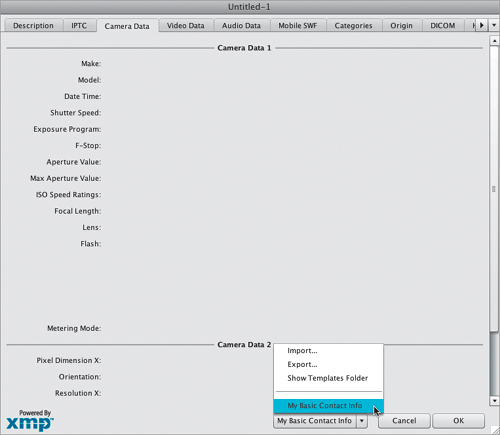
Step Four:
Lastly, go under the File menu and choose File Info. When the dialog appears, click on the Camera Data tab and you’ll see that all the fields are blank. However, if you click on the IPTC tab, you’ll see that all your copyright and contact info has been stripped out, too. Luckily, when you create a metadata template in Bridge, it is also available in Photoshop. So if you’d like to add your IPTC contact and copyright info back in, just click on the down-facing triangle at the bottom right of the dialog and, from the pop-up menu, choose the metadata template with the info you’d like to embed (as shown here). By the way, if you find yourself doing this a lot, this is an ideal thing to record as an action, so the whole process is totally automated (more on actions later).
If you didn’t rename your photos when you first imported them from your memory card (or if the photos were already on your computer), then you can use Bridge to automatically rename an entire folder full of images. This is really helpful because you can give your photos descriptive names, rather than the cryptic secret code names assigned by your digital camera (which tends to give your photos fun names like DSC_0486.JPG or DSC_0784.NEF). So, here’s how to batch rename a folder full of (or just selected) photos fast!
Step One:
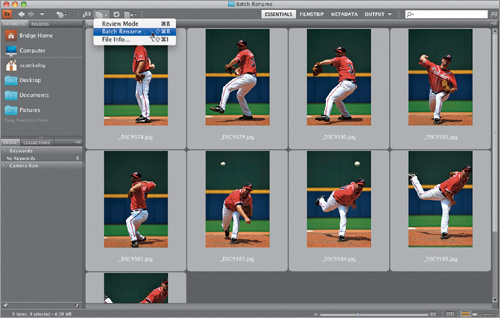
First, you have to tell Bridge which photos you want to rename. If it’s just a certain number of images within your main window, you can press-and-hold the Command (PC: Ctrl) key and click on only the photos you want to rename. But a more likely scenario is that you’ll want to rename all the photos open in your Content panel, so go under Bridge’s Edit menu and choose Select All, or press Command-A (PC: Ctrl-A). All the photos in your Content panel will be highlighted. Now, click on the Refine icon in the Application Bar (it looks like a stack of paper) and, from the pop-up menu, choose Batch Rename.
SCOTT KELBY
Step Two:
When the Batch Rename dialog appears, you need to select a destination for these renamed photos by choosing an option. Will they just be renamed in the folder they’re in now? Do you want them renamed and moved to a different folder, or do you want to copy them into a different folder? If you want to either move or copy them, you’ll need to click on the Browse button. In the resulting dialog, navigate to the folder you want your photos moved (or copied) into after they’re renamed. In our example, we’ll just rename them right where they are (which is probably what you’ll do most of the time).

Step Three:
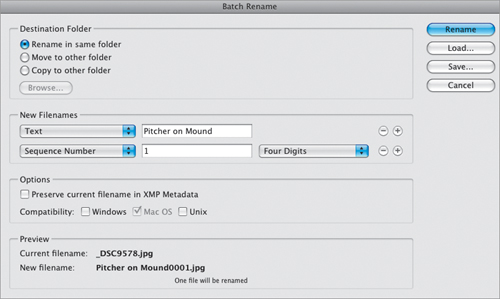
Under the New Filenames section of the dialog, the first pop-up menu shows Text by default and a text field appears to the right. Just type in your own custom filename to replace the default text (I entered “Pitcher on Mound”). At the bottom of the dialog, there’s a live before-and-after preview of your custom filename so you can see how it will look. Since we’re not going to include the date and time in our new filename, or any other additional text, click on the – (minus sign) buttons to the far right of the second and third rows of pop-up menus to remove them (as shown here). Okay, so far, so good, but there’s a problem: In your folder, you can only have one photo (or any file for that matter) exactly named Pitcher on Mound, so you’ll need to add something to the end of the filename (like a number), so each photo is named something different (like Pitcher on Mound001, Pitcher on Mound002, and so on). This is where the last default row of pop-up menus comes in.
Step Four:
To use the built-in auto-numbering, leave the first pop-up menu in the second row set to Sequence Number (to have Bridge automatically add a sequential number after the name); in the center text field, enter the number you want to start with (I left the number 1); then, from the pop-up menu on the far right, choose how many digits you want for your sequence (I chose Three Digits, as shown here). Look at the preview at the bottom of the dialog to see how the name looks now—Pitcher on Mound001.jpg. (By the way, if you want a space between the last word and the number, just press the Spacebar once after you type in your name in the text field.)

Step Five:
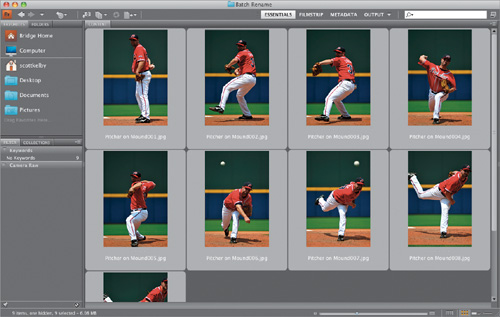
When you click the Rename button, Batch Rename does its thing. If you chose to rename your files in the same folder, you can just take a peek at Bridge, and you’ll see that your selected thumbnails are now updated with their new names (as seen here). If you chose to move all your files to a different folder and then clicked the Rename button, the Content panel will be empty (that makes sense because you moved the images to a new folder and the Content panel is displaying the current folder, which is now empty). So, you’ll need to go to the Folders panel in Bridge and navigate your way to the folder to which you moved (or copied) all your photos (and best of all, they’ll be sporting their new, more descriptive names).
Step Six:
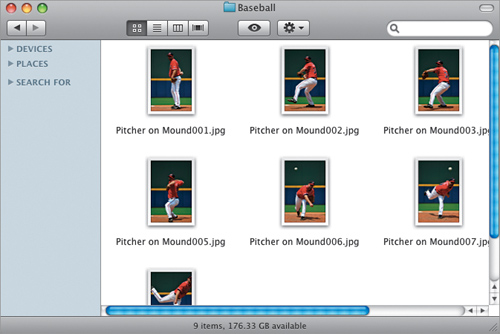
Batch renaming doesn’t just change the thumbnails’ names, it applies this name change to the actual image file. To check it out, leave Bridge and go to the folder on your hard disk where these photos are stored. Open that folder and you’ll see the new filenames have been assigned there, as well.
TIP: Including the Original Filename
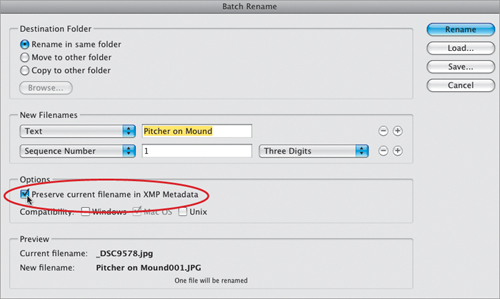
If you want to take this renaming thing a step further, you can click on the little + (plus sign) button on the far right of the last row in the New Filenames section to add another set of naming options. From the first pop-up menu in the new row, choose Current Filename, which adds the original filename to the end of your new filename. Hey, some people dig that. Instead of adding the original filename to the end of the new one, what I do is go under the Options section, and turn on the checkbox for Preserve Current Filename in XMP Metadata. That way the original filename is embedded into the file, just in case you have to go searching for the original file one day.
In CS4, Adobe added smart collections—a very powerful, yet fully automated way to create collections based on a set of criteria you get to select. For example, you could create a smart collection that would include any photo, from all your photos, that has both a 5-star rating and is tagged with Bride as the keyword, but only those that were shot with a wide-angle lens, and only those that were shot this year. You give it the criteria, and it does the rest. Here’s how to start making your own smart collections:
Step One:
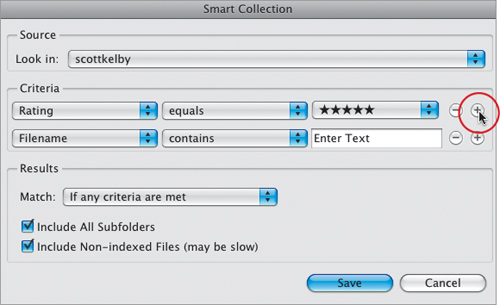
To create a smart collection, click on the Collections panel’s tab (if it’s not visible, just choose Collections Panel from the Window menu up top). Next, click on the New Smart Collection icon at the bottom right of the Collections panel (it’s shown circled here). This brings up the Smart Collection dialog (seen here). Now, let’s use the situation I laid out in the intro above to create your first smart collection. The default criterion is to create a collection based on Filename (as you can see here), but we’re going to change that first field to Rating, so click on the word Filename, and choose Rating from the pop-up menu, instead.

Step Two:
When the Rating criterion appears, it changes the criteria to the right of it. Leave the center pop-up menu set to Equals, but choose five stars (as shown here) from the third pop-up menu. If we click Save now, it would just search your computer for five-star photos, but we want to add more criteria to make our search even more powerful. Click the small + (plus sign) button to the right (shown circled in red) to add another search criterion (it appears below the first one, with the default Filename chosen).
Step Three:
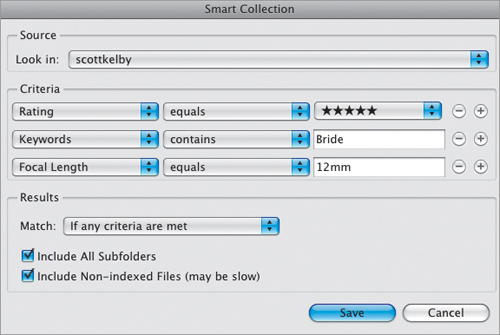
Now for our new criterion, from the pop-up menu, choose Keywords, leave the center pop-up menu set to Contains, and then type in Bride in the field on the right (as shown here). If you clicked the Save button now, it would make a smart collection of all your five-star photos that contain the keyword Bride, but we want to add a few more criteria before we create our smart collection. Click the plus sign button again, and this time choose Focal Length from the first pop-up menu, leave the center pop-up menu set to Equals, then type in the length of your wide-angle lens (in this case, 12mm).
Step Four:
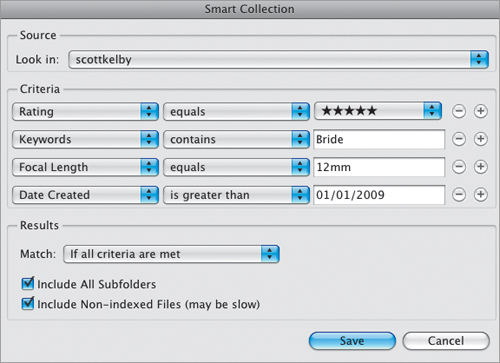
Click the plus sign button again to add another line of criteria. Because we just want to have it collect photos taken this year, we’re going to set the first menu to Date Created, the center to Is Greater Than, and set the date to the first of this year (as shown). Lastly, in the Results section, set the Match pop-up menu to If All Criteria Are Met. Now, click the Save button, and this new smart collection will appear in your Collections panel with its name field highlighted ready for you to name. So, just type in a name and then hit the Return (PC: Enter) key. Here are two very cool things you’ll want to know about smart collections: (1) They’re live. If you set the Match pop-up menu to If All Criteria Are Met when you created your smart collection, and you lower the rating of one of your five-star photos, it will be removed from this smart collection automatically, because it no longer matches all the criteria. And, (2) you can edit the criteria for any existing smart collection by clicking on the smart collection first, then clicking the Edit Smart Collection icon at the top right of the Content panel. This brings back up the Smart Collection dialog with your current criteria, so you can add criteria, or delete criteria (by clicking the – [minus sign] button), or change the criteria using the pop-up menus.
One big area that Adobe updated in CS4 is how you go directly from Bridge to output, and by that I mean going straight from Bridge to either a printed contact sheet (or a regular print), to a full-blown online photo gallery for the Web. You do this in a much different way than in previous versions of Bridge, and now all your printed output is actually saved to a PDF, which to some will be a bonus, and to others... well...let’s just say it’s not a bonus. Here’s how to do both:
Step One:
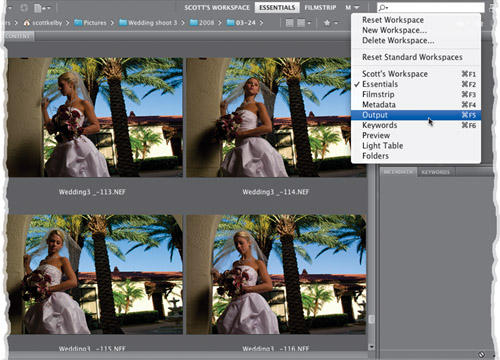
Adobe has changed this part of the Bridge process enough that it now has its own workspace. When you’re ready to make a print (straight from Bridge, without going through Photoshop—keeping in mind that you can use Bridge’s version of Camera Raw first, though), go ahead and switch to the Output workspace (click on Output at the right end of the Application Bar; click on the Output icon and choose Output to Web or PDF from the pop-up menu; go under the Window menu, under Workspace, and choose Output; or use the keyboard shortcut Command-F4 [PC: Ctrl-F4]). (Note: If you still want to create contact sheets and custom prints from Photoshop, see Chapter 14 for how to get these features [and others] back in CS4.)
SCOTT KELBY
Step Two:
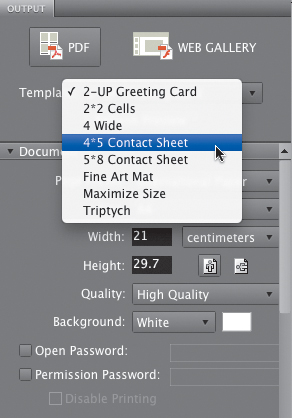
When this Output workspace appears, the Output panel appears along the right side of the window, with your Content panel thumbnails as a filmstrip along the bottom in the middle. To start the process, you first choose whether you want a print (from a PDF) or an online Web gallery. We’ll start with the prints, so click on the PDF button at the top of the Output panel. Directly under that are the built-in templates you can use, but for our example, choose 4*5 Contact Sheet (as shown here), then down in the Content panel, select the photos you want to appear in your contact sheet.
Step Three:
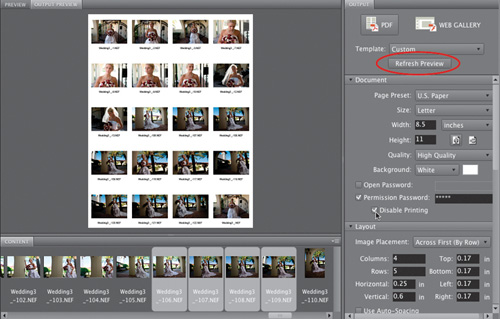
Even though you can see your selected photos in the Preview panel, they don’t appear in the Output Preview panel until you click the Refresh Preview button (circled here in red). Before you click that button, you have a few choices to make first in the Document section of the Output panel, including your paper size, quality (choose High Quality for larger size images), your background color, and whether you want to password protect your PDF (so it can only be opened by someone you give the password to). Also, if you’re emailing this to a client for proofing, and you don’t want them to be able to print your contact sheet out, then turn on the Permission Password and the Disable Printing checkboxes (as shown here).
SCOTT KELBY
Step Four:
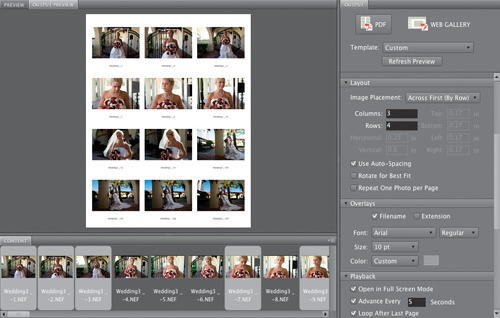
If you scroll down, you’ll see the Layout section, where you can choose how many rows and columns you’d like, and your page margins (here I changed it to 3 columns and 4 rows, which makes the images larger on the contact sheet, but to see that change I had to click the Refresh Preview button). There’s also an Overlays section with checkboxes for whether you want the filename to appear below each image, and whether it should show the filename extension. If you choose to print the filename, you get to choose the font, style, size, and color (I chose a medium gray). If you create a multi-page PDF and want it to appear as a slide show when opened, you can use the Playback section.
SCOTT KELBY
Step Five:
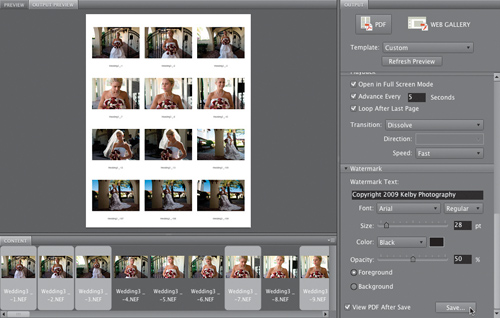
There’s one thing to point out in the Playback section, and that’s the Transition pop-up menu. If you choose one (I always choose Dissolve, because I like that it’s subtle and doesn’t take away from the photos themselves), you’ll get either one or two more pop-up menus with options for your selected transition. The final section is the Watermark section, which lets you put a visible watermark (usually a copyright notice or the name of your studio) right over each image. You get to choose the font, style, size, color, and opacity of this watermark. You also get to choose whether it appears over your images or behind them. Lastly, I recommend turning on the View PDF After Save checkbox, so you can see your final contact sheet before you print it or email it. Now all you need to do is click the Save button, and then if you want to print it, you can print from Adobe Acrobat or Photoshop.
Step Six:
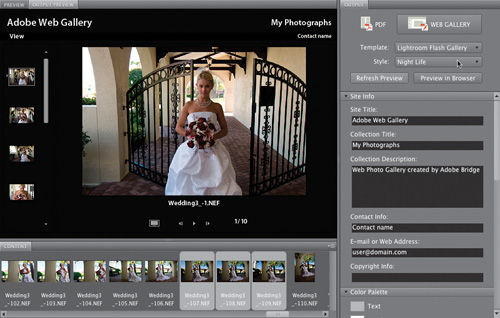
If you choose to create a Web photo gallery instead, you start at the top of the panel by clicking on the Web Gallery button, and when you do an entirely new set of options appears. You can choose a built-in Web gallery template from the Template pop-up menu. My favorites are under Lightroom Flash Gallery (chosen here), and when you choose this, you get to choose which Style you want. Now, sadly there is no preview, so what you have to do is choose a style and (you guessed it) click the Refresh Preview button each time you choose a new style, until you come up with a look you like (the one shown here is Night Life).
SCOTT KELBY
Step Seven:
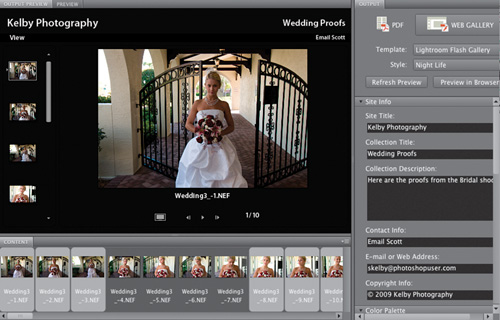
You customize the text that appears on your Web gallery in the Site Info section of the Output panel. You just click in the text fields and type in the info you’d like to appear on the page. As always, none of this updates live, so after you enter your text, the only way to actually see it on the page is to click that by now really annoying Refresh Preview button (can you tell this is starting to get to me?). Then it redraws the preview with your new text changes.
Step Eight:
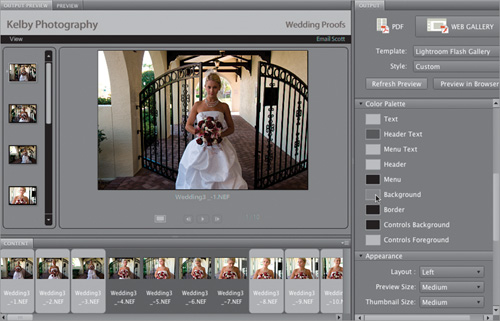
If you continue scrolling down the Output panel, you’ll find a Color Palette section, where you can choose custom colors for everything from your backgrounds, to your borders, to your text by clicking on the little color swatches. Sounds like fun, until you realize that none of these changes appear until (gotcha!) you click the Refresh Preview button again. (I know, I know. Hey, I didn’t design it—I just teach it.) A little farther down is an Appearance section, where you can choose things like which side your filmstrip will appear on, how large your thumbnails will appear, and how big the main preview will appear when you click on a thumbnail.
Step Nine:
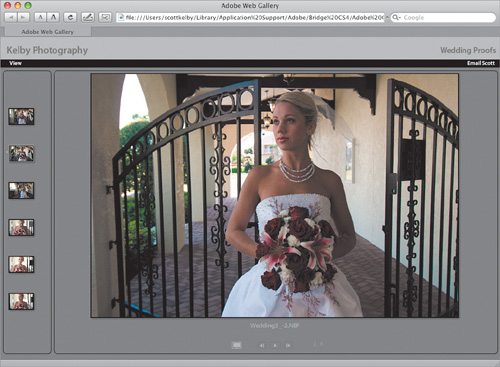
After you’ve tweaked your colors, positions, sizes, and basically whatever you felt like tweaking, before you go and save your Web gallery, I absolutely recommend heading back up to the top of the Ouput panel and clicking the Preview in Browser button. This renders a temporary version of the photo gallery—it launches your default Web browser, and opens the page so you can see what your client will see, and how it will really look when it’s up on the Web. I’ve caught little things a dozen or more times that I didn’t see (or just didn’t notice) until I saw the page previewed in a browser like this, so I definitely recommend giving it a look here before you save the final file.
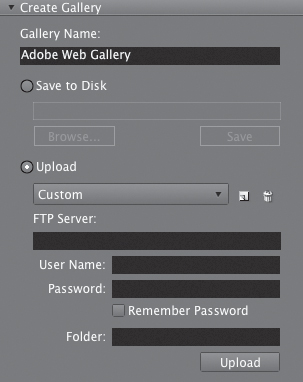
Step 10:
When it’s time to save your Web photo gallery, scroll down to the very bottom of the Output panel to the Create Gallery section (I know, it should be named “Save Gallery”). Here’s where you give your gallery a name and choose whether you want to save it on your computer (for uploading to your Web hosting company) by clicking the Save to Disk radio button, or if you host and maintain your own server, then you can actually upload the files directly to your FTP server by clicking the Upload radio button (by the way, if you were reading that last part about the FTP thing and you thought to yourself, “What’s FTP?” then you’re a Save to Disk person, so ignore the FTP stuff, which will make sense to people who use FTP [freaks that they are]). For you FTP guys, you enter your server path, login stuff, and root folder (again, if that sounds foreign, you’ve read too far. Go back and choose Save to Disk).