In previous editions of the book, I pretty much used up all the good titles for this chapter. I already used “True Colors” (my personal favorite title, inspired by the Cindy Lauper song), and up to this point, I have skillfully avoided using Chicago’s “Color My World” as a title. By the time I got to the CS2 version of the book, I was already running out of decent names, so I had to go with “The Color of Money” (from the movie of the same name), which admittedly was kind of lame. So this time I dug a little deeper and found a movie called Local Color, made back in 1977, that starred Jane Campbell, Bob Herron, and Temmie Brodkey, among others. If none of those people sound familiar, it’s probably because you didn’t see Local Color, which was the story of a young boy in a small village who only had Photoshop 5.5 and used only Brightness/Contrast for his tonal corrections. This made the other children laugh at him, and recalibrate his monitor to crazy colors when he was off selling his handmade trinkets to the American tourists who would visit his tiny village. Then one day, he met a kind American tourist (we’ll call him Señor Willmore), who was getting on his air-conditioned tour bus when he stopped and looked back at the uncalibrated little boy, and tossed him an X-Rite Eye-One Display 2 hardware calibrator. The little boy’s eyes filled with joy as he ran back to his 25 Mhz Macintosh Quadra, opened the box, took out the USB cable, and started to connect the calibrator, but then he realized his old Mac Quadra didn’t have a USB port, and he cried and cried, then the movie ended. It was a really sad movie. No wonder you didn’t see it.
Before we correct even a single photo, there are two quick little changes we need to make in Photoshop to get better, more accurate results. The first is to change how the Eyedropper tool measures color, and the second is to get a neutral gray background behind your photos, so your background doesn’t affect how you color correct your photos. Although it’s just two simple changes, don’t underestimate their impact—this is important stuff.
Step One:
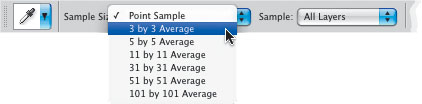
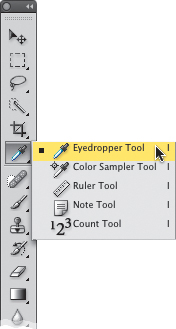
Go to the Toolbox and click on the Eyedropper tool (or just press the letter I). If you look up in the Options Bar, you’ll see that the default Sample Size setting for this tool is Point Sample. The problem with this setting is it gives you a reading from just one individual pixel, rather than giving you an average of the area where you’re clicking (which is much more accurate for color correction purposes). To fix this, go up to the Options Bar, and change the Sample Size pop-up menu to 3 by 3 Average (as shown here). By the way, if you’re working on super-high-resolution images, in CS3, Adobe added larger sampling areas, like 5×5, 11×11, 31×31, and on up to 101×101.
Step Two:
Although having a colorful desktop background is fine when we’re working in Photoshop, you’ll rarely find a professional doing color correction with a colorful desktop background, because it changes how you perceive color (and that will influence how you color correct your photos). Ideally, you’d use a neutral gray background, and to get one, just press the letter F once. This centers your photo onscreen with a neutral gray background behind it. To return to regular mode, press the letter F two more times. Okay, now you’re ready.
SCOTT KELBY
Today’s digital cameras do an incredible job of giving you great color and contrast, as long as the lighting is perfect and your white balance is set properly for that lighting. However, if anything changes, like you move from sunlight into shade, or from outdoors to indoors, or the lighting changes during the day (the sun is always on the move), then you wind up having to color correct your images. Here’s a step-by-step method that makes getting perfect color and contrast pretty darn easy.
Step One:
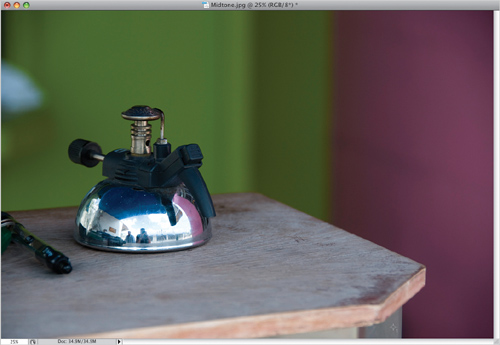
Open the photo you want to color correct. The photo shown here doesn’t look all that bad, but as we go through the correction process, you’ll see that it really needed a correction. The thing I see right off the bat is that the photo looks kinda flat, so it’s low on contrast and there’s a blue color cast to the photo, which is typical on a cloudy day or when your subject winds up in the shade and your camera is set to Auto white balance.

SCOTT KELBY
Step Two:
Go under the Image menu, under Adjustments, and choose Curves (or press Command-M [PC: Ctrl-M]). Curves is the hands-down choice of professionals for correcting color because it gives you a greater level of control than other tools, like Levels, where you pretty much are limited to just three adjustment sliders. The Curves dialog may look intimidating at first, but the technique you’re going to learn here requires no previous knowledge of Curves, and it’s so easy, you’ll be correcting photos using Curves immediately.
Step Three:
First, we need to set some preferences in the Curves dialog, so we’ll get the results we want when color correcting. We’ll start by setting a target color for our shadow areas. To set this preference, in the Curves dialog, double-click on the black Eyedropper tool (the Eyedroppers are found below the center of the curve grid, and the shadow Eyedropper is the first Eyedropper from the left [the one half-filled with black], as shown here).

Step Four:
When you double-click on that shadow Eyedropper, it brings up the Color Picker asking you to select your target shadow color. This is where you’ll enter some new RGB numbers that will help remove any color casts your camera introduced in the shadow areas of your photo. We’re going to enter values in the R, G, and B (Red, Green, and Blue) fields of this dialog (the Blue field is highlighted here).
For R, enter 7
For G, enter 7
For B, enter 7

Now click OK to save these numbers as your target shadow settings. Because these figures are evenly balanced (they’re all the same number), it helps ensure that your shadow areas won’t have too much of one color (which is exactly what causes a color cast—too much of one color), and by using 7 we get dark shadows while still maintaining shadow detail in our inkjet prints.
Step Five:
Now we’ll set a preference to make our highlight areas neutral. Double-click on the white Eyedropper (the third of the three Eyedroppers at the bottom of the Curves dialog). The Color Picker will appear asking you to Select Target Highlight Color. Click in the R field, and then enter these values (Note: To move from field to field, just press the Tab key):
For R, enter 245
For G, enter 245
For B, enter 245

Click OK to set those values as your highlight target.
Step Six:
Now, set your midtone preference. You know the drill: Double-click on the midtone Eyedropper (the middle of the three Eyedroppers), so you can Select Target Midtone Color. Enter these values in the RGB fields:
For R, enter 133
For G, enter 133
For B, enter 133

Then click OK to set those values as your midtone target. That’s it—you’ve done all the hard work. The rest from here on out is pretty easy.
If you still have the Curves dialog open, click OK to exit it for now, and you’ll get a warning dialog asking you if you want to Save the New Target Colors as Defaults. Click Yes (as shown here), and from this point on, you won’t have to enter these values each time you correct a photo, because they’ll already be entered for you—they’re now the default settings. So, the next time you color correct a photo, you can skip these seven steps and go straight to the correcting.

Step Eight:
Okay, now that you’ve entered your preferences (target colors) in the Curves dialog, you’re going to use these same Curves Eyedropper tools (shown here) to do most of your color correction work. In a nutshell, here’s what you’ll do with those three Eyedroppers:
(1) Find something in your photo that you know is supposed to be the color black. If you can’t find something black, find the darkest area in your photo and convert that area to your target shadow color by clicking on that area once with the shadow Eyedropper.
(2) Find something in your photo that you know is supposed to be the color white. If you can’t find something white, find the brightest area in your photo and convert that area to your target highlight color by clicking on that area once with the highlight Eyedropper.
(3) Find a neutral gray area in your photo and convert that to your target midtone color by clicking on that area once with the midtone Eyedropper.

Step Nine:
Let’s start by setting the shadows first, so press Command-M (PC: Ctrl-M) to bring back up the Curves dialog (shown here). Now, your job is to look at the photo and find something that’s supposed to be the color black. In most photos, this won’t be a problem—you’ll see a dark area of shadows (like the center of the trombone’s bell in this photo, or a black car tire, or a black shirt, etc.), and in those cases, it’s no sweat. But, if you can’t find something that’s supposed to be the color black, then you can have Photoshop show you exactly where the darkest part of the photo is.

TIP: Using Curves from the Adjustments Panel
If you’re familiar with adjustment layers, you can apply your Curves as an adjustment layer, instead, using CS4’s new Adjustments panel. Just click on the icon that looks like the Curves grid, and instead of getting a floating dialog, you can adjust your curve from right within the panel. More on adjustment layers later on.
Step 10:
There are two sliders directly under the curve grid that can help you find where the darkest and brightest parts of your image are. Start by turning on the Show Clipping checkbox (shown here), and your image area turns solid white, then click-and-hold on the left (shadow) slider. As you drag slider to the right, the first areas that appear onscreen are the darkest parts of your photo. That’s Photoshop telling you exactly where to click, so remember where those areas are (in this case, I’d probably choose that circle in the center of the bell of the trombone, because it’s showing up as solid black, which means all three color channels are solid black).

Step 11:
Now that you know where your shadow area is, drag that shadow slider back to the left, and turn off the Show Clipping checkbox. Click on the shadow Eyedropper, move out over your photo (while the Curves dialog is still open), and click once on that shadow area. In this case, click in the shadow area in the center of the trombone’s bell (shown circled here in red), and it converts your shadow areas to a neutral shadow color, and the color cast is removed from the shadow areas (compare this photo with the one in Step Nine and you’ll see the difference this one click makes, in both color and contrast).

TIP: Turning Off the Channel Overlays
When you click in that shadow area, three new lines appear in your curve, showing how the Red, Green, and Blue channels were affected by your move. Although some users love seeing these lines, some folks (like me) find it really distracting. If you’d like those channel lines turned off, just click on the triangle next to Curve Display Options at the bottom left of the Curves dialog, then turn off the checkbox for Channel Overlays (as shown here).

Step 12:
Now, on to setting the highlight point. Your job: find something that’s supposed to be the color white. Again, this is usually pretty easy, but if you can’t find something white, you can use the same trick you just learned to have Photoshop show you where the lightest part of your photo is. Turn on the Show Clipping checkbox again, but this time drag the far-right slider to the left. The screen turns black (as shown here), and as you drag to the left the first white areas that appear are the lightest parts of your image.

TIP: Skipping the Show Clipping Checkbox
Pressing-and-holding the Option (PC: Alt) key and dragging those Input sliders does the same thing as temporarily turning on the Show Clipping checkbox.
Step 13:
Now that you know where your highlight area is, drag that highlight slider back all the way to the right, and turn off the Show Clipping checkbox. Click on the highlight Eyedropper, move out over your photo, and click once on that highlight area. I try to look for a white area that has some detail (rather than clicking on what’s called a specular highlight, which is a blown out highlight area with no detail, like the sun, or a bright sun reflection on a chrome car bumper, etc.). In this case, I clicked on the white bass drum head in the background (as shown here), and that made the highlight areas neutral and removed any color cast in the highlights (we’re only two clicks into this correction, and look how much better the photo already looks).

Step 14:
Now for your third click—finding something that’s supposed to be a neutral gray. This one’s a little trickier, because not every photo has a neutral gray area, and the Curves dialog doesn’t have a “find the gray” trick like it does for shadows and highlights, but never fear—there’s a project coming up in this chapter that shows you a way to find that neutral area every time. In the example we’re working on, finding an area that’s supposed to be a neutral gray isn’t a problem—you can click on the back of the uniform of the guy holding the bass drum in the background (as I did here). It neutralizes the color cast in the midtones, and as you can see here, it removed that blue color cast that was still there after neutralizing the highlights and shadows. Now we have a much warmer and more natural looking tone.

Step 15:
Before you click OK, you’re going to use Curves to increase the overall contrast in the photo (in fact, it’s the best way to increase contrast in Photoshop). Plus, it’s easy: (1) first, click once right in the very center of the grid to add a point; (2) click above and to the right of the center, right along the line, where the gray grid lines intersect with the diagonal line; and (3) add one more point on the line, where the lines intersect at the bottom quarter (they’re shown circled here).

Step 16:
Now, while the bottom-left point is selected, press the Down Arrow key on your keyboard eight or nine times to move that point of the curve downward, which increases the contrast in the shadow areas. Then, click on the top-right point, but now press the Up Arrow key on your keyboard 10 or 12 times to increase the contrast in the highlights. Moving the top point up and the bottom point down like this steepens the curve and adds more contrast. Now you can click OK, and you’re done.


Before

After
Before we really dive into color, we need to spend two minutes with the Adjustments panel. Of all the new enhancements in Photoshop CS4, the new Adjustments panel is my favorite, because it streamlines our workflow so dramatically that even if you’ve never used adjustment layers before, you’ve got to start working with them now. In fact, from this point in the book on, we’re going to try and use adjustment layers every chance we get, because of all the advantages they bring. Here’s a quick look at them and how to use them to your advantage:
Advantage One:
Undos That Live Forever
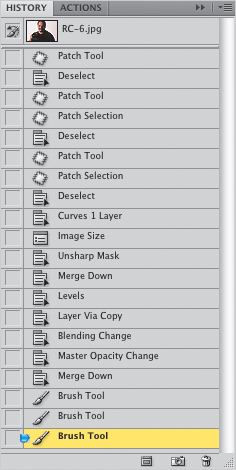
By default, Photoshop keeps track of the last 20 things you’ve done in the History panel (shown here), so if you need to undo a step, or two, or three, etc., you can press Command-Option-Z (PC: Ctrl-Alt-Z) up to 20 times. But, when you close your document, all those undos go away. However, when you make an edit using an adjustment layer (like a Levels or Curves adjustment), you can save your image as a layered file (just save it in Photoshop format), and your adjustment layers are saved right along with it. You can reopen that document days, weeks, or even years later, click on that adjustment layer, and either undo or change that Curves, Levels, or other tonal adjustment. It’s like an undo that lives forever.
SCOTT KELBY
Advantage Two:
Built-In Masks
Each adjustment layer comes with a built-in layer mask, so you can easily decide which parts of your photo get the adjustment just by painting. If you want to keep an area of your photo from having the adjustment, just get the Brush tool (B) and paint over it in black. There’s more on layer masks to come, but they offer tremendous flexibility, and since they don’t actually affect the pixels in your image, they’re always undoable.

One-Click Presets
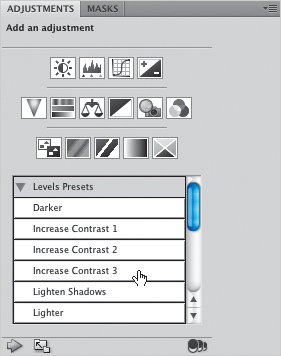
In CS4, Adobe added a bunch of built-in presets, and you can apply them with one click right from within the Adjustments panel. Plus, if you come up with a setting you like, you can save your own custom presets. So, for example, if you come up with a favorite Levels setting (using a Levels adjustment layer), you can save it as a preset (by choosing Save Levels Preset from the panel’s flyout menu), and then apply it anytime from the Adjustment panel’s Preset list with just one click.
Advantage Four:
Blend Modes
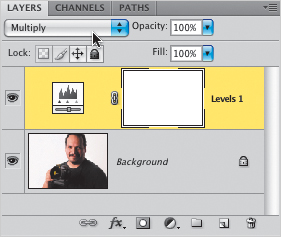
When you apply an adjustment layer, you get to use the layer blend modes. So if you want a darker version of your adjustment, you can just change the layer blend mode of your adjustment layer to Multiply. Want a brighter version? Change it to Screen. Want to make a Curves adjustment that doesn’t affect the skin tone as much? Change it to Luminosity. Sweet!
Advantage Five:
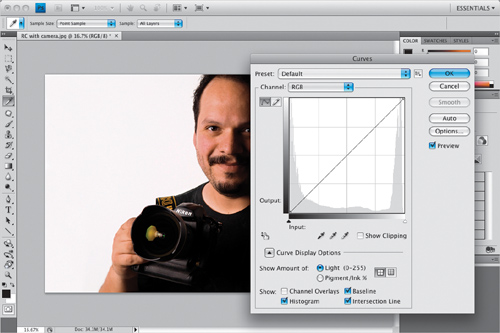
Everything Stays Live
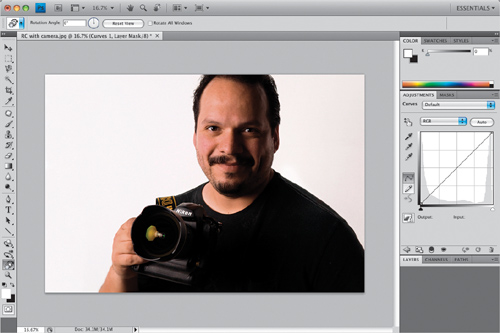
Back in previous versions of Photoshop, when you created an adjustment layer (let’s say a Curves adjustment layer, for example), it would bring up the floating Curves dialog (as seen here). While it was onscreen, the rest of Photoshop was frozen—you couldn’t make changes or do anything else until you closed the Curves dialog by either applying your adjustment or hitting Cancel. But thanks to the Adjustments panel, everything stays live—you just go to the Adjustments panel and make your changes there. There is no OK or Apply button, so you can change anything anytime. This will make more sense in the next step.
Step One:
The best way to understand this whole “live” thing is to try it, so go open any photo (it really doesn’t matter which one), then go to the Adjustments panel and click on the Curves icon (it’s the third one in the top row). Rather than bringing up the Curves dialog in front of your image (and freezing everything else), the Adjustments panel now displays the curve, so you can make your adjustments, but everything stays live—you can adjust your curve, go right down and change the blend mode of a layer, or paint a few brush strokes, then grab another part of the curve and adjust it. There’s no OK button, and everything stays live. This is bigger than it sounds (ask anyone who’s used CS3).
Step Two:
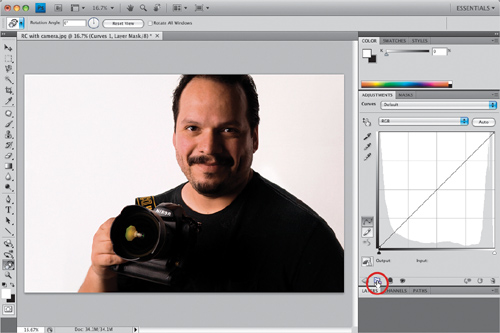
If you’re thinking the curve itself looks a little small stuck in that narrow panel, Adobe must have been thinking the same thing, because there’s a little icon in the bottom-left corner of the panel (shown circled here in red), and if you click on it, it expands the size of the entire panel so everything’s easier to work with (as seen here).
Step Three:
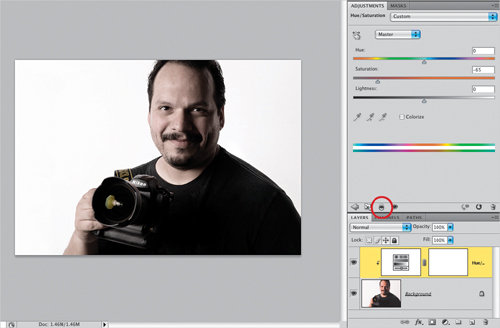
Now let’s delete our Curves adjustment layer by clicking on the Trash icon at the bottom of the panel. Add a Hue/Saturation adjustment by clicking on its icon (it’s the second one in the middle row). Drag the Saturation slider way over to the left to remove most of the color, for the look you see here. Now, the way adjustment layers work is this: they affect every layer below them. So if you have five layers below it, all five layers will have their color desaturated like this. However, if you want this adjustment layer to just affect the one single layer directly below it (and not the others), then click on the clipping icon (it’s the third from the left at the bottom of the panel, shown circled here in red). This clips the adjustment layer to the layer directly beneath it.
Step Four:
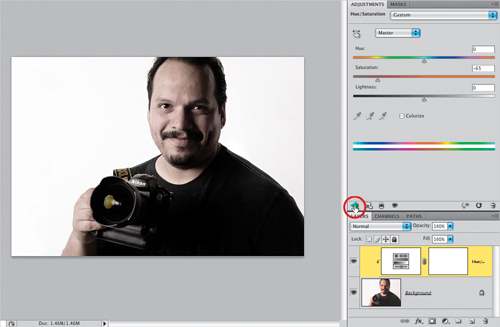
There are a couple other options: To edit any adjustment layer you’ve already created, just click on it once in the Layers panel and its controls will appear in the Adjustments panel. To return to the list of adjustment layers and their presets, click on the Return to Adjustment List icon at the bottom of the panel (shown circled here in red). To hide any adjustment layer you’ve created, click on the Eye icon (either at the bottom of the Adjustments panel, or to the left of the adjustment layer in the Layers panel). To reset any panel to its default settings, click the round arrow icon to the immediate left of the Trash icon. To see a before/after of just your last change, click the icon to the left of the Reset icon. The hardest thing about the Adjustments panel is figuring out which icon represents which adjustment, so just move your cursor over an icon, and its name appears in the upper-left corner of the panel.
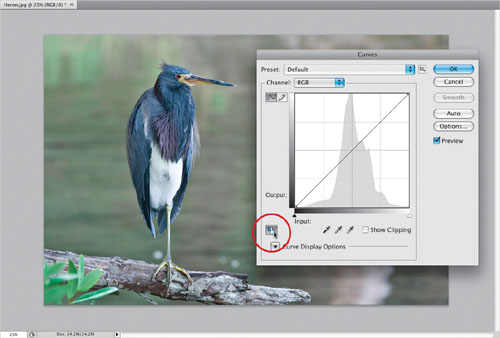
Besides using Curves for color correction, this is my main tool for creating contrast, because it gives you a range of control you really can’t get any other way. Of course, in the past, you really had to know Curves inside and out to tweak individual areas of your image, but in Photoshop CS4, Adobe introduced the Targeted Adjustment Tool (or TAT for short), which lets you click-and-drag right on the image, and the tool will tweak the right part of the curve for you automatically. It’s way cooler than it sounds.
Step One:
Here’s a pretty flat-looking photo that could use a Curves adjustment to bring more contrast to the photo and, as I mentioned above, we’re going to use the TAT (shown circled in red here), so we really don’t have to mess with the curve at all, we just have to tell Photoshop two simple things: (1) which area of the photo we want to adjust, and (2) if we want that area to be darker or brighter. That’s it—and we do the whole thing using just our mouse. So, start by pressing Command-M (PC: Ctrl-M) to open the Curves dialog and clicking on the TAT.
SCOTT KELBY
TIP: Using a Curves Adjustment Layer
Don’t worry—if you use a Curves adjustment layer (rather than just using the standard Curves dialog seen here), it has the TAT, too! (Get it, TAT too? Tattoo? Aw, come on, that one wasn’t that bad.)
Step Two:
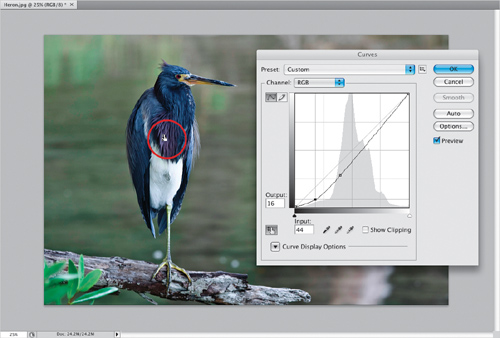
Now, move your cursor outside the Curves dialog, and out over the part of your image you want to adjust. In our case, we want to make the neck of our blue heron darker. Start by clicking-and-holding on the blue part of the neck, and you’ll notice that your cursor turns into a hand with a two-headed arrow, pointing up/down. That tells you that dragging up/down will make the adjustment. In our case, we want this blue area darker, so drag downward. As you do, it knows exactly which part of the curve to adjust to darken that area. Now move just to the left, to the purple feathers (the tool’s shown circled here), then click-and-drag downward again to darken that area.
Step Three:
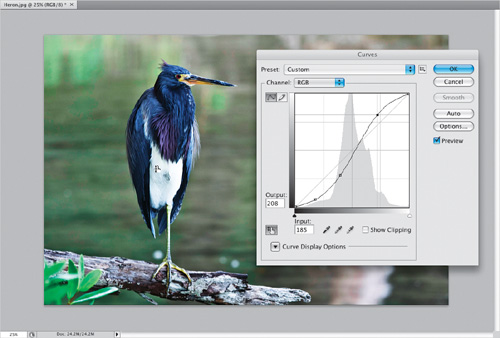
So, now that we’ve darkened the blue and purple feathers, let’s go make the white feathers on his chest brighter. Move your cursor over these feathers, but this time you’re increasing the brightness, so you’d click-and-drag upward (rather than downward). As you do this, it knows exactly which part of the curve to adjust to affect that area (if you look at the curve, you can see a new point has been added on the top right of the curve—that was added when you clicked-and-dragged on the white feathers).
Step Four:
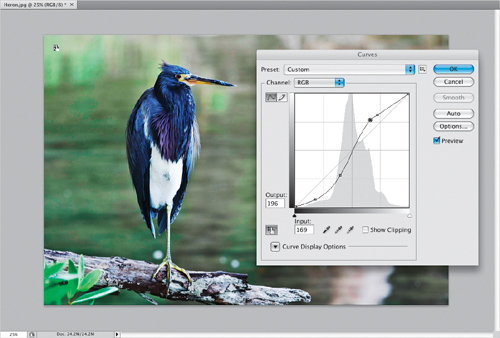
Lastly, now that we’ve darkened the bird, let’s brighten the water behind him by moving our cursor over to the lighter area up in the top-left corner, and clicking-and-dragging upward to brighten that area (also note where it added a new curve point, and how it adjusted that new point upward). This is so darn easy to do, but as you can see, it’s also pretty darn powerful.
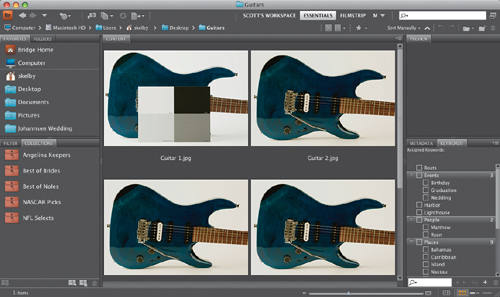
If you’re shooting in a studio or on location, whether you’re shooting portraits or products, there’s a technique many pros use that can make the color-correction process so easy that you’ll be able to train laboratory test rats to correct photos for you. The secret is this: in the back of this book I included my version of a gray card, and it’s perforated, so you can easily tear it out. By sticking this card into the first shot of your shoot (and shooting it again only if your lighting setup changes), it will make your color correction almost automatic.
Step One:
When you’re ready to start shooting and the lighting is set the way you want it, tear out the swatch card from the back of this book and place it within your shot (if you’re shooting a portrait, have the subject hold the card for you), then take the shot. After you’ve got one shot with the swatch card, you can remove it and continue with the rest of your shoot.
SCOTT KELBY
Step Two:
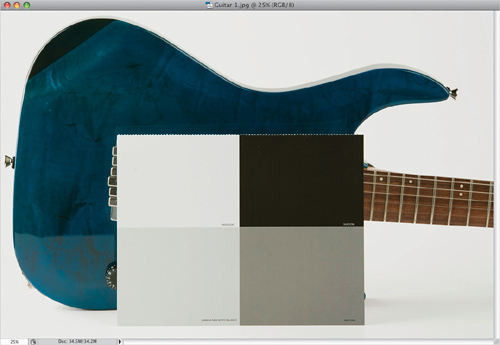
When you open the first photo taken in your studio session, you’ll see the swatch card in the photo. By having a card that’s pure white, neutral gray, and pure black in your photo, you no longer have to try to determine which area of your photo is supposed to be black (to set the shadows), which area is supposed to be gray (to set the midtones), or which area is supposed to be white (to set the highlights). They’re right there in the card.
Step Three:
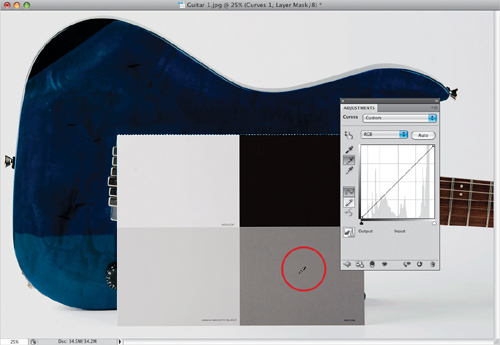
Go to the Adjustments panel and click on the Curves icon (it’s the third one from the left in the top row). Click the black Eyedropper on the black panel of the card to set the shadows, then click the middle gray Eyedropper on the darker gray panel to set the midtones (as shown here). Finally, click the white Eyedropper on the white panel to set the highlights, and the photo will nearly correct itself. No guessing, no Threshold adjustment layers, no using the Info panel to determine the darkest areas of the image—now you know exactly which part of that image should be black and which should be white.
Step Four:
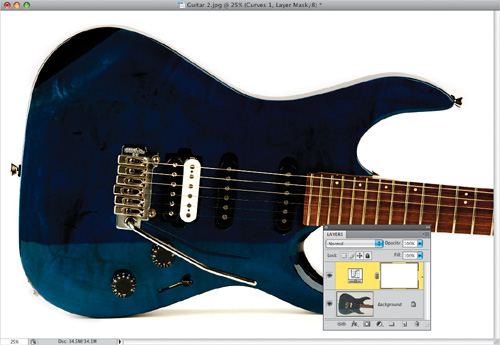
Once you have the Curves setting for the first image, you can correct the rest of the photos using the exact same curve: Just open the next photo and position it so you can see part of both photos. Now click back on the first photo (the one you corrected), click on the Curves adjustment layer in the Layers panel, and drag-and-drop that adjustment layer onto the second photo. Do this until all the photos are corrected. (Note: You won’t be able to drag-and-drop the adjustment layer if you’re working in the Application Frame, so be sure that you’re viewing your photos in floating windows.)
Finding a neutral midtone while color correcting has always been kind of tricky. Well, it was until Dave Cross, who works with me as Senior Developer, Education and Curriculum for the National Association of Photoshop Professionals (NAPP), came into my office one day to show me his amazing trick for finding right where the midtones live in just about any image. When he showed me, I immediately blacked out. After I came to, I begged Dave to let me share his very slick trick in my book, and being the friendly Canadian he is, he obliged.
Step One:
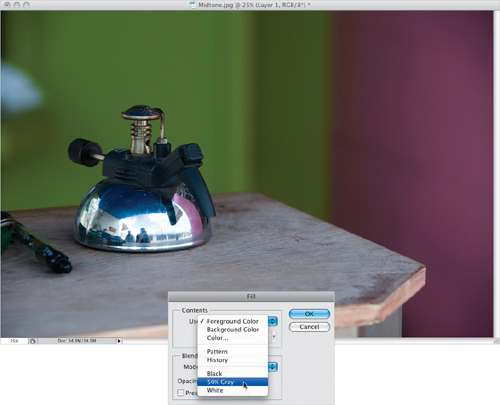
Open any color photo, and click on the Create a New Layer icon at the bottom of the Layers panel to create a new blank layer. Then, go under the Edit menu and choose Fill. When the Fill dialog appears, in the Contents section, under the Use pop-up menu, choose 50% Gray (as shown here).
SCOTT KELBY
Step Two:
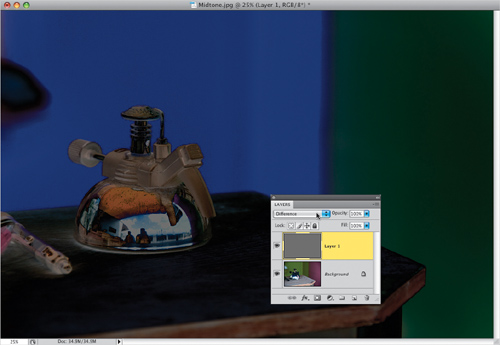
When you click OK, it fills your layer with (you guessed it) 50% gray (you can see the gray thumbnail for Layer 1 in the Layers panel shown here). Now, go to the Layers panel and change the blend mode of this layer to Difference. Changing the layer blend mode to Difference doesn’t do much for the look of your photo (as you can see here), but don’t worry—it’s only temporary.
Step Three:
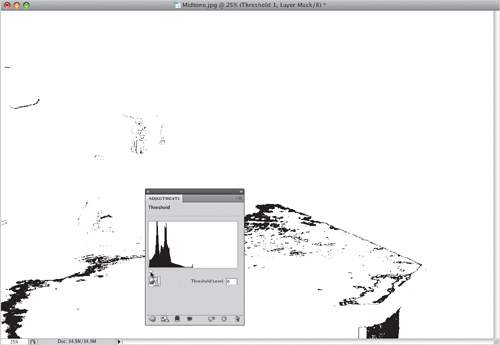
Choose Threshold from the Create New Adjustment Layer pop-up menu at the bottom of the Layers panel. Then, in the Adjustments panel, drag the slider under the histogram all the way to the left (your photo will turn completely white). Now, slowly drag the slider back to the right, and the first areas that appear in black are the neutral midtones. In the bottom right of this photo is a decent-sized area of black, so that will be our midtone correction point. To help you remember exactly where that area is, get the Color Sampler tool (nested under the Eyedropper tool), and click on that spot to add a Color Sampler point as a reminder. Then click the Trash icon at the bottom of the Adjustments panel to discard the adjustment layer.
Step Four:
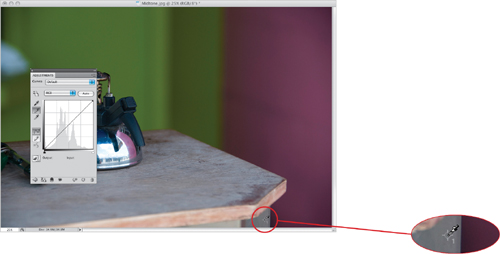
Now that your midtone point is marked, go back to the Layers panel and drag the 50% gray layer onto the Trash icon to delete it (it already did its job, so you can get rid of it). You’ll see your full-color photo again. Now, click on the Curves icon in the Adjustments panel (the second icon from the right in the top row) to open the Curves Adjustments panel, get the midtones Eyedropper (it’s the middle Eyedropper), and click directly on that Color Sampler point (shown circled in red here).
Step Five:
That’s it; you’ve found the neutral midtones and corrected any color cast within them. So, will this trick work every time? It works most of the time, but you will run across photos that just don’t have a neutral midtone, so you’ll have to either not correct the midtones or go back to what we used to do—guess.
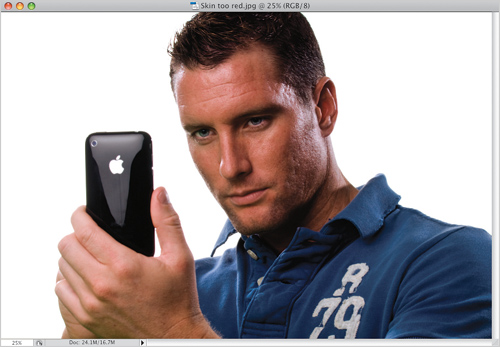
So what do you do if you’ve used Curves to properly set the highlights, midtones, and shadows, but the flesh tones in your photo still look too red? Try this quick trick that works great for getting your flesh tones in line by removing the excess red.
Step One:
Open a photo that you’ve corrected using the Curves technique shown earlier in this chapter. If the whole image appears too red, skip this step and go on to Step Three. However, if it’s just the flesh-tone areas that appear too red, press L to get the Lasso tool and make a selection around all the flesh-tone areas in your photo. Press-and-hold the Shift key to add other flesh-tone areas to the selection, such as arms, hands, legs, etc., or press-and-hold the Option (PC: Alt) key to subtract from your selection. This can be a really loose selection like the one shown in Step Two (which doesn’t include his neck).
SCOTT KELBY
Step Two:
Go under the Select menu, under Modify and choose Feather. Enter a Feather Radius of 3 pixels (as shown here), and then click OK. By adding this feather, you’re softening the edges of your selection, which will keep you from having a hard, visible edge show up where you made your adjustment.

TIP: Hiding the Selection Border
Once you’ve made a selection of the flesh-tone areas, you might find it easier if you hide the selection border from view (that makes it easier to see what you’re correcting) by pressing Command-H (PC: Ctrl-H).
Step Three:
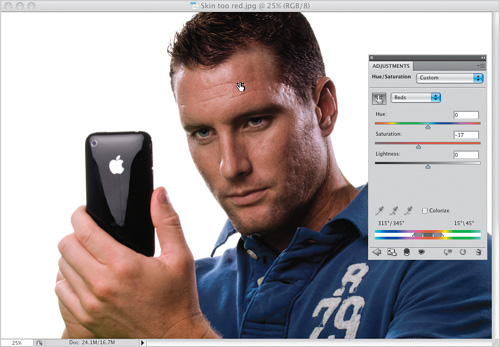
In the Adjustments panel, click on the Hue/Saturation icon, and when the Hue/Saturation options appear, click on the TAT (the Targeted Adjustment Tool—more on how it works on page 214). To reduce some of the reds in his face, move the cursor over an area of his face that looks overly red, click-and-hold the tool, and drag to the left. The tool knows which Hue/Saturation slider to move (it jumps to the Reds, and reduces the Saturation amount), so just keep dragging until his skin tone looks more natural (a before and after is shown below). When it looks good to you, press Command-D (PC: Ctrl-D) to Deselect, completing the technique.
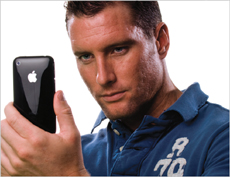
Before

After
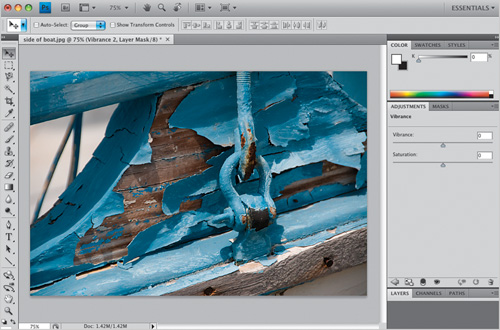
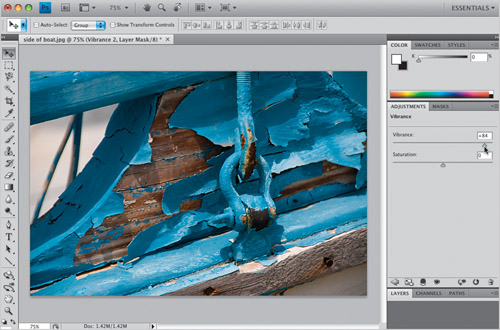
Vibrance—one of my favorite features in Camera Raw—has made it outside of Camera Raw in Photoshop CS4. It pretty much does the same thing that Vibrance inside of Camera Raw does—it boosts the least vivid colors in your photo the most, it affects the already vivid colors the least, and it tries to avoid boosting skin tones. And here in CS4, it’s an adjustment layer, so you get the built-in mask, as well. Sweet! Here’s how it works:
Step One:
Just click the Vibrance icon in the Adjustments panel (the first icon in the center row), and the Vibrance controls appear (as seen here). Adobe also put a Saturation slider there, and I avoid it like the plague (except for using it occasionally to remove color), so if I come to this panel, it’s for Vibrance—not Saturation. However, you can use this Saturation slider in conjunction with Vibrance (like lowering Saturation, which evenly takes color from the entire photo, then really boosting Vibrance, so the dullest colors start to stand out more).
SCOTT KELBY
Step Two:
Using Vibrance is a no-brainer—just drag the slider to the right (as shown here), and the farther you drag it, the more vibrant your less vibrant colors become.
TIP: The Sponge Has Vibrance
Unless you take your images to a printing press, you probably haven’t used the Sponge tool (O), which either saturates or desaturates the color in any areas you paint with it, and is often used to desaturate colors that are out-of-gamut (colors too vibrant for a CMYK printing press). In CS4, they added Vibrance as an option (in the Options Bar) that will focus more on less saturated colors while not affecting already saturated colors as much.
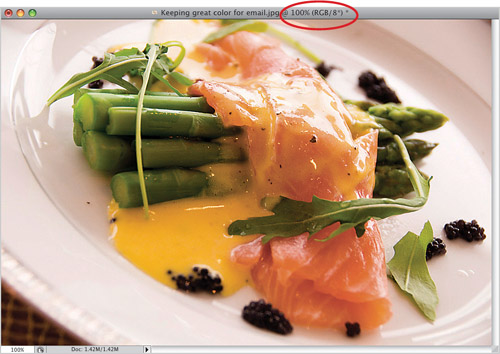
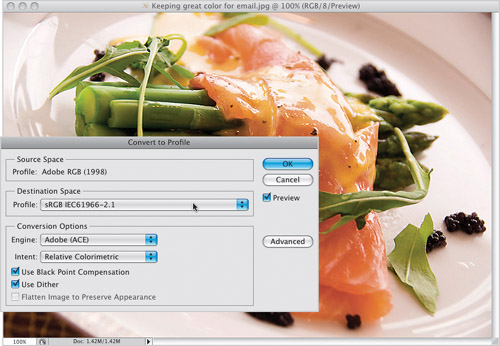
Email applications (and nearly all Web browsers) don’t support color management. So, if you’re working in Adobe RGB (1998) or ProPhoto RGB as your Photoshop color space, when you email your photos or post them on the Web, they probably look like %$*# (with the colors all desaturated and flat-looking). Ah, if only there was a trick that would let anyone you email (or anybody who sees your photos on the Web) see your photos pretty much the same way you do in Photoshop (of course, there is—I just wish I knew it. Kidding!) Here ya go:
Step One:
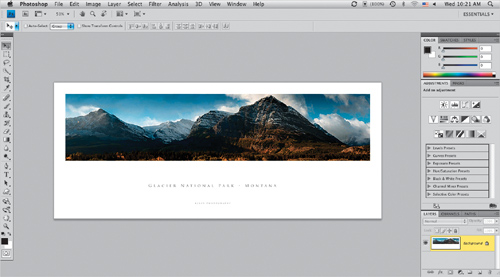
To convert this photo to the proper color space for emailing or posting to the Web, go under the Edit menu and choose Convert to Profile. This brings up the Convert to Profile dialog (shown here). The Source Space at the top shows you the current color space your photo is in (if you’re working in Adobe RGB [1998], like in this example, that’s what you’ll see here). For your Destination Space (what you’re converting to), choose sRGB IEC61966-2.1 from the Profile pop-up menu (as shown here) and click OK. That’s it—it’s ready to go.
SCOTT KELBY
Step Two:
One quick way to ensure that your photo has been converted to sRGB is to look at the window’s title bar. If you’ve got Photoshop’s color space set to Adobe RGB (1998), which is pretty typical for photographers, and you just converted this photo to a different color space (sRGB), then you have a “profile mismatch.” So, you should see an asterisk right after (RGB/8) in the title bar (as shown circled here in red), which is Photoshop’s way of letting you know that your photo is one space, and Photoshop is in another. In this case, that’s a good thing.