
If you search the iTunes Store for “Black & White,” you will be stunned at how many songs are named exactly that—“Black & White.” In fact, if I just wanted to stay with the chapter title “Black & White” (like I did back in the CS2 book), then I’d be pretty much covered until about Photoshop CS46. However, for some reason I was drawn to “Black and White World” by Elvis Costello. I almost went with “Black Widow” by Mötley Crüe, but I noticed that the song was tagged with the iTunes Store Clean icon, which means there must also be an explicit version, too. Now, you know, and I know, that when you search for “Black Widow” in the iTunes Store, you’re going to listen to the explicit version, right? See, I knew it! And I’m sure that explicit version is laden with words so naughty that you’d normally have to listen to an Andrew Dice Clay show just to keep up, but somehow when Vince Neil sings them, they don’t sound as naughty. They sound beautiful, and melodic, with meaning, texture, and a certain poetic charm to them. Aw, who am I trying to kid? It’s super-dirty naughtiness, but you don’t even care. You know why? Because you’re a photographer, which means that at least one time in your career you did a client shoot where some setting in the camera was horribly wrong, but you didn’t realize it until you opened the images later in Photoshop. It was at that moment you learned that the entire shoot was done with your camera set to JPEG Basic mode, with your image size set to Small. Right then you started screaming expletives that would make Snoop Dogg wash your mouth out with soap. So, the next time this happens, just pop in that Crüe song and let Vince do the cussing on your behalf. Apparently, he’s quite comfortable with it.
I’m starting this chapter with Photoshop’s built-in Black & White converter, because it was introduced back in Photoshop CS3 just for converting your color images to black and white, and I think it’s better than the old Channel Mixer technique we used to use. However, even though I’m going to show you how this Black & White converter works, I honestly think there are better methods that produce much better results, and I’m going to show you those, as well, later in this chapter, but go ahead and try this first and see what you think.
Step One:
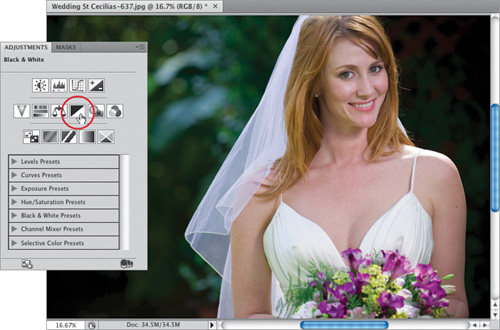
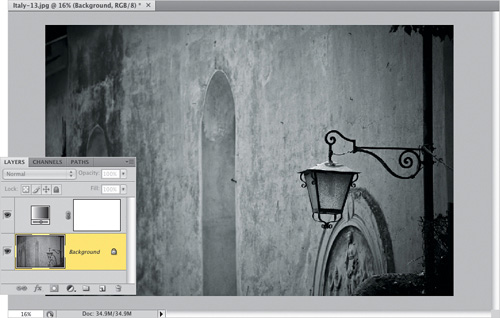
Open the color photo you want to convert to black and white. Click on the Black & White icon (shown circled here) in the Adjustments panel. A Black & White converter is also found under the Image menu, under Adjustments, however, by applying it as an adjustment layer, it’s non-destructive (you can edit your conversion later, paint [mask] over parts that you don’t want black and white, lower the opacity for a faded-color look, or you can delete the adjustment layer and return to your full-color photo). It’s like an undo that lives forever (well, at least until you discard the layer).
SCOTT KELBY
Step Two:
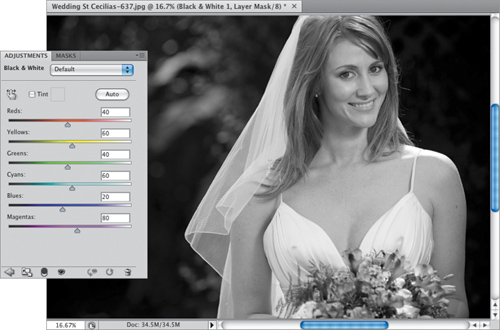
When you click the Black & White icon, its options appear in the Adjustments panel, and it applies the default B&W conversion (seen here). This default conversion isn’t as flat as you’d get by going under the Image menu, under Mode, and choosing Grayscale, but it’s usually not real great either. If you notice, the percentage of each group of two colors (Reds and Yellows, for example) adds up to 100%. That’s fine if your goal is to maintain the same brightness in the photo, but most photographers want that rich, high-contrast B&W look, which means your numbers will probably add up to more than 100%. Don’t let that freak you out.
Step Three:
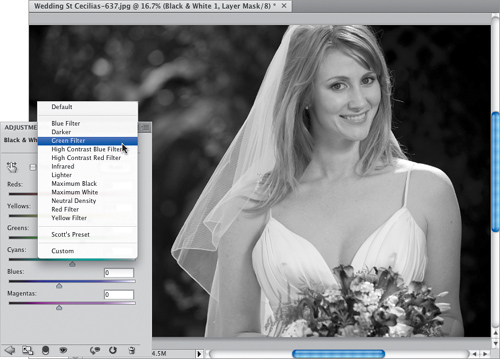
At the top of the Adjustments panel, there’s a pop-up menu with a list of built-in Black & White presets (as shown here), so click on the menu to see the presets. Go ahead and give these a try and see what you think (most of them are pretty lame, but click on them now anyway just so you know). The main reason I wanted to show you these presets is because if you come up with a B&W conversion setting you like, you can save your own custom presets to this list. Just click on the little down-facing triangle in the top-right corner of the panel, and choose Save Black & White Preset from the flyout menu that appears. Then give your preset a name, and it will now appear in this presets pop-up menu.
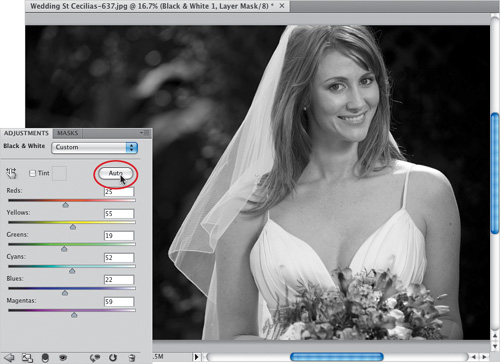
Step Four:
After you’ve tried the presets, choose Default from the top of the preset pop-up menu to return to the default B&W conversion. Luckily, there is an Auto button (shown circled in red here), which does an auto-B&W conversion. I think it tends to give better results than the default conversion or any of the presets, so go ahead and click on it, and use it as a starting point for your conversion (of course, you could just click Auto and be done with it, but you’re really not one of those “Auto” people, are you? I didn’t think so. You’re a tweaker, right? I knew it—I knew it! Okay, then you’ll really love the next step, because it’s the most fun part of this process).
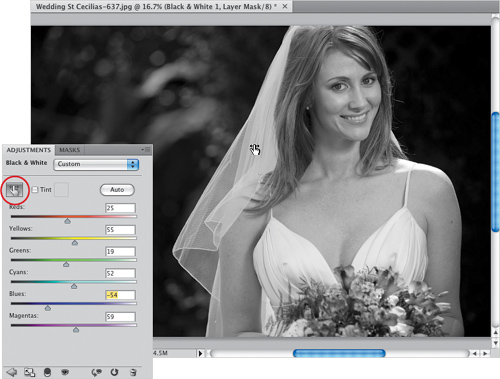
Step Five:
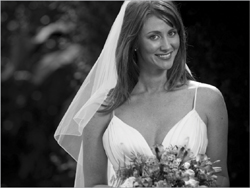
Since you’re now seeing the photo in black and white, it’s a little challenging figuring out which color slider will affect which area, and that’s one of the problems with the old Channel Mixer—it was somewhat of a guessing game. Just like with layer visibility, you could toggle the Preview checkbox on and off and peek at the color photo for a moment, so you could make an educated guess as to which color would adjust what. Thankfully, now there’s a better way, because the Black & White adjustment has a TAT (Targeted Adjustment Tool), just like Curves does. Click on the TAT (shown circled here) and move your cursor out over the area in your photo you want to adjust (as shown here on her veil). Now click-and-drag to the left to darken the area where you’re at, or click-and-drag to the right to lighten that area. Your cursor knows which colors are below it, and it moves just the color sliders that would affect that particular area. TATs are pretty slick.
Step Six:
So, that’s what you’ll do from here on out. If I use this Black & White adjustment, this is the way I work with it—using the TAT. The only difference is, once I see which slider is adjusting the colors where I clicked, I sometimes go over and manually drag that slider a little just to tweak it, as shown here. Also, sometimes you’ll drag left (or right), and the change will be very subtle. In those cases, I go straight to the slider itself and drag it all the way to the left, then back all the way to right. That way I can clearly see which areas in the photo are being adjusted, and whether it’s worth even bothering with. I think the photo looks better here, after dragging in different parts of it, and as you can see, some of the numbers add up to more than 100%. Yet, I’m still able to sleep at night.

Step Seven:
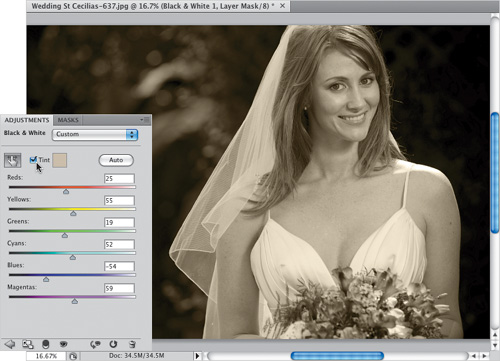
Another nice feature of the Black & White adjustment is that you can apply a tint for an instant duotone effect. Just turn on the Tint checkbox (to the right of the TAT), and it applies a tint to your photo—you choose your tint color by clicking on the little square color swatch to the right of the checkbox. (If you choose the Black & White adjustment found under the Image menu, under Adjustments, the Saturation amount is set pretty high, so just drag the Saturation slider to the left to reduce the amount of saturation until it looks about right.) So, although it’s not my favorite B&W conversion method, it does have its advantages over the old Channel Mixer technique. Lastly, there are a couple of one-click controls at the bottom of this panel: to delete this adjustment layer, click on the Trash icon; to reset it to its default settings, click on the circular arrow icon; to see a before/after, click on the eye icon; to see a before/after of just your last change, click-and-hold on the eye with the curved arrow icon.
Standard grayscale conversion
CS4’s Black & White conversion
Sometimes when you’re taking a shot, you’re thinking to yourself, “This would make a great black and white,” or maybe before you went shooting, you knew what you’d be shooting would make a great black and white. In those cases, I prefer to do my conversions right in Camera Raw (in fact, it’s one of my two favorite ways to go from color to black and white). Camera Raw has a version of the Black & White adjustment you just learned, but after I show you that, I’m going to show you a technique I like even better.
Step One:
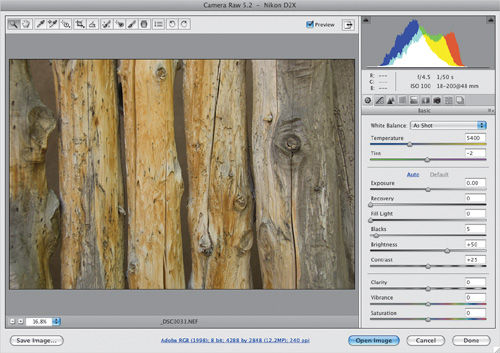
We’ll start with the color original image in Camera Raw (as seen here).
SCOTT KELBY
Step Two:
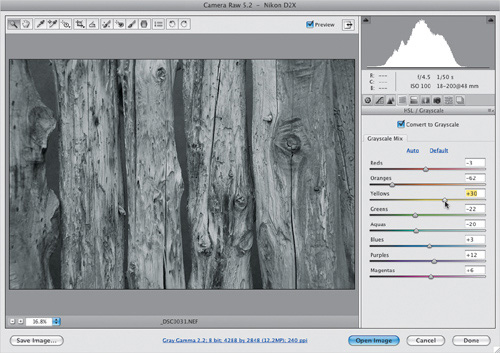
Converting from color to black and white is simple—just click on the HSL/Grayscale icon (it’s the fourth icon from the left) and then turn on the Convert to Grayscale checkbox at the top of the panel (as seen here). This brings up the Grayscale Mix options, which look pretty much like the Black & White adjustment options you just learned about on the previous pages, but with these two exceptions: (1) here there are two more sliders—Oranges and Purples; and (2) there’s no TAT (Targeted Adjustment Tool) in the panel, although you can use the TAT found in the toolbar up top while you’re in Grayscale Mix. Other than that, it’s pretty much the same idea. So, go ahead and turn on that Convert to Grayscale checkbox, and Camera Raw performs an Auto grayscale adjustment. It’s not terrible, but it usually looks a little flat to me (as you can see here).
Step Three:
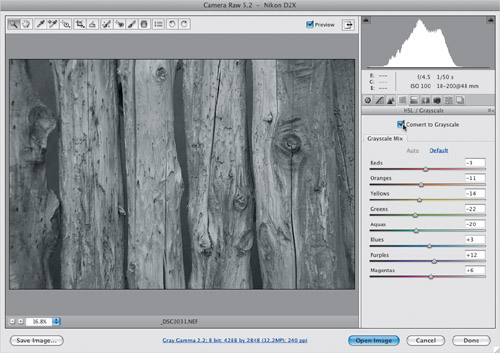
There’s also a Default button (it looks like a link, but it’s a button), just to the right of the Auto button (which looks like a link, too) and if you click on it, it sets all the Grayscale Mix sliders back to zero, which generally looks even worse (as seen here) than the Auto adjustment, so I don’t recommend it.

Step Four:
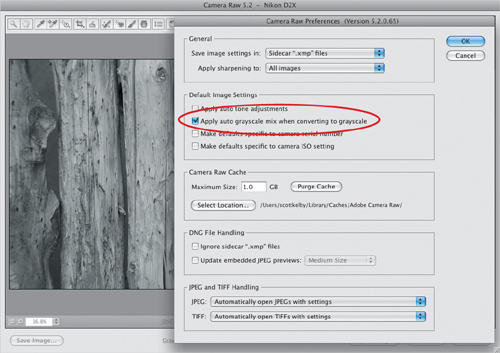
If, for some reason, you like this “zero’d out” look more than the Auto-adjusted look (hey, it’s possible), press Command-K (PC: Ctrl-K) to bring up Camera Raw’s Preferences dialog and turn off the checkbox for Apply Auto Grayscale Mix When Converting to Grayscale (the checkbox is shown turned on here, so you’d turn that checkbox off).
Step Five:
The color sliders in the Grayscale Mix panel are pretty much like the HSL sliders for adjusting color. The catch is you can’t see which colors you’re adjusting because the photo is already converted to black and white. So, what I do is press the letter P to toggle the Grayscale Mix Preview on/off. That way I can take a peek back at the original colors, and try to figure out which slider would adjust which parts of my image. If you’re not sure which slider does what, just drag any slider back and forth, and you’ll know pretty quickly what it affects (if anything). By now you’ve probably come to the same realization that I have, and that is the Grayscale Mix sliders alone aren’t enough to make a great B&W photo. You need to add some serious contrast, including pushing the highlights exposure and shadows to create a B&W photo with any decent depth.
Step Six:
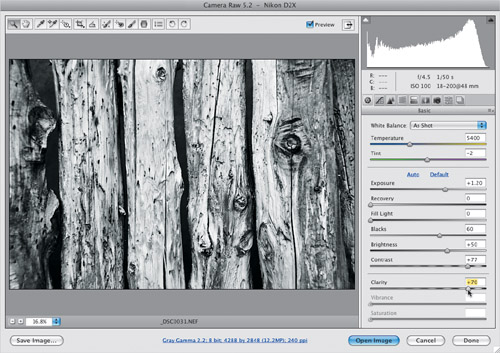
Because we need all that contrast and depth, I only use the Grayscale Mix panel for one thing—turning on the Convert to Grayscale checkbox—and I let the Auto setting be my starting place. So, go back to the Basic panel and adjust the photo like you would any other. Drag the Exposure slider to the right to increase the exposure in the highlights. If it starts to clip the highlights, drag the Recovery slider to the right to bring those clipped highlights back. Increase the Blacks to make the shadow areas nice and rich, and if part of it gets too dark, drag the Fill Light slider to the right to open up those areas. Here, I’ve increased the Exposure, Blacks, Contrast, and Clarity settings quite a bit to really create that high-contrast look.
Step Seven:
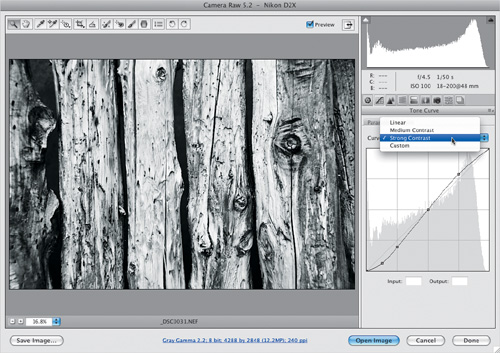
Of course, when it comes to adding contrast, nothing beats the Tone Curve. So click on the Tone Curve icon (second from the left), then click on the Point Curve tab, and choose Strong Contrast from the Curve pop-up menu (as shown here). In our example, I went with just the default Strong Contrast curve, but if you wanted to “juice” that curve and make it a little steeper (for more kick in your contrast), then click on the top-right point and nudge it upward using the Up Arrow key on your keyboard. Then click on the second point from the bottom left and nudge it downward using the Down Arrow key (again, I didn’t do that here, but...well...ya could).
Step Eight:
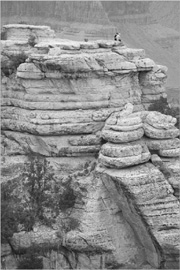
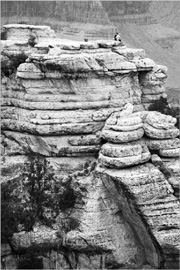
The before/after is shown below, with the Auto conversion on the left and our tweaked version on the right, which makes our case that we can’t rely on the Grayscale Mix panel alone to give us that rich B&W photo we’re hoping for.
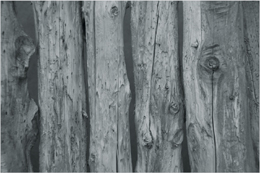
Before (the Auto grayscale conversion)
After (tweakin’ it a bit)
If there’s one dialog in Photoshop that scares the living daylights out of people, it’s the Calculations dialog. It’s got an awfully intimidating layout for a dialog that simply lets you combine two channels, but that’s part of the beauty of it—once you learn this technique, you can “name drop” it to impress other Photoshop users. Anyway, I like the Calculations conversion for three reasons: (1) it gives you an instant B&W just by choosing it, (2) you can choose your favorite variations, and (3) it’s where I go for tricky images that didn’t convert well using another method.
Step One:
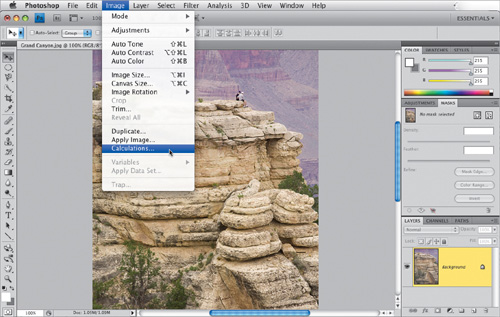
Open the color photo that you want to convert to black and white using Calculations. Go under the Image menu and choose Calculations (as shown here) to bring up the Calculations dialog. Basically, what you’re going to do here is choose the best two grayscale channels from your color photo, and use a blend mode to blend them together to create a high-contrast B&W image. For example, if you have one channel that looks too dark and one that looks too light, you can usually combine the two to create a B&W image with added depth.
SCOTT KELBY
Step Two:
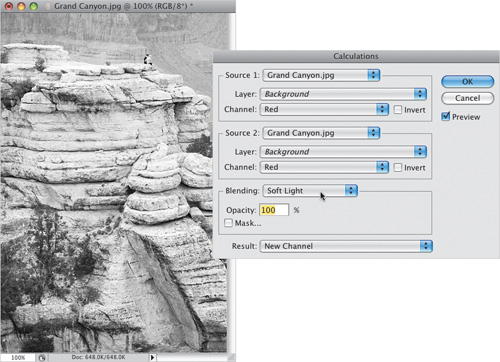
As soon as the Calculations dialog appears, it does a B&W conversion (as seen here). By default, it takes the Red channel (seen up top in the Source 1 section of the dialog), and combines it with a copy of the same Red channel (under Source 2). By default, it blends them using Multiply mode (in the Blending pop-up menu), but we need to use Soft Light as our blending mode (it’s more balanced than Multiply for this task), so change the Blending pop-up menu to Soft Light (as shown here). Now, your job is to look at four different channels and find out which two look best together.
Step Three:
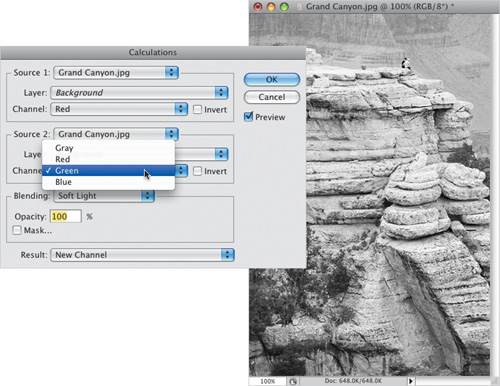
You’ve already seen what the Red channel and the Red channel look like blended together (that’s what you see when the Calculations dialog first appears). Now, let’s take a look at the second channel. Go to the Source 2 section, and choose Green from the Channel pop-up menu, as shown here, and see how that looks when paired with the Red channel from Source 1. If you think it’s perfect, you’re done—just click OK and then go under the Image menu, under Mode, and choose Grayscale. If not (personally, I think this combination still looks a little flat), then go on to Step Four and let’s try another look and see what you think.
Step Four:
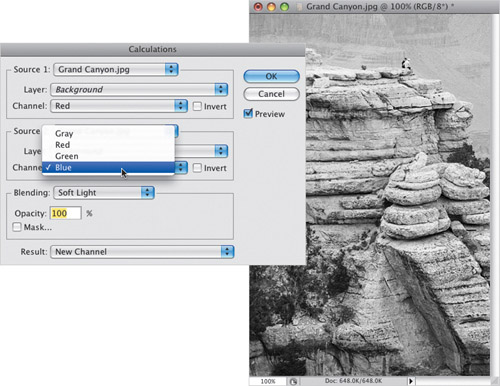
Now try the Blue channel (as shown here), and see how this pairing looks (the Red channel with the Blue channel). Again, what you’re doing here is just choosing a channel, sitting back and looking at it, and seeing if it looks better than what you tried in Step Three (using the Green channel—and I think it does look better). But we’re not out of choices yet.
Step Five:
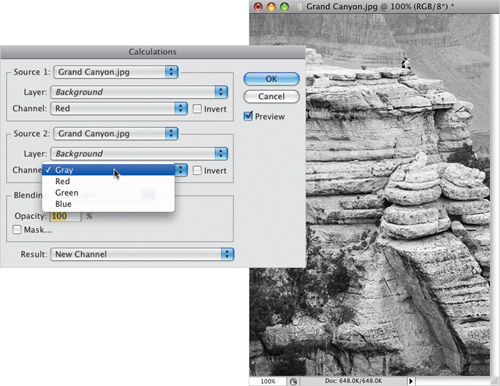
Your fourth choice is trying the Gray channel (as shown here), and seeing how that looks. Not too shabby, eh (this combination is the Red channel with the Gray channel combined)?
Step Six:
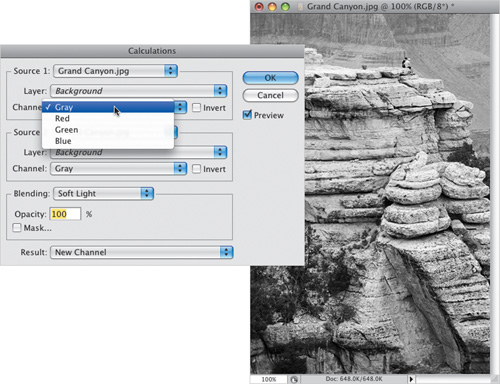
For most images, one of those four combinations is going to look best, and 99% of the time, I choose one of those four, hit the OK button, and then convert to Grayscale mode (as mentioned at the end of Step Three). But if you have one of those really stubborn images, you could try two last resorts: First, you could change the top channel (Source 1) and run through those channels. For example, you’ve tried the Red and the Gray in Step Five, right? How about blending the gray with itself (the Gray and the Gray, as shown here)? Or the Green with the Gray, or Blue with the Gray? You get the idea. But there’s one more thing you could also try.
Step Seven:
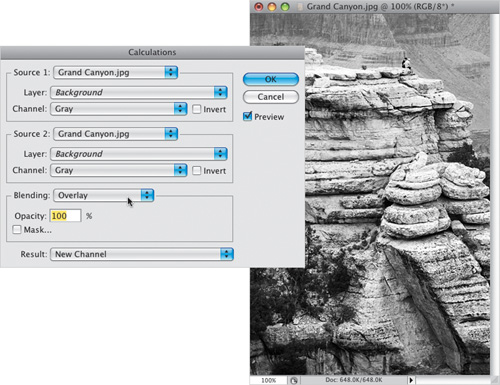
If you want your photo even darker and richer, in the Blending section, change the Blending from Soft Light (which is more subtle) to Overlay (as shown here, which is more intense). This makes everything...well...more intense. I usually try this first, before going through the different channel pairings like I showed you earlier, because it’s faster and easier (it’s just one simple change—from Soft Light to Overlay—and it either looks better or it doesn’t). Now, just to reiterate: 99% of the time, you won’t need Step Six—you’ll be done with Step Five (maybe sooner), so think of Step Six as your conversion of last resort. Below is the conversion using Gray and Gray, blended with Overlay mode.
Regular grayscale conversion
B&W conversion using Calculations
Some of the best techniques unfold when you least expect it, and this technique is a perfect example. I was working on a completely different technique when I stumbled upon this and I fell in love. It’s about the easiest, fastest, most predictable way to create stunning high-contrast B&W images. Plus, at the end I show you how you can get two different variations to choose from with just a few clicks each. Not bad, eh matey?
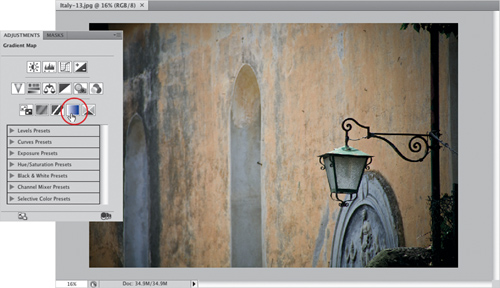
Step One:
Open the color photo you want to convert into a high-contrast B&W image You start by pressing the letter D to set your Foreground color to black, and then in the Adjustments panel, click on the Gradient Map icon (it looks like a horizontal gradient—it’s shown circled in red here).
SCOTT KELBY
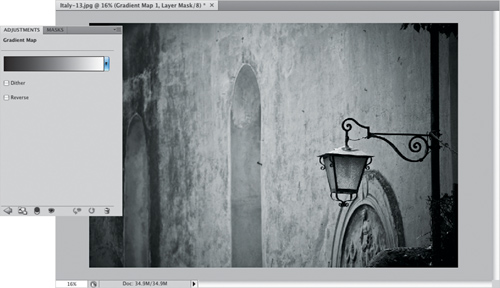
Step Two:
Once you click that button, you’re done! The Gradient Map options appear, but you don’t have to do anything. Not a bad B&W conversion, eh? Believe it or not, just the simple act of applying this black-to-white gradient map will almost always give you a much better conversion than choosing Grayscale from the Image menu’s Mode submenu, and I feel it’s generally even better than both the default and Auto settings of the Black & White adjustment layer technique you learned at the beginning of this chapter. Now, if I was going to nitpick this conversion, I’d like to see the edges a little darker. Easy enough.
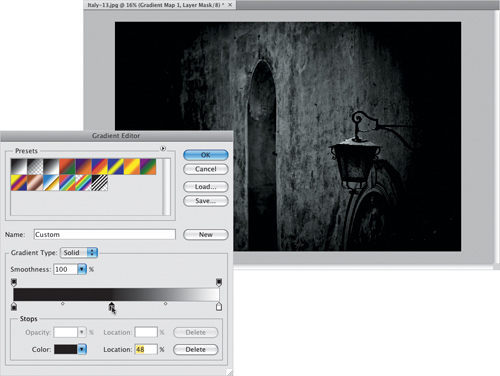
Step Three:
If you find a photo (like this one) where you want to tweak the conversion a little (like darkening the edges), then go to the Adjustments panel, and click directly on the gradient to bring up the Gradient Editor dialog. Once it appears, click once directly below the center of the gradient to add a color stop to your gradient (as shown here). The stop appears in the color black, so it’s going to greatly darken your photo, but you’ll fix that in the next step.
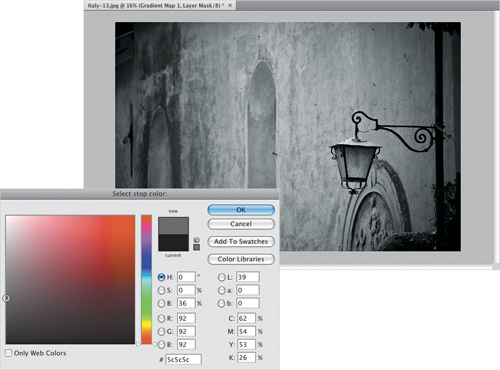
Step Four:
Double-click on that color stop you created and Photoshop’s Color Picker appears (seen here). All you have to do is click-and-drag your cursor all the way over to the left side of the Color Picker, right up against the edge (as shown here), and pick a gray color. As you slide up and down that left side, let go of the mouse button and look at your photo, and you’ll see the midtones changing as you drag. Once you find a spot that looks good (in our case, one where the center looks lighter), click OK to close the Color Picker (don’t close the Gradient Editor, though—just the Color Picker at this point—because there’s another tweak you can do. Of course, what we’ve done so far is probably all you’ll have to do, but since there is something else you can do, I at least want to show you, but know that this next step usually isn’t necessary).
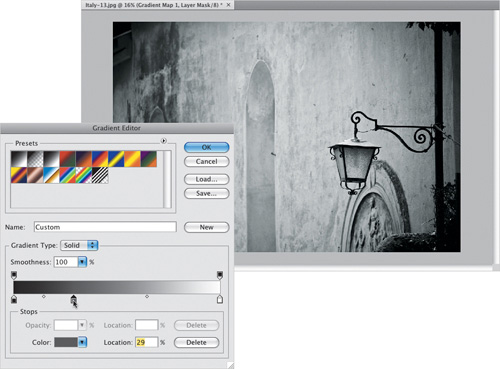
Step Five:
Once you’re back at the Gradient Editor, and your color stop is now gray, you can drag that middle gray stop around to adjust the tone of your image (as shown here). What’s weird is you drag the opposite way that the gradient shows. For example, to darken the photo, you drag to the right, toward the white end of the gradient, and to lighten the photo, you drag left toward the dark end. Freaky, I know. One other thing: unlike almost every other slider in all of Photoshop, as you drag that color stop, you do not get a live preview of what’s happening—you have to release the mouse button and then it shows you the results of your dragging. Click OK, and you’re done.
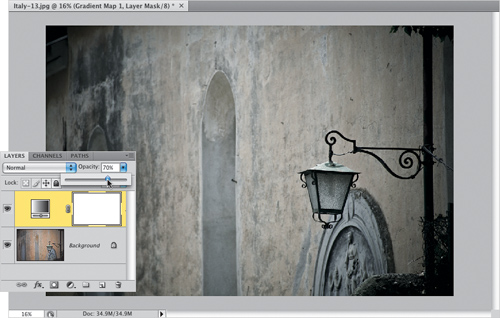
Step Six:
Here’s one of the two variations I talked about in the introduction for this technique: just go to the Layers panel and lower the Opacity of your Gradient Map adjustment layer to 70% (as shown here). This bleeds back in a little of the color, and gives a really nice subtle “wash” effect (compare this slightly-colored photo with the full-color photo in Step One, and you’ll see what I mean. It’s kinda nice, isn’t it?). Okay, now raise it back up to 100% for the second variation, which is also a second version of your B&W conversion.
Step Seven:
For this version, go to the Layers panel and click on the Background layer, which is still in color. If you remove the color from that Background layer, you’d get a somewhat different conversion, right? Right! So, once you’ve clicked on the Background layer, press Command-Shift-U (PC: Ctrl-Shift-U), which is the shortcut for the Desaturate command (it’s found under the Image menu, under Adjustments). This removes the color and gives you a different look (although the change is fairly subtle with this photo, with some photos it’s pretty dramatic—it just depends on the photo). But, either way, wouldn’t you rather choose between two B&W conversions and then pick your favorite? If you don’t like this other look, just press Command-Z (PC: Ctrl-Z) to Undo it.
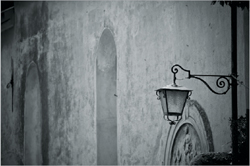
Regular grayscale conversion
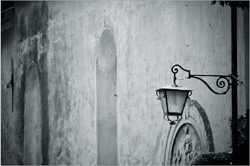
Scott’s high-contrast B&W conversion