At some point in all of this, you’re eventually going to want to show your client, or more likely a potential client, samples (or even finished products) of your work. Make sure you work on this part of the process long before your client is within 100 miles of your studio because (and this is a little-known fact), hard wired into your color inkjet printer is a small integrated chip that actually senses fear. That’s right—if you’re on a tight deadline, and you have to get your samples out of the printer right before your client arrives, the tiny electrodes in the chip sense your fear, and as a defense mech anism it releases millions of tiny silicon wafers into your printer’s USB port, which causes your printer to basically go into sort of a prolonged hibernation mode which makes it just sit there and quietly hum. This auto-sleep or shut down mode is called “mocking mode” and is the digital equivalent of a small child giving you a raspberry. The more freaked out or rushed you get, the more of those tiny silicon wafers it releases, and the sleepier your printer becomes, until it gets to the point that it has the operating functionality of a block of cheese. Now, you can fool your printer into printing again, but it’s not easy. First, you have to continue to act freaked out, but when the printer’s not paying attention you sneak out of the room and use your cell phone to call the studio phone nearest the printer. Once it starts ringing, you rush into the studio, and looking exasperated, you grab the phone and pretend it’s the client on the line, and they’re calling to cancel today’s appointment. When your printer hears this (and trust me, this is true), it will instantly start outputting your prints. Try this—it works every time.
This technique uses both Bridge and Photoshop CS4. We use Bridge’s built-in Contact Sheet feature, but we’re going to tweak the size and layout, so it makes a poster design, instead. First, we’re going to do a little Photoshop work, then we’ll go to Bridge, and then we’ll finish up the final poster back in Photoshop. It sounds like a lot of work, but believe me, Photoshop does all the hard stuff itself—the rest is easy.
Step One:
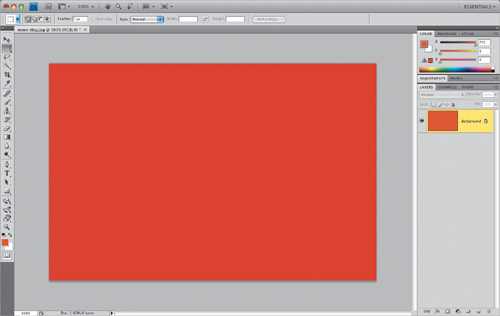
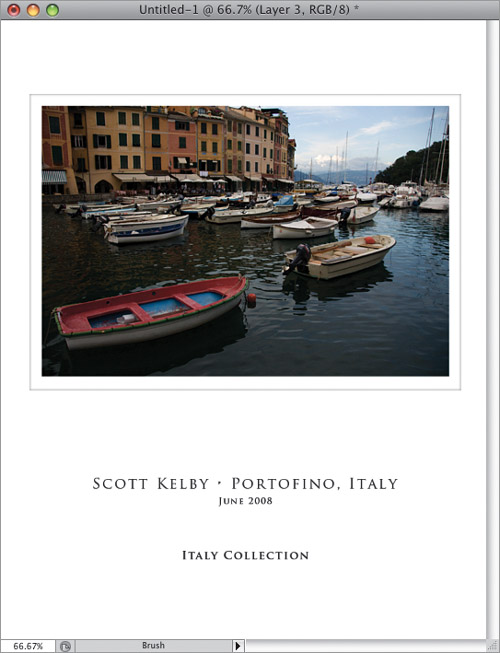
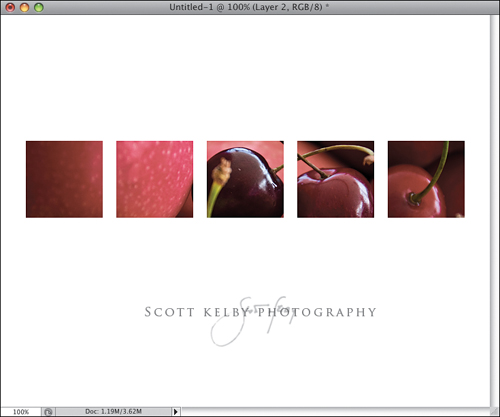
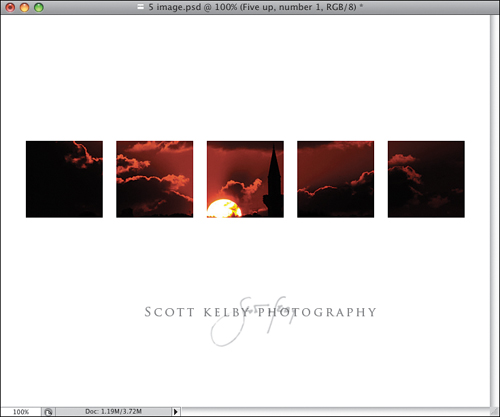
We’ll start in Photoshop by making a name slug (a small graphic with the name of our poster, which goes in the bottom-right corner of it), so open a horizontal photo (it doesn’t matter which photo—just a wide one that’s the same size as the rest of the wide photos from your camera). Click on the Foreground color swatch in the Toolbox and, from the Color Picker, choose a color that goes well with the photos you’re going to use in your poster, then press Option-Delete (PC: Alt-Backspace) to fill your Background layer with this color.
Step Two:
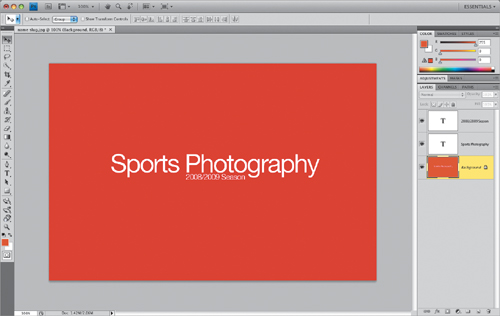
Get the Type tool (T) from the Toolbox, choose a font from the Font pop-up menu in the Options Bar (I chose Helvetica), then click on the color swatch (also in the Options Bar) and choose a text color from the Color Picker. Type in the name of your poster. Here, I’m using sports photos, so I typed in “Sports Photography,” and then I made a separate type layer (by clicking on the Create a New Layer icon at the bottom of the Layers panel) and added “2008/2009 Season” in a smaller font. Then I switched to the Move tool (V) and tucked that smaller type right up under the larger type. Now press Command-Shift-E (PC: Ctrl-Shift-E) to merge all your visible layers down to just the Background layer.
Step Three:
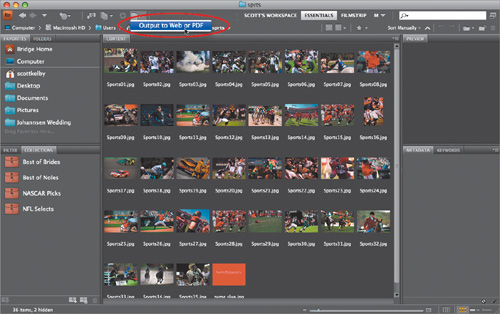
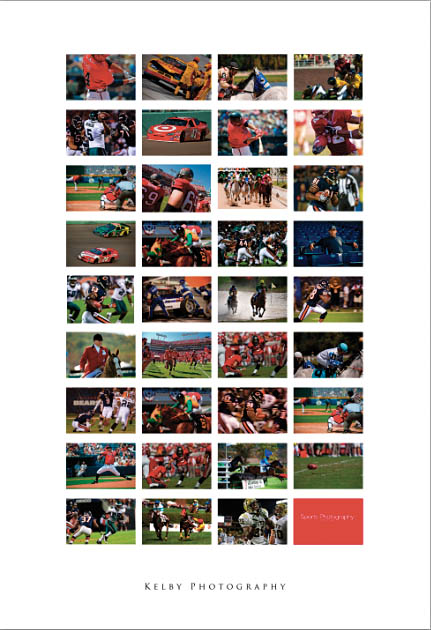
Now save this file as a JPEG into the same folder where the photos you want to make into a poster are located. (Note: This effect works best if you use either all horizontal or all vertical photos. In our case, I put 35 horizontal photos, and that one name slug we just created, into the same folder.) Now, open Bridge CS4 and locate that folder of images on your computer (as shown here). In Bridge’s thumbnail window, click-and-drag the name slug, so it’s the last image in the window (as seen here). Then up at the top of the window, choose Output to Web or PDF from the Output pop-up menu (as shown here).
SCOTT KELBY
Step Four:
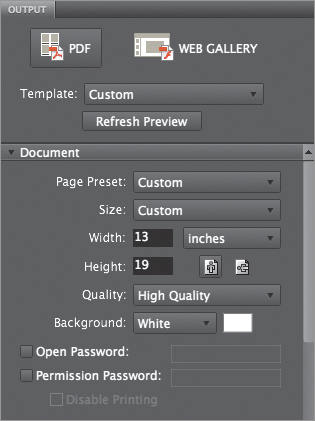
When you choose Output to Web or PDF, the Output panel you see here appears on the right side of the window. Click on the PDF icon to show the PDF controls (we normally use this to create contact sheets, but like I said in the intro, we’re gonna tweak that a bit). In the Document section, enter the largest size your printer will allow (I use an Epson Stylus Photo R2880, which makes up to 13×19″ prints, so for Width I entered 13, for Height 19, and I chose Inches from the pop-up menu to the right). You can leave the rest at the default settings of High Quality, a White Background, and we’ll ignore the password stuff altogether, because we’re making this PDF for ourselves, not to send to a client.
Step Five:
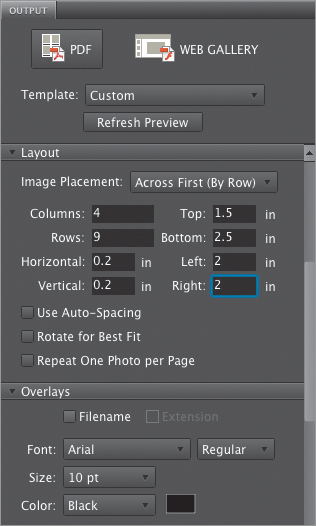
Scroll down further in the Output panel to the Layout section (seen here). You’ll need to enter these figures to set up our 36-image poster (which is four columns wide by nine columns deep): For Columns, enter 4; for Rows, enter 9 (you can move from field to field by pressing the Tab key on your keyboard); for Horizontal spacing, enter 0.2 inches; and enter the same for the Vertical spacing. For the Top margin, enter 1.5 inches; for the Bottom margin, enter 2.5 inches; and for the Left and Right margins, enter 2 inches (as shown here). Also, scroll down to the Overlays section and turn off the checkbox for Filename, or each image’s name will appear below the photo (filenames are fine for regular contact sheets, but not for poster layouts like this).
Step Six:
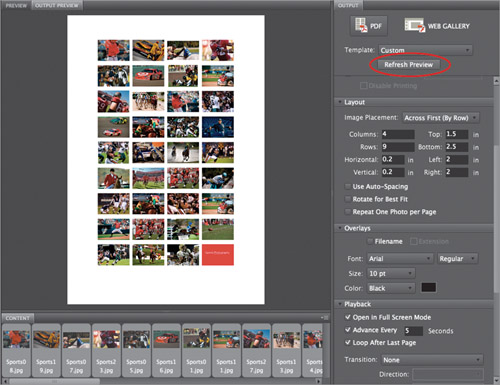
Now press Command-A (PC: Ctrl-A) to select all the images in your folder, then click the Refresh Preview button at the top of the Output panel (shown circled here in red), and it creates a preview of your poster layout (as seen here). This particular 4×9 grid seems to work really well, but if you want to experiment with other grid layouts, just remember that each time you change the settings in the Layout section, you have to go up and click the Refresh Preview button (I know, it’s a pain, but things like the Refresh Preview button are there to remind us daily that we’re not living in a perfect world, or not even one that has live previews. Ah, but one can dream, can’t one? I digress).
Step Seven:
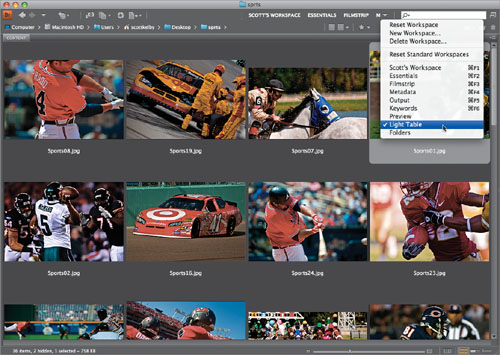
If you don’t like the order your photos appear in your poster layout, I recommend going up to the Workspace pop-up menu (click on the little down-facing triangle to the left of the Search field) and choosing the Light Table workspace, which hides just about everything but your thumbnails (as seen here). Now, press Command-Shift-A (PC: Ctrl-Shift-A) to Deselect all your photos. You can use the Thumbnail Size slider at the bottom-right corner to make your thumbnails large enough so there’s just four across, which will give you nine rows of thumbnails—just like the poster. Now, just drag-and-drop them into the order you’d like them to appear in your poster (the first photo in the upper left will be the first photo, the next photo will be second, and so on), and when they’re in the order you want, choose Output to PDF or Web from the Output pop-up menu up top (again). Also, don’t forget to select all your images and click the Refresh Preview button once again (Arrrggg!) to see how your final changes look.
Step Eight:
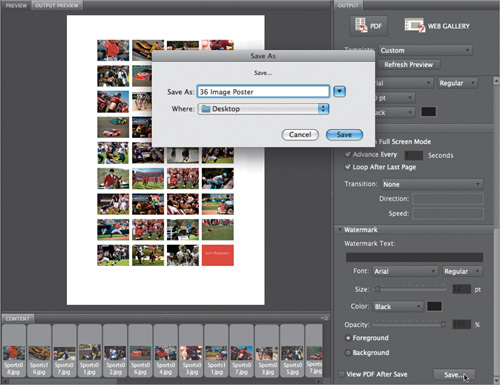
When it all looks the way you want it to, first press Command-A (PC: Ctrl-A) to select all the photos, then scroll all the way down to the bottom of the Output panel, to the Watermark section. You’re not going to add watermark text, but at the bottom of this section is the Save button, which creates the PDF and saves it, so you can open it in Photoshop. Click the Save button (as shown here) to bring up the Save As dialog, give your poster a name, and then click the Save button in that dialog. Now, we’ll finish things off in Photoshop CS4.
Step Nine:
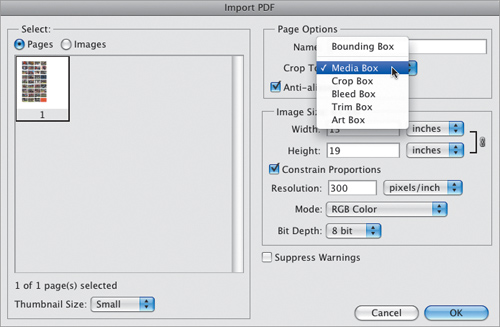
You bring your PDF into Photoshop like you would any other image: just go under the File menu, choose Open, and find the PDF on your computer. Once you do that, the Import PDF dialog (seen here) will appear. There’s only one thing you need to do here, and that’s make sure that your PDF comes in at the right size by choosing Media Box from the Crop To pop-up menu (as shown here). The default Crop To setting is Bounding Box, which crops in tight right around your photos, and because of that, it won’t be 13×19″ any longer, but choosing Media Box keeps the original size in place. Now just click OK to import the PDF into Photoshop (from here on out, it will act just like a regular image).
Step 10:
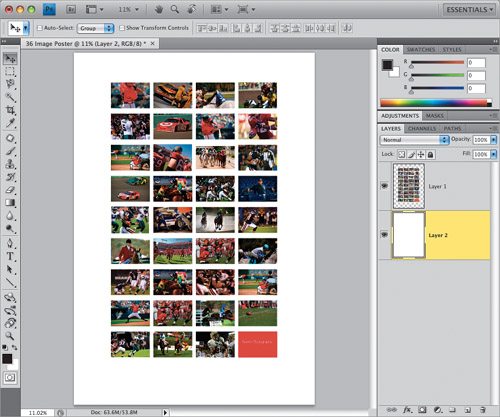
When your PDF appears, it appears on its own layer, with no Background layer, so everything surrounding the photos is transparent. To add a white background behind your photos, just press-and-hold the Command (PC: Ctrl) key, and click on the Create a New Layer icon at the bottom of the Layers panel (holding the Command key puts the new layer directly beneath your current layer, as seen here). To fill that layer with white, press the letter D, then press X (which makes white your Foreground color), and then press Option-Delete (PC: Alt-Backspace) to fill this layer with white. Now that we have our images on one layer, and a totally separate background layer, we have a lot of flexibility for how to customize this look. For example, one thing you can do is add a stroke around your photos (something you couldn’t do in Bridge).
Step 11:
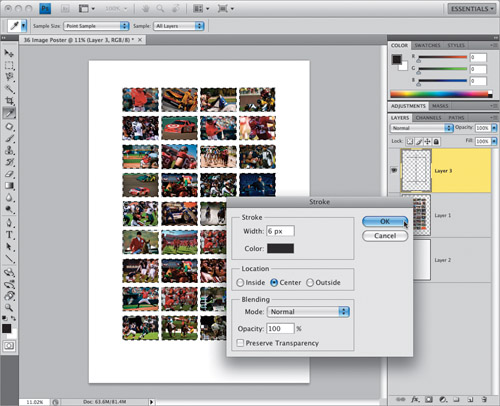
Click on the Create a New Layer icon again to add a new blank layer and then click-and-drag it to the top of the layer stack. Press-and-hold the Command (PC: Ctrl) key and click on the images layer’s thumbnail to put a selection around each photo. Go under the Edit menu, choose Stroke, then choose the width and color of your stroke (I chose 6 pixels and black), and click OK. Press Command-D (PC: Ctrl-D) to Deselect. Lastly, get the Type tool (T) and add some text in the white space below the images (as seen below on the left, where the stroke layer is hidden). The center image below has the bottom layer filled with black and the stroke layer in white (select the stroke layer and press Command-I [PC: Ctrl-I] to Invert it). The bottom-right image has the bottom layer filled with light gray, and a black stroke around the images.
The original layout, with the black stroke layer turned off, and some text added
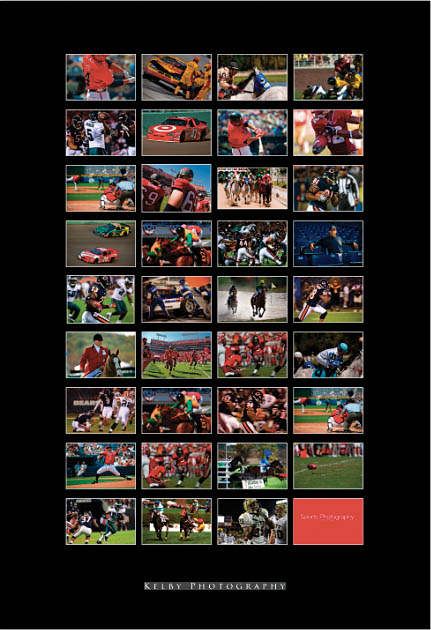
The background layer filled with black, and the stroke and text layers in white
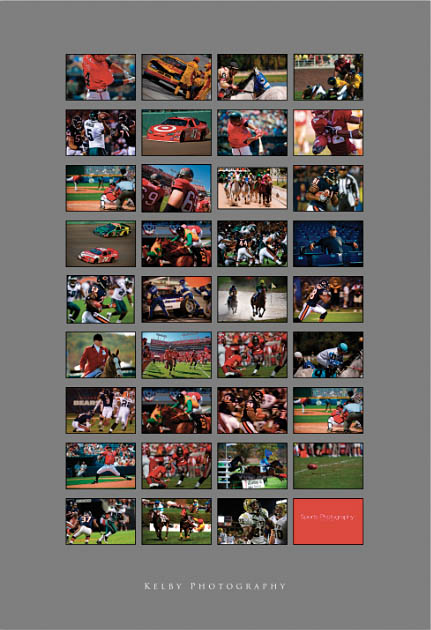
The background layer filled with light gray, the stroke layer in black, and text layer in white
This two-part technique is particularly important if you’re putting your proofs on the Web for client approval. In the first part of this technique, you’ll add a see-through watermark so you can post larger proofs without fear of the client downloading and printing them; and second, you’ll embed your personal copyright info, so if your photos are used anywhere on the Web, your copyright info will go right along with the file.
Step One:
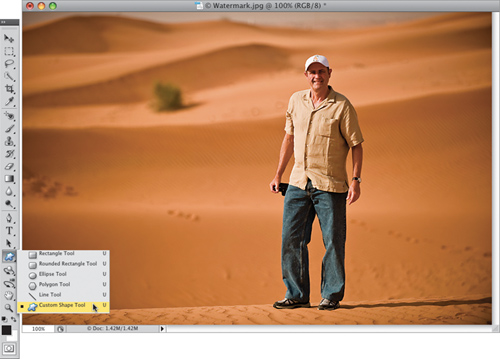
Open the photo you want to add your copyright watermark to, then get the Custom Shape tool from the Toolbox (as shown here), or just press Shift-U until you have the tool (it looks like a star with rounded corners).
SCOTT KELBY
Step Two:
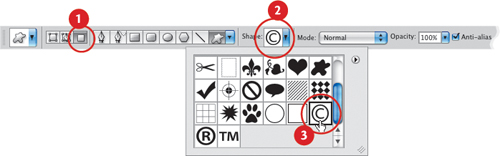
Once you have the Custom Shape tool, go up to the Options Bar and (1) click on the Fill Pixels icon (the third from the left), which makes your shape up of pixels (like normal), rather than as a Shape layer or path. Then, (2) click on the thumbnail to the right of the word “Shape” to bring up the Custom Shape Picker. When it pops down, (3) choose the copyright symbol, which is included in the default set of custom shapes (as shown here).
Step Three:
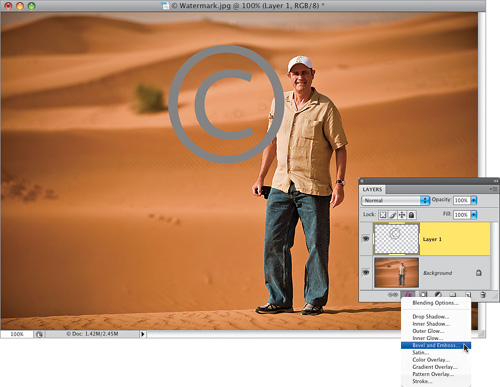
Create a new blank layer by clicking on the Create a New Layer icon at the bottom of the Layers panel. Click on the Foreground color swatch at the bottom of the Toolbox, and choose a light gray in the Color Picker for your Foreground color. Then, press-and-hold the Shift key (to keep things proportional), take your Custom Shape tool, and click-and-drag just above the center of your photo to add a large copyright symbol shape (seen here). Once it’s drawn, click on the Add a Layer Style icon at the bottom of the Layers panel, and choose Bevel and Emboss from the pop-up menu (as shown here).
Step Four:
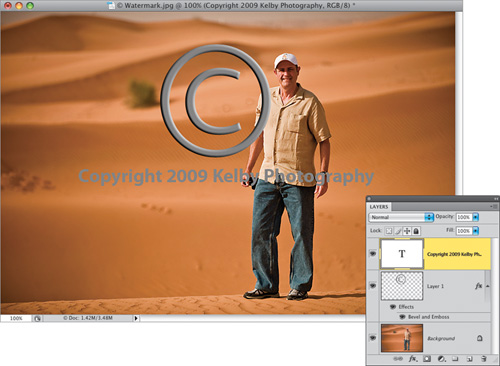
When the Layer Style dialog appears, you don’t have to change any settings—just click OK to apply a beveled effect to your copyright symbol (seen here). Now, get the Type tool (T), make sure your Text color swatch in the Options Bar matches your Foreground color, type in “Copyright,” followed by the current year, and lastly the name of your studio, then position it under the copyright symbol (as shown here).
Step Five:
Now you’re going to duplicate your Bevel and Emboss layer style and apply it to your new Type layer. To do that, just press-and-hold the Option (PC: Alt) key, and in the Layers panel click directly on the word “Effects” on your copyright symbol layer, and drag-and-drop it onto your Type layer (as shown here). Holding that Option key down tells Photoshop CS4 to duplicate the effect. If you didn’t hold the Option key, it wouldn’t duplicate the effect on that layer—instead it would actually move it to that layer.
Step Six:
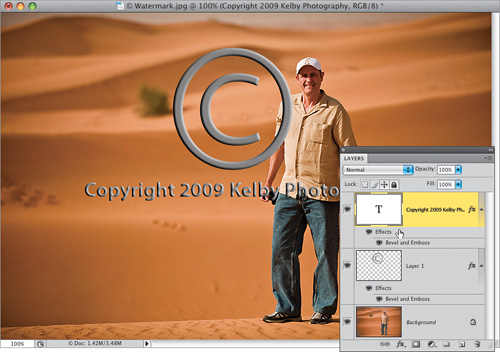
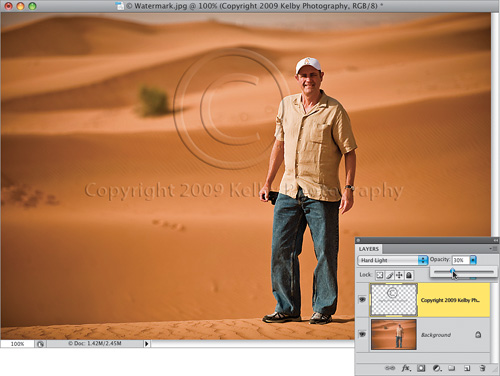
Go to the Layers panel, press-and-hold the Command (PC: Ctrl) key, and click on the top two layers to select them. Once they’re both selected, press Command-E (PC: Ctrl-E) to merge these two layers into one single layer (don’t worry—they will maintain the embossed effect look). Now, change the layer blend mode of this merged symbol layer from Normal to Hard Light (as shown here), which makes the watermark transparent. You can lower the Opacity of this layer enough to where your clients can easily evaluate the photo, but there’s enough watermark visible to keep them from using it as their final print (in the example shown here, I lowered the Opacity to 30%).
Step Seven:
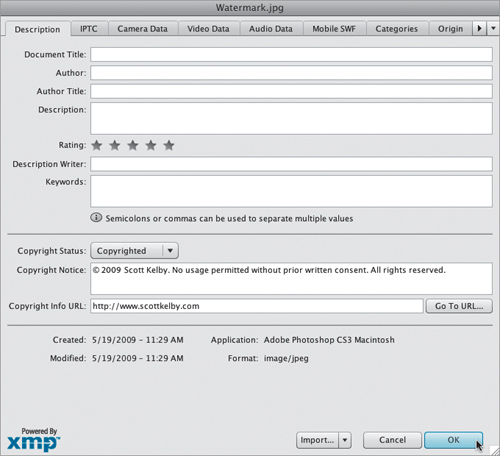
Now that the watermarking is complete, let’s embed your copyright info into the file itself. Go under the File menu and choose File Info to bring up the File Info dialog (seen here). At the top, click on the Description tab (if it doesn’t come up by default). In the center section, choose Copyrighted from the Copyright Status pop-up menu. In the Copyright Notice field, enter your personal copyright info, and then under Copyright Info URL, enter your full Web address (so if someone downloads your photo and opens it in Photoshop, they can click on the Go To URL button to go directly to your website). Lastly, click OK and this info is embedded into the file.
Step Eight:
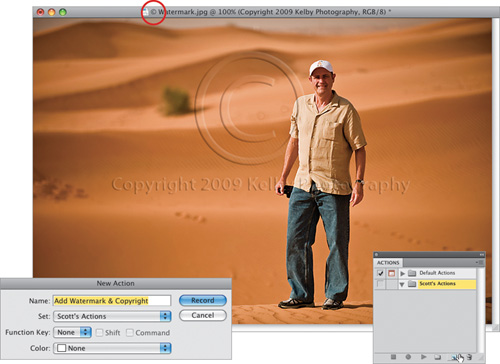
When you click OK, Photoshop automatically adds a copyright symbol before your file’s name in the title bar (shown circled in red here). Flatten your image by choosing Flatten Image from the Layers panel’s flyout menu. Now you’re going to create an action to automate this entire process. Start by opening a different photo, then go to the Actions panel (found under the Window menu) and click on the Create New Action icon at the bottom of the panel. When the dialog appears, name your action (as shown here) and click the Record button.
Step Nine:
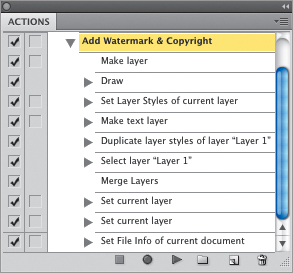
Now repeat the whole process of adding the copyright symbol and copyright info (Photoshop will record all your steps as you’re doing them, as seen here in the Actions panel). Start at Step One and stop after Step Seven (you stop after Step Seven, before flattening your file, because you may want to keep your layers intact so you can reposition your watermark, depending on the image).
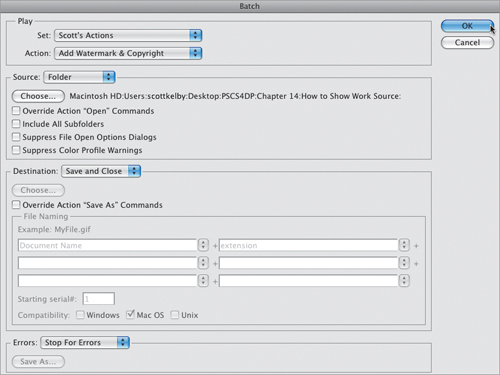
Step 10:
When you’re done, click on the Stop icon (it looks like a tiny square) at the bottom left of the Actions panel. Here’s where it gets fun: you can apply this action to an entire folder full of photos. Go under the File menu, under Automate, and choose Batch. In the Play section, choose your action set and new watermark action from the pop-up menus. Under Source, choose Folder, then click the Choose button, navigate to your folder full of photos, and under Destination choose Save and Close. (If you want to save your watermarked photos to a different folder, choose Folder under the Destination section, click the Choose button, and navigate to the folder you want to save them to. You’ll also need to add either a Flatten Image step or a Save and a Close step to your action.) Now, click OK and your watermark and copyright will be added to each photo in that folder automatically.
Artists always sign their work, and if you’d like to have your own signature so handy that you can add it to any finished piece with just one click, then you’ll want to turn your signature into a brush. That way, you just grab the Brush tool, choose your signature brush, click once, and it’s there.
Step One:
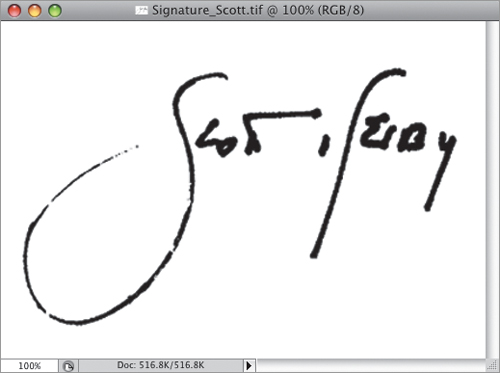
The first step to all this is getting your signature into Photoshop CS4. There are basically two ways: (1) take a nice black writing pen, sign your name fairly large on a piece of paper, and then scan your signature (which is what I did here); or (2) if you have a Wacom tablet with its wireless pen, just open a new document (at a resolution of 300 ppi), press D to set your Foreground color to black, get the Brush tool (B), then choose a small, hard-edged brush from the Brush Picker, and sign your name at a fairly large size.
Step Two:
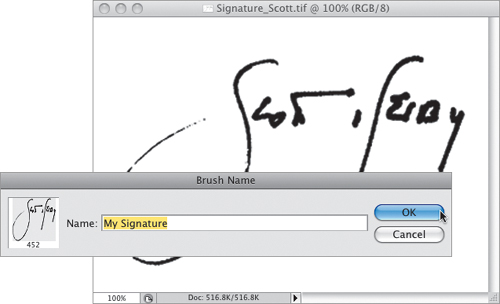
Now go under the Edit menu and choose Define Brush Preset. This brings up the Brush Name dialog (shown here), where you give your new signature brush a name (I named mine “My Signature,” which is another carefully thought-out, highly original name) and click OK (as shown here). That’s all there is to creating your signature brush, and the nice thing is—you only have to do this once—it’s saved into Photoshop’s Brush Presets for use in the future. Now let’s put this new signature brush to use.
Step Three:
When you want to apply your signature to a photo, open that photo, get the Brush tool (B), Control-click (PC: Right-click) anywhere inside your image area, and the Brush Picker will appear right at the location of your cursor (as seen here). The new signature brush you just created in Step Two will appear as the last brush in the list of brushes, so scroll all the way down to the bottom, and click on that very last brush (you’ll see a tiny version of your signature as the brush’s thumbnail).
SCOTT KELBY
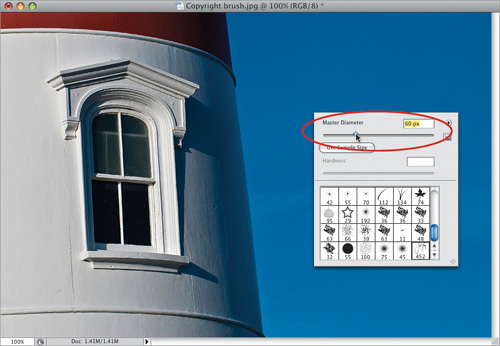
Step Four:
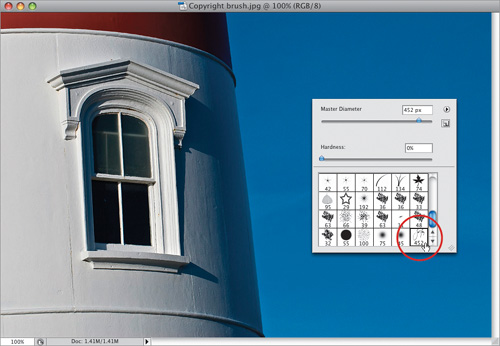
By default, the brush will be the size it was when you created your Brush Preset, so if you need to change the size of your brush, just drag the Master Diameter slider at the top of the Brush Picker (shown circled here in red). In my case, I needed to drag that slider to the left to make the brush much smaller, because if you look directly under the thumbnail, it shows your brush’s size in pixels, and mine was 452 pixels. Kinda big, don’tcha think?
Step Five:
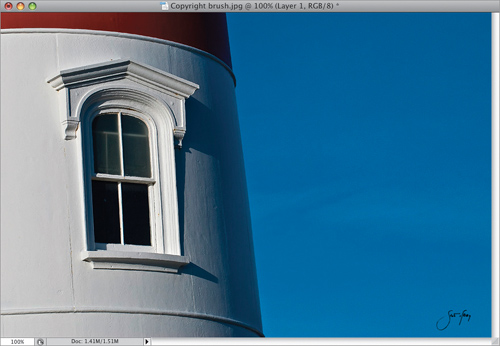
Now that you’ve got your signature brush, and have adjusted the size, go to the Layers panel and click on the Create a New Layer icon at the bottom. Then, take the brush and simply click once where you want the signature to appear (as shown here, where I clicked in the bottom-right corner). If your photo has a dark background, just change your Foreground color to something that can easily be seen on a dark background (like white).
In Photoshop CS4, Adobe kind of “trimmed the fat” and got rid of some plug-in filters, automations, and presets it felt really didn’t need to be there. However, apparently some users didn’t agree (I, for one, was shocked to learn that they removed the Extract filter from CS4), so Adobe went and made these “legacy” plug-ins and presets available for free download from Adobe.com. All you have to do is download them and install them. Sounds like fun, eh? Luckily, it’s easier than it sounds, and here’s how it’s done:
Step One:
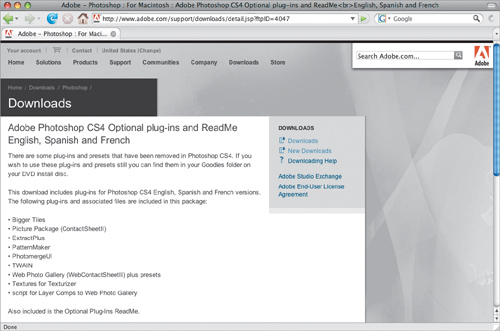
Go to www.adobe.com, and in the search field at the top right, type in “CS4 Optional plug-ins,” and it will take you to a page where you can download these plug-ins for Macintosh and Windows. Click the Proceed to Download button, and then click on the Download Now button to download the plug-ins, presets, and the installer.
Step Two:
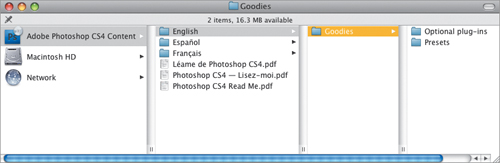
Once it downloads, double-click on the downloaded file, and you’ll find a Goodies folder inside with all the various stuff Adobe took out of CS4, separated by category (Optional Plug-ins and Presets).
Step Three:
There are ReadMe files included in most of the folders, which show the exact path of where each individual item gets installed in Photoshop (it’s a drag-and-drop process), and it’s really pretty easy. Since each one is different, I won’t list them all here, but I’ll give you an example: To get Picture Package back on the Mac, just go to your Mac’s Applications folder, where you’ll find your Adobe Photoshop CS4 folder. Look inside that and you’ll find a Plug-ins folder, and inside that an Automate folder. Now just drag-and-drop the ContactSheetII.plugin file (found in the Optional Plug-ins folder, then inside the Automate folder) into that Automate folder. Next, go to your Users folder, then your Home folder, then your Library folder. Inside there, go to the Application Support folder, then the Adobe folder, and then the Adobe Photoshop CS4 folder. Now drag-and-drop the Layouts folder (found inside the Presets folder, inside the Goodies folder) into your Adobe Photoshop CS4 folder’s Presets folder (whew!). Restart Photoshop, and Picture Package (along with Contact Sheet II) will appear back under the File menu, under Automate. On a PC, you’ll drag-and-drop that same ContactSheetII.plugin file (in the Goodies folder, open the Optional Plug-ins Folder, choose the 32-bit or 64-bit Plug-ins folder, then look in the Automate folder) into the Adobe Photoshop CS4/Plug-ins/Automate folder on your computer (found under C://Program Files/Adobe). Then, you’ll need to drag-and-drop the Goodies/Presets/Layouts folder into your Adobe Photoshop CS4/Presets folders (in the same place as the Plug-ins folder) on your computer, and restart Photoshop.
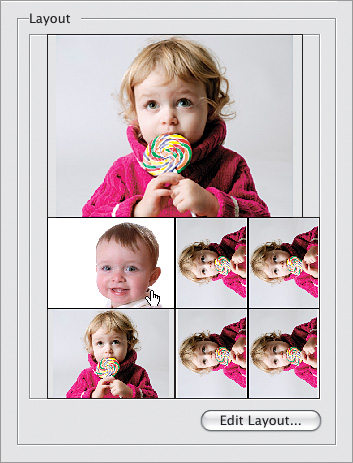
When it’s time to deliver final prints to your client, you can save a lot of time and money by creating a Picture Package, which lets you gang-print common final sizes together on one sheet. Luckily, Photoshop does all the work for you. All you have to do is open the photo you want gang-printed and then Photoshop will take it from there, except the manual cutting of the final print, which is actually beyond Photoshop’s capabilities. So far. Note: You’ll need to read the previous tutorial on how to get Picture Package back in CS4 first.
Step One:
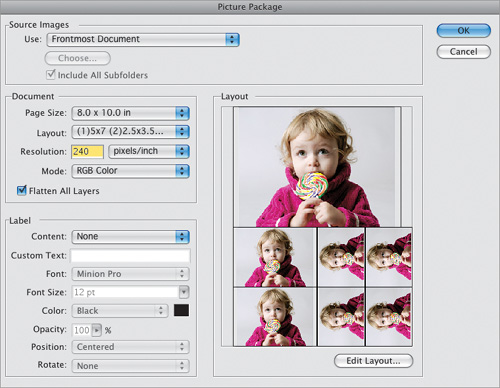
Open the photo you want to appear in a variety of sizes on one page, and then go under the File menu, under Automate, and choose Picture Package. (You can also choose Picture Package from Bridge CS4, under the Tools menu, under Photoshop, if you’ve downloaded Picture Package into Bridge CS4, as well.) At the top of the dialog, the Source Images section is where you choose your source photo. By default, if you have a photo open, Photo shop assumes that’s the one you want to use (your Frontmost Document), but you can choose from the Use pop-up menu to pick photos in a folder or an individual file on your drive. By default, Picture Package chooses an 8×10″ page size for you, but you can also choose either a 10×16″ or 11×17″ page size.

©ISTOCKPHOTO/KATI NEUDERT
Step Two:
You choose the sizes and layout for your Picture Package from the Layout pop-up menu. In this example, I chose (1) 5×7 (2) 2.5×3.5 (4) 2×2.5, but you can choose any combination you like. When you choose a layout, a large preview of that layout appears in the right section of the dialog.
Step Three:
You can also choose the final resolution output in the Resolution field (which I lowered to 240 ppi here, because you don’t really need a high resolution when you’re not printing to a commercial press). Then, you can pick the color mode you’d like for your final output (in this case, I chose RGB Color in the Mode pop-up menu, because I’ll be printing to a color inkjet printer). The bottom-left section of the dialog is for labeling your photos, but be forewarned—these labels appear printed right across your photos, so use them only if you’re creating client proof sheets, not the final prints. Note: With the exception of adding your own custom text, this information is pulled from embedded info you enter in the File Info dialog, found under the File menu.
Step Four:
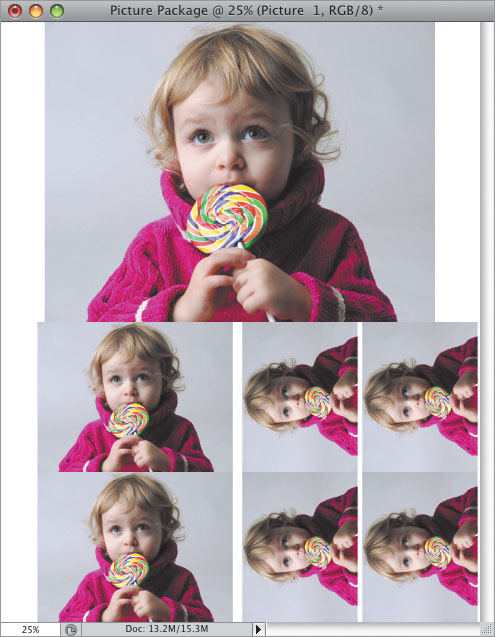
Click OK and Photoshop automatically resizes, rotates, and compiles your photos into one document (as shown here). Now, it’s not letter-sized—it’s 8×10″, so if you print this on letter-sized photo paper (which is very common), you’ll have a little more white border all the way around.
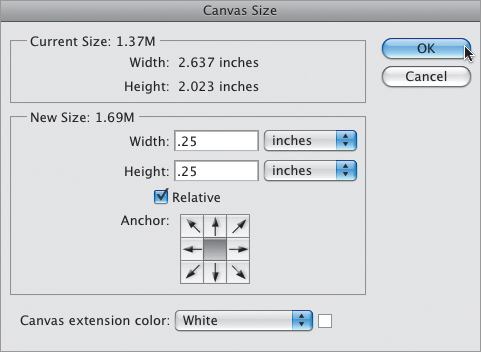
If you want to add a white border around each photo (including the wallet-size photos), then before you open Picture Package, go under the Image menu and choose Canvas Size. Make sure the Relative checkbox is turned on and enter the amount of white border you’d like in the Width and Height fields (i.e., 0.25 inches for a quarter-inch border). Now, make sure your Canvas Extension Color is set to white (at the bottom of the dialog). When you click OK in the Canvas Size dialog, a white border will appear around your photo. Now you can choose Picture Package.
Step Five:
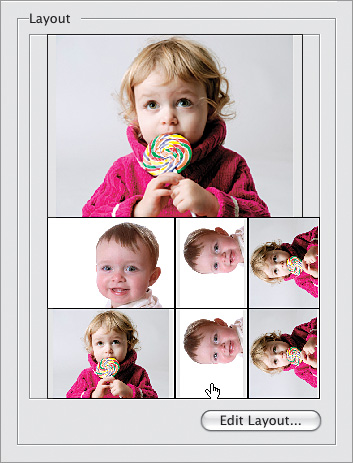
Another nice feature of Picture Package is that you can have two or more different photos on the same Picture Package page (say that three times fast). For example, to change just one of the 2.5×3.5″ prints to a different photo, click on the preview of the image that you want to change in the Layout section (as shown here, where I’m clicking on the top one of the 2.5×3.5″ photos).
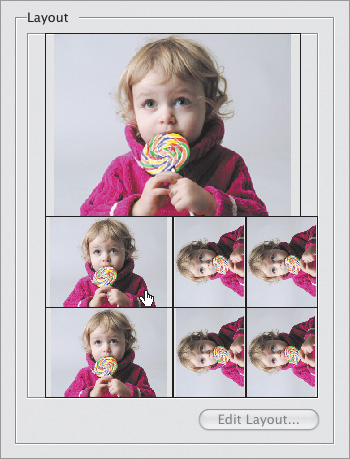
Step Six:
This brings up the standard Open dialog so you can select a photo to replace the one you clicked on. Navigate your way to the photo you want to appear at this size and location on your printed sheet, and click Open. That photo will appear at the right size and position (as seen here).
©ISTOCKPHOTO/KATI NEUDERT
Step Seven:
You can replace any other photo (or all the photos) using the same method (here I replaced two of the smaller photos with that same photo I just imported earlier by clicking on each one individually and choosing that same photo to replace it). When the Picture Package layout preview looks the way you want it to, click OK and Photoshop CS4 will create your final document.
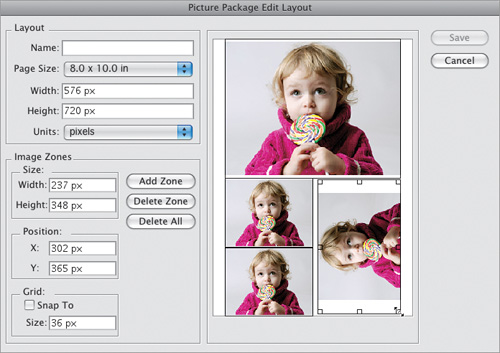
Step Eight:
This is really an optional step, but if you decide that the layout you want doesn’t appear in the built-in list of layouts, then you can create your own custom layout. You do that by clicking on the Edit Layout button, found just below the Layout preview area (and seen in the close-up of the Layout preview area shown in the previous step—Step Seven). This brings up the Picture Package Edit Layout dialog (shown here). Adobe calls each photo cell a “zone.” To delete a zone just click on it, then click on the Delete Zone button. To add a new zone, click on the Add Zone button, and the same photo you currently have selected appears in the blank space. You can grab the corners to resize it to your liking. (Note: Drag the corners outward to rotate the photo.)
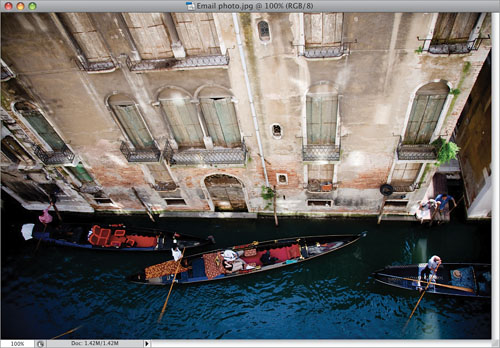
Believe it or not, how to prepare photos for emailing is one of those most-asked questions, and I guess it’s because there are no official guidelines for emailing photos. The two emailing photos problems I hear the most are: (1) “My photos keep getting bounced back because they’re too big,” and (2) “When I email people my photos, they look really washed out, and don’t look nearly as good as they did on my computer.” Here’s how to fix both of these:
Step One:
Open the photo that you want to email. Before you go any further, you have some decisions to make based on whom you’re sending the photo to. If you’re sending it to friends and family, you want to make sure the file downloads fast, and (this is important) can be viewed within their email window. I run into people daily (clients) who have no idea how to download an attachment from an email. If it doesn’t show up in their email window, they’re stuck, and even if they could download it, they don’t have a program that will open the file. So the goal: make it fit in their email browser.
SCOTT KELBY
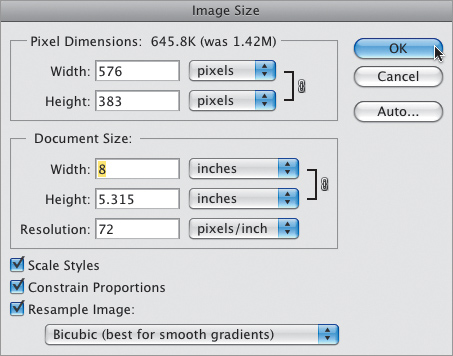
Step Two:
Go under the Image menu and choose Image Size (or press Command-Option-I [PC: Ctrl-Alt-I]). Because they’ll just be viewing this onscreen, you can lower the resolution to what’s called “screen resolution,” which is 72 ppi (no matter what kind of monitor or which kind of computer they have). Next, set the Width (in inches) to no wider than 8″ (the height isn’t the big concern, it’s the width, so make sure you stay within the 8″ width). If you’re sending this to a client or a photo lab, you’ll need a higher resolution. I use 240 ppi if they’re printing it to an inkjet printer, or 300 ppi if it will be printed on an actual printing press. Click OK.
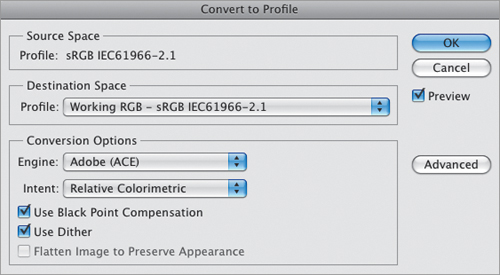
Step Three:
Now that you have the size and resolution figured out, here’s a trick to keeping the colors looking right for email: Before you save the file in Photoshop, go under the Edit menu and choose Convert to Profile. When the Convert to Profile dialog appears, from the Destination Space Profile pop-up menu, choose Working RGB – sRGB IEC61966-2.1 (as shown here), and then click OK. This converts your image to a color space that works for email or Web images. (Note: You probably won’t see a change in color onscreen on your end, but it will make a big difference when they see it on their end.)
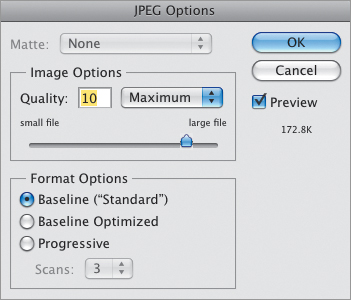
Step Four:
Saving your file as a JPEG is the safest (and most popular) way to ensure that the person you’re emailing this photo to will actually be able to see it. To save your photo as a JPEG, go under the File menu and choose Save As. In the Save As dialog, choose JPEG in the Format pop-up menu, and then click Save. This brings up the JPEG Options dialog (shown here), where you get to choose the amount of compression applied to your image (this compression shrinks the file size for email while maintaining as much of the quality as you choose using the Quality slider. Your goal is to email a photo that is small in file size (so it downloads quickly), yet still looks really good. I generally save all my JPEGs at a quality setting of 10, which I think is the ideal balance between getting a small file size and still keeping great image quality.
This technique gives your work the layout of a professional poster, yet it’s incredibly easy to do. In fact, once you learn how to do it, this is the perfect technique to turn into a Photoshop action. That way, anytime you want to give your image the poster look, you can do it at the press of a button.
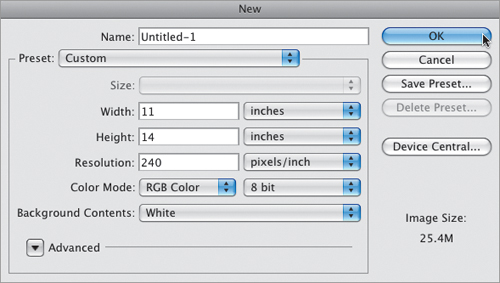
Step One:
Press Command-N (PC: Ctrl-N) to create a new document in the size you want for your fine art poster layout (in our example here, I’m creating a standard-sized 11×14″ print). Set your Resolution to 240 ppi (for color inkjet printing), then click OK to create your new blank document.
Step Two:
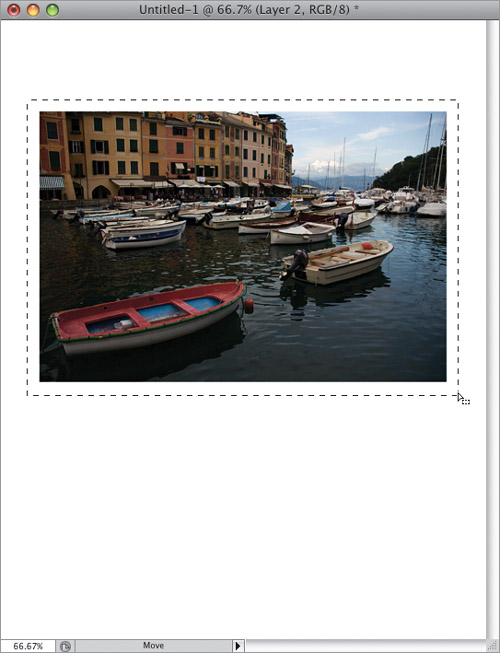
Open the photo you want to feature in your fine art poster layout. Get the Move tool (V) and click-and-drag that photo over into your fine art poster layout (as shown here). Press Command-T (PC: Ctrl-T) to bring up Free Transform. Press-and-hold the Shift key, grab a corner, and drag inward to size the photo down so it fits within your layout like the photo shown here. Press Return (PC: Enter) to lock in your transformation. To perfectly center your photo within the document, click on the Background layer, press-and-hold the Command (PC: Ctrl) key, and click on the photo layer to select both layers. Then go up to the Options Bar, and click on the Align Horizontal Centers icon (circled here in red) to center the photo side-to-side (as shown here).

SCOTT KELBY
Step Three:
Go to the Layers panel, and click on the Background layer to select it. Now, click on the Create a New Layer icon at the bottom of the Layers panel to create a new blank layer, then get the Rectangular Marquee tool (M) and click-and-drag out a selection that is about ½″ larger than your photo (as shown here). You’re going to turn this selection into a fake mat. Press D, then X to make your Foreground color white, then fill this selected area with white by pressing Option-Delete (PC: Alt-Backspace).
Step Four:
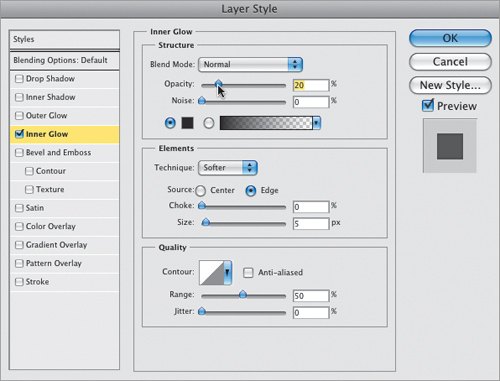
To create the mat effect, choose Inner Glow from the Add a Layer Style pop-up menu at the bottom of the Layers panel. This brings up the Inner Glow section of the Layer Style dialog. Click on the light yellow color swatch below the Noise slider and change the color of the glow to black. You won’t be able to see the glow at this point, because the default blend mode for the Inner Glow is Screen, so to see your glow, change the Blend Mode pop-up menu (near the top of the dialog) to Normal. Increase the Size of the glow to 5 (try 10 for very high-res photos), then lower the Opacity of this glow to 20% (as shown here) to create the subtle shadow of a beveled mat (as seen in the next step), and click OK.
Step Five:
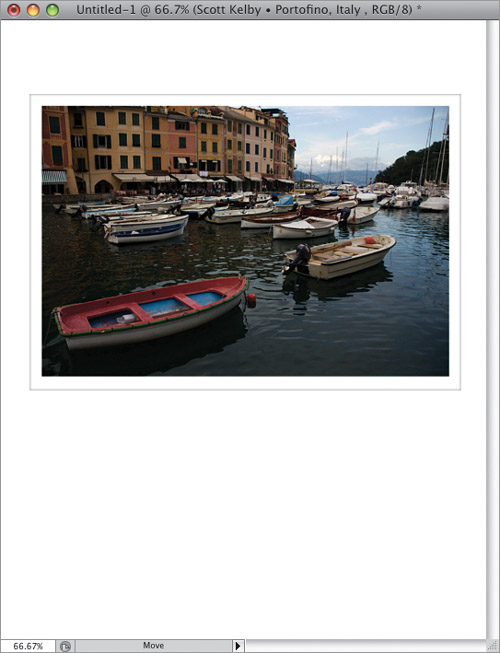
Press Command-D (PC: Ctrl-D) and you’ll see the mat-like effect is in place around your photo. Although you want the photo centered side-to-side, you don’t want the photo centered top-to-bottom. Fine art posters generally have the photo well above the center of the photo, at what is called the “optical center,” which is the area just above the center. To move the photo up, go to the Layers panel, select both the photo layer and the mat layer beneath it, then get the Move tool (V), and use the Up Arrow key on your keyboard to nudge the photo and mat upward until it’s well above the center top-to-bottom (as seen here).
Step Six:
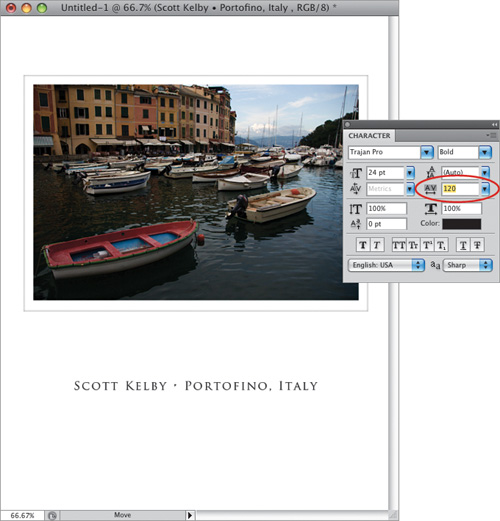
Now it’s time to add your poster text. Press the letter T to get the Type tool to add your text (i.e., the name of your studio, the name of the poster, whatever you’d like). I chose the font Trajan Pro at 24 points, and I typed in upper- and lowercase (this font comes with the Creative Suite, so chances are you already have it installed. It actually doesn’t have lowercase letters—instead, it uses large caps and smaller caps, as seen here). The extra space between the letters adds an elegant look to the type. To do that, highlight your type with the Type tool, then go to the Character panel (found under the Window menu), and in the Tracking field, enter 120.
Step Seven:
The easiest way to add more type is to press Command-J (PC: Ctrl-J) to duplicate the Type layer. Then you can change the size of the type, and add additional lines of text (as I did here, where I added a line underneath the top line with the date the photo was taken. Then I duplicated the Type layer again and added the bottom line of text). To center all three lines of type side-to-side perfectly within your image area, click on the Background layer in the Layers panel, and then Command-click (PC: Ctrl-click) on each Type layer so all three layers are selected. Press V to get the Move tool, and in the Options Bar, click on the Align Horizontal Centers icon to center your text beneath your image (like you did earlier to center your image).
Step Eight:
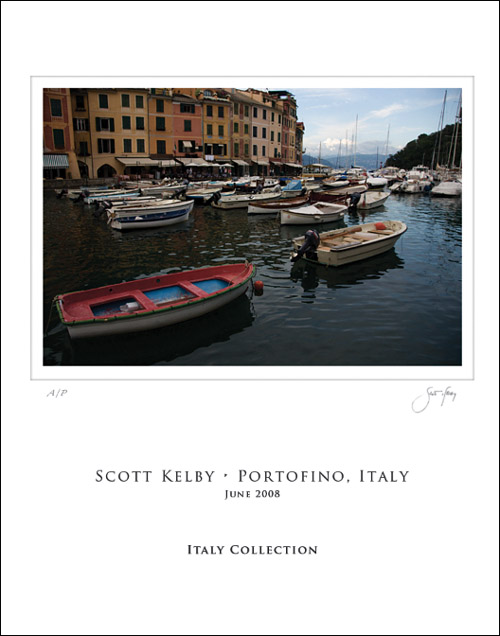
Lastly, you can add your signature (either after it’s printed, or right within Photoshop CS4 itself if you have a scan of your signature or a Wacom tablet, where you can just use the tablet’s wireless pen to create a digital signature). Here’s the final photo with my signature added under the right corner, and the letters “A/P” under the left corner, which stands for “Artist Print” indicating the print was output by the photographer him/herself.
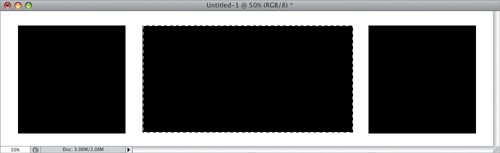
This is just a simple layout that is very effective. We’re going to bring in our photos as Smart Objects, so we can save the layout as a template and update the look very quickly whenever we want. Here’s how it’s done:
Step One:
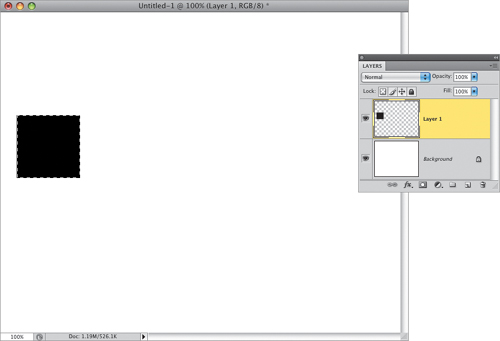
Press Command-N (PC: Ctrl-N) and create a new document that is very wide (the one shown here is 11″ wide by 3″ deep). Go to the Layers panel, click on the Create a New Layer icon at the bottom of the panel, and then get the Rectangular Marquee tool (M). Press-and-hold the Shift key, and on the left side of the document, drag out a square selection (since you’re holding the Shift key—don’t worry—it will be perfectly square) that is almost as tall as the document itself (leave approximately ½″ of white space all the way around). Press D to set your Foreground color to black, then press Option-Delete (PC: Alt-Backspace) to fill your selection with black. Don’t deselect.
Step Two:
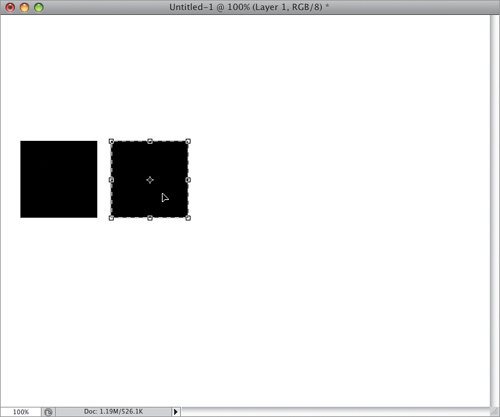
Press V to get the Move tool from the Toolbox. Press-and-hold Option-Shift (PC: Alt-Shift), then click-and-drag yourself a copy of your selected black square. Drag it all the way over to approximately the same position on the right side of your document, as shown here. (Holding the Option key makes a duplicate of your square, and holding the Shift key keeps it perfectly aligned with the other square as you’re dragging to the right.)
Step Three:
Deselect by pressing Command-D (PC: Ctrl-D). Switch back to the Rectangular Marquee tool, but this time don’t hold the Shift key (that way, you can draw a rectangle). Now, draw a rectangular selection between the two squares, leaving approximately the same amount of space between your shapes (as shown here). Then fill that long rectangle with black. So, what you have is (from L to R): a black square, a long black rectangle, and another black square. Press Command-D again to Deselect.
Step Four:
We’re going to bring in our photos as Smart Objects, so go under the File menu and choose Place. When the Place dialog appears, choose the photo you want to appear over the square on the left. When it appears onscreen, position it over the first square on the left. Press-and-hold the Shift key and click-and-drag a corner handle to resize it, so it’s slightly larger than the square (as shown here), then press the Return (PC: Enter) key to lock in your resizing. Note: If you can’t see the transform handles, press Command-0 (zero; PC: Ctrl-0) and the window will expand out so you can reach them.
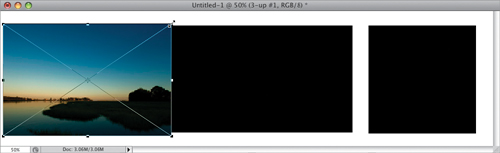
SCOTT KELBY
Step Five:
Now press Command-Option-G (PC: Ctrl-Alt-G) to mask your rectangular photo into that black square (as shown here). You can get the Move tool and reposition your photo inside that black square by just clicking-and-dragging on it. Don’t freak out if you see part of your photo appearing in the center rectangle (like you see here), because we’ll cover that with a different photo layer.
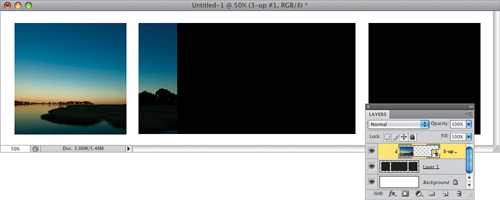
Step Six:
Now repeat the last two steps, opening two other photos, and resizing them so that they’re slightly larger than the boxes they’re going to be masked into. Once one of them is sized, press Command-Option-G (PC: Ctrl-Alt-G) to mask it into the shape. Then do the same for the other photo. If, when you’re done, any one of those photos extends into a different box, just go to the Layers panel and move that layer down one (or two) layers until that extra area is hidden behind one of the other masked photos.

SCOTT KELBY
Step Seven:
At this point, your layout is basically done (but stick around for just a minute, so we can do the whole Smart Object thing, which you will totally dig, by the way), but if you’d like a different look, just click on the Background layer, press the letter D on your keyboard to set black as your Foreground color, then press Option-Delete (PC: Alt-Backspace) to fill your Background layer with black, which gives you the look you see here. Now, here’s where it gets fun: because we placed those images into our document as Smart Objects, we can save a version of this file, with all our layers intact, so that becomes a quick-updating template (you’ll see how in a moment). For now, just save the file and add the name “Template” at the end of the filename, so that you can use it again in the future.
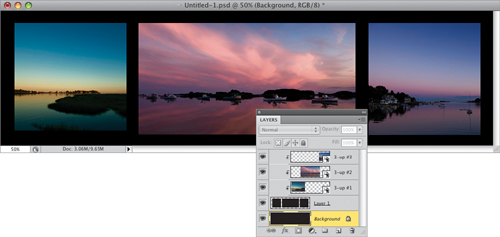
Step Eight:
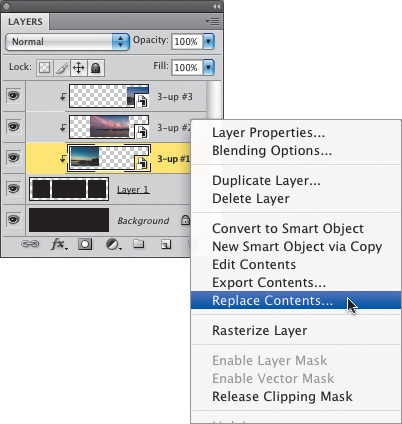
Now, click on the first image’s thumbnail in the Layers panel, then Control-click (PC: Right-click) on its name, and from the contextual menu, choose Replace Contents (as shown here). A dialog appears where you can choose which photo you want to replace this first one with. Choose the photo, click OK, and it replaces the first photo, and resizes it to fit in that exact spot (provided, the photo you’re importing is the same dimensions and resolution, of course). Now, just repeat that process for the other two photos, and in just seconds you’ve got all three photos updated.

Here’s our original three-up layout
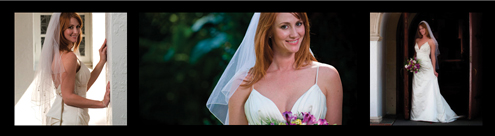
Here’s a variation I was able to create in just seconds, because we made our photos Smart Objects, and I just swapped them out
I first saw this layout on a website that sells fine art prints, and I thought it was a very slick way to show your work because it’s not the standard old “photo in the middle of a page” look you see again and again, and the separation between the boxes really seemed to add some visual interest. Plus, even though you’re just using one photo, it has the look of a multi-photo layout.
Step One:
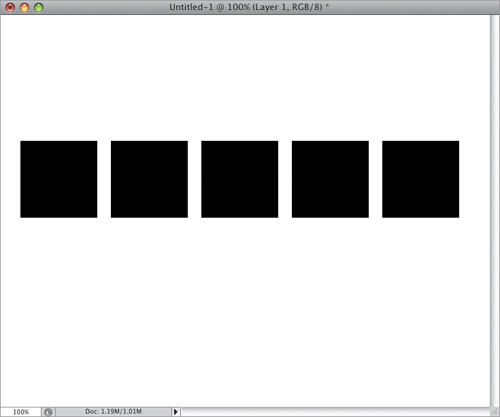
Press Command-N (PC: Ctrl-N) to create a new document in the size and resolution you want for your final print. Go to the Layers panel and click on the Create a New Layer icon at the bottom. Get the Rectangular Marquee tool (M), and click-and-drag out a small square over to the far-left side (you’re going to fit five of these boxes across, so keep that in mind when choosing how big to make your first box; press-and-hold the Shift key while you drag to make it square). Once your box selection is in place, press D to set your Foreground color to black, then press Option-Delete (PC: Alt-Backspace) to fill your square selection with black (as shown here). Don’t deselect yet.
Step Two:
Press Command-Option-T (PC: Ctrl-Alt-T) to bring up Free Transform. Press-and-hold the Shift key (to keep your alignment straight), then click-and-drag a copy of this square straight over to the right, leaving a small gap between the two squares (as shown here). Press Return (PC: Enter) to lock in your move.
Step Three:
Now press Command-Option-Shift-T (PC: Ctrl-Alt-Shift-T), which creates another copy of your square to the right of your first two squares, with the exact same amount of spacing between the squares. Now, press this keyboard shortcut two more times until you have five squares in a row (as shown here). Press Command-D (PC: Ctrl-D) to Deselect the last square you copied.
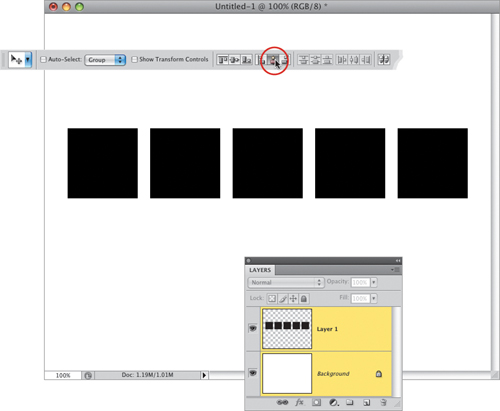
Step Four:
Now, to perfectly center this row of five squares within your document, first click on the Background layer in the Layers panel. Then, press-and-hold the Command (PC: Ctrl) key and click on the five-squares layer to select it as well. Once both layers are highlighted (as shown here), get the Move tool (V), go up to the Options Bar, and click on the icon for Align Horizontal Centers (you can see my cursor over that icon in the Options Bar here—it’s the fifth icon from the left, and it’s circled in red).
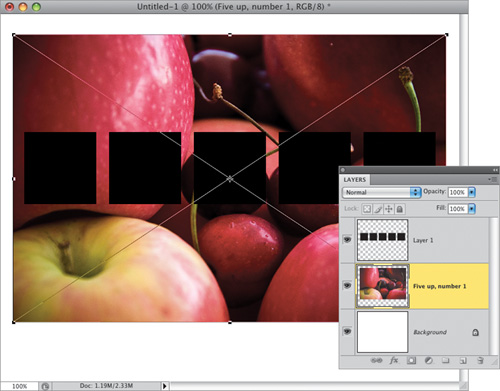
Step Five:
Now we’re going to bring in our photo as a Smart Object. To do that, click on the Background layer, then just go under the File menu and choose Place (rather than Open). Once the photo appears, press-and-hold the Shift key, grab any corner point, and drag in to shrink the size or drag outward to increase the size (basically, you want to resize your imported Smart Object photo so it’s just slightly larger than the five black boxes, as shown here). Once it’s sized, press Return (PC: Enter) to lock in your size change.
SCOTT KELBY
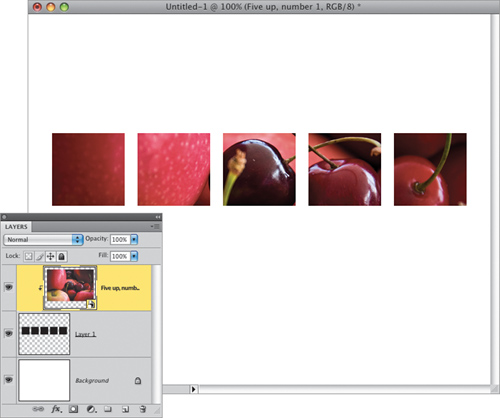
Step Six:
To get your photo inside those five boxes, start by going to the Layers panel and dragging your photo layer to the top of the layer stack, so it’s the top layer (as shown here). Now either go under the Layer menu and choose Create Clipping Mask (as shown here) or use the keyboard shortcut Command-Option-G (PC: Ctrl-Alt-G).

Step Seven:
When you choose Create Clipping Mask (or use that keyboard shortcut), it masks your Smart Object photo inside the five boxes on the layer below it (as shown here, where the photo is clipped into those five boxes).
Step Eight:
The final step is to add your studio name over a scan of your signature (just sign your name with a thick black pen on a white piece of paper, and scan it on a flatbed scanner. Of course, if you have a Wacom tablet and wireless pen, you can just get a small hard-edged brush and sign your name right in your document). Position your signature so it’s centered at the bottom of the five boxes, about halfway between the bottom of the document and the bottom of the boxes. Lower the opacity of your signature to around 40% or 50% so it looks like a medium gray color. Now, take the Type tool (T) and add your studio’s name (or your name), and position this type centered, right over your signature (I used the font Trajan Pro, which is installed automatically when you install the Adobe Creative Suite). To add a little elegance to this type, increase the amount of tracking (the spacing between letters) to 200 (this is done in the Character panel).
Step Nine:
Since you brought in your photo as a Smart Object, you can easily change your photo, and it will automatically be masked into those five boxes. To do that, go to the Layers panel, Control-click (PC: Right-click) on your Smart Object layer, and choose Replace Contents. Now choose a different photo, and when you do, it automatically appears within your five boxes (as shown here). Yet another advantage of using Smart Objects.
SCOTT KELBY
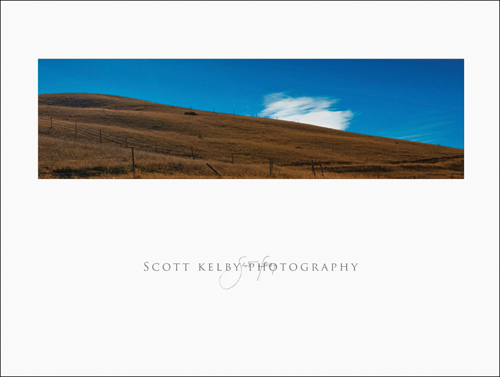
I originally came up with the idea for this when playing around with Print template designs in Adobe Photoshop Lightroom (Adobe’s workflow tool for professional photographers), and what it does is takes any photograph and presents it as a panorama. When I showed this “instant pano” template in a Lightroom seminar I was teaching, the crowd loved it so much, I knew then I had to find a way to do the same thing in Photoshop CS4 (which I did, and here’s how it’s done).
Step One:
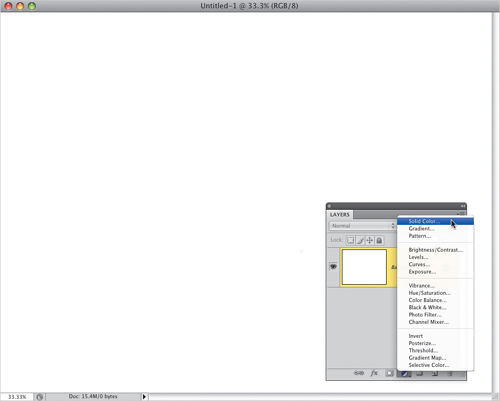
Press Command-N (PC: Ctrl-N) to create a new document in whatever size and resolution you’d like (in my example, I created a wide letter-sized document (11×8½″) at a resolution of 240 ppi (for inkjet printing). Once you’ve opened the document, choose Solid Color from the Create New Adjustment Layer pop-up menu at the bottom of the Layers panel (as shown here).
Step Two:
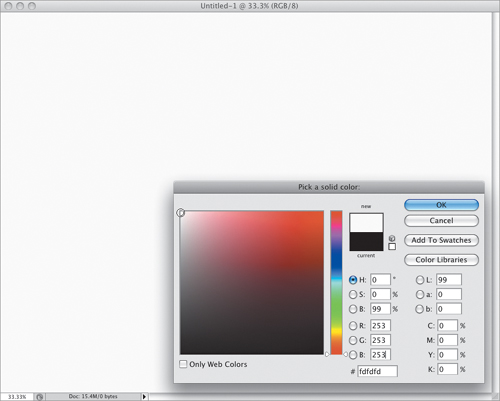
This brings up a Color Picker, prompting you to Pick a Solid Color. Since our background is white (which is the default setting in the New document dialog), choose white as your solid color (as shown here), and click OK. This fills your new adjustment layer with solid white (okay, it’s kind of hard to see a white-filled layer on top of a white background, so you’ll just have to trust that it worked. Well, for now anyway).
Step Three:
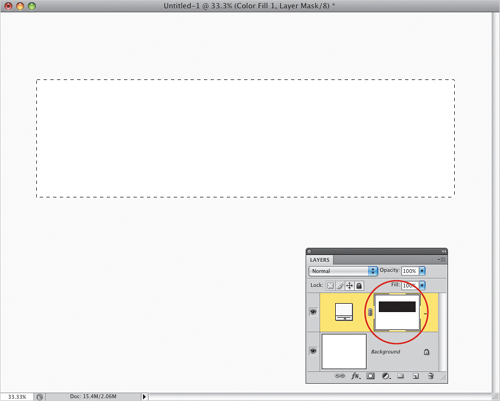
Get the Rectangular Marquee tool from the Toolbox, or just press M, and click-and-drag a wide rectangle about 2″ from the top of the document (as shown here). Don’t make the selection too deep (in fact, while you’re dragging out your selection, try dragging it out in the shape of a panorama—wide, but not very deep). Once your selection is in place, press the letter X on your keyboard to switch your Foreground color to black, then press Option-Delete (PC: Alt-Backspace) to fill your selected area with black. Now, you’re only filling the white Solid Color adjustment layer’s mask with black, so you won’t see anything change onscreen. To confirm that your black fill worked, take a look in the Layers panel, and you should see a black rectangle in the adjustment layer’s mask thumbnail (as shown circled here). Press Command-D (PC: Ctrl-D) to Deselect.
Step Four:
Click on the Background layer, then go under Photoshop’s File menu and choose Place (importing a file using Place, rather than Open, automatically makes the photo a Smart Object. You’ll see why it’s so smart in just a moment). Now, locate the photo you’d like to have become an instant pano, and click OK to import that photo. When your photo appears, you’ll see a large bounding box around the entire photo (with a big X over the image area). Press-and-hold the Shift key, click on one of the corner handles, and drag inward to scale the photo down to size, so it’s just slightly larger than your pano opening.
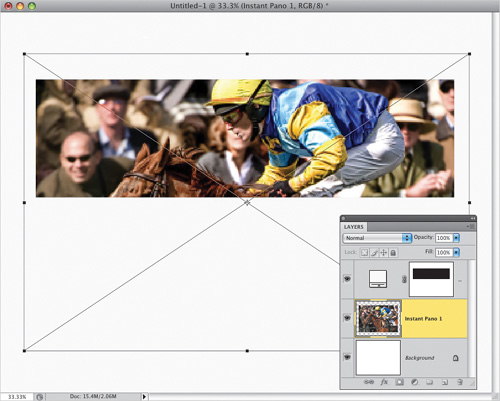
SCOTT KELBY
Step Five:
Once you have it sized the way you’d like it, you can click in the center and drag it up or down to reveal a different part of the image, then press the Return (PC: Enter) key to complete your resizing. But remember: since you imported this as a Smart Object, if you ever need to resize the photo, it draws upon the original file (which is automatically embedded into your document), so your resized photo looks pristine (but that’s not the main reason we made it a Smart Object—that’s coming in a moment). Now that your photo is placed as a Smart Object, the cool thing is it already looks like a pano, because all you can see of it is that wide, not very tall opening (which was the selected area you filled with black in the previous step).
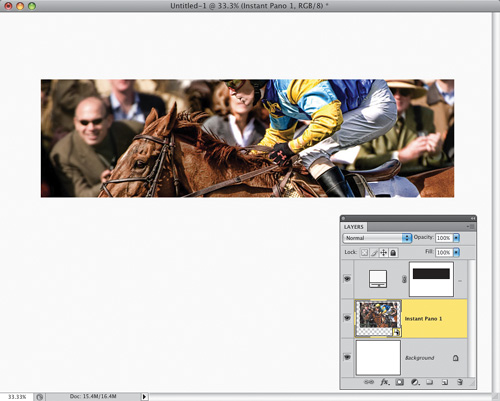
Step Six:
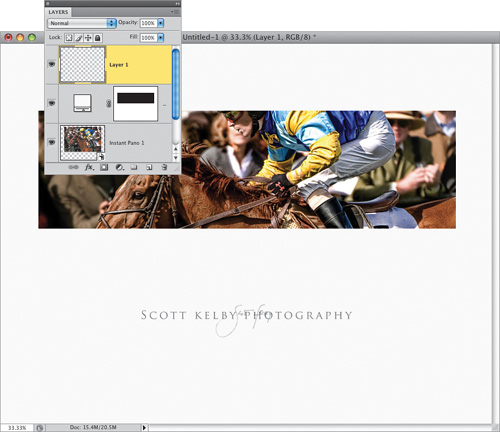
Now that your photo is in place, you can add any poster-style text you’d like using the Type tool (T). Here, I added a text-and-signature look that I showed you how to create in the previous tutorial.
Step Seven:
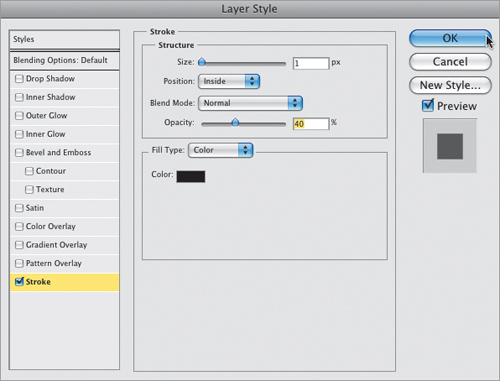
Now, we’re going to add a thin border around our photo that you’ll be able to turn on/off, depending on how it looks with the particular photo you’ve imported, in just one click. Go to the Layers panel, click on your Solid Color adjustment layer, and choose Stroke from the Add a Layer Style pop-up menu at the bottom of the panel. When the Layer Style dialog appears, click on the Color swatch to bring up the Color Picker, then choose black as your stroke color and click OK. Set the Size to 1 pixel, set the Position to Inside (this makes the corners of your stroke nice and square), then lower the Opacity to 40% (this makes your stroke appear thinner), and click OK.
Step Eight:
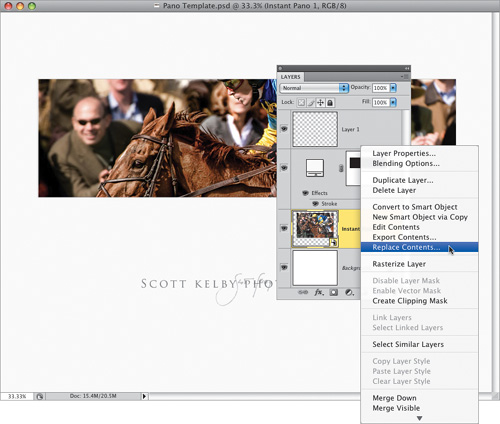
At this point, you’ve created an Instant Pano template that can be used again and again, and it’s the Smart Object (yes, we finally get to take advantage of it) that makes the template process so easy. So, first save this file (in Photoshop format) as a template (name it “Pano Template”). Now, let’s say it’s a week or so later and you want to turn a different photo into an instant pano. Open your template, then go to the Layers panel, Control-click (PC: Right-click) on your photo layer’s name, and a contextual menu will appear. Choose Replace Contents (as shown here).
Step Nine:
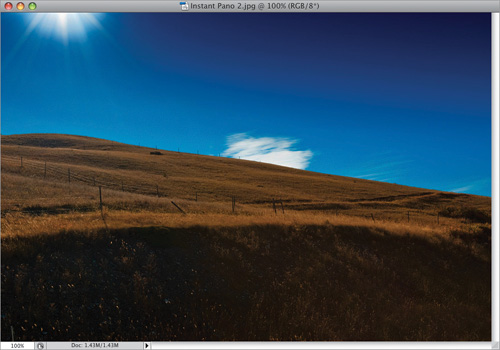
Now navigate to a different photo you’d like to see as an instant pano (here’s the photo that we’re going to use—I’m just showing it to you here so you can see the full photo before it’s brought into your template).
SCOTT KELBY
Step 10:
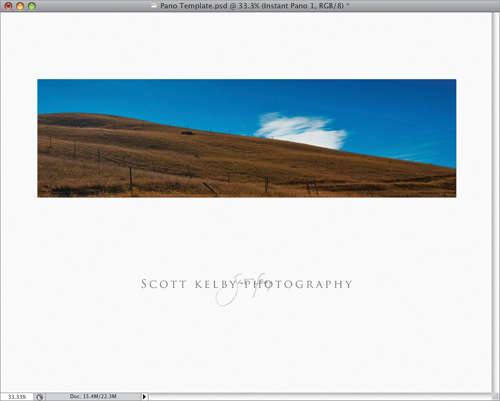
When you click the Place button, it replaces your current photo with the photo you just selected, and if the photos were the same size (and if they came from your digital camera, they’re probably the exact same size), it automatically resizes to perfectly fit inside your pano opening (as shown here). If it’s not the same size, you’ll be able to change the size using the big bounding box (press-and-hold the Shift key, grab a corner point, and draw inward). Then hit the Return (PC: Enter) key to lock in your resize. To reposition your photo inside the pano opening, just take the Move tool (V), click on the photo layer and drag up or down, and you can easily reposition it to get it right where you want it.
Step 11:
Remember that thin black border we added (well, at 40% opacity it actually looks gray)? Once you’ve imported your photo, you can decide whether it looks better with or without a border, and you can turn that border on/off with just one click. In the Layers panel, under your Solid Color adjustment layer, you’ll see the word Effects with an Eye icon to the left of it. Click on that Eye icon to hide the stroke. To make it visible again, click where the Eye icon used to be.
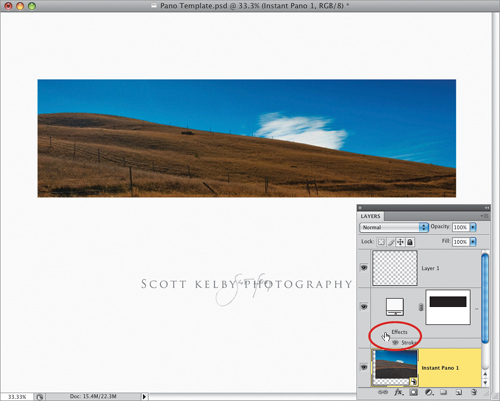
Step 12:
Here’s the final image. Now, since you’ve created a template, at this point you’d want to flatten the image and do a Save As, and give your file a different name. That way, your template stays intact, and the next time you want to try a different photo as an instant pano, you just open the original template, Control-click (PC: Right-click) on the Smart Object layer, choose Replace Contents, and choose a new photo. Once you’ve set this up like this, instant panos are about 30 seconds away.