
3. iPod touch As iPod
Sure, your iPod touch is a handy device for surfing the Web, grabbing your email, and discovering just how much you’ve lost in the stock market in a given day. But the word iPod appears in its name for good reason. Multitalented though this iPod may be, it’s also a heck of a great media player. This chapter focuses on the iPod touch’s media capabilities and shows you how to make the most of them.
Getting the Goods
“Eep!” I hear you squeep. “I’ve never used iTunes or owned an iPod. I have no idea how to get music into iTunes, much less put it on my portable music player. What do I do?”
Relax. I’m not going to tell you how to put your music and movies on your iPod touch until you know how to assemble a music and movie library.
I’ll start with music. You have three ways to get tunes into iTunes:
• Recording (or ripping, in today’s terminology) an audio CD
• Importing music that doesn’t come directly from a CD (such as an audio track you downloaded or created in an audio application on your computer)
• Purchasing music from an online emporium such as Apple’s iTunes Store
The following sections tell you how to use the first two methods. The iTunes Store is a special-enough place that I discuss it in Chapter 4.
![]() The procedures for adding movies and videos are similar, except that iTunes offers no option for ripping DVDs. You can do that, but the procedure is more complicated than ripping an audio CD. I cover ripping DVDs in the following section.
The procedures for adding movies and videos are similar, except that iTunes offers no option for ripping DVDs. You can do that, but the procedure is more complicated than ripping an audio CD. I cover ripping DVDs in the following section.
Rip a CD
Apple intended the process of converting audio-CD music to computer data to be painless, and it is. Here’s how to go about it:
1. Launch iTunes.
2. Insert an audio CD into your computer’s CD or DVD drive.
By default, iTunes tries to identify the CD you’ve inserted. It logs on to the Web to download the CD’s track information—a very handy feature for those who find typing such minutia to be tedious.
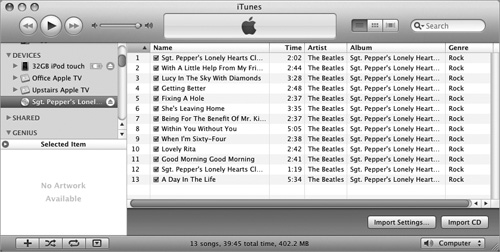
The CD appears in iTunes’ Source list under the Devices heading, and the track info appears in the Song list to the right (Figure 3.1).
Figure 3.1 A selected CD and its tracks.
Then iTunes displays a dialog box, asking whether you’d like to import the tracks from the CD into your iTunes Library.
3. Click Yes, and iTunes imports the songs; click No, and it doesn’t.
![]() You can change this behavior in iTunes’ Preferences window. In the General preference, you find a When You Insert a CD pop-up menu. Make a choice from that menu to direct iTunes to show the CD, begin playing it, ask to import it (the default), import it without asking, or import and then eject it.
You can change this behavior in iTunes’ Preferences window. In the General preference, you find a When You Insert a CD pop-up menu. Make a choice from that menu to direct iTunes to show the CD, begin playing it, ask to import it (the default), import it without asking, or import and then eject it.
4. If you decided earlier not to import the audio but want to do so now, simply select the CD in the Source list and click the Import CD button in the bottom-right corner of the iTunes window.
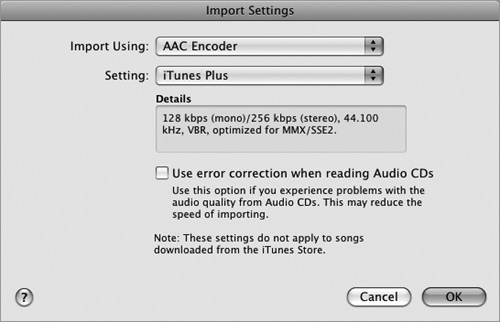
iTunes begins encoding the files via the method chosen in the Import Settings window (Figure 3.2 on the following page), which you access by opening iTunes’ Preferences window (choose iTunes > Preferences on a Mac or Edit > Preferences on a Windows PC), clicking the General tab, and clicking the Import Settings button. By default, iTunes imports songs in iTunes Plus AAC format at 256 Kbps. (For more on encoding methods, see the sidebar “Import Business: File Formats and Bit Rates” in the next section.)
Figure 3.2 Importing a CD with iTunes.
![]() To import only certain songs, uncheck the boxes next to the titles of songs you don’t want to import; then click the Import CD button.
To import only certain songs, uncheck the boxes next to the titles of songs you don’t want to import; then click the Import CD button.
5. Click the Music entry in the Source list.
You’ll find the songs you just imported somewhere in the list.
6. To listen to a song, click its name in the list and then click the Play icon or press the spacebar.
Move music into iTunes
Ripping CDs isn’t the only way to put music files on your computer. Suppose that you’ve downloaded some audio files from the Web and want to put them in iTunes. You have three ways to do that:
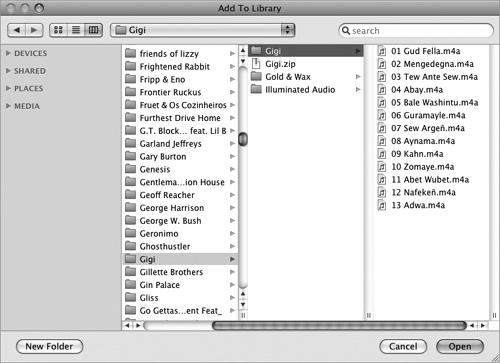
• In iTunes, choose File > Add to Library.
When you choose this command, the Add To Library dialog box appears (Figure 3.3). Navigate to the file, folder, or volume you want to add to iTunes, and click Open. iTunes determines which files it thinks it can play and adds them to the library.
Figure 3.3 Navigate to tracks you want to add to iTunes via the Add To Library dialog box.
• Drag files, folders, or entire volumes to the iTunes icon in Mac OS X’s Dock, the iTunes icon in Windows’ Start menu (if you’ve pinned iTunes to this menu), or the iTunes icon in either operating system (at which point iTunes launches and adds the dragged files to its library).
• Drag files, folders, or entire volumes into iTunes’ main window or the Library entry in the Source list.
In the Mac versions of iTunes, by default you’ll find songs in the iTunes Music folder within the iTunes folder inside the Music folder inside your Mac OS X user folder. The path to my iTunes music files, for example, would be chris/Music/iTunes/iTunes Music.
Windows users will find their iTunes Music folder by following this path: yourusername/My Music (XP) or Music (Vista and Windows 7)/iTunes/iTunes Music.
You can use the same methods to add compatible videos and movies to your iTunes Library. (For more on what makes those videos compatible, see the sidebar “Working with Supported Video Formats” later in the chapter.) Those videos will most likely appear in the Movies playlist in the Source list.
I say most likely because there are a few exceptions: Videos specifically designated as music videos appear in the Music playlist, videos designated as TV shows appear in the TV Shows playlist, and video podcasts are filed under Podcasts in iTunes’ Source list. See the sidebar “Tag, You’re It” later in this chapter for information on how to apply those video designations.
MP3, MPEG-4, AAC, AIFF, WAV … is the computer industry incapable of speaking plain English?
It may seem so, given the plethora of acronyms floating through modern-day Technotopia. But the lingo and the basics behind it aren’t terribly difficult to understand.
MP3, AAC, AIFF, and WAV are audio file formats. The compression methods used to create MP3 and AAC files are termed lossy because their encoders remove information from the source sound file to create these smaller files. Fortunately, these encoders are designed to remove the information you’re least likely to miss—audio frequencies that humans can’t hear easily, for example.
AIFF and WAV files are uncompressed, which means that they contain all the data in the source audio file. When a Macintosh pulls audio from an audio CD, it does so in AIFF format, which is the native uncompressed audio format used by Apple’s QuickTime technology. WAV is an AIFF variant used extensively with the Windows operating system.
iTunes supports one other compression format: Apple Lossless. This format is termed a lossless encoder because it shrinks files by removing redundant data without discarding any portion of the audio spectrum. This scheme yields sound files with all the audio quality of the source files at around half their size. iTunes and the iPod also support the H.264 and MPEG-4 video formats. These, too, are compressed formats that allow you to fit a great big movie on a tiny iPod.
Now that you’re familiar with these file formats, I’ll touch on resolution as it applies to audio and video files.
You probably know that the more pixels per inch a digital photograph has, the crisper the image (and the larger the file). Resolution applies to audio as well. But audio defines resolution by the number of kilobits per second (Kbps) contained in an audio file. With files encoded similarly, the higher the kilobit rate, the better-sounding the file (and the larger the file).
I emphasize with files encoded similarly because the quality of the file depends a great deal on the encoder used to compress it. Many people claim that if you encode a file at 128 Kbps in both the MP3 and AAC formats, the AAC file sounds better.
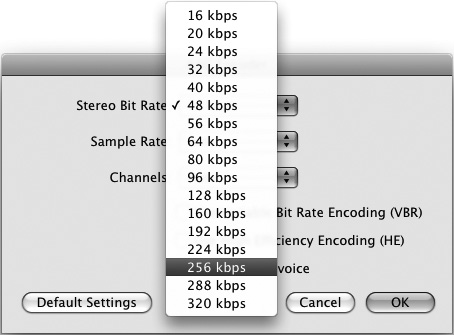
The Import Settings menu (which you reach by clicking the Import Settings button within iTunes’ General preferences) lets you choose to import files in AAC, AIFF, Apple Lossless, MP3, or WAV format. The Setting pop-up menu is where you choose the resolution of the AAC and MP3 files encoded by iTunes by choosing Custom from the menu. iTunes’ default setting is iTunes Plus (256 Kbps). To change this setting, choose High Quality (128 Kbps) or Custom from the Setting pop-up menu. (Spoken Podcast is another option when you choose the AAC Encoder, but it produces quality that’s good only for spoken-word audio.) If you choose Custom, the AAC Encoder dialog box appears. Choose a different setting—in a range from 16 Kbps to 320 Kbps—from the Stereo Bit Rate pop-up menu (Figure 3.4). Files encoded at a high bit rate sound better than those encoded at a low bit rate (such as 96 Kbps). But files encoded at higher bit rates also take up more space on your hard drive and iPod.
The preset options for MP3 importing include Good Quality (128 Kbps), High Quality (160 Kbps), and Higher Quality (192 Kbps). If you don’t care to use one of these settings, choose Custom from this same pop-up menu. In the MP3 Encoder dialog box that appears, you have the option to choose a bit rate ranging from 16 Kbps to 320 Kbps.
Figure 3.4 The Stereo Bit Rate pop-up menu.
Resolution is important for video as well. Fortunately, iTunes allows you to convert video to only two formats: iPod/iPhone–compatible format and Apple TV format. You do this by choosing Advanced > Create iPod or iPhone Version or Create Apple TV Version, respectively. These commands provide no tools for adjusting resolution settings.
Creating and Configuring a Playlist
Before you put any media files (music or video) on your iPod, organize them in iTunes. Doing so will make it far easier to find the media you want, both on your computer and on your iPod. The best way to organize that material is through playlists.
A playlist is simply a set of tracks and/or videos that you believe should be grouped in a list. The organizing principle is completely up to you. You can organize songs by artist, by mood, by style, by song length … heck, if you like, you can have iTunes automatically gather all your 1950s polka tunes with the letter z in their titles. Similarly, you can organize your videos by criteria including director, actor, and TV-series title. You can mix videos and music tracks within playlists as well, combining, say, music videos and music tracks by the same artist. As far as playlists are concerned, you’re the boss.
The following sections look at ways to create playlists.
Standard playlists
Standard playlists are those that you make by hand, selecting each of the media files you want grouped. To create a standard playlist in iTunes, follow these steps:
1. Click the large plus (+) icon in the bottom-left corner of the iTunes window, or choose File > New Playlist (Command-N on the Mac, Ctrl+N in Windows).
2. In the highlighted field that appears next to that new playlist in the Source list, type a name for your new playlist.
3. Click an appropriate entry in the Source list—Music, Movies, TV Shows, or Podcasts—and select the tracks or videos you want to place in the playlist you created.
4. Drag the selected tracks or videos to the new playlist’s icon.
5. Arrange the order of the tracks or videos in your new playlist.
To do this, click the Number column in the main window, and drag tracks up and down in the list. When the iPod is synchronized with iTunes, this order is how the songs will appear in the playlist on your iPod.
If the songs in your playlist come from the same album, and you want the songs in the playlist to appear in the same order as they do on the original album, click the Album heading.
Playlist from selection
You can also create a new playlist from selected items by following these steps:
1. Command-click (Mac) or Ctrl+click (Windows) songs or videos to select the files you’d like to appear in the new playlist.
2. Choose File > New Playlist from Selection (Command-Shift-N on a Mac, Ctrl+Shift+N on a Windows PC).
A new playlist containing the selected items will appear under the Playlists heading in the iTunes Source list. If all selected tracks are from the same album, the list will bear the name of the artist and album. If the tracks are from different albums by the same artist, the playlist will be named after the artist. If you’ve mixed tracks from different artists or combined music with videos, the new playlist will display the name untitled playlist.
3. To name (or rename) the playlist, type in the highlighted field.
Smart Playlists
Smart Playlists are slightly different beasts. They include tracks that meet certain conditions you’ve defined—for example, Fountains of Wayne tracks encoded in AAC format that are shorter than 4 minutes. Here’s how to work the magic of a basic Smart Playlist:
1. In iTunes, choose File > New Smart Playlist (Command-Option-N on the Mac, Ctrl+Alt+N in Windows).
You can also hold down the Option key on the Mac or the Shift key on a Windows PC and then click the gear icon that replaces the plus (+) icon at the bottom of the iTunes window.
2. Choose your criteria.
You’ll spy a pop-up menu that allows you to select items by various criteria—including artist, composer, genre, podcast, bit rate, comment, date added, and last played—followed by a Contains field. To choose all songs by Elvis Presley and Elvis Costello, for example, you’d choose Artist from the pop-up menu and then enter Elvis in the Contains field (Figure 3.5).
Figure 3.5 The inner workings of a simple Smart Playlist.
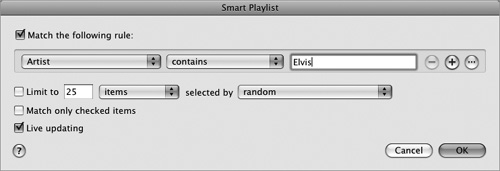
You can limit the selections that appear in the playlist by minutes, hours, megabytes, gigabytes, or number of songs. You may want the playlist to contain no more than 2 GB worth of songs and videos, for example.
You’ll also see a Live Updating option. When it’s switched on, this option ensures that if you add to iTunes any songs or videos that meet the criteria you’ve set, those files will be added to the playlist. If you add a new Elvis Costello album to iTunes, for example, iTunes updates your Elvis Smart Playlist automatically.
3. Click OK.
A new playlist that contains your smart selections appears in iTunes’ Source list.
You don’t have to settle for a single criterion. By clicking the plus icon next to a criterion field, you can add other conditions. You could create a playlist containing, say, only songs you’ve never listened to by punk artists whose names contain the letter J.
With iTunes 9, you can create more powerful Smart Playlists than you could before, thanks to a new feature called nested conditional rules. With nested conditional rules, you have sets and subsets of rules that can act on previous rules. Perhaps you want a Smart Playlist that picks out music and music-video files that are less than 4 minutes long, that were recorded before 1990, and that fall within the Pop and Soul genres. It would be difficult to get this level of detail in a traditional Smart Playlist—but not quite so difficult in a Smart Playlist that contains nested conditional rules. Figure 3.6 shows settings for an example conditional Smart Playlist.
Figure 3.6 A conditional Smart Playlist.
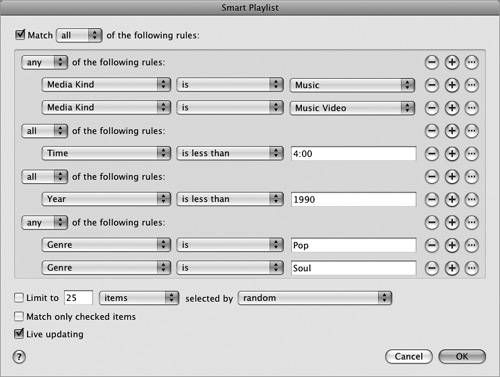
A good way to see how to use nested conditional rules is to duplicate the settings in Figure 3.6. (Later, you can follow this same procedure but choose different settings for your own conditional Smart Playlists.) Follow these steps:
1. In iTunes, choose File > New Smart Playlist (Command-Option-N on the Mac, Ctrl-Alt-N in Windows).
2. In the resulting Smart Playlist window, click the ellipsis (…) button to expand the window.
3. Click the minus (−) button to remove the top condition, which reads (over the pop-up menu) Artist Contains.
For nesting to work properly, you need to start with a conditional, and that first default entry prevents you from doing that.
4. Click the plus (+) button next to Artist Contains to create another condition. Configure the two conditions to read Media Kind is Music and Media Kind is Music Video.
5. In the All of the Following Rules section above these two conditions, choose Any from the pop-up menu so that it reads Any of the Following Rules.
This setting ensures that the playlist will look for both music and music-video files.
6. Click the ellipsis button at the top of the window to add another condition group.
If you click the ellipsis button next to one of the Media Kind entries, you’ll set a condition that affects only that Media Kind rule. You want something that affects all chosen files.
7. In the new condition group, create a rule that reads Time is Less Than 4:00.
That takes care of the time limit.
8. Click the top ellipsis button again, and create a rule that reads Year is Less Than 1990.
So much for the date.
9. Click the top ellipsis button just one more time to create one last group.
10. In this group, add two genre conditions that read Genre is Pop and Genre is Soul.
11. Above these Genre entries, change All of the Following Rules to Any of the Following Rules.
Changing All to Any instructs the playlist to look for any tracks that meet the previous conditions and that are tagged with any of these two genres.
Folders for playlists
You can also file playlists in folders. By invoking the File > New Playlist Folder command, you can lump a bunch of playlists into a single folder. Folders are a great way to keep your playlists separate from your spouse’s or to gather groups of similar playlists (All My Jazz Playlists, for example) when you listen to music in iTunes. Regrettably, the iPod touch doesn’t respect folders. When you copy a folder that contains playlists to your iPod touch, all the music in that folder is placed in a single playlist on the touch.
Genius playlists and Mixes
With iTunes 8, Apple introduced the compelling Genius feature. When you turn on Genius, you voluntarily (and anonymously) submit the contents of your iTunes Library to Apple. In exchange, Apple analyzes that content and sends a database file of related music in your library back to your computer. Using this file, Genius can create playlists of music that it believes will work well with a track that you’ve selected.
Say that you select The Rolling Stones’ “19th Nervous Breakdown” as the source track in iTunes and then click the Genius icon at the bottom of the iTunes window. Genius creates a playlist of 25 tracks that includes classic rock tracks from your iTunes Library—Donovan’s “Mellow Yellow,” The Allman Brothers’ “Whipping Post,” and Deep Purple’s “Hush,” for example.
In addition to Genius playlists, iTunes 9 can create Genius Mixes, which are 250-track playlists chosen by genre from your iTunes Library. In the following sections, I look at the ins and outs of each feature.
Genius playlists
To create Genius playlists with iTunes, follow these steps:
1. Switch on the Genius feature.
When you install iTunes, you’re offered the choice to turn Genius on. Doing so requires an iTunes account. If you don’t have one, no worries; when you start the Genius process, you’ll find an option for signing up for an account. If you neglected to turn on Genius, you can do so by choosing Store > Turn on Genius. If you’re connected to the Internet, iTunes will ask you to sign into your iTunes account.
2. Wait while iTunes configures Genius.
iTunes gathers information about your music library—specifically, the songs it contains—and sends that information to Apple’s servers anonymously. That information is compared with similar data from other users and placed in a database. A database file that contains the relationship data is sent back to your computer.
3. Create a Genius playlist.
Select a track in your iTunes Library, and click the Genius button in the bottom-right corner of the iTunes window. iTunes will create a new playlist of 25 songs (by default) that should go well with the track you selected. You can ask Genius to create a longer version of this playlist by making a larger choice from the Limit To pop-up menu at the bottom of the window; your choices are 25, 50, 75, and 100 songs. You can also click Refresh to ask Genius to try again.
4. Save the playlist.
When you click the Save Playlist button at the top of the window, iTunes creates a playlist named after your source track—A Common Disaster, for example. You can return to any Genius playlist you’ve created and change the Limit To settings as well as refresh the playlist.
5. Expose the Genius sidebar.
Click the Sidebar icon in the bottom-right corner of the iTunes window to display the Genius sidebar, which is designed to recommend related music from the iTunes Store (Figure 3.7).
At the top of the sidebar, you’ll find entries that include the name of the artist, Also By This Artist (which includes Top Albums and Top Songs entries), and Genius Recommendations. You might also see an iTunes Essentials entry. A small arrow icon next to an entry indicates a potential trip to the iTunes Store. Click an artist’s name, for example, and you’ll be taken to the Store page devoted to that artist. Click the arrow icon next to Genius Recommendations, and iTunes creates a list of those recommendations (though this looks like a playlist, you can’t save it as such).
Figure 3.7 The Genius sidebar.
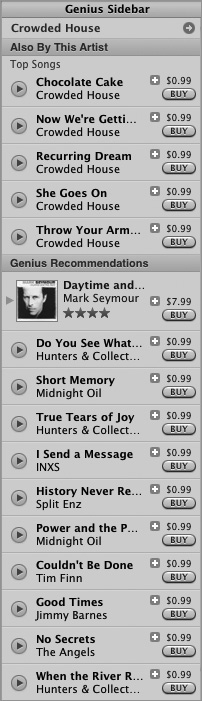
Next to the song selections, you’ll see both a Preview button (denoted by a small Play icon) and a Buy button. To audition 30 seconds of a track, just click the Preview button. If you like what you’ve heard and would like to own the track, click Buy. In the resulting dialog box, you’ll be prompted for your Apple ID and password. Enter that info and click the Buy button, and the track downloads to your computer.
![]() You can sync Genius playlists to your iPod just as you can any other playlists.
You can sync Genius playlists to your iPod just as you can any other playlists.
Genius Mixes
Genius Mixes are new in iTunes 9 and, as I write this chapter, supported only by 2G iPod touches (including the iPod touches released in late 2009), the 5G iPod nano, and the iPhone. Genius Mixes are broader tools than Genius playlists in that they’re created based on genres—Rock, Jazz, and Classical, for example.
The “genius” of Genius Mixes is that their content is still related, much like the content of Genius playlists. Unless you have a small music library, it’s unlikely that iTunes will produce a Genius Mix including AC/DC, Donovan, Sheryl Crow, and Ry Cooder, even though all four artists may have had a Rock genre tag applied to them. Instead, you may have one Rock Genius Mix that includes ’60s artists such as Janis Joplin, Cream, Jimi Hendrix, and The Small Faces. Another Genius Mix could include modern pop artists such as Death Cab for Cutie, The Finn Brothers, The Apples in Stereo, and Feist. So thanks to the enormous database of related music first created when the Genius feature was introduced with iTunes 8, iTunes has the power to create these large mixes that make sense.
Creating them is really easy:
1. Launch iTunes 9 or later.
2. Click the Genius Mixes entry located under the Genius heading in iTunes’ Source list.
3. There is no step 3.
iTunes will create up to 12 Genius Mixes. Each Genius Mix is represented by an album cover that, in turn, features four album covers taken from the music in that Genius Mix (Figure 3.8). An example Rock Genius Mix, then, could include artwork from Coldplay, Radiohead, Oasis, and John Mayer albums.

Unlike Genius playlists, Genius Mixes can’t be edited. In fact, you can’t even see the contents of one of these mixes. What iTunes provides is exactly what you get. To play one, just click its icon, and the first track in the mix plays. To skip to the next track, click the Next button in iTunes’ play controls (located in the top-left corner of the iTunes window) or press your keyboard’s right-arrow key.
To sync Genius Mixes, do this:
1. Select your iPod in iTunes’ Source list.
2. Click the Music tab.
3. Enable the Sync Music option.
4. Enable the Selected Playlists, Artists, and Genres option.
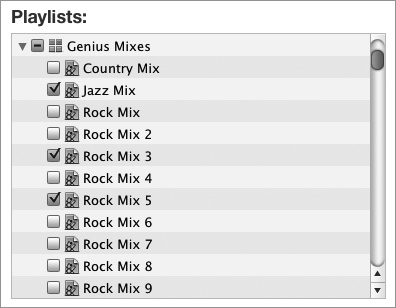
5. In the Playlists column, look for the Genius Mixes entry; then select all of these mixes (by checking the Genius Mixes check box) or specific mixes (Figure 3.9).
Figure 3.9 Selecting Genius Mixes.
6. Sync the iPod.
When you sync a Genius Mix to your iPod touch, a new Genius icon appears at the bottom of the Music-application screen. Tap Genius, and you can select the Genius Mixes on the iPod and play them simply by tapping the Play icon in the center of the screen.
![]() If you choose to sync all your music with the iPod, Genius Mixes will be included automatically. If you don’t have enough room on the iPod to sync your entire music library, however, Genius Mixes won’t be added—which makes sense, as each Genius Mix can include up to 250 tracks.
If you choose to sync all your music with the iPod, Genius Mixes will be included automatically. If you don’t have enough room on the iPod to sync your entire music library, however, Genius Mixes won’t be added—which makes sense, as each Genius Mix can include up to 250 tracks.
Configuring iTunes
Intuitive though it may be, iTunes packs a lot of features and power—enough that I could write an entire book about just this application. I have bigger fish to fry: showing you how to get the most out of your iPod. But part of frying those fish is introducing the key iTunes features that can make using and listening to your iPod more enjoyable. In this section, I examine those features.
Setting iTunes preferences
Choose iTunes > Preferences on a Mac or Edit > Preferences on a Windows PC, and you open iTunes’ Preferences window. Some of the tabs within this window lead to settings that you should know about.
General
I’ve already mentioned that within the General preference, you specify what happens when you insert a CD. Elsewhere in this tab, you find options for showing or hiding certain items in iTunes’ Source list, including Movies, TV Shows, Podcasts, iTunes U, Audiobooks, Applications, Ringtones, Radio, iTunes DJ, and Genius. If you find iTunes’ interface too cluttered, disabling the items you don’t use will clean things up.
One of iTunes’ most important features is hidden behind the Import Settings button in the General preference. Click Import Settings to open the window of the same name, and you find iTunes’ encoder settings—the settings you configure to determine which codec iTunes uses to rip CDs and convert audio files, as well as what bit rates the encoder uses. I explain the workings of encoders and bit rates earlier in this chapter, in the “Import Business: File Formats and Bit Rates” sidebar.
![]() The Import Settings window also includes the Use Error Correction When Reading Audio CDs option. If you’re having difficulty ripping an audio CD (because it’s dirty, for example), enable this option. iTunes will try that much harder to rip the CD properly, though the process will take longer.
The Import Settings window also includes the Use Error Correction When Reading Audio CDs option. If you’re having difficulty ripping an audio CD (because it’s dirty, for example), enable this option. iTunes will try that much harder to rip the CD properly, though the process will take longer.
Playback
Here, you can determine where in the iTunes interface movies, TV shows, and music videos are displayed (in a separate window, for example) and set the default and subtitle languages for movies. It’s also within this preference that you instruct iTunes to play videos in standard definition by default and show closed captions when they’re available. But the most interesting settings here are Crossfade Songs, Sound Enhancer, and Sound Check:
• Crossfade Songs. This setting causes the end of each song to fade out and the beginning of the next track to fade in. For some people, this feature makes for a less jarring listening experience. You can set the length of the crossfade—1 to 12 seconds—with a slider. These settings don’t transfer to the iPod.
• Sound Enhancer. This feature is a kind of audio filter that can expand and brighten the sound coming from iTunes tracks. It’s worth playing with to see whether its results please you. These settings don’t transfer to the iPod either.
• Sound Check. iTunes includes a Sound Check feature that you use to make the volumes of all your tracks similar. Without Sound Check, you may be listening to a Chopin prelude at a lovely, lilting volume and be scared out of your socks when the next track, AC/DC’s “Highway to Hell,” blasts through your brain. With Sound Check on, each track should be closer to the same relative volume. This preference is where you do that.
Sharing
iTunes allows you to easily share your music library or just specific playlists in it with other copies of iTunes running on a local network (and allows those iTunes libraries to be shared with you). You can share your library by enabling the Share My Library on My Local Network option. To seek out other iTunes shared libraries, enable the Look for Shared Libraries option.
Store
As the name implies, this preference is where you tell iTunes how to interact with the iTunes Store. Options include Automatically Check for Available Downloads, Automatically Download Prepurchased Content, Automatically Download Missing Album Artwork, and Use Full Window for iTunes Store. All options but the last one are enabled by default.
Parental
Not all music and video is appropriate for all ages. Within the Parental preference, you can disable podcasts, radio, the iTunes Store (though optionally allow access to iTunes U), and shared libraries, as well as restrict content—certain movies, TV shows, and applications, and explicit material—from the iTunes Store.
Advanced
The Advanced preference is where you tell iTunes the location of your media files and how to organize them. In Chapter 9, I put this preference to good use in shifting an iTunes Library from a cramped startup drive to a more expansive external drive.
Working with the Info window
I talk about tagging a fair amount in this chapter. By tagging, I don’t mean playing the kids’ game, but practicing the subtle art of marking files with identifying bits of information (such as title, artist, album, and genre) so that you can locate and organize them more easily. You do all this in an item’s Info window.
Summary
Should a stranger stop you in the street and demand the format, bit rate, location of a particular track in your iTunes Library, this tab is where you’d look. Additionally, you’ll discover the track’s name, artist, album, sample rate, modification date, play count, and last-played date in the Summary pane.
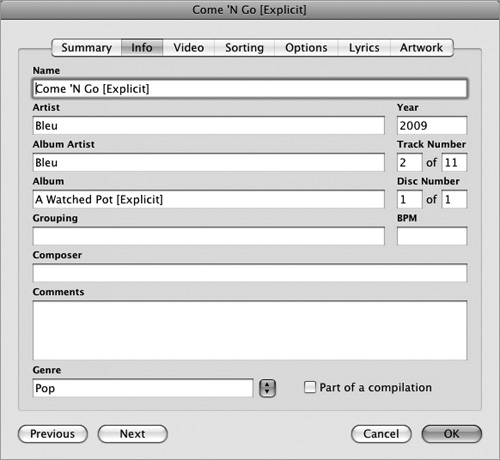
Info
This tab is where all the tagging business takes place. Here, you find fields for such information as name, artist, album, composer, comments, year, and track number, as well as a Genre menu (Figure 3.10). iTunes is pretty good about filling in this information for you, but at times, you may need to tag your own music—when iTunes doesn’t recognize a ripped CD, for example, or when you’ve ripped someone else’s mix CD and iTunes can’t identify its tracks.
Video
When you import TV episodes from sources other than the iTunes Store, that video may lack the proper tags—show name, season, and episode number, for example. The Video tab contains fields for exactly that information.
Sorting
Tracks can be sorted by their real name, artist, album artist, album, composer, and show—or by their sort name, sort artist, sort album artist, sort album, sort composer, and sort show. Why? Suppose that you really like Willie Nelson. As you probably know, Willie has performed duets with every living artist born between 1925 and 1994—sometimes on his albums and sometimes on the duet partner’s album. If you want to listen to all-Willie-all-the-time, you might track down all those duet tracks that aren’t on Willie’s own albums and assign Willie Nelson as the sort artist for those tracks. Do that, and when you sort tracks by artist or search for Willie Nelson, you’ll find these tracks bunched in with the tracks from Willie’s albums.
Options
Within the Options pane, you can adjust a track’s volume so that it’s louder or softer, choose an equalizer (EQ) preset (see the sidebar “EQ and the iPod” toward the end of this chapter), select an item’s media type, and choose a VoiceOver language (for speaking track titles when using an iPod nano or shuffle that supports VoiceOver). For videos, the media type will be music video, movie, TV show, podcast, or iTunes U; for audio files, it will be music, podcast, iTunes U, audiobook, or voice memo.
You can also impose start and stop times on a track. This feature is useful when you can’t stand the first minute of a song or podcast and want to skip that minute automatically whenever you play the track. To do that, enable the Start Time option and then enter 1:00 in the text box.
You’ll also see the Remember Playback Position, Skip When Shuffling, and Part of a Gapless Album options. The first two options are particularly useful for audiobook chapters that you may have ripped. You want to be able to pick up listening where you left off in a 30-minute chapter, and you don’t want your iPod randomly playing the third chapter of Harry Potter and the Usurious Audiobook Purchase when you’re working out.
The last option, Part of a Gapless Album, overrides any crossfade setting that you’ve applied to a song, preventing songs that should naturally flow together (think Dark Side of the Moon or concert recordings) from being crossfaded.
Finally, cock a keen eye at the Rating field in the middle of the pane. Here, you can rate your tracks with one to five stars. (You can also rate tracks by clicking the Rating column next to a track’s name, as well as by selecting a track and choosing a rating from the Rating submenu of the File menu.) Rating your media now is helpful for creating Smart Playlists later, basing those playlists on songs and videos you enjoy.
Lyrics
You recall that your iPod can display lyrics, right? This pane is where you enter them. Regrettably, lyrics don’t come with tracks that you purchase from the iTunes Store (no, not even with the premium-priced iTunes LPs that I discuss in Chapter 4). You’re welcome to enter the lyrics by hand or search for them online. Music publishers have cracked down on Web sites that offer free lyrics, however, so these words are more difficult to find than they once were.
Artwork
iTunes is more than happy to seek out album artwork for you, but it locates artwork only for albums that are available from the iTunes Store. If you import an album that can’t be had from the Store, a generic icon appears in Grid and Cover Flow views. You can add your own artwork simply by dragging a graphic file into the artwork field in the Artwork pane.
![]() You can tag multiple files simply by selecting more than one file and choosing File > Get Info. A Multiple Item Information window appears, and you can add tags therein for such things as artist, album, composer, comments, genre, artwork, and rating. This feature is handy for adding one piece of album artwork to a group of tracks.
You can tag multiple files simply by selecting more than one file and choosing File > Get Info. A Multiple Item Information window appears, and you can add tags therein for such things as artist, album, composer, comments, genre, artwork, and rating. This feature is handy for adding one piece of album artwork to a group of tracks.
Using the Music Application
Now that you’ve filled your iPod touch with tunes, you’d probably like to know how to find and play it. Follow along as I walk through the Music application of the iPod touch.
Cover Flow view
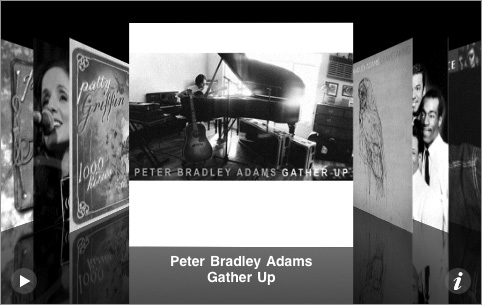
Tap the orange Music icon in the bottom-left corner of your iPod’s Home screen, wait for the Playlists screen to appear (which it does by default when you first tap iPod), and immediately turn the iPod on its side. You’re witnessing the iPod’s Cover Flow view, which lets you browse your music collection by its album or program artwork (Figure 3.11). I don’t care if you never choose to browse your music this way; Cover Flow is the music feature you’ll choose first to impress your friends. They can’t help but oooh in awe when you flick your finger across the screen and the artwork flips by.
Figure 3.11 Cover Flow on the iPod touch.
Should you want to navigate your music in Cover Flow view, you can do so easily:
1. Turn the iPod touch to landscape orientation (it doesn’t matter whether this turn places the Home button on the right or left side; the button works either way), and flick your finger across the display to move through your audio collection.
Albums are sorted by the artist’s first name, so Al Green appears near the beginning and ZZ Top appears close to the end.
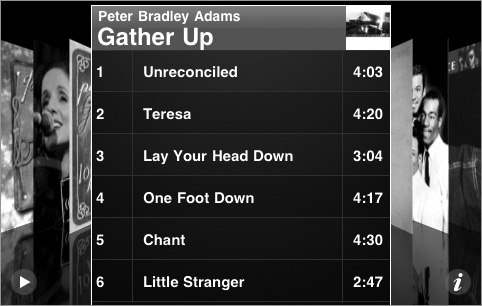
2. When you find an album you want to listen to, tap its cover.
The artwork flips around and reveals the track list of the album’s contents (Figure 3.12).
Figure 3.12 The iPod’s track list.
As with other lists on the iPod that may be longer than the screen, you’re welcome to flick your finger up the display to move down through the list.
3. Tap the track you want to listen to.
Playback begins from that track and plays to the end of the list in the order presented in the track list.
To adjust volume in this view, use the Volume buttons on the side of the phone. To pause playback, tap the Play/Pause icon in the bottom-left corner of the screen or, if you’re listening with the iPod’s headset, press its Center button once.
4. To move to another album, tap the album-art thumbnail in the top-right corner of the cover, swipe your finger to the right or left, or tap the i icon in the bottom-right corner of the screen.
Any of these actions will flip the track list back to the artwork.
![]() While you’re listening to the contents of one album, you’re free to view the contents of another. Just flick your finger across the screen to move through your collection. Go ahead and tap an album to see its contents. It won’t play until you tap a track.
While you’re listening to the contents of one album, you’re free to view the contents of another. Just flick your finger across the screen to move through your collection. Go ahead and tap an album to see its contents. It won’t play until you tap a track.
Music Now Playing screen
Turn your iPod so that it’s in portrait orientation, and Cover Flow disappears; it works only in landscape orientation. What you’re left with when you flip the iPod to portrait orientation is the Music Now Playing screen. This screen is what you’ll use to perform several tasks, including navigating through an album, fast-forwarding, switching on shuffle or repeat play, and rating your tracks. This screen differs from the Now Playing screen that you see when playing a video, podcast, or audiobook. (I discuss how it differs later in the chapter.)
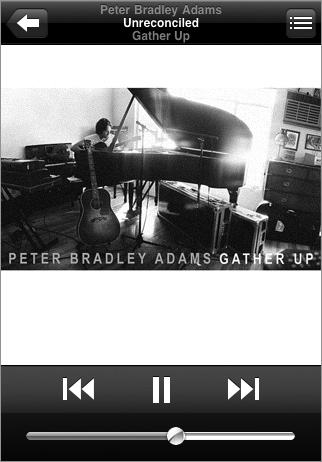
This Now Playing screen has two main views: standard play and track list.
Standard play
The view you see first is straightforward. From the bottom of the screen to the top, you see a volume slider; play controls that include Previous/Rewind, Play/Pause, and Next/Fast Forward icons; album art; a Back icon; artist, track title, and album title information; and a Track List icon (Figure 3.13).
Figure 3.13 The Now Playing screen.
The volume slider operates like its real-world equivalent. Just drag the silver ball on the slider to the right to increase volume and to the left to turn the volume down. (You can use the iPod’s mechanical volume buttons to adjust volume as well.)
The Previous/Rewind icon earns its double name because of its two jobs. Tap it once, and you’re taken to the beginning of the currently playing track or chapter of the currently playing podcast or audiobook. Tap it twice, and you move to the previous track or chapter. Tap and hold, and the currently playing track rewinds.
The Play/Pause icon toggles between these two functions.
The Next/Fast Forward icon works like Previous/Rewind: Tap once to move to the next track in the track list or chapter in an audiobook or podcast; press and hold to fast-forward through the currently playing track.
I’ll skip album art for a second and move to the Back icon in the top-left corner of the screen. Tap this icon, and you’ll move to the currently selected track-view screen. If you’ve chosen to view your music by playlist, for example, you’ll see your list of playlists. When you tap the Back icon and are taken to one of these screens, a Now Playing button appears in the top-right corner of the current screen. This icon appears whenever you’re in the iPod area, making it easy to move to the Now Playing screen.
Track list
In the top-right corner of the Now Playing screen is the Track List icon. Tap this icon, and you get that album-cover flip effect again and a list of the current album’s contents (Figure 3.14 on the following page). (Naturally, if you have only a couple of tracks from that album on your iPod, you’ll see just those tracks.) Just as you can in Cover Flow view, tap an entry in the track list to listen to that track. Again, tracks play in order from where you tapped.
Figure 3.14 A track list in the Now Playing screen.
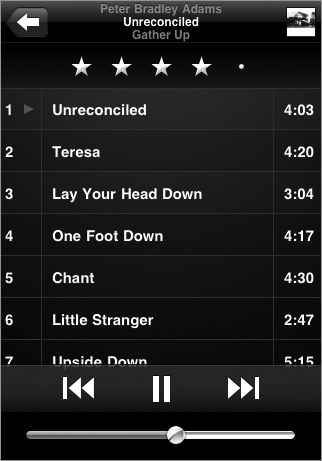
The Track List screen also includes a means for rating tracks. Just above the track list, you’ll see five gray dots. To assign a star rating from 1 to 5, simply tap one of the dots. Tap the fourth dot, for example, and the first four dots turn to stars. You can also wipe your finger across the dots to add or remove stars. These ratings are transferred to iTunes when you next sync your iPod touch. Tap the artwork image to flip the track list and return to the Now Playing screen.
Additional controls
While you’re in the Now Playing screen, tap the artwork in the middle of the screen, and additional controls drop down from above (Figure 3.15). Starting from the left, you’ll find a Repeat icon. Tap this icon once, and the contents of the currently playing album, audiobook, or podcast will repeat from beginning to end. Tap the Repeat icon twice, and just the currently playing selection will repeat.
Figure 3.15 Tap the Now Playing screen to see additional controls.
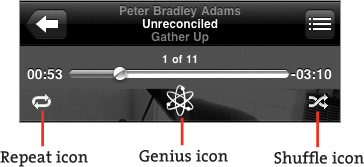
A timeline with playhead comes next. To its left is the location of the playhead in minutes and seconds—1:40, for example. To its right is the track’s remaining time. Drag the playhead with your finger to move to a different position in the currently playing track. You can do this while a track is playing and hear where you are as your drag (or scrub, as it’s known in the iTunes business).
To the far right is the Shuffle icon. Tap this icon once so that it turns blue and the contents of the current album are shuffled; tap it again to turn shuffle off.
If you’ve added lyrics to a track (as you can in the Lyrics tab of the track’s Info window in iTunes), those lyrics will appear on the iPod’s screen when you enter this view.
Below the timeline is the Genius icon. As you saw earlier in this chapter, Genius is a very cool feature—so cool, in fact, that it deserves to be called out. I do that in the next section.
True Genius
After you’ve enabled the Genius feature in iTunes and synced your iPod touch, you can create Genius playlists on your iPod. Here are two ways to do this.
1. Launch the Music app, and tap Playlists at the bottom of the screen.
2. Tap Genius Playlist at the top of the screen.
The Songs screen appears.
3. Tap a song that you want to use as the basis of the Genius playlist.
The iPod constructs a playlist of up to 25 tracks (including the one you selected) that it believes are related. The track you selected starts playing.
4. Tap the Back icon to view the playlist.
Doing so takes you to the Genius screen, where you see the list of tracks (Figure 3.16). To create a new Genius playlist, tap New, and the process begins again. To have the iPod construct a different playlist based on the same selection, tap Refresh. Finally, if you want to save your playlist, tap Save.
Figure 3.16 The iPod’s Genius Playlist screen.
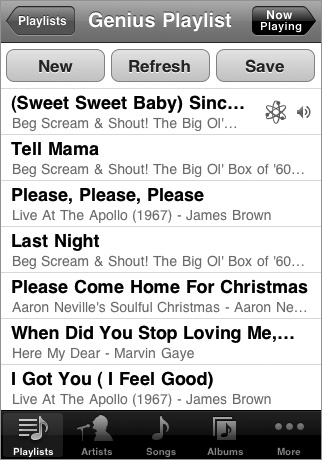
When you tap Save, Genius creates a playlist that bears the name of the selected track. So, for example, if you based a Genius playlist on “Here Comes the Sun,” the playlist will be called Here Comes the Sun. Its name is followed by a Genius icon in the list of playlists so that you know its origin.
Or …
1. While viewing the Now Playing screen, tap the screen so that the timeline appears near the top of the screen; then tap the Genius icon below the timeline (refer to Figure 3.15 earlier in this chapter).
The iPod’s progress icon appears briefly, followed by a Genius screen that features, at the top, the song you selected as the basis for the playlist. The up-to-24 additional songs appear below it.
2. Create a new Genius playlist, try again, or save the playlist.
When you sync your iPod touch to your Mac or PC, the Genius playlists you created on your iPod appear in your computer’s copy of iTunes, marked with the Genius icon.
Podcasts and audiobooks
Start a podcast or audiobook playing on your iPod touch, and you’ll notice that the controls at the bottom of the screen—Previous/Rewind, Play/Pause, and Next/Fast Forward—are exactly the same. The controls above are not.
Although you see the expected timeline and time readouts near the top of the screen, the icons you see just below them when playing an audio podcast, video podcast, or audiobook are different (Figure 3.17).
Figure 3.17 Additional controls for listening to an audio podcast.
Depending on which kind of media you’re playing, all these icons shake out this way.
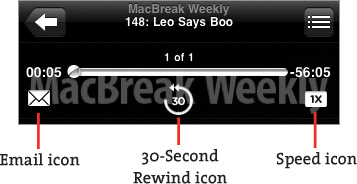
This icon appears when you’re playing a video or audio podcast. Tap this icon, and in most cases an unaddressed email message opens, bearing the message Check out this podcast on iTunes, followed by a link to that podcast. When the recipient clicks or taps that link, iTunes launches and takes her to that podcast’s page.
I say in most ca ses because sometimes the email link does nothing—presumably because the iPod touch doesn’t have the email address for the podcast and, therefore, can’t embed it in an email message.
30-Second Rewind
Tap this icon while an audio podcast, video podcast, or audiobook plays; it jumps back 30 seconds and plays from that point.
Speed
With this icon, you can change the playback speed of an audio podcast or audiobook. By default, playback speed is set at 1x, which is normal speed. Tap the Speed icon once to change it to 2x, and the speed doubles (without changing pitch). Tap the icon again, and it changes to 1/2x, indicating that the audio plays at half speed (again, without changing pitch). One more tap takes you back to 1x.
Loop
The Loop icon appears in the far-left corner of the screen, below the timeline, when you listen to an audiobook. Tap the icon once, and the entire audiobook loops. Tap it twice, and the currently playing chapter loops.
Shuffle
The Shuffle icon appears in the far-right corner of the screen when you play a video podcast. If you activate it, when the currently playing video podcast concludes, the iPod shuffles to another episode of that same podcast. If you have only one episode of that podcast, you return to that podcast’s screen rather than shuffle to an episode of a different video podcast.
Track List
In the top-right corner of the screen is the Track List icon—which in this case isn’t really a track list. Instead, when you tap it, you see an audiobook’s chapters or the chapters of an “enhanced” audio podcast. (What makes these podcasts “enhanced” is their inclusion of graphics and chapter markers.) To navigate easily through an audiobook or enhanced podcast, just tap the chapter you want to move to.
iPod Voice Control
If you have a 32 GB or 64 GB iPod touch released in late 2009, you can control audio playback to an extent. Just press and hold the Center button of the iPod’s headset controller, and the iPod’s Voice Control screen appears. Wait for the double beep, and issue any of the following commands to control music functions on the iPod:
• “Play” or “Play music”: The iPod will play the last song that it believes you were listening to and then continues playing the album or playlist that the song is part of. If no last song was playing, the iPod picks a song at random.
• “Pause”: The iPod pauses the currently playing track.
• “Next song”: You get the next song in the album or playlist.
• “Previous song”: You get the previous song in the album or playlist.
• “Play album” (name of album): If you say “Play album Court and Spark,” and you have that album (or a portion of it) on your iPod touch, that’s just what the iPod will do.
• “Play artist” (name of artist): Same idea here. Say “Play artist Jeff Lorber,” and the iPod will pick a track by the estimable jazz keyboard player and then continue playing his work in random order.
• “Play playlist” (name of playlist): Shout out “Play playlist 50 Fabulous ’70s Hits by ’80s Artists!” to hear that playlist played from beginning to end.
• “Shuffle”: Use this command to shuffle the currently playing playlist.
• “What’s playing?” or “What song is this?” or “Who sings this song?” or “Who is this song by?”: All these questions provide an answer along the lines of “Now playing name of song by name of artist.”
• “Genius” or “Play more like this” or “Play more songs like this”: Any command like these directs the Genius feature to play songs in the vein of the currently playing song.
• “Cancel”: Never mind.
Music content views
The iPod’s Music application provides several ways to organize your media. Look across the bottom of the screen (anywhere but in the Now Playing screen), and you’ll see five icons for doing just that: Playlists; Artists; Songs; Albums; and More, which leads you to even more options (Figure 3.18 on the following page).
Figure 3.18 The icons you find at the bottom of most Music-application screens.

![]() If you’ve synced a Genius Mix to your iPod touch, those icons will be Genius, Playlists, Artists, Songs, and More. The Album entry is now located at the top of the More screen.
If you’ve synced a Genius Mix to your iPod touch, those icons will be Genius, Playlists, Artists, Songs, and More. The Album entry is now located at the top of the More screen.
These icons are largely self-explanatory. If you’ve synced a Genius Mix to your iPod touch, it (and others you’ve synced) are playable when you tap Genius. To play one, just tap the Play icon on the screen. To navigate to other Genius Mixes, swipe your finger from right to left.
When you tap Playlists, you’ll see a list of all the playlists you’ve synced to your iPod. Tap a playlist to move to a screen where all the tracks on the playlist appear in the order in which they were arranged in iTunes. If you tapped the Album heading when the playlist was displayed in iTunes, for example, the tracks appear in that order. Tap a track, and you’re taken to the Now Playing screen, where the track begins playing.
Whenever you choose a list of tracks in one of these views, Shuffle is the obvious entry at the top of the list. (I say obvious because if you flick down, the Search field appears, thus becoming the first entry.) Tap Shuffle, and the contents of that collection of tracks play in random order.
Tap Artists, and you’re presented with an alphabetical list of the artists represented on your iPod. If your iPod has tracks from more than one album by the selected artist, when you tap the artist’s name, you’ll be taken to that artist’s screen, which displays the titles of the artist’s represented albums (along with thumbnails of their cover art). To view tracks from a particular album, tap its name. To view all songs by the artist, tap All Songs in this screen.
The Songs screen lists all the songs on your iPod. Like any list that contains several dozen (or more) entries, this one displays a tiny alphabet along the right side of the screen. To navigate to a letter quickly, tap it (as best you can, as the letters are really small) or slide your finger along the alphabet listing to dash through the list.
![]() If the first word of a list entry is A or The, the second word in the entry is used for sorting purposes. The Beatles is filed under B, for example, and A Case of You appears under C.
If the first word of a list entry is A or The, the second word in the entry is used for sorting purposes. The Beatles is filed under B, for example, and A Case of You appears under C.
The Albums screen lists albums in alphabetical order and displays a thumbnail of the cover art next to the name of each album.
The iPod touch’s display has limited space, yet you have many more ways to organize your media—by audiobooks, compilations, composers, and genres, for example. That’s exactly what the More icon is for. Tap it, and you’ll see just those items I list, as well as iTunes U and Podcasts entries. Tap these entries, and most of them behave pretty much as you’d expect, with a couple of variations:
• The Compilations entry lists only those albums that iTunes denotes as compilations. These items are usually greatest-hits collections, soundtracks, or albums on which lots of artists appear—tribute albums or concert recordings, for example.
• The Podcasts screen displays all the podcasts on your iPod, along with their cover art. Tap a podcast title, and you’re taken to a screen that lists all that podcast’s episodes. Blue dots denote podcasts that you haven’t listened to yet.
Using the Videos Application
Like recent click-wheel iPods, the iPod touch plays videos. Some people would say that unlike these iPods, the touch makes videos actually watchable—bright and plenty big enough for personal viewing. Here are the ins and outs of iPod video.
Choosing and playing videos
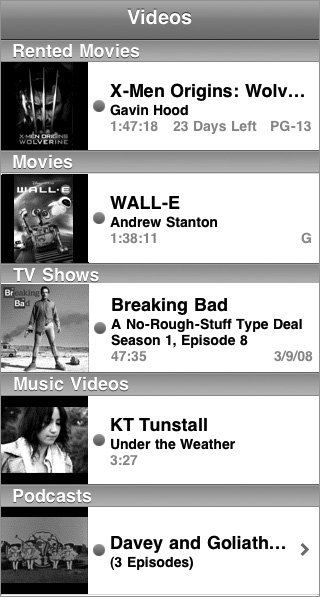
Playing videos within the Video application is straightforward. Tap the Videos app at the bottom of the iPod’s Home screen, and you’ll see your videos listed by categories: Rented Movies (if any have been copied to the iPod), Movies, TV Shows, Music Videos, and Podcasts (Figure 3.19 on the following page). Each video has a thumbnail image of its artwork next to it. Depending on the original source of the video, you may see title, artist, season, and episode information. The Rented Movies section, for example, tells you how many days you have left in the rental period to begin watching each movie (or how many hours you have left to finish watching a movie you’ve started). You’ll definitely see the length of single videos—1:56:26, for example. If you have multiple episodes of a TV show, you’ll see the name of the show as well as the number of episodes on the iPod.
Figure 3.19 An elongated view of the iPod’s Videos screen.
To play a video, tap its list entry. Videos play only in landscape orientation, regardless of which way you have the iPod turned.
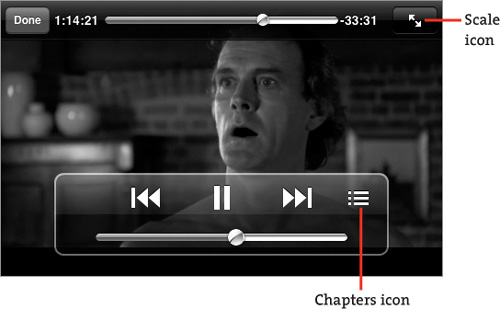
Navigating the video Now Playing screen
The video Now Playing screen is similar to the music Now Playing screen except that the play controls and timeline aren’t visible unless you make them so. To display these controls, tap the video (Figure 3.20). You see the usual play controls—Previous/Rewind, Play/Pause, and Next/Fast Forward icons, and a volume slider—as well as a timeline near the top of the screen. The volume slider and timeline work just like they do in the music Now Playing screen. Drag the volume slider’s volume indicator (represented by the silver dot) to increase or decrease volume, and move the timeline’s playhead to a new location in the video.
Figure 3.20 A video Now Playing screen.
![]() Cool as these controls look, you don’t need to pull them up every time you want to adjust the volume. Just use the iPod’s mechanical volume buttons. Or, if your iPod touch includes a headset controller, you can put its Volume Up and Volume Down buttons to good use.
Cool as these controls look, you don’t need to pull them up every time you want to adjust the volume. Just use the iPod’s mechanical volume buttons. Or, if your iPod touch includes a headset controller, you can put its Volume Up and Volume Down buttons to good use.
You can advance to the next chapter in a video by tapping the Next/Fast Forward icon. (If the video has no chapters, nothing happens when you tap this icon.) If a movie has chapters, you can also tap the Chapters icon that appears to the right of the Next/Fast Forward icon and choose the chapter you want from the Chapter Guide menu that appears. This icon won’t appear when you view a movie without chapters.
If you tap and hold Next/Fast Forward, the video speeds up. To retreat a chapter, tap Previous/Rewind twice (tap once to return to the beginning of the currently playing chapter). The play controls list the chapter you’re currently watching—Chapter 13 of 32, for example.
The video Now Playing screen has a control you may not have seen before: the Scale icon, in the top-right corner of the screen. Tapping this icon toggles the display between Fill Screen and Fit to Screen. (You can also toggle these views by double-tapping the display.)
Fill Screen is similar to DVDs you’ve seen that say the movie was altered to fit your TV. The iPod’s entire screen is taken up by video, but some of the content may be chopped off in the process.
Fit to Screen displays the entire video, similar to a letterbox movie you may have seen. In this view, you may have black bars at the top and bottom or on the sides.
When you finish watching a video, tap the screen and then tap the Done icon in the top-left corner of the screen. You’ll return to the Videos screen.
![]() By default, the iPod remembers where you left off. When you next play this video, it will take up from the point where you stopped playback. To change this behavior so that you always start from the beginning of a video, tap the Video entry in the Settings screen and then tap the Start Playing entry. You can choose From Beginning or Where Left Off.
By default, the iPod remembers where you left off. When you next play this video, it will take up from the point where you stopped playback. To change this behavior so that you always start from the beginning of a video, tap the Video entry in the Settings screen and then tap the Start Playing entry. You can choose From Beginning or Where Left Off.
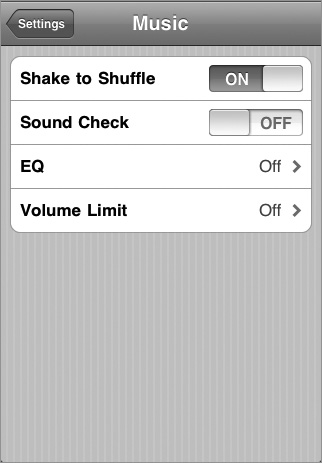
Applying Music Settings
Like other iPod touch applications, the Music and Videos apps get their own little entries in the iPod’s Settings screen. I’ll start with Music Settings.
Shake to Shuffle
If you’d like to engage the iPod’s shuffle feature, just switch on this option and give the iPod a vigorous shake. This shake does more than shuffle; it also immediately causes the iPod to stop playing the current song and move to another one. So even though you can’t vent your frustration at a particularly awful song via Voice Control, you’re free to violently shake the iPod while shouting “I … hate … this … song!”
Sound Check
I talk about Sound Check in iTunes earlier in this chapter. This feature, when enabled in iTunes, also works on the iPod. You switch it on within the Music Settings screen.
EQ
EQ (or equalization) is the process of boosting or cutting certain frequencies in the audio spectrum—making the low frequencies louder and the high frequencies quieter, for example. If you’ve ever adjusted the bass and treble controls on your home or car stereo, you get the idea.
The iPod comes with the same EQ settings as iTunes:
• Off
• Acoustic
• Bass Booster
• Bass Reducer
• Classical
• Dance
• Deep
• Electronic
• Flat
• Hip Hop
• Jazz
• Latin
• Loudness
• Lounge
• Piano
• Pop
• R & B
• Rock
• Small Speakers
• Spoken Word
• Treble Booster
• Treble Reducer
• Vocal Booster
Although you can listen to each EQ setting to get an idea of what it does, you may find it easier to open iTunes; choose Window > Equalizer; and then, in the resulting Equalizer window, choose the various EQ settings from the window’s pop-up menu. The equalizer’s ten band sliders will show you which frequencies have been boosted and which have been cut. Any slider that appears above the 0 dB line indicates a frequency that has been boosted. Conversely, sliders that appear below 0 dB indicate frequencies that have been cut.
Volume Limit
Though Apple takes pains to warn you in the iPod’s documentation that blasting music into your ears at full volume can lead to hearing loss, some people just can’t get enough volume. If your child is one of those people, consider setting a volume limit for the iPod’s headphone port. To do so, tap Volume Limit in the Music Settings screen, and in the resulting Volume Limit screen, use the volume slider to set an acceptable volume. (Have a track playing when you do this so that you can listen to the effect.) To keep your kid from changing your settings, tap Lock Volume Limit. You’ll see a Set Code screen, where you’ll enter and confirm a four-digit security code (Figure 3.21). When this code is set, the Lock Volume Limit icon changes to Unlock Volume Limit. Tap this button, and you’ll be prompted for the security code.
Figure 3.21 Setting a volume limit for the iPod touch.
Applying Video Settings
And now to the settings that you find when you tap Video in the Settings screen.
Start Playing
I mention this setting in a little tip earlier in the chapter. Start Playing lets you choose whether videos that you return to later play from where they left off or from the beginning.
Closed Captioning
Some videos that you purchase from the iTunes Store include closed captions. You can choose to show those captions by flicking this switch to On.
Widescreen
This first option in the TV Out section of the Video Settings screen lets you specify whether videos played on the iPod connected to a television set with a compatible cable or Dock will play in widescreen or standard-screen view. Why wouldn’t you choose widescreen if your iPod contains a widescreen movie? If you have such a movie and are attempting to display it on a small-screen TV set, the picture could be pretty narrow and tiny. If you turn this option off, the entire TV screen will be filled with the picture (though both sides of the movie will be clipped off so that this screen-filling can take place).
TV Signal
The world has two major TV standards: NTSC (used in North and South America and much of Asia) and PAL (used in much of Europe and Australia). The iPod touch can output video to a television set in either standard. You use this setting to choose NTSC or PAL.