
7. Photos and YouTube
Your iPod touch is an audio wonder, but it also offers its share of visual delights. Although it lacks the 5G iPod nano’s and iPhone’s camera, it’s capable of displaying pictures that you sync to the iPod, as well as those that you receive via email and copy from Safari. Also on the visual front, your iPod touch can play YouTube videos in a separate YouTube application—no Web browser required. In this chapter, I scrutinize both talents in detail.
You Ought to Be in Pictures
Tapping Photos in the iPod’s Home screen is the digital equivalent of flipping open your wallet to reveal a seemingly endless stream of pictures of the kids, the dog, and that recent trip to Coober Pedy. The iPod’s Photos application, however, is no mere repository for pictures. Flick a finger, and you’re flying from photo to photo. Spread your fingers, and you’ve zoomed in on a picture’s most poignant portion. If you have a more formal presentation in mind—a showing of your child’s first birthday party for Grandma and Grandpa, for example—you can create something far grander in the form of a slideshow. And if you have movies in your Mac’s iPhoto library, the Photos application can play those too. To learn about these and other visual wonders, just follow along.
The face of Photos
When you tap Photos, you see the Photo Albums screen, which acts as the gateway to the images stored on your camera (Figure 7.1). In this screen, you’ll find at least one entry, and there’ll be more after you sync photos to your iPod.
Figure 7.1 The Photo Albums screen.
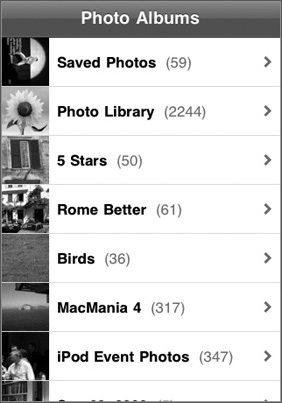
The first entry is Saved Photos. Tap it to see the images you’ve captured by using the iPod’s screen-capture shortcut (hold the Home button while quickly pressing the Sleep/Wake button), the images that have been sent to you in email, and the images you’ve copied from Safari.
To the left of this entry in the Photo Albums screen, you’ll see a thumbnail image of the last picture added to the album. To the right of the entry, in parentheses, you’ll see the combined number of images that this album contains—Saved Photos (17), for example. The > character at the far-right edge of the screen indicates that when you tap this entry, you’ll be taken to another screen. That other screen, called Saved Photos, contains thumbnail images of all the photos in this album.
The next entry, Photo Library, contains all the photos on your iPod save for those in the Saved Photos library. It too bears a thumbnail (not one of your images, but a sunflower), and it displays the total number of images in the library—Photo Library (2239), for example. Tap this entry, and in the resulting Photo Library screen, you’ll see thumbnail images of all the photos on your iPod (again, excluding the Saved Photos images).
As you learned in Chapter 2, you can sync photo albums created by such programs as iPhoto, Aperture, Photoshop Elements, and Photoshop Albums. When you do, these albums appear in the Photo Albums screen as separate entries, each featuring a thumbnail of the first image in the album as well as the number of images in the album—Father’s Day (48) or Family Holiday (92), for example.
When you select your Pictures folder (Mac, Windows Vista, and Windows 7), My Pictures (Windows XP), or a folder of your choosing within iTunes’ Photos tab, any folders contained within those folders are presented as separate albums. So, for example, if your Pictures folder holds three folders that contain pictures—say, Betty’s Birthday, Dog Polisher, and Cheeses Loved and Lost—each of those items appears as a separate album in the Photo Albums screen. Again, each album lists the number of images it contains in parentheses.
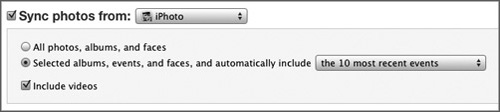
If you’re a Mac user and store your pictures in iPhoto ’09, you’re probably aware that iPhoto automatically groups pictures taken during the same general period—a single day, for example. In the Photos tab within iTunes, you can ask that iPhoto’s 1, 3, 5, 10, or 20 most recent events be synced to your iPod (Figure 7.2). Additionally, with iTunes 9, you can sync Faces albums to your iPod touch (as I explain in Chapter 2).
Figure 7.2 Sync iPhoto’s most recent events to your iPod.
iPhoto users have one additional advantage: When you connect a 5G iPod nano, an iPhone 3GS, or one of today’s pocket camcorders (such as Pure Digital’s popular Flip camcorders), iPhoto will offer to import that device’s video. I’ll explain the mechanics of this process shortly.
Picture and movie viewing
As I mention earlier in this chapter, when you’re in an album’s screen, you see all the pictures in that album arrayed four across as thumbnail images (Figure 7.3). You can see 20 complete thumbnails onscreen. If your album contains more than 20 images, just flick your finger up across the display to scroll more images into view. To see a picture or movie full-screen, just tap it.
From this thumbnails screen, you can also copy pictures and movies. To do that, just tap and hold the picture or movie you want to copy. A Copy bubble will appear. Tap it, and the item is copied to the iPod’s clipboard.
Figure 7.3 A photo album’s thumbnail images.

From this thumbnails screen, you can also copy pictures and movies. To do that, just tap and hold the picture or movie you want to copy. A Copy bubble will appear. Tap it, and the item is copied to the iPod’s clipboard.
Currently, the iPod’s Mail application is the only Apple application that lets you paste images and movies.
![]() If you attempt to paste images or movies into a note that you create in the Notes application, you paste only the names of the items, not the images or movies themselves.
If you attempt to paste images or movies into a note that you create in the Notes application, you paste only the names of the items, not the images or movies themselves.
Setting Album thumbnail-screen options
You know that when you tap the name of an album, that album appears with its contents displayed as thumbnails. At the bottom of the album screen are two buttons: Options (represented by an arrow rising out of a picture frame) and Play.
The Play button. Tapping this button, regardless of the kind of album you’ve selected, starts a slideshow of the pictures in that library. You can view slideshows in either horizontal or vertical orientation.
The timing and transitions of a slideshow are determined by options set for the Photos entry in the iPod’s Settings screen. You have the option to play each slide for 2, 3, 5, 10, or 20 seconds, and you can choose among Cube, Dissolve, Ripple, Wipe Across, and Wipe Down transitions.
When you tap the screen during a slideshow, transparent gray bars appear briefly at the top and bottom of the screen. The top one displays a left-pointing arrow bearing the name of the currently selected photo album. As with most iPod screens, you tap this arrow to move up one screen in the iPod’s hierarchy. You’ll also see an entry such as 8 of 48, which tells you which one of the total number of pictures you’re looking at. The bottom bar includes an Options button, along with Previous and Next buttons. (I describe these buttons in “Working with the picture screen” later in this chapter.)
The Options button. When you tap this button while viewing the thumbnail images of the Saved Photos screen, you’ll see three buttons at the bottom of the screen: Share, Copy, and Delete. They work this way:
• Share. Tap one or more images and then tap Share, and two or three buttons scroll up from the bottom of the screen. The first, Email, does what you’d expect. The selected images are imported into an empty email message. Just fill in the recipient and add a Subject line, and you’re ready to send.
If you have a MobileMe account configured on your iPod, and you’ve selected a single image or movie, a Send to MobileMe button will also be present. Tap it, and a MobileMe screen appears. Within this screen, you assign a title to your image or movie and, optionally, add a description. Next, select one of the MobileMe Galleries you’ve published. (You must have published such a gallery for this option to work.) Finally, then tap the Publish button. The image or movie will be uploaded to the selected MobileMe Gallery.
• Copy. Tap this option, and the selected images and/or movies are copied to the iPod’s clipboard. Then you can paste them into compatible applications (refer to “Picture and movie viewing” earlier in this chapter).
• Delete. Select images and/movies and tap Delete, and they’re removed.
When you’re viewing any album’s thumbnail page other than Saved Photos, you’ll find just the Share and Copy buttons. They perform exactly the same way as the options I’ve just described.
Setting picture-screen options
When you tap a thumbnail image, you’ll see that image and, briefly, a gray bar along the bottom that contains three buttons: Options, Back, and Next. Back and Next are obvious, but Options presents a couple of choices that aren’t available in an album’s thumbnails screen.
When you tap the Options button, the bottom of the screen rolls up to display four or five buttons—Email Photo, Send to MobileMe (this is the “or five” button; it won’t appear if you don’t have a MobileMe account on your iPod), Assign to Contact, Use As Wallpaper, and Cancel (Figure 7.4).
Figure 7.4 Options available in the picture screen.
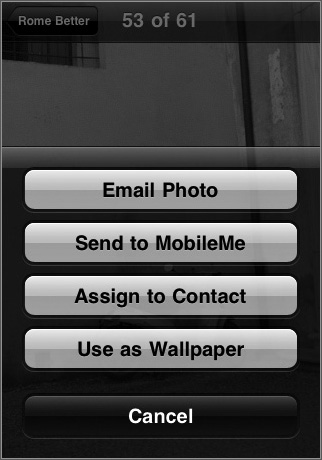
You know what Email Photo and Send to MobileMe do. As for the other two:
• Assign to Contact. You recall from Chapter 5 that you can assign pictures to the names in the Contacts application. This button is one other avenue for doing that.
• Use As Wallpaper. When your iPod’s screen goes black, it hasn’t turned itself off. Rather, it’s locked itself and switched off the screen to save power. When you click the Home button to bring the screen back to life, you see the Locked screen. The background image for this screen is the iPod’s wallpaper. If you’d like that wallpaper to be the currently displayed image, tap this button.
Orienteering
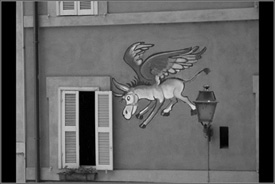
For those of you keeping score at home, Photos is one of those areas of the iPod that has always worked in both portrait and landscape orientation. When viewing pictures and movies, it’s best to view them in the orientation in which they were originally shot. So, for example, if you shot a picture holding a camera the “normal” way, you’d turn the iPod on its side to view the picture in landscape orientation (Figure 7.5). If you turned the camera 90 degrees to take another picture, hold the iPod in its normal orientation to look at that image in portrait view.
Figure 7.5 Widescreen picture view.
The same goes for videos that you’ve synced from iPhoto. Hold the iPod normally, and you’ll see black bars above and below the video. Turn the iPod on its side, and the video should fill the screen.
Working with the picture screen
In addition to letting you rotate your pictures by flipping your iPod around, the screen in which you view individual images offers some cool features. When viewing a picture in Saved Photos, an album, or the Photo Albums screen, you’ll briefly see a transparent gray control bar at the bottom of the screen, displaying three symbols: Options, Previous, and Next (Figure 7.6). This control bar conveniently disappears after a couple of seconds so that you can see the complete picture without obstruction. To bring it back, just tap the display.
Figure 7.6 Control-bar options in the picture screen.
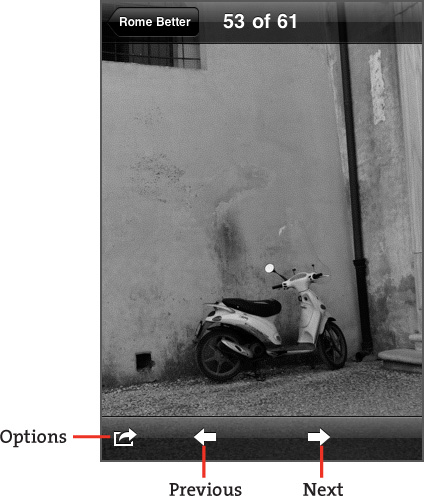
When you view a picture in the Saved Photos album, you see one additional icon: Trash. If you’ve synced or captured an image with the iPod’s screen-shot button combination and now regret that action, just tap the Trash icon, and in the sheet that appears, tap the red Delete Photo icon.
The left- and right-arrow icons that represent the Previous and Next commands do just what they suggest. Tap the left arrow, and you go back to the previous image in the album. Tap the right arrow, and you’re on to the next image. If you tap and hold these icons, you zip through your pictures at increasing speed.
Viewing pictures
Tapping those Previous and Next icons is the less impressive way to move from picture to picture. For a far more stirring demonstration of the iPod’s slickness, swipe your finger to the left to advance to the next picture or to the right to retreat one picture. You’re guaranteed to get an “Oooh!” from the audience on this one.
While you’ve got your audience in the “Oooh”ing mood, try this: Double-tap an interesting spot in a picture. Like magic, the screen zooms and places that spot as close to the center of the screen as it can. Drag your finger on the picture to reposition it. If you’d like greater control of how large the image is, use the spread gesture (which I discuss in Chapter 1) to make it grow incrementally. Regrettably, the iPod won’t remember how you’ve repositioned and resized the picture. Also regrettably, you can’t swipe to the next picture until you’ve restored the picture to its original size. You can do this by double-tapping the display again or by pinching the image down to its native size.
Swiping is good at any time, even during a slideshow. If, while viewing a slideshow, you’d like to take control, just tap the display to stop the slideshow, or swipe your finger to the left to advance or right to go back. When you manually navigate to the photo that precedes or follows the one on view, the slideshow is canceled. To restart it, you must return to the album screen and tap the Play button, which starts the show from the first image.
These settings are the defaults. If you’ve configured the Photos settings so that the Repeat and Shuffle options are on, the slideshow will behave a bit differently. To begin with, the show will reach the end and then start over, continuing to play until you tell it to stop by tapping the display. And if Shuffle is on, the photos in the selected album will play in random order.
Viewing movies
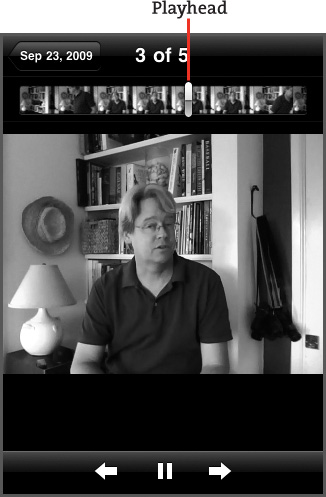
When you tap a movie that you’ve synced to the iPod, you see a different interface from what you’re accustomed to seeing for pictures. At the bottom of this screen are three buttons: Back, Play, and Next. To move to the previous movie in the album (if there is one), tap Back. To travel to the subsequent movie, tap Next. And to play the movie, tap either the Play button at the bottom of the screen or the larger Play button in the middle of the screen. (When you tap either button, the Play button at the bottom of the screen changes to a Pause button.)
Along the top of the screen is a series of thumbnail images (Figure 7.7 on the following page), which is the movie timeline. On this timeline is a narrow silver playhead. To navigate quickly through the movie—forward or backward—just drag the playhead. You can get much finer control by tapping and holding the playhead. When you do, the timeline expands to show a subset of the thumbnail images closest to the playhead.
![]() In the thumbnails screen of an album that holds nothing but movies, you’ll see an Options button, just as you’d see this button on any other thumbnails screen. Tap it, however, and you see a screen that reads No Photos or Videos. Weird.
In the thumbnails screen of an album that holds nothing but movies, you’ll see an Options button, just as you’d see this button on any other thumbnails screen. Tap it, however, and you see a screen that reads No Photos or Videos. Weird.
Figure 7.7 Viewing a movie in the Photos application.
YouTube
YouTube remains the Big Cheese for watching politicians kill their careers with a few ill-chosen words, frat boys set themselves on fire, and felines impersonate Elvis. Because YouTube is so popular, it only makes sense that the iPod offers you a way to watch its content. It does via the YouTube application.
Navigating YouTube
Tap the YouTube icon in the iPod’s Home screen, and you’ll see a screen that resembles the one you view when you enter the iPod’s Music area. Like the Music screen, this one has five icons along the bottom. By default, these icons are Featured, Most Viewed, Search, Favorites, and the ever-popular More (Figure 7.8).
Figure 7.8 Icons in the YouTube screen.

Here’s what you’ll find when you tap each icon.
Featured
Tap Featured, and you get a list of YouTube videos that the service believes most worthy of your attention (Figure 7.9). To play one, just tap it. The video will stream to your iPod via a Wi-Fi connection. (If your iPod isn’t connected to a Wi-Fi network, of course, you’ll see nothing at all.) When you scroll to the bottom of the list, you’ll see a Load More entry. Tap it, and more videos are added to the list.
Figure 7.9 Featured YouTube videos.
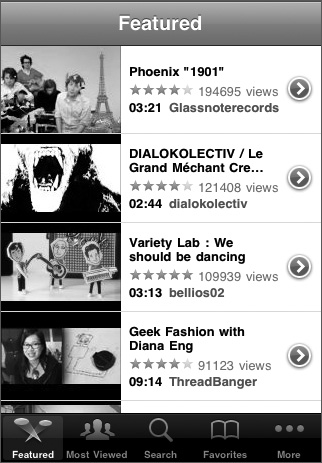
If a video’s title, such as Simon’s Cat ‘Let Me In!’, doesn’t provide you enough information, feel free to tap the blue icon to the right of the video’s title. When you do, you’ll see the name of the movie you selected at the top of the screen and three buttons below: Add to Favorites, Add to Playlist, and Share Video.
Tap Add to Favorites, and that video is added to your list of favorites, making it easy to find it again. (I reveal more about favorites shortly.)
You can create playlists of YouTube videos via an option in the More screen. When you tap Add to Playlists, you can choose a playlist to add a video to. Alternatively, tap the plus (+) button in the Add to Playlist screen, and create a playlist right then and there.
When you tap Share Video, a new email message opens. The Subject line includes the title of the video, and the message body contains Check out this video on YouTube:, followed by a link to the video. (You can edit Check out this video on YouTube: to anything you like.) When you complete the To field and tap Send, the email message is sent via your default email account (as configured in Mail Settings).
The description screen also includes a Related Videos area. If YouTube has videos that it believes are similar in theme to the one you’ve chosen, it lists them here.
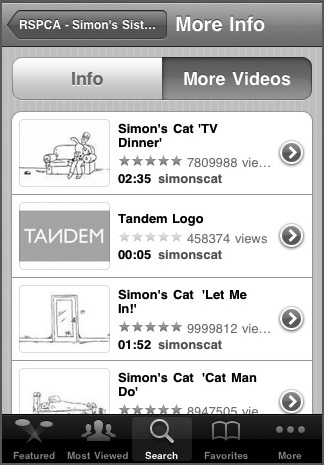
Tap yet another blue icon to the right of the movie in this screen, and you arrive at the movie’s More Info screen. This screen includes a description of the video, the date when the video was added; its category (Drama or Documentary, for example); and its tags, which include anything that the poster thought appropriate, such as poodle, waterslide, and ointment; a Rate, Comment or Flag button for doing just that; and user comments below. To read more comments, tap the Load More comments button at the bottom of the screen.
If you’re interested in seeing other videos uploaded by the producer of the video you’re currently exploring, tap the More Videos button at the top of the More Info screen (Figure 7.10).
Figure 7.10 A YouTube More Videos screen.
Most Viewed
The Most Viewed icon provides you the opportunity to view YouTube’s most popular videos—all videos, or the most viewed today or this week. Like the Featured screen, this one carries a Load More entry at the bottom of the list. To watch all, today’s most viewed, or this week’s most viewed videos, tap the appropriate icon at the top of the screen.
Search
You can search YouTube’s catalog of videos, of course, and this button is the way to go about it. Tap Search, and you get a Search field in return. Tap this field, and up pops the iPod’s keyboard. Type a search term—skateboard or Mentos, for example—and YouTube searches for videos that match your query. Then it presents a list of 25 videos that it feels match what you’re after. If more than 25 videos are available that match your query, your friend the Load More entry appears at the bottom of the list.
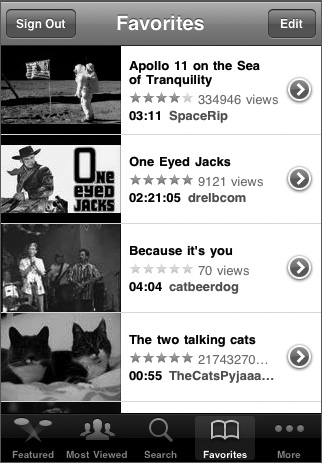
Favorites
As the name hints, here’s where you store links to your favorite YouTube videos. To begin streaming one of these videos, just tap its name. To remove a favorite, tap the Edit icon at the top of the screen, tap the red minus (–) icon that appears next to the entry, and then tap Delete (Figure 7.11). When you’re finished removing favorites, tap Done to return to the Favorites screen.
Figure 7.11 YouTube favorites.
![]() When you sign into your YouTube account and add a favorite, that favorite appears not only on your iPod, but also within YouTube in your computer’s Web browser.
When you sign into your YouTube account and add a favorite, that favorite appears not only on your iPod, but also within YouTube in your computer’s Web browser.
More
You’ve read Chapter 3, right? Then this More icon should be no mystery to you. Tap it, and you get additional choices: Most Recent, Top Rated, History, My Videos, Subscriptions, and Playlists.
Most Recent offers a glimpse of the 25 videos most recently added by YouTube, and Top Rated displays YouTube’s 25 highest-rated videos.
History details all the videos you’ve chosen. Yes, chosen. You don’t have to watch these videos for them to appear in your History list. Just choose them, and even if you cancel playback before they appear, they’ll be part of your iPod’s YouTube History. If this list is too long, or if you’re embarrassed by some of the things you’ve chosen, tap the red Clear icon at the top of the screen. All History entries disappear.
![]() The Clear icon is an all-or-nothing affair. Currently, the iPod touch doesn’t provide an option to delete individual videos from the History screen.
The Clear icon is an all-or-nothing affair. Currently, the iPod touch doesn’t provide an option to delete individual videos from the History screen.
My Videos lists all the videos you’ve uploaded to YouTube under your account.
Subscriptions presents a list of the producers or channels you’ve subscribed to. The number of videos available in a subscription appears next to its name—Macworld (171), for example.
Finally, as I mention earlier, you can create playlists of YouTube videos. To create a playlist, just tap the plus (+) button in the top-left corner of the screen. An Add Playlist screen scrolls up from the bottom. Use the keyboard to name your playlist, and tap the Add button when you’re done. You can remove playlists later by tapping the Edit button in the Playlists screen and using the tap-minus-and-then-Delete technique.
Playing YouTube videos
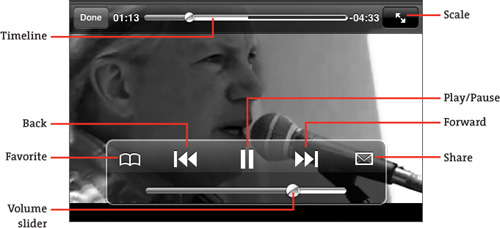
To play a YouTube video, tap it, and the video will begin loading in landscape orientation. You’ll see the now-familiar video play controls—Back, Play, and Next—along with a volume slider, timeline, and Scale icon. Like the play controls in the iPod’s iPod area, these controls fade a few seconds after they first appear. To force them to reappear, just tap the iPod’s display.
In addition to the play controls, you’ll see a Favorite icon to the left of the play controls and a Share icon to the right (Figure 7.12). Tap Favorite, and the currently playing video is added to your YouTube favorites. Tap Share, and you create another one of those special YouTube recommendation emails that I describe in the “Featured” section earlier in this chapter.
Figure 7.12 The YouTube play screen.
The video begins playing when the iPod determines that it has downloaded enough data for the video to play from beginning to end without pausing to download more. When the video concludes, you’ll see its More Info screen.