Chapter 5. Editing
The whole reason you purchased Final Cut Pro in the first place was to learn how to edit. And the reason you purchased this book was to learn how to edit more easily, with better quality, while learning how to handle difficult situations.
Well, only you can decide where to put the In or the Out point, but once you’ve made that aesthetic decision, the Power Skills in this chapter will make the rest of your editing workflow fly. You’re bound to find several skills here that will make a significant difference in your editing life.
Find It in the Timeline
Final Cut Pro can locate a specific frame in your sequence by using a clip from the Browser.
If you have a multitude of clips in your Timeline sequence and you’re not sure if you used a particular shot or if you want to see where you placed it, this technique can help.
Note
To find if you used a specific clip in your sequence, check out the Power Skill “Finding Unused Media,” next.
First, open the sequence you want to search into the Timeline. Next, open the Browser clip containing the frame you want to find into the Viewer. Position the Viewer playhead on the specific frame you want to locate in the Timeline and press F. If you used the shot in the active sequence, the playhead should jump right to it. (Think of this as a reverse match frame.)
This technique only works if it finds a match for that specific frame, but it can be a good time-saver nonetheless.
Finding Unused Media
Here’s a very fast way to find clips you haven’t used in a sequence.
Editing documentaries often requires keeping track of hundreds of different files. However, all too often, it seems like you are constantly searching for some shot, any shot, that you haven’t used yet to cover a jump cut or add necessary visual interest.
Here’s a great trick that can help you find a shot you haven’t used yet.
1. In the Browser, select the sequence you want to search.
2. Choose Edit > Find and choose Unused Media in the Find menu.
3. Make sure in selected sequences is checked, then click Find All.
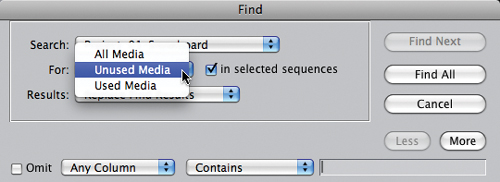
All the clips you have not yet used in the selected sequence will appear in a separate Find Results window.
Note
Final Cut considers a shot “used” even if you have only edited one frame from it into a sequence.
Two Fast Ways to Move a Clip Between Tracks
A keyboard shortcut or mouse click can move a clip between tracks.
First, here’s the keyboard shortcut: to move a clip up or down between tracks, select the clip and hold down the Option key while also pressing the Up or Down Arrow key. Up moves the clip up a track and Down, not surprisingly, moves it down.
Here’s the mouse move: press Shift and drag the clip you want to move. Shift constrains the clip so it only moves vertically and doesn’t get out of sync.
Extra Credit
If you only want to move the audio or video portion of a linked clip, press the Option key to select just the side of the clip you want, that is, the audio or the video. Then press the Shift key and drag the clip—or press Option+Up/Down Arrow—to move just the selected portion of the clip to the track you want.
Editing Is a Snap
However Snapping is set, it always seems to be wrong. Here’s how to change it.
When Snapping is on, whenever the playhead, a clip, or a tool gets within about 15 frames of an edit point, it snaps to the end of a clip.
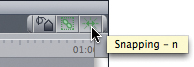
The keyboard shortcut for snapping is famous the world over as N—as in snnnnnnapping! (Steve Martin, of Ripple Training, may not have originated this line, but he is most famous for using it.)
You have several other ways to change snapping—one of which can bail you out of some tricky situations:
• Toggle the setting by choosing View > Snapping.
• Click the Snapping button in the top right of the Timeline.
• When dragging, press the Option key to toggle Snapping to the opposite of its current setting.
Note
Using the menu, the letter N, or the Timeline button permanently alters snapping. Pressing the Option key only alters snapping until you release the mouse button; then snapping goes back to the way it was.
Faster Track Patching
Patching sets how audio and video routes from the Viewer to the Timeline. Here’s how to control it.
The Patch panel on the left of the Timeline controls how the media in the Viewer edits into your sequence in the Timeline.
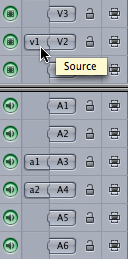
Specifically, it determines what tracks the video and audio go to. Since the Viewer holds only one track of video but up to 24 tracks of audio, this can be a complex thing to figure out. However, the Patch panel makes it easy.
For instance, grab the small, gray, v1 patch on the left, which represents the video in the Viewer, and move it until it lines up with a patch on the right, which represents which Timeline track that video will edit to.
You can move the audio and video patches with the mouse, but a faster way is to use a keyboard shortcut. For example:
• Pressing F6 followed by pressing the number 2, moves the v1 video patch selector to connect to V2 of the Timeline.
• Pressing F7 followed by a number moves the a1 patch.
• Pressing F8 followed by a number moves the a2 patch.
Extra Credit
Disconnecting both audio patches allows a video-only edit; disconnecting the video patch allows an audio-only edit.
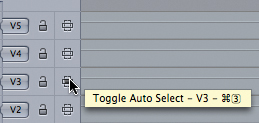
This technique is easier to see than to explain. Press F7, then 3, and watch how the a1 target track connects to A3.
Here are some more tricks:
• To disconnect the v1 patch, creating an audio-only edit, press Shift+F6.
• To disconnect the a1 patch, press Shift+F7.
• To disconnect the a2 patch, press Shift+F8.
Opening a Clip into the Viewer
Here are three quick ways to open a clip into the Viewer.
To open a clip into the Viewer:
• Select the clip and press Return, or Enter.
• Double-click a clip name or icon.
• Drag the clip in.
Extra Credit
An interesting interface rule is “double-click a clip to load it into the Viewer.” Whether you double-click a clip in the Browser, Timeline, or Canvas, in all three cases it appears in the Viewer.
A Fast Way to Reset the Patch Panel
One mouse click and the entire Patch panel resets.
The Patch panel controls which tracks a clip in the Viewer will edit to when you press the F10 key or click the red envelope in the lower left of the Canvas.
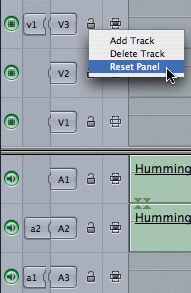
Personally, I use the Patch panel a lot and often need to reset it. I used to drag each patch back to where it belongs—until I learned this trick.
Simply Control-click anywhere in the left side of the Timeline and select Reset Panel.
Instant reset!
Opening a Sequence into the Viewer
There’s the obvious way, and a double-extra-secret way, to load a sequence into the Viewer.
First, to load a sequence into the Viewer—either to review it or in preparation for editing it into the Timeline—simply drag it from the Browser into the Viewer.
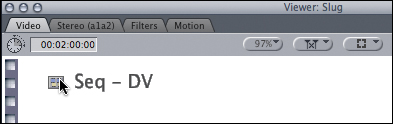
However, here’s a much cooler way: To open a sequence from the Browser or Timeline into the Viewer, hold down the Option key and double-click the sequence.
Note
This technique is great if you want to edit sections from one sequence into another sequence, or if you want to apply a filter to an entire sequence, then adjust the settings of the filter.
Deconstructing a Nest
Here’s a fast way to move all the clips out of one sequence into another.
A nest is one sequence contained in another sequence. Nesting is the process of putting one sequence into another sequence. Most of the time, this works fine. But wouldn’t it be great if you could instantly move the clips out of one sequence into another?
Note
For those times when you want to keep the clips in the sequence nested, remember that Final Cut allows you to nest one sequence inside another inside another inside another... up to eight levels deep.
Well, you can—provided you take command of the situation.
1. Open the sequence to which you want to add the clips in the Timeline.
2. In the Browser, grab the sequence with the clips you want to add and drag it into the Timeline.
3. As soon as your cursor enters the Timeline window, and not until then, press the Command key.
Voilá! The sequence instantly turns into its individual clips, which you can add as a group in the Timeline.
A Fast and a Faster Way to Edit
These two keyboard shortcuts really speed things up.
While you can drag clips from the Viewer to the Timeline, there are much faster ways to edit: one is a keyboard shortcut and one is a mouse click.

But first you need to know that Final Cut has two principal ways to edit: Overwrite and Insert. Once you have the In and Out points set for a clip in the Viewer:
• An overwrite edit replaces the footage in the Timeline that the clip from the Viewer lands on, starting at the position of the playhead. Overwrite edits never change the duration of the sequence (unless the clip is edited at the end of the sequence).
Extra Credit
There is another specialized edit: the Replace edit. The keyboard shortcut for this is F11, and the mouse click is the blue envelope in the lower left of the Canvas.
• An insert edit forces an edit point in the Timeline at the position of the playhead, inserting the Viewer clip, and pushing everything to the right of the edit downstream to make room for the clip. Insert edits always change the duration of the sequence.
• The keyboard shortcut for an overwrite edit is F10.
Note
If your F-keys don’t function the way you expect, read the Power Skills in Chapter 1 (pages 22 and 23) on how to reset the operating system.
• The mouse click for an overwrite edit is the small red envelope in the lower left of the Canvas.
• The keyboard shortcut for an insert edit is F9.
• The mouse click for an insert edit is the small yellow envelope in the lower left of the Canvas.
What the Cursor Is Telling You
The cursor changes shape depending upon what it’s editing.
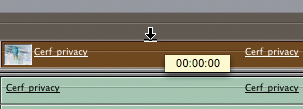
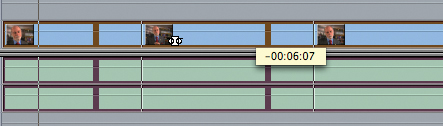
When you drag a clip to the Timeline, the cursor has one of two shapes:
• A down-pointing arrow, which indicates you are about to do an overwrite edit; it’s indicated by a solid brown clip.
• A right-pointing arrow, which indicates you are about to do an Insert edit; it’s indicated by a hollow clip outline.
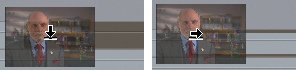
The shape of the cursor is determined by its position. If the cursor is positioned above the thin gray line about one-third of the way down from the top of a track, you’ll do an Insert edit. If it’s below that gray line, you’ll do an Overwrite edit.
Toggling the Edit Point
An edit point has three sides—and we have a keyboard shortcut to select each of them.
To quickly toggle between selecting one of the three sides of an edit (that is, the In, the Out, or both), select the edit point with the Arrow tool and press U on your keyboard... do it again... and again.
The nice thing about this technique is that this works in both the Timeline and the Trim Edit window.
Extra Credit
Select one side of the edit point, then press the Up or Down Arrow key and watch what happens. The selected edit point jumps to the previous (Up Arrow) or next (Down Arrow) edit point with the same portion of the edit point selected.
Note
You can jump the playhead to the nearest edit point by pressing V. This selects the edit point as well.
Editing on the Fly
Introducing high-speed edits with one keystroke!
Did you know that you could add edits to a clip while playing the Timeline? This is perfect for cutting to the beat of the music in real time.
Here’s the trick: press Control+V as the playhead moves across the clip. Final Cut adds markers as you go, and then creates the edits when you stop playback.
Extra Credit
You can also use this technique when the playhead is stopped. Control+V is especially useful when you want to cut clips on multiple tracks all at the same point.
Note
In Final Cut Pro 7 the markers are gray. In earlier versions, the markers are red.
Extra Credit
You could also use this technique with the multitrack Razor Blade tool, but using Control+V doesn’t require selecting a different tool. Plus, Control+V uses the position of the playhead to determine where the edits occur. The Razor Blade is more flexible in its positioning, but Control-V is faster.
Quick Cuts
Welcome to faster cuts with a keyboard shortcut.
So, you’re editing up a storm, slicing and dicing with the Razor Blade tool, when suddenly you come to a series of stacked clips.
The Razor Blade only cuts one linked clip at a time. You are stuck. Dead in the water. All that great mojo is fizzling away. You could drag your mouse all the way over to the Tool palette and select the multitrack Razor Blade tool—but you are moving way too fast for that.
Instead, press the Shift key—which instantly switches the Razor Blade into the multitrack Razor Blade—and just keep on rocking.
Note
You could accomplish the same goal by pressing B twice, but that isn’t nearly as cool.
A Faster Way to Do a Roll Trim
Roll trims are my bread and butter. Here’s how to eat faster.
Select an edit point. Put your playhead where you want the selected edit point to move and press E. The selected edit point jumps to the position of the playhead—provided you have sufficient handles in your media.
Note
You can’t jump an edit point over an existing clip.
This is essentially a Roll trim in real time.
Apple calls this an Extend edit. I call it fast and it is one of my favorite editing techniques.
Extra Credit
You can also do this in real time while playing the sequence. Just press E and the selected edit point jumps to the position of the playhead at the instant when you press the key—again, provided you have sufficient handles on each clip.
Rolling Edits on Multiple Tracks
Here’s a fast way to roll edit points on multiple tracks.
Use this technique to adjust the timing of an edit point when using clips on multiple tracks:
1. Toggle Snapping off (press N).
2. Make sure the Linked Selection button is on (green).
3. Select the Roll tool (press R).
4. Click the edit point you want to adjust on V1. This selects both the audio and video edit points.
5. Hold the Command key and click the edit point of the clip on V2. Since audio and video are linked, both audio and video edit points are also selected.
6. Drag the Roll tool to adjust the timing of all selected edit points.
Creating a Split Edit
Use this tip to have audio and video edit at different times.
A split edit is one where the audio and video of a clip edit at different times. But because the audio and video are linked (which maintains sync), selecting the video edit point also selects the audio edit point by default.
You can force Final Cut to select only the video or audio edit point by turning off Linked Selection. However, turning off the Linked Selection button when you want to move the edit points of a linked clip is an easy way to get your clips out of sync because this button turns off Sync Lock throughout the entire sequence until you turn it back on again. Very scary!
Note
I can’t stress enough how much easier, and safer, using the Option key is than turning off linking or Linked Selection. Using the Option key is temporary. As soon as you let go, linking resets to normal. The last thing you want is to forget you turned off linking, make a few changes, then discover that now your entire sequence is out of sync.
Instead, this tip makes the process much less risky:
1. Select the Roll tool (press R).
2. Hold down the Option key.
3. Click the edit point (audio or video) you want to move.
4. Release the Option key and drag the edit with the Roll tool as necessary.
This is much safer and faster than using the Linked Selection button because it turns off linking only for as long as you press the Option key.
Creating Split Edits on Multiple Tracks
This is a very fast way to create split edits across multiple tracks.
Rolling just the audio or video is a trimming technique called “split edits” that allows you to change where the edit occurs in the picture without affecting the sound, or vice versa.
Avid editors often call these types of edit “L” or “J” edits. In an “L” edit, the video edits before the audio, with the two edit points forming the shape of an L. In a “J” edit, the video edits after the audio, forming the shape of a J.
To do the same thing for clips on multiple tracks:
1. Turn Snapping off (press N).
2. Select the Edit Selection tool (press G). This allows you to select edit points across multiple tracks.
3. Hold the Option key and drag the Edit Selection tool around the edits you want to change. The Option key allows you to select just the audio or just the video of a linked clip.
4. Release the Option key after you’ve selected the edit points you want.
5. Select the Roll tool (press R).
6. Drag the Roll tool to adjust your edit points.
Ripple Delete
Yet another brilliant keyboard shortcut!
A ripple delete removes clips and pulls up all downstream clips on all tracks so that there are no gaps in the Timeline. Here’s a neat shortcut for performing quick ripple deletes in Final Cut Pro:
1. Set In and Out points in the Timeline.
2. Press Shift+X, and Final Cut performs a ripple delete between the In and Out points.
Extra Credit
I’m often asked how I edit. The answer is that I have one hand on the mouse and the other on the keyboard. That way, I can quickly use either a mouse shortcut or a keyboard shortcut, without spending a lot of time moving my hands.
Note
Some editing systems—and Avid editors will know what I mean—require you to select clips on all downstream tracks before doing a ripple delete to keep things in sync. That’s not necessary with Final Cut Pro, which handles trimming across multiple tracks automatically.
Multiple-Frame Trimming
This keyboard shortcut saves you hours when trimming clips.
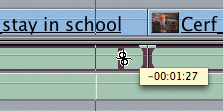
When an edit point is selected, you can move the edit point one frame to the left, or right, using the comma, or period, keys.
But what if you are looking for a fast way to trim multiple frames at once from the end of a clip using the keyboard?
Select the In, Out, or both of the edit points you want to trim.
Press Shift+period. Ta-da! The selected edit point moves five frames to the right.
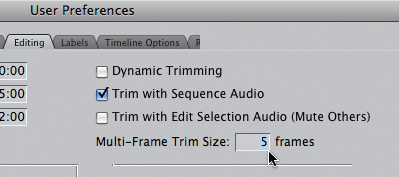
Extra Credit
You can modify the number of frames trimmed when holding the Shift key; just choose Final Cut Pro > User Preferences, select the Editing tab, and adjust the Multi-Frame Trim Size option.
Shift+comma moves it five frames to the left.
You can do the same thing with Shift+[ or Shift+]—but the period and comma may be easier for you to remember.
Sliding Clips
Sliding changes the location of a clip without changing its content or duration.
The Slide tool (shortcut: SS) allows you to change the location of a clip in the Timeline in relation to the clip before and after it, while keeping its content and duration unchanged. Thus, you are shortening the clip on one side and lengthening the clip on the other side of the clip you are sliding.
Sliding adjusts the Out point of the previous clip and the In point of the following clip.
Note
It helps to turn off Snapping (press N) when doing any trimming.
You can slide a clip on the Timeline by selecting the Slide tool, clicking the clip you want to slide, and dragging it (or using the comma and period keys) to alter its location.
Creating an Asymmetric Trim
Here’s an answer to a question that many Avid editors raise.
An asymmetric trim allows you to move the video edit point in one direction while the audio edit point(s) move in the opposite direction.
I get asked this question a lot because because Avid and Final Cut systems treat multilayer sync differently. So, in case you need to know, here’s how to do it:
1. Select the Ripple tool (press RR).
2. Option-click one side of the video edit point (either the In or the Out).
3. Command-click the opposite side of the audio edit point (in other words, if you selected the video Out, Command-click the audio In).
4. Command-click any other edit points on all other tracks that you want to move.
5. Trim the selected edit point by dragging, pressing comma/period, or entering the number of seconds or frames you want to move.
Note
During a standard trim, Final Cut Pro links all clips on all tracks. This means that if you ripple trim clips on V1 to pull up a clip, all downstream clips on all tracks will be pulled up automatically. In other words, Final Cut Pro is able to maintain sync automatically, without needing this specialized edit.
This moves the selected edit points in opposite directions without losing sync.
High-Speed Trimming
This may be the fastest way to trim.
Trimming is all about speed and accuracy. The reason we trim an edit point is to make the transition between the two clips flow as smoothly as possible. (To me, trimming is what separates a “home movie” from a professional edit.)
However, important as trimming is, we don’t want to waste any time doing it. There’s way too much work in any project to get bogged down trimming. So here’s a high-speed trimming technique you can use on a daily basis:
1. Select the edit point.
2. Press U until the side of the edit point you want to trim is selected—In, Out, or both.
3. On the keypad, press the plus sign (+) followed by the number of frames, or seconds and frames, you want to trim; then press Enter.
4. The selected edit point will move to the right the number of frames you just entered.
Note
You don’t need to add punctuation. If you enter one or two digits, Final Cut treats them as frames (i.e., 45 = 45 frames). If you enter three or four digits, Final Cut Pro calculates them as seconds and frames (i.e., 1234 = 12 seconds, 34 frames). Final Cut Pro does all the necessary math.
To move to the left, press the minus sign (−) followed by the number of frames you want to trim.
Extra Credit
If you don’t have a numeric keypad on your laptop, press Shift+= to move right, while you only need to press the minus sign (−) to move left on your regular keyboard.
I use this technique constantly because it is blindingly fast.
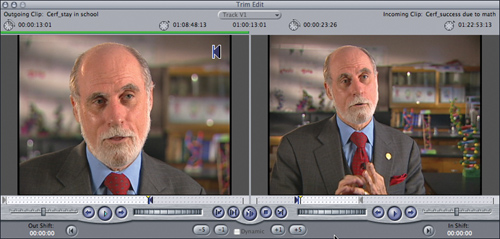
Real-Time Trimming
The Trim Edit window provides real-time trimming—once you turn it on.
The Trim Edit window generates passionate responses from editors—both positive and negative. For those who edit audio, it’s not particularly helpful. For those who edit action and movement, it can be invaluable.
One of the secret tips that makes this window so useful is that it can trim your edit points in real time—while you are playing your clips. Here’s how:
1. Double-click an edit point to open the Trim Edit window.
Note
All trims made in the Trim Edit window are instantly passed to the Timeline and all clips are updated.
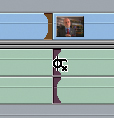
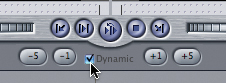
2. At the bottom center of the window is a hard-to-see, gray Dynamic check box. When this option is selected, the Trim Edit window becomes real time.
3. To perform a trim, click the image for the clip you want to trim. The green bar indicates which clip is selected for trimming. Thus, to trim the Out point, click the left image; to trim the In point, click the right image. To do a Roll trim, click the vertical bar between the images.
Note
Dynamic trimming remains on, even after you close the window, until you change its setting again.
4. Position the playhead before the point you want to trim.
5. Press L to play the clip.
6. When you reach the point you want to trim to, press K. This resets the selected edit point.
7. To preview your edit, press the spacebar.
Trim Edit Window Shortcuts
Here are six tricks to make trimming even faster.
The Trim Edit window is designed to provide a fast way to trim clips while you’re watching them.
• To open the Trim Edit window, double-click any edit point.
Extra Credit
You can also access the Trim Edit window by selecting an edit point and pressing Command+7.
• To select a Ripple trim, click in either the left or right window. The window that has a green bar over it is the clip that will be trimmed.
• To select a Roll trim, click the vertical gray bar between the two images. Roll trims are indicated by green bars over both windows.
• To set the In or Out point on the fly, press the I or O key while in Play mode. You can also set the In or Out point on the fly by clicking the Mark In or Mark Out button.
Note
To close the Trim Edit window, click anywhere outside it.
• Press U to toggle between selecting the In, the Out, or both points.
• In a hurry to know the duration of a clip? Look in the top-left corner of each clip.
Using the Range Selection Tool
Here’s a fast way to select only a portion of a clip without adding an edit point.
Wouldn’t it be great to apply a filter to only a portion of a clip—without having to cut the clip into a million pieces first?
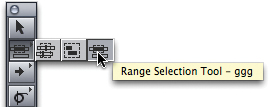
Well, you can—using the Range Selection tool (keyboard shortcut: GGG).
Using this tool, drag across a portion of a clip. Wherever you drag will be selected.
Note
While you can select only one range at a time, your range can extend across multiple clips, or you can select the same clip multiple times to create multiple ranges within the same clip.
Now you can delete just this portion of the clip, copy and paste this part of the clip elsewhere, or apply a filter to the selected range. Whatever action you choose will only apply to the selected portion of the clip!
Getting Clips Back in Sync
First, you swear. Then, with one mouse click, you smile!
If you accidentally move a clip out of sync, don’t worry! Here’s a quick way to correct this.

Final Cut uses red “out of sync” flags to mark a clip that has been moved out of sync. To get an out-of-sync clip back into sync, Control-click the red flag of the clip you want to move and select Move into Sync.
If you don’t want to move the clip but you want to get rid of the red flag, select the clip and choose Modify > Mark In Sync. Final Cut Pro now treats the new position of the clip as if it was in sync.
Extra Credit
If you clicked the video side of the clip but want to move the other side of the synced clip (for example, the audio), select Move Others into Sync. If you want the position of the video clip to stay put but adjust the contents so the video and audio are back in sync, select Slip into Sync. This option slips the video so the position of the clip doesn’t change but the content moves so that it syncs with the audio.
Note
In some versions of Final Cut Pro, in order to see the red flag, Show Video Clip Names must be turned on (it’s on by default).
Note
You can generally avoid out-of-sync problems by never turning off Modify > Link Selection.
Setting Clip Durations
Here are five fast ways to change the duration of a clip.
Final Cut Pro uses two words to describe the length of a clip: length and duration.
Length is the total running time of the source clip stored on your hard disk. Duration is the running time between the In and Out points of a clip. Length can’t be adjusted; Duration is adjusted constantly.
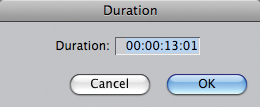
Here are several ways to adjust the Duration setting of a clip:
• Select the clip and press Control+D. This opens the Duration dialog box, where you can enter the new duration for a clip. When you adjust the duration, you are changing the location of the Out point.
Note
For clips in the Timeline, changing the Duration setting does a ripple edit, unless there’s a clip on a track immediately above the altered clip. In that case, it shortens the clip but makes no other adjustments. Also, if the end of the altered clip has a transition attached to it, the duration of the clip can’t be changed.
• Control (or right)-click a clip in the Timeline and select Duration from the pop-up menu.
• Select the clip and choose Modify > Duration.
• For a clip in the Viewer, select the Viewer window and press the Tab key. The Duration dialog box opens, where you can specify a new Duration setting.
• For a clip in the Browser, change the entry in the Duration column for that clip.
Changing Generated Clip Durations
All generated clips have a default 10-second duration. But you can change it.
By default, all generated video (bars, mattes, text—everything except slugs) has a 10-second duration. (Slugs, for some strange reason, have a 2-minute duration.)
Extra Credit
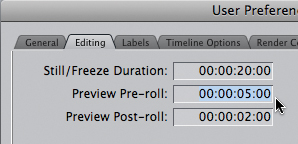
In some versions of Final Cut Pro, you can change the duration by selecting Final Cut Pro > User Preferences, clicking the Editing tab, and adjusting the Still/Freeze Duration setting.
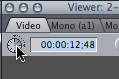
To make generated video have a duration longer than 10 seconds, select the Viewer, press the Tab key (or click in the top-left timecode box), and enter the desired duration.
Note
You can change the duration of a generated clip to any length—provided it has not been edited to the Timeline. Once a clip is placed in the Timeline, the maximum length is only 2 minutes.
Pressing Tab opens the Duration dialog box in the top-left corner, where you can type whatever duration you choose.
Clearing Settings from a Group of Clips
Here’s a fast way to reset clips in the Browser.
You can clear the settings for a group of selected clips in the Browser. Suppose you want to remove all the In points from a group of clips:
1. Select all the clips in the Browser that have In points you want to clear.
2. Control-click in the In column of the Browser and select Clear In at the bottom of the pop-up menu.

Poof. Gone.
You can reset the In, Out, Duration, Reel ID, as well as some other settings.
Note
Clearing an In point means the clip will start at the beginning of the source clip stored on your hard disk. Clearing the Out point means the clip will end at the end of the source clip. Clearing the Duration setting means the clip runs the entire length of the source clip.
Deleting a Through Edit
You can eliminate those confusing red bowties in your Timeline.
When you use the Razor Blade (or Control+V) to cut a clip, you create an edit point that separates a clip into two pieces. This “through edit” is between two consecutive frames; thus there’s no interruption to timecode, video, or audio continuity.
Normally, this is done to apply a filter or effect to one side of a clip but not the other. However, sometimes through edits occur because we cut a clip and forget to put it back. Through edits are indicated by red “bowties” at the edit points.
Well, unlike Humpty Dumpty, we can put this back together again.
Note
If there are effects applied to one side of a red bowtie and not the other, the settings of the clip on the left will be applied to the newly joined clip on the right.
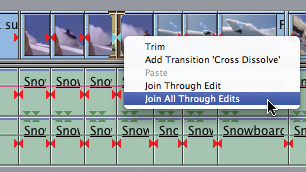
To heal a through edit, do one of three things:
• Click the red bowtie to select it, and then press Delete.
• Control-click the red bowtie and select Join Through Edit.
• Control-click the red bowtie and select Join All Through Edits to make all your red bowties disappear.
The Fastest Way to Move a Clip
This mouse shortcut quickly moves a clip in the Timeline.
Need to quickly move a clip?
Extra Credit
To select just the audio or video side of a linked clip, press the Option key. Once you have just one side of the clip selected, these shortcuts will work.
Shift-dragging allows you to move a clip vertically without allowing it to shift from side to side. If it’s a linked clip, both the audio and video will change tracks.
If you just want to move a clip, another fast way to do so is to press Option+Up/Down Arrow key. As long as the audio and video aren’t linked, this quickly moves a clip up or down a track.
Duplicate Clips in the Timeline
Here are three ways to easily duplicate Timeline clips.
Say you have a clip on the Timeline that you want to duplicate.

Option #1: Select a clip(s), then Option-drag it. Final Cut Pro copies the clip and does an insert edit wherever you drag it.
Option #2: Select a clip(s), then Option-drag it, but before you release the mouse, let go of the Option key. Now, Final Cut Pro performs an overwrite edit.
Option #3: Select an audio or video clip(s) (but not both). Press Shift+Option and drag the clip. You’ll make a copy of the selected clip, but constrain it so that it doesn’t shift horizontally. This trick is very useful when you’re creating duplicate clips for effects.
Extra Credit
To select just the video or just the audio of a linked clip, press the Option key when selecting the clip.
Creating a Subclip
Subclips make it easy to divide a long clip into small chunks.
The basic capture rule of Final Cut Pro is to capture as short a clip as possible. Final Cut would prefer not to use long clips. But sometimes long clips are unavoidable. So, Final Cut provides a simple way to create a shorter clip from a longer clip; it’s called a “subclip.”
Subclips don’t create any new media on your hard disk. Instead, they point to existing media, but instead of starting at the beginning of the file and going to the end, a subclip points to just a portion of it.
The nice thing about subclips is that they display with more detail in the Viewer, allow you to name the clip differently from the master clip that it was derived from, and, in general, help keep things more organized in your project.
Note
You can also make subclips of sequences by loading the sequence into the Viewer and following the steps in the previous paragraph.
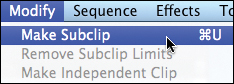
There are several ways to create subclips. One of the easiest is to load the master clip into the Viewer, set In and Out points that represent the portion of the clip you want to subclip, and then either select Modify > Make Subclip or press Command+U.
Copying and Pasting Between Tracks
The longest operational definition in Final Cut Pro...
Understanding how cutting, copying, and pasting work between tracks is the longest operational definition in Final Cut Pro, so brace yourself.
Definition: Final Cut Pro will always paste, as an overwrite edit, to the same track from which you cut or copied the clip unless, after you cut or copy the clip, you change the Auto-Select lights. If you change the Auto-Select lights, Final Cut Pro will paste the clip to the lowest numbered track whose Auto-Select light is dark.
Extra Credit
A fast way to turn off all Auto-Select lights except the one you click is to hold Option down when clicking. To turn them all back on again, press the Option key and click the Auto-Select light that’s dark.
So, if you want to cut a clip from V2 and paste it to V3:
1. Select the clip.
2. Choose Edit > Cut (press Command+X).
3. Move your playhead to the location where you want the soon-to-be-pasted clip to start.
4. On the left side of the Timeline, turn off (un-darken) the Auto-Select lights for tracks V1 and V2.
5. When the V3 Auto-Select light is dark, paste the clip. It will appear at the position of the playhead on V3.
Note
Remember, you need to change the Auto-Select lights after you cut or copy the clip. Otherwise, it has no effect.
Copying and Pasting Clips from the Viewer
Where clips go depends on where they come from.
If you load a clip into the Viewer, select Edit > Copy (or press Command+C), then paste it into the Timeline (by pressing Command+V), the Patch panel on the left side of the Timeline controls which track the clip goes to.
Note
If one of the patches is disconnected, that track won’t paste into the Timeline. This is how to create a video-only, or audio-only, edit.
A Faster Way to Create Subclips
Markers make subclip magic.
Subclips can be useful ways to break a long capture file into individual scenes. But the process of setting In and Out points for each scene is... cumbersome. The reason you bought this book is that you are looking for faster ways, secret ways, to get your work done. Well, watch this:
1. Load a long Browser clip into the Viewer. Place a marker (press M) at the start of every scene, or section, that you want to turn into a subclip.
2. Notice that as soon as you create a marker, a small triangle appears next to your clip in the Browser. Twirl that triangle down to reveal all the clip markers you just set.
3. Drag those markers into a bin. (To create a new bin, press Command+B.)
4. The instant the markers are dropped into a bin, they become subclips that use the same names you gave the markers.

Extra Credit
You can always change the name of a Browser marker or subclip by clicking it; this is the same as changing the name of a clip.
Removing Subclip Limits
Reset a subclip to match the source media.
Since subclips don’t really exist—they simply point to a portion of already existing source media on your hard disk—removing the limits of a subclip doesn’t cause any media to be lost.
When you remove the limits of a subclip, the subclip reverts back to the same length and contents as the source clip on your hard disk.
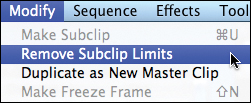
To reset a subclip to match the source clip, open the subclip in the Viewer and select Modify > Remove Subclip Limits. The icon for the clip in the Browser switches from a subclip icon to a normal clip icon.
Note
When you remove the limits on a subclip, any Timeline edits made with that subclip remain the same, but all clips affiliated with that subclip revert back to normal clips.
Many Ways to Match a Frame
Finding a match frame gets easier.
Sometimes you need to find the source clip for a clip in the Timeline. This is called finding the match frame. A match frame is a frame-accurate match between a clip in the Timeline and the source clip in the Browser.
Extra Credit
The option Option+Command+F is especially useful when you want to do a replace edit based on the position of the playhead versus the In or the Out point.
There are several ways you can do this. Put your playhead in the Timeline on the clip you want to match. Then:
• Select View > Match Frame > Master Clip (or, much more easily, press F) to load the source clip from the Browser into the Viewer, matching the clip in the Viewer with the In point, Out point, and position of the playhead of the Timeline clip.
• Select View > Match Frame > Source File (or, also more easily, press Option+Command+F) to load the source clip from the Browser into the Viewer, matching the position of the Timeline playhead but not adding an In or Out point in the Viewer.
• Select View > Reveal Master Clip (or press Shift+F) to highlight the source clip in the Browser.

Find Match Frames from a Subclip in the Timeline
Now you can match to the subclip or the source file.
Subclips are special kinds of clips. They don’t really exist—they simply point to a portion of an existing clip.
Note
Apple cautions that if you’re working with a project created in an earlier version of Final Cut Pro, View > Match Frame > Subclip Parent Clip won’t work.
So, when you need to find the match frame to a subclip, you have two choices: to find the subclip in the Browser, or to find the original source clip in the Browser. We’ve been able to do the first option for a while. The second option is brand new with Final Cut Pro 7.
To find the subclip in the Browser from a clip in the Timeline, put your Timeline playhead in the subclip you want to match and press F. The original subclip opens in the Viewer, with matching In and Out points and playhead position.
To find the source file for a subclip, put your Timeline playhead in the subclip, then press Option+Command+F. The original source clip opens in the Viewer and matches the position of the Timeline playhead.
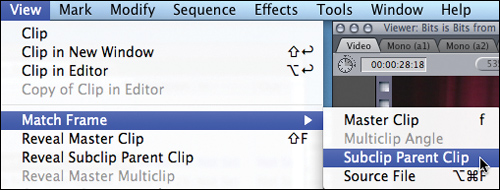
New with Final Cut Pro 7 is the option to choose View > Match Frame > Subclip Parent Clip. This opens the parent clip (the source of the subclip) into the Viewer and matches the position of the playhead.
Why Won’t a Match Frame Match?
Because sometimes clips are independent...
When you edit a clip from the Viewer, or Browser, into the Timeline, the editing process creates a relationship between the master clip in the Browser and the edited clip in the Timeline. Apple calls this edited clip an affiliate clip, which is related to the Browser clip based on four criteria:
• Reel ID
• Filename
• Source timecode
• Auxiliary timecode
Extra Credit
To be sure to create a master clip, whenever you drag a clip into Final Cut Pro, drop it into the Browser first, then edit it to the Timeline.
It’s because of this relationship that match framing works. However, when you drag a clip directly into the Timeline, no master clip is created in the Browser. This means that while you can still find the source file on the hard disk that relates to the Timeline clip, match framing won’t work.
Note
Independent clips can also cause problems during media management and recapturing. Avoid creating independent clips. Also, try not to create more than one master clip (a clip in the Browser) that references the same source media file on your hard disk.
Opening Clips in Another Application
Here’s a fast way to open clips in another program.
In the View menu is the option Open Clip in Editor (the shortcut is Option+Return). This menu choice also exists if you Control-click a clip. But what does it do?
Note
The Send option only works with Final Cut Studio applications. Open in Editor allows you to move a file to any application.
Open Clip in Editor is a very fast way to open a clip in the application that created it—or somewhere else, if you prefer.
Assuming your preference files haven’t been altered, this option opens:
• A QuickTime file in QuickTime
• A Motion project in Motion
• A LiveType project in LiveType (assuming you have LiveType installed on your system)
• A Soundtrack project in Soundtrack
• A Photoshop file in Photoshop
In other words, it opens the file in the application that created it.
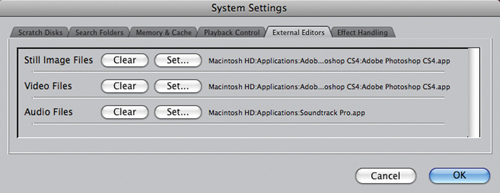
But you can change this behavior. Choose Final Cut Pro > System Settings, then click the External Editors tab. Here, you can set what application opens a particular type of file. In this example, I’m using Photoshop CS4 to open both still and video files for image editing, and Soundtrack Pro for audio files. This option gives you one-click access for moving a file out of Final Cut Pro directly into another application.
Find Clips in the Finder
Tracking down media files is really easy.
Recent versions of Final Cut Pro have made it increasingly easy to locate media files stored on your hard disk.
This is helpful when you stored—purely by accident, I’m sure—your media files in some really bizarre place. Realizing the error of your ways, you want to move them to a more logical location—except, you’ve forgotten where you first put those files.
Not to panic.
Select the clip you want to find—this works for clips in the Browser, Viewer, Timeline, or Canvas. The key is to first select the clip.
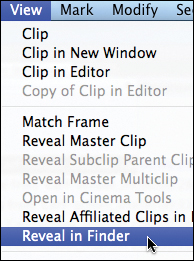
Next, choose View > Reveal in Finder. A Finder window opens in front of Final Cut Pro and your wayward file is highlighted.
Note
If you move file locations in the Finder, you will break the links for those files stored in Final Cut. The first rule is: “Don’t move files.” If you must move files, relink them in Final Cut as soon as you get done moving them.
Reveal the Location of a Subclip’s Source
Here’s a surefire way to find a source clip in the Browser.
Match frames allow you to open a master clip in the Viewer so you can review it or edit it into the Timeline.
Sometimes, however, you just need to figure out where the source clip is located in the Browser. There are two ways you can easily do that. They all start with highlighting the clip you want to find in either the Viewer or the Timeline.
• Press Shift+F to reveal the location of the selected clip in the Browser. If it is in a bin, the bin will be opened and the clip name highlighted.
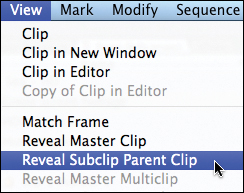
• Select View > Reveal Subclip Parent Clip to reveal the location in the Browser of the parent (source) clip from which a subclip was created.
Renaming Files in the Finder
Renaming a file is a sure route to disaster—unless you follow this procedure.
Apple designed Final Cut Pro project files to be renamed or moved to any location you want without breaking, but source files must not be renamed or moved once they are imported into Final Cut because that breaks the links to the files in Final Cut.
Extra Credit
If you’ve renamed a clip in the Finder and updated the link to the same clip in the Browser using File > Reconnect Media, choose Modify > Rename > Clip to Match File to change the Browser clip name to match the name of the source file in the Finder.
However, sometimes you just need to rename a file for completely valid reasons.
So, here’s what you do to prevent a crisis: rename it in the Browser first. Then, select the Browser clip and choose Modify > Rename > File to Match Clip.
The “File” is the source file stored on your hard disk. The “Clip” is the name of the clip in the Browser. The huge benefit to this is that Final Cut Pro automatically updates its links when you rename the file so that nothing breaks.
Use this trick whenever you start renaming Browser clips so that the Browser and Finder clip names match.

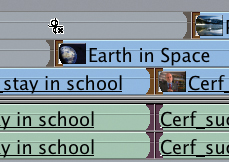
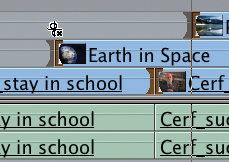
Finding Related Clips in the Timeline
Find every occurrence of the same file in the Timeline.
Have you ever wanted to find all the uses of the same clip in the Timeline? Well, with Final Cut Pro 7 you can.
Note
This only works on the active sequence in the Timeline.
Select the clip you want to find in the Browser, Viewer, or Timeline and make sure the window your clip is in is selected.
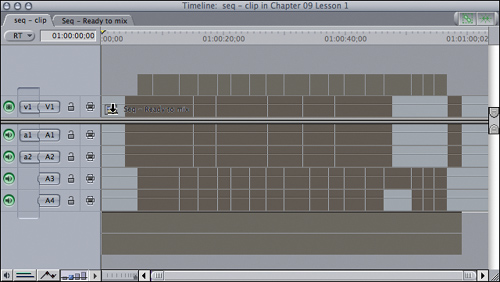
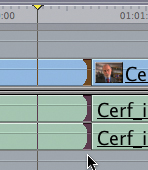
Choose View > Reveal Affiliated Clips in Front Sequence.
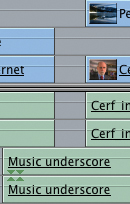
All the clips from the same source are highlighted in the Timeline.
Note
This is a great technique to use when you want to apply the same filter or effect to every use of a specific clip in the Timeline—think color correction.
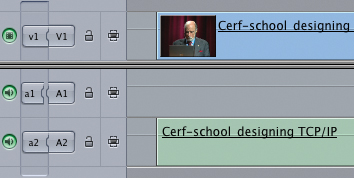
For instance, in this example I loaded a clip into the Viewer and all the occurrences of that clip are highlighted in the Timeline.
Merging vs. Linking Clips
How do you decide which to use?
Whether you are merging or linking clips, you still start from the same place. You have at least two unsynchronized clips: an audio clip and a video clip. Both merging and linking create a clip where the audio and video act as though they are synced.
A classic example of why you’d do this is in a music video where the audio plays from a CD while the performers lip-sync on camera. The audio is from one source; the video is from another.
Here’s the short answer: Clips you link exist only in the Timeline, while clips you merge exist in the Browser. Generally, linked clips are for one particular use in a sequence; merged clips are for general use throughout a project.
Extra Credit
A fast way to create a merged clip is to drag a linked clip from the Timeline to the Browser.
You can link, or merge, one video clip with up to 24 tracks of audio. You cannot merge or link multiple video clips together.
To link a clip, align both the video and audio clip in the Timeline, then select them. Choose Modify > Link (or press Command+L). A linked clip simply creates a group of two or more clips. The linking is based on the position of the two clips in the Timeline when linked.
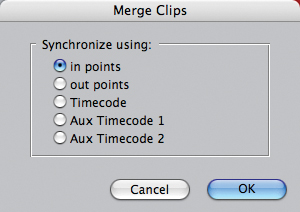
A merged clip creates an entirely new clip, called a master clip, that’s stored in the Browser. A merged clip connects clips based on a common In point, Out point, or timecode between the two clips. If the timecode is not the same, you must set the In or Out point before merging clips.
To merge a clip, select all the clips you want to merge in the Browser, then choose Modify > Merge Clips. In the dialog box, specify the sync point for these clips, then click OK.
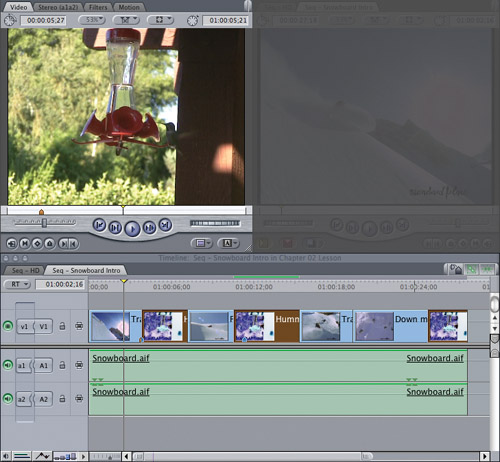
Comparing Two Clips or Sequences at the Same Time
Here’s a great way to check two different clips or sequences in sync against each other.
Most of the time you don’t want any connection between the Viewer and the Timeline.
But sometimes you do—for example, if you want to compare a low-resolution cut of a sequence with a high-resolution cut of the same sequence to be sure you have all the cuts in the right place.
Here’s a neat way to accomplish this. The basic idea is to load one sequence (or clip) into the Timeline, then run it in sync with a second clip (or sequence) in the Viewer.
Note
You can use this to make sure the cuts between two versions match. The fastest way for you to compare is to use the Up/Down Arrow keys to jump both Viewer and Canvas to the same point. Also, if you use Option+P, remember that it won’t play in real time but somewhat slower, which means you won’t hear audio.
Start by opening one of the clips, or sequences, you want to compare into the Timeline. Put your playhead where you want the comparison to begin. Be precise, because this becomes your sync point.
Load the second clip, or sequence, you want to compare into the Viewer. Again, set your Viewer playhead precisely at the point you want to sync these two clips.
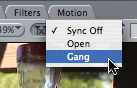
Open the center pop-up in either the Viewer or Canvas and set it to Gang. While the clips won’t play in sync (for that, you’d need to create a multiclip), you can view them both by dragging the playhead, using the Up/Down or Left/Right Arrow keys, or pressing Option+P.
Finding and Eliminating Timeline Gaps
Gaps cause flashes of black—and ulcers. Here’s how to get rid of them.
There are two kinds of gaps in Final Cut Pro:
• A timeline gap crosses all tracks in the Timeline.
• A track gap is a gap in one or more tracks, but other clips on other tracks span the gap. Generally, track gaps are only a concern for video and not audio.
This Power Skill talks about timeline gaps; the next skill covers track gaps.
Finding and eliminating gaps across all the tracks in the Timeline is easy to do:
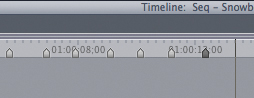
1. Select Mark > Next > Gap (or press Shift+G) to move forward to the next gap, or select Mark > Previous > Gap (or press Option+G) to move back to the previous gap.
Note
If the Auto-Select button is turned off (it’s hollow and light gray), any gaps in that track are ignored.
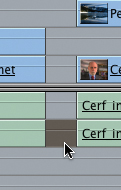
2. Click within the gap on any track to highlight it.
Extra Credit
You can also delete gaps by Control-clicking a gap and selecting Close Gap, or by selecting Sequence > Close Gap.
3. Press the big Delete key (above Return). No more gap!
Finding Track Gaps
Track gaps in video cause flashes of black—which can get you fired. Here’s how to spot ’em.
A track gap in Final Cut occurs when a gap exists between clips on one track but has material over or under it on other tracks. What to do?
Generally, if a video clip is above a gap in a lower video track, you don’t need to worry. The higher clip covers the gap in the lower track.
Also, track gaps in audio are normal, and unless you need continuous audio for that section, you have nothing to worry about.
But when a gap in a video track is covered by continuous audio, there’s a problem. Worse, these gaps are often only a frame or two wide, which makes them difficult to spot.
Extra Credit
To find gaps in only one track, Option-click the Auto-Select button for the track you want to search—most often this is the V1 track. Final Cut Pro will only search tracks whose Auto-Select buttons are dark.
So, to find track gaps, position the playhead at the beginning of the sequence.
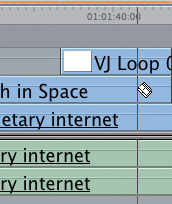
Then choose Mark > Next > Track Gap and watch how Final Cut Pro jumps to the next gap in any track. To go back to a gap, select Mark > Previous > Track Gap.
To remove a track gap, see the next Power Skill.
Removing Track Gaps
Fixing a track gap can be tricky.
The previous Power Skill discussed how to find track gaps—gaps in a video track that are covered with audio.

Once you’ve found a track gap, you can remove it in one of three ways:
• Stretch one of the clips on either side of the gap to fill the gap.
• Lock all tracks except the track with the gap, click the gap to select it, and press Delete.
• Pick the Select Track Forward tool (press T), click in the gap to select all clips in that track to the right of the gap, and drag the selected clips to close the gap.
Note
Because there are an almost unlimited number of ways to potentially fix a track gap, Final Cut does not provide an automated way to fix them.
Picking the best method depends on the amount of video in the clips before and after a gap and whether you need to worry about audio sync after the gap.
A Faster Way to Preview an Edit
This keyboard shortcut makes it easy to preview an edit point.
Here’s a fast way to preview anything at the position of the playhead. Press the backslash key () located immediately above the Return key.
Watch how the playhead backs up a few seconds, plays through the current location of the playhead, stops for a few seconds, then resets the playhead to its original position.
This method of previewing is so quick, it’s addictive.
Extra Credit
You can change the amount of time the playhead backs up, or how far it plays past the edit point, by choosing Final Cut Pro > User Preferences and modifying options on the Editing tab.
Continuous Looping
Real-time review—over and over and over...
Not sure you like that edit? Want to see it a few times in a row?
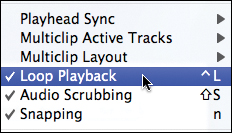
To have Final Cut continuously loop playback in either the Viewer or Canvas, select View > Loop Playback (or press Control+L), set In and Out points on either side of the section you want to review in your Timeline (or Viewer), and press Shift+/.
You are now stuck in a time loop from which there is no escape! (Actually there is: It’s called the spacebar.) While this trick is most useful in the Timeline, it’s nice to know this works in the Viewer as well.
Note
The Trim Edit window also provides a realtime preview, but the Timeline is faster.
Copy Timecode from Window to Window
This is a quick trick that can save you lots of typing.
There are times when it’s useful to match a timecode from one window to another—to match a duration, In point, or Out point, for example.
There are two solutions:
• Select the timecode by clicking the timecode icon next to the numbers; then copy (Command+C) the selected timecode from one Timecode data entry box and paste (Command+V) it to another Timecode data entry box.
or
• Make sure the timecode is not selected, then hold down the Option key and drag the timecode numbers from one Timecode data entry box to another.
Quick, easy, simple, and neat.
Continuously Loopy
Here’s another way to view the same thing over and over in real time.
A special window is built into Final Cut Pro that allows you to view even the most complex effect in real time. It’s called the QuickView window, and here’s how it works.
Place your playhead in the middle of the sequence you want to review. (You can do this in the Viewer as well, but most of the time, you want to see an effect from the Timeline without waiting for it to render.)
Select Tools > QuickView. A window opens in front of the Viewer, with the playhead parked in the middle of the window.
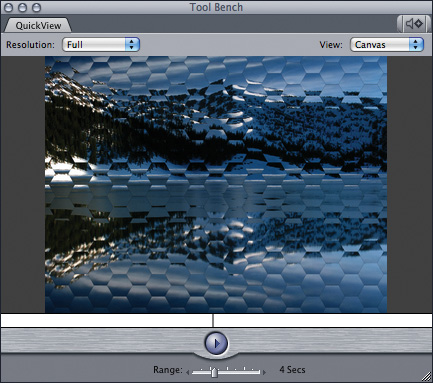
The slider at the bottom allows you to adjust how many seconds of your sequence you want to view. The range is 2 to 10, centered on the current location of the playhead. For example, if you select 4 seconds, it backs up 2 seconds before the current location of the playhead, then plays for the next 4 seconds.
The first time the QuickView window plays, it builds a RAM preview, so it’s slower than real time. After that, it continuously loops for the selected duration in real time.
Extra Credit
If you want a larger QuickView window, increase the size of the Viewer before you open QuickView, or drag the thumb in the lower-right corner of the QuickView window.
Get Things Moving
Here’s a fast way to accurately move the playhead, clips, or edit points.
When in doubt, grab something and drag it. That admonition works great... when you’re more concerned about speed than accuracy. But what about when you want to move something a precise amount?
Here’s a great way to move something precisely:
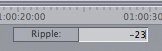
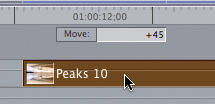
• Moving the playhead: If nothing is selected in the Timeline, press + or − on the numeric keypad followed by a number, then press Enter. The playhead will move right (+) or left (-) based on the number you type in. If the number is one or two digits, it moves by frames. If the number consists of three or four digits, it moves by seconds and frames. If the number consists of five or six digits, it moves by minutes, seconds, and frames.
Extra Credit
You don’t need to use punctuation—you can just type the number. Final Cut Pro does the math for you—typing 99 is the same as typing 3:09 for 29.97 fps NTSC video.
So, type +15, and the playhead moves 15 frames to the right. Type −35 and the playhead moves 35 frames to the left. Type +1000 and the playhead moves 10 seconds to the right. Type −13014 and the playhead moves 1 minute, 30 seconds, and 14 frames to the left.
• Moving a clip: Select a clip, then press + or − on the keypad followed by a number, then press Enter. The selected clip(s) moves left or right, based on the number you typed in, provided it’s not blocked by another clip on the same track.
Note
If you don’t have a numeric keypad, substitute minus (−) and Shift+= for the plus.
• Moving an edit point: Select an edit point, then press + or − on the keypad followed by a number, then press Enter. The selected edit point moves left or right, based on the number you typed in, provided there are sufficient handles for it to move that distance.
Note
The Enter and Return keys are often programmed to do different things. For that reason, when you are accepting the contents of a data entry box, Enter always works reliably. Return sometimes adds a carriage return and leaves the dialog box open. For this reason, I recommend using the Enter key.
Changing Timecode
QuickTime files contain three timecode tracks. Here’s how to change them.
Timecode is at the heart of nonlinear editing. Sometimes timecode needs to be changed to properly sync separately recorded picture and sound, or to change a timecode setting chosen in the camera that does not work for you in postproduction.
A good example is a narrative film scene where the audio is recorded to one device and the video to another. And, as often happens, the audio and video timecodes are not the same. Often, you don’t want to change the master timecode, but you do want to track both timecodes in the video clip.
To do this, select the clip with the timecode you want to change in the Browser, the Viewer, or the Timeline.
Select Modify > Timecode. Three timecode tracks are stored inside every QuickTime file: the primary and two auxiliary tracks.
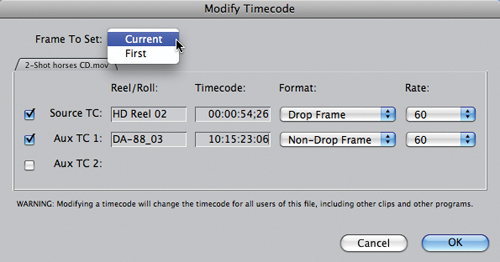
In our example, I turned on the Aux 1 timecode track by checking it. Then, I added a Reel ID to identify the source tape or folder and entered the timecode setting I wanted to use.
In the pop-up at the top, I indicated whether this timecode number should be set to the first frame of the clip or the current location of the playhead. A good reason for using the current location of the playhead is when you want to match timecode between audio and video elements based on the location of a clapper slate.
Extra Credit
To change the timecode that’s displayed in the Viewer and used when editing that clip, load the clip into the Viewer, Control-click the top-right timecode box in the Viewer, and change it from Source to Aux 1 or Aux 2 at the bottom of the pop-up menu.
Multiclips and Markers
Keep these tips in mind when using markers with multiclips.
In Final Cut Pro, a multiclip combines a series of related shots into a special clip where you can see all the images at once when played in the Viewer.
Markers, as you know, are a great way to flag specific locations in a clip or the Timeline. With the release of Final Cut Pro 7, Apple changed the way multiclips and markers work:
• If you load a source clip into the Viewer and apply markers before combining that clip into a multiclip, the Clip markers will be retained in the multiclip.
• When a multiclip is edited to the Timeline, any Clip markers in the active angle of the clip are displayed in the multiclip.
• You can apply Clip markers to a multiclip the same as a normal clip.
• Markers in a multiclip appear on the Timeline as Clip markers.
• Timeline markers for a sequence containing a multiclip behave exactly the same as markers for any other clip.
Extra Credit
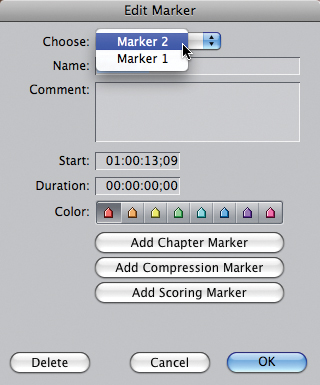
It’s possible two markers may appear on the same frame. If that happens, open the Edit Marker dialog box for one the markers (a good way to do this is to put the playhead on a marker and press M), and select the marker you want to adjust from the Choose pop-up menu at the top of the window.
Adding Clips to Multiclips
Oops. You forgot to add an angle to a multiclip. Now what?
You have two choices in this situation, depending on whether you’ve edited the clip to the Timeline yet.
Extra Credit
To shuffle the order of images in the Viewer, press the Command key and drag them into a new position.
To remove an angle from a multiclip, press the Command key and drag it out of the Viewer window.
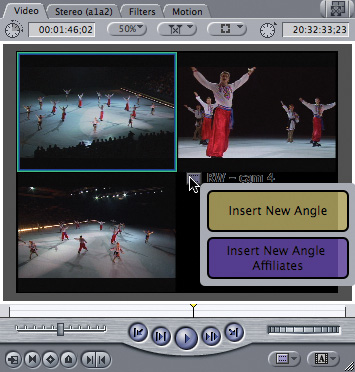
In either case, you start the same way: In the Browser, grab the clip you want to add and drag it into the multiclip you’ve loaded into the Viewer.
Then, wait! Don’t let go. In a few seconds, a pop-up menu will appear. (There aren’t a lot of these types of menus in Final Cut Pro, though DVD Studio Pro uses them frequently.)
If you drop the clip on Insert New Angle, the clip will be added to the multiclip in the Viewer, but not into any multiclips you’ve edited to the Timeline.
If, on the other hand, you drop the clip on Insert New Angle Affiliates, the clip will be added to the multiclip in the Viewer and to any multiclips you’ve edited down to the Timeline.
Match Frames and Multiclips
Match frames for multiclips are just like match frames for clips—sort of.
In the same way we can find match frames for individual clips and subclips, we can do the same for multiclips—we just have more choices.
To match a Browser source clip to a multiclip angle in the Timeline:
• Put your playhead in the angle you want to find and press F (View > Match Frame > Master Clip). The source clip appears in the Viewer, matching the position of the playhead.
To find the location of the Browser source clip:
• Put your playhead in the angle you want to find and select View > Match Frame > Multiclip Angle.
To match an active multiclip angle in the Viewer to a multiclip in the Timeline:
1. Double-click the source clip in the Browser to load it into the Viewer (this replaces any multiclips that may be there).
2. Select View > Match Frame > Multiclip Angle. The Timeline playhead jumps to the matching frame that’s displayed in the Viewer.
Multiclip Mishaps
Not all multiclips are created equal...
Having problems with getting a multiclip to work properly?
Keep in mind that all source clips for a multiclip need to be the same video format, the same frame size, and the same frame rate. In other words, they need to be technically identical.
Extra Credit
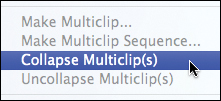
To rebuild a collapsed multiclip for editing, select the multiclip and choose Modify > Uncollapse Multiclip.
Note
Remember to select Modify > Collapse Multiclip to collapse your multiclip when you are done editing it to minimize wear and tear on your hard drives. This tells Final Cut to play only the data it needs, not all the linked clips of a multiclip.
Getting Multiclips to Play Properly
Multiclips require a really fast hard drive—and a special RT setting.
If you plan to do a lot of multiclip work, getting a fast hard drive—or, far better, a RAID—should be part of your plan. While you can easily handle four to five DV streams for a multiclip, many HD formats require far faster data streams.
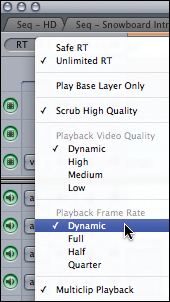
There’s also an RT menu setting that can make a difference in whether your multiclips play smoothly.
Before starting your multiclip, open the RT menu in the top-left corner of the Timeline and set the following:
• Unlimited RT
• Dynamic image quality
• Dynamic frame rate
This allows Final Cut Pro to modify both the frame rate and image quality during editing and so minimizes the load on your CPU. This setting doesn’t affect output, only editing, so you can change it as often as you wish.
Note
Changing the RT menu does not affect the data rate you need from your hard disk; it only affects how the processor handles the data. So if you are getting dropped frame errors during playback, the most likely solution will be a faster hard disk, not changing this menu.