
Chapter 10. Security
There are three main areas of focus when securing services: authentication, authorization, and encryption. Authentication refers to verifying that the user is who she says she is and that no one has tampered with her message. Authorization refers to determining what a given user is allowed to do on the system. Encryption is a technique to keep people in the middle from being able to know what data is being sent back and forth. All three are important to properly securing a system, but each is approached in a different way. This chapter covers how to approach each of these facets of security to ensure that your services are not compromised.
Authentication
There are two main components to authentication. The first is validating a user’s identity. The second is ensuring that the message the server received is the same message the client sent. The simplest form of user authentication is to require the user to provide a user name and password. This ensures that the user knows at least a valid login and its associated password, but it does little to guarantee that the message body the server received is the same as the one that the client sent. Message signing provides a more foolproof mechanism for validating that message contents have arrived unmodified. In addition, message signing can be used to validate a user’s identity because the signing mechanism can also be used to uniquely identify a user.
This section starts with simple HTTP authentication to validate a user’s identity and then moves on to two forms of message signing: shared secrets and public/private key pairs. It finishes with a quick look at using SSL certificates to validate the identity of a server. While reading this section, remember that passwords and message signing do not have to be used exclusively, and greater security can be attained by requiring both HTTP authentication and a signed message.
HTTP Authentication
One of the simplest ways of verifying the identity of a user is to use HTTP basic authentication, which is a simple challenge-and-response method that requires the user to provide a user name and password. On the client side, basic authentication is usually very easy to implement. In Typhoeus, it’s as easy as adding an authorization header, like so:

Thankfully, the work on the server side is nearly as simple. Rack ships with the Rack::Auth::Basic class, which is Rack middleware that you initialize with an authentication realm and authentication block, like so:

This rackup file ensures that only requests with a basic authentication header including the user name bobs_protection and the password bobs_sekret_pass are passed to the application. As the file notes, a request to an authentication service could also be made at this time to determine whether the user name and password are correct.
Though basic authentication is easy to set up and use, it is not the most secure approach. In particular, the user name and password are sent as clear text. For this reason, it is inadvisable to use basic authentication over anything other than SSL. If SSL is unavailable, HTTP Digest Authentication is also an option. Setup on the server side is accomplished with a Rack adapter similar to Rack::Auth::Basic. Unfortunately, usage on the client side is usually slightly more difficult, as it requires a handling of nonces and hashing of the user credentials.
Signing Requests
Request signing can serve two purposes. First and foremost, it is often used to verify that the contents of a message have not been modified. An unsigned message can be intercepted and modified by a malicious third party and then routed on to the intended recipient. To the recipient, it appears that the message has come directly from the client, but in reality, someone in the middle has changed it to convey false information. (This is referred to as a man-in-the-middle attack.) When a message has been signed, a unique cryptographic hash is appended to the message. The server uses this hash to validate the message contents. This prevents man-in-the-middle attacks because it is quite difficult for a man in the middle to generate the correct signature.
Second, request signing can be used to validate a user’s identity. By assigning a unique signature key to each client, a server can be assured that only that client could have possibly signed the message. In this way, the signature serves as a validator both of the message contents and of the user.
Shared Secrets with HMAC
Using Hash-based Message Authentication Code (HMAC) is one of the easiest ways to sign a request. It requires the use of a shared secret and can be performed using the ruby-hmac gem (http://ruby-hmac.rubyforge.org). When using HMAC, the requester signs the message using a shared key and appends his or her signature to the message. It is usually best to include the signature as part of a header because it makes it easy for the server to pull it back out. However, you will see it appended to the query string or to the POST body in some APIs. Upon receiving the message, the server signs the message using the same key and verifies that the signature matches the one sent by the client.
For the implementation, an HMAC signature class is first needed to standardize signature generation. Encapsulating the signature algorithm in a single class makes it easier to reuse on both the client and server sides:
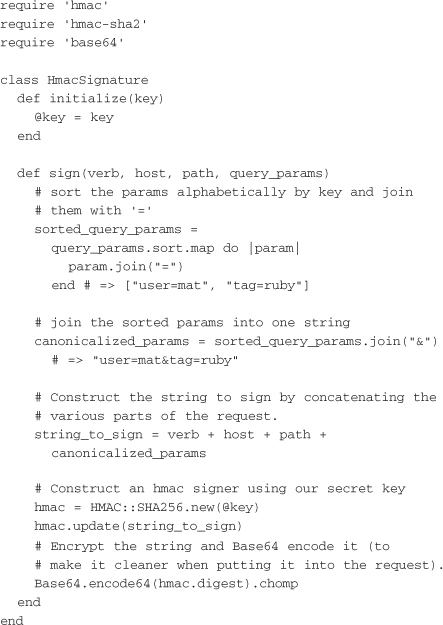
The signature class signs a message with the HTTP verb (GET, PUT, POST, DELETE), the host, the path, and the query parameters. To ensure that the message to be signed is consistent on both ends, the query parameters are put in sorted order by their keys. The message containing all these pieces of information are put together and signed using a HMAC::SHA256 signer.
It’s important to note that this method does not protect against replay attacks—that is, listening in on a request and then reissuing it later. To ensure some level of protection against a replay, you should include a time in the query parameters. This can be checked on the server side to make sure that the time at which the request was signed is close to the time the server receives the request. Amazon’s API provides an example of where this method is used.
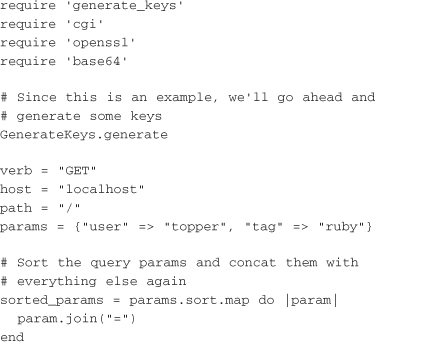
With a signature generator written, the next step is to write a sample client. The client uses HmacSignature to create the signature and then executes to curl requests. The first is done without the signature to verify that the server is indeed protected. The second is done with the signature in the X-Auth-Sig header, which should ensure that the request is processed by the server:

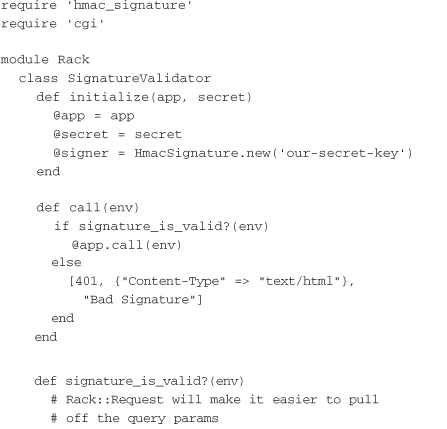
The next step is to write a simple Rack adapter that will be used to protect the application. This adapter will be initialized with the same secret key used by the client, our-secret-key. If the signature is also being used to validate the client’s identity, another header (such as X-Auth-User) should be added to the request by the client. Then in signature_is_valid? the header could be used to look up the appropriate secret to use when validating signatures from that client. Here is an example that shows a rack module for performing signature validation:
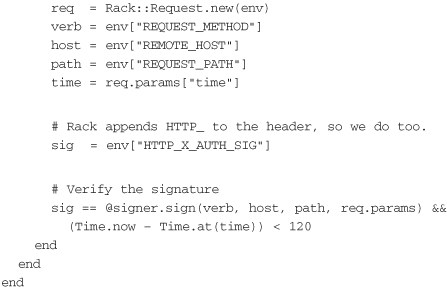
The validator gets the HTTP verb, host, path, request time, and signature from the request. It uses the verb, host, and path to sign the message using the same signer as the client. It compares this generated signature with the signature that was passed in the request. Finally, it ensures that the time value in the query string is within 120 seconds of the current time. Note that the method assumes that the time query parameter is an integer—that is, a Unix time epoch value generated when calling to_i on a Ruby time object.
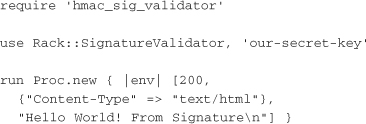
The final step is to use Rack::SignatureValidator in a rackup configuration to protect the server. The following example defines a simple “Hello, World” application and instantiates Rack::SignatureValidator with the key our-secret-key to protect it:
This example assumes that all users will use the same key to sign requests. This approach is practical only in a controlled setting where there are few clients, and all are highly trusted. In many circumstances, it is better to give each client a unique key, which the server looks up on each request. Amazon does this with the combination of the AWS access key ID and the AWS secret. The server looks up the shared secret based on the access key ID and uses that to verify the request.
One of the problems with a shared secret is that the secret must actually be given to the client. The next section discusses public/private key pairs, which provide a way around this deficiency at the cost of a more difficult implementation.
Public/Private Key Pairs with RSA
If there is an attacker in the middle when the shared secret for HMAC signing is shared, the attacker can steal the secret and then sign requests as if he were the actual client. One option for safeguarding against this type of attack is to use a public/private key pair generated using the RSA algorithm. In this approach, the client creates a key pair and then sends the public portion to the server. When the client makes an API request, it uses the private key to encrypt a signature string. Upon receiving the request, the server looks up the client’s public key and uses it to decrypt the signature. If the signature matches what is expected, the request is valid.1
To get started with public/private key pairs, the actual keys are needed. These can be generated in many ways, but because this is a Ruby book, the following example shows how to do it in pure Ruby. It is important to note that openssl is required, and it is not part of the default Ruby package on Ubuntu. If you’re running on Ubuntu, be sure to install the ruby-openssl package first. That said, actually generating the keys takes only a few lines:

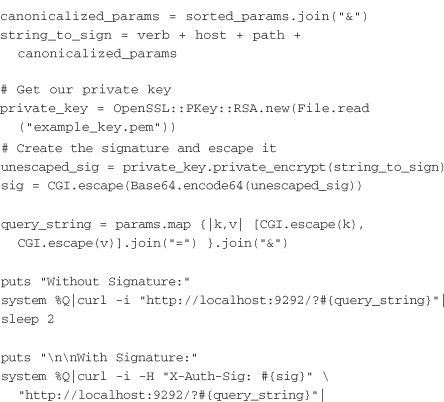
Once both keys are generated, the private key must be given to the client and the public key to the server. A sample client that uses the private key to sign a request can then be written as follows. The signature is again placed in X-Auth-Sig, and X-Auth-User could be added to allow the server to look up the appropriate public key based on a user identifier, as shown in the following example:
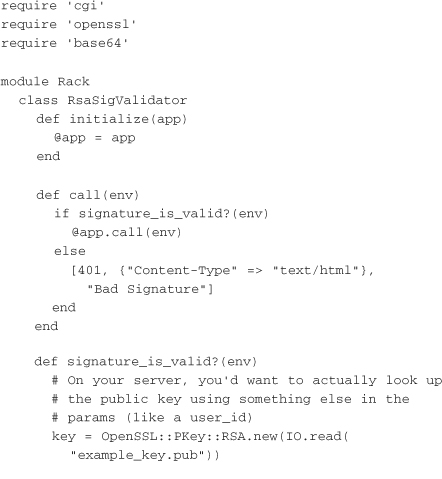
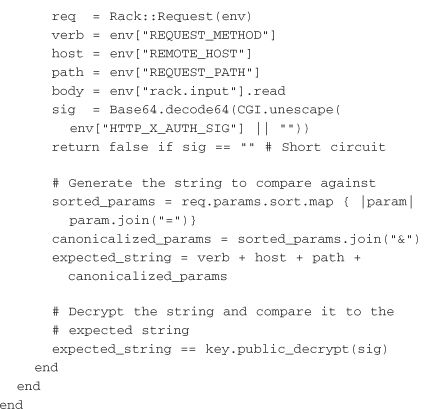
On the server side, a validator is once again needed. This time, the validator uses the public key to decrypt the signature and compare it to the unsigned canonicalized query parameters. This differs from the HMAC validator’s approach because the public key cannot be used to generate the same signature as the private key for the canonicalized query parameters. However, it can be used to decrypt strings signed using the private key:
With the validator written, the only step left is to wire it into a rackup configuration, which is left as an exercise for you.
What to Sign
In the preceding examples, the client signs only a simple query string along with some information about the request. The real world is more complicated and requires that POST bodies consisting of XML or JSON also be signed. As it turns out, signing a POST body is even simpler than signing query strings or form-encoded POSTs because the client does not need to worry about ordering parameters. The problem with query strings and form-encoded POSTs is that many common HTTP clients do not guarantee the order in which parameters will be added to the query string or POST body. For this reason, the client and server must agree on the order. The preceding examples use simple alphabetic sorting.
When the POST body is an XML, JSON, or other BLOB, however, the client does not need to worry about sorting and can simply append it to the string to sign. In the case of a JSON request, generating the string to sign on the client might look something like the following:
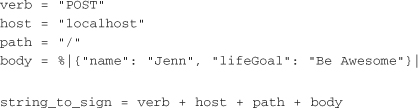
On the server, only a slight modification is made to extract the request body and append it to the string to be signed:
![]()
Even though there is no query string in this example, it’s better to keep the server side as general as possible by continuing to include canonicalized_params. In this way, the server can handle incoming requests with either canonicalized params or a POST body. However, keep in mind that a more robust implementation would check the Content-Type of the POST and parse and sort the parameters in the body if it is application/form-url-encoded.
SSL for Authentication
Although SSL is often thought of as an encryption mechanism, it can also be used to verify identities. In the case of a web server, the certificate acts as proof to the client that the server really is the correct server because a third party (such as VeriSign) validates the certificate. Unfortunately, validating a server’s certificate is not exactly straightforward in Ruby. Unlike a browser, Ruby does not inherently know how to trust the third party’s validation of the certificate. It is up to the programmer to provide a certificate authority’s file for Ruby to use. The following code example tells the story:
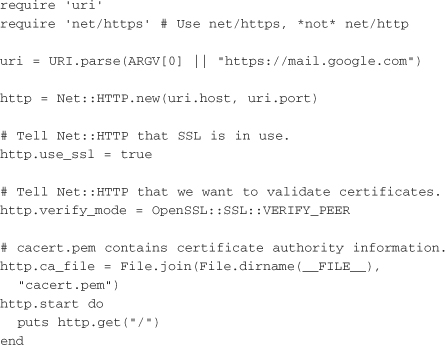
As you can see, Net::HTTP must be told to use SSL and be given a list of valid certificate authorities in the form of cacert.pem. In the case of this example, the cacert.pem used is the one from Haxx, the creators of Curl (http://curl.haxx.se/ca/cacert.pem). If self-signed certificates rather than purchased certificates are being used, then it is necessary to use a cacert.pem that contains the self-signing authority.
As mentioned earlier, authentication covers verifying both the identity of an individual and the validity of the message being sent. This section has only scratched the surface of authentication. Other topics include authenticating that messages sent from the server to the client are valid and using signatures to verify identity. Authentication is an essential piece of the security puzzle. As you will see in the next section, authorization is sometimes quite useless if the user’s identity is not verified.
Authentication for Rails Applications
The previous examples of authentication concern authenticating service clients with services. Service clients in these cases have been other programmers. These could be programmers within your organization accessing shared services or external programmers connecting to your service (for example, programmers connect to Amazon Web Services). However, web applications also have to concern themselves with authenticating regular users.
Authenticating users of a web application with regard to services can occur in two forms. First, the user can log into the application and perform actions that require authentication. Second, the user can allow a third-party service to connect to your service on his or her behalf. The latter scenario is covered in Chapter 12, “Web Hooks and External Services,” in the section on OAuth. The former scenario can be handled without much difficulty.
Chapter 1, “Implementing and Consuming Your First Service,” works through an example of creating a user service. This same service can be used for authenticating users within a Rails application. Figure 10.1 shows the communication among the web user, the Rails application, and services.
Figure 10.1 User authentication.
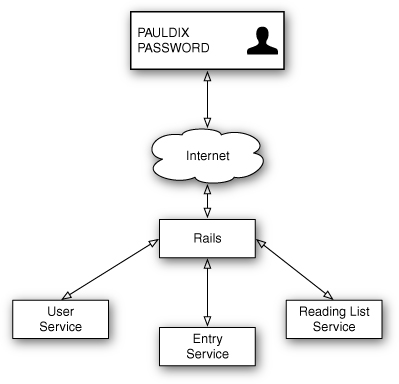
Figure 10.1 shows an example from the social feed reader application. The Rails application handles all requests coming from a user. The user (pauldix) provides his user name and password so he can then be authenticated against the user service. Once this has occurred, the Rails application can make requests to the reading list and entry services. Note that the reading list and entry services will probably have their own authentication, as detailed in previous sections. However, that layer of security is designed for service-to-service communication.
If services are exposed directly to end users of an application, the services need to authenticate users. An example of this would be JavaScript calls from the web browser directly to services. It’s usually a good idea to have those requests all come into a central place, such as the Rails application. However, it’s possible to route those requests to the services themselves. In those cases, the service will have to call out to the user service to authenticate the request.
If the services handle authentication directly, they also have to concern themselves with session management. Coverage of user sessions is beyond the scope of this book. For more information, the Ruby on Rails guide to security is a useful resource (http://guides.rubyonrails.org/security.html#sessions). Note that each service that handles external requests directly from users has to deal with this. In this case, the best method is to write the user-based authentication as a Rack adapter, like the previously covered HMAC adapter. The important thing to keep in mind is that the user service must have very quick response times in order to ensure that request processing isn’t held up.
Authorization
This section covers two major approaches to authorization. The first is a sort of blanket protection provided by software such as firewalls. In this approach, the user is not necessarily authenticated but is instead restricted from performing certain actions based merely on the fact that he is coming from outside the local machine. Sometimes a form of weak authentication is coupled with this when access is further restricted to coming in from only a few known IP addresses. The second approach leans more heavily on authentication to first verify the user and then determines whether this user is allowed to perform a certain action. It results in more fine-grained access control because it’s easier to specify that a user can access only certain parts of a single application as opposed to the firewall approach of allowing users access to anything on a certain port. This section discusses role-based access control (RBAC) as one means of implementing this approach. It is important to keep in mind that these authorization mechanisms are not exclusive. In many applications, you will certainly want both.
Firewalls
One of the simplest and most effective ways to protect private services from unauthorized external access is with a simple firewall. A firewall can restrict access to only a few known IP addresses, which can be useful (though somewhat fragile, if dynamic IP addresses are in use) when you’re limiting access to a ReaderList service to the web servers only. Because iptables is prevalent and easy to install on many Linux distributions, the following examples assume that it is being used. However, these concepts should generalize to other firewalls, so you should consult the documentation to translate these examples to your firewall of choice. To get started with iptables, you need to have it installed. On Ubuntu, you use a simple apt-get call:
sudo apt-get install iptables
Once iptables is installed, the rules must be set up. Gaining full mastery of iptables rules can take quite some time, so this section covers only turning on access to all but a couple external machines. The first step is to set up an iptables ruleset that restricts all traffic other than local (this machine) traffic, outbound requests, and SSH. You save this file to /tmp/iptables.test.rules:
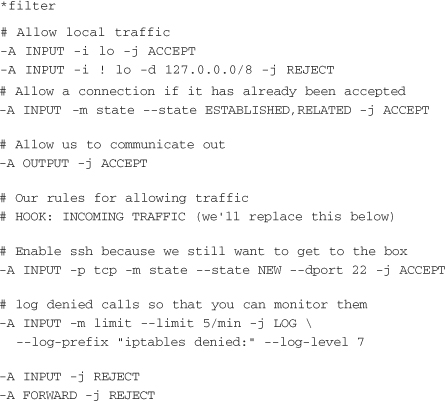
This ruleset blocks nearly all incoming traffic to this machine, which is more than ultimately desired.
The next step is to lock incoming TCP requests to specific ports. Assuming that an HTTP service is being protected, this involves opening ports 80 and 443 to all clients. You replace HOOK: INCOMING TRAFFIC in the preceding file with the following:
![]()
The next step is to restrict these ports even further by applying an iprange filter. This filter ensures that only requests from a certain IP range—in this case, 192.168.1.100 to 192.168.1.200—are allowed to connect. Typically, an iprange filter is applied only when restricting access to a few internal machines. If the service needs to be accessible over the Internet, an iprange filter is not practical. The filter looks like this:

Access to the server is now restricted to ports 80 and 443 from clients with an IP address in the 192.168.1.100 to 192.168.1.200 range. Any attackers coming from outside this range are immediately prevented from gaining access once these rules are actually loaded. Loading them involves a simple iptables-restore command. It is typically good practice to also execute an iptables-save to store the new configuration permanently:
![]()
Using a firewall as a means of authorization is a very powerful tool, but it cannot distinguish one valid user of a web service from another. If the service needs to be publicly exposed as part of a broader API, a firewall protects other ports on the machine from unauthorized access but not the service itself. In these cases, an authorization service like the one described in the next section helps immensely.
An RBAC Authorization Service
An RBAC authorization service provides the kind of fine-grained authorization that a firewall is unable to provide. With RBAC, a user is assigned one or more roles, and protected resources are set as accessible by one or more roles. When a user requests access to a resource, access is granted only if one of the user’s roles is also in the set of allowed roles.
There are a number of Rails plugins for RBAC, but they’re usable only from within a Rails app. A more general RBAC solution is necessary for use with Sinatra or other Rack-based services. This section covers implementing RBAC as a Rack adapter and associated service. It allows for all access rules to exist in a single service, which can be scaled independently of the other services. In addition, it provides a write-once, implement-everywhere approach to RBAC security. If RBAC does not fit your particular need, this form of Rack adapter and associated service could also be used to implement other authorization mechanisms such as user-based access control.
RBAC Service
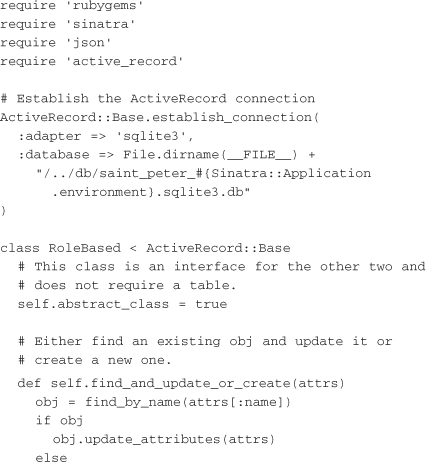
At its core, an RBAC authorization service consists of three main resources. First, it needs a way to create users and associate them with roles. Second, it needs a way to create resources and authorize roles to act on them. Third, it needs a way to query whether a given user can access a given resource. The simplified server that follows uses ActiveRecord data objects to store users (which map user identifiers to roles) and resources (which match resources to roles). There are three actions for the server: create a user, create a resource, and query. To remove roles from a user or resource, the user or resource is created again with no roles, which overrides the previous roles. This RBAC server relies on two ActiveRecord models and utilizes a Sinatra front end to serve the three URLs.
The RBAC model layer is relatively simple and consists of two classes, User and Resource. Each has a name and a comma-separated list of roles associated with it. In the case of User, roles denotes the roles the user belongs to. In the case of Resource, roles denotes the roles that are allowed access. In a more full-fledged system, the roles themselves may be broken off into a separate model. In this case, however, a comma-separated list is sufficient. The following example shows a class called RoleBased that provides an inheritable interface for adding roles to the User and Resource models:
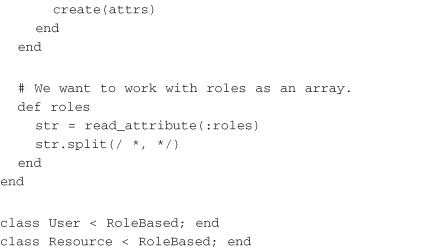
The controller level exposes three URLs: /users, /resources, and /users/:name/authorizations. The first allows a client to either create or update a user. To simplify the example, both methods are handled through a POST. The second URL allows a client to either create or update a resource, behaving nearly identically to the first URL. The third URL is the one that is used most often. It allows a client to check whether a user is authorized for a given resource by querying a URL in the form /users/:name/authorizations?resource=%2Fadmin. If scaling were ever to become an issue, caching this URL would be a good first step. The following is an example of a Sinatra service for handling users and roles:
The service is Sinatra based, so it can easily be started on its own or as part of a larger Rack application. At this point, it is accessible on port 3333, which is the port that the Rack adapter in the next section will use to talk to it.
The Rack Adapter
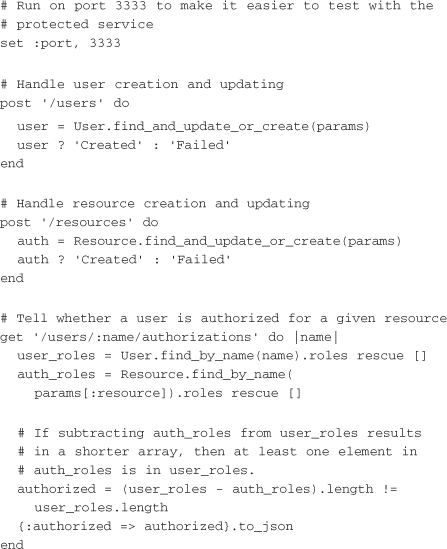
The RBAC service can be accessed from anywhere in the application stack via a simple HTTP call. However, the simplest method is to use a Rack adapter that sits in front of the protected application and checks whether the user can access the requested URL. This Rack adapter relies on a block to set the user name and resource that will be passed to the RBAC service to determine whether a user is authorized to act on that resource. In this way, the rackup configuration of the protected application can determine exactly how to identify users and resources. The following example shows a Rack adapter for RBAC:

You can use Rack::RBAC to protect a simple application server with config.ru:
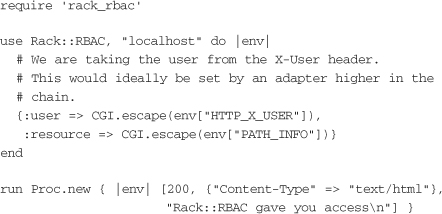
This example relies on the X-User HTTP header being set, but alternate implementations could do a lookup of the user in a database, based on information stored in a cookie. If X-User is used, it should be set by another adapter higher in the chain, such as the HTTP basic authentication adapter.
In order to test the implementation, both servers need to be started, and the RBAC service needs to be populated with user and resource information. Because it is a simple HTTP server, this can be done with a few curl commands, as follows:

Now if the protected server is started with rackup config.ru, a few curl commands verify that only pinot can access /litterbox:

This is all there is to setting up a simple RBAC service that integrates with other applications via a Rack adapter. Users can be assigned to roles, and resources can be restricted to access only by specific roles through HTTP calls. Querying user authorization involves simply a single HTTP call to the service. As usage of the system grows, authorization lookups can be cached either on the service side or on the rack side. In addition, the system can be extended to support other means of user lookup or resource specification. In a RESTful Rails setup, the resource would likely be specified as a combination of the HTTP method and the request path.
Encryption
The final piece of the security puzzle is encryption. When sending any sensitive information over the wire, encryption is a necessity. Although authentication and authorization help ensure that information is sent by the correct client to the correct server, they cannot prevent a man in the middle from reading the traffic. Man-in-the-middle attacks are easier for would-be attackers when the victim is on a cloud solution such as Amazon’s EC2. The lack of control over the networking hardware between machines enables the attacker to listen in on traffic between instances. For applications or situations where security is an important requirement, it is imperative that information between services be encrypted even when communicating with two “internal” services.
SSL for Encryption
When it comes to ease of implementation and knowing that it will “just work,” SSL is the obvious solution for encryption. It easily integrates into most web servers, and RabbitMQ can even use it to encrypt traffic. Unfortunately, using SSL requires that you attain an SSL certificate, which can be costly. Thankfully, it is also possible to self-sign a certificate, and an Internet search reveals many resources that can show the best way to do so. Once a certificate is acquired, telling Apache or Nginx to use it is fairly trivial. For Apache, mod_ssl should be enabled, and the following three lines should be added to the virtual host:
![]()
For Nginx, the following needs to be added to nginx.conf:
![]()
With an SSL certificate in place, all communication with the service will be encrypted. Most HTTP clients automatically detect that SSL is in use when given a URL that starts with https, so implementation on the client side takes no work. Using SSL really is just this easy.
Public/Private Key Pairs for Encryption
Public/private key pairs are used earlier in this chapter as an authentication mechanism. They can also be used to encrypt either the query string or the POST body of a request and the response body. This method does not provide as much security as SSL, but you use it as a form of encryption when SSL is not available or as extra encryption when it is.
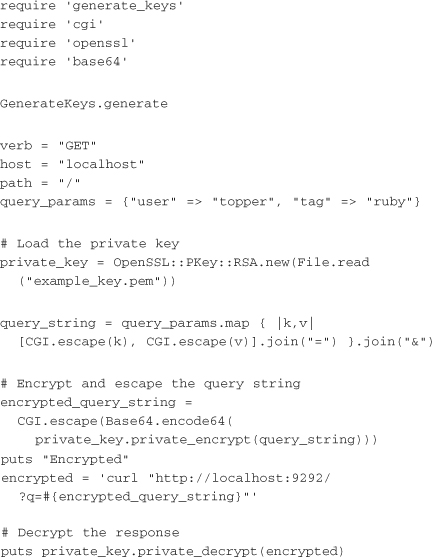
In practice, using public/private key pairs for encryption is very similar to using them for signing. The only difference is that the unencrypted version of the query string or POST body is not included, and an encrypted version is put in its place. The client code once again uses GenerateKeys to create the keys. It then uses the key to encrypt the entire query string and places it on the request as q. If this code needs to encrypt the body instead, the encrypted body can be placed directly into the request body rather than in a parameter named q. When the request comes back from the server, it is also encrypted. The client can then use private_decrypt to decrypt the response body:
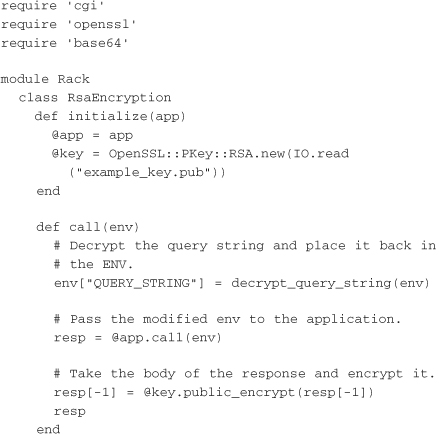
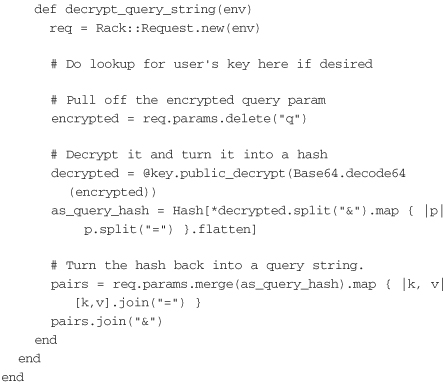
The server now uses a Rack adapter that acts as an around filter rather than a before filter. It takes the incoming request, pulls off the q parameter, decrypts it, and passes the decrypted query string through to the application. Once the application has returned a response, the adapter encrypts the response body using the public key and passes it on:
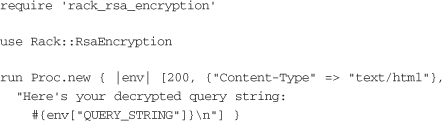
All that remains at this point is to link the Rack adapter to an application in a rackup configuration:
Encryption is a necessary piece of any security strategy. No level of authentication is truly secure if an attacker can intercept the message in transit and write down the user’s credentials. Encryption helps prevent this form of attack and ensures users that their sensitive data is not left in the clear for anyone to see.
Conclusion
This chapter covers the basics of restricting access to services to authenticated and authorized individuals connecting over an encrypted channel. Many of the technologies covered can fit into more than just one form of security. SSL is used to both verify a server’s identity and encrypt information. Other public/private key pairs can be used to verify the client’s identity, to verify the integrity of a message, and to encrypt the message. Other tools, such as an authorization service, iptables, HMAC signing, and HTTP authentication, are also used as means to protect a service. With all these technologies, it is important to remember that choosing only one of them is not enough. Effective security involves using many means of authenticating, authorizing, and encrypting access to services.