Create word processing documents on the Web
Learn to format documents using the Google Docs document editor
Discover how to save Web-based documents to your hard drive in many different formats
Build your first Google Docs spreadsheet
Build entire applications with the power of Google Docs spreadsheet formulas
Manage your Google Docs files online
Google does not have a product or application called Office. That’s why I’ve placed it in quotes. What it does have is Google Docs, previously known as Writely and Google Spreadsheets, two online office automation products. There is no doubt that these two products fall outside of the general goal of controlling the world’s information, but they are related. After all, they are the two most common types of information-handling tools in the world. So, it still makes sense for Google to have these products.
Unlike other office-automation products common in the marketplace, these two products are Web-based and, of course, are free. One of the distinct advantages these products offer is the ease with which others can collaborate on the creation and editing of documents.
Creating word processor documents, or simply “documents” and spreadsheets is simple in this Google tool. To get started using Google Docs, point your Web browser to http://docs.google.com. From the Google Docs Web site, you can create new word processing documents, new spreadsheets, and upload existing word processing documents from many popular office automation tools such as Open Office and Microsoft Word so you can continue working on them using Google Docs products.
You can start creating new documents or send your existing documents to Google to continue editing them online. There are advantages to this strategy. One immediate advantage is the ability to share your document with others and allowing them to assist in making changes. You control who has access. Another advantage is that uploading files to Google puts them in a form of safe storage. You can never seem to back up their hard drive enough. Google takes excellent care to maintain backups, both in its equipment and its file storage. It also frees up disk space on your own computer, although with today’s huge hard drives that’s usually not an issue. Google Docs allows you to upload documents in Word, OpenOffice, RTF, HTML or text format.
Tip
If you’ve never heard of OpenOffice, it’s worth a look. You can learn more at www.openoffice.org.
Once you load the Google Docs Web page, the first thing you’ll notice is that it has the familiar Google Search box at the top of the page. With this search box, you can search through all your word processing and spreadsheet documents online, or search the Web (see Figure 18.1). Log in to your Google account to use these applications.
Google uses the term document to refer specifically to a word processing document, as compared to a spreadsheet. Begin a new document by clicking the New Document link at the top of the Google Docs Web page, or when you are currently editing a document, select New from the File menu. Doing either of these launches a new, empty document.
When you first launch the document, a new browser window opens. The document is given the temporary name of “untitled”, which appears in the upper-left corner. As soon as a draft of the document is auto-saved by Google, it is given the temporary name of the first text you’ve typed into the document. Changing that text will not change the temporary name with the next auto-save. To rename the document you must manually choose Rename from the File menu.
Begin creating your document by placing content in the large document area. Content can be text that you type or copy and paste into the document. It can also include graphics, Internet hyperlinks, tables, bookmarks, separators, and special characters. Most of the time, you simply type text from your keyboard into the document. All of the same keyboard keys, such as Backspace, Delete, Shift, Page Up, and Page Down all work the same as in any other word processing program. By default, the text you type appears in the Verdana font. It’s widely used and becoming the new “Times New Roman” made popular by Microsoft.
Check the spelling at any time by clicking the Check Spelling link at the bottom-right corner of the page. Misspelled words are highlighted in orange. You can correct the spelling and click the Recheck link that appears in place of the Check Spelling link, or click the Done link to remove the highlighting of any misspelled or unknown words.
As you enter text into your document, you may want to format it, remove or change formatting, or enter page breaks and special characters. These features and more are available using the toolbar displayed across the top of the document. Read the next section to learn about the toolbar.
The toolbar, located across the top of each document, contains icons representing most of the features you’ll use while editing your document. If you are unsure of an icon’s meaning, place your mouse over the icon without clicking and a pop-up appears that tells you the function performed by clicking the icon.
In Figure 18.2, the Edit tab toolbar icons from left to right across the top of the page are as follows:
Undo last edit: Restores your last edit to its original state
Redo last edit: Restores an edit that was previously undone with Undo last edit
Cut: Removes selected text or image and copies it to the clipboard
Copy: Copies selected text or image to the clipboard
Paste: Places clipboard contents into the document at the cursor
Bold: Causes new or selected text to appear in Bold
Italics: Causes new or selected text to be formatted as italics
Underline: Causes new or selected text to appear underlined
Font change: Allows you to change the font face of new or selected text
Font size change: Allows you to change the font size of new or selected text
Font color change: Changes the color of new or selected text
Highlighter (text background change): Changes the background color of new or selected text
Hyperlink: Creates a hyperlink in the document
Numbered list format: Creates a numbered list so that items are auto-numbered
Bullet list format: Creates a bullet list so that each line is auto-bulleted
Indent less: Moves indented text to the left one tab space
Indent more: Moves indented text to the right one tab space
Quote: Formats text as a quote, indenting it and placing it in a box
Left align text: Aligns text along the left margin
Center align text: Centers text
Right align text: Aligns text along the right margin
Remove Formatting: Removes formatting
Most of the editing tools can be applied by clicking the icon and typing. Click the icon again when you no longer want that feature or formatting applied to your text. You can also select the text by first dragging across it with your mouse and then clicking the icon one time to apply that text enhancement.
To remove the formatting, you can select the formatted text and click the formatting icon of the feature you want removed, and the formatting is reversed. You can also select the formatted text and click the special Remove Formatting icon to the far right side of the toolbar to removes all formatting. For example, if the text is bold, italicized, and underlined, one click on the Remove Formatting icon returns the text to its standard, unembellished appearance.
The toolbar also contains two drop-down menus. The Style drop-down menu allows you to select preset styles to your text for fast and consistent formatting. The Change drop-down menu allows you to restore or remove blank lines and manage bookmarks.
Styles are named, preconfigured formatting that you can apply to your document text. For example, if you want huge bold text to appear as a page heading or paragraph heading, you no longer need to apply both the Font Size and Bold formatting. Click anywhere in the line of text you want formatted, and then click the Style drop-down menu next to the toolbar and select a style. In this example, Header 1 (Huge) is used.
You can apply styles to entire documents, paragraphs, words, or characters. Clicking anywhere in a paragraph and applying a style changes the style for the entire paragraph. Be aware that although most of the formatting you’ve already applied within the paragraph will be preserved, some may be changed by the new style. You can also select text by highlighting it applying the style only to the selected text.
Note
Many word processing programs allow you to create custom styles. Google Docs documents do not support custom styles. Text formatted with a custom style appears in the Google Docs normal style, and all formatting is removed.
Google Docs offers five Paragraph formatting styles and five Page Spacing styles that control line spacing, such as single space, space and a half, double-space, and triple-space. There are also four Text formatting styles that include strikeout, superscript, subscript, and a special menu selection to remove formatting with a function identical to the Remove Formatting icon in the toolbar.
The Google Docs document editor includes a menu consisting of a drop-down File menu and three tabs: Edit, Insert, and Revisions. The Edit tab is normally active when you edit your document. You can edit your document in the Insert tab, but the toolbar is replaced by selections you can insert into your document, such as:
Image: Insert a graphic image you’ve uploaded.
Link: Insert a clickable hyperlink.
Comment: Insert a comment.
Table: Insert a custom table.
Bookmark: Insert a bookmark.
Separator: Insert either a page break or horizontal line.
Special character: Insert a nonalphabetic or foreign alphabetic character.
Here’s something difficult to do in other word-processing software programs. You can review your document’s revision history and roll back to a previous version. Click the Revisions tab. Your document with revisions highlighted appears. Select a revision from the drop-down list to view a previous revision of your document. This is a great feature if you carefully format your document and then suddenly, you accidentally apply formatting that affects the entire document, deleted half of the text, or turned it all blue. You can easily step backward and restore your document to its former state.
The File drop-down menu in Figure 18.3 contains selections that let you create a new document, save the current document in a number of different formats, copy the document, rename it, print it, count the number of words (useful for homework assignments), and use Find & Replace functions.
The Edit HTML link is next to the Revisions tab along the top of the document. Click this link to see and edit the underlying HTML code for the document you are creating. Here is an example of the HTML code you might see:
this is the edit interface<br/>
<span style="COLOR:#ff6666">this is pink text<br/>
</span><span style="COLOR:#ff6666"></span>
<h1> this is huge text<br/> </h1>
When you finish with the HTML view, click the Back to editing the document link to return to the normal WYSIWYG (What You See Is What You Get) editor.
Preview the document as others might see it by clicking the Preview link or icon to the right of the tabs. Your document appears without the Google Docs editor interface. This is what others who view your document will see. If others are allowed to edit your document (collaborators), they can click the link that appears below the document. You can give others permission to edit your documents. You learn more about that later in the chapter.
Click the Print link on the right side of the page to print your document. A copy of your document is sent to your local computer’s print queue for printing. The normal printer dialog box appears allowing you to select a printer and set any print preferences before printing the document.
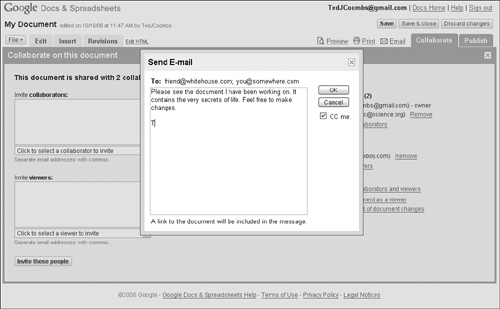
Before you can e-mail a document, it must be shared. Clicking the Email link sends a copy of the document to one of the collaborators with whom you are sharing a document. If the document has not been shared, Google Docs prompts you to share the document first and launches the Collaborate on this document interface.
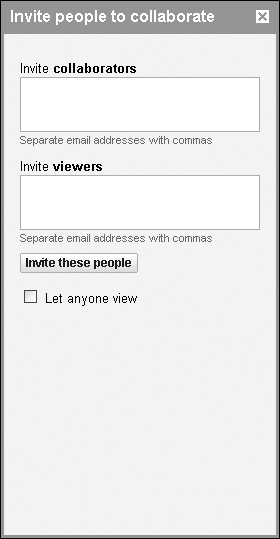
One of the great things about Google Docs is the ability to share your documents with other people without compromising the security of your own computer. You can invite collaborators to edit or merely view your document, whether it’s a completed work or a work in progress.
A notice that no one else is editing the document appears in very light print at the bottom of the document. When you add others to collaborate with you, an orange bar appears at the bottom of the document containing the names of the other people who are working on your document. To add collaborators follow these steps:
Click the Add collaborators link at the bottom of the document.
Enter the e-mail addresses of the people you want to collaborate with in editing your document, or invite people to view your document by entering their e-mail addresses in the Invite Viewers box.
Click Invite these people.
When you choose to invite either a collaborator or a viewer, an e-mail message is sent to each person containing a link to the document, an invitation to view or collaborate on the document, and a personal message you can include before the e-mail is sent, as shown in Figure 18.4.
Collaborators can view and make changes to your document. They can also add and remove other collaborators, except for the document owner. They can also add additional viewers to the document. Viewers are people who can see the document but cannot make changes. Viewers cannot add collaborators or other viewers.
Click the Publish tab on the far right of the document editor to publish a copy of the document on the Internet for anyone to view. Google gives you a unique URL that points to this document. You can then send this link to others in e-mail or create a link from another Web page—perhaps your home page—to this published document.
Next, click Publish document as shown in Figure 18.5. Your document is made available on the Web with a unique URL displayed for you. Make note of this URL because in the future, when you click Publish, your changes to this document will be published to this URL address. You can also send this link to others to view or edit your document.
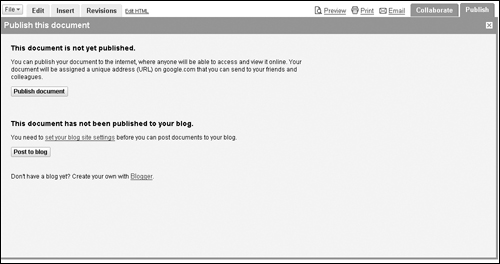
You can also publish documents directly to your blog. Click the set your blog site settings link to tell Google Docs how to post to your blog. If you don’t have a blog yet, you can create one on Google’s Blogger by clicking the Blogger link at the bottom of the page.
In the top-right corner of the Google Docs editor are three buttons: Save, Save & close, and Discard changes. These buttons allow you to immediately save changes to your document or disregard all the changes and revert to the previous saved version. The following sections describe the differences between the three options.
There are four ways to save your edited document to the storage space on Google. The first is the simplest: do nothing. If you do nothing long enough, the auto-save feature automatically saves your document. If you have made changes since the last auto-save, you can roll back your changes using the Revisions tab. The next way to save changes is nearly as simple: click Save in the upper-right portion of the Google Docs editor window. The third way is to simply press Ctrl+S on your keyboard. Lastly, the only two-step process is to choose File and click Save.
To save your document to your computer in one of several formats, choose the File. The menu selections include:
Save as HTML (Zipped)
Save as RTF
Save as Word
Save as OpenOffice
Save as PDF
Selecting one of these menu choices converts the document into the selected format and immediately begins to download this file to your local computer. Your file download is handled by your normal computer file download configuration. It may download to a default download folder, or you may be able to select a location for it to be saved.
It’s midnight. The caffeine buzz has worn off, and the neon light outside your motel window flickers incessantly; it’s time to sleep. While you know Google has been faithfully saving your life’s work, you don’t feel safe leaving it open on your laptop. Who knows when the housekeeping crew might really be spies. It’s time to save the document and close it. Of course, you could just close the Web browser, but to be certain your last sparks of brilliance added in the last minute are saved, click Save & close. To be extra careful, log out of your Google account!
The fastest way to abandon all the edits you’ve just made without stepping through all the revisions is to click Discard changes. Your document reverts to its last purposefully saved revision. Purposefully saving means you clicked Save, Save & close, pressed Ctrl+S, or selected Save from the File menu.
Right-clicking within the document launches a context menu. All the menu selections in the context menu are availably by clicking icons in the toolbar. Sometimes it’s just faster to use the context menu, rather than mousing up to the toolbar. The context menu choices are listed in Table 18.1.
Table 18.1. Document Context Menu Selections
Menu Choice | Action |
|---|---|
Cut | Remove selected text or image and copy it to the clipboard. |
Copy | Copy selected text or image and copy it to the clipboard. |
Paste | Place clipboard contents into the document at the cursor location. |
Select All | Selects all objects, such as text and graphics, highlighting it. |
Insert Image | Insert an image into the document at the cursor location. |
Insert Link | Insert a hyperlink into the document at the cursor location. |
Insert Bookmark | Insert a bookmark into the document at the cursor location. |
Insert Comment | Insert a comment into the document at the cursor location. |
Insert Page break | Insert a page break into the document at the cursor location, ending one page and starting another. |
Horizontal Line | Insert a graphic horizontal line the width of the page at the cursor location. |
Insert Special Character | Insert a special character, such as an ascii text character, into the document at the cursor location. |
You can mark blocks of text and name them, creating future links. Technically, in HTML-speak, this is an anchor. Bookmarks are handy ways to identify places in large documents that are referred to often, contain important quotes, need to be edited, or are just interesting enough to deserve a name of their own. Use bookmarks for creating an electronic table of contents (TOC) to your document. Clicking the TOC item takes you to that place in the document.
To create a bookmark:
Click the Insert tab.
Click Bookmark from the toolbar. This launches the Insert Bookmark dialog box where you are prompted to type a name for your new bookmark.
Type a bookmark name. You are also shown a list of the previously entered bookmarks. Selecting bookmarks from the list allows you to also click Remove to delete them from the document.
Use the bookmarks you create by creating links to them. When you insert a link into your document, select the Bookmark radio button from the list of items to which you can link. Type a descriptive phrase for your link—any flyover text you want—and click OK. Clicking this link causes your document to scroll to the bookmark.
The spreadsheet was one of the very first PC computer applications. More than 25 years ago, the first PC programmers thought that one of the most important programs they could write would be a spreadsheet. They are just as important today, and considerable functionality has been added to them since then.
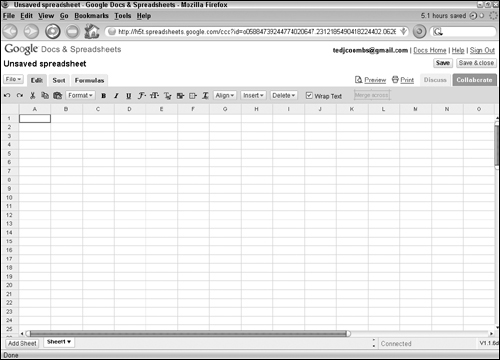
To create a new spreadsheet, click the New Spreadsheet link from the Google Docs main page (http://docs.google.com). This launches a blank spreadsheet as shown in Figure 18.6. By default, you are placed in the first sheet with the Edit tab selected. You can begin adding information to the empty cells. Each spreadsheet can have more than one sheet. To add a new sheet to an existing spreadsheet, click Add Sheet in the lower-left corner of the page.
Change the order of the sheets in your spreadsheet document by first clicking on the sheet you want to move, and then selecting Move Right or Move Left. The popup menu allows you to rename or delete individual sheets.
In addition to creating spreadsheets on the Google Docs site, you can also import spreadsheets in Excel (XLS), Comma Separated Value (CSV), and OpenOffice (ODS) formats.
Typing alpha (nonnumeric) text in the cell causes it to automatically align to the left of the cell. Numeric data is automatically aligned to the right. While both alpha text and numeric data can be sorted, only numeric data can be used in formulas, such as adding columns of numbers.
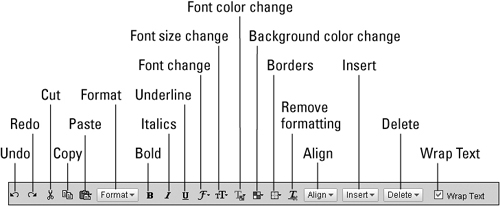
The spreadsheet editor, like the document editor, has a toolbar along the top of the sheet as shown in Figure 18.7. The items in the toolbar, from left to right, are:
Undo last edit: Restores your last edit to its original state
Redo last edit: Restores an edit that was previously undone with Undo last edit
Cut: Removes selected text or image and copies it to the clipboard
Copy: Copies selected text or images to the clipboard
Paste: Places clipboard contents into the document at the cursor
Format: Formats the way numbers and dates in the cell are displayed
Bold: Causes new or selected text to appear in Bold
Italics: Causes new or selected text to be formatted as italics
Underline: Causes new or selected text to appear underlined
Font change: Allows you to change the font face of new or selected text
Font size change: Allows you to change the font size of new or selected text.
Font color change: Changes the color of new or selected text
Background Color: Changes the background color of new or selected text
Borders: Customizes cell and spreadsheet borders
Remove formatting: Discards previous current formatting
Align: Selects a horizontal and vertical alignment for information within a cell
Insert: Inserts rows and columns
Delete: Deletes a row of cells, a column of cells, or clears a selection without deleting the cells
Wrap text: Selects whether to wrap text within a cell
Merge Across: Merges data between sheets
You can sort data in your sheet by selecting the columns of data (you can sort columns of information, not rows) and clicking the Sort tab. Choose whether you want data sorted from lowest to highest (ascending) (A ![]() Z) or highest to lowest (descending) (Z
Z) or highest to lowest (descending) (Z ![]() A) by clicking the corresponding button in the toolbar. Numeric data is sorted in ascending or descending order also be clicking these same buttons. Determine which column is used to sort the data by clicking on any cell in that column. You will see the Sort sheet by Column message along the top of the sheet change as you click in different columns.
A) by clicking the corresponding button in the toolbar. Numeric data is sorted in ascending or descending order also be clicking these same buttons. Determine which column is used to sort the data by clicking on any cell in that column. You will see the Sort sheet by Column message along the top of the sheet change as you click in different columns.
To identify and freeze column headers so they are not sorted along with the data, click the Freeze header row drop-down list and select how many rows of data to freeze. You can choose from 0 rows to 5.
Like other spreadsheet programs, the Google Docs spreadsheet enables you to enter formulas that perform functions on your data. The types of functions include:
Math: Perform math, trigonometry, and important functions like rounding, creating a random number, and more.
Financial: Perform financial functions such as interest calculations and many more
Logical: Perform Boolean logic calculations using AND, OR, IF, NOT, OR, and TRUE.
Date: Perform date arithmetic and access your computer or network clock for current time and date.
Lookup: Perform lookup functions on lists of textual data.
Statistical: Perform the magic of statistics using these functions.
Text: Manipulate text strings using these many text functions.
Info: Get information about your data and calculations using these functions, most of which return a logical TRUE or FALSE.
Each formula type accepts a particular type of data. For example, the Info formula (ISEVEN()) can be entered into a cell preceded by the equal sign and with a value or cell address entered in the parentheses as a parameter like =ISEVEN(7). The value included in the parens is evaluated to determine whether it is even. The result is TRUE or FALSE. This, of course, displays the word FALSE in the cell. This is not a text entry, but a Boolean entry that can be used in Boolean calculations using the Logical formulas.
Tip
Use the Info formula ERROR.TYPE to determine what error has occurred and display an error message.
The Text formulas operate on textual data. For example, when cell D5 contains the text “My country tis of thee” using the LEFT() text formula, entering the cell address and the number of characters from the left to extract =LEFT(D5,2) returns “My.”
Click the More link to see a list of all the formulas. Selecting a formula from the Insert a Function dialog box inserts the function into the cell identified by the mouse cursor and displays the syntax of the formula in the bottom of the dialog box. For help on that formula or all formulas, click the more link at the bottom of the dialog box. This launches a page with a complete description of all the supported formulas.
Like documents, spreadsheets are automatically saved on a regular basis. The Save button in the upper right only becomes active when an auto-save has not already taken place. Otherwise, the button is disabled and reads Automatically Saved.
To close the spreadsheet and save it at the same time, click Save & close in the upper-right corner.
Spreadsheets can be saved to your local hard drive by exporting the data you’re your files in Google Docs. Export them as CSV, HTML, ODS, PDF, or XLS files. You can then use applications on your computer, such as Excel, Acrobat reader, or your Web browser to read or edit the files depending on the file type you’ve selected.
Invite collaborators or viewers of your spreadsheet just as described in the document section. Click the Collaborate tab (see Figure 18.8) and type the e-mail addresses of new collaborators and viewers, or select existing people from the list. Click Invite these people to launch a dialog box allowing you to personalize the e-mail that you send to your invitees.
You can see a list of collaborators at the bottom of the Collaborate tab. Click the Turn off link to keep your invited collaborators from inviting other collaborators.
Chat in real time with others who edit your spreadsheet. When collaborators log in to their Google Docs account and edit your document, you see them in the list displayed in the Discuss tab. Chat with them by typing messages in the text box at the bottom of the tab and press Enter to send the message. Your conversation appears in the chat box. You can chat with several people editing the spreadsheet simultaneously.
Like documents, you can publish your spreadsheet to the Web for everyone to view. The terminology and the way you do it are slightly different, but the result is exactly the same. At the bottom of the Collaboration tab is a “Let anyone view” checkbox. Selecting this checkbox causes Google Docs to publish this sheet to the Web, giving you the URL right next to the checkbox.
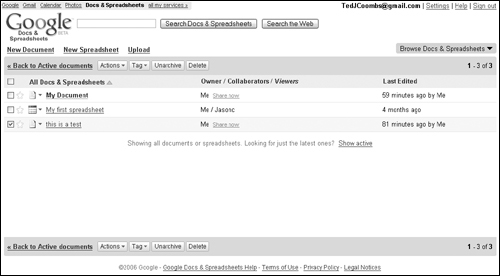
The Google Docs main page displays all of your saved documents and spreadsheets and allows you to manage them (see Figure 18.9). From this page, you can:
Open a file for editing.
See who the owners, collaborators, and viewers are for each file.
See the file type identified with an icon representing either a document or spreadsheet. Save/Export the file in the corresponding supported formats.
See when the file was last edited and by whom.
Create new documents and spreadsheets.
Upload documents and spreadsheets from your computer to Google Docs.
Take actions on, tag, archive/un-archive, and delete selected files.
You can take actions, which are processes such as saving and copying, on one or more selected files. Select a file in the list by clicking the checkbox next to the file icon. Click the Actions menu drop-down. The actions you can take differ between documents and spreadsheets. The only allowed actions for spreadsheets are Star and Un-star. Placing a star on a document merely calls attention to it for your sake. It does not change the file in any manner. Sometimes it’s easy to place a star in front of files that need your attention or to call attention to files for collaborators.
Documents have a larger number of allowed actions. You can save the documents to your local computer by selecting Save as, and a document type. You can select Copy document, Star, Un-star, and Un-collaborate me to remove all collaborator access to this document.
You can quickly organize your documents and spreadsheets by giving them a tag, a descriptive word or phrase attached to the file description. Because your files are not organized into folders, tagging them is the best way of viewing all related files. For example, perhaps you are working on a proposal that involves multiple documents and spreadsheets. Label them all with the name of the proposal you are working on. This places a green link with the tag name next to each filename. Clicking on any of the links changes the file display to only files matching that tag. You can easily return to the view of all active files by clicking the Back to Active documents link at the top of the page.
To tag a file, first select a file from the list of files. Then, select New Tag from the Tag drop-down menu that appears above or below the file list. Type a new tag name or select a previously created tag name from the list, and click OK.
Create multiple tags and apply them simultaneously by selecting Multiple Tags from the Tag menu. You are prompted to type new tag names, separated by commas. Clicking OK tags each of the selected files with all the tags you created in this step.
When you finish working with a file and no longer need to see it in your list of active files, archive it. This is not the same as deleting it. Instead, archived files no longer appear in the list of active files. Here’s how you archive a file:
Select the file by selecting the checkbox next to the file icon. You can archive multiple files by selecting more than one file.
Click Archive. Files immediately disappear from your active file list.
To view archived files, click the View all link to the right of the page. All files are displayed. You can browse them by type by clicking Browse Docs & Spreadsheets. Once you click the View all link, the Archive button changes to Unarchive. Select an archived file and click Unarchive to return the file to your list of Active files.
You can delete both documents and spreadsheets in the Google Docs main page. Select the document or spreadsheet to be deleted by selecting the checkbox to the left of the file icon. Next, click Delete in the bar across the top or bottom of the page.
Deleted documents are transferred to the Deleted Docs and Spreadsheet folder. Published versions of the file also disappear. You can view the list of deleted items by clicking the Browse Docs & Spreadsheets drop-down menu and then selecting Deleted. Undelete files by selecting them from the list and clicking Undelete.
Note
Files in the Trash are still available to collaborators. You may choose to remove all the collaborators when deleting a file or the file becomes unavailable when you empty the Trash.
To permanently remove all deleted files, click Empty Trash. This button is found in the bottom bar when viewing deleted files. Permanently removed files are removed from Google Docs and no longer available for collaborative editing.
Here is some important information about some of the limitations and requirements when using Google Docs. Each document can be up to 500KB in size. Each image you embed in a document can be up to 2MB in size.
Each spreadsheet can have up to 10,000 rows up to 256 columns with a maximum of 50,000 cells or up to 20 sheets, whichever limit is reached first.
You can import spreadsheets up to 1MB in size in either XLS or ODF format.
Supported browsers and minimum versions include:
IE 6.0 or greater.
Firefox 1.07. There are issues with versions 1.08. It’s best to use at least the most current version, which at the time of this book is version 1.5.0.7.
Mozilla 1.7.12 and greater.
Netscape 7.2, 8.0.
Your browser must have cookies and JavaScript enabled to use Google Docs. Sorry, but Google Docs does not run using the Opera or Safari browsers.
Google Docs allows you to use some of the most widely used office automation tools freely on the Web. There are other free office tools, like those offered by OpenOffice, but Google Docs gives you access to instant Internet file publishing, collaboration, and communication features that are not available in other software.
Easily transfer your word processing documents and spreadsheets to Google Docs for editing, publishing, archiving, and collaboration with others. Create new documents and spreadsheets and save them in a number of popular formats, including PDF. Integrating these two popular tools with the Internet fits in well with Google’s Gmail, which is discussed in the next chapter.