Get your computer ready for Gmail
Learn about Gmail features
Sign up for a Gmail account
Change from your old e-mail account to Gmail
Setup your Gmail contact list
Sending and receiving e-mail
Set up POP, forwarding, and filters for more custom access to Gmail
Chatting with Gmail
Gmail on your mobile phone
Never throw anything away! That is the goal of Gmail, Google’s Web-based e-mail program. Imagine never having to erase another e-mail and later being able to simply search through all your old e-mail. There are many Web-based e-mail providers out there, but Google is adding something new to one of the most important applications to run over the Internet.
Internet communications have become more like conversations than the older idea of postal mail. Gmail organizes your e-mail as it would appear in a real-time conversation—it’s more like chat than mail.
The important feature of Gmail is storage. The reason it is not necessary to delete any of your old e-mail is that it is difficult to ever fill up all the free storage space given to Gmail users. You can store files, pictures, and nearly an unlimited number of e-mail messages on the Google servers. At the time of writing of this book, users are offered 2.5 gigabytes (GB) of free storage.
Switching e-mail programs is often a big decision. E-mail has become such an important part of the way that we communicate with others that we have come to expect e-mail software to act and perform in a certain way. When checking your e-mail, you shouldn’t have to think too much about the software you are using to read, respond to, and compose new e-mail messages.
When deciding to use Gmail (http://gmail.google.com) for your e-mail rather than another Web-based e-mail program, you should consider some of the features. These features can include important things such as the amount of online storage offered or the compatibility of the Web-based e-mail program with your preferred Web browser, or less important things such as the ability to customize the user interface of the Web e-mail program. Gmail’s interface is currently not customizable, where Yahoo allows you to have message stationary and MSN/Hotmail allows you to customize your interface with nine different color schemes. Yahoo and MSN/Hotmail also have drag-and-drop message interfaces where Gmail does not. But while these features are incidental, nice-to-have features, the core program is where Gmail excels.
The amount of storage space on the server for your e-mail is an important consideration when choosing among Web-based e-mail programs. Certainly you will want an e-mail service provider that gives you plenty of storage space or you will need to begin erasing old e-mails and lose important historical information. Because Google’s idea is to increase your ability to maintain historical information rather than removing old e-mail, it was important to offer more storage space. Here is a comparison of the top Web-based e-mail programs:
Gmail: 2.65GB
MSN/Hotmail: 2GB
Yahoo Mail: 1GB
You can see from this list that a Gmail account gives you the ability to save e-mail for a very long time. Storage space is considered a technical advantage and therefore these amounts are always changing, each one trying to outdo the other. So, watch for higher storage capacities in the future.
Because Web-based programs rely on the features of Web browsers to make them work, it is important to select an e-mail program that works with the browser you use. For a long time, the main browser of choice was Microsoft’s Internet Explorer (IE). Other browsers have gained importance as they have developed additional features. Many people are switching to Firefox for Windows, Mac and Linux installations, and some to Opera on the Macintosh.
When selecting a Web-based e-mail program, you don’t want to sacrifice your choice in browsers to make the switch. This means that selecting the Web-based e-mail program that operates with your browser is important. Table 19.1 gives you the browser compatibility comparisons among the various Web-based e-mail programs.
The last section compares Gmail with two other popular Web-based e-mail programs. There are features that are unique to Gmail and certainly provide a strong reason to select and use Gmail for all your e-mail needs. A big feature internationally is being able to use Gmail in your own language.
Like many Google services, Gmail is available in 36 languages; 38 if you count American and the United Kingdom’s English, simplified and traditional Chinese as different languages. Other languages available include Bulgarian, Catalan, Croatian, Czech, Danish, Dutch, Estonian, Finnish, French, German, Greek, Hindi, Hungarian, Icelandic, Indonesian, Italian, Japanese, Korean, Latvian, Lithuanian, Polish, Portuguese, Romanian, Russian, Serbian, Slovak, Slovenian, Spanish, Swedish, Tagalog, Thai, Turkish, Ukrainian, and Vietnamese. Gmail not only allows you to view the Gmail interface in these other languages, it also has spell-check capability in at least 30 languages.
The two Web-based e-mail programs that have forwarding and POP features are Gmail and Yahoo Mail. The ability to forward messages means that you can receive e-mail in your Web-based mail program and choose to automatically forward the messages to another e-mail account, perhaps a corporate account that you want to keep private.
The POP feature allows you to check and manage Gmail using a different e-mail client such as Thunderbird or Outlook. POP (Post Office Protocol) servers are e-mail servers your software contacts to retrieve e-mail.
People have become accustomed to the ability to format their e-mail messages using rich text, the kind of text formatting found in word processing software. Gmail offers this type of formatting in Web-based e-mail. You can now use features such as font changes, color text, indenting, bullet and number lists, and more.
Never send a boring e-mail message again. E-mail written in rich text is sent as HTML, readable by most modern e-mail programs and Web-based e-mail programs.
When you decide that Gmail is the e-mail program for you, there are a few things you need to check to be certain that you are ready for a Gmail installation. After that, getting started with Gmail is quite simple.
Gmail is a Web-based program, so it is not necessary to install any new software on your computer. If you can access the World Wide Web using one of the more popular Web browsers, you already have everything it takes. No other software setup is required. You need one of the following Web browsers installed on your computer to get started.
Microsoft Internet Explorer version 5.5 or greater for use only on a Windows computer
Netscape version 7.1 or greater
Mozilla version 1.4 or greater
Mozilla Firefox version 0.8 or greater
Safari version 1.2 or greater for use only on a Macintosh computer
If you do not already have one or more of these programs installed on your computer please refer to the Resources Section of this book for more information about where to download one of these programs.
There are presently two ways to sign up for a Gmail account. You either need an invitation to sign up for Gmail from someone that currently has a Gmail account or sign up by having Google send an invitation to your cell phone as a text message. When someone sends you an invitation, click the invitation link in the e-mail you receive. When messages come as text messages on your cell phone, you are provided an Invitation Code, which you enter on the Gmail signup page (https://www.google.com/accounts/SmsMailSignup2).
When you click the I’m ready - show me my account link displayed in Figure 19.1, the next page appears, which lets you know that you can now chat using Google Talk while using Gmail. On this page, notice an important selection for setting up the Google Talk feature within Gmail. Select between saving your chat history and not saving your chat history. If you are concerned about others discovering the content of your chats it’s recommended that you select the Don’t save chat history option. By default, the Save chat history option is selected. If keeping a record of your chats is important choose the Save chat history option. Remember, your chat history is indexed by the Google Desktop program when you have that installed. This easily gives you access to your chat through keyword searches from the Google Desktop software.
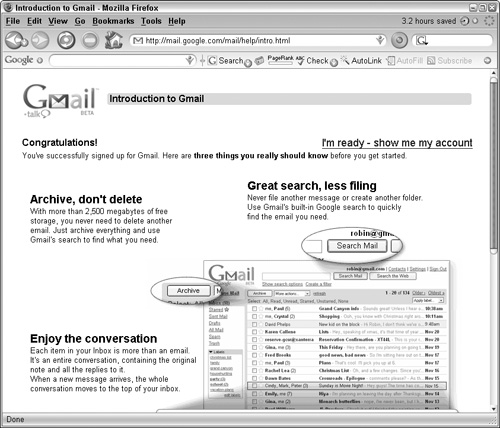
Speaking of easy, an easy way of accessing your Gmail account is to add Gmail to the Google Toolbar in your Web browser (see Figure 19.2).
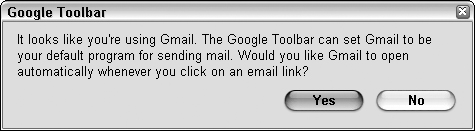
When you select your chat history save option, click Sweet! Go to my inbox >>. Your Gmail inbox appears, probably containing a couple of welcome e-mail messages from the folks at Google.
One of the most important concerns when switching e-mail programs is maintaining your current e-mail messages and contacts. If you are like most people, contacts are very important. Rebuilding the contact list from scratch is nearly impossible, or at least time consuming and difficult. Some programs, such as Microsoft Outlook, also manage information resources like your calendar. These can be exported and many of them imported into either Gmail or some other Google service.
Cross-Ref
See Chapter 26 to learn about importing events into Google Calendar.
Most e-mail programs allow you to export your contacts in CSV (Comma Separated Value) format. Some programs offer several different export formats; but when exporting so that you can import into Gmail you will want to select the CSV format. Save the exported CSV file to a place on your hard drive where you know where to find it during the import process. It is common for some e-mail programs to select the export folder for you, and then it takes forever to find the export file. Therefore, knowing where the export file is saved is an important step.
Once you have an exported file in CSV format you can begin the importing process into Gmail. Follow these steps:
Launch Gmail and log in to your account.
Look along the left side of the page, and find and click the Contacts link. This launches the Contacts page.
In the upper-right corner click the Import link. This launches the Import Contacts page in a new browser window.
Type the path to the exported CSV file in the File to import: text box, or click Browse and locate the file, and the path is added automatically.
Click Import Contacts.
When the process is complete the Import Contacts window reports how many contacts were imported into Gmail. When you are satisfied that the import is successful, click the Close link and the Import Contacts windows disappears. In the Contacts page, click the All Contacts tab to verify that your import is successful. You may notice that some of the information doesn’t map correctly between contact programs, and some information may be wrong or missing. You may have to correct this manually by editing the contact in Gmail.
Once you import your contacts into Gmail you will want to let people know about your new e-mail address. The way to do this is to open your Contacts list and select everyone you want to notify. Here’s how:
Launch Gmail and log in to your account.
Along the left side of the page locate and click the Contacts link.
Select each contact by selecting the checkbox next to the contact name. You can select all contacts by clicking the All link at the bottom of the Contacts link. You may want to send a private, individual message to each contact.
Click Compose. This launches the compose e-mail form.
Write a letter to your contacts and include your new Gmail e-mail address.
Click Send.
Gmail is a great way to manage all of your email. Use the Gmail interface with more than one e-mail address. To add a new e-mail address to Gmail, just follow these steps
Click the Settings link next to your login name along the top of the page. This launches your Gmail Settings page.
Click the Accounts tab.
Below where you see your Gmail e-mail address displayed, click the Add another email address link. This launches a new window containing the Add another e-mail address form.
Type your name and the e-mail address you want to add.
Optionally click the Specify a different “reply-to” address link
Click Next Step >>.
Gmail will want to send a verification e-mail to be sure you are not trying to masquerade by using someone else’s e-mail address (spoofing). When you receive the e-mail, type the Verification Code.
The quick way to add contacts to your Gmail contact list is by importing them from another program. Importing contacts is covered in the “Switching to Gmail” section earlier in this chapter. You can add contacts individually by clicking the Contacts link located on the left side of the page. In the text box that appears, type the e-mail address of your new contact. This launches the contact management form.
Click the Create Contact link at the top of the form to create a new contact. Fill in the name of the contact, the primary e-mail address, and any notes you want to keep about this person. You can also specify a photo for this person or choose to view a photo of his or her choosing. When you specify a photo, you need to locate it on your hard drive and upload it to the Google server. If the photo is too large, a cropping window appears above the photo. You can choose to crop this image by moving the cropping window to the area of the photo you want to display or by choosing to discard this photo and selecting another, smaller image.
To include additional contact information, such as the person’s address and telephone number, click the add more contact info link when adding a new contact. This link appears below the person’s optional display photo. Clicking this link expands the contact information.
You can create your own contact format by choosing the information you want to add in each field. Select a label from the drop-down list. The field labels include:
Email: Adds a secondary e-mail address. The primary e-mail address was already entered.
IM: Include an instant messenger contact name.
Phone: Telephone number.
Mobile: Mobile or cell phone number.
Pager: Do people still use these?
Fax: It won’t be long until these are a thing of the past.
Company: Name of the company in which the contact is employed.
Title: The contact’s title within the company.
Other: Add custom information.
To add additional fields, click the add another field link. A new field is inserted into your contact form. Select a label for the new field by choosing one from the drop-down list.
Tip
Once you add a field it cannot be removed. You will need to remove the section (see the following) and add the fields back.
The default sections are Personal and Work. You can choose to rename these sections simply by overwriting the current section names, or you can add new sections by clicking the add section link at the bottom of the contact form. The default name for the new section is Other. You can choose to keep that section title or change it by overwriting it (highlighting the word and typing over it). You can add additional fields to each new section you add.
Remove sections by simply clicking the remove section link in the corresponding section.
The Contact form has three tabs, Frequently Mailed, All Contacts and Groups. The Frequently mailed tab contains a list of the people you have mailed regularly. The list contains the name of the person, their email address and a selection allowing you to manage whether each contact appears in your Quick Contacts list in the left pane of the Gmail window. The selections include: Always, Auto, Never and Block.
Import contacts into the Contact management by clicking the Import link in the upper-right portion of the Contact management tab. You can also export your contacts stored in Gmail for use in other contact management programs. Simply click the Export link and choose between Gmail CSV and Outlook CSV file formats, then click Export Contacts.
The All Contacts tab is similar to the list of contacts in the Frequently Mailed tab except that it contains a list of anyone you have either sent email to, or received email from using Gmail. It is a good idea to clean this out once in a while as it may contain contacts from people you meant to email only a single time. To create a new contact in this list, click the Create Contact link at the top of the page. Organize your contacts into groups by selecting the contacts you want to organize and selecting a group from the drop down list at the top of the page.
You can enter additional information for each contact, such as their phone number and address. To enter this information, follow these steps:
Log in to your Gmail account.
Click Contacts on the left side of the page.
Click the contact you want to edit.
Click edit contact information.
Type the information in each field.
Click Save.
Manage your groups by clicking the Groups tab. There you will see a list of your groups by group name. The details column of the list tells you how many people are in each group, and lists the names of the people in the group. Create new groups by clicking the Create Group link.
You can access your Gmail from any computer in the world with Internet access by pointing a Web browser to http://mail.google.com. It’s best to use some of the newer Web browser versions discussed earlier in this chapter but all the basic features should be available using almost any Web browser. Launching Gmail takes you directly to your Inbox where your incoming e-mail is placed by the Gmail program.
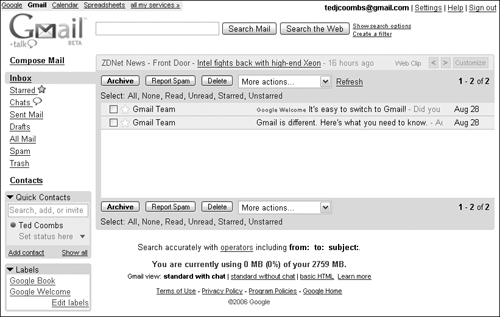
Your Inbox is automatically populated with your incoming e-mail as it is received by Google’s Gmail. To read your e-mail, click the Inbox link in the menu on the left of the page. Next to the Inbox link is a number in parentheses that indicates the number of unread messages in your Inbox. This number does not appear when all messages have been read (see Figure 19.3). You can select different views. Click the Gmail view at the bottom of the Gmail page to switch among:
Standard view with chat
Standard view without chat
Basic HTML
Select a view by clicking the corresponding link. As the number of e-mail messages begins to grow, you may want a way to select groups of messages in your Inbox. There are special Select links at the top and bottom of the Inbox that, when clicked, place or remove checkmarks next to the e-mail messages that have been marked in a certain manner, either automatically by Gmail or purposefully by you. These Inbox selection links are:
All: Select all the e-mail messages in the Inbox.
None: Deselect all the messages in the Inbox.
Read: Select all the messages that have been marked as read.
Unread: Select messages that have not been read or purposefully marked as unread.
Starred: Select all the messages you have marked with a star.
Unstarred: Select all messages that have not been marked with a star.
Selecting groups of messages using these tools allows you to easily archive groups of messages or perform other actions on groups of messages.
When your e-mail arrives into your Gmail account, it is normally sent to your Inbox (see Figure 19.3). You may have filters that check e-mail sent to your Inbox that marks it as unsolicited (spam) and is sent to the Spam folder, or deletes the mail and send it to the Trash folder. Also, a copy of each e-mail that you compose and send is saved in the Sent Mail folder.
To read an individual e-mail message, click anywhere along the message display bar and the message appears. You may even see a “Loading . . .” message appear as the message is read onto your display. When the message appears on the screen, the subject appears in bold letters above the message. Inside the box that contains the message you see the address of the message sender and the date the message was sent. Gmail even calculates how long it has been since the message was sent.
Clicking the More options link displays detailed e-mail header information and a list of actions that you can take. These actions include:
Reply: Send a reply to the message sender.
Reply to all: Send a reply to the sender and all other recipients.
Forward: Forward a copy of the message to someone else.
Print: Print the message.
Add Sender to Contacts list: Create a contact from the information in the e-mail message header.
Delete this message: Erase the message.
Report phishing: Report illegal attempts to collect information through subterfuge.
Show original: Displays the message in its raw, text form.
Message text garbled? Provides information for changing the text-encoding scheme in your Web browser when the message appears garbled.
You can read your message and then choose to return to the Inbox by clicking the Inbox link at the top-left corner of the message or choose to respond to the e-mail immediately by replying or forwarding the message. When you click in the text box at the bottom of the e-mail message it expands to show all the e-mail reply functions. The From field is filled in with your e-mail address but you can choose to change that by clicking the change link next to the address displayed. The To field is automatically populated with the e-mail address of the original sender. You can choose to add additional e-mail addresses to this list or add a carbon copy (Cc), blind carbon copy (Bcc), edit the Subject line, or Attach a file by clicking the links beneath the address box. You can also choose to add event information that is automagically entered into Google Calendar by clicking the Add event info link.
When replying or forwarding the message, the original message appears within the message box with a line entered by Gmail to note that, “On some date Sender <sender e-mail> wrote:.” Optionally include a note along with the message by typing at the top of the message box above the quoted message. When you finish, click Send or discard the message by clicking Discard.
At the bottom of each e-mail message displayed in Gmail, and also displayed above and below the list of messages in the Inbox, are a number of actions you can take for each message. The first is a link to return to the Inbox without taking any actions. The second option, Archive, is shown in bold because this is what Google hopes you will do with your e-mail rather than erase it. Archiving the e-mail keeps it stored on the Google e-mail servers where it is accessible to be searched through Google Desktop. Clicking Archive quickly stores the message in the archive and returns you to the Inbox, where the message no longer appears.
Clicking Report Spam sends a message to Google, which uses this information to help filter and block future incoming spam.
The third option is to delete the message. Clicking Delete removes the message and places it in the Trash folder. You can access the Trash folder by clicking the Trash link in the menu to the left side of the page.
Note
E-mail messages left in either the Trash of Spam folders for more than 30 days are automatically and irretrievably erased.
Clicking the More actions... drop-down list displays additional actions that you can take. Select a checkbox on the left of the message, or click on the message to open it before selecting an action from the list. The actions you can select are:
Mark as unread: Messages that have been read are automatically marked as read. You can override that by marking the message as unread for whatever reason you may find this necessary.
Add star: Mark messages with a star as a visual cue that this message is important or requires your attention.
Apply label: Organize your e-mail by applying labels to the messages. You can create many custom labels that can help sort your e-mail.
Remove label: Remove labels from previously labeled messages. This is useful when you have filters automatically label messages and you want to manually change them. You might also have a temporary label that lets you know that an action should be taken; when the action is completed, you can change or remove the label.
Labels are a different way to organize your e-mail. Many e-mail programs allow you to organize e-mail into folders. Gmail is different. You can’t add new folders as you can in other programs. Instead, Gmail allows you to add labels. You can easily limit the messages you are viewing in your Inbox to only messages with a certain label. This is a more intuitive way to manage e-mail rather than moving it between folders. It also allows you to view e-mail in the order it was received or as part of a thread.
Gmail has several different ways to organize your e-mail. The last section explained how you can use labels to organize your messages. Gmail uses another system automatically known as threading. Threads are groups of e-mail messages that have gone back and forth using the same subject. This is a great way to organize discussions based on topics. The messages appear in chronological order but are grouped with the subject of the messages in bold above the group.
At the very top of the menu on the left, just below the Gmail logo, is a bold Compose Mail link. Clicking this link launches the editor for creating a new e-mail message (see Figure 19.4).
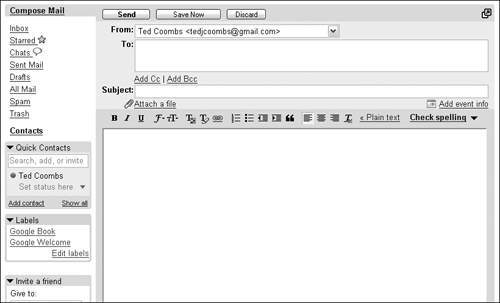
Your Gmail address is displayed in the From: field by default. If you have added and verified other e-mail addresses, you can select those from the drop-down list and your message, when sent, appears that it has been sent from the e-mail address you selected rather than from your Gmail address.
The To: field is ready to accept e-mail addresses. If you have added your contacts into Gmail these contacts appear in a drop-down list as you type in the To: field. When adding more than one e-mail address, separate them with commas. If you select an address from the list shown by Gmail, a comma is automatically added after the address.
You can add additional people to the address list as carbon copy (Cc) recipients. This does not change the message—only how it appears to be addressed. Some message filters look to see if the person is an addressee or a carbon copy recipient and filter the message accordingly.
Blind carbon copy (Bcc) allows you to add recipients without having their addresses appear to other recipients of the message. This is a way to privately copy someone on a message you send.
Type a subject for your message. With today’s spam filters working overtime, it’s a good idea to add a subject that is more descriptive than simply, “Hi”. Subject lines are not required, but many people will not read messages without subject lines out of concern for messages that contain harmful program code. These harmful messages often appear in e-mail messages without subject lines or with subjects that appear to make absolutely no sense.
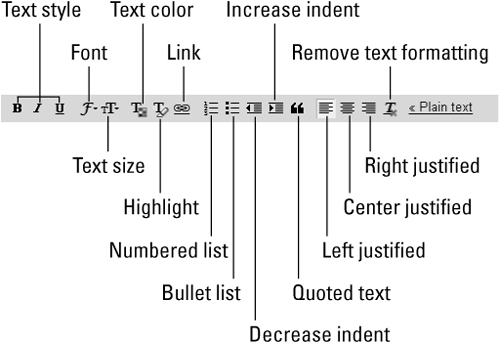
Type the message text of your e-mail in the large box. You have the choice of writing your message as plain text or formatting your message so that it appears displayed using HTML in your recipient’s e-mail program. Your formatting options are (see Figure 19.5):
Text style: Apply a text style by clicking the style symbol.
Font: Select a font from the drop-down list.
Text size: Choose Small, Normal, Large, or Huge from the drop-down list.
Text color: Select a text color by clicking the color in the palette displayed as a pop-up.
Highlight: Choose to highlight text by changing its background color. The default is yellow, but you can select other colors.
Link: Create a hyperlink out of a valid URL.
Lists: Create lists.
Numbered List: Format information in a list preceded by sequential numbers.
Bullet List: Format list information so that it is preceded with a bullet symbol.
Indent: Move paragraphs of text to various levels of indenting by using either the left or right indent icons.
Quoted text: The double-quote symbol does not add quotes. Rather, it precedes text with a grey vertical line to show that this is text you are quoting. This is how text appears in forwarded messages or message replies where the original text is included.
Justification: Change text justification.
Left justification aligns text to the left of the message. This is the default.
Center justification aligns text to the center of the message, leaving jagged left and right margins.
Right justification aligns text to the right side of the message leaving a jagged left margin
Remove text formatting: Click the italics T with a small red x and formatting is removed.
These formatting features are similar to those found in most popular word processing programs. Messages formatted using these formatting features are sent in HTML. This is the way that most e-mail programs can interpret text formatting and display the message as you formatted it.
Gmail allows you to send messages without special formatting. Send your message in plain text by clicking the << Plain text link next to the formatting icons. Clicking this link removes all the formatting icons and replaces them with a Rich formatting >> link. Clicking the Rich formatting >> link redisplays the formatting icons.
When you finish writing your message you can choose to check the spelling before sending it. Clicking the Check spelling link performs a spell check on your message, marking words that it believes to be misspelled by changing the text color to red and underlining the text. You can click on the marked text to see a drop-down list of suggested spellings. The last selection in the list is Edit . . . . Select this when the suggested spellings do not include the correct spelling of the word. This puts the word in a text box where you can edit it. When you complete your spelling corrections, click the Resume editing link. Words marked as spelled incorrectly, and ignored during edits, return to their normal color and formatting when the spell-check editing is completed.
You can attach files to your e-mail message. Once selected from your hard drive they are specially encoded, because all e-mail is sent as text, and packaged as part of your message. Click the Attach a file link next to the paperclip icon located beneath the subject line of your message. Clicking this link causes a text box and button to appear where you can type the filename and path, or click Browse to locate the file on your hard drive. The filename and path are then stored in the text box. Click the Attach another file link if you want to attach additional files. You can also remove a file that is already attached by removing the checkmark in the box next to the filename of the attached file.
Gmail works together with the Google Calendar. By adding event info into your e-mail message you cause two things to happen. First, if you have Google Calendar set up (see Chapter 26) it automatically adds an event into your calendar. Second, another e-mail message is sent along with the one you are composing that invites the recipient of your message to attend the event you have described. Invitations are also managed by Google Calendar.
Add the event name, the location of the event, the start date and time, and the end date and time. You can also select the All Day Event checkbox. Particularly when you have Google Calendar configured it’s a good idea to click the more event options >> link. This gives you access to additional options such as whether or not the event repeats at regular intervals, such as a birthday or anniversary. You can also type a description of the event and choose in which of your calendars you want the event stored. One of the features of Google Calendar’s event management is that you can invite guests to an event. You can also give permission to your guests to invite other guests.
Cross-Ref
See Chapter 26 for detailed information on Guest and Invitation management.
If you get tired of typing your name and contact information at the bottom of every e-mail message, let Gmail take the work out of it for you by including a signature file at the end of your e-mail message. You control exactly what goes in your signature.
Creating a signature file is simple enough. Click the Settings link at the top right of the page. Scroll down to the section labeled Signature:. The default setting is No Signature. To add a signature, select the radio button next to the text box and type the information you want to appear at the end of each message. Some people like to add a favorite quote or company stock symbol.
When you are ready to send your message, click Send. You might notice next to the Send button a message telling you that a Draft of the message was autosaved, and the time it was saved. If your Internet connection is lost, hamsters chew through your computer’s power cord, or some other interruption takes place, a draft of your message may have been autosaved.
This chapter mentions several times that one of the Gmail features is the ability to archive messages, and that it is the philosophy of Google to keep e-mail for as long as possible so you have a searchable record. That doesn’t mean you have to keep thousands of messages in your Inbox, which can be unwieldy. It’s best to move messages you don’t access regularly into the archive.
To archive messages stored in your Inbox, select the checkbox next to the e-mail message and click Archive either above or below the list of messages. If you later need to access a message that has been archived you can find it in the All Mail folder. This folder allows you to view all messages—those that currently appear in your Inbox and any archived messages. To archive groups of messages or multiple messages, select the checkbox next to as many messages as you want, or use the Select settings found below the Archive button. This allows you to choose messages with certain labels, messages that have or have not been read, messages that are starred, or all messages. This makes archiving large numbers of messages much more efficient.
To easily move around in the Gmail environment, you might want to learn a few shortcut keys for actions you take regularly. For example, typing the letter “n” takes you to the next message. Typing the letter “c” tells Gmail to compose a new message. Some of the shortcuts, called combo keys, are activated by first pressing one key, then another. See Table 19.2 for a complete list of all the keyboard shortcuts.
Table 19.2. Keyboard Shortcuts
Shortcut | Description |
|---|---|
c | Compose new message |
/ | Puts your mouse cursor in the search box |
k | Move to the next newest conversation |
j | Move to the previous (older) conversation. |
n | Move to the next message. |
p | Move to the previous message |
o <Enter> | Opens or closes a conversation. |
u | Refreshes the page and returns you to the list of messages and conversations. |
y | Archives the currently selected message or conversation. |
x | Selects a message or conversation. |
s | Add or remove a “star” from the message or conversation. |
! | Marks the currently selected message as spam. |
r | Send a reply message to the currently selected message. |
a | Send a reply to all recipients of the currently selected message. |
f | Forward the currently selected message. |
<tab>, <Enter> | Combo key (first press one key, then the other) Send message. |
y, o | Combo key. Archive conversation and move to next one. |
g, a | Combo key. Go to All Mail. |
g, s | Combo key. See all Starred e-mail. |
g, c | Combo key. Go to Contacts. |
g, d | Combo key. Go to Drafts. |
g, i | Combo key. Go to Inbox. |
<esc> | Change the focus from the currently selected input field. |
To use the keyboard shortcuts, you need to click the Settings link located at the top of the page. When the Settings page launches, make sure you are looking at the General tab. If not, click the General tab and locate the Keyboard Shortcuts section. Select the Keyboard shortcuts on radio button. This allows you to use the shortcut features.
Click the Settings link at the top of the page to launch the Gmail Settings page. Click the Forwarding and Pop tab. To set up e-mail forwarding, find the Forwarding section of the Forwarding and Pop form. By default, the Disable Forwarding selection is enabled. To turn on forwarding, select Forward a copy of incoming mail to, and type a destination e-mail address in the text box provided. From the next drop-down list, select the action you want Gmail to take when forwarding your mail. Here are the choices:
keep Gmail’s copy in the Inbox
archive Gmail’s copy
delete Gmail’s copy
It’s recommended that you either keep Gmail’s copy in the Inbox or archive Gmail’s copy. Remember that the goal of Gmail is to never require that e-mail be erased, only archived so that it can be searched and accessed at a later time.
Forwarded e-mail is simply sent on to the next e-mail address specified as the destination. It is forwarded as soon as Gmail puts it in your Inbox. You do not have to configure your other e-mail program to receive this e-mail.
When you want to forward only some of your e-mail, you can create a filter.
You can filter messages based on several different types of information. For example, you can filter your messages so that only e-mail from a specific person is forwarded to you. This gives you complete control over what messages are viewed through Gmail and which are retrievable through a different e-mail client program such as Thunderbird or Outlook.
While viewing the Pop and Forwarding settings you see the Create a Filter link. Clicking this link launches the Create a Filter page. In this page, you can determine which e-mail messages are selected by Gmail for forwarding.
There are six criteria that you can set for filtering messages. You can fill in one or several of the filter criteria, which include:
From: Forward messages sent from a specific person or e-mail address.
To: Filter on the intended recipient of the message.
Subject: Forward messages that contain certain words or phrases in the e-mail subject line.
Has the words: Filter on specific words or phrases in the body of the message.
Doesn’t have: Only forward messages that do not contain certain words.
Has attachments: Only forward messages that have attachments. Checkbox only.
After typing keywords or phrases in one or more of these criteria or checking the attachments criteria, click Next Step >>. The next step is choosing an action.
There are five actions you can take when filtering messages. This section focuses on one of those: forwarding the message. You can also choose to filter the message where other actions take place. These actions include
Skip the inbox (archive it)
Star it
Apply the label (choose label from a drop-down list)
Forward it to e-mail address.
Delete it
To continue setting up e-mail forwarding, type an e-mail address in the Forward it to: text box and select the checkbox next to this criteria. You can then either click Create Filter or first select the Also apply filter to option. This causes Gmail to evaluate e-mail currently in the Inbox. Leaving this unchecked only applies your filter to e-mail received after creating the filter.
Your new filter now appears in your filter list and can later be edited or deleted by clicking the associated links next to the filter. There is also a Create new filter link at the bottom of the filter list that takes you to the beginning of the filter creation process.
Gmail can be accessed using an e-mail (client) program like Thunderbird or Microsoft Outlook. You can configure both Gmail to allow POP retrieval and configure your e-mail client program to retrieve messages from Gmail. Follow these steps:
Click the Settings link at the top of the Gmail page.
In the Settings form, click the Forwarding and POP tab.
In the POP Download section, select either the Enable POP for all email option or the Enable POP only for email that arrives from now on option.
Choose what you want to have happen to Gmail’s copy of the message once it is retrieved by your e-mail client. The choices are
archive Gmail’s copy
keep Gmail’s copy in the Inbox
delete Gmail’s copy
Configure your e-mail client. You can find the account configuration instructions for your e-mail client program by clicking the Configuration instructions link in the last line of the POP download configuration form.
Click Save Changes.
Caution
It’s easy to get involved in setting up your e-mail client program and forget to save your changes.
Once your e-mail client is set up by adding a new POP e-mail account, you can begin receiving your Gmail right in your own e-mail client.
Note
When using your own e-mail program to send and receive e-mail you lose many of the extra features Gmail offers when managing e-mail. You cannot use Gtalk, view pictures saved with contacts, or use your Gmail Contact information when sending and receiving e-mail. Of course, Gmail filters do not function in your other e-mail program.
One of the features that make Gmail unique when compared to other Web-based e-mail programs is the ability to chat with the people with whom you share e-mail messages. There have certainly been times when you have used your e-mail program like a chat program, sending short messages back and forth. Rather than wait for e-mail messages to hop their way to your computer, begin chatting directly. It’s more efficient and more fun.
In order to use Gmail chat you must have either Microsoft IE 6.0 or greater or Firefox 1.0 or greater installed on your computer. If you need to install or upgrade these programs visit www.microsoft.com/windows/ie/default.mspx. for new versions of Internet Explorer or www.mozilla.com. for new versions of Firefox.
To set your Gmail chat settings, click the Settings link in the upper-right corner of the page to open the Settings page. Once the Settings page loads, click the Chat tab. In this form, you can configure the way your Gmail chat program operates.
You can determine whether of not your chat transcripts are saved into you Gmail account by setting the Chat History to either:
Save chat history in my Gmail account
Don’t save chat history in my Gmail account
In considering whether to save your chat history you must balance security with convenience. For security reasons, consider that your private chat conversations with others will be saved, and if you are using Google Desktop to index your e-mail, your chat transcripts will also be indexed and available for desktop searches. This is exactly the same reason why you might consider saving your transcripts so that you have them available for future reference.
Set the number of contacts that appear in Quick Contacts by setting the Quick Contacts Size and choosing a value (0, 5, 10, 15, 20, 40) from the drop-down list. In addition to the size, you can also set whether your Quick Contacts appear above or below the Labels box on the left side of the page. Set this value in the Quick Contacts Location field.
Set the Auto-Add Suggested Contacts to determine how contacts are added to your list of chat contacts. You have two choices:
Automatically allow people I communicate with often to chat with me and see when I’m online.
Only allow people I’ve explicitly approved to chat with me and see when I’m online.
Once again, security concerns should be your guide in choosing how people are added to your chat contacts. If you are concerned about security—and you should be—consider selecting the second option.
You can be notified of incoming chat messages with a sound by configuring the Sounds setting. To turn on the ability to be notified by sound you must have Macromedia Flash installed.
Configure your chat profile by placing the mouse over your ID in the Quick Contacts box. Adding your name allows others to see more than your Google ID. You can choose to use your real name or a name of your choosing.
Type your primary e-mail address. Your Gmail address is displayed by default. Choose to add a note about yourself by typing it in the Notes text box.
Upload a photo of yourself that appears in your chat or use the photo that your chat partners select. You can also choose to view someone’s chosen photo or select one you’d rather view. You can choose to add more contact information by clicking the add more contact info link. The contact information you add here works exactly the same way as adding e-mail contacts as explained earlier.
To change the status that is displayed, click once on your ID in the Quick Contacts box and select a status from the list that appears. You can select one of the following status messages:
Available
Custom Message: Create a custom “I am available to chat” message.
Busy
Custom Message: Create a custom “I am busy; don’t contact me right now” message.
Sign out of chat
Change your status as often as you like.
Before you can chat with someone, that person must be in the list of people you can chat with, and, of course, must have Gmail installed. Adding others to your list and inviting them to chat with you is simple.
In the Quick Contacts box on the left click the Add contact link. In the text box that appears, type the Gmail address of the person with whom you want to chat. Gmail processes the invitation and sends it on to the person you’ve invited to chat with you. Once that person accepts your invitation, a small bubble appears next to the person’s Gmail ID that appears in your contact list. The bubble is green when the other person is online and able to chat with you, and gray when offline.
When you want to chat with someone who is in your list and is available, place your mouse cursor over the ID in the list and a pop-up window appears next to the entry in the list (see Figure 19.6).
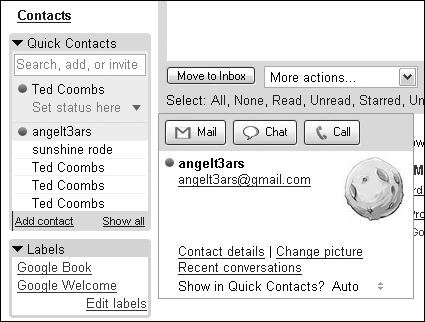
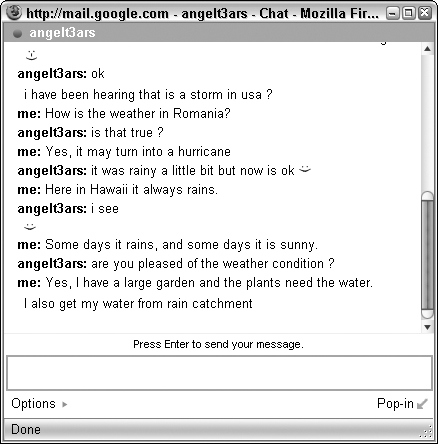
Click Chat in the contact pop-up window to begin chatting. A small chat window appears within the Gmail page where you can begin sending and receiving messages. The text of your message appears above the text entry box marked with the name of the person who sent the text. Yours is marked as “me”.
In the bottom of the window, you see a Pop-out link. Clicking that link opens a new window containing only your chat, as shown in Figure 19.7. You can always choose to restore the chat back into the Gmail window by clicking the Pop-in link.
If you configure Gmail to save your chats, the full transcript appears in the Gmail Chats folder. Detailed information about the chat, including the exact time each message was sent or received appears in the chat transcript. If you are concerned that the person on the other end of the chat is saving your chat transcript and you want all or portions of it to remain private and unsaved, you can go off the record. Click the Options link at the bottom of the chat window and select the go off the record option. If you start a new conversation with the same person, this setting is not saved, so you need to go off the record each time you chat with someone and don’t want the chat transcript saved. Chat transcripts, up to the time you decide to go off the record, are saved.
At the top of the Gmail page is the familiar Google Search box. There are two buttons, one for searching your e-mail and the button on the right for searching the Web. Click Search Options to launch a page that allows you to focus your search through your e-mail messages. The additional search options include:
From: Specify from whom the e-mail was sent.
To: Type in the name or email address the e-mail was sent to.
Subject: Type in search terms that may appear in the subject line of the e-mail.
Search: Select All Mail, Inbox, Starred, Chats, Sent Mail, Drafts, Spam, Trash, Mail & Spam & Trash, Read Mail, Unread Mail, and any labels you may have created.
Has the words: Type in search terms that might appear anywhere in the e-mail.
Doesn’t have: Type terms that should not appear in the messages, excluding them from your search results.
Has attachment: Select this option when you want your results focused to only messages that contain file attachments.
Date Within: Specify a length of time, such as 1 day, and the date from which the time should start. This allows you to focus your search within a particular time period.
When you have finished entering search options and terms click Search Mail. A list of the messages matching your search will appear below.
Google provides a special desktop program for both Windows and Mac users that notifies you when new e-mail arrives in your Gmail account. It remains invisible until mail arrives in your Gmail inbox. Then, a small window appears from the taskbar alerting you to the new message.
You can click this notification to launch Gmail and view the new message. This service is automatically installed when you install Google Desktop.
Cross-Ref
See Chapter 11 for more information about installing Google Desktop.
One of the great things about Gmail is the ability to check it while you’re on the go using the Web browser on your mobile phone. First, your phone must be equipped with a Web browser. It doesn’t need to use a color display, but it helps. Unlike other Web-based e-mail programs that make you search through a full-sized Web page to read your e-mail on a tiny screen, Gmail automatically adjusts its display for the phone on which you are viewing your e-mail.
Like almost all the other Google applications, Gmail mobile is free to use. Point your phone’s Web browser to http://m.gmail.com. You need to know how to use your phone’s Web browser because each phone works in a slightly different manner.
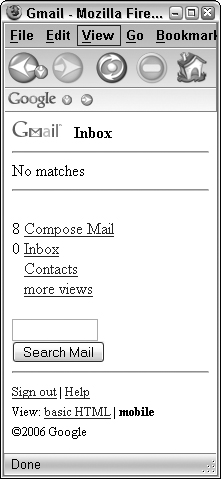
You can get an idea of what Gmail will look like on your mobile phone by visiting http://m.gmail.com in your regular Internet Web browser. Figure 19.8 shows how the interface is pared down with limited graphics and simple text interface, perfect for most mobile browsers, particularly when bandwidth is limited, which slows your connection.
Gmail Mobile also allows you to view many kinds of attachments, including Adobe PDF files. This saves you a lot of trouble trying to transfer the files later onto you laptop or desktop just to read an attachment.
You can read your e-mail by clicking the Inbox link and selecting a message you want to read. Notice that Gmail Mobile does not show you all the various folders, such as Trash, All Mail, and Spam to limit the amount of space required to display the e-mail program on your mobile.
Clicking the Contacts link shows you a list of your Frequently Mailed contacts and then provides a search box so that you can search for other contacts from your list.
Unfortunately, many of the Gmail features available on your desktop, such as Gmail Chat, are not available using the mobile version. Some features needed to be sacrificed to create a simple interface that works on almost all Internet-ready phones and mobile devices.
Gmail is a new experience in Web-based e-mail programs. The entire philosophy behind Gmail is different with the idea of saving e-mail messages on the Gmail server indefinitely compared with other Web-based programs that appear happier when you store nothing on their servers. Gmail integrates with other Google technologies, such as the Google Calendar and Gtalk for chatting. You can even use Google’s Picasa to locate and share images located on your computer with others in e-mail.
If you’ve found that you really like using Gmail and want to share it with others, send them an invitation. You are given a small number of invitations to allow others to use Gmail. You can also sign up for an account using your cell phone. You can find the invitation system in the small box at the left of the screen. Type the e-mail address of your invitee and an invitation is sent. The remaining number of invitations allowed is displayed in this same box.
First, there was e-mail; then there was the Web; and soon after came Google and not long after that instant messaging. It only makes sense that all of these have come together to create Gmail.
Gmail integrates well with other Google applications such as Google Desktop. When you use Gmail with other Google applications it can easily form the heart of your Internet communications. Included in these communications should be Google’s chat program, Gtalk, which is covered in the next chapter.