
Getting to know Google Updater
Finding your current update or download status
Seeing what Google software you have installed
Setting your Google Updater preferences
Learning more about Google Gadgets and Plug-ins
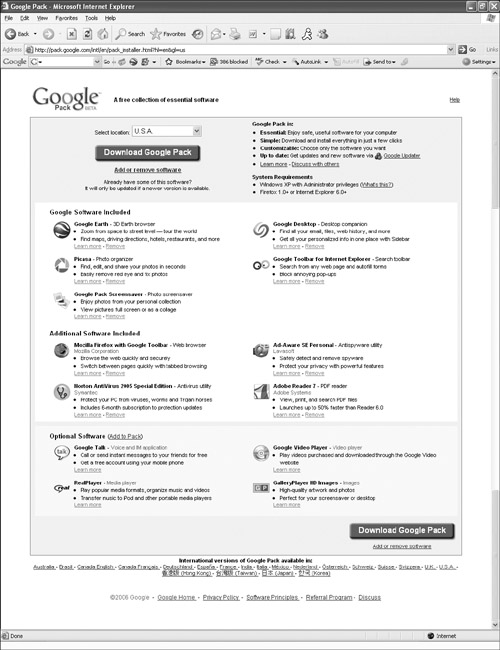
The Google Pack is an electronic package of essential Google software. It includes software programs written by Google to enhance your desktop, customize Microsoft’s Internet Explorer with the Google Toolbar, and Google’s image software tool, Picasa. Also included are several software tools provided by Google partner companies, including these:
Mozilla Firefox with Google Toolbar
Norton Antivirus 2005 Special Edition
Ad-Aware SE Personal
Adobe Reader 7
You also can choose to download and install optional programs not included in the Google Pack by default. When this book was being written, the optional software package was GalleryPlayer HD Images, a group of high-definition photos and artwork that you can use as screensaver images or to customize the image on your computer desktop. You also can print them and use them for your child’s origami project. See, Google thinks of everything!
To download and get started installing the Google Pack software, go to http://pack.google.com, as shown in Figure 30.1. Click Download Google Pack. You must agree to the license agreement before the software is downloaded using the Google Updater program. If you’ve already installed the Google Pack, this page displays and allows you to download any additional software that has been made available since you last installed the Google Pack.
With the Google Pack, you will receive essential Google software to give you access to the world’s and your own information stored on your computer.
The Google Updater program is the application that Google uses to download and install all the programs in the Google Pack. Google Updater includes these features, among others:
It monitors your Google Pack installation status.
It runs installed Google Pack software.
It uninstalls Google Pack Software.
It remains in your taskbar and informs you of updates as they become available.
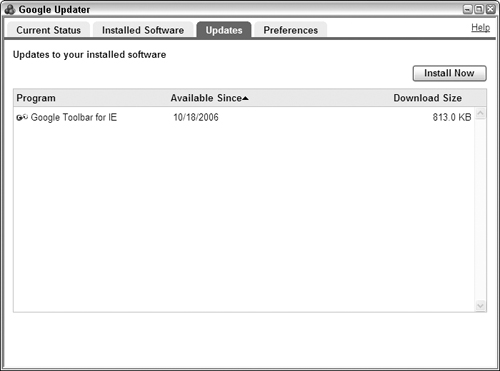
The Google Updater application automatically starts when you log in to your Windows account. The application runs in the background, but a Google Updater window can be launched by double-clicking the multicolored ball icon in your computer’s taskbar, as shown in Figure 30.2.
Google Updater can display the current status of Google Pack software installed on your system or its installation. Launch the Google Updater application from the taskbar, and click the Current Status tab. This tab allows you to see potential downloads and downloaded software that needs to be installed and to check the current status of any programs being downloaded or installed while you watch.
The Downloads section of the Current Status tab displays a list of all the software that is available for download. When no new software is available, a message tells you that there is Nothing to download. You also can click the Get more software link in this section to navigate to the Google Pack page and see a list of optional software.
The section to the right of the Current Status tab lists any Google Pack software that has been downloaded to the computer and is awaiting installation. Because most of the software is installed immediately, this should rarely have any entries. But if there are, you can see which programs still need to be installed.
Clicking the Installed Software tab of the Google Updater program allows you to see a list of the software installed or detected by the Google Updater program. This program does not detect all the software on your hard drive, only those it was designed to manage.
From this list you can select, run, get help, and uninstall software. Clicking the Run link next to the program name launches the application. Clicking the Help link loads a Web page with support information applicable to the selected product. You can see the date the application was installed on your computer and the size of the installed program. This can be handy if you want to verify that the software you installed is genuine. It’s not a perfect way to tell, but it’s at least one indication. Click the Uninstall link to remove any of these installed applications.
When you want to see any recent activity with regard to updates or recent installs, click the Recent Activity link in the bottom of this tab. This launches the Recent Activity window displaying a list of any Google Pack programs that have been installed or updated recently, the current version, which action took place, and the date on which it happened. After reviewing this list, you can clear it by clicking Clear History Now. Click Close to close the window and return to the Google Updater program main screen.
To launch the Google Pack home page to see what new software is available, click the Get more software link in the top-right corner of this tab.
The Updates tab displays a list of updates to currently installed Google Pack programs that have not yet been installed. The list contains any downloaded updates that have occurred and not been installed. You can see the date the update became available. Click the small arrow in this column to sort updates chronologically from newest to oldest or oldest to newest.
Select the program name to see a small description, and when you are ready to install it, click Install Now in the upper-right portion of this tab. This takes you to the Status tab. The Status changes to Updating, and the progress of each installation appears in a progress bar in the top left of the tab. When installing multiple updates, you can watch your progress through these updates by watching the Installs progress bar in the upper right. When the updates are installed, the Status changes to Updated. Returning to the Updates tab should show you that all the updates you requested no longer appear in the list.
Click the Preferences tab to configure Google Updater. The Preferences tab is organized into five different types of configuration settings.
You can set the following preferences:
Notifications: Select whether you want to be notified about new software by selecting or deselecting the check box.
Updates: Choose whether to automatically update your software, be notified of updates before installing them, or let you check for updates on your own.
Connection Settings: Set manual proxy settings for computers protected behind firewalls.
System Tray: Choose to display the Google Updater icon in the system tray or only when there are updates.
Other: Allow Google to collect anonymous statistics to improve the services it offers you.
Tip
For security reasons, you should choose to be notified of any updates before allowing them to be installed on your computer. It’s a small hassle to put up with to be a little safer. Of course, you can trust Google, but you may not be able to trust people who manage to hack the Google Updater program. It can happen.
When you finish making changes to the preferences, click Save Preferences. A bar appears across the top of the tab telling you that your preferences are saved. To exit Google Updater, click the small red X in the upper-right corner of the window.
One of the enjoyable little extras you get with the Google Pack is the Google Pack Screensaver. When your computer is idle, the screensaver displays to your screen pictures it finds on your hard drive.
To configure the Google Pack Screensaver, follow these steps:
Choose Start
 Control Panel.
Double-click Display.
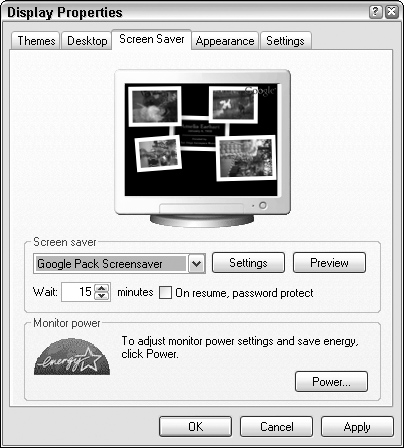
Click the Screen Saver tab.
Select Google Pack Screensaver from the Screen saver drop-down list, as shown in Figure 30.3.
Click Settings. This launches the Google Pack Screensaver configuration window.
Set the Visual and Picture Folder Settings described next.
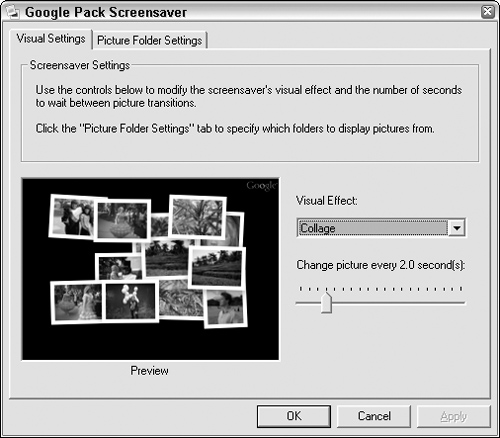
Set the Visual settings for the Google Pack Screensaver by selecting how you want images to appear on the screen when the screensaver is active. The choices are
Collage: Displays many images (size-reduced) in a random collage
Wipe: Shows full-screen images in a wipe from left to right across the screen
Crossfade: Shows full-screen images as they fade onto the screen
Set how often you want new images to appear on-screen. The default is 2 seconds. You can increase or decrease this number by using the slider shown in Figure 30.4. The Preview window allows you to see how the screensaver will appear when it’s active.
The Picture Folder setting is important. It determines where images are selected from for viewing. Click the Picture Folder Settings tab to configure this setting. By default, the Google Pack Screensaver program selects images from your My Pictures folder and any subfolders.
You can select any subfolders not already selected by selecting the check box. Deselect check boxes from any folders you want the Google Pack screensaver to ignore. For example, you may not want “business design images” displayed for just anyone to see.
Add new folders by clicking Add Folder. A dialog box appears that allows you to browse to the folder you want to include. Select the folder, and it appears in your list with the check boxes already selected. Deselect any subfolders you do not want to include.
To make selecting and deselecting all the check boxes simple, click Check All or Uncheck All. When you finish making changes, click Apply and continue with configuring the screensaver, or click OK to save your changes and close this window.
In the Screensaver Display Properties window, you can click Preview to see a full-screen preview of your selections. After watching the show, you may want to make changes to the selections displayed on-screen.
Everyone has become gadget-happy. There are Yahoo! Gadgets, Google Gadgets and now Vista Gadgets (Vista is the code name for the Microsoft Windows version after XP). Essentially, they are all the same with minor differences. Google Gadgets tend to be more web-centric than the Vista gadgets. You can certainly take advantage of all the different gadgets. To get you started, Google Pack comes with several Gadgets included in the download. Chapter 11, Personalizing Google Desktop, has additional information about installing and using the Google Gadgets.
You can find hundreds of additional Google Gadgets at http://desktop.google.com/plugins/ sidebar/.
You’ll see the Google Featured Gadgets displayed across the top of this Web page. You also can choose to sort hundreds of others by popularity (based on the number of user downloads), by date (when they were added), and by name, in case you know the name of the Gadget and want to find it quickly.
Click the Next link to see additional pages of Gadgets. The Gadgets are organized by category. Choose from one of the following Gadget categories:
All
News
Tools
Communication
Finance
Fun & Games
Google
Sports
Lifestyle
Technology
Select one of these categories from the column on the left and view the Gadgets in this category. For example, clicking the Lifestyle category link displays Gadgets for viewing your daily horoscope, seeing the local weather, or assisting you in a job search.
Clicking the Gadget launches a page with more information about the Gadgets, such as the company or person who authored the Gadget, the size in bytes, what type of license it is offered under, the version number and the release date. You can learn even more by clicking the Learn more link or join in discussions about the Gadget by clicking the Discuss this gadget link, which launches the Google Group associated with this Gadget.
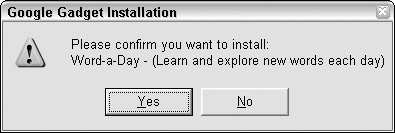
When you’re ready, click Download gadget to begin the download. You are asked to confirm that you want the Gadget installed, as shown in Figure 30.5.
Some Gadgets require that you set preferences before they can be used. For example, you may need to set the month and day of your birth before using one of the horoscope Gadgets. Some Gadgets are not authored or controlled by Google. You may be giving out personal information to a third party.
When your Gadget is installed you can begin using it with Google Desktop.
Download Google Pack when you want to install all the latest personal Google software on your computer. Get some of the latest Open software offered by Google partners or important desktop protection tools. Open software is written by programmers that believe that the source code to software should be shared “openly” and that software should not be proprietary. Open software is generally free to download and use. Developers make money offering services such as support or products such as user manuals.
The Google Updater helps you manage all your Google Pack software by watching for updates; managing your downloads and installs; and providing a place where you can run, get help, or uninstall your downloaded programs.
One of the great add-ons for the Firefox and Internet Explorer browsers is the Google Toolbar. The next chapter helps you manage this great search feature.