In This Chapter
Finding out what you can do with iTunes
Playing music tracks on a CD
Skipping and repeating music tracks
Displaying visuals while playing music
Getting suggestions from the Genius sidebar
More than half a century ago, jukeboxes were the primary and most convenient way for people to select the music they wanted to hear and share with others, especially newly released music. Juke joints were hopping with the newest hits every night. You could pick any song to play at any time, but you had to insert a coin and pay for each play. Radio eventually supplanted the jukebox as the primary means of releasing new music to the public, and the music was free to hear — but you couldn't choose to play any song you wanted at any time.
Today, using iTunes, you not only have a digital jukebox and a radio in your computer, but you also have online access to millions of songs, with most songs available for download for 99 cents each and entire albums available for download at less than the list price of a CD.
Connect your computer to a stereo amplifier in your home (through wires or Apple TV), or connect speakers to your computer, and suddenly your computer is the best jukebox in the neighborhood. Connect your computer to a television, and you have a full multimedia environment in your home, all controlled by iTunes. And after you've organized your content in iTunes, you can put it all on your iPod or iPhone to carry your jukebox with you.
This chapter gives you an overview of what you can do with iTunes, and you get started in the simplest way possible: using iTunes to play music tracks on a CD. You can use iTunes just like a jukebox, only better — you don't have to pay for each song you play, and you can play some of or all the songs on an album in any order.
You can download songs or entire albums, audio books, TV shows, movies, and other videos from the iTunes Store directly into your iTunes library (as I describe in Chapter 7), or you can copy these items from other sources (including audio CDs) into your iTunes library (as I describe in Chapter 8). You can also subscribe to podcasts that transfer audio or audio/video episodes, such as weekly broadcasts, automatically to your iTunes library from the Internet or through the iTunes Store. You can even use iTunes to listen to Web radio stations and add your favorite stations to your music library. After you store the content in your iTunes library, you can play it on your computer and transfer it to iPod, Apple TV, and iPhone models. You can also use your computer to burn the audio content onto an audio CD or copy audio and video files onto other hard drives or DVD data discs as backups.
Transferring songs from a CD to your computer is referred to as ripping a CD (to the chagrin of the music industry old-timers who think that users intend to rip off music without paying for it). Ripping an entire CD's worth of songs is quick and easy, and track information, such as artist name and title, arrives automatically over the Internet for most commercial CDs. (You can add the information yourself for rare CDs, custom-mix CDs, live CDs, and others that are unknown to the database.)
You can also add video files to your iTunes library in a couple of ways: by choosing content from the iTunes Store (such as TV shows, feature-length high-definition movies, music videos, and even free movie trailers) or by downloading standard video files in the MPEG-4 format from other sources on the Internet. You can also create your own videos with a digital camcorder (or cameras built into computers, such as the iSight camera included with MacBooks) and copy them to iTunes.
Note
Although you can't use iTunes to transfer video content from a DVD, you can use other software to convert DVDs to digital video files, and you can transfer video content from older VHS players. Visit the Tips section of the author's Web site at www.tonybove.com for more info.
As if that weren't enough, iTunes gives you the power to organize content into playlists, as I describe in Chapter 14. (You can even set up dynamic, smart playlists that reflect your preferences and listening habits.) iTunes even has a built-in equalizer with preset settings for all kinds of music and listening environments, with the added bonus of being able to customize and save your own personalized settings with each item of content.
The Mac and Windows versions of iTunes are virtually identical, with the exception that dialogs and icons look a bit different between the two operating systems. You also find a few other differences, mostly related to the different operating environments. The Windows version lets you import unprotected Windows Media (WMA) songs; the Mac version, like most Mac applications, can be controlled by AppleScript programs and Automator workflows. Nevertheless, as Apple continues to improve iTunes, the company releases upgrades to both versions at the same time, and the versions are free to download.
You can run iTunes anytime (with or without an iPod, iPhone, or Apple TV) to build and manage your library of music, audio books, podcasts, Web radio stations, TV shows, and other videos. You don't have to connect your iPod or iPhone until you're ready to transfer content to it (as I describe in Chapter 9).
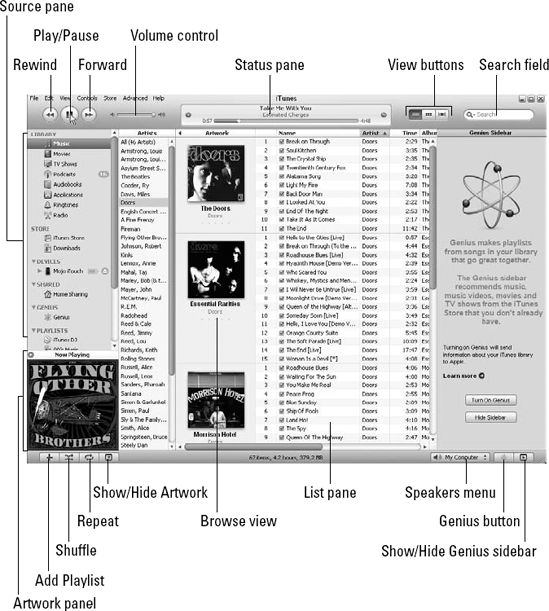
When you launch iTunes, your library and other sources of content appear. Figure 6-1 shows the iTunes window on a PC running Windows showing the Column Browser (to browse by artist) and the Artwork Column (to show album covers). You can also click the column headings in the List pane to sort your library by artist, album title, or any of the other view options.
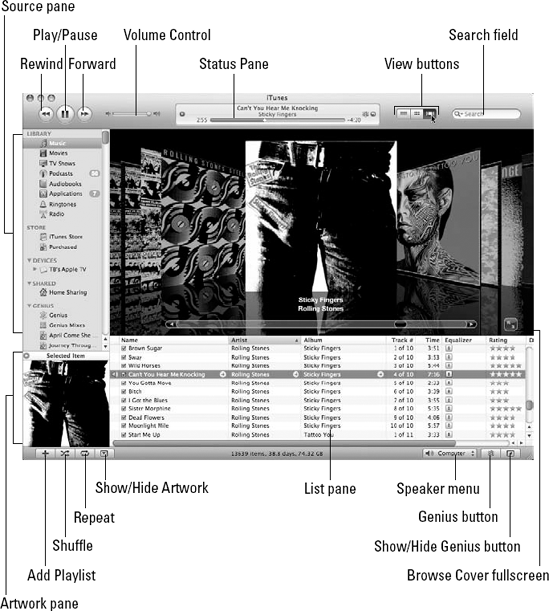
The Mac and Windows versions of iTunes offer the same functions and viewing options, including the cover browser (also known as Cover Flow). Figure 6-2 shows the iTunes window on the Mac with the cover browser open, displaying the cover art for albums. Both versions also offer the Genius Sidebar (shown in Figure 6-1, but hidden in Figure 6-2) and the Speakers pop-up menu for choosing a speaker system.
iTunes offers multiple views of your library and your sources for content, as well as controls for organizing, importing, and playing content, as follows:
Source pane: Displays the source of your content, handily divided into the following sections:
Library: Includes your music, movies, TV shows, podcasts, audio books, applications and games, ringtones, and all available radio stations.
Store: Includes the iTunes Store and your Purchased or Downloads list (if you've purchased items or have recently downloaded items).
Devices: Includes audio CDs and any iPods (such as Mojo iTouch in Figure 6-1), iPhones, and Apple TV devices (such as TB's Apple TV in Figure 6-2) that are connected to your computer.
Eject button: This button appears next to the name of an audio CD, iPod, or iPhone in the Source pane. Clicking the Eject button, um, ejects a CD or an iPod or iPhone. However, whereas a CD actually pops out of some computers, iPods and iPhones act like hard drives, and ejecting them simply removes (unmounts) the drives from the system so that you can disconnect them.
Shared: Includes iTunes libraries on your home network that you can share iTunes Store content with, as I describe in Chapter 7.
Genius: Includes Genius mixes and your Genius playlists, which I describe in Chapter 14.
Playlists: Includes the automatic tune-selector iTunes DJ (see Chapter 13 for details) and the Genius and your own playlists (see Chapter 14 for more info).
Cover browser: Also called Cover Flow, the cover browser lets you flip through your cover art to choose songs (Refer to Figure 6-2). You can use the slider to move swiftly through your library, or you can click to the right or left of the cover in the foreground to step forward or back-ward in your library.
List pane: Depending on the source that's selected in the Source pane under Library, Store, Devices, Shared, Genius, or Playlists, the List pane (refer to Figure 6-1) displays the content from that source. For example, choosing an iPod in the Devices section displays the iPod content in the List pane, while choosing Music in the Library section displays the music in your iTunes library.
Column Browser and Artwork Column: To see these views, click the leftmost View button for List view (refer to Figure 6-1) and then choose either View

View buttons: The three buttons near the upper-right corner change your view of the List pane to show items in a list, cover art thumbnail images in a grid, or the cover browser.
Search field: Type in this field to search your library. You can also use the Search field to peruse a playlist or to look within the iTunes Store.
Status pane: When content is playing, you can see the artist name, piece title (if known), and the elapsed time displayed in this pane. When synchronizing, you see a progress bar. If more than one operation is happening at the same time (such as playing music and synchronizing), you can see either status display by clicking the tiny right arrow in the status pane.
Player buttons — Forward/Next, Play/Pause, and Previous/Rewind: Use these buttons to control the playback of content in iTunes.
Volume control: You can change the volume level in iTunes by dragging the volume control slider in the upper-left section of the iTunes window to the right to increase the volume or to the left to decrease it. The maximum volume of the iTunes volume slider is the maximum set for the computer's sound, which you set separately. See Chapter 13 for more about setting volume levels on your computer.
Playlist buttons — Add, Shuffle, Repeat: Use these buttons to add playlists, and randomly shuffle or repeat playback of playlists.
Show/Hide Artwork button: Use this button to display or hide artwork (either your own or the artwork supplied with purchased songs and videos).
Speakers pop-up menu: Use this pop-up menu near the lower-right corner of the iTunes window to select a different speaker system than the computer's speakers (see Chapter 6). This pop-up menu appears only if you choose Preferences (from the iTunes menu on a Mac or the Edit menu in Windows), click the Devices tab, and turn on the Look for Remote Speakers Connected with AirTunes option. If iTunes locates such speakers, the pop-up menu appears.
Genius button: The Genius button, located in the lower-right corner of the iTunes window to the left of the Show/Hide Genius Sidebar button, generates a Genius playlist of songs from your library that go great with the song you selected. The Genius button appears gray unless you have selected a song — see Chapter 14 for details. After clicking the Genius button, the Genius playlist appears and is automatically selected in the Source pane in the Playlists section.
Show/Hide Genius Sidebar button: Use this button to display or hide the Genius Sidebar.
Genius Sidebar: The Genius Sidebar (refer to Figure 6-1) makes suggestions for what to get from the iTunes Store based on what you've selected. You have obligation to buy anything, and you can dispense with it if it bothers you — you can open or close the Genius sidebar by clicking the boxed-arrow Show/Hide Genius Sidebar button in the lower-right corner of the iTunes window. (See the section "Using the iTunes Genius Sidebar," later in this chapter, for details.)
If you don't like the width of the Source pane, you can adjust it by dragging the vertical bar between the Source and List panes. You can also adjust the horizontal bar between the song listing in the List pane and the Column Browser. To resize the iTunes window on a Mac, drag diagonally from the lower-right corner. In Windows, drag the edges of the window horizontally or vertically.
iTunes needs content. You can get started right away by ripping music from CDs into your library, as I describe in Chapter 8. For more instant gratification, though, you can play music right off the CD without importing it. Maybe you don't want to put the music into your library. Maybe you just want to hear it first, as part of your Play First, Rip Later plan.
To play a CD, insert any music CD — or even a CD-R that someone burned for you — into your computer. After you insert the CD, iTunes displays a dialog that asks whether you want to import the CD into your library right now — you can click the Yes button to import now or the No button to do nothing yet. Click No for now.
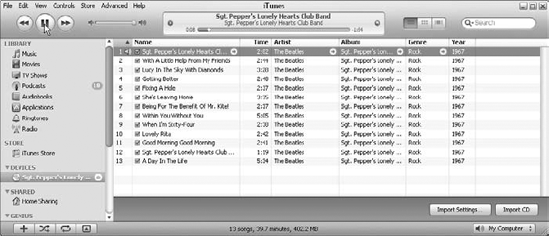
If you're connected to the Internet, iTunes accesses the Gracenote CDDB for song information while you are answering the import question so that after you click Yes or No, iTunes presents the track information for each song automatically, as shown in Figure 6-3. (Gracenote CDDB is a song database on the Internet that knows the track names of most commercial CDs but not those of homemade mix CDs. You can read about Gracenote CDDB and editing song information in Chapter 12.)
When you play a CD in iTunes, it's just like using a CD player. To play a CD from the first track, click the Play button. (If you clicked somewhere else after inserting the disc, you might have to click the first track to select it before clicking the Play button.) The Play button then turns into a Pause button, and the song plays.
When the song finishes, iTunes continues playing the songs in the list in sequence until you click the Pause button (which then toggles back into the Play button) or until the song list ends. You can skip to the next or previous song by using the arrow keys on your keyboard or by clicking the Forward button or the Back button (next to the Play button). You can also double-click another song in the list to start playing it.
Tip
You can press the spacebar to perform the same function as clicking the Play button; pressing it again is just like clicking the Pause button.
The Status pane above the list of songs tells you the name of the artist and the song title as well as the elapsed time of the track. When you click the artist name, the artist name is replaced by the album name. The time on the left of the slider is the elapsed time; the time on the right is the duration of the song. When you click the duration, it changes to the remaining time; click it again to return to the song's duration.
Tip
Eject a CD by clicking the Eject icon next to the CD name in the Source pane or by choosing Controls
You can rearrange the order of the tracks to automatically play them in any sequence you want, similar to programming a CD player. When you click the up arrow at the top of the first column in the List pane (refer to Figure 6-3), it changes to a down arrow, and the tracks appear in reverse order.
To change the order of tracks that you're playing in sequence, just click and hold the track number in the leftmost column for the song; then drag it up or down in the list. You can set up the tracks to play in a completely different sequence.
To skip tracks so that they don't play in sequence, deselect the check box next to the song names. iTunes skips deselected songs when you play the entire sequence.
Tip
To remove all check marks from a list, press
Tip
The Shuffle button, located to the left of the Repeat button, plays the songs on the CD in random order, which can be fun. You can then press the arrow keys on your keyboard or click the Back and Forward buttons to jump around in random order.
The visual effects in iTunes can turn your iTunes window into a light show that's synchronized to the music in your library. You can watch a cool display of eye candy while the music plays — or leave it on like a lava lamp.
Choose View
iTunes offers two visualizers: The iTunes Visualizer has a simulated 3D look that includes spheres, ribbons, and lights that pulsate to the beat and tempo of the song you're playing. The Classic Visualizer, with a 2D look, has been part of the application since the beginning. To switch from the iTunes Visualizer to the Classic Visualizer, choose View
Tip
You can tweak the Classic Visualizer a bit by changing the Visualizer options. Choose View
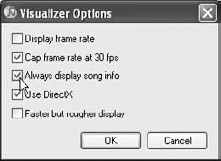
The Visualizer Options dialog offers the following options that affect the animation (but not the performance of iTunes when it's playing music):
Display Frame Rate: Choosing this option displays the frame rate of the animation along with the animation so that you can tell whether it is going faster or slower than normal video (30 fps).
Cap Frame Rate at 30 fps: Choosing this option keeps the frame rate at 30 fps (frames per second) or lower to keep animation from moving too fast.
Always Display Song Info: Choosing this option displays the song name, artist, and album for the song currently playing, along with the animation.
Use DirectX (Windows only) or Use OpenGL (Mac only): You can choose to use DirectX on a Windows PC or OpenGL on a Mac to display very cool animation with faster performance. These are the most widely used standards for three-dimensional graphics programming.
Faster but Rougher Display: When you use this option, animation plays faster but with rougher graphics. Select this option if your animation plays too slowly.
Choosing View
Tip
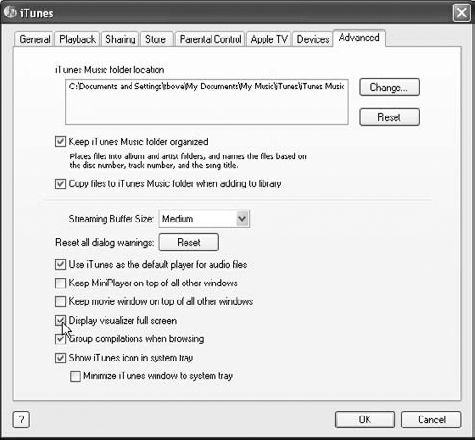
The Preferences dialog in iTunes lets you set the visualizer to always display full-screen. Choose iTunes
While the animated visual effects play, press Shift-/ (as if you're typing a question mark) to see a list of keyboard functions. Depending on the visual effect, you might see more choices of keyboard functions by pressing Shift-/ again.
Tip
You can enhance iTunes with plug-ins that provide even better visuals. For example, SpectroGraph from Dr. Lex displays a spectrogram of the music, and Cover Version from imagomat displays the album cover artwork. You can find them — and many other enhancements — at Apple's software download site (www.apple.com/downloads/macosx/ipod_itunes).
After installing an iTunes plug-in, you can switch from one plug-in to another by choosing View
If you display the iTunes Genius Sidebar (refer to Figure 6-1), which shows up next to the List pane, it makes suggestions on what to buy from the iTunes Store based on the song or video you've selected. (This is not the same guy as the Genius button that creates a playlist from your library based on the song you select, or the Genius Mixes that iTunes creates automatically for you — see Chapter 14 for details on these geniuses.)
The Genius Sidebar will try to skip songs or videos that are already in your library to show you content you might want to buy. But it's not perfect — sometimes it doesn't recognize that you already have the song or video (especially if you ripped the song from a CD).
iTunes informs the online store about the songs and videos you select whenever the Genius Sidebar is open. It then shows you content that other iTunes users purchased when they purchased the content you're playing. You can click any item in the Genius Sidebar to go right to the iTunes Store page for that item. See Chapter 7 for details about using the iTunes Store.
The Genius Sidebar operates only if you give it permission and if you already have an iTunes Store account. (To open an account, see Chapter 7.) When you first start iTunes, the sidebar is not yet turned on. (Refer to Figure 6-1.) To turn it on, click the Turn On Genius button, enter your Apple ID and password for your iTunes Store account, and click the Continue button. If you don't have an account yet, select the Create a New iTunes Store Account option, and choose your country from the country pop-up menu. Then click Continue. See Chapter 7 for further instructions on creating an account.
If the Genius Sidebar can't find the content you're playing, it offers choices that are simply in the same genre. If you don't have an iTunes Store available for your country, you see the U.S. store, just as Chuck Berry once sang, "Anything you want, we got right here in the U.S.A."