Playing movies and TV shows on your iPod or iPhone
Playing YouTube videos
Playing podcasts and audio books
Listening to the iPod nano's FM radio
The Buggles sang "Video Killed the Radio Star," but both coexist quite nicely on your iPod or iPhone, which is not only a fantastic music player (and the current iPod nano can even play FM radio), but also a terrific video player, with crisp, clear picture quality. Video appears horizontally on an iPod touch, iPod nano, or iPhone screen (in what's known as landscape mode), and if you rotate it 180 degrees to the opposite horizontal position, the video adjusts accordingly. All the controls you expect in a DVD player are right on the screen at the touch of a finger.
You can also play audio books and podcasts on this multimedia machine. The iTunes Store offers an amazing selection of TV shows, movies, audio books, and podcasts. (See Chapter 7.) This chapter shows you how to control video playback, skip forward or backward, and scale the picture to fit your screen. It also shows you how to watch YouTube videos on your iPod touch or iPhone.
Movies, TV shows, and music videos are easy to locate and play. Videos you purchase from the iTunes Store are ready to use, but videos you bring in from other sources may have to be converted first by iTunes for use on your iPod or iPhone. You can tell whether a video needs to be converted by selecting the video in iTunes and checking the Advanced menu: the Create iPod or iPhone version option is grayed out. To convert a video, select the video in iTunes and choose Advanced
Note
To find out more about why videos need to be converted and how to prepare your own videos and convert imported videos for use with an iPod or iPhone, visit the free tips section of my Web site (www.tonybove.com).
To locate and play a video on your iPod touch or iPhone, follow these steps:
Tap Videos on the iPod touch Home screen, or tap iPod on the iPhone Home screen and then tap the Videos icon at the bottom of the screen.
Scroll the Videos screen to see the sections for Movies, TV Shows, Music Videos, and Podcasts (video podcasts only).
The video titles are listed in alphabetical order within these sections.
Tap the title of an item to play it.
To play a video on an iPod classic or iPod nano, follow these steps:
Choose Videos from the main menu to select a movie, TV show, or imported video. Choose Music from the main menu to select a music video.
Scroll the menu until the title is highlighted and then press the Select button to play your selection.
Hold the iPod nano horizontally to view the picture. If you rotate the iPod nano to the opposite horizontal position, the video adjusts accordingly.
Videos are automatically set to remember the playback position when you pause them. (See how to pause in the next section.) This feature lets you pause a video or TV episode in iTunes while you synchronize your iPod or iPhone. After syncing, you can continue playing the video or episode on your iPod or iPhone from where you paused. This feature also works the opposite way: If you start playing a video on your iPod or iPhone and then pause, and then you sync it with iTunes, the video retains the playback position so that you can continue playing it in iTunes from where you paused.
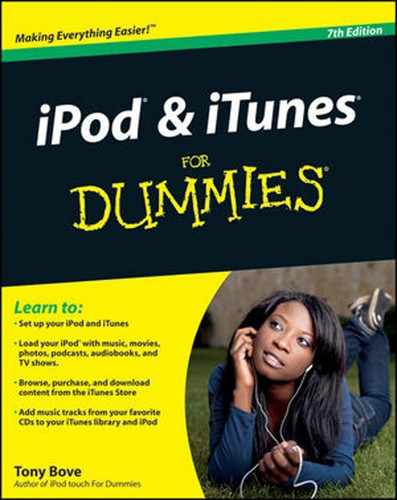
To control playback on an iPod touch or iPhone, tap the screen to show the video controls (as shown in Figure 17-1). You can tap again to hide them.
Tap the Play/Pause button while a video is playing to pause the playback. To raise or lower the volume, drag the volume slider. (See Figure 17-1.) To stop watching a video before it finishes playing, tap the Done button in the upper-left corner of the display or press the physical Home button.
You can fast-forward through a video by touching and holding down the Next/Fast Forward button, and you can rewind a video by touching and holding down the Previous/Rewind button.
To skip to any point in a video, drag the playhead along the scrubber bar. To start a video over from the beginning, drag the playhead on the scrubber bar all the way to the left or tap the Previous/Rewind button (if the video doesn't contain chapters).
Tip
If the video contains chapters, you can skip to the previous or next chapter by tapping the Previous/Rewind or Next/Fast Forward button. To start playing at a specific chapter, tap the bullet-list button that appears in the upper-right corner.
If a video offers an alternative audio language or subtitles, a Subtitles button appears. Tap the Subtitles button and then choose a language from the Audio list or a language from the Subtitles list, or tap On to turn off subtitles.
Tip
You can delete a video directly from your iPod touch or iPhone by flicking left or right across the video selection in the Videos menu and then tapping the Delete button that appears. Your video is still in iTunes but is deleted from the iPod touch or iPhone — but remember, you can sync it again and copy the video back to it (as I explain in Chapter 9). If you delete a rented movie from the iPod touch or iPhone, it's deleted permanently.
Videos are displayed in landscape mode in widescreen format on an iPod touch or iPhone. You can also scale the video picture to fill the screen or to fit within the screen. Tap the Scale button (the one with two arrows facing away from each other — refer to Figure 17-1) or double-tap the video picture itself to switch from one to the other.
Filling the screen may crop the sides or top and bottom to give you a larger view of the center of the picture. Fitting to the screen assures that the entire picture is shown, but you may see black bars on the sides or top and bottom.
The video playback controls on an iPod classic or iPod nano work the same way as with songs — you use precisely the same buttons, in other words. Scroll the click wheel to adjust the volume as you would for a song (as I describe in Chapter 16).
To pause playback, press the Play/Pause button while a video is playing. To start again, press Play/Pause again.
To skip to any point in a video, press the Select button to reveal the scrubber bar. Scroll the click wheel to move the playhead across the scrubber bar forward (to the right) or backward (to the left) in the video.
Press the Next/Fast Forward button once to play the next video in sequence (such as the next episode of a TV show), and press the Previous/Rewind button once at the beginning of a video, or twice during the video, to play the previous video in sequence. You can fast-forward through a video by pressing and holding down the Next/Fast Forward button, and rewind a video by pressing and holding down the Previous/Rewind button. If the video contains chapters, you can skip to the previous or next chapter by pressing the Previous/Rewind or Next/Fast Forward button — but remember, this trick works only if the original video was set up to contain chapters. To start a video over from the beginning, move the playhead on the scrubber bar all the way to the left, as previously described, or press the Previous/Rewind button once.
To return to menus and make other selections on an iPod classic or iPod nano, press the Menu button.
With the iPod touch or iPhone, the newest and most popular videos in YouTube are right in your hand. All you need to do is connect to the Internet — by Wi-Fi with an iPod touch, or by Wi-Fi or 3G with an iPhone. (See Chapter 4 to set up Wi-Fi.) You can search for and play videos, bookmark favorites for later playback, and share videos with others by e-mail.
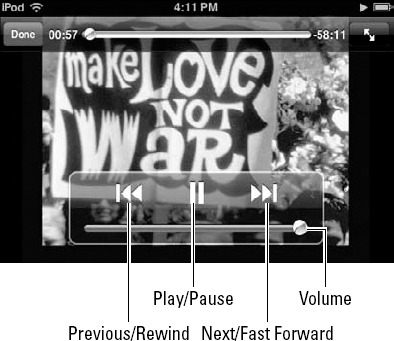
Tap YouTube on the Home screen to run the YouTube app. If this is your first visit to the YouTube app, the Featured screen appears, as shown in Figure 17-2 (left side). Otherwise, the screen you were viewing when you last used the app appears.
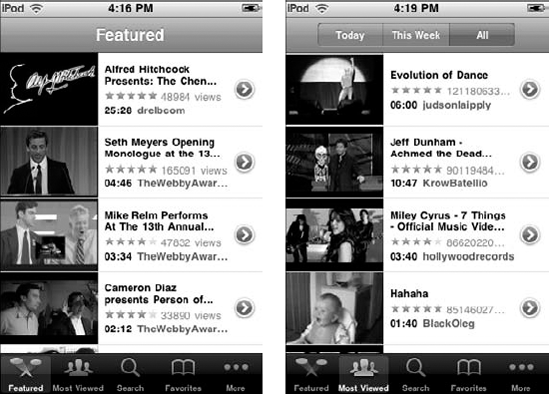
Figure 17-2. YouTube: Featured videos (left) and most-viewed videos for today, for this week, and for all time (right).
You can tap icons along the bottom of the display to get to other screens, such as Most Viewed, as shown in Figure 17-2 (right side), which offers buttons at the top for today's most-viewed videos, the faves for this week, and all the most-viewed videos.
After you've saved your favorites as bookmarks (see the section "Bookmarking and sharing," later in this chapter), you can go right to your favorite videos by tapping the Favorites icon. Tap the More icon to see even more screens, including Top Rated (the best of the best), Most Recent (the most recent videos added), and History (all the videos you've played so far). You can also tap the Sign In button to sign in to your YouTube account and access the My Videos section of your account.
Tap a selection to play the video. YouTube streams the video to your iPod touch or iPhone — sending it bit by bit — so that you can start playing it immediately.
Tap the video picture to see the controls (see Figure 17-3, left side), which are exactly like the video controls described in the previous section. The progress of the downloaded stream appears in the scrubber bar. Even though you can play the video as it streams, you might want to pause it for a few seconds so that more of the stream is downloaded. You can then play the video without any hiccups (depending, of course, on the speed and stability of your connection).
YouTube offers a couple of handy buttons on its videos (see Figure 17-3, left side, for both buttons):
Bookmark button (a book icon): This button appears to the left of the Previous/Rewind button, and you can use it to bookmark the video so that you can easily find it on the Favorites screen.
Share button (an envelope icon): This button is located to the right of the Next/Fast Forward button. Tap it to bring up the e-mail sending screen to share the video with others via e-mail — see Chapter 20 for details on how to fill out the e-mail message.
Tap the Bookmark button to save a bookmark for the video — the video selection appears in the Favorites screen (tap the Favorites icon in the bottom row). (The Bookmark button is gray rather than white if the video is already bookmarked.)
You can also bookmark or share the video without playing it — in case the material disgusts you or you don't have time for it — and you can view information about the video as well as related video selections, to clue you into its content before playing it. Tap the right-arrow button on the right side of each selection (refer to Figure 17-2, right side) to see information about the video and to use the Bookmark or Share buttons.
To delete entries from your Favorites screen (especially those news stories that have gone stale), tap the Favorites icon at the bottom of the display to show your bookmarked favorites; then tap the Edit button in the upper-right corner of the screen. The Favorites screen changes to include circled minus (−) signs next to the video selections. To delete a bookmarked video selection, tap the circled minus sign, which rotates and displays a Delete button over the selection; then tap the Delete button. To cancel deletion, tap the rotated circled minus sign again. Tap the Done button in the upper-right corner of the Favorites screen to finish editing.
To search for the videos on YouTube that everyone's talking about, tap the Search icon in the bottom row of icons. Then tap the Search Entry field that appears at the top of the screen. The on-screen keyboard pops up, ready for your search term. (For instructions on using the on-screen keyboard, see Chapter 3.)
If the entry field already has a search term, tap the circled x in the right corner of the field to clear its contents. Then tap out the letters of the search term using the on-screen keyboard and tap the Search key on the keyboard. Immediately after tapping Search, video selections from YouTube appear below, as shown in Figure 17-3, right side (in which I type just u2 to get the latest U2 music videos).
You can scroll this list by dragging up and down. If a video selection appears that satisfies your search, tap it to play it without further ado.
Audio books are, naturally, organized into chapters or parts. Podcasts are also organized into parts, called episodes, and both play the same way. The audio book title or podcast name and episode appear on your iPod or iPhone display along with its cover — similar to a book or album cover.
After syncing your audio books and podcast episodes (as I describe in glorious detail in Chapter 9), you can play them on your iPod or iPhone. Audio books and podcasts are automatically set to remember the playback position when you pause. If you pause playback on your iPod or iPhone and then sync with iTunes, you can resume playback at that position on either the iPod or iPhone, or in iTunes.
Tap Music on the iPod touch Home screen or iPod on the iPhone Home screen, and then tap the More icon at the lower-right corner of the Music or iPod screen to see the More screen.
For the literary-minded, tap Audiobooks on the More screen and then scroll the Audiobooks screen to select and play an audio book. Tap an audio book on the Audiobooks screen that appears and then tap a chapter or part to play it, starting from that point. The audio book chapters or parts are listed in proper order for each book.
For a podcast, tap Podcasts on the More screen and then scroll the Podcasts screen to select and play a podcast episode. Podcasts are organized by podcast name (which is like an album name), and episodes are listed within each podcast in the order that they were released (by date). A blue dot appears next to any podcast that has unplayed episodes.
You control the playback of an audio book or podcast episode exactly the same way as a song (see Chapter 16) — you can pause playback by tapping the Play/Pause button and so on. You can control video podcasts the same way you control videos. (See the section "Everything's Coming Up Videos," earlier in this chapter.)
Podcasts, naturally, have their own menu on an iPod nano or iPod classic. They're organized by podcast name (which is like an album name), and podcast episodes are listed within each podcast in the order that they were released (by date).
To play a podcast episode, choose Podcasts from the iPod classic or iPod nano main menu. Scroll the Podcasts menu until the podcast name is highlighted and press the Select button; then scroll and select an episode. A blue dot appears next to any podcast that has unplayed episodes.
To play an audio book, choose Music from the iPod classic or iPod nano main menu, and then Audiobooks from the Music menu. The audio book episodes (collections of chapters) are listed in the proper order for each book. Scroll the list of audio book episodes until the one you want is highlighted and then press the Select button to play it.
The current iPod nano model includes an FM radio that displays station and song information for radio stations that support RDS (Radio Data System). If the station supports iTunes Tagging, you can also tag any songs you hear for later purchase from the iTunes Store. You can also pause a radio broadcast, and resume playing it from the same point up to 15 minutes later.
Connect your earbuds or headphones to your iPod nano first, because the iPod nano uses the earbud or headphone cord as the FM radio antenna. Also, the radio doesn't play through the iPod nano speaker — only through the earbuds or headphones.
To hear the radio, choose Radio from the iPod nano main menu. The radio screen appears with a station already selected — if you don't see the radio dial underneath the station's number, press the Select button until it appears. You can scroll the click wheel to tune to a station while you listen for a signal, or press the Next/Fast-forward or Previous/Rewind buttons to jump from station to station. Press and hold Next/Fast-forward or Previous/Rewind to scan stations and hear a five-second preview of each station. To stop scanning and listen to the current station, press the Select button.
To save a station as a favorite, Press and hold the Select button until a menu appears, scroll to highlight Add to Favorites, and then press the Select button. After saving one or more favorite stations, pressing Next/Fast-forward or Previous/Rewind while tuning takes you to the next or previous favorite station.
After you tune to a station, the progress bar replaces the radio dial. (Press the Select button to switch between the progress bar and the radio dial.) The progress bar fills up as you continue to listen to the station. To pause the broadcast while the radio is playing, press the Play/Pause button. The actual time you paused appears above the progress bar. As Live Pause continues, a yellow triangle appears for your pause point in the progress bar, and the progress bar continues to fill up — showing the time that's passed since you paused. Press Play/Pause again to resume the broadcast from the point you paused.
You can navigate back and forth along the progress bar. To skip forward or back in one-minute intervals, press the Next/Fast-forward or Previous/Rewind buttons. To fast-forward or rewind, press and hold Next/Fast-forward or Previous/Rewind, or scroll the click wheel. The progress bar displays as completely filled when Live Pause reaches the 15-minute limit. You can still navigate back and forth through the 15 most recent minutes, as long as your pause isn't cleared. Anything older than 15 minutes is cleared to make room for the continuing broadcast. If you pause without resuming for 15 minutes, your iPod nano goes to sleep and clears your paused radio.
To disable Live Pause, press Menu from the Radio screen, highlight and select Live Pause, and then press the Select button to select Off. To enable Live Pause again, select On.
Tagging a song that strikes your fancy for later purchase from the iTunes Store is a great idea, but it only works with stations that support iTunes Tagging. To tag a song you hear, press and hold the Select button until a menu appears. Highlight Tag in the menu and press the Select button. Tagged songs are marked with a tag icon next to the song title, and they appear in the Radio menu under Tagged Songs (press the Menu button while the radio is playing to see the Radio menu).
The next time you sync your iPod nano to iTunes, your tagged songs are synced to iTunes and removed from the iPod nano. You can preview and purchase these tagged songs by clicking Tagged in the Store section of the Source pane, and then click the View button for the song you want. To preview the song, double-click it or click the preview button. To buy the song, click the Buy button.
To turn the FM Radio off and clear paused radio, press the Menu button and choose Stop Radio (which appears only if the radio is on). You can also display the most recently played songs on a station that supports RDS by pressing Menu and then choosing Recent Songs.