
In This Chapter
Touching and gesturing on an iPod touch or iPhone
Typing on the iPod touch or iPhone
Thumbing through iPod menus
The iPod is all about convenience. Apple designed the iPod classic and iPod nano models to be held in one hand so that you can perform simple operations by thumb. Even if you're all thumbs when pressing small buttons on tiny devices, you can still thumb your way to iPod heaven.
With the iPod shuffle, Apple took convenience a step further — the controls are on the earbud cord so that you can tuck the tiny device somewhere on your clothing and control it without looking at it. Its VoiceOver feature complements this arrangement by announcing each song, so you can quickly jump around.
With an iPod touch or iPhone, your fingers do the walking. You can make gestures, such as flicking a finger to scroll a list quickly, sliding your finger to scroll slowly or drag a slider (such as the volume slider), pinching with two fingers to zoom out of a Web page in Safari, or pulling apart with two fingers (also known as unpinching) to zoom in to the page to see it more clearly.
This chapter gives you a quick tour of the iPod and iPhone models, including the menus of an iPod classic or iPod nano, the iPod shuffle controls, and all the touch-and-gesture tricks to make your iPod touch or iPhone dance and sing. I also give you a complete tour of the most unique feature of the iPod touch and iPhone: the on-screen keyboard.
The iPod touch or iPhone responds to tapping, flicking, and sliding your finger(s), among other gestures (such as shaking, tilting, two-finger tapping, and so on). One tap is all you need to run an app or select something, but sometimes you have to slide your finger to scroll the display and see more selections.
Tip
Sticky fingers are not recommended. To clean your iPod touch or iPhone, make sure to unplug all cables and turn it off. (See Chapter 1.) Use a soft, slightly damp, lint-free cloth to wipe your iPod touch or iPhone clean. — see Chapter 23 for cleaning tips.
The first message you see on an iPod touch or iPhone display (besides the time of day and the date) is Slide to unlock — to get started, you have to unlock the iPod touch or iPhone by sliding your finger across the message. After the unit is unlocked, your Home screen appears in all its glory. (See Figure 3-1.)
There's no place like Home — it's the screen where you start. Everything is available from the Home screen at the touch of a finger:
To access your music on an iPod touch, tap the Music icon in the bottom row; on an iPhone, tap the iPod icon in the bottom row (which offers music and videos).
To access your videos on an iPod touch, tap the Videos icon in the bottom row; on an iPhone, tap the iPod icon in the bottom row.
Tap the Photos icon to view your photos on an iPod touch or iPhone.
Tap the Calendar icon to view your calendars on an iPod touch or iPhone.
Tap the Contacts icon to view your contacts on an iPod touch or iPhone.
Tap the iTunes icon to access the iTunes Store on an iPod touch or iPhone.
Tap the App Store icon to access the App Store on an iPod touch or iPhone.
After tapping an icon, a new screen appears with selections and icons. (Tapping Music on an iPod touch, for example, brings up Artists, Songs, Albums, and so on.) The multitouch interface changes for each app. Press the physical Home button below the screen at any time to go to back to the Home screen.
Apps you download from the App Store (as I describe in Chapter 7) show up as icons on your Home screen. You can also save Web "clips" (page references) to your Home screen as icons that take you directly to those Web pages (as I describe in Chapter 19). When you add enough apps and Web clips so that they no longer all fit on the first page of the Home screen, the iPod touch or iPhone automatically creates more Home screen pages to accommodate them. (See the section "Rearranging your Home screen pages," later in this chapter, to find out how to customize your icons and Home screen pages.)
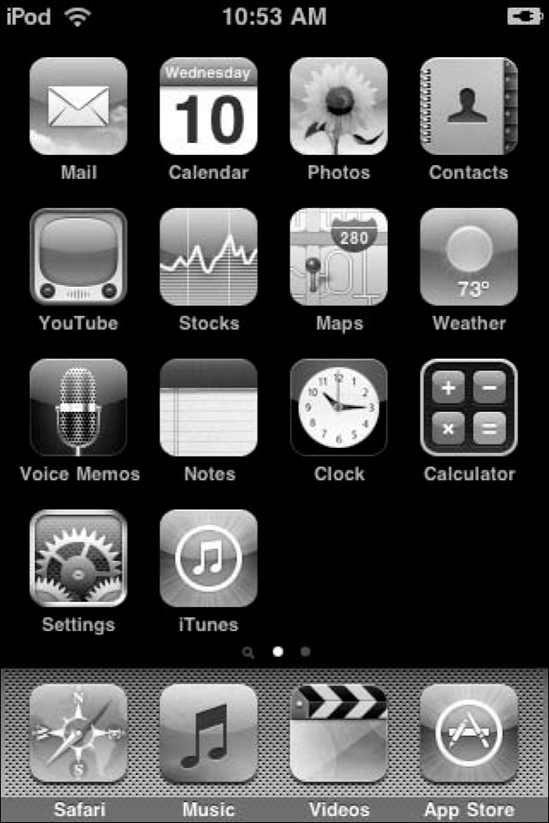
The bottom row of the Home screen (refer to Figure 3-1) is called the dock. The number of dots above the dock shows the number of Home screen pages you have, and also indicates which page you're viewing. To switch to another Home screen page, flick with your finger left or right, or tap to the left or right of the row of dots.
A tiny magnifying glass icon for searching (introduced with the iPhone 3.0 software) appears to the left of the dots above the dock on the Home screen. Tap this icon, or flick with your finger to the right, to show the Search screen (see Figure 3-2). The Search function is similar to the Spotlight universal search feature available in Mac OS X. You can then type in a search term and immediately see suggestions.
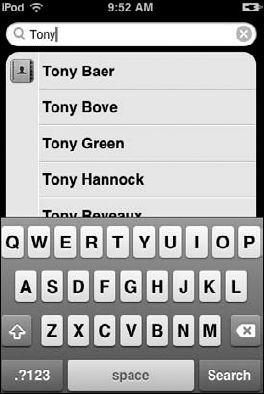
Search looks through contacts, calendars, e-mail (the To, From, and Subject fields, but not the message content), the content (songs, videos, podcasts, and audio books), the text in the Notes app, and text messages on an iPhone. Tap a contact, calendar entry, e-mail, note, or text message suggestion to open it, or tap the song, video, podcast, or audio book suggestion to play it.
The iPod touch or iPhone shows its current state in the status bar at the top of the screen (refer to Figure 3-1). The icons mean the following:
iPod: Just in case you forgot you had an iPod touch in your hands (very existential). On an iPhone, you see the cascading bars of cell-phone service coverage.
Wi-Fi: This icon says that the iPod touch or iPhone is connected to a Wi-Fi network. If the network offers Internet access (all commercial ones do), you're on the Internet (or at least on it as far as the commercial service's log-in screen — you may have to purchase access and log into the service). The more arcs you see in the icon, the stronger the connection to the network. To find out more about setting up Wi-Fi with Internet in your home, see Chapter 4.
Network activity: This icon twirls to show that data is traveling from the network to your iPod touch or iPhone (or vice versa). (Not visible in Figure 3-1.)
VPN: If you have special network settings that access a virtual private network (VPN), this icon shows up to tell you that you are connected to it. See Chapter 4 for details. (Not visible in Figure 3-1.)
Lock: You see this icon whenever the iPod touch or iPhone is locked. (The
Slide to unlockmessage also appears on the screen.) (Not visible in Figure 3-1.)Play: This icon tells you that a song, audio book, or podcast is playing (in case you didn't know — maybe you took your headphones off). (Not visible in Figure 3-1.)
Alarm: This icon appears if you set an alarm. See Chapter 4 for details. (Not visible in Figure 3-1.)
Battery: The Battery icon shows the battery level or charging status. It's completely filled in when the battery is fully charged, and it slowly empties into just an outline as the battery is used up. A lightning bolt appears inside the icon when the device is recharging, and a plug appears inside it when the iPod touch or iPhone is connected to power.
You get flexible apps and a key to the Net! The iPod touch or iPhone Home screen (refer to Figure 3-1) offers the following icons:
Phone: Use the phone functions (iPhone only).
Mail: Check and send e-mail.
Calendar: View your calendar.
Contacts: View your contacts (on the first Home screen page of an iPod touch, or the second Home screen page on the iPhone).
YouTube: List and select videos from YouTube.
Stocks: Check the prices for financial stocks, bonds, and funds.
Maps: View maps and get driving directions.
Weather: View the weather in multiple cities.
Clock: View multiple clocks and use the alarm clock, timer, and stopwatch.
Compass: View a compass showing your direction (iPhone 3GS only).
Calculator: You can use your iPod touch or iPhone as a regular calculator for adding, subtracting, multiplying, dividing, and so on. Also, if you hold the iPod touch or iPhone horizontally, it becomes a scientific calculator.
Notes: Add text notes.
Settings: Adjust settings for Wi-Fi, sounds, brightness, Safari, and other apps, as well as apply other settings for the iPod touch or iPhone itself.
Music (iPod touch): Select playlists, artists, songs, albums, and more (including podcasts, genres, composers, audio books, and compilations). The Music icon also offers Cover Flow browsing, as I describe in Chapter 16.
Videos (iPod touch): Select videos by type (movies, music videos, TV shows, or video podcasts).
iPod (iPhone): Select playlists, artists, songs, videos, and more (including podcasts, genres, composers, audio books, and compilations). The iPod icon also offers Cover Flow browsing, as I describe in Chapter 16.
Photos: Select photos by photo album or select individual photos in the Photo Library.
Camera: Snap a photo (iPhone only), or shoot video (iPhone 3GS only).
Voice Memos: Record using the built-in microphone (iPhone only) or the Apple earbud microphones (iPhone or iPod touch).
App Store: Go to Apple's online App Store to download other Apple and third-party apps.
iTunes: Go to the iTunes Store to purchase content.
You find one more icon for an app that you can activate in Settings, if you have the appropriate Nike shoes and the Nike+ iPod Sport Kit, sold separately. See Chapter 23 for details.
With the iPhone or iPod touch, it's touch and go. These models respond to gestures you make with your fingers:
Drag with your finger: Scroll up or down lists slowly.
Flick up or down: Swipe your finger quickly across the surface to scroll up or down lists quickly.
Touch and hold: While scrolling, touch and hold to stop the moving list.
Flick from left to right or right to left: Quickly swipe your finger across the screen to change screens or application panes (Home screens, Cover Flow when browsing music, Weather, and other apps).
Single tap: Select an item.
Double tap: Zoom in or out with Safari, Maps, and other applications.
Two-finger single tap: Zoom out in Maps.
Pinch: Zoom out.
Unpinch: Zoom in.
Tip
Need to practice your tapping? Try Tap Tap Revenge, a rhythm game that plays music while requiring you to tap each of the colored balls when they reach the line at the bottom of the screen. If you tap the ball on the beat, you gain points; if not, it counts as a miss. You can also activate a revenge mode to score more points by shaking the iPod touch or iPhone after setting a winning streak of 50 beats.
You can rearrange your iPod touch or iPhone app icons, create additional Home screen pages, and customize these pages. Touch and hold any icon until all the icons begin to wiggle. (That's right; it looks like they're doing the Cha-cha-cha.) Then drag a wiggling icon to the right edge of the screen until a new page appears. You can flick to return to the original Home screen page and drag more wiggling icons to the new page. You can create up to nine Home screen pages.
Tip
Press the Home button under the screen to go to back to the first Home screen page. To go to any other Home screen page, tap one of the dots above the dock on any Home screen page — for example, to go to Home screen page 4, tap the fourth dot.
While the wiggling icons are doing their show, you can also rearrange them. Drag the wiggling icons into new positions, and the other icons move to accommodate, creating a new arrangement.
Tip
You can also delete apps you downloaded from the App Store by tapping the circled X that appears inside the icon as it wiggles.
To stop all that wiggling, press the Home button, which saves your new arrangement and pages.
To reset your Home screen to the default arrangement, thereby cleaning up any mess you may have made on your Home screens, tap Settings on the Home screen and then tap General. On the General screen, drag your finger to scroll the list to Reset and then tap Reset. On the Reset screen, tap Reset Home Screen Layout. (In the future, I make it easier for you by abbreviating instructions like these to the more manageable Settings
Shake, rattle, and roll
Your iPod touch or iPhone can sense motion using a built-in accelerometer. When you rotate it from a vertical view (portrait) to a horizontal view (landscape), the accelerometer detects the movement and changes the display accordingly. This happens so quickly that you can control a game with these movements.
For example, Pass the Pigs is a dice game in which you shake three times to roll your pigs to gain points. In the Labyrinth game, you tilt your iPod touch or iPhone to roll a ball through a wooden maze without falling through the holes. And you can shake, rattle, and roll your way around the world in Yahtzee Adventures as you rack up high scores.
And if that's too tame for you, try Chopper, a helicopter game in which you need to complete your mission and return to base while avoiding enemy fire from tanks and bazooka-wielding madmen. You tilt the iPod touch or iPhone to fly, and you touch the screen to drop bombs or fire the machine gun.
Xhake Shake lets you shake, flip, rub, and tap your iPod touch or iPhone to challenge your hand-eye responses. And for scrolling practice, try Light Bike (loosely based on the Disney movie Tron) in which you scroll to maneuver a light bike from a third-person perspective against three computer-controlled light bikes. And infants can join the fun: Silver Rattle shows a screen that changes color and rattles with every shake. Big Joe Turner would be proud.

One trick that's sure to amaze your friends is the ability to whip out your iPod touch or iPhone and type notes, contact information, calendar entries, map locations, stock symbols, e-mail messages, and Web site addresses (and even cell-phone text messages on an iPhone). You can also make selections for pop-up menus that appear on Web pages. You can do all this with the on-screen keyboard.
You may want to start practicing on the keyboard with just one finger, and as you get used to it, try also using your thumb. Tap a text entry field, such as the URL field for a Web page in Safari (as I describe in Chapter 19) or the text of an e-mail message (as I describe in Chapter 20), and the on-screen keyboard appears.
You can practice your technique using the Notes app. Tap Notes on the Home screen and the on-screen keyboard appears, as shown in Figure 3-3. (If you've already saved notes, a list of notes appears — tap the + button in the upper-right corner to type a new note.)
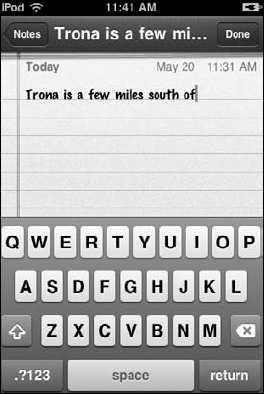
Tap the keys, and as you type, each letter appears above your thumb or finger. If you tap the wrong key, slide your finger to the correct key. The letter isn't entered until you lift your finger from the key.
Tip
You can start a new sentence quickly by double-tapping the spacebar to insert a period followed by a space. The keyboard automatically capitalizes the next word after you type a period, a question mark, or an exclamation point.
To enable caps lock (locking the keyboard to uppercase letters), choose Settings
To save your note, tap Done in the upper-right corner. A list of Notes appears with a date attached to each note. You can also delete a note by choosing the note and tapping the Trash icon at the bottom of the note. Notes can be synchronized back to your computer's e-mail program — see Chapter 10.
Tip
You can e-mail notes to others (and also transfer notes to your computer by e-mailing them to an e-mail address you receive e-mail with on your computer). Choose the note from the Notes screen and tap the letter icon at the bottom of the note to display a ready-made e-mail message that contains the text of your note — all you need to do is enter the e-mail address. See Chapter 20 for details on sending the message.
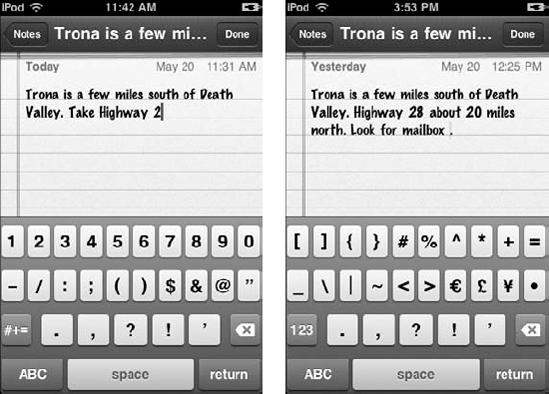
To enter numbers, symbols, or punctuation, tap the .?123 key at the lower-left corner of the keyboard (refer to Figure 3-3). This changes the keyboard layout to numbers, as shown in Figure 3-4 (left side). To return to the alphabetical keys, tap the ABC key.
To enter symbols with the keyboard, tap the .?123 key for the number layout (refer to Figure 3-3) and then tap the #+= key (refer to Figure 3-4, left side) to change the layout to symbols, as shown in Figure 3-4 (right side).
Tip
Here's a trick you can use to switch to the numeric keyboard layout and back to alphabetical layout automatically to type a number and continue typing letters: Touch and hold down the .?123 key and then slide your finger over the keyboard to the number you want. Release your finger to select the number. The keyboard immediately reverts back to alphabetical keys so that you can continue typing letters.
Tip
Need to use an accent mark? For instance, the word café should really have an accent mark over the e, and there may even come a day when you need to include a foreign word or two in a note — lycée or Autowäsche or también, for example. Although you can switch the language for the keyboard (as I describe in Chapter 23), you can also include an accent mark over a vowel by using the English keyboard. Hold your finger on a vowel (such as e) to show a row of keys that offer variations on the letter. Slide your finger over the row to highlight the variation you want and then release your finger to select it.
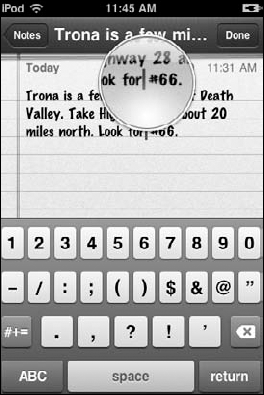
Yes, you can edit your mistakes. To edit text in an entry field, touch and hold to see the circular magnifier, which magnifies portions of the text view as shown in Figure 3-5.
Before releasing your finger, slide the magnifier to the position for inserting text. You can then tap keys to insert text, or you can use the backspace key — the key sporting the X — to remove text.
The intelligent keyboard automatically suggests corrections as you type, as shown in Figure 3-6 (some languages only). You don't need to accept the suggested word — just continue typing. If you do want to accept it, tap the spacebar, a punctuation mark, or the Return key. Your iPhone or iPod touch fills in the rest of the word.
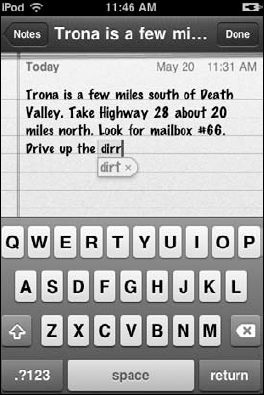
To reject the suggested word, finish typing the word or tap the x next to the suggestion to dismiss it. Each time you reject a suggestion for the same word, your iPod touch keeps track and eventually adds the word you've been using all along to its dictionary. The iPod touch includes dictionaries for English, English (UK), French, French (Canada), German, Japanese, Spanish, Italian, and Dutch. The appropriate dictionary is activated automatically when you select a particular international keyboard. (See Chapter 23 for details about international keyboards.)
You can turn off suggestions by choosing Settings
Tip
You don't have to turn suggestions off if you just want to temporarily make them go away. To keep suggestions from appearing, start by typing a special symbol (such as $ or &), a numeral (such as 0). Then touch and hold to see the magnifier for inserting text, and drag the insertion point to be right before this symbol or numeral, so that you'll be inserting text before it. Release and start typing. The keyboard won't suggest anything because it won't know what you mean — there are no words in its dictionary that end with these symbols or numerals. Don't use punctuation symbols such as a period, comma, parentheses or quotes, or even the @ symbol because the keyboard knows that they're used after words.
If you've upgraded your iPod touch or iPhone to version 3.0 of the software or newer, you can copy or cut a chunk of text and paste it into another app — for example, you can copy a paragraph from a note in Notes and paste it into an e-mail message in Mail.
Double-tap a word to select it for copying or cutting. The word appears selected with handles on either end of the selection and a Cut/Copy/Paste bubble above it, as shown in Figure 3-7 (left side). You can then tap Cut (to cut the text) or Copy (to copy the text) in preparation for pasting it elsewhere.
You can also select the nearest word, or the entire text, by touching an insertion point. The Select/Select All/Paste bubble appears (refer to Figure 3-7, center). Tap Select to select the nearest word (left or right of the insertion point) or Select All to select all the text, and the Cut/Copy/Paste bubble appears (refer to Figure 3-7, right side).
To make a more precise selection, double-tap a word as previously described and then drag one of the handles by sliding your finger. A rectangular magnifier appears, as shown in Figure 3-8 (left side), which magnifies portions of the text view so that you can drag the handle more precisely. When you remove your finger to stop dragging, the Cut/Copy/Paste bubble appears (refer to Figure 3-8, right side). You can then tap Cut or Copy.
To paste the text you just cut or copied, open a note (or create a new note) in Notes, create a new e-mail message, or open any app that lets you enter text. (For details on creating a new e-mail message, see Chapter 20.) Touch an insertion point for pasting the text. The circular magnifier appears (as shown in Figure 3-9, left side), which magnifies portions of the text view so that you can mark the insertion point precisely. When you remove your finger, the Cut/Copy/Paste bubble appears (refer to Figure 3-9, center), or if text is already in the message, the Select/Select All/Paste bubble appears. Either way, you can then tap Paste to paste the text at that point (refer to Figure 3-9, right side).
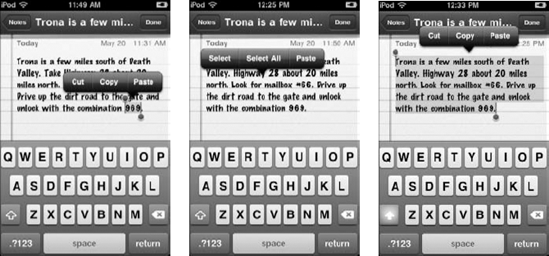
Figure 3-7. Double-tap a word to cut or copy it with the Cut/Copy/Paste bubble (left). Or, tap an insertion point and select all the text (center) to cut or copy it with the Cut/Copy/Paste bubble (right).
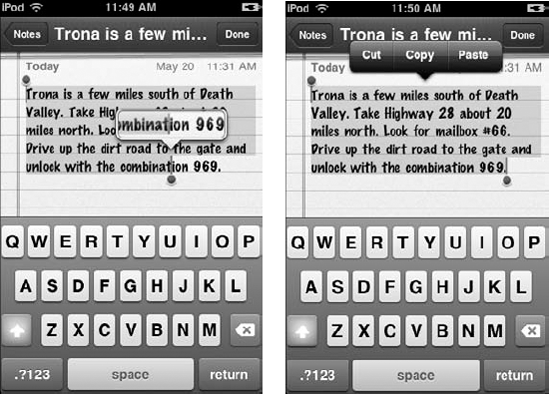
Figure 3-8. Drag a handle to extend the selection for cutting or copying (left) and then release your finger to complete the selection (right).
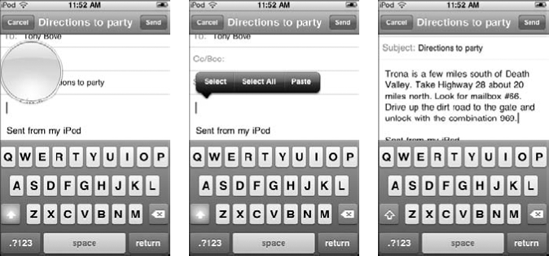
Figure 3-9. Touch an insertion point (left), release to complete the selection (center), and then tap Paste; the pasted text appears (right).
Tip
You can use Copy, Cut, and Paste in Safari to copy portions of a Web page (see how in Chapter 19), in Mail to copy portions of an e-mail message (see Chapter 20), or even in Calendar to copy the details of an event (see Chapter 21).
To set keyboard options, choose Settings
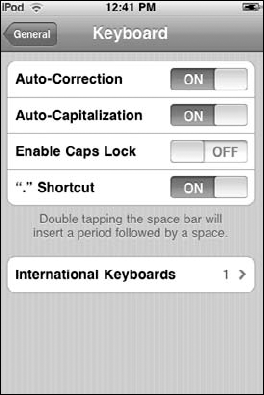
Tap On to turn off Auto-Correction if you don't want the keyboard to suggest typing corrections.
Auto-Capitalization automatically capitalizes the next word after you type a period, question mark, or exclamation point (punctuation that ends a sentence). It also automatically capitalizes after you tap the Return key. The assumption is that you're starting a new sentence or new line of text that should begin with a capital letter. Tap On to turn this feature off if you want; tap Off to turn it back on.
To turn on caps lock (locking the keyboard to uppercase letters), tap the Off button next to Enable Caps Lock. (Tap it again to turn it off.) You can then double-tap the Shift key to turn on caps lock (uppercase letters). The Shift key turns blue, and all letters you type are uppercase. Tap the Shift key again to turn caps lock off.
The shortcut for inserting a period is to double-tap the spacebar, which inserts a period followed by a space. The assumption is that you want to finish a sentence and start the next one. Tap On to turn this feature off if you want; tap Off to turn it back on.
To find out how to turn on and use multiple international keyboards, see Chapter 23.
The circular click wheel on iPod classic and iPod nano models makes scrolling through an entire music collection quick and easy. With your finger or thumb, scroll clockwise on the wheel to scroll down a list or counterclockwise to scroll up. As you scroll, options on the menu are highlighted. Press the Select button at the center of the wheel to select whatever is highlighted in the menu display.
The main menu for iPod classic and iPod nano models offers the following selections:
Music: Select playlists, artists, albums, songs, genres, composers, or audio books. You can also select Cover Flow to browse by cover art or choose Search to search for a song or album title or artist (as I describe in Chapter 16). On an iPod nano you can also select Genius Mixes, which appear if you follow my instructions in Chapter 16.
Videos: Select videos by video playlist or by type (movies, music videos, or TV shows), as I demonstrate in Chapter 17. On an iPod nano you can also select Camera Videos — the videos you shoot with the iPod nano camera See Chapter 18 for details.
Photos: Select photos by photo album or select all photos in the Photo Library (as I show in Chapter 17).
Podcasts: Select podcasts by title and then select podcast episodes. Find out more in Chapter 19.
Radio: Select the built-in FM radio in the iPod nano to listen to local stations, as I describe in Chapter 17 and radio regions for the iPod nano built-in FM radio (see Chapter 17).
Video Camera: Select the built-in video camera in the iPod nano to shoot videos — it's incredibly easy, as I show in Chapter 18.
Extras: View the clock, set time zones for clocks, set alarms and the sleep timer, use the stopwatch, use the iPod nano fitness features, and view contacts and your calendar, as I show in Chapter 4.
Settings: Adjust menu settings, the backlight timer, the clicker, the date and time, and so on (see Chapter 4). You can also set the iPod's EQ (see Chapter 16), and radio regions for the iPod nano built-in FM radio (see Chapter 17).
Shuffle Songs: Play songs from your music library in random order.
Now Playing: This selection appears only when a song is playing — it takes you to the Now Playing display.
The iPod classic or iPod nano click wheel has pressure-sensitive buttons underneath the top, bottom, left, and right areas of the circular pad that tilt as you press them. These buttons on the iPod classic or iPod nano do various tasks for song, podcast, audio book, and video playback. Here they are, in clockwise order from the top:
Select: Press the Select button at the center of the wheel to select whatever is highlighted in the menu display.
Menu: Press once to go back to the previous menu. Each time you press, you go back to a previous menu until you reach the main menu.
Next/Fast Forward: Press once to skip to the next item. Press and hold Next/Fast Forward to fast-forward.
Play/Pause: Press to play the selected item. Press Play/Pause when the item is playing to pause the playback.
Previous/Rewind: Press once to start an item over. Press twice to skip to the previous item (such as a song in an album). Press and hold to rewind.
The buttons and click wheel on the iPod classic or iPod nano can do more complex functions when used in combination:
Turn on the iPod. Press any button.
Turn off the iPod. Press and hold the Play/Pause button.
Reset the iPod. You can reset the iPod if it gets hung up for some reason. (For example, it might get confused if you press the buttons too quickly.) See Chapter 22 for instructions on how to reset your iPod.
Change the volume. While playing a song (the display reads
Now Playing), adjust the volume by scrolling the click wheel. Clockwise turns the volume up; counterclockwise turns the volume down. A volume slider appears on the iPod display, indicating the volume level as you scroll.Skip to any point in a song, video, audio book, or podcast. While playing an item (the display reads
Now Playing), press and hold the Select button until the progress bar appears to indicate where you are, and then scroll the click wheel to move to any point in the song. Scroll clockwise to move forward and counterclockwise to move backward. Press the Select button again to see lyrics for the song (if available). Find out more about using these controls in Chapter 16.
Note
To discover advanced iPod and iPhone techniques, such as customizing your menus, visit the Tips section of the author's Web site at www.tonybove.com.