
Classes are practically synonymous with objects and they're at the very heart of programming with Visual Basic. The controls you use to build the visible interface of your application are objects, and the process of designing forms consists of setting the properties of these objects, mostly with point-and-click operations. The Framework itself is an enormous compendium of classes, and you can import any of them into your applications and use them as if their members were part of the language. You simply declare a variable of the specific class type, initialize it, and then use it in your code.
Controls are also objects; they differ from other classes in that controls provide a visual interface, whereas object variables don't. However, you manipulate all objects by setting their properties and calling their methods.
In this chapter, you'll learn how to do the following:
Build your own classes
Use custom classes in your projects
Customize the usual operators for your classes
When you create a variable of any type, you're creating an instance of a class. The variable lets you access the functionality of the class through its properties and methods. Even base data types are implemented as classes (the System.Integer class, System.Double, and so on). An integer value, such as 3, is an instance of the System.Integer class, and you can call the properties and methods of this class by using its instance. Expressions such as Convert.ToDecimal(3).MinValue and #1/1/2000#.Today are odd but valid. The first expression returns the minimum value you can represent with the Decimal data type, whereas the second expression returns the current date. The DataTime data type exposes the Today property, which returns the current date. The expression #1/1/2000# is a value of the DataTime type, so you can find out the current date by calling its Today property. If you enter either one of the preceding expressions in your code, you'll get a warning, but they will be executed.
Classes are used routinely in developing applications, and you should get into the habit of creating and using custom classes, even with simple projects. In team development, classes are a necessity because they allow developers to share their work easily. If you're working in a corporate environment, where different programmers code different parts of an application, you can't afford to repeat work that someone else has already done. You should be able to get their code and use it in your application as is. That's easier said than done because you can guess what will happen as soon as a small group of programmers start sharing code — they'll end up with dozens of different versions for each function, and every time a developer upgrades a function, they will most likely break the applications that were working with the old version. Or each time they revise a function, they must update all the projects by using the old version of the function and test them. It just doesn't work.
The major driving force behind object-oriented programming (OOP) is code reuse. Classes allow you to write code that can be reused in multiple projects. You already know that classes don't expose their source code. The Framework itself is a huge collection of classes, which you can use without ever seeing its source code. As you'll learn in Chapter 10, "Applied Object-Oriented Programming," you can even expand the functionality of an existing class without having access to its code. In other words, you can use a class without having access to its code, and therefore you can't affect any other projects that use the class. You also know that classes implement complicated operations and make these operations available to programmers through properties and methods. The Array class, for example, exposes a Sort method, which sorts its elements. This is not a simple operation, but fortunately you don't have to know anything about sorting. Someone else has done it for you and made this functionality available to your applications. This is called encapsulation. Some functionality has been built into the class (or encapsulated into the class), and you can access it from within your applications by using a simple method call. The System.Security.Cryptography class of the Framework (which isn't discussed in this book) provides all the functionality you need to encrypt a secret code, or an entire document, by calling a method. Encryption is a very complicated operation, but you don't have to know anything about it except how to call the appropriate method and pass a secret key to it.
A class can be thought of as a program that doesn't run on its own; it's a collection of properties and methods that must be used by another application. We exploit the functionality of the class by creating a variable of the same type as the class and then calling the class's properties and methods through this variable. The methods and properties of the class, as well as its events, constitute the class's interface. It's not a visible interface, like the ones you've learned to design so far, because the class doesn't interact directly with the user. To interact with the class, the application uses the class's interface, just as users will be interacting with your application through its visual interface.
You have already learned how to use classes. Now is the time to understand what goes on behind the scenes when you interact with a class and its members. Every object is an instance of a class. When you declare an array, a Color object, or a collection, some code is executed in the background to create the variable. It's the code that actually implements the class. When you declare an array, you're invoking the System.Array class, which contains all the code for manipulating arrays (the method to sort the array's elements, another method to reverse the order of the elements in the array, and so on). Even simple variables of the Integer or String type are implemented as classes.
The first time you use an object in your code, you're instantiating the class that implements it. The class's code is loaded into memory, initializes its variables, and is ready to execute. The image of the class in memory is said to be an instance of the class, and this is an object.
At the beginning of this section I mentioned that classes can be thought of as "programs that can't be executed on their own." This is an oversimplification, which I can remedy now. Classes are made up of code, not visual elements, and are used as templates for objects. For example, there's a single System.Array class and this class is invoked every time you create an array in your code. The arrays you declare in your code are instances of the class. Yet, there's only one class that implements arrays and all arrays are "serviced" by the same class.
Another way to view classes is to understand how they combine code and data. This simple idea is the very essence of object-oriented programming. Data is data, and procedural languages allow you to manipulate data in any way. Meaningful data, however, is processed in specific ways.
Let's consider accounting data. You can add or subtract amounts to or from an account, sum similar accounts (such as training and travel expenses), calculate taxes on certain account amounts, and the like. Other types of processing may not be valid for this type of data. You never multiply the amounts from two different accounts or calculate logarithms of account balances. These types of processing are quite meaningful with different data, but not with accounting data.
Because the nature of the data itself determines to a large extent the type of processing that will take place on the data, why not "package" the data along with the code for processing it? Instead of simply creating structures for storing our data, we also write the code to process them. The data and the code are implemented in a single unit, a class, and the result is an object. After the class has been built, we no longer write code for processing the data; we simply create objects of this type and call their methods. To transfer an amount from one account to another, we call a method that knows how to transfer the amount, and the same method also makes sure the amount isn't subtracted from one account unless it has been added to the other account (and vice versa). By the way, the process of completing multiple operations in a single step or canceling all the operations if one of them fails is known as a transaction. A transaction will not subtract an amount from one account unless it has added the same amount to another account, and it won't credit an account without debiting another one by the same amount. You'll learn more about transactions later in this book, when we'll explore database programming.
To better understand how classes combine code with data, let's take a close look at a class we're all too familiar with, the Array class. The role of the array is to store sets of data. In addition to holding data, the Array class also knows how to process data: how to retrieve an element, how to extract a segment of the array, and even how to sort its elements. All these operations require a substantial amount of code. The mechanics of storing data in the array, the code that implements the properties, and the methods of the array are hidden from you, the developer. You can instruct the array to perform certain tasks by using simple statements. When you call the Sort method, you're telling the array to execute some code that will sort its elements. As a developer, you don't know how the data are stored in the array or how the Sort method works. An overloaded form of the method allows you to sort a segment of the array by specifying the index of the first and last elements to be sorted. All you have to know is how to call the Sort method, not how it works. Classes abstract many operations by hiding the implementation details; developers manipulate arrays by calling methods. And you certainly can't access the code of the class and edit it to accommodate the requirements of a specific application.
With LINQ, a new technology for querying collections that was introduced with version 3.5 of the Framework, the Array class was enhanced with a few new methods, like the Sum method that calculates the sum of the elements in a numeric array and the Select method that allows you to select elements that meet certain criteria, and a few more. You'll learn a lot more about these methods (they're called extension methods) in Chapter 14, "An Introduction to LINQ." Although this is something you'll understand better in Chapter 14, let me just mention that the team that implemented LINQ did not have access to the source of the Array class!
In the following sections, you'll learn how data and code coexist in a class and how you can manipulate the data through the properties and methods exposed by the class. In Chapter 3, "Visual Basic Programming Essentials," you learned how to create structures to store data. Classes are similar to structures in that they represent custom data structures. In this chapter, I'll take the idea of defining custom data structures one step further, by adding properties and methods for manipulating the custom data, something you can't do with structures. Let's start by building a custom class and then using it in an application.
My first example is the Minimal class; I'll start with the minimum functionality class and keep adding features to it. The name of the class can be anything — just make sure that it's suggestive of the class's functionality.
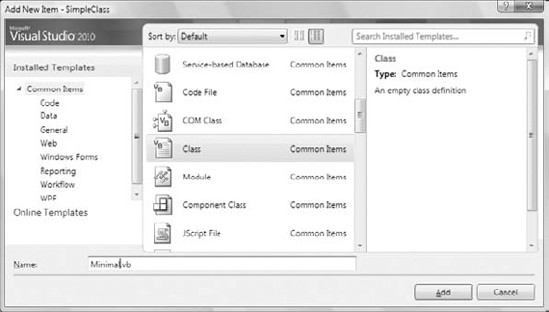
A class may reside in the same file as a form, but it's customary to implement custom classes in a separate module, a Class module. You can also create a Class project, which contains one or more classes. However, a class doesn't run on its own and you can't test it without a form. Start a new Windows project and name it SimpleClass (or open the SimpleClass sample project available for download from www.sybex.com/go/masteringvb2010). Then create a new class by adding a Class component to your project. Right-click the project name in the Solution Explorer window and choose Add
The sample project contains a main form, as usual, the Form1 form. The code that implements the class resides in the Minimal.vb file, which is part of the project, and you'll use the project's main form to test your class. After you have tested and finalized the class code, you no longer need the form and you can remove it from the project.
When you open the class by double-clicking its icon in the Project Explorer window, you will see the following lines in the code window:
Public Class Minimal

End Class
If you'd rather create a class in the same file as the application's form, enter the Class keyword followed by the name of the class after the existing End Class in the form's code window. The editor will insert the matching End Class for you. Insert a class definition in the form's code window if the class is specific to this form only and no other part of the application will use it. At this point, you already have a class, even if it doesn't do anything.
Switch back to the Form Designer, add a button to the test form, and insert the following code in its Click event handler:
Dim obj1 As Minimal
Press Enter and type the name of the variable, obj1, followed by a period, on the following line. will see a list of the methods your class exposes already:
Equals
GetHashCode
GetType
ReferenceEqual
ToString
If you don't see all of these members, switch to the All Members tab of the IntelliSense drop-down box.
These methods are provided by the Common Language Runtime (CLR), and you don't have to implement them on your own (although you will probably have to provide a new, nongeneric implementation for some of them). They don't expose any real functionality; they simply reflect the way VB handles all classes. To see the kind of functionality that these methods expose, enter the following lines in the Button's Click event handler and then run the application:
Dim obj1 As New Minimal
Debug.WriteLine(obj1.ToString)
Debug.WriteLine(obj1.GetType)
Debug.WriteLine(obj1.GetHashCode)
Dim obj2 As New Minimal
Debug.WriteLine(obj1.Equals(obj2))
Debug.WriteLine(Minimal.ReferenceEquals(obj1, obj2))
The following lines will be printed in the Immediate window:
SimpleClass.Minimal
SimpleClass.Minimal
18796293
False
False
The name of the object is the same as its type, which is all the information about your new class that's available to the CLR. Shortly you'll see how you can implement your own ToString method and return a more-meaningful string. The hash value of the obj1 variable is an integer value that uniquely identifies the object variable in the context of the current application. (It happens to be 18796293, but the actual value is of no consequence for our discussion. It's a standard member, but it's good to know that the functionality is built into the control.)
The next line tells you that two variables of the same type are not equal. But why aren't they equal? We haven't differentiated them at all, yet they're different because they point to two different objects, and the compiler doesn't know how to compare them. All it can do is figure out whether the variables point to the same object. If you want to understand how objects are compared, add the following statement after the line that declares obj2:
obj2 = obj1
When you run the application again, the last two statements will display True in the Output window. The Equals method compares the two objects and returns a True/False value. Because you haven't told the class how to compare two instances of the class yet, it compares their references, just as the ReferenceEquals method does. The ReferenceEquals method checks for reference equality; that is, it returns True if both variables point to the same object (the same instance of the class). If you change a property of the obj1 variable, the changes will affect obj2 as well, because both variables point to the same object. We can't modify the object because it doesn't expose any members that we can set to differentiate it from another object of the same type. We'll get to that shortly.
Most classes expose a custom Equals method, which knows how to compare two objects of the same type (two objects based on the same class). The custom Equals method usually compares the properties of the two instances of the class and returns True if a set of basic properties (or all of them) are the same. You'll learn how to customize the default members of any class later in this chapter.
Notice the full name of the class: SimpleClass.Minimal. Within the current project, you can access it as Minimal. Other projects can either import the Minimal class and access it as Minimal or specify the complete name of the class, which is the name of the project it belongs to followed by the class name. To use the Minimal class in another project, however, you must add a reference to it. (You'll learn shortly how to reuse classes in other projects.)
Let's add some functionality to our bare-bones class. We'll begin by adding two trivial properties and two methods to perform simple operations. The two properties are called strProperty (a string) and dblProperty (a double). To expose these two members as properties, you can simply declare them as public variables. This isn't the best method of implementing properties, but it really doesn't take more than declaring something as public to make it available to code outside the class. The following statement exposes the two properties of the class:
Public strProperty As String, dblProperty As Double
The two methods you'll implement in your sample class are the ReverseString and NegateNumber methods. The first method reverses the order of the characters in strProperty and returns the new string. The NegateNumber method returns the negative of dblProperty. They're two simple methods that don't accept any arguments; they simply operate on the values of the properties. Methods are exposed as public procedures (functions or subroutines), just as properties are exposed as public variables. Enter the function declarations of Listing 8.1 between the Class Minimal and End Class statements in the class's code window. (I'm showing the entire listing of the class here.)
Example 8.1. Adding a few members to the Minimal class
Public Class Minimal
      Public strProperty As String, dblProperty As Double
      Public Function ReverseString() As String
          Return (StrReverse(strProperty))
      End Function
      Public Function NegateNumber() As Double
          Return (-dblProperty)
      End Function
  End Class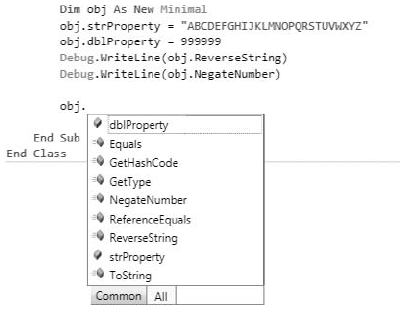
Let's test the members we've implemented so far. Switch back to your form and enter the lines shown in Listing 8.2 in a new button's Click event handler. The obj variable is of the Minimal type and exposes the public members of the class, as shown in Figure 8.2. You can set and read its properties and call its methods. Your code doesn't see the class's code, just as it doesn't see any of the built-in classes' code. You trust that the class knows what it is doing and does it right.
The strProperty and dblProperty properties will accept any value as long as the type is correct and the value of the numeric property is within the acceptable range. But what if the generic properties were meaningful entities, such as email addresses, ages, or zip codes? We should be able to invoke some code to validate the values assigned to each property. To do so, we implement each property as a special type of procedure: the so-called property procedure.
Properties are implemented with a special type of procedure that contains a Get and a Set section (frequently referred to as the property's getter and setter, respectively). The Set section of the procedure is invoked when the application attempts to set the property's value; the Get section is invoked when the application requests the property's value. The value passed to the property is usually validated in the Set section and, if valid, is stored to a local variable. The same local variable's value is returned to the application when it requests the property's value, from the property's Get section. Listing 8.3 shows what the implementation of an Age property might look like.
Example 8.3. Implementing properties with property procedures
Private m_Age As Integer
  Property Age() As Integer
     Get
        Age = m_Age
     End Get
     Set (ByVal value As Integer)
        If value < 0 Or value >= 100 Then
           MsgBox("Age must be positive and less than 100")
        Else
           m_Age = value
        End If
     End Set
  End Property
The local variable where the age is stored is m_Age. When a statement such as the following is executed in the application that uses your class, the Set section of the property procedure is invoked:
obj.Age = 39
Because the property value is valid, it is stored in the m_Age local variable. Likewise, when a statement such as the following one is executed, the Get section of the property procedure is invoked, and the value 39 is returned to the application:
Debug.WriteLine(obj.Age)
The value argument of the Set segment represents the actual value that the calling code is attempting to assign to the property. The m_Age variable is declared as private because we don't want any code outside the class to access it directly. The Age property is, of course, public so that other applications can set it, and external applications shouldn't bypass the validation performed by the property's setter.
Enter the property procedure for the Age property in the Minimal class and then switch to the form to test it. Open the button's Click event handler and add the following lines to the existing ones:
Dim obj As New Minimal
obj.Age = 39
Debug.WriteLine("after setting the age to 39, age is " &
                      obj.Age.ToString)
obj.Age = 199
Debug.WriteLine("after setting the age to 199, age is " &
                       obj.Age.ToString)
The value 39 will appear twice in the Output window, which means that the class accepts the value 39. When the third statement is executed, a message box will appear with the error's description:
Age must be positive and less than 100
The value 39 will appear in the Output window again. The attempt to set the age to 199 failed, so the property retains its previous value. You will also see the message box with the warning, which is invoked from within the class's code.
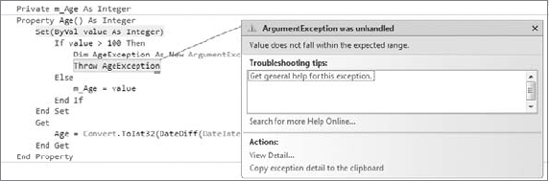
The error-trapping code works fine, but what good is a message box displayed from within a class? As a developer using the Minimal class in your code, you'd rather receive an exception and handle it from within your code, unless you're writing classes to use in your own applications. Normally, you don't know who's going to use your class, or how, so you can't assume that any messages displayed from within your class's code will be seen by the end user. The class may be invoked on a remote server, in which case the error message will go unnoticed. So let's change the implementation of the Age property a little. The property procedure for the Age property (Listing 8.4) throws an InvalidArgument exception if an attempt is made to assign an invalid value to it. The InvalidArgument exception is one of the existing exceptions, and you can reuse it in your code. Later in this chapter, you'll learn how to create and use custom exceptions.
Example 8.4. Throwing an exception from within a property procedure
Private m_Age As Integer
  Property Age() As Integer
     Get
        Age = m_Age
     End Get
     Set (ByVal value As Integer)
        If value < 0 Or value >= 100 Then
           Dim AgeException As New ArgumentException()
           Throw AgeException
        Else
           M_Age = value
        End If
     End Set
  End Property
You can test the revised property definition in your application; switch to the test form, and enter the statements from Listing 8.5 in a new button's Click event handler. (This is the code behind the Handle Exceptions button on the test form.)
Example 8.5. Catching the Age property's exception
Dim obj As New Minimal
Dim userAge as Integer
UserAge = InputBox("Please enter your age")
Try
   obj.Age = userAge
Catch exc as ArgumentException
   MsgBox("Can't accept your value, " & userAge.ToString & VbCrLf &
          "Will continue with default value of 30")
   obj.Age = 30
End Try
This is a much better technique for handling errors in your class. The exceptions can be intercepted by the calling application, and developers using your class can write robust applications by handling the exceptions in their code. When you develop custom classes, keep in mind that you can't handle most errors from within your class because you don't know how other developers will use your class.
When you design classes, keep in mind that you don't know how another developer may use them. In fact, you may have to use your own classes in a way that you didn't consider when you designed them. A typical example is using an existing class with a web application. If your class displays a message box, it will work fine as part of a Windows Forms application, but in the context of a web application, the message box won't be displayed anywhere. Even if you don't plan to use a custom class with a web application, never interact with the user from within the class's code. Make your code as robust as you can, but don't hesitate to throw exceptions for all conditions you can't handle from within your code (as shown here). In general, a class's code should detect abnormal conditions, but it shouldn't attempt to remedy them.
The application that uses your class may inform the user about an error condition and give the user a chance to correct the error by entering new data, disabling some options on the interface, and so on. As a class developer, you can't make this decision — another developer might prompt the user for another value, and a sloppy developer might let their application crash (but this isn't your problem). To throw an exception from within your class's code, call the Throw statement with an Exception object as an argument. To play well with the Framework, you should try to use one of the existing exceptions (and the Framework provides quite a few of them). You can also throw custom exceptions by passing an error message to the Exception class' constructor with a statement such as the following:
Throw New Exception("your exception's description")Let's make our class a little more complicated. Age is not usually requested on official documents because it's valid only for a year (or less) after filling out a questionnaire. Instead, you are asked to furnish your date of birth, from which your current age can be calculated at any time. We'll add a BDate property in our class and make Age a read-only property.
To make a property read-only, you simply declare it as ReadOnly and supply code for the Get procedure only. Revise the Age property code in the Minimal class to that shown in Listing 8.6. Then, enter the property procedure from Listing 8.7 for the BDate property.
Example 8.6. Implementing a read-only property
Private m_Age As Integer
ReadOnly Property Age() As Integer
   Get
      Age = m_Age
   End Get
End Property
Example 8.7. The BDate property
Private m_BDate As DateTime
Private m_Age As Integer
Property BDate() As DateTime
    Get
        BDate = m_BDate
    End Get
    Set(ByVal value As Date)
        If value > Now() Or _
                DateDiff(DateInterval.Year, value, Now()) >= 100 Then
            Dim AgeException As New Exception
                     ("Can't accept the birth date you specified")
            Throw AgeException
        Else
            m_BDate = value
            m_Age = DateDiff(DateInterval.Year, value, Now())
        End If
    End Set
End Property
As soon as you enter the code for the revised Age property, two error messages will appear in the Error List window. The code in the application form is attempting to set the value of a read-only property, so the editor produces the following error message twice: Property 'Age' is 'ReadOnly.' As you probably figured out, we must set the BDate property in the code instead of the Age property. The two errors are the same, but they refer to two different statements that attempt to set the Age property.
The code checks the number of years between the date of birth and the current date. If it's negative (which means that the person hasn't been born yet) or more than 100 years (we'll assume that people over 100 will be treated as being 100 years old), it rejects the value. Otherwise, it sets the value of the m_BDate local variable and calculates the value of the m_Age local variable.
You can implement write-only properties with the WriteOnly keyword and a Set section only, but write-only properties are rarely used — in my experience, only for storing passwords.
There's still a serious flaw in the implementation of the Age property. Can you see it? The person's age is up-to-date the moment the birth date is entered, but what if we read it back from a file or database three years later? It will still return the original value, which will no longer be the correct age. The Age property's value shouldn't be stored anywhere; it should be calculated from the person's birth date as needed. If we avoid storing the age to a local variable and calculate it on the fly, users will always see the correct age. Revise the Age property code to match Listing 8.8 and the property will now calculate the difference between the date of birth and the current date and return the correct person's age every time it's called.
Example 8.8. A calculated property
ReadOnly Property Age() As Integer
   Get
      Age = Convert.ToInt32(DateDiff(DateInterval.Year, m_BDate , Now()))
   End Get
End Property
Notice also that you no longer need the m_Age local variable because the age is calculated on the fly when requested, so remove its declaration from the class and remove the statement that sets the value of the m_Age variable in the BDate property's setter. As you can see, you don't always have to store property values to local variables. A property that returns the number of files in a directory, for example, also doesn't store its value in a local variable. It retrieves the requested information on the fly and furnishes it to the calling application. By the way, the calculations might still return a negative value if the user has changed the system's date, but this is a rather far-fetched scenario.
Your Minimal class is no longer so minimal. It exposes some functionality, and you can easily add more. Add properties for name, profession, and income, and add methods to calculate insurance rates based on a person's age and anything you can think of. Experiment with a few custom members, add the necessary validation code in your property procedures, and you'll soon find out that building and reusing custom classes is a simple and straightforward process. Of course, there's a lot more to learn about classes, but you already have a good understanding of the way classes combine code with data. Before continuing, let me introduce auto-implemented properties, which are a major convenience when you implement custom classes.
Quite often, actually more often than not, properties are implemented with straightforward code, without any validation code — just straight setters and getters like the following:
Private m_Occupation As String
Property Occupation() As String
   Get
      Return (m_Occupation)
   End Get
   Set (value As String)
      m_Occupation = value
End Property
The definition of many properties is based on a standard template, or boilerplate, which is always the same, except for the names of the properties and the corresponding local variables. If you don't need any additional code, shouldn't there be a simple method of defining a property? Indeed, with VB 2010 you can supply the name of the property and its type in a single statement like the following:
Public Property Occupation As String
And that's all it takes to create a straightforward property. Properties declared this way are known as auto-implemented properties, and they can simplify the coding of large classes considerably because most properties are usually implemented with the default setter and getter. Behind the scenes, the VB compiler generates the appropriate Get and Set segments of the property for you. As for the matching local variable, the compiler uses the same name as the property prefixed with an underscore. You can access this local variable from within the code that implements other properties, as in the following example:
Public Class Contact
    Public Property Name As String
    Public Property Company As String
    Public Property Occupation As String
    Private _Title
    Public Property Title() As String
        Get
            If _Occupation.Trim.Length > 0 Then
                Return _Occupation & "/" & _Title
            Else
                Return _Title
            End If
        End Get
        Set(ByVal value As String)
            _Title = value
        End Set
    End Property
End Class
The Contact class exposes three auto-implemented properties, the Name, Company, and Occupation properties and a fully implemented property, the Title property. Note that the Title property's Get segment takes into consideration the _Occupation local variable that holds the value of the Occupation auto-implemented property. Although the _Occupation variable is not declared anywhere in the class, it's being used in the Title property's implementation.
Auto-implemented properties are just a shorthand notation for properties, and they're converted into actual code by the compiler on the fly. Actually, when you type the statement
Public Property Company As String
the editor won't insert the stubs for the Get and Set segments; you must type the Get keyword on the following line and then press Enter for the editor to emit the stubs for the two segments of the property procedure.
As you recall, when you created the Minimal class for the first time, before adding any code, the class exposed a few members — the default members, such as the ToString method (which returns the name of the class) and the Equals method (which compares two objects for reference equality). You can (and should) provide your custom implementation for these members; this is what I'm going to do in the following sections.
The custom ToString method is implemented as a public function, and it must override the default implementation. The implementation of a custom ToString method is shown next:
Public Overrides Function ToString() As String
   Return "The infamous Minimal class"
End Function
As soon as you enter the keyword Overrides, the editor will suggest the names of the three members you can override: ToString, Equals, and GetHashCode. Select the ToString method, and the editor will insert a default implementation for you. The default implementation returns the string MyBase.ToString. Just replace the statement inserted by the editor with the one shown in the preceding code segment.
The Overrides keyword tells the compiler that this implementation overwrites the default implementation of the class. The original method's code isn't exposed, and you can't revise it. The Overrides keyword tells the compiler to "hide" the original implementation and use your custom ToString method instead. After you override a method in a class, the application using the class can no longer access the original method. Ours is a simple method, but you can return any string you can build in the function. For example, you can incorporate the value of the BDate property in the string:
Return("MINIMAL: " & m_BDate.ToShortDateString)The value of the local variable m_BDate is the value of the BDate property of the current instance of the class. Change the BDate property, and the ToString method will return a different string.
The Equals method exposed by most of the built-in objects can compare values, not references. Two Rectangle objects, for example, are equal if their dimensions and origins are the same. The following two rectangles are equal:
Dim R1 As New Rectangle(0, 0, 30, 60)
Dim R2 As New Rectangle
R2.X = 0
R2.Y = 0
R2.Width = 30
R2.Height = 60
If R1.Equals(R2) Then
   MsgBox("The two rectangles are equal")
End If
If you execute these statements, a message box confirming the equality of the two objects will pop up. The two variables point to different objects (that is, different instances of the same class), but the two objects are equal because they have the same origin and same dimensions. The Rectangle class provides its own Equals method, which knows how to compare two Rectangle objects. If your class doesn't provide a custom Equals method, all the compiler can do is compare the objects referenced by the two variables. In the case of our Minimal class, the Equals method returns True if the two variables point to the same object (which is the same instance of the class). If the two variables point to two different objects, the default Equals method will return False, even if the two objects are the same.
You're probably wondering what makes two objects equal. Is it all their properties or perhaps some of them? Two objects are equal if the Equals method says so. You should compare the objects in a way that makes sense, but you're in no way limited as to how you do this. In a very specific application, you might decide that two rectangles are equal because they have the same area, or perimeter, regardless of their dimensions and origin, and override the Rectangle object's Equals method. In the Minimal class, for example, you might decide to compare the birth dates and return True if they're equal. Listing 8.9 is the implementation of a possible custom Equals method for the Minimal class.
The Equals method shown in Listing 8.9 assumes that the object you're trying to compare to the current instance of the class is of the same type. Because you can't rely on developers to catch all their mistakes, you should know what you're comparing before you attempt to perform the comparison. A more-robust implementation of the Equals method is shown in Listing 8.10. This implementation tries to convert the argument of the Equals method to an object of the Minimal type and then compares it to the current instance of the Minimal class. If the conversion fails, an InvalidCastException is thrown and no comparison is performed.
Example 8.10. A more-robust Equals method
Public Overrides Function Equals(ByVal obj As Object) As Boolean
   Dim O As New Minimal()
   Try
       O = DirectCast(obj, Minimal)
   Catch typeExc As InvalidCastException
      Throw typeExc
      Exit Function
   End Try
   If O.BDate = m_BDate Then
      Equals = True
   Else
      Equals = False
   End If
End Function
The equals (=) operator can be used in comparing all built-in objects. The following statement is quite valid, as long as the R1 and R2 variables were declared of the Rectangle type:
If R1 = R2 Then
    MsgBox("The two rectangles are equal")
End If
This operator, however, can't be used with the Minimal custom class. Later in this chapter, you'll learn how to customize operators in your class. In the meantime, you can use only the Is operator, which compares for reference equality (whether the two variables reference the same object), and the Equals method. If the two variables R1 and R2 point to the same object, the following statement will return True:
If R1 Is R2 Then
    MsgBox("The two variables reference the same object")
End If
The Is operator tells you that the two variables point to a single object. There's no comparison here; the compiler simply figures out whether they point to same object in memory. It will return True if a statement such as the following has been executed before the comparison:
obj2 = obj1
If the Is operator returns True, there's only one object in memory and you can set its properties through either variable.
Let's add a little more complexity to our class. Because we're storing birth dates to our custom objects, we can classify persons according to their age. Most BASIC developers will see an opportunity to use constants here. Instead of using constants to describe the various age groups, we'll use an enumeration with the following group names:
Public Enum AgeGroup
   Infant
   Child
   Teenager
   Adult
   Senior
   Overaged
End Enum
These statements must appear outside any procedure in the class, and we usually place them at the beginning of the file, right after the declaration of the class. Public is an access modifier (we want to be able to access this enumeration from within the application that uses the class). Enum is a keyword: It specifies the beginning of the declaration of an enumeration and it's followed by the enumeration's name. The enumeration itself is a list of integer values, each one mapped to a name. In our example, the name Infant corresponds to 0, the name Child corresponds to 1, and so on. The list of the enumeration's members ends with the End Enum keyword. You don't really care about the actual values of the names because the very reason for using enumerations is to replace numeric constants with more-meaningful names. You'll see shortly how enumerations are used both in the class and the calling application.
Now add to the class the GetAgeGroup method (Listing 8.11), which returns the name of the age group to which the person represented by an instance of the Minimal class belongs. The name of the group is a member of the AgeGroup enumeration.
Example 8.11. Using an enumeration
Public Function GetAgeGroup() As AgeGroup
   Select Case m_Age
      Case Is < 3 : Return (AgeGroup.Infant)
      Case Is < 10 : Return (AgeGroup.Child)
      Case Is < 21 : Return (AgeGroup.Teenager)
      Case Is < 65 : Return (AgeGroup.Adult)
Case Is < 100 : Return (AgeGroup.Senior)
Case Else : Return (AgeGroup.Overaged)
End Select
End FunctionThe GetAgeGroup method returns a value of the AgeGroup type and you can compare it to members of the same enumeration. Switch to the form's code window, add a new button, and enter the statements from Listing 8.12 in its event handler.
Example 8.12. Using the enumeration exposed by the class
Protected Sub Button1_Click(...)
Handles Button1.Click
Dim obj As Minimal
obj = New Minimal()
Try
obj.BDate = InputBox("Please Enter your birthdate")
Catch ex As ArgumentException
MsgBox(ex.Message)
Exit Sub
End Try
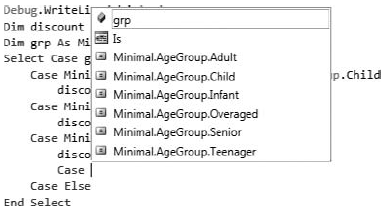
Debug.WriteLine(obj.Age)
Dim discount As Single
Dim grp As Minimal.AgeGroup = obj.GetAgeGroup
Select Case grp
Case Minimal.AgeGroup.Infant, Minimal.AgeGroup.Child
discount = 0.4
Case Minimal.AgeGroup.Teenager
discount = 0.5
Case Minimal.AgeGroup.Senior
discount = 0.2
Case Else
End Select
MsgBox("Your age is " & obj.Age.ToString &
" and you belong to the " &
obj.GetAgeGroup.ToString &
" group" & vbCrLf & "Your discount is " &
Format(discount, "Percent"))
End SubThis routine calculates discounts based on the person's age. Notice that we don't use numeric constants in our code, just descriptive names. Moreover, the possible values of the enumeration are displayed in a drop-down list by the IntelliSense feature of the IDE as needed (Figure 8.3), and you don't have to memorize them or look them up as you would with constants. I've used an implementation with multiple If statements in this example, but you can perform the same comparisons by using a Select Case statement.
You've seen the basics of working with custom classes in a VB application. Let's switch to a practical example that demonstrates not only the use of a real-world class, but also how classes can simplify the development of a project.
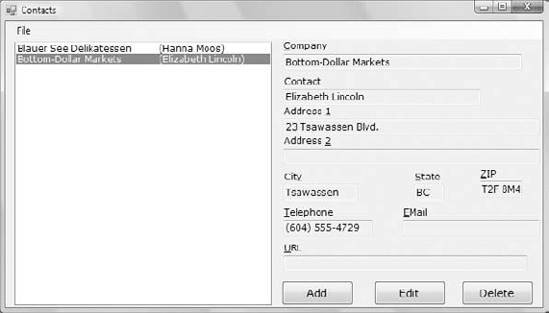
In Chapter 6, "Working with Forms," I briefly discussed the Contacts application. This application uses a custom structure to store the contacts and provides four navigational buttons to allow users to move to the first, last, previous, and next contact. Now that you have learned how to program the ListBox control and how to use custom classes in your code, you can revise the Contacts application. First, you'll implement a class to represent each contact. The fields of each contact (company and contact names, addresses, and so on) will be implemented as properties and they will be displayed in the TextBox controls on the form.
You'll also improve the user interface of the application. Instead of the rather simplistic navigational buttons, you'll place all the company names in a sorted ListBox control. The user can easily locate the desired company and select it from the list to view its fields. The editing buttons at the bottom of the form work as usual, but you no longer need the navigational buttons. Figure 8.4 shows the revised Contacts application.
Copy the contents of the Contacts folder you used when you worked on the Contacts project in Chapter 6 under a new folder and open the project by double-clicking the solution's name, Contacts.sln. You will also find the revised project in this chapter's projects. First, delete the declaration of the Contact structure and add a class to the project. Name the new class Contact and enter the code from Listing 8.13 into it. The names of the private members of the class are the same as the actual property names, and they begin with an underscore. (This is a good convention that lets you easily distinguish whether a variable is private and the property value it stores.) The implementation of the properties is trivial, so I'm not showing the code for all of them.
Example 8.13. The Contact class
<Serializable()> Public Class Contact
    Private _companyName As String
    Private _email As String

    Property CompanyName() As String
        Get
            CompanyName = _companyName
        End Get
        Set(ByVal value As String)
            If value Is Nothing Or value = "" Then
                Throw New Exception("Company Name field can't be empty")
                Exit Property
            End If
            _companyName = value
        End Set
    End Property

    Property ContactName As String

    Property Address1 As String

    Property Address2 As String

    Property City As String

    Property State As String

    Property ZIP As String

    Property tel As String

    Property EMail As String
    Get
            EMail = _email
        End Get
        Set(ByVal value As String)
If value.Contains("@") Or value.Trim.Length = 0 Then
_email = Value
Else
Throw New Exception("Invalid e-mail address!")
End If
End Set
End Property
Property URL As String
Overrides Function ToString() As String
If _contactName = "" Then
Return _companyName
Else
Return _companyName & vbTab & "(" & _contactName & ")"
End If
End Function
Public Sub New()
MyBase.New()
End Sub
Public Sub New(ByVal CompanyName As String,
ByVal LastName As String, ByVal FirstName As String)
MyBase.New()
Me.ContactName = LastName & ", " & FirstName
Me.CompanyName = CompanyName
End Sub
Public Sub New(ByVal CompanyName As String)
MyBase.New()
Me.CompanyName = CompanyName
End Sub
End ClassThe first thing you'll notice is that the class's definition is prefixed by the <Serializable()> keyword. The topic of serialization is discussed in Chapter 13, "XML in Modern Programming," but for now all you need to know is that the .NET Framework can convert objects to a text or binary format and then store them in files. Surprisingly, this process is quite simple; as you will see, we'll be able to dump an entire collection of Contact objects to a file with a single statement. The <Serializable()> keyword is an attribute of the class, and (as you will see later in this book) there are more attributes you can use with your classes — or even with your methods. The most prominent method attribute is the <WebMethod> attribute, which turns a regular function into a web method.
The various fields of the Contact structure are now properties of the Contact class. The implementation of the properties is trivial except for the CompanyName and EMail properties, which contain some validation code. The Contact class requires that the CompanyName property have a value; if it doesn't, the class throws an exception. Likewise, the EMail property must contain the symbol @. Finally, the class provides its own ToString method, which returns the name of the company followed by the contact name in parentheses. All other properties are auto-implemented.
The ListBox control, in which we'll store all contacts, displays the value returned by the object's ToString method, which is why you have to provide your own implementation of this method to describe each contact. The company name should be adequate, but if there are two companies by the same name, you can use another field to differentiate them. I used the contact name, but you can use any of the other properties (the URL would be a good choice).
Although the ListBox displays a string, it stores the object itself. In essence, it's used not only as a navigational tool, but also as a storage mechanism for our contacts. Now, we must change the code of the main form a little. Start by removing the navigational buttons; we no longer need them. Their function will be replaced by a few lines of code in the ListBox control's SelectedIndexChanged event. Every time the user selects another item on the list, the statements shown in Listing 8.14 display the contact's properties in the various TextBox controls on the form. The currentContact variable is an integer that represents the index of the currently selected item, and it must be declared outside the subroutine because it must be accessed by other event handlers as well.
Example 8.14. Displaying the fields of the selected Contact object
Private Sub ListBox1_SelectedIndexChanged(...)
              Handles ListBox1.SelectedIndexChanged
   currentContact = ListBox1.SelectedIndex
   ShowContact()
End Sub
The ShowContact() subroutine reads the object stored at the location specified by the currentContact variable and displays its properties in the various TextBox controls on the form. The TextBox controls are normally read-only, except when users are editing a contact. This action is signaled to the application when the user clicks the Edit or the Add button on the form.
When a new contact is added, the code reads its fields from the controls on the form, creates a new Contact object, and adds it to the ListBox control. When a contact is edited, a new Contact object replaces the currently selected object on the control. The code is similar to the code of the Contacts application. I should mention that the ListBox control is locked while a contact is being added or edited because it doesn't make sense to select another contact at that time.
To delete a contact (Listing 8.15), we simply remove the currently selected object from the ListBox control. In addition, we must select the next contact on the list (or the first contact if the deleted one was last in the list). The code of this event handler makes use of the currentContact variable to remove the currently selected item from the list.
Example 8.15. Deleting an object from the ListBox
Private Sub bttnDelete_Click(...) Handles bttnDelete.Click
   If currentContact > −1 Then
      ListBox1.Items.RemoveAt(currentContact)
      currentContact = ListBox1.Items.Count - 1
      If currentContact = −1 Then
         ClearFields()
         MsgBox("There are no more contacts")
      Else
         ShowContact()
      End If
   Else
        MsgBox("No current contacts to delete")
     End If
End Sub
When you add a new contact, the following code is executed in the Add button's Click event handler:
Private Sub bttnAdd_Click(...) Handles bttnAdd.Click
  adding = True
  ClearFields()
  HideButtons()
  ListBox1.Enabled = False
End Sub
The controls are cleared in anticipation of the new contact's fields, and the adding variable is set to True. The OK button is clicked to end either the addition of a new record or an edit operation. The code behind the OK button is shown in Listing 8.16.
Example 8.16. Committing a new or edited record
Private Sub bttnOK_Click(...) Handles bttnOK.Click
    If SaveContact() Then
        ListBox1.Enabled = True
        ShowButtons()
    End If
End Sub
As you can see, the same subroutine handles both the insertion of a new record and the editing of an existing one. All the work is done by the SaveContact() subroutine, which is shown in Listing 8.17.
Example 8.17. The SaveContact() subroutine
Private Function SaveContact() As Boolean
    Dim contact As New Contact
    Try
        contact.CompanyName = txtCompany.Text
        contact.ContactName = txtContact.Text
        contact.Address1 = txtAddress1.Text
        contact.Address2 = txtAddress2.Text
        contact.City = txtCity.Text
        contact.State = txtState.Text
        contact.ZIP = txtZIP.Text
        contact.tel = txtTel.Text
        contact.EMail = txtEMail.Text
        contact.URL = txtURL.Text
    Catch ex As Exception
        MsgBox(ex.Message)
        Return False
    End Try
    If adding Then
        ListBox1.Items.Add(contact)
    Else
        ListBox1.Items(currentContact) = contact
    End If
    Return True
End Function
The SaveContact() function uses the adding variable to distinguish between an add and an edit operation and either adds the new record to the ListBox control or replaces the current item in the ListBox with the values on the various controls. Because the ListBox is sorted, new contacts are automatically inserted in the correct order. If an error occurs during the operation, the SaveContact() function returns False to alert the calling code that the operation failed (most likely because one of the assignment operations caused a validation error in the class's code). Note that the SaveContact routine uses the currentContact variable to determine the selected item on the list.
The last operation of the application is the serialization and deserialization of the items in the ListBox control. Serialization is the process of converting an object to a stream of bytes for storing to a disk file, and deserialization is the opposite process. To serialize objects, we first store them into an ArrayList object, which is a dynamic array that stores objects and can be serialized as a whole. Likewise, the disk file is deserialized into an ArrayList to reload the persisted data back to the application; then each element of the ArrayList is moved to the Items collection of the ListBox control. ArrayLists and other Framework collections are discussed in Chapter 12, "Storing Data in Collections," and object serialization is discussed in Chapter 13. You can use these features to test the application and examine the corresponding code after you read about ArrayLists and serialization.
This section's sample application demonstrates an interesting technique for handling a set of data at the client. We usually need an efficient mechanism to store data at the client, where all the processing takes place — even if the data comes from a database. In this example, we used the ListBox control because each item of the control can be an arbitrary object. Because the control displays the string returned by the object's ToString method, we're able to customize the display by providing our own implementation of the ToString method. As a result, we're able to use the ListBox control both as a data-storage mechanism and as a navigational tool. As long as the strings displayed on the control are meaningful descriptions of the corresponding objects and the control's items are sorted, the ListBox control can be used as an effective navigational tool. If you have too many items to display on the control, you should also provide a search tool to help users quickly locate an item in the list without having to scroll up and down a long list of items. Review the ListBoxFind project from Chapter 5, "Basic Windows Controls," for information on searching the contents of the ListBox control.
When data are being edited, you have to cope with another possible problem. The user may edit the data for hours and forget to save the edits every now and then. If the computer (or, even worse, the application) crashes, a lot of work will be wasted. Sure the application provides a Save command, but you should always try to protect users from their mistakes. It would be nice if you could save the data to a temporary file every time the user edits, deletes, or adds an item to the list. This way, if the computer crashes, users won't lose their edits. When the application starts, it should automatically detect the presence of the temporary file and reload it. Every time the user saves the data by using the application's Save command or terminates the application, the temporary file should be removed.
Let's switch to a few interesting topics in programming with objects. Objects are instances of classes, and classes are instantiated with the New keyword. The New keyword can be used with a number of arguments, which are the initial values of some of the object's basic properties. To construct a rectangle, for example, you can use either of two statements. You can use this one:
Dim shape1 As Rectangle = New Rectangle()
shape1.Width = 100
shape1.Height = 30
Or you can use the following one:
Dim shape1 As Rectangle = New Rectangle(100, 30)
The objects in the Minimal class can't be initialized to specific values of their properties, and they expose the simple form of the New constructor — the so-called parameterless constructor. Every class has a parameterless constructor, even if you don't specify it. You can implement parameterized constructors, which allow you to pass arguments to an object as you declare it. These arguments are usually the values of the object's basic properties. Parameterized constructors don't pass arguments for all the properties of the object; they expect only enough parameter values to make the object usable.
Parameterized constructors are implemented via public subroutines that have the name New(). You can have as many overloaded forms of the New() subroutine as needed. Most of the built-in classes provide a parameterless constructor, but the purists of OOP will argue against parameterless constructors. Their argument is that you shouldn't allow users of your class to create invalid instances of it. A class for describing customers, for example, should expose at least a Name property. A class for describing books should expose a Title and an ISBN property. If the corresponding constructor requires that these properties be specified before you create an instance of the class, you'll never create objects with invalid data. There are cases, however, where this isn't possible. When you call a function that returns a custom object, for example, you must declare a variable of the same type and assign the function to this variable:
Dim C As Contact
C = ListBox1.SelectedItem
Here we can't create a new Contact object because we want to store in the C variable an existing object. Is there a good reason to create an object variable before you have an object to store in it?
Let's add a parameterized constructor to our Contact class. Each contact should have at least a name; here's a parameterized constructor for the Contact class:
Public Sub New(ByVal CompanyName As String)
    MyBase.New()
    Me.CompanyName = CompanyName
End Sub
The code is trivial, with the exception of the statement that calls the MyBase.New() subroutine. MyBase is an object that lets you access the members of the base class (a topic that's discussed in detail later in this chapter). The reason you must call the New method of the base class is that the base class might have its own constructor, which can't be called directly. You must always insert this statement in your constructors to make sure any initialization tasks that must be performed by the base class will not be skipped.
The Contact class's constructor accepts a single argument: the company name (this property can't be a blank string). Another useful constructor for the same class accepts two additional arguments, the contact's first and last names, as follows:
Public Sub New(ByVal CompanyName As String,
               ByVal LastName As String, ByVal FirstName As String)
    MyBase.New()
    Me.ContactName = LastName & ", " & FirstName
    Me.CompanyName = CompanyName
End Sub
With the two parameterized constructors in place, you can create new instances of the Contact class by using a statement such as the following:
Dim contact1 As New Contact("Around the Horn")Or you can use a statement such as this:
Dim contact1 As New Contact("Around the Horn", "Hardy", "Thomas")Notice the lack of the Overloads (or Overrides) keyword. Constructors can have multiple forms and don't require the use of Overloads — just supply as many implementations of the New() subroutine as you need.
One last but very convenient technique to initialize objects allows you to supply values for as many properties of the new object as you wish, using the With keyword. The With keyword is followed by the names of the properties you want to initialize and their values in a comma-separated list, as shown in the following statements, which create two new instances of the Person class, and they initialize each one differently:
Dim P1 As New Person With
       {.LastName = "Doe", .FirstName = "Joe"})
Dim P2 As New Person With
       {.LastName = "Doe", .Email = "[email protected]"})
Note that the property names are prefixed with the period. The With statement is a shorthand notation for accessing multiple members of an instance of a class without having to repeat the class's name. This syntax allows you to quickly initialize new objects regardless of their constructors; in effect, you can create your own constructor for any class. This technique will be handy when combining object initialization with other statements, such as in the following example, which adds a new object to a list:
Persons.Add(New Person With {.LastName = "Doe", .FirstName = "Joe"})While the New function is the class constructor, the syntax with the With keyword is not a constructor, although it creates a new instance of the class and initializes its properties. The process of initializing an instance of a class is known as object initialization. An advantage of the With keyword is that as soon as you type the opening bracket, the editor will display the list of properties you can initialize in the IntelliSense box.
The projects we built in this section are Windows applications that contain a Class module. The class is contained within the project, and it's used by the project's main form. What if you want to use this class in another project?
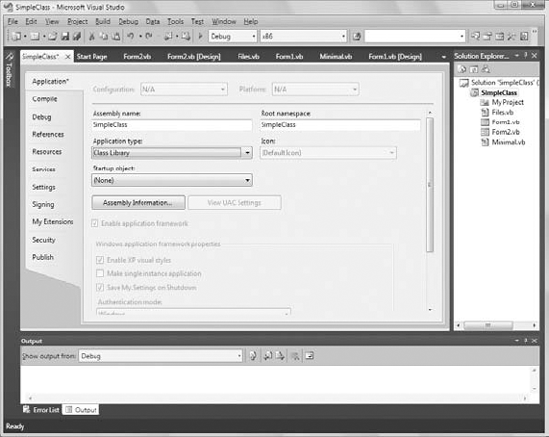
First, you must change the type of the project. A Windows project can't be used as a component in another project. Right-click the SimpleClass project and choose Properties. In the project's Property Pages dialog box, switch to the Application tab, locate the Application Type drop-down list, and change the project's type from Windows Forms Application to Class Library, as shown in Figure 8.5. Then close the dialog box. When you return to the project, right-click the TestForm and select Exclude From Project. A class doesn't have a visible interface, and there's no reason to include the test form in your project.
From the main menu, choose Build
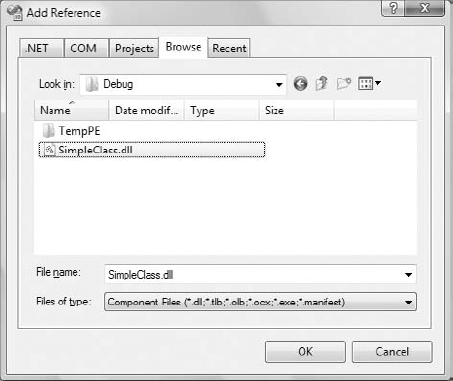
Let's use the SimpleClass.dll file in another project. Start a new Windows application, open the Project menu, and add a reference to the SimpleClass. Choose Project
The compiler will place the DLL in the folder objx86Debug under the project's folder. The SimpleClass component will be added to the project. You can now declare a variable of the SimpleClass.Minimal type and call its properties and methods:
Dim obj As New SimpleClass.Minimal
obj.BDate = #10/15/1992#
obj.strProperty = 5544
MsgBox(obj.NegateNumber())
If you want to keep testing the SimpleClass project, add the TestForm to the original project (right-click the project's name, choose Add
Adding references to multiple DLLs scattered through your disk or local network can become a nightmare, especially if multiple developers are working on the same projects. All related items should belong to the same solution, so don't be afraid to add multiple classes to the same project. Actually, this is the recommended practice and it will simplify the task of referencing the classes from within the other projects.
In addition to methods and properties, classes can also fire events. You will find that events are not quite as common with classes. Controls have many events because they expose a visible interface and the user interacts through this interface (clicks, drags and drops, and so on). But classes can also raise events. Class events can come from three different sources:
- Progress events
A class might raise an event to indicate the progress of a lengthy process or indicate that an internal variable or property has changed value. The
PercentDoneevent is a typical example. A process that takes a while to complete reports its progress to the calling application with this event, which is fired periodically. These events, which are called progress events, are the most common type of class events.- Time events
Time events are based on a timer. They're not very common, but you can implement alarms, job schedulers, and similar applications. You can set an alarm for a specific time or an alarm that will go off after a specified interval.
- External events
External events, such as the completion of an asynchronous operation, can also fire events. For example, a class might initiate a file download and notify the application when the file arrives.
To fire an event from within a class, you must do the following:
First you must declare the event and its signature in your class. The declaration must appear in the class, not in any procedure. A simple event, with no arguments, should be declared as follows (
ShiftEndis the name of the event — an event that signals the process):Public Event ProcessCompleted()
Fire the event from within your class code with the
RaiseEventmethod:RaiseEvent ProcessCompleted()
That's all as far as the class is concerned.
The application that uses the custom class must declare it with the
WithEventskeyword. Otherwise, it will still be able to use the class's methods and properties, but the events raised by the class will go unnoticed. The following statement creates an instance of the class and listens for any event:Dim WithEvents obj As New Minimal
Finally, the calling application must provide a handler for the specific event. Because the class was declared with the
WithEventskeyword, its name will appear in the list of objects in the editor window and itsProcessCompletedevent will appear in the list of events (Figure 8.7). Insert the code you want to handle this event in the procedureobj.ProcessCompleted.
Events usually pass information to the calling application. In VB, all events pass two arguments to the application: a reference to the object that fired the event and another argument, which is an object that contains information specific to the event.
The arguments of an event are declared just as the arguments of a procedure are declared. The following statement declares an event that's fired every few seconds to report the progress of a process as a percent complete value. The event passes a single parameter value to the application that intercepts it:
Public Event ProcessProgress(ByVal percent As Integer)
The progress is reported as an integer between 0 and 100. To raise this event from within a class code, call the RaiseEvent statement as before, passing a value of the appropriate type, as shown next, where the iProgress variable is maintained by the class code and is increased with every iteration:
RaiseEvent PercentProgress(iProgress)
When coding the event's handler, you can access the arguments and use them as you wish. Alternatively, you could create a new object and pass multiple values to the calling application, as most event handlers in Visual Basic do. Consider a class that manipulates a large number of files (changes the format of many files, locates and moves images around, and so on). You may not know how many files you'll process, in which case the class can report the number of files processed thus far but not the percent of the work done. The following object exposes as properties the percent of the work completed so far as well as the number of files processed and their total size (as well as the current folder):
Public Class FilesProcessedArgument
    Public Files As Integer
    Public TotalSize As Long
    Public Percent As Integer
    Public CurrentFolder As String
End Class
Then you can declare the event's signature by using the FilesProcessedArgument type in the argument list:
Public Event PercentProgress(ByVal sender As Object,
             ByVal e As FilesProcessedArgument)
To fire the PercentProgress event from within your class's code, create an instance of the FilesProcessedArgument class, set its properties, and then call the RaiseEvent method, as shown here:
Dim DArgument As New sFilesProcessedArgument
DArgument.Files = tmpTotalFiles
DArgument.TotalSize = tmpTotalSize
DArgument.Percent = Nothing
DArgument.CurrentFolder = tmpCurrentFolder
RaiseEvent PercentProgress(Me, DArgument)
To intercept this event in your test application, declare an object of the appropriate type with the WithEvents keyword and write an event handler for the PercentProgress event:
Public WithEvents obj As New EventFiringClass
Private Sub obj_Fired(ByVal sender As Object,
          ByVal e As Firing.FilesProcessedArgument)
          Handles obj.PercentProgress
    MsgBox("Event fired" & vbCrLf &
           e.Files.ToString & vbCrLf &
           e.TotalSize.ToStrng & vbCrLf &
           e.CurrentFolder)
End Sub
That's all it takes to fire an event from within your custom class. In Chapter 9, "Building Custom Windows Controls," you will find several examples of custom events.
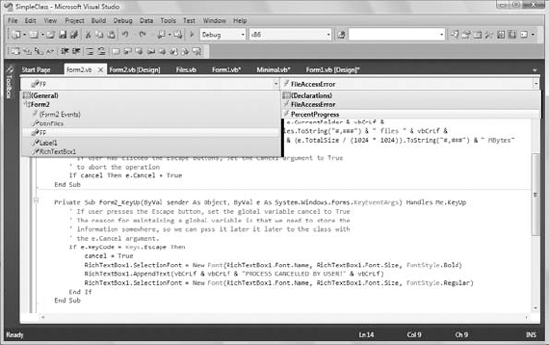
Some events expose a Cancel argument, which you can set to True to cancel an operation that takes place in the background. For example, users should be able to abort the process of counting the files in a volume, which can take minutes depending on the size of the volume. In the SimpleClass project (available for download from www.sybex.com/go/masteringvb2010), you will find the Form2. Form2 implements a method for counting files (the ProcessFiles method). This method raises the PercentProgress event every time it starts processing a different folder. The PercentProgress event exposes the Cancel argument, which the calling application can set to True to end the operation. Make Form2 the startup of the project to experiment with a class that interacts with the calling application with events. The process takes a while, but you can interrupt it by pressing the Escape key. The code is adequately documented and will help you understand how to retrieve multiple parameters through an event handler as well as how to pass information back to the class through its events.
As you have seen in earlier chapters, some classes allow you to call some of their members without first creating an instance of the class. The DateTime class, for example, exposes the IsLeapYear method, which accepts as an argument a numeric value and returns a True/False value that indicates whether the year is a leap year. You can call this method through the DateTime (or Date) class without having to create a variable of the DateTime type, as shown in the following statement:
If DateTime.IsLeapYear(1999) Then
   { process a leap year}
End If
A typical example of classes that can be used without explicit instances is the Math class. To calculate the logarithm of a number, you can use an expression such as this one:
Math.Log(3.333)
The properties and methods that don't require you to create an instance of the class before you call them are called shared methods. Methods that must be applied to an instance of the class are called instance methods. By default, all methods are instance methods. To create a shared method, you must prefix the corresponding function declaration with the Shared keyword, just as you would a shared property.
Why do we need shared methods, and when should we create them? If a method doesn't apply to a specific instance of a class, make it shared. In other words, if a method doesn't act on the properties of the current instance of the class, it should be shared. Let's consider the DateTime class. The DaysInMonth method returns the number of days in the month (of a specific year) that is passed to the method as an argument. You don't really need to create an instance of a Date object to find out the number of days in a specific month of a specific year, so the DaysInMonth method is a shared method and can be called as follows:
DateTime.DaysInMonth(2010, 2)
Think of the DaysInMonth method this way: Do I need to create a new date to find out if a specific month has 30 or 31 days? If the answer is no, then the method is a candidate for a shared implementation.
The AddDays method, on the other hand, is an instance method. We have a date to which we want to add a number of days and construct a new date. In this case, it makes sense to apply the method to an instance of the class — the instance that represents the date to which we add the number of days — rather than passing the date as argument to the AddDays method.
If you take a moment to reflect on shared and instance members, you'll come to the conclusion that all members could have been implemented as shared members and accept the data they act upon as arguments. This approach, however, would reduce classes to collections of functions, just like the built-in functions of Visual Basic. The idea behind classes, however, is to combine data with code. If you implement a class with shared members, you lose one of the major advantages of OOP. One of the reasons for turning to object-oriented programming was that languages were being enhanced with every new version to a point that they were bloated and developers couldn't memorize all the functions.
The SharedMembers sample project (available for download from www.sybex.com/go/masteringvb2010) is a simple class that demonstrates the differences between a shared and an instance method. Both methods do the same thing: They reverse the characters in a string. The IReverseString method is an instance method; it reverses the current instance of the class, which is a string. The SReverseString method is a shared method; it reverses its argument. Listing 8.18 shows the code that implements the SharedMembersClass component.
Example 8.18. A class with a shared and an instance method
Public Class SharedMembersClass
   Private _strProperty As String

   Sub New(ByVal str As String)
      _strProperty = str
   End Sub

   Sub New()
End Sub
Public Property strProperty As String
Get
Return(_strProperty)
End Get
Set (ByVal value As String)
_strProperty = value
End Set
End Property
Public Function IReverseString() As String
Return (StrReverse(strProperty))
End Function
Public Shared Function SReverseString(ByVal str As String) As String
Return (StrReverse(str))
End Function
End ClassNote that I had to declare the parameterless constructor in the class. This form of the constructor should be included only if you add multiple forms of the constructor. If you don't care about constructors that accept parameters, you don't have to list the default constructor explicitly. The instance method acts on the current instance of the class. This means that the class must be initialized to a string, and this is why the New constructor requires a string argument. To test the class, add a form to the project, make it the Startup object, and add two buttons to it. The code behind the two buttons is shown next:
Private Sub Button1_Click(...) Handles Button1.Click
   Dim testString As String = "ABCDEFGHIJKLMNOPQRSTUVWXYZ"
   Dim obj As New SharedMembersClass(testString)
   Debug.WriteLine(obj.IReverseString)
End Sub

Private Sub Button2_Click(...) Handles Button2.Click
   Dim testString As String = "ABCDEFGHIJKLMNOPQRSTUVWXYZ"
   Debug.WriteLine(SharedMembersClass.SReverseString(testString))
End Sub
The code behind the first button creates a new instance of the SharedMembersClass and calls its IReverseString method. The second button calls the SReverseString method through the class's name and passes the string to be reversed as an argument to the method.
A class can also expose shared properties. There are situations in which you want all instances of a class to see the same property value. Let's say you want to keep track of the users currently accessing your class. You can declare a method that must be called to enable the class, and this method signals that another user has requested your class. This method could establish a connection to a database or open a file. We'll call it the Connect method. Every time an application calls the Connect method, you can increase an internal variable by one. Likewise, every time an application calls the Disconnect method, the same internal variable is decreased by one. This internal variable can't be private because it will be initialized to zero with each new instance of the class. You need a variable that is common to all instances of the class. Such a variable should be declared with the Shared keyword.
Let's add a shared variable to our Minimal class. We'll call it LoggedUsers, and it will be read-only. Its value is reported via the Users property, and only the Connect and Disconnect methods can change its value. Listing 8.19 is the code you must add to the Minimal class to implement a shared property.
Example 8.19. Implementing a shared property
Shared LoggedUsers As Integer
ReadOnly Property Users() As Integer
   Get
      Users = LoggedUsers
   End Get
End Property

Public Function Connect() As Integer
   LoggedUsers = LoggedUsers + 1
   ' { your own code here}
End Function

Public Function Disconnect() As Integer
   If LoggedUsers > 1 Then
      LoggedUsers = LoggedUsers - 1
   End If
   ' { your own code here}
End Function
To test the shared variable, add a new button to the form and enter the code in Listing 8.20 in its Click event handler. (The lines with the bold numbers are the values reported by the class; they're not part of the listing.)
Example 8.20. Testing the LoggedUsers shared property
Private Sub Button3_Click(ByVal sender As Object,
                 ByVal e As System.EventArgs)
   Dim obj1 As New SharedMembersClass
   obj1.Connect()
   Debug.WriteLine(obj1.Users)
1
   obj1.Connect()
   Debug.WriteLine(obj1.Users)
2
   Dim obj2 As New SharedMembersClass
obj2.Connect() Debug.WriteLine(obj1.Users)3Debug.WriteLine(obj2.Users)3Obj2.Disconnect() Debug.WriteLine(obj2.Users)2End Sub
If you run the application, you'll see the values displayed under each Debug.WriteLine statement in the Output window. As you can see, both the obj1 and obj2 variables access the same value of the Users property. Shared variables are commonly used in classes that run on a server and service multiple applications. In effect, they're the class's global variables, which can be shared among all the instances of a class. You can use shared variables to keep track of connection time, the total number of rows accessed by all users of the class in a database, and other similar quantities.
The StringTools project, which is included with this chapter's projects, contains the StringTools class, which exposes a few interesting methods. The first two methods are the ExtractPathName and ExtractFileName methods, which extract the filename and pathname from a full filename. If the full name of a file is C:DocumentsRecipesChineseWon Ton.txt, the ExtractPathName method will return the substring C:DocumentsRecipesChinese, and the ExtractFileName method will return the substring Won Ton.txt.
A third method, called Num2String, converts numeric values (amounts) to the equivalent strings. For example, it can convert the amount $12,544 to the string Twelve Thousand, Five Hundred And Forty Four dollars. No other class in the Framework provides this functionality, and any program that prints checks can use this class.
The Num2String method uses three properties of the StringTools class: the Case, Delimiter, and Padding properties. The Case property determines the case of the characters in the string returned by the method. The Delimiter property specifies the special characters that should appear before and after the string. Finally, the Padding property specifies the character that will appear between groups of digits. The values each of these properties can take on are members of the appropriate enumeration:
|
|
|
|---|---|---|
|
|
|
|
|
|
|
|
|
The values for each of these properties are implemented as enumerations, and you need not memorize their names. As you enter the name of the property followed by the equal sign, the appropriate list of values will pop up and you can select the desired member. Listing 8.21 presents the UseCaseEnum enumeration and the implementation of the UseCase property.
Example 8.21. The CaseEnum enumeration and the UseCase property
Enum CaseEnum
   caseCaps
   caseLower
   caseUpper
End Enum

Private varUseCase As CaseEnum
Public Property [Case]() As CaseEnum
   Get
        Return (varUseCase)
   End Get
   Set
      varUseCase = Value
   End Set
End Property
Notice that the name of the Case property is enclosed in square brackets. This is necessary when you're using a reserved keyword as a variable, property, method, or enumeration member name. Alternatively, you can use a different name for the property to avoid the conflict altogether.
To test the StringTools class, create a test form like the one shown in Figure 8.8. Then enter the code from Listing 8.22 in the Click event handler of the two buttons.
Example 8.22. Testing the StringTools class
Protected Sub Button1_Click(...) Handles Button1.Click
   TextBox1.Text = Convert.ToDecimal(
                    TextBox1.Text).ToString("#,###.00")
     Dim objStrTools As New StringTools()
     objStrTools.Case = StringTools.CaseEnum.CaseCaps
     objStrTools.Delimiter = StringTools.DelimitEnum.DelimiterNone
     objStrTools.Padding = StringTools.PaddingEnum.PaddingCommas
     TextBox2.Text = objStrTools.Num2String(Convert.ToDecimal(TextBox1.Text))
End Sub

Protected Sub Button2_Click(...) Handles Button2.Click
   Dim objStrTools As New StringTools()
   openFileDialog1.ShowDialog()
   Dim fName as String
   fName = OpenFileDialog1.FileName
   Debug.writeline(objStrTools.ExtractPathName(fName))
   Debug.WriteLine(objStrTools.ExtractFileName(fName))
End Sub
In the examples so far, we used simple classes with properties that are basic data types. Practical classes use nested classes and their properties are not basic data types. The very essence of a class is to encapsulate the complexity of an entity and present a simplified view of that particular entity. Let's consider a simple, yet quite practical example.
A class for representing products should expose properties like the product name, its price, the number of items in stock, and so on. Here's a typical class that represents a product:
Public Class Product
    Public Property ProductName As String
    Public Property ProductPrice As Decimal
    Public Property InStock As Integer
    Public Property OnOrder As Integer
End Class
This class is as straightforward as it gets. But you may notice that the last two properties are related to stocking. What if you created a class to represent a product's in-stock and on-order status and used it in the definition of the Product class? Consider the following Stock class, which represents both the in-stock and on-order quantities of a product:
Public Class Stock
    Public Property InStock As Integer
    Public Property OnOrder As Integer
End Class
With the Stock class in place, you can create a property of the Stock type in the Product class:
Public Class Product
    Public Property ProductName As String
    Public Property ProductPrice As Decimal
Public Property ProductStock As Stock End Class
The ProductStock property encapsulates all the complexity of the product's stock. The Stock property could also contain the units that are reserved for orders that haven't been shipped yet (and therefore are not available for sale, even though they belong to the actual stock) and methods for manipulating the stock. By defining a custom class, ProductStock, we've isolated the stocking details from the product. When we create a new instance of the Product class, we can assign value to the ProductStock property with statements like the following:
Dim P As New Product P.ProductName = "New product" P.ProductPrice = 99.99 P.ProductStock.InStock = 9 P.ProductStock.OnOrder = 24
One item of interest here is where you should define the Stock class. Should you embed its definition in the Product class, or should you implement it as an independent class? Here are the two possible ways to implementing the Product and Stock classes:
Public Class Product
Public Property ProductName As String
Public Property Price As Decimal
Public Property ProductStock As Stock
Public Class Stock
Public Property InStock As Integer
Public Property OnOrder As Integer
End Class
End Class
Public Class Product
Public Property ProductName As String
Public Property Price As Decimal
Public Property ProductStock As Stock
End Class
Public Class Stock
Public Property InStock As Integer
Public Property OnOrder As Integer
End ClassIf the Stock class will be used only in conjunction with the Product class, you can embed its definition in the definition of the larger class. If the Stock class may be used by several other classes, then it should be defined as a separate class. The difference between the two methods of nesting classes is in the way you create new instances of the nested class. If the Stock class is embedded in the Product class, its type is Product.Stock. Otherwise, it's type is just Stock.
The Stock class example is fairly simple, but it demonstrates the use of nested classes. Typically, an application uses high-level classes, such as Customer, Invoice, Product, and so on. These classes are usually too complicated to be built with the basic data types, so we nest the classes in many levels, creating a hierarchy of classes that reflects the hierarchy of the entities we're modeling. Consider the Address property of the Customer class. Doesn't it make sense to create an Address class with the details of the address and reuse it in the Customer class? We could also use it with the Supplier class and possibly other entities that have addresses. An even better example is that of an invoice. The invoice's body contains the items sold: product codes and names, prices, units, and so on.
Let's create a Detail class that represents the details of an invoice:
Public Class Detail
   Public Property ProductID As String
   Public Property ProductName As String
   Public Property UnitPrice As Decimal
   Public Property Units As Integer
End Class
Then, we can create a class that represents the entire invoice and make use of the Detail class:
Public Class Invoice
    Public InvoiceNumber As String
    Public CustomerID As Long
    Public InvoiceDate As DateTime
    Public Details() As Detail

    Public Class Detail
        Public Property ProductID As String
        Public Property ProductName As String
        Public Property UnitPrice As Decimal
        Public Property Units As Integer
    End Class
End Class
Since we're on the topic of nesting classes, you should try to combine the ProductID and ProductName properties into a new class, the Product class, and use this class in the definition of the Detail class.
One more interesting topic I should mention briefly here is how to initialize objects with nontrivial members. Let's consider an Invoice class, which exposes a member that is an array of custom objects. Could you initialize an instance of the Invoice class in a single statement? You may wish to give this a try before you look at the code.
The statement is a bit complicated, so let me introduce it gradually. To create an instance of the Invoice class, you'd use a statement like the following:
Dim detail = New Invoice.Detail With {.ProductID = 11, .ProductName = "item1",
                         .UnitPrice = 9.95, .Units = 3}
To populate the Invoice.Detail property, you must create an array with as many elements as there are detail lines in the invoice. The array's type should be of the Invoice.Detail type, as in the following example:
Dim details(1) As Invoice.Detail
Details(0) = New Invoice.Detail With {.ProductID = 101, .ProductName = "item1",
                         .UnitPrice = 9.95, .Units = 3}
Details(1) = New Invoice.Detail With {.ProductID = 102, .ProductName = "item2",
                         .UnitPrice = 4.45, .Units = 12}
Finally, you can combine all initialization statements into a single statement that initialized an invoice object:
Dim inv As New Invoice With
        {.CustomerID = 1001, .InvoiceDate = Now,
         .InvoiceNumber = "101-1",
         .Details = {New Invoice.Detail With
                         {.ProductID = 101, .ProductName = "item1",
                          .UnitPrice = 9.95, .Units = 3},
                          New Invoice.Det0ail With
                              {.ProductID = 102, .ProductName = "item2",
                               .UnitPrice = 4.45, .Units = 12}}}
The code is probably simpler to write than it is to read. Start with simple elements, like integers, that will help you get the brackets right, and then replace each simple value with the appropriate object constructor. You can also count on IntelliSense, which will show you the members available at each stage every time you type the period in a With clause.
In this section you'll learn about an interesting (but quite optional) feature of class design: how to customize the usual operators. Some operators in Visual Basic act differently on various types of data. The addition operator (+) is the most typical example. When used with numbers, the addition operator adds them. When used with strings, however, it concatenates the strings. The same operator can perform even more complicated calculations with the more-elaborate data types. When you add two variables of the TimeSpan type, the addition operator adds their durations and returns a new TimeSpan object. Each instance of the TimeSpan class is initialized with three integer values, which are the number of hours, minutes, and seconds in the time interval. If you execute the following statements, the value 3882 will be printed in the Output window (this value is the number of seconds in a time span of 1 hour, 4 minutes, and 42 seconds):
Dim TS1 As New TimeSpan(1, 0, 30)
Dim TS2 As New TimeSpan(0, 4, 12)
Debug.WriteLine((TS1 + TS2).TotalSeconds.ToString)
The TimeSpan class is discussed in detail in Chapter 11, "The Framework at Large," but for the purposes of the preceding example, all you need to know is that variable TS1 represents a time span of 1 hour and 30 seconds, while TS2 represents a time span of 4 minutes and 12 seconds. Their sum is a new time span of 1 hour, 4 minutes, and 42 seconds. So far you have seen how to overload methods and how the overloaded forms of a method can simplify development. Sometimes it makes sense to alter the default function of an operator. Let's say you designed a class for representing lengths in meters and centimeters, something like the following:
Dim MU As New MetricUnits
MU.Meters = 1
MU.Centimeters = 78
The MetricUnits class allows you to specify lengths as an integer number of meters and centimeters (presumably you don't need any more accuracy). The most common operation you'll perform with this class is to add and subtract lengths. However, you can't directly add two objects of the MetricUnits type by using a statement such as this:
TotalLength = MU1 + MU2
Wouldn't it be nice if you could add two custom objects by using the addition operator? For this to happen, you should be able to overload the addition operator, just as you can overload a method. Indeed, it's possible to overload an operator for your custom classes and write statements like the preceding one. Let's design a class to express lengths in metric and English units and then overload the basic operators for this class.
To overload an operator, you must create an Operator procedure, which is basically a function with an odd name: the name (this is usually a symbol) of the operator you want to overload. The Operator procedure accepts as arguments two values of the custom type (the type for which you're overloading the operator) and returns a value of the same type. Here's the outline of an Operator procedure that overloads the addition operator:
Public Shared Operator + (
           ByVal length1 As MetricUnits,
           ByVal length2 As MetricUnits) As MetricUnits
End Operator
The procedure's body contains the statements that add the two arguments as units of length, not as numeric values. Overloading operators is a straightforward process that can help you create elegant classes that can be manipulated with the common operators.
To demonstrate the overloading of common operators, I included the LengthUnits project, which is a simple class for representing distances in English and metric units. Listing 8.23 shows the definition of the MetricUnits class, which represents lengths in meters and centimeters.
Example 8.23. The MetricUnits class
Public Class MetricUnits
    Private _Meters As Integer
    Private _Centimeters As Integer
Public Sub New()
End Sub
Public Sub New(ByVal meters As Integer, ByVal centimeters As Integer)
Me.Meters = meters
Me.Centimeters = centimeters
End Sub
Public Property Meters As Integer
Public Property Centimeters() As Integer
Get
Return _Centimeters
End Get
Set(ByVal Value As Integer)
If value > 100 Then
_Meters += Convert.ToInt32(Math.Floor(Value / 100))
_Centimeters = (Value Mod 100)
Else
_Centimeters = value
End If
End Set
End Property
Public Overloads Function Tostring() As String
Dim str As String = Math.Abs(_Meters).ToString & " meters, " &
Math.Abs(_Centimeters).ToString & " centimeters"
If _Meters < 0 Or (_Meters = 0 And _Centimeters < 0) Then
str = "-" & str
End If
Return str
End Function
End ClassThe class uses the private variables _Meters and _Centimeters to store the two values that determine the length of the current instance of the class. These variables are exposed as the Meters and Centimeters properties. Notice the two forms of the constructor and the custom ToString method. Because the calling application may supply a value that exceeds 100 for the Centimeters property, the code that implements the Centimeters property checks for this condition and increases the Meters property, if needed. It allows the calling application to set the Centimeters property to 252, but internally it increases the _Meters local variable by 2 and sets the _Centimenters local variable to 52. The ToString method returns the value of the current instance of the class as a string such as 1.98, but it inserts a minus sign in front of it if it's negative. If you open the sample project, you'll find the implementation of the EnglishUnits class, which represents lengths in feet and inches. The code is quite similar and I won't repeat it here.
There's nothing out of the ordinary so far; it's actually a trivial class. We can turn it into a highly usable class by overloading the basic operators for the MetricUnits class: namely the addition and subtraction operators. Add the Operator procedures shown in Listing 8.24 to the class's code to overload the addition (+) and subtraction (-) operators. By the way, you can't use these operators with variable of the Metric type; the compiler just doesn't know how to add two instances of this class.
Example 8.24. Overloading operators for the MetricUnits class
Public Shared Operator + (
                ByVal length1 As MetricUnits,
                ByVal length2 As MetricUnits) As MetricUnits
    Dim result As New metricUnits
    result.Meters = 0
    result.Centimeters =
        length1.Meters * 100 + length1.Centimeters +
        length2.Meters * 100 + length2.Centimeters
    Return result
End Operator

Public Shared Operator - (
                ByVal length1 As MetricUnits,
                ByVal length2 As MetricUnits) As MetricUnits
    Dim result As New MetricUnits
    result.Meters = 0
    result.Centimeters =
         length1.Meters * 100 + length1.Centimeters -
         length2.Meters * 100 - length2.Centimeters
    Return result
End Operator
These two procedures turn an ordinary class into an elegant custom data type. You can now create MetricUnits variables in your code and manipulate them with the addition and subtraction operators as if they were simple numeric data types. The following code segment exercises the MetricUnits class:
Dim MU1 As New MetricUnits
MU1.Centimeters = 194
Debug.WriteLine("194 centimeters is " & MU1.Tostring & " meters")
194 centimeters is 1.94 meters
Dim MU2 As New MetricUnits
MU2.Meters = 1
MU2.Centimeters = 189
Debug.WriteLine("1 meter and 189 centimeters is " & MU2.Tostring & " meters")
1 meter and 189 centimeters is 2.89 meters
Debug.WriteLine("194 + 289 centimeters is " & (MU1 + MU2).Tostring & " meters")
194 + 289 centimeters is 4.83 meters
Debug.WriteLine("194 - 289 centimeters is " & (MU1 - MU2).Tostring & " meters")
The negative of 1.94 is −1.94
MU1.Meters = 4
MU1.Centimeters = 63
Dim EU1 As EnglishUnits = CType(MU1, EnglishUnits)
Debug.WriteLine("4.62 meters are " & EU1.Tostring)
4.62 meters are 15' 2"
MU1 = CType(EU1, MetricUnits)
Debug.WriteLine(EU1.Tostring & " are " & MU1.Tostring & " meters")
15' 2" are 4.62 metersIf you execute the preceding statements, the highlighted values will appear in the Output window. (The LengthUnits sample project, available for download from www.sybex.com/go/masteringvb2010, uses a TextBox control to display its output.) Figure 8.9 shows the test project for the MetricUnits and EnglishUnits classes. The last few statements convert values between metric and English units, and you'll see the implementation of these operations momentarily.
In addition to being the subtraction operator, the minus symbol is also a unary operator (it negates the following value). If you attempt to negate a MetricUnits variable, an error will be generated because the subtraction operator expects two values — one on either side of it. In addition to the subtraction operator (which is a binary operator because it operates on two values), we must define the negation operator (which is a unary operator because it operates on a single value). The unary minus operator negates the following value, so a new definition of the subtraction Operator procedure is needed. This definition will overload the existing one, as follows:
Public Overloads Shared Operator -(
          ByVal length1 As MetricUnits) As MetricUnits
    Dim result As New MetricUnits
    result.Meters = -length1.Meters
    result.Centimeters = -length1.Centimeters
    Return result
End Operator
To negate a length unit stored in a variable of the MetricUnits type in your application's code, use statements such as the following:
MU2 = -MU1
Debug.Write(MU2.Tostring)
Debug.Write((-MU1).Tostring)
Both statements will print the following in the Output window:
−1 meters, −94 centimeters
There are several unary operators, which you can overload in your custom classes as needed. There's the unary + operator (not a common operator), and the Not, IsTrue, and IsFalse operators, which are logical operators. The last unary operator is the CType operator, which is exposed as a method of the custom class and is explained next.
To make your custom data type play well with the other data types, you must also provide a CType() function that can convert a value of the MetricUnits type to any other type. It doesn't make much sense to convert metric units to dates or any of the built-in objects, but let's say you have another class: the EnglishUnits class. This class is similar to the MetricUnits class, but it exposes the Inches and Feet properties in place of the Meters and Centimeters properties. The CType() function of the MetricUnits class, which will convert metric units to English units, is shown next:
Public Overloads Shared Widening Operator
                 CType(ByVal MU As MetricUnits) As EnglishUnits
    Dim EU As New EnglishUnits
    EU.Inches = Convert.ToInt32(
                (MU.Meters * 100 +  MU.Centimeters) / 2.54)
    Return EU
End Operator
Do you remember the implicit narrowing and widening conversions we discussed in Chapter 2, "Handling Data"? An attempt to assign an integer value to a decimal variable will produce a warning, but the statement will be executed because it's a widening conversion (no loss of accuracy will occur). The opposite is not true. If the Strict option is on, the compiler won't allow narrowing conversions because not all decimal values can be mapped to integers. To help the compiler enforce strict types, you can use the appropriate keyword to specify whether the CType() function performs a widening or a narrowing conversion. The CType() procedure is shared and overloads the default implementation, which explains all the keywords prefixing its declaration. The following statements exercise the CType method of the MetricUnits class:
Debug.Write(MU1.Tostring)1 meters, 94 centimetersDebug.WriteLine(CType(MU1, EnglishUnits).Tostring)6 feet, 4 inches
The output of the two statements is highlighted. In this code both classes expose integer properties, so the Widening or Narrowing keyword isn't really important. In other situations, you must carefully specify the type of the conversion to help the compiler generate the appropriate warnings (or exceptions, if needed).
The CType operator we added to the MetricUnits class can only convert values of the MetricUnit type to values of the EnglishUnit type. If it makes sense to convert MetricUnits variables to other types, you must provide more overloaded forms of the CType() procedure. For example, you can convert them to numeric values (the numeric value could be the length in centimeters or a double value that represents the same length in meters). The compiler sees the return type(s) of the various overloaded forms of the CType operator, and since it knows whether the requested conversion is possible, it will generate the appropriate exception.
In short, operator overloading isn't complicated, adds a touch of elegance to a custom class, and enables variables of this type to mix well with the other data types. If you like math, you could implement classes to represent matrices, or complex numbers, and overload the usual operators for addition, multiplication, and so on. The downside of operator overloading (at least in its current implementation) is that it requires quite a bit of code. Even so, the code is straightforward. The LengthUnits sample application contains quite a bit of code that I haven't discussed in this chapter, but I suggest you take a look at the application as it implements many operators, including equals (=), not equals (<>), greater than, and less than.
- Build your own classes.
Classes contain code that executes without interacting with the user. The class's code is made up of three distinct segments: the declaration of the private variables, the property procedures that set or read the values of the private variables, and the methods, which are implemented as public subroutines or functions. Only the public entities (properties and methods) are accessible by any code outside the class. Optionally, you can implement events that are fired from within the class's code. Classes are referenced through variables of the appropriate type, and applications call the members of the class through these variables. Every time a method is called, or a property is set or read, the corresponding code in the class is executed.
- Master It
How do you implement properties and methods in a custom class?
- Master It
How would you use a constructor to allow developers to create an instance of your class and populate it with initial data?
- Master It
Which are the default methods of a custom class that you will most likely override with more meaningful definitions?
- Master It
How should you handle exceptions in a class?
- Overloading operators.
Overloading is a common theme in coding classes (or plain procedures) with Visual Basic. In addition to overloading methods, you can overload operators. In other words, you can define the rules for adding or subtracting two custom objects, if this makes sense for your application.
- Master It
When should you overload operators in a custom class, and why?